How to Export WooCommerce Data
In this article, we show you how to export WooCommerce data using the WP All Export plugin. If you don’t own this plugin but want to try the examples, you can use this free online sandbox. Just choose the WooCommerce Store option and click Create Sandbox.
One of the advantages of using WP All Export is that the basic steps required to export data are the same regardless of whether you are working with WooCommerce customers, products, orders, reviews, or coupons.
Rather than repeat these same steps for each data type, we’ll demonstrate them using just WooCommerce orders, then describe any special considerations for specific data types.
Exporting WooCommerce Orders
Step 1: Create a New Order Export
Go to All Export > New Export in the WordPress main menu:
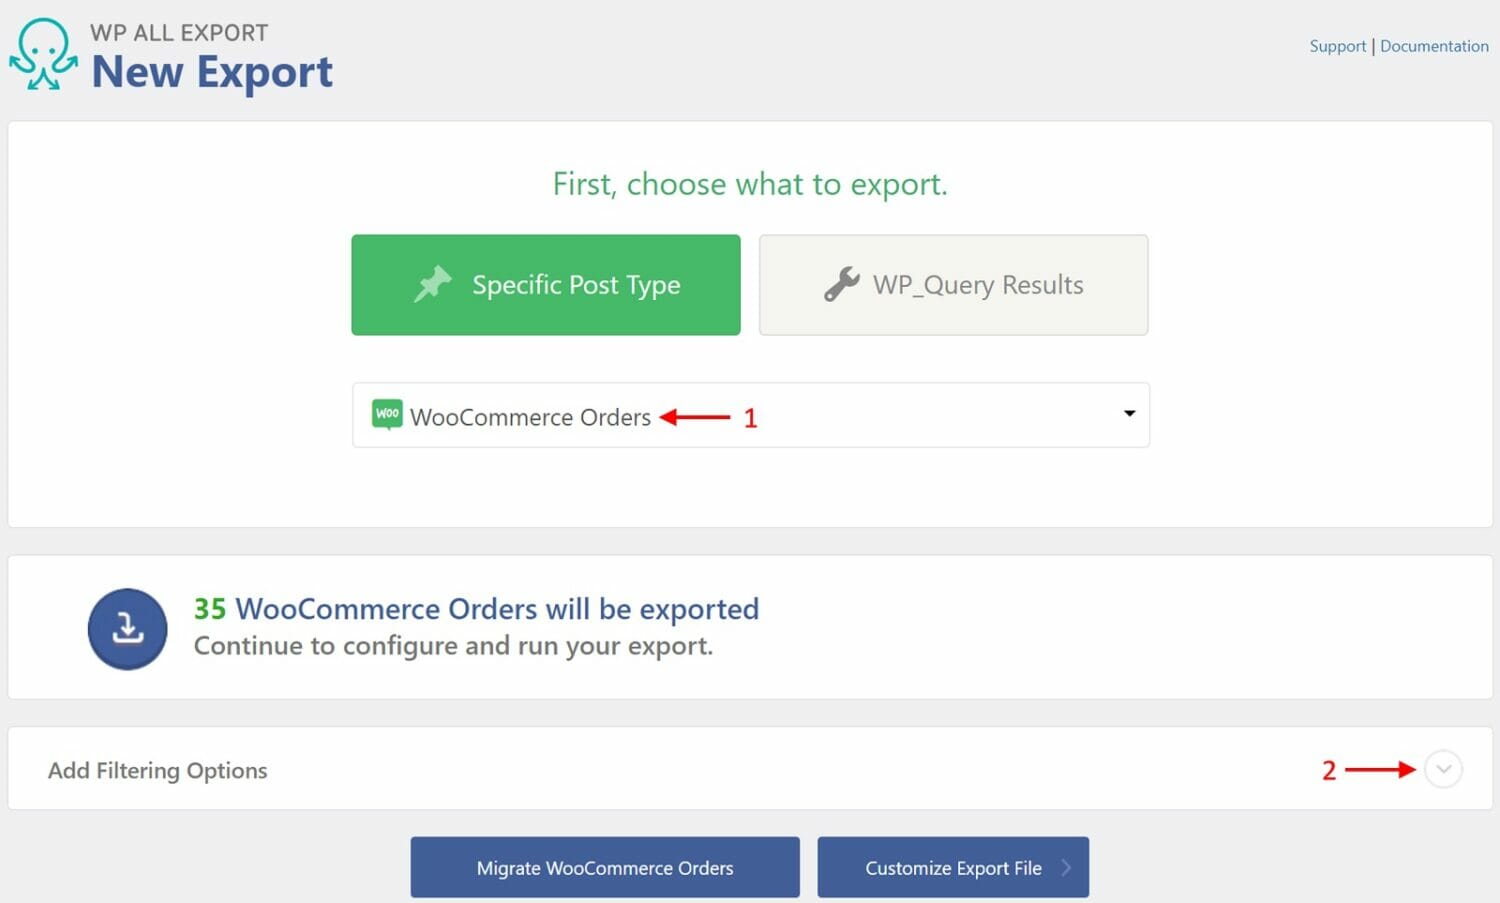
- Choose WooCommerce Orders as your export type (alternatively, you could choose WooCommerce Products, WooCommerce Customers, etc., here).
- Expand the Add Filtering Options section.
Step 2: Add an Export Filter
Most exports involve some kind of filter. The Add Filtering Options section lets you define your filter(s):
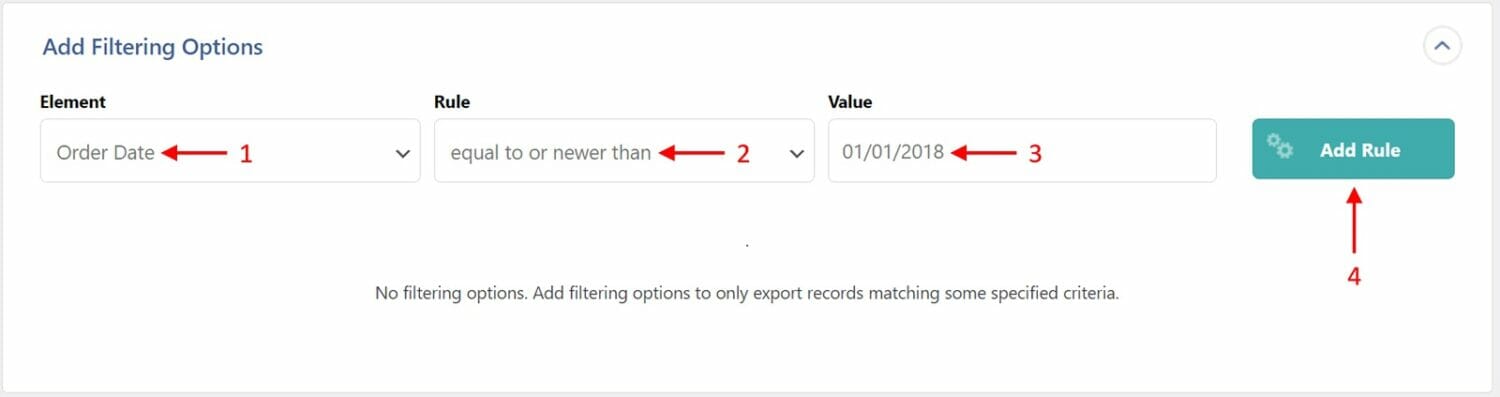
- Choose Order Date as the Element (i.e., data field).
- Select equal to or newer than as the Rule.
- Enter “01/01/2018” in the Value field.
- Click the Add Rule button.
This is equivalent to saying, “Export all WooCommerce orders with an order date of January 01, 2018, or newer.”
When you click the Add Rule button, the rule will be applied. In our test system, this reduces the order count from 35 to 14.
What makes this filter tool especially powerful is that you can create as many rules as you like. For example, here’s a filter that exports only those orders with an order date in the first half of 2018 that also have an order total of more than $50:
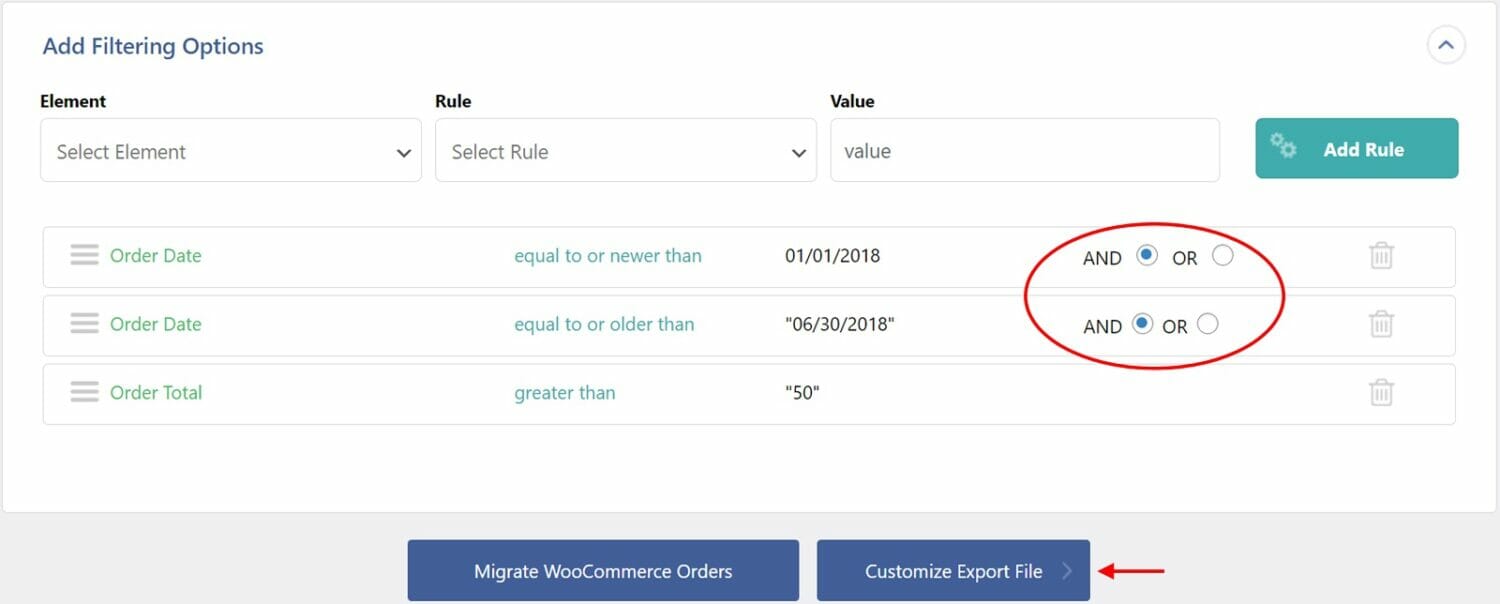
When you have multiple rules, you get to choose whether they are separated by AND or OR operators. In this example, we used an AND operator between all rules so that all filter conditions must be met.
You can also mix AND and OR operators. You can even group your rules (equivalent to using parentheses) by dragging some rules to an indented position.
When you are finished setting your filters, click the Customize Export File button.
Step 3: Select Your Export Columns
The second most common element in every export is choosing the output columns. This is done in the Drag & Drop screen:
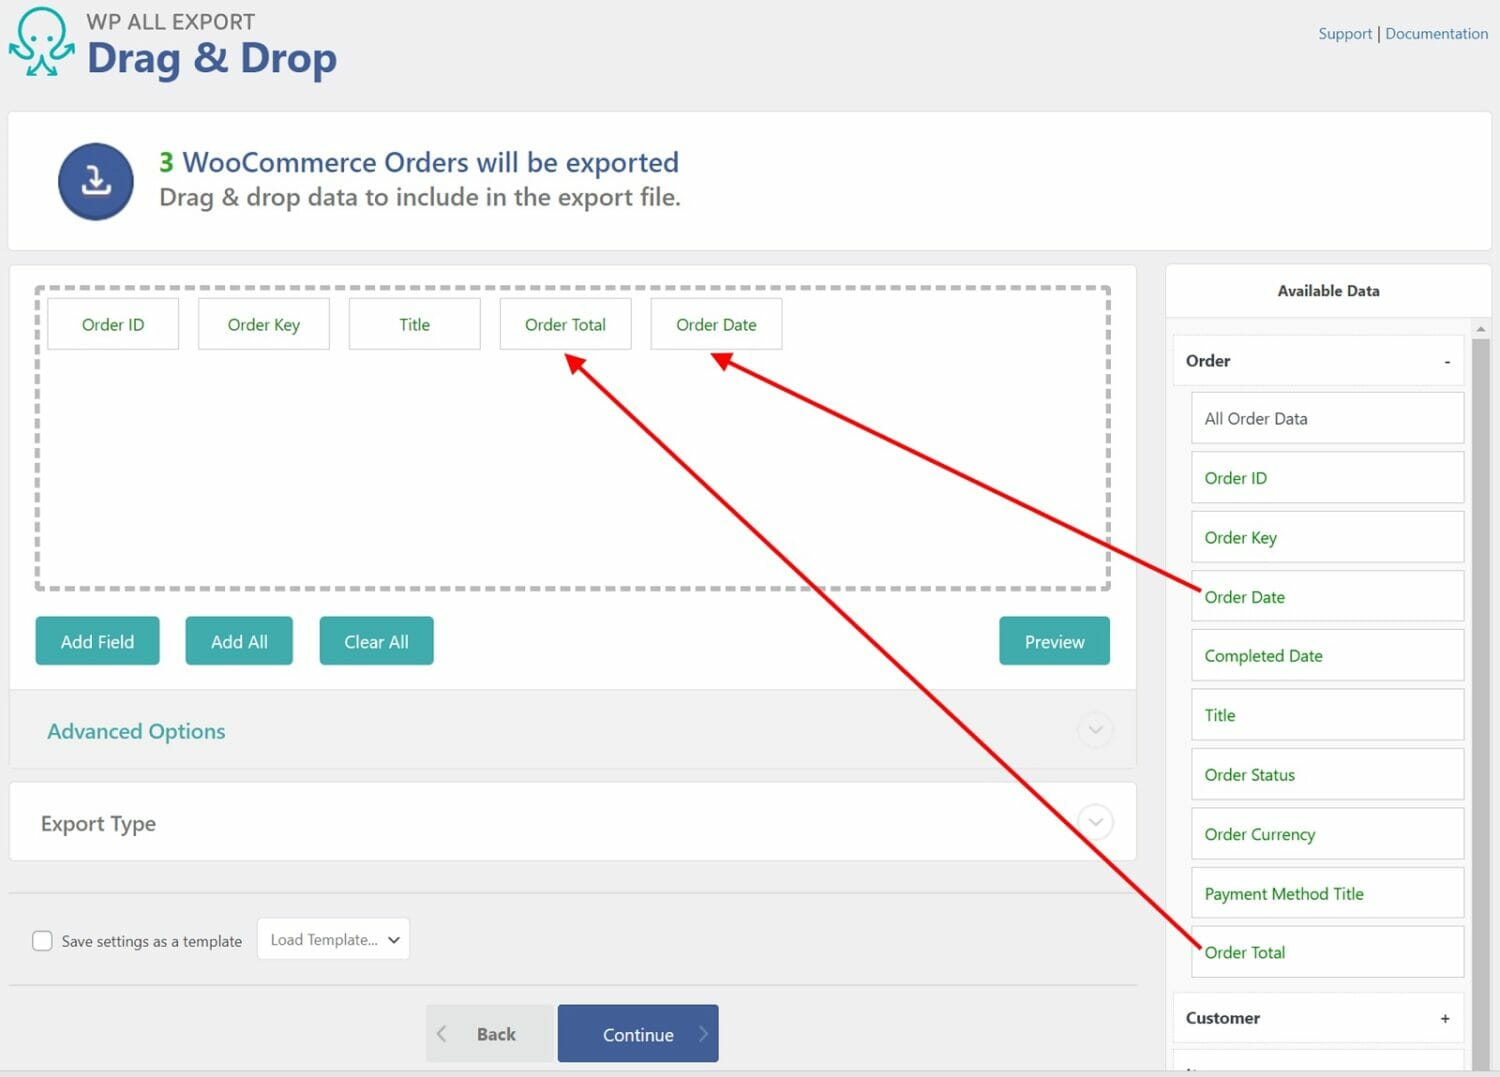
The Available Data panel on the right contains all the data fields available for export, organized into subsections. For WooCommerce orders, these subsections are Order, Customer, Items, Taxes & Shipping, Fees & Discounts, Notes, Refunds, Custom Fields, and Other. This grants you access to every piece of data that is related to WooCommerce orders.
The easiest way to add an export column is simply to drag a field from the Available Data panel onto the column selection area on the left, as shown above.
You can reorganize columns within the column selection area by dragging and dropping them into the desired position.
You can remove columns by dragging and dropping them outside of the column selection area.
Step 4: Add Custom Columns
Need a custom column? No problem. Just click the Add Field button, which is right below the column selection area. This brings up the Add Field to Export form. You can create many different types of fields in this form. For example, you can combine two or more fields:
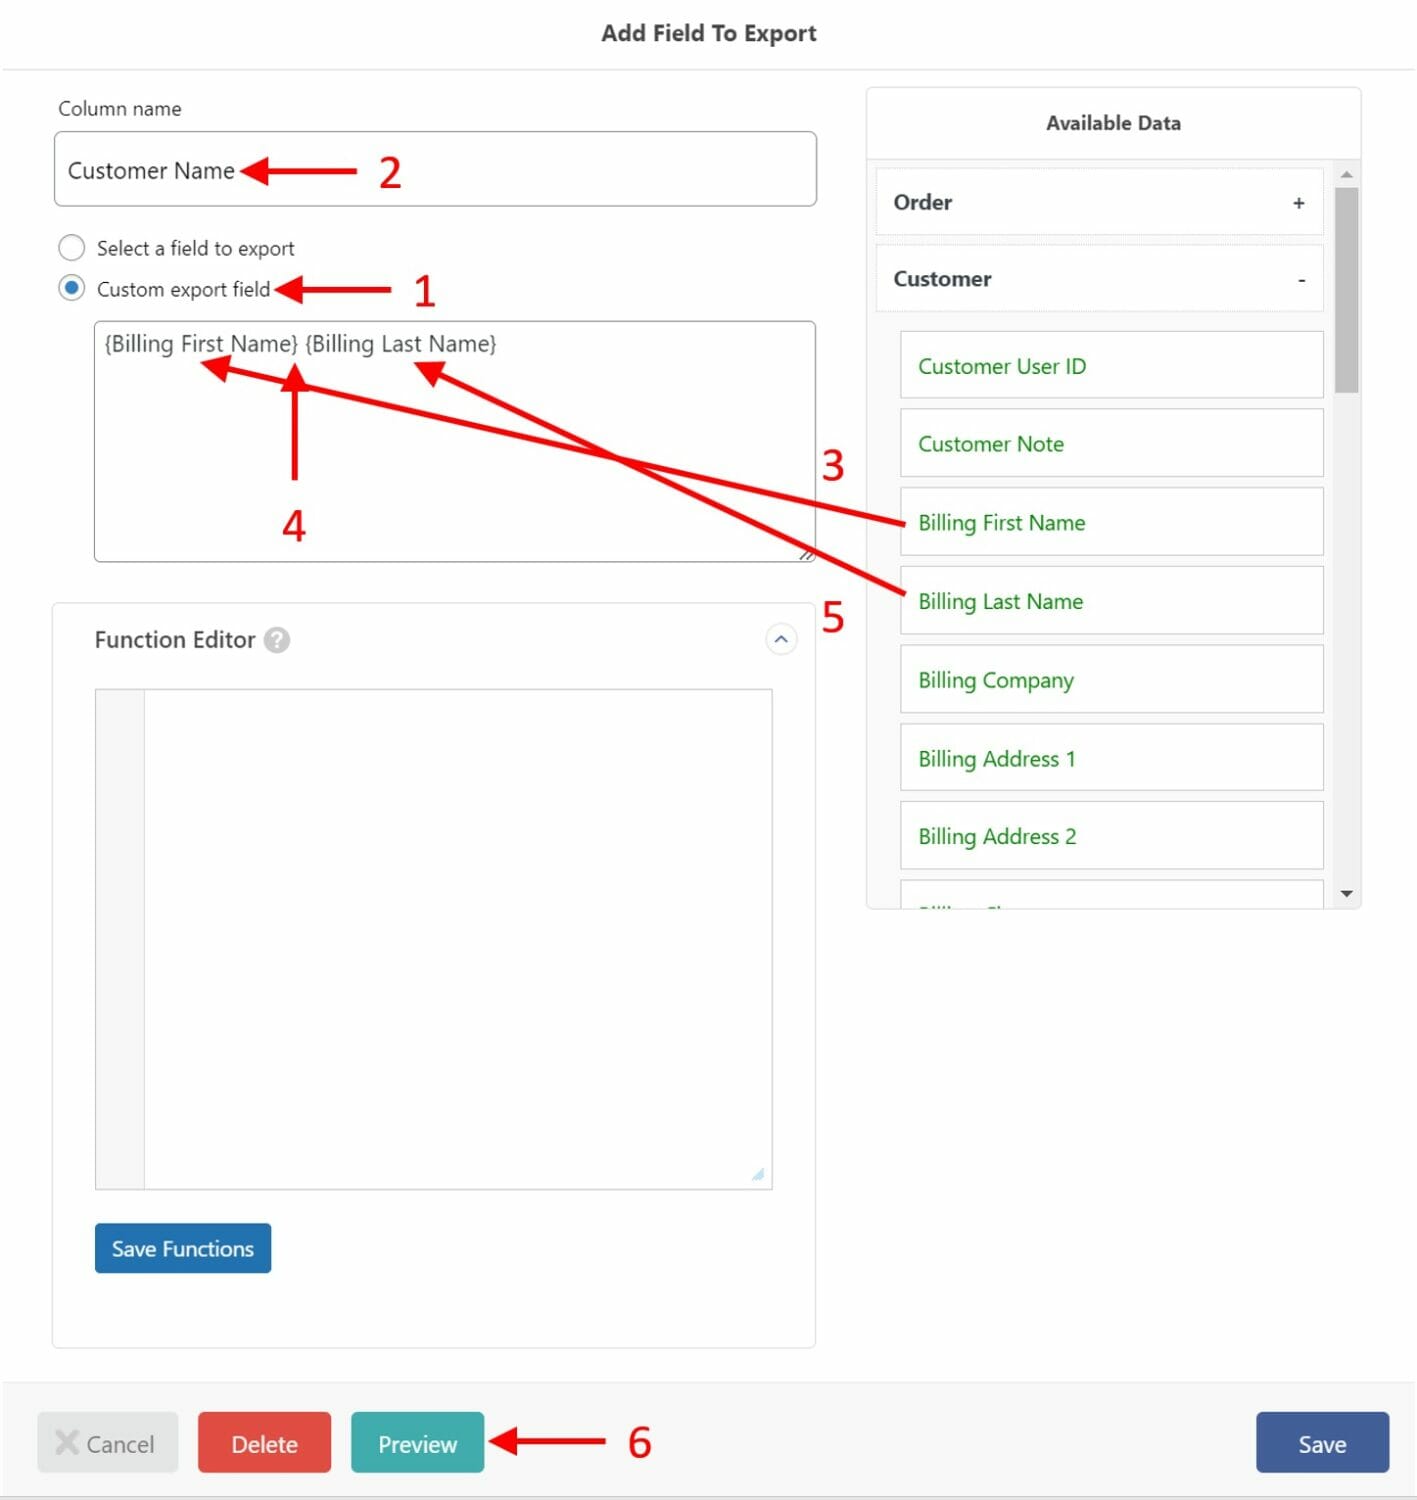
- Select Custom export field.
- Enter “Customer Name” in the Column name field.
- Drag the Billing First Name field over to the custom edit box.
- Enter a space.
- Drag the Billing Last Name field over to the custom edit box.
- Click the Preview button.
The preview should appear as follows:
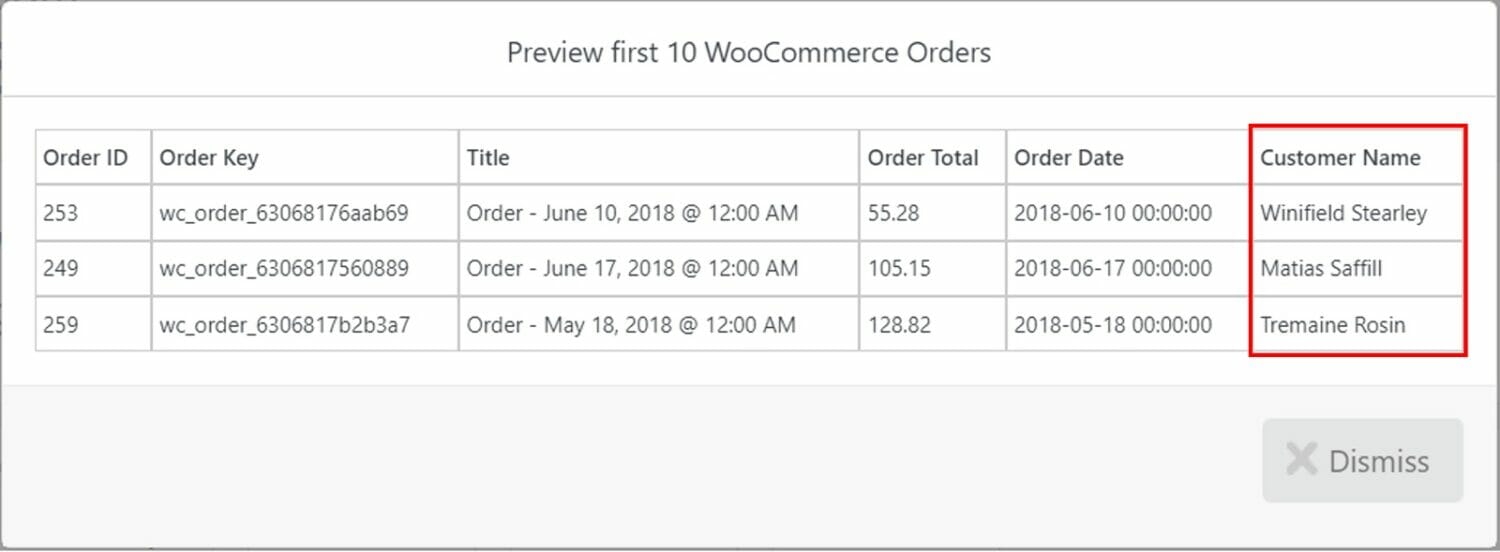
As you can see from the column framed by the red box, your custom export field is indeed a combination of the customer’s first and last names with a space in between.
Speaking of that space, you can use any literals you wish in a custom field like this. For example, you can use specific currency prefixes.
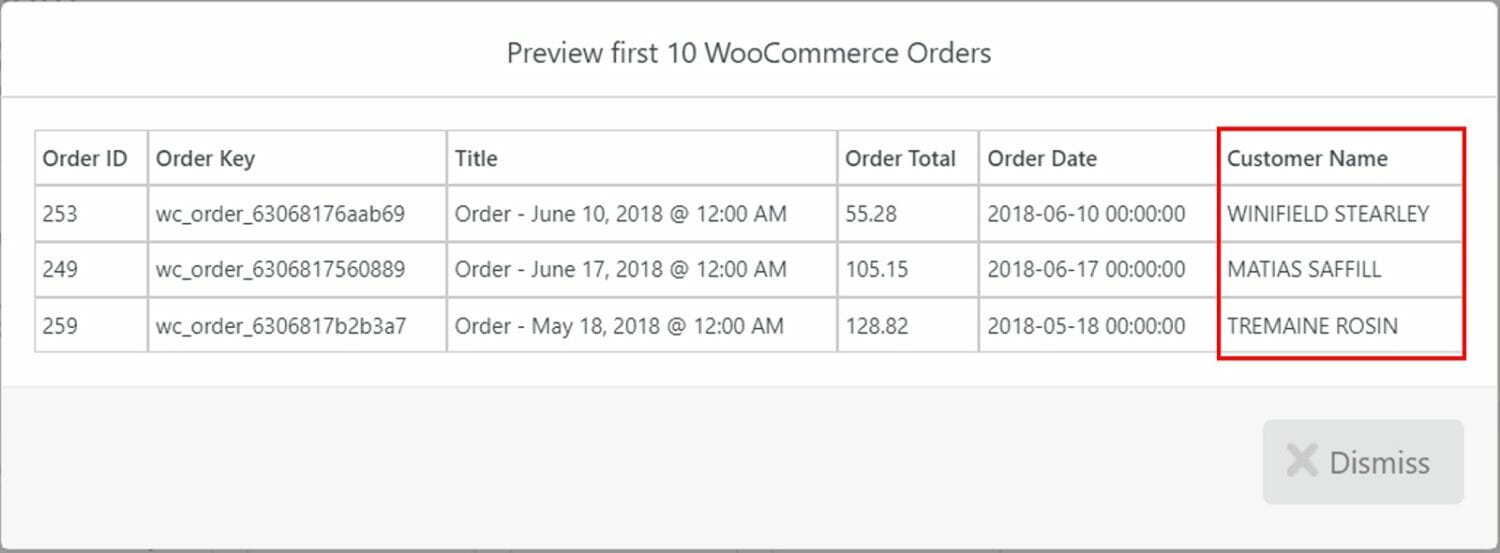
You can also use built-in PHP functions. For example, if you apply the PHP function strtoupper() to your custom field, like this: [strtoupper({Billing First Name}.” “.{Billing Last Name})]
…you will get an uppercase version of your customer’s full name:
If you want even more control, you can create your own custom PHP functions. For example, say you want to calculate a special credit for orders over $100. We show you how to do this below. Don’t worry if you don’t understand the code. We just want you to understand that this type of flexibility is available to you:
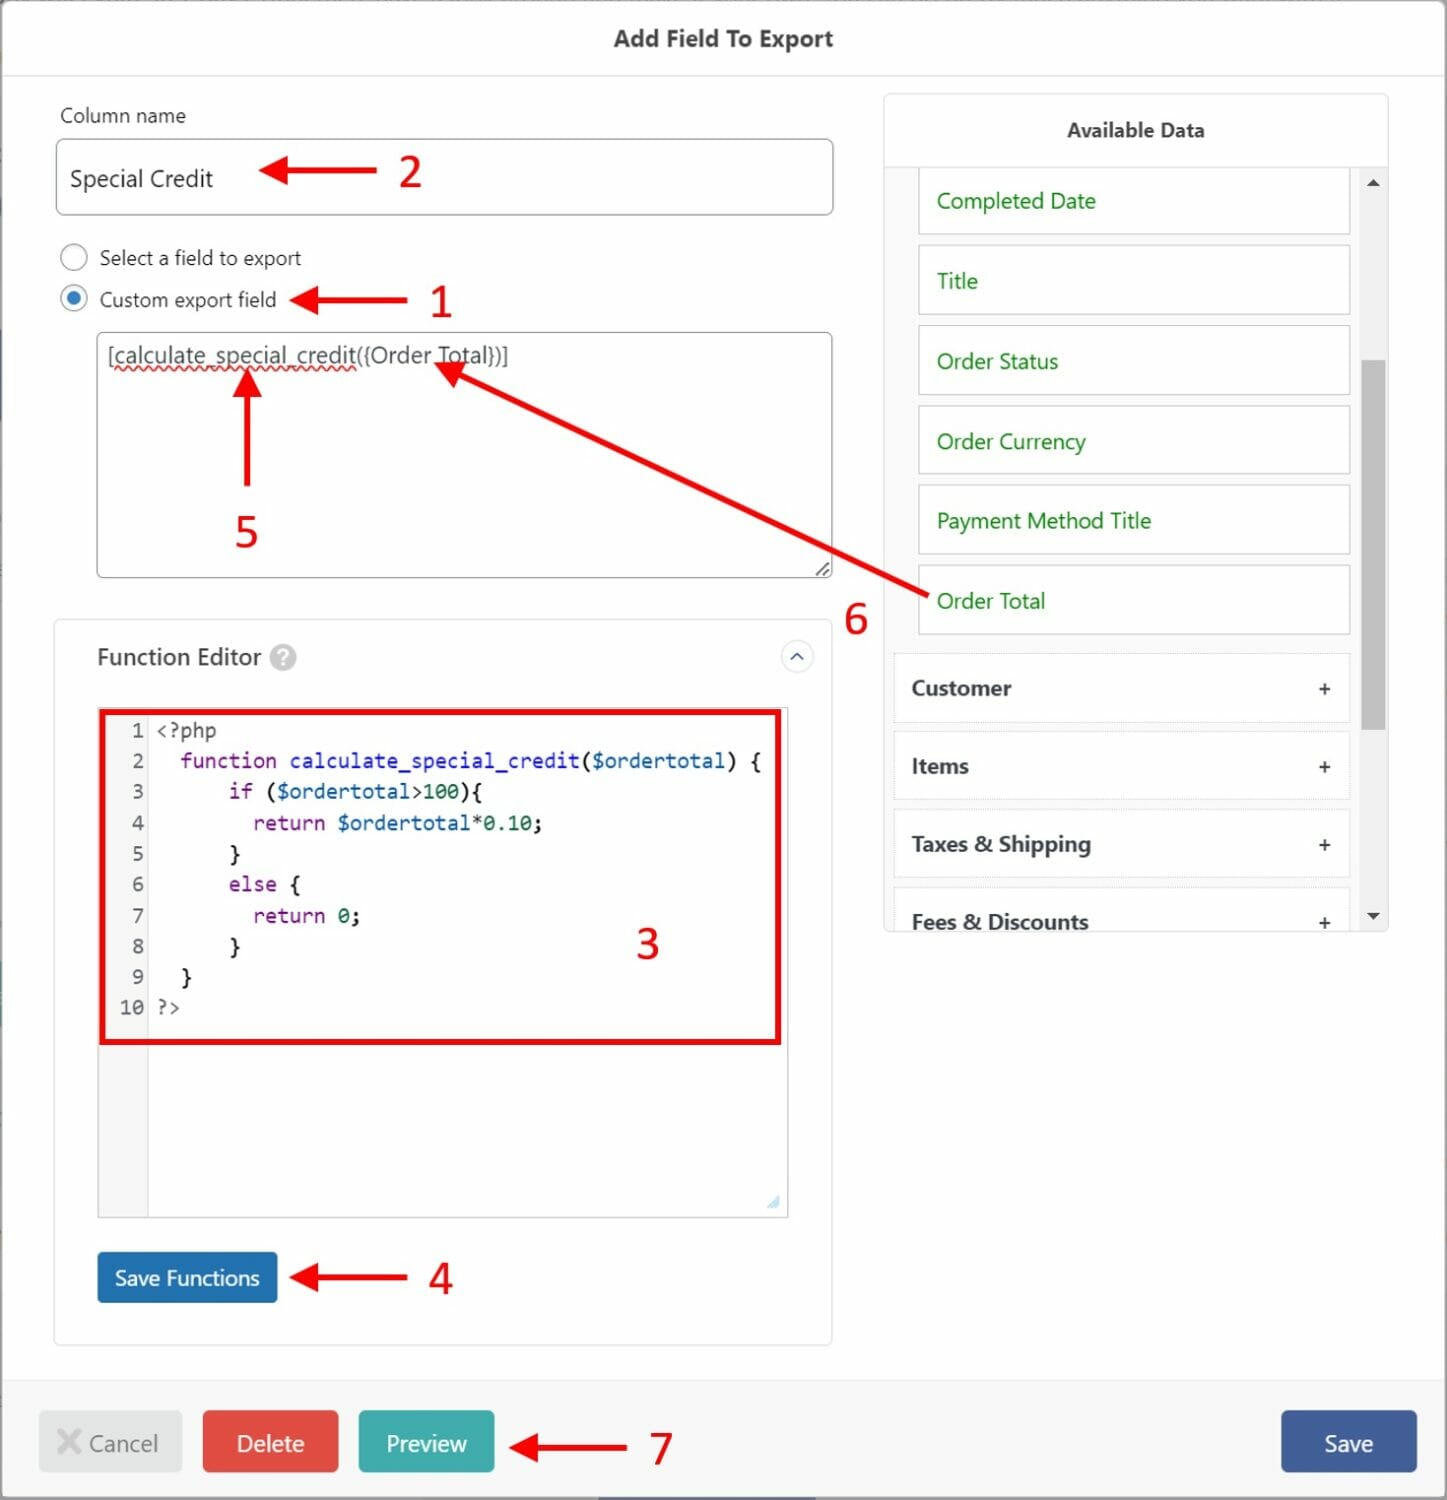
- Select Custom export field.
- Enter “Special Credit” in the Column name field.
- Create a custom PHP function called calculate_special_credit($ordertotal) in the Function Editor.
- Click Save Functions.
- Call your custom PHP function in the custom export field edit box.
- Drag and drop the Order Total field as the input parameter to your custom function.
- Click the Preview button.
Here is the preview:
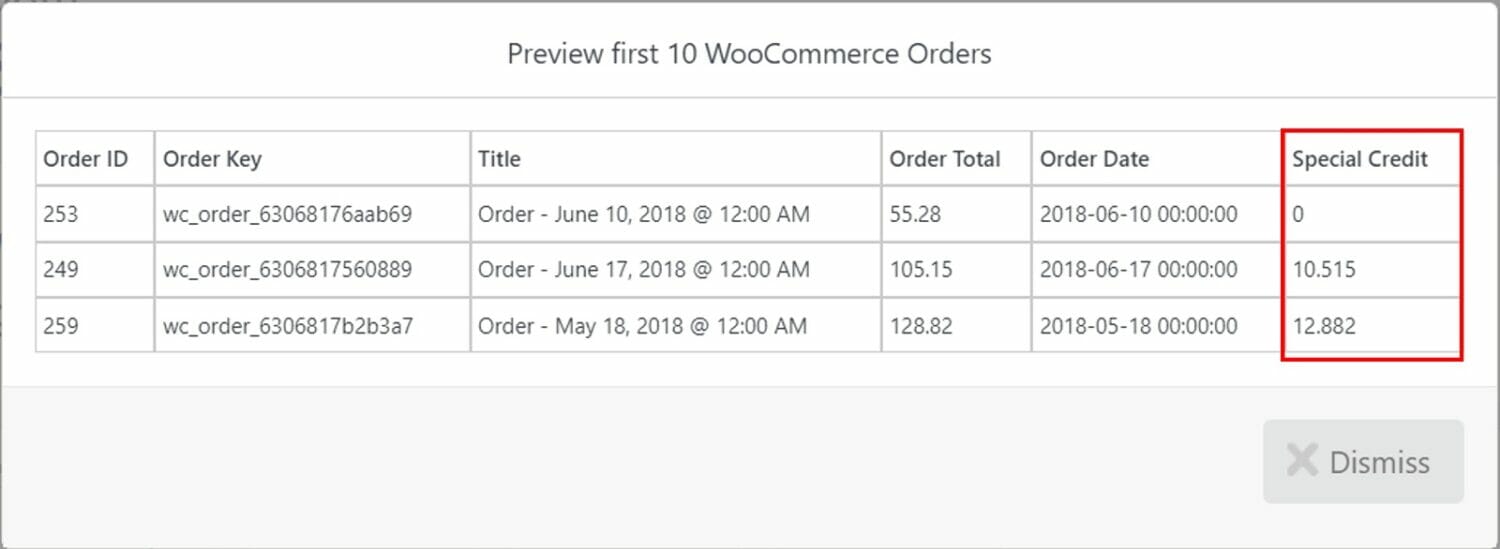
Congratulations. You have just used conditional logic in your export!
At this point, you have complete control over which orders end up in your export file, as well as what your export columns will contain. This alone should let you meet 95 % of all export requirements, whether it’s WooCommerce orders, customers, products, or anything else.
Let’s complete the export process.
Step 5: Configure the Order Export Settings
Close the preview and the Add Field to Export form. This will return you to the Drag & Drop screen. Here, click the blue Continue button at the bottom. This will bring you to the Export Settings screen:
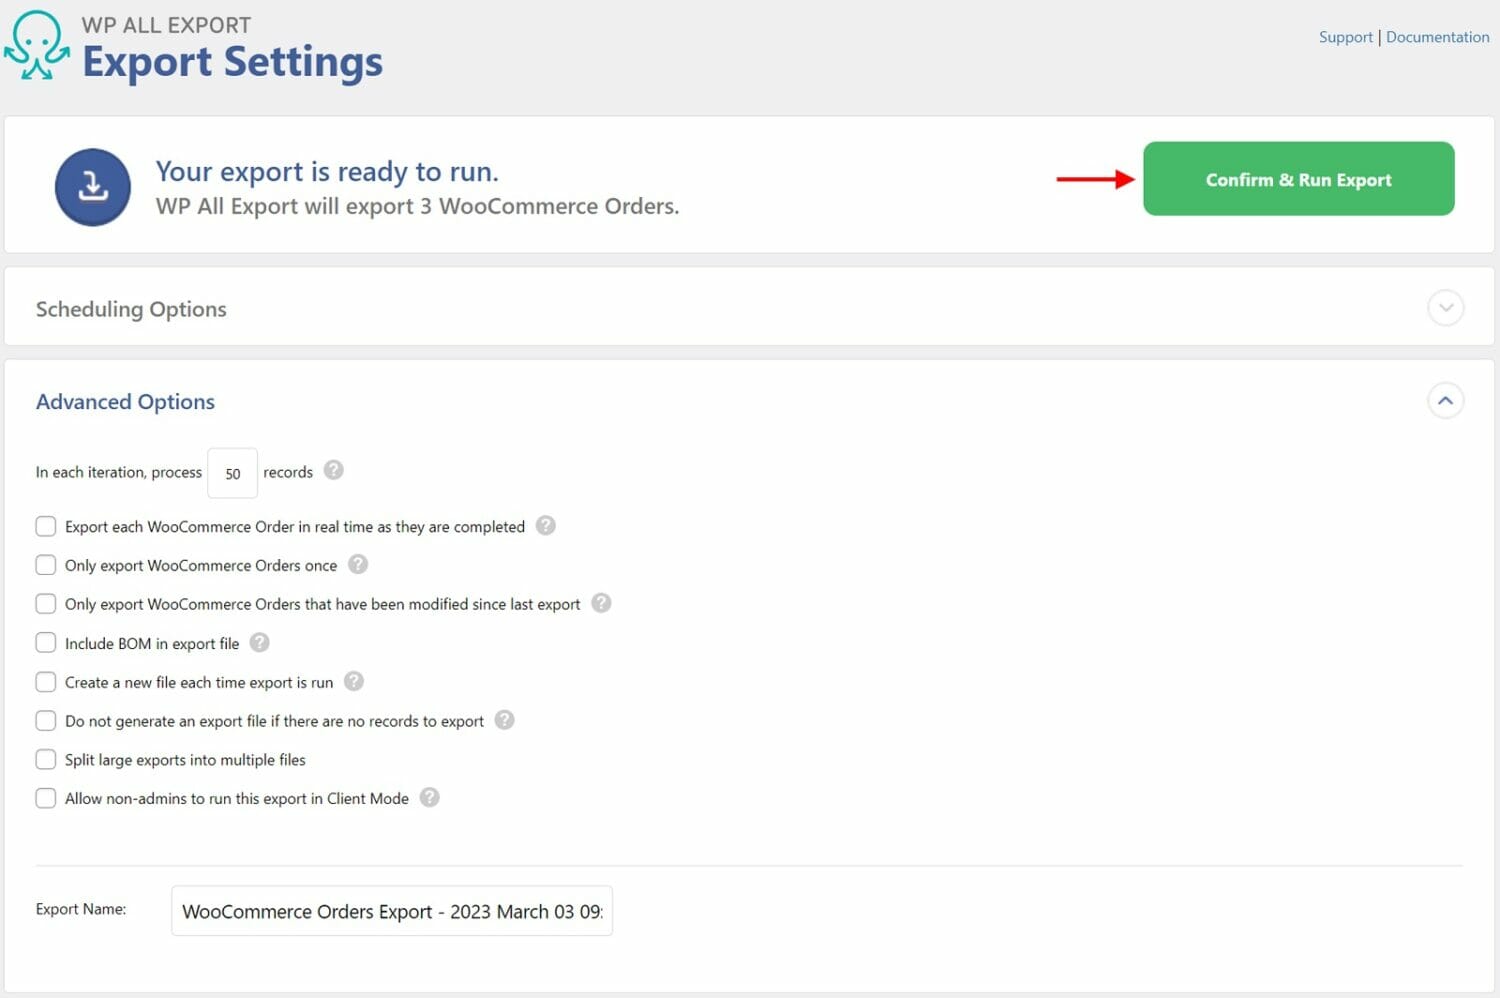
This screen lets you control several export settings, including:
- Whether to export only orders that have changed since the export was last run;
- The batch processing size for the export;
- Whether to break the export into multiple files;
We’ll return to some of these features shortly. For now, click the green Confirm & Run Export button.
Step 6: Complete the Export and Download Your Export File
The export will now run. When it’s complete, it will display this screen:
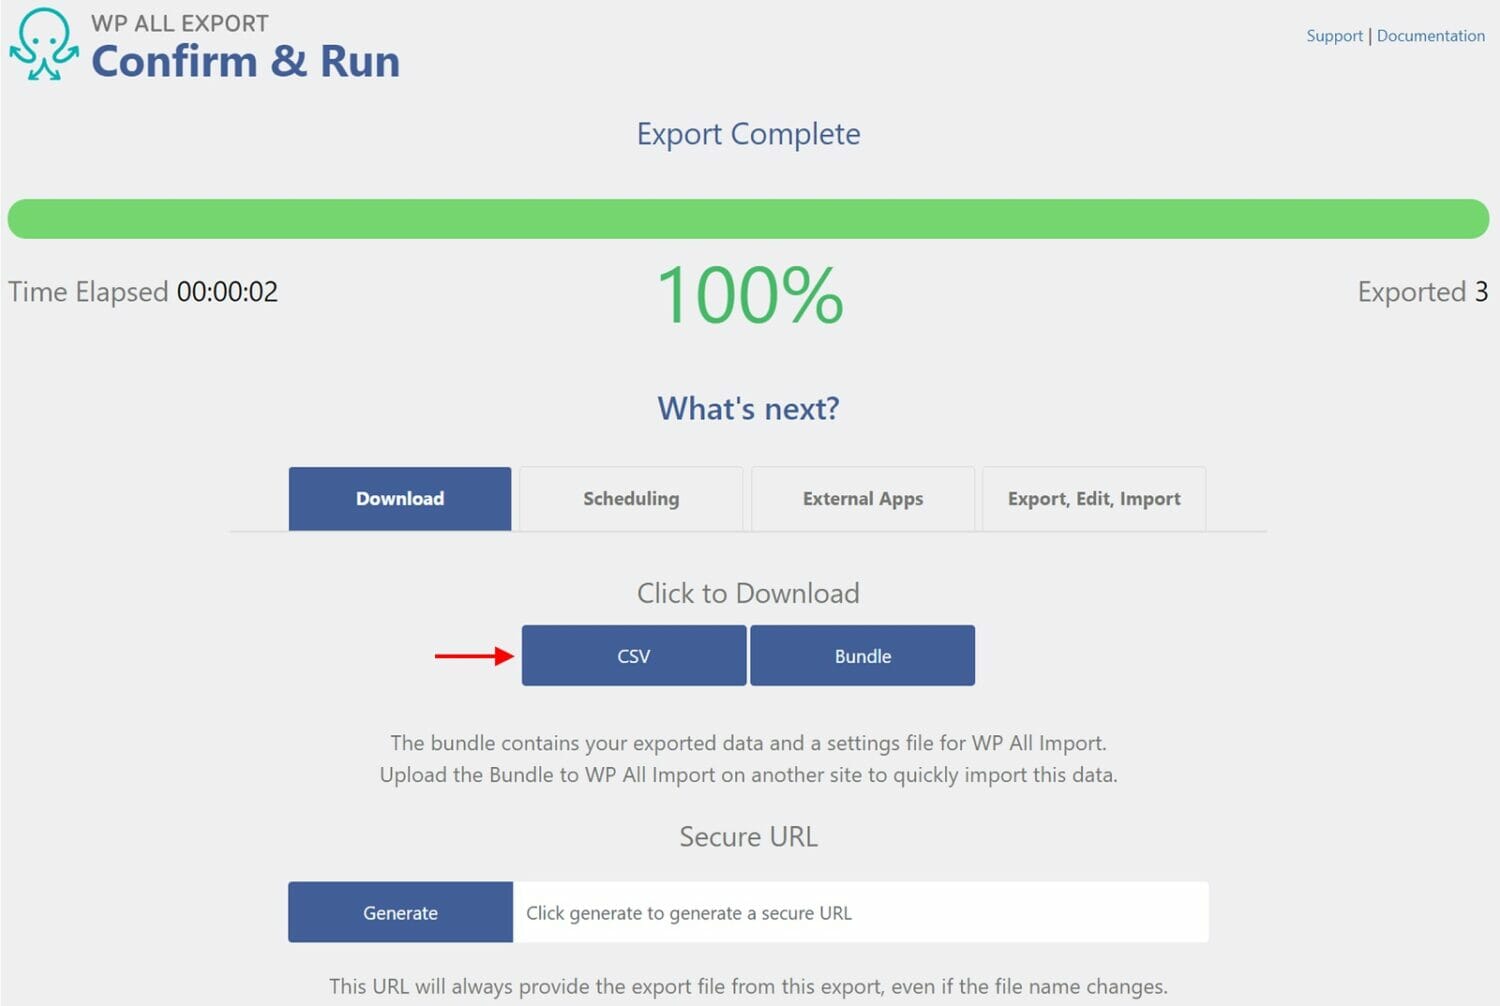
Click the CSV button to download a CSV version of your export file. Note that you can switch the export file format to Excel or XML earlier in the process, in which case the label on this button will change accordingly.
And that’s it. That’s the basic loop for exporting WooCommerce orders and, in fact, all types of WooCommerce data. Now let’s examine two features that are used when you want to export data on a regular basis.
Scheduling WooCommerce Exports
If needed, you can run your WooCommerce exports automatically on a schedule. You can configure this on the preceding screen by selecting the Scheduling option beneath the What’s next? heading:
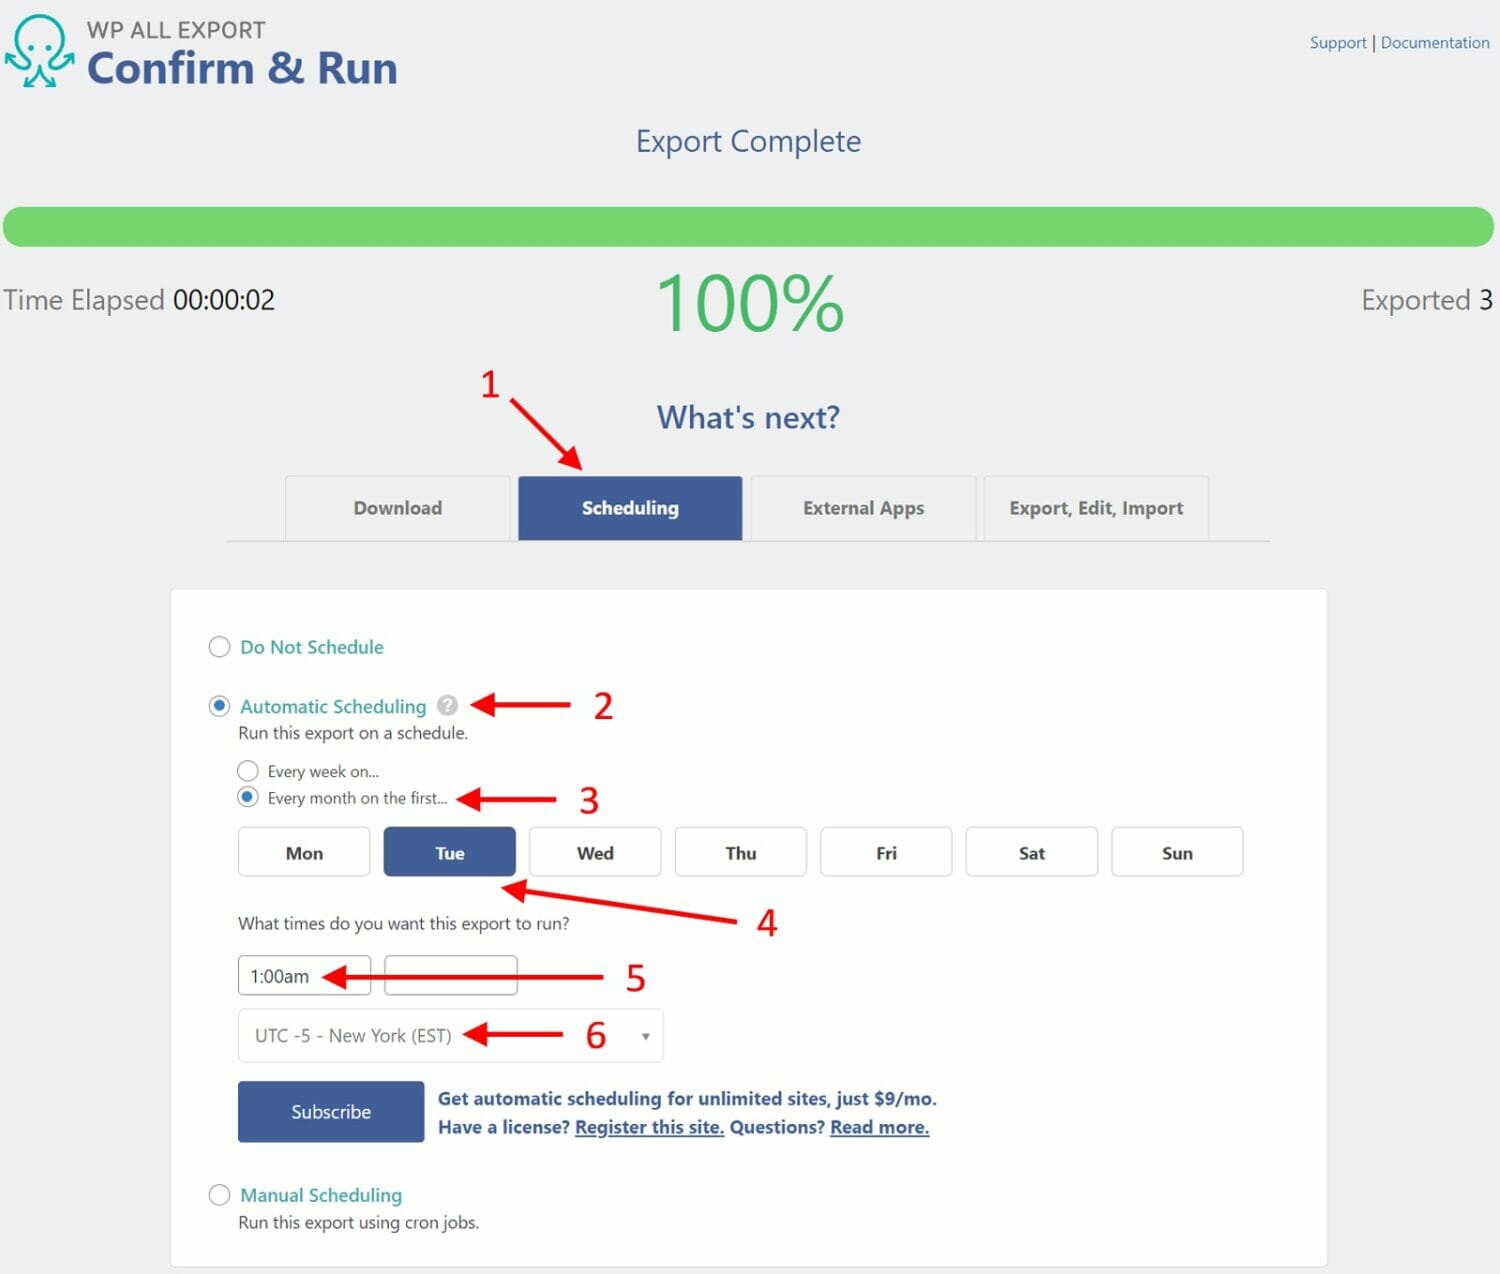
- Select Scheduling.
- Select Automatic Scheduling.
- Choose the frequency of the export. In this example, we have chosen to run the export every month.
- Choose the day on which to run the export. When exporting every month, this selects the first instance of that day in the month.
- Enter the time(s) when you want the export to run.
- Select the time zone on which to base the export schedule. In this example, we have opted for New York, which runs on Eastern Standard Time (EST).
Your report will now run automatically on the defined schedule. Note that to use automatic scheduling, you must subscribe to WP All Export’s Automatic Scheduling service. But you can also set up the same schedule manually using cron jobs.
Sharing WooCommerce Export Data with External Applications
WP All Export has two ways that allow you to share your export data with external applications.
The first and easiest way is to generate a secure URL for your export file instead of downloading it, which you do at the bottom of the Confirm & Run screen:
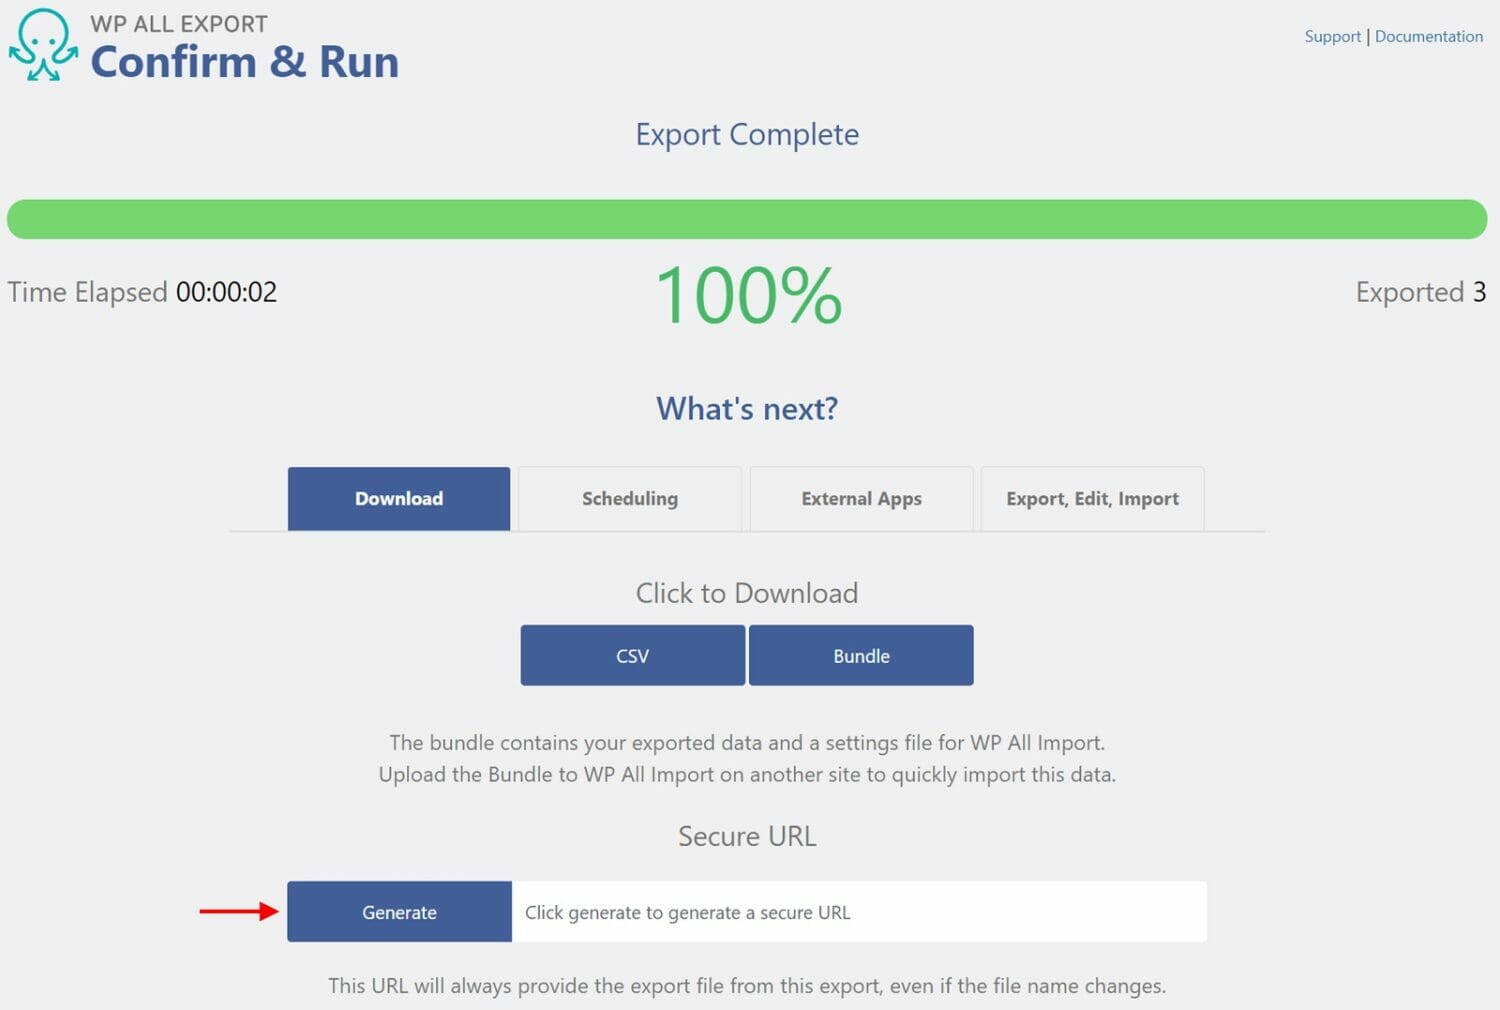
You can then share this URL with the person running the external application. Even if you re-run the export every week or month, this URL will always point to the latest data, meaning that the external application can safely rely on it as a source of data. All you have to do with the person running that application is agree on a schedule.
A more formal way to share export data with an external application is to use WP All Export’s integration with Zapier. The basic steps involved in this process are:
- Set up an account with Zapier.
- Create a Zap that uses WP All Export as the app and the appearance of a new export file as the trigger.
- Set up an action to perform in response to the trigger, such as automatically moving the export file to a Google Drive folder.
- Use the appearance of the file in the Google Drive folder to trigger an action by the external app, such as importing the data. You may even be able to set up this part with Zapier, too.
The details of using Zapier are beyond the scope of this article, but you can read more about it in How to Send Exported Data to Zapier.
Special Export Considerations for each WooCommerce Data Type
Despite using WooCommerce orders for all our examples, everything you’ve read about so far is equally applicable to all WooCommerce data types.
In this section, we’ll discuss special considerations for each data type.
WooCommerce Orders
Automatic exports of WooCommerce orders are usually intended to feed external accounting or shipping systems.
In the case of the latter, it is often desirable to send the orders as quickly as possible.
WP All Export has a special feature called Real-Time Exports that is ideal for this scenario. As the name implies, it allows you to automatically export each order as it occurs. Using Zapier, you can then feed these orders to a special location where an external app can automatically pick them up. This is perfect for use with an external fulfillment center.
This feature is not limited to WooCommerce order exports. Orders are just a prime candidate for its use.
For more information, see How to Run Real-Time Exports.
WooCommerce Products
A common requirement for exporting WooCommerce products is to send the export data to the Google Merchant Center to support Google shopping.
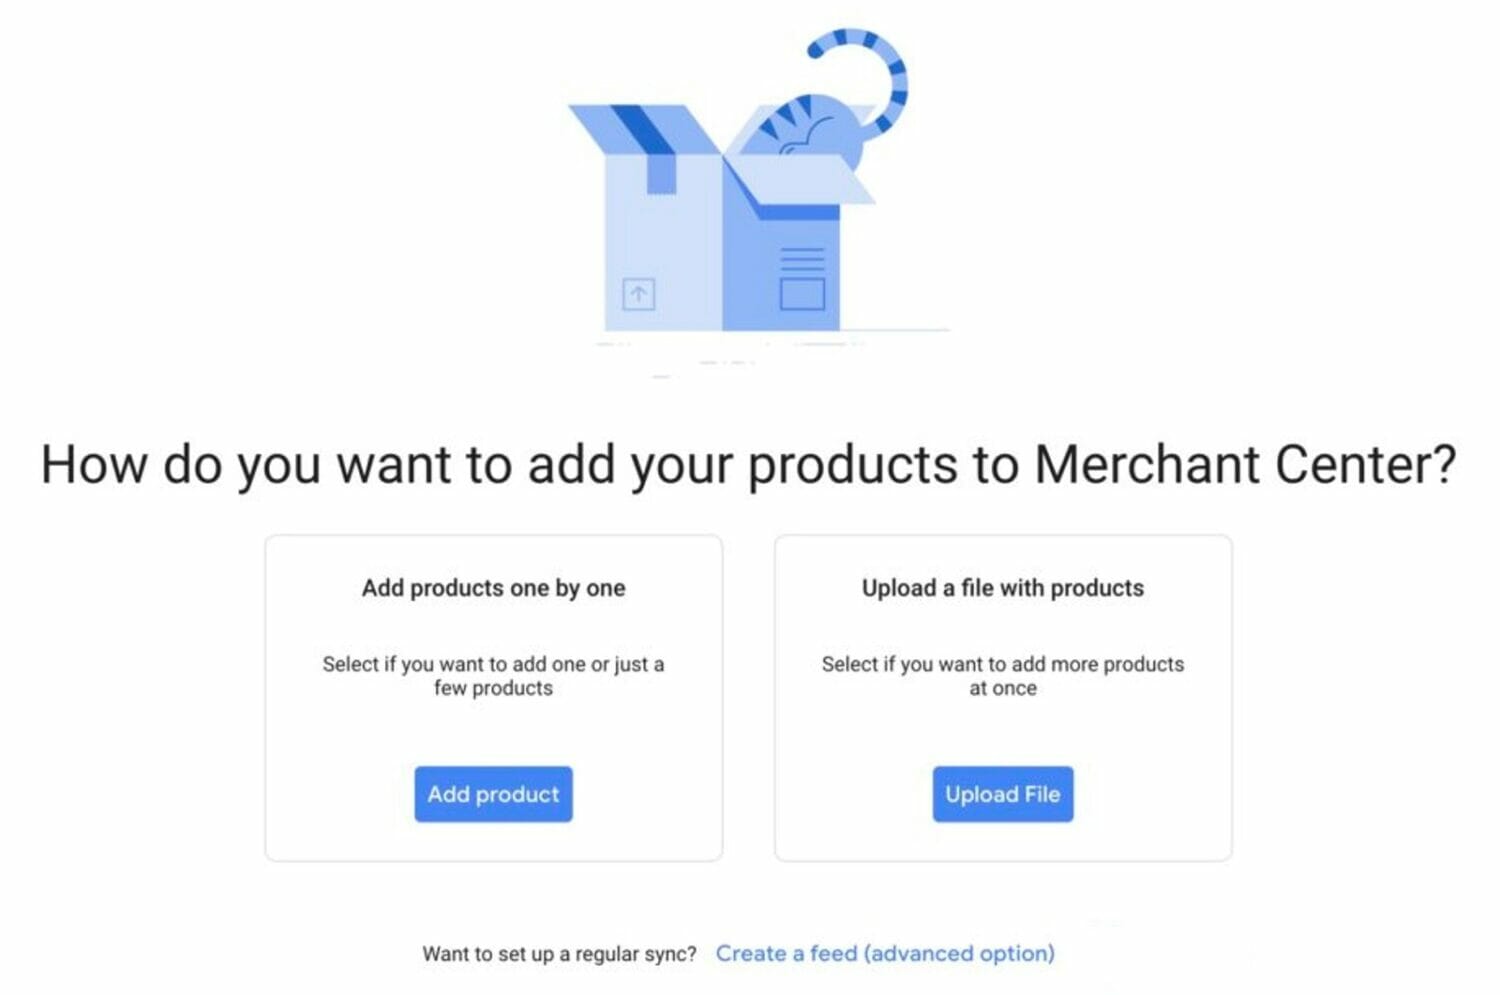
This can be extremely time-consuming and painful if configured manually.
Luckily, WP All Export has a sophisticated export template/wizard that removes all the pain. For more information, see How to Export WooCommerce to the Google Merchant Center.
Another export pain point has to do with exporting variable products. You can get specific information on this task at How to Export WooCommerce Variable Products.
WooCommerce Customers
A common use of WooCommerce customer exports is to send customer names, addresses, etc., to external marketing platforms. Most of these platforms have strict requirements for data layouts/formatting.
This is where WP All Export’s capacity to modify data during export will greatly assist you. For more information, see How To Export WooCommerce Customers to CSV, Excel, or XML.
WooCommerce Coupons and Reviews
There are no real special considerations for these data types.
Wrapping Up
In this article, we have tried to show you how to manage all aspects of exporting WooCommerce data. We have done this using the WP All Export plugin because, frankly, it is the most powerful data export plugin available, not just for WooCommerce data but also for all types of WordPress data.