How to Export, Import, and Migrate WordPress Users
There are always two fundamental issues when trying to move WordPress user data:
- How do you handle the basics?
- What are the potential complications?
In the following sections, we address these issues for exporting, importing, and migrating WordPress users.
We do this using the WP All Import and WP All Export plugins for all examples. If you don’t have access to these plugins, you can use this free online sandbox. Just choose the WooCommerce Store option and click Create Sandbox.
Export WordPress Users – The Basics
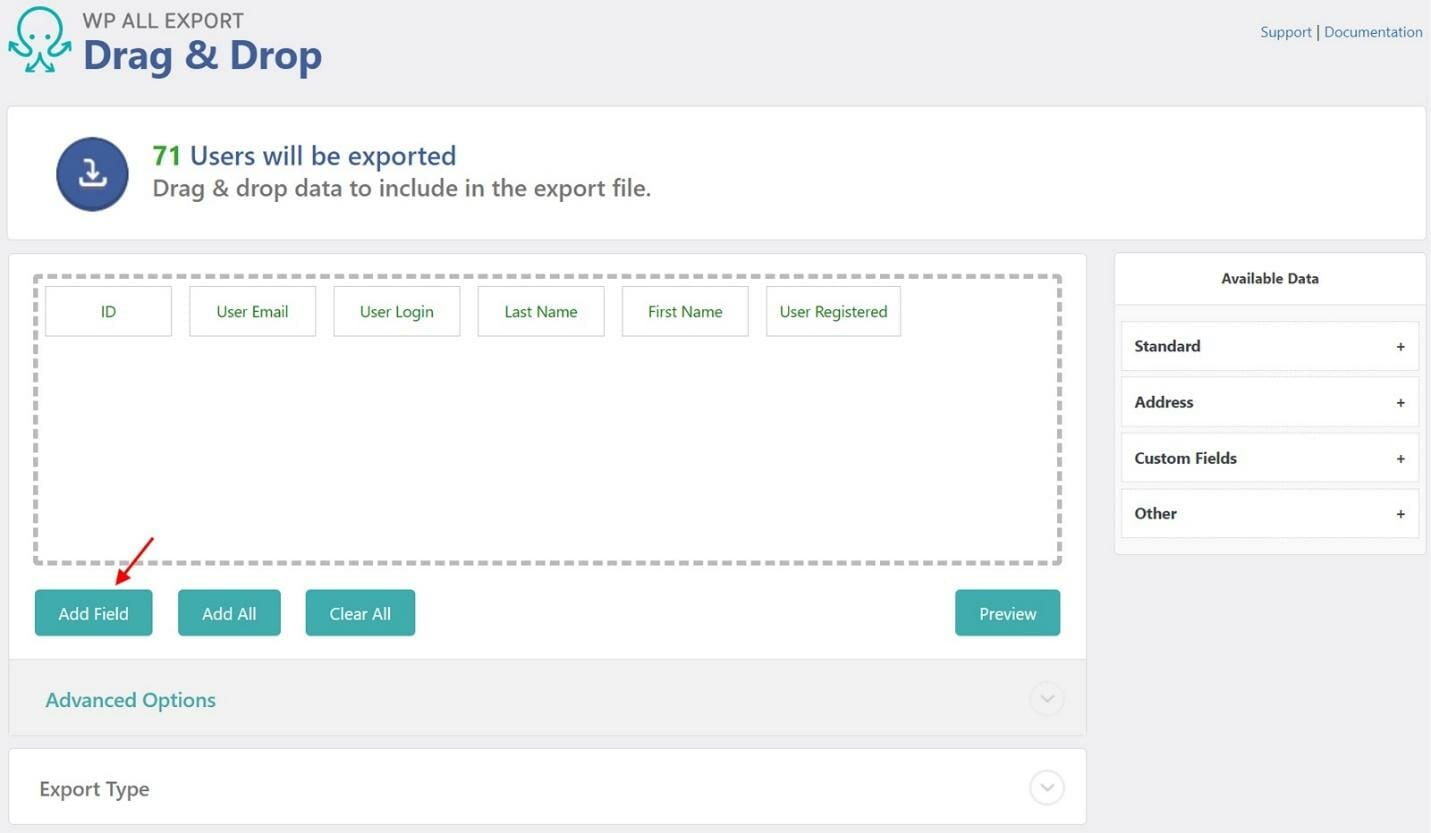
To export WordPress users, go to All Export > New Export:
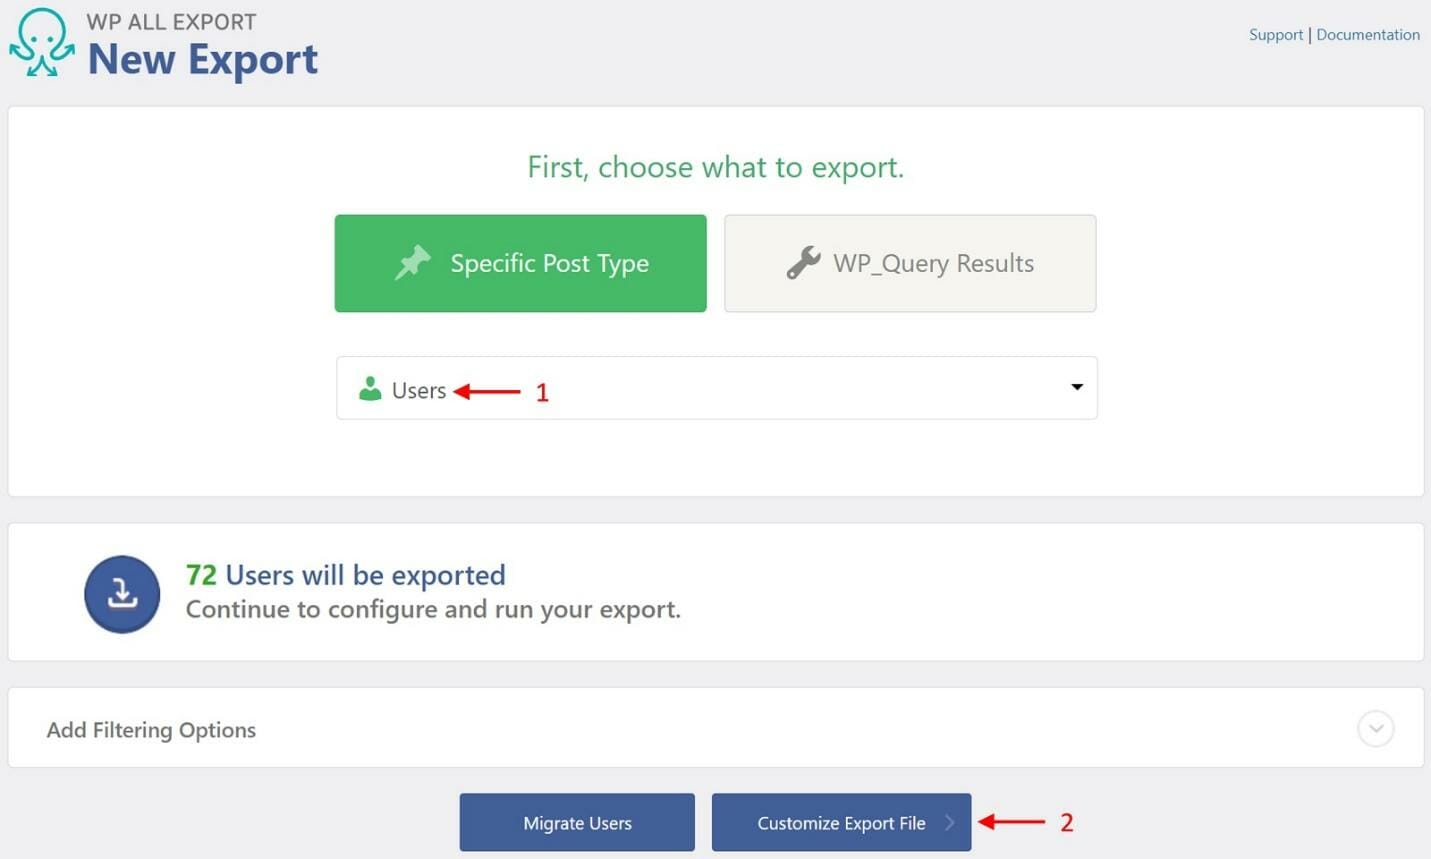
- Choose Users.
- Click Customize Export File.
This brings you to the Drag & Drop screen:

This screen allows you to interactively build your export column layout.
You do this by dragging fields from the panel on the right (Available Data) to the column selection area. You can also rearrange these export columns by dragging them into the desired order.
When you’re finished, click the blue Continue button at the bottom.
This brings you to the Export Settings screen:
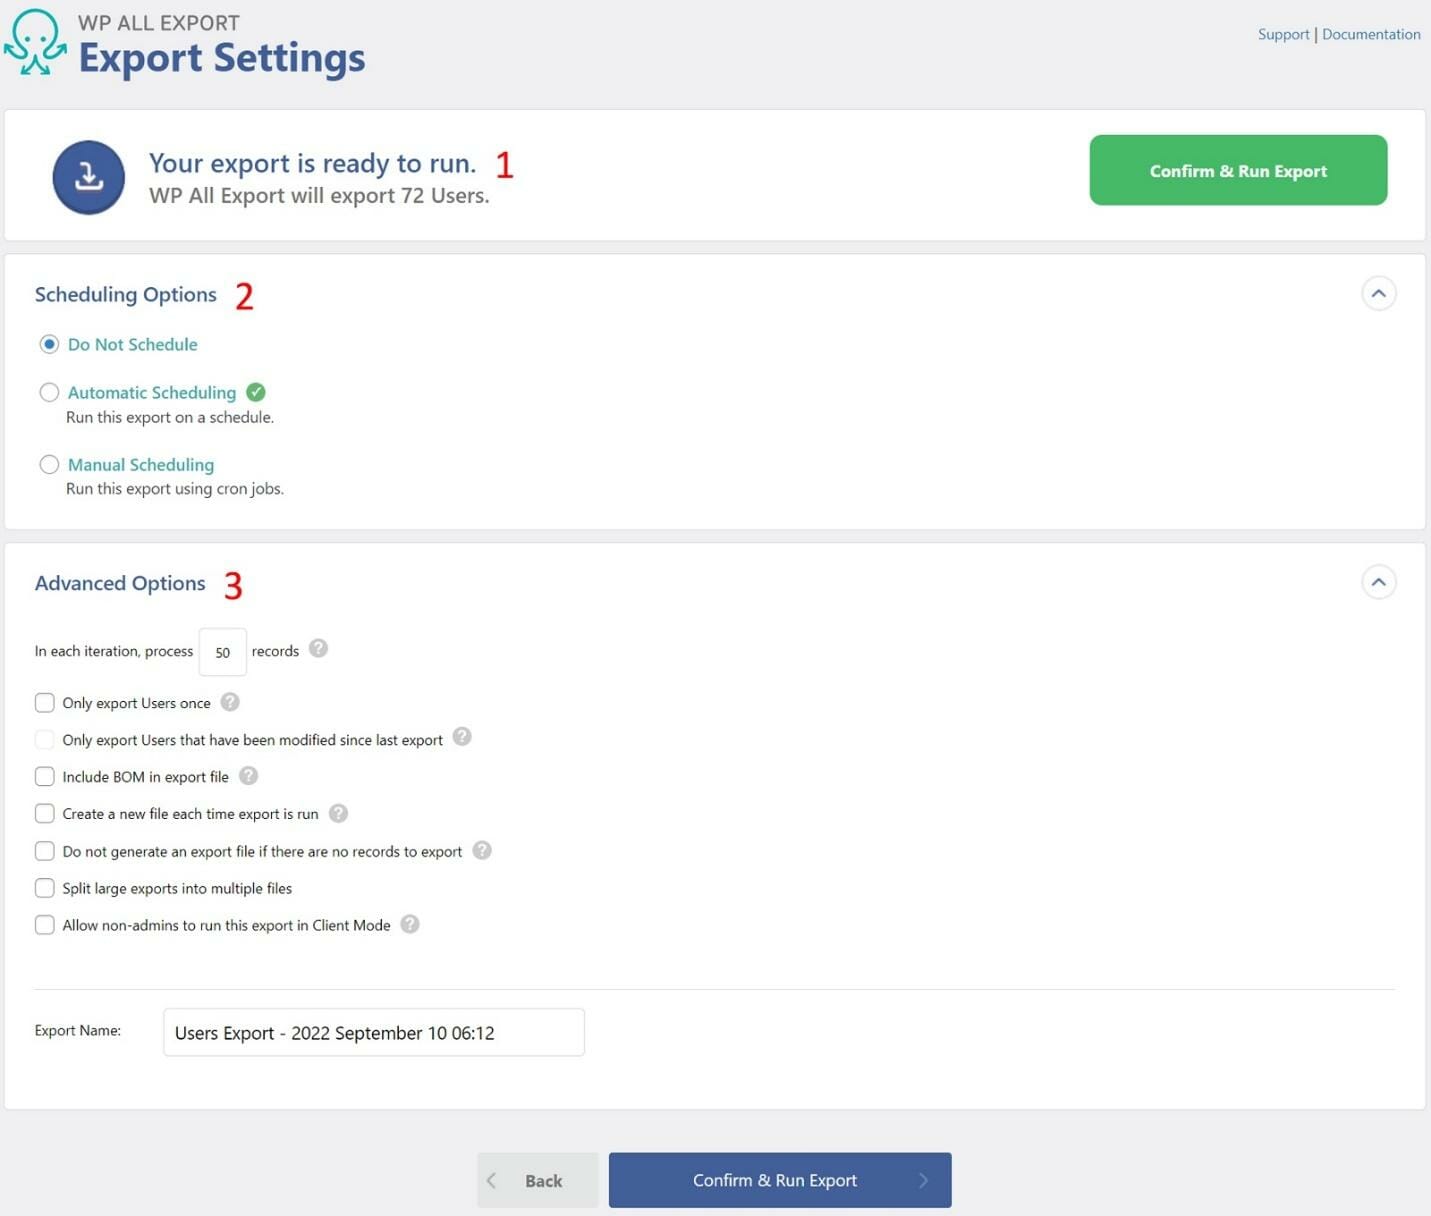
This screen has three parts:
- A section that shows you how many users will be exported.
- A section that allows you to schedule your exports to run automatically.
- An Advanced Options section that lets you configure import settings, such as whether to export users only once or only users that have been modified since the last export, etc.
For now, leave all these settings at their default values and click Confirm & Run Export.
When the export is complete, the following screen will appear:
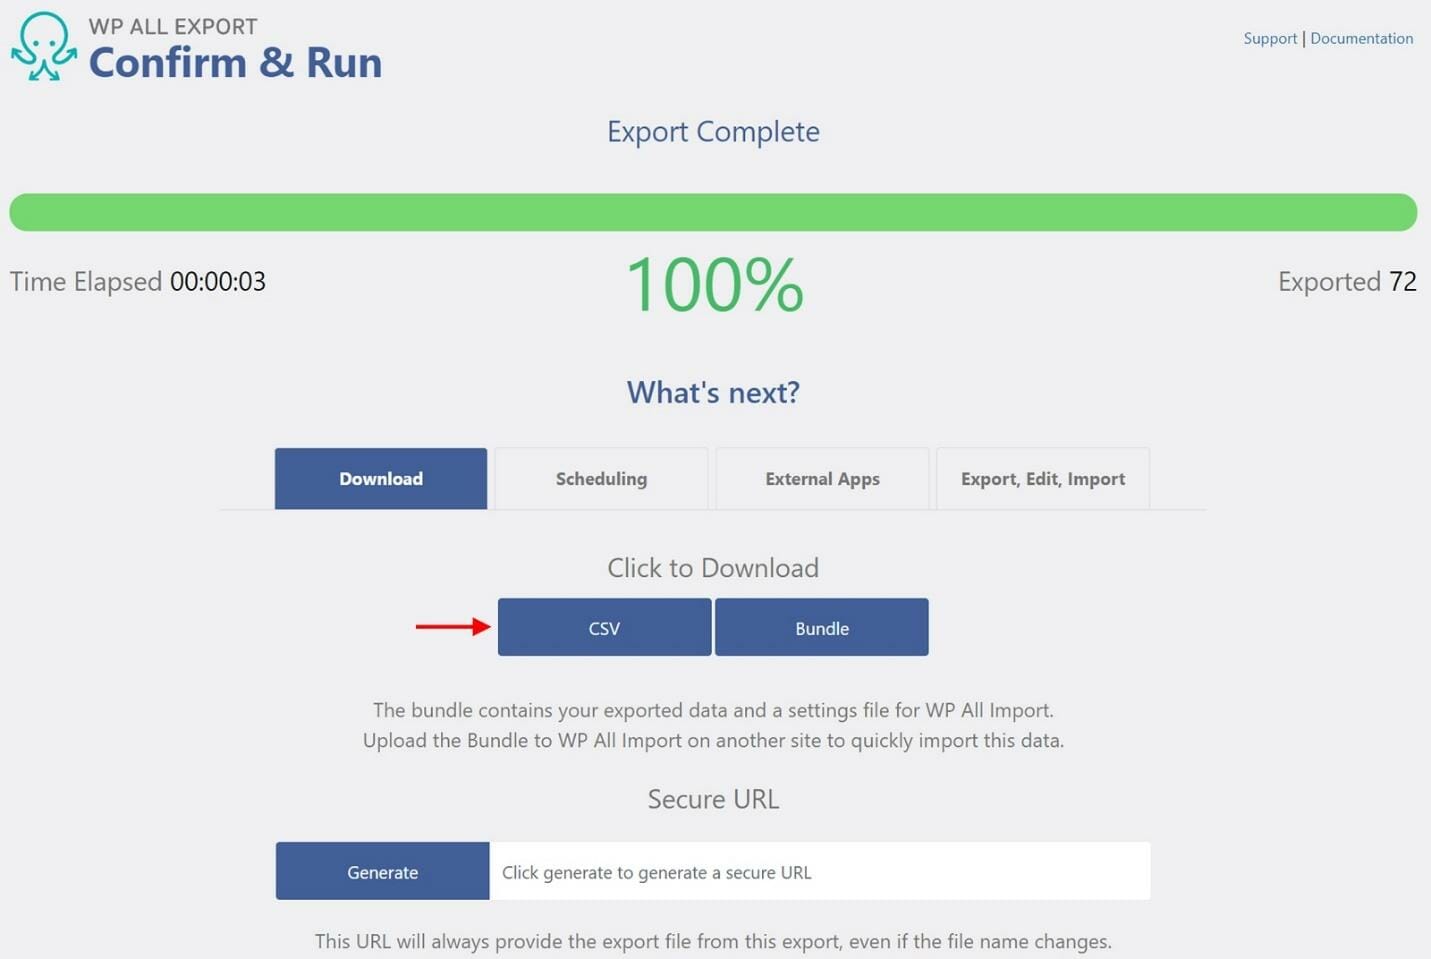
Assuming everything went smoothly, just click the blue CSV button to download your export file.
And that’s it! You can export all of your WordPress users like this in mere seconds.
Unfortunately, things are seldom so simple!
Export WordPress Users – Potential Complications
The Need for Filters
Unless you are exporting users for internal purposes, it’s rare that you’ll want to export all users. For example, you may want to exclude your admin users or your employee user accounts.
To support this, WP All Export provides a simple yet powerful filter tool at the bottom of the New Export screen:
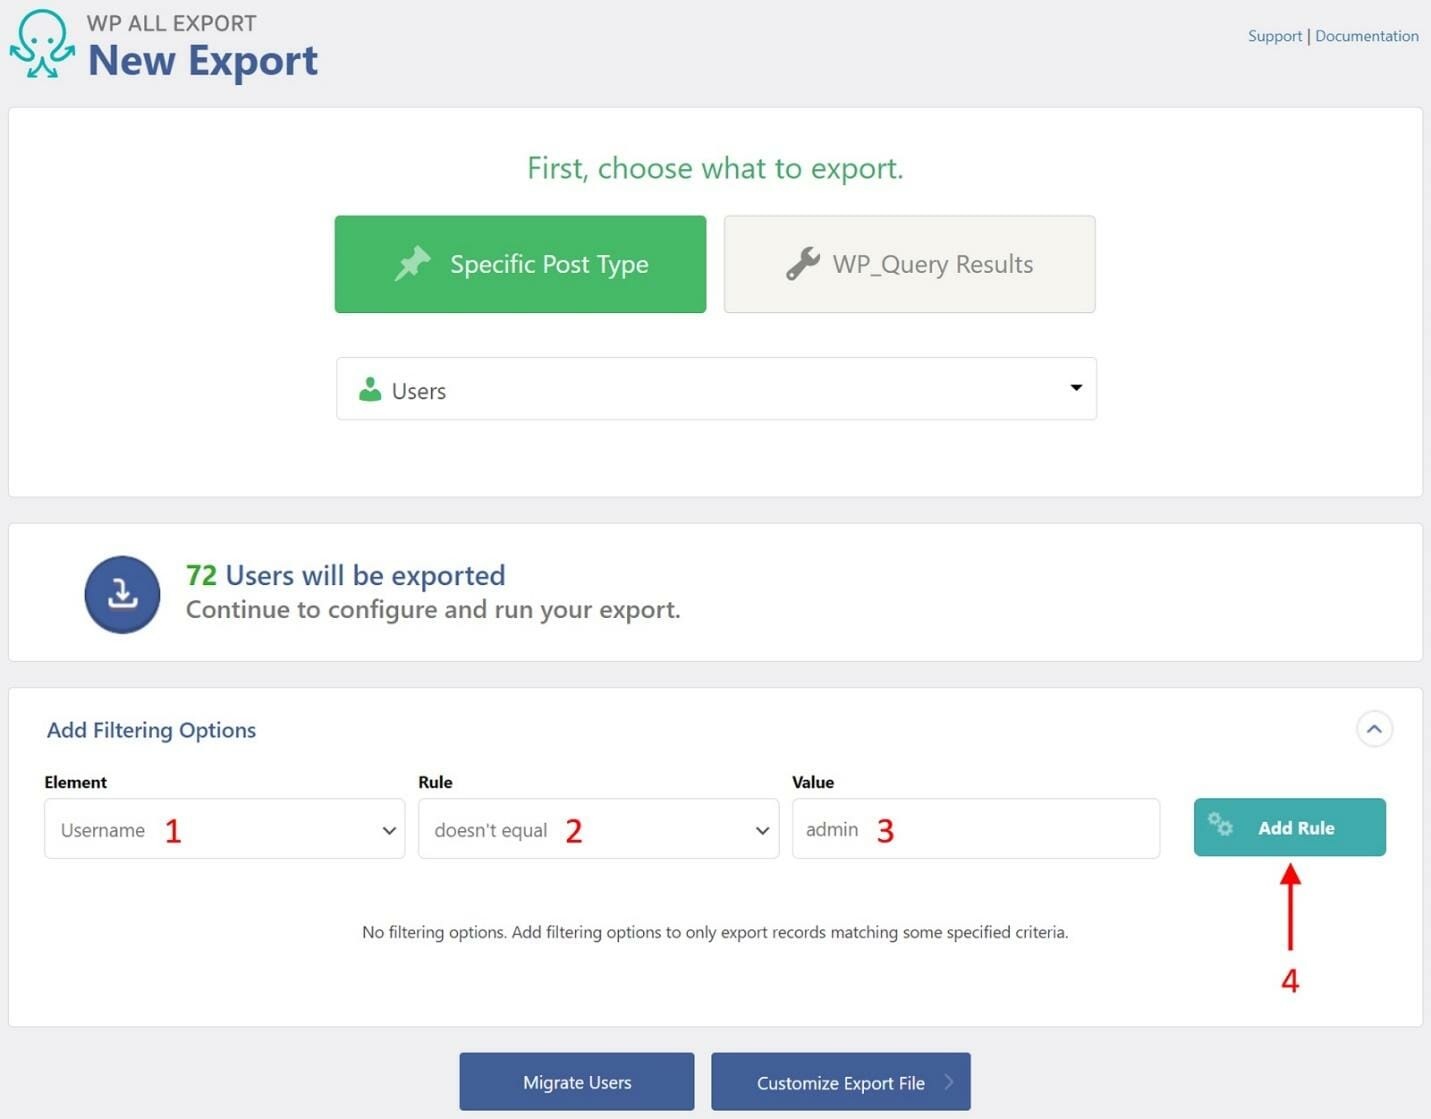
Filters consist of elements, rules, and values. In this example, our filter consists of the following:
- Element = Username
- Rule = doesn’t equal
- Value = “admin”
This means: exclude any users with a Username of “admin”.
There is only one admin user in the sample database, so when you click the Add Rule button, you’ll see your user count drop from 72 to 71.
The nice thing about this filter tool is that you can add as many rules as you want, and you can join those rules with any combination of AND and OR operators, even nesting them together to simulate the use of parentheses.
This is one of WP All Export’s most powerful features.
What if the User Data Needs to be Specially Formatted?
If you are exporting your WordPress user data to an external system, that system may be very rigid when it comes to file layouts and data format rules.
As we’ve already pointed out, you have complete control over the export file layout by using the Drag & Drop interface. But what about data formatting?
Fortunately, WP All Export gives complete control here, too. For example, say the external system needs to have the user registration date in a field named “Date Registered”, and this field should not include the time portion of the date.
No problem. Here’s what to do. In the Drag & Drop interface, click the Add Field button:
This will bring up a popup:

- Enter the name for your new field, in this case, “Date Registered”.
- Select the Custom export field option.
- Enter your custom field definition. Because the User Registered field has already been converted to a string, we’re using a PHP function to extract the first 10 characters of that string.
- Click the Preview button.
Here are the results:
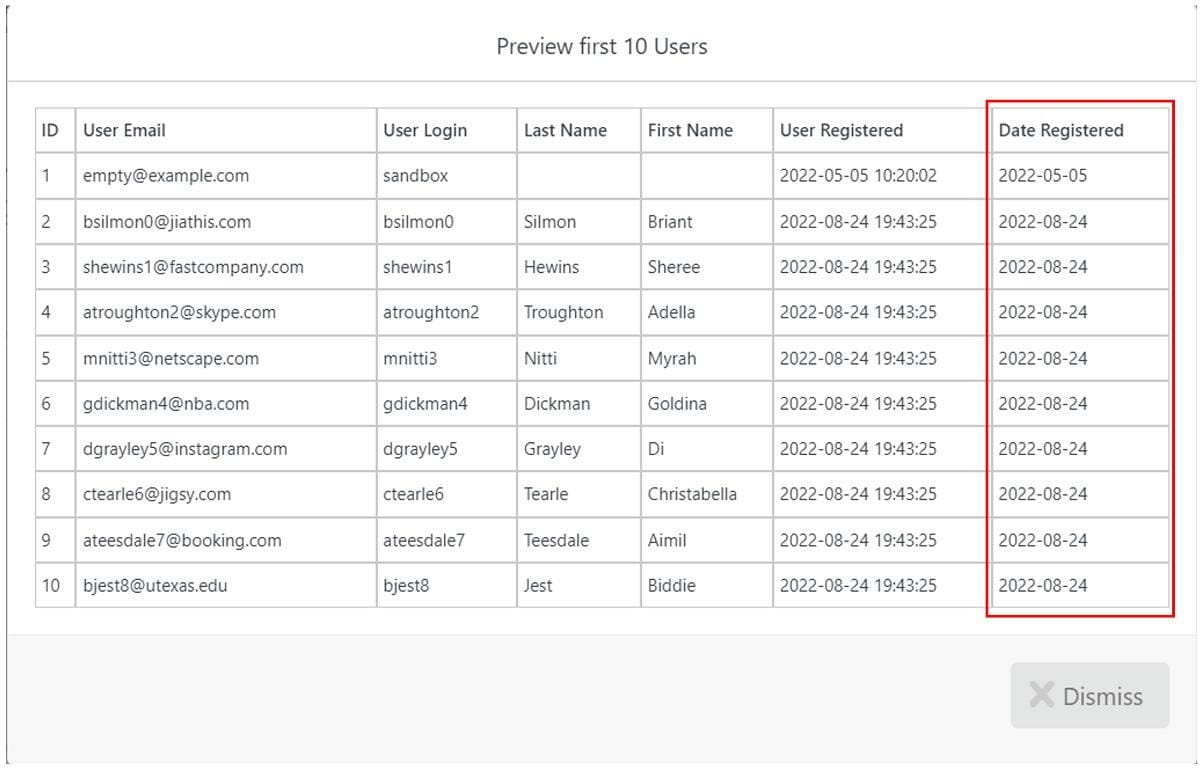
As you can see, you now have a properly formatted Date Registered field alongside the original User Registered field.
We’re only scratching the surface of this capability. If you look back at the Add Field to Export popup, you will see that it has a full-blown function editor. This editor allows you to create PHP functions of any complexity, including conditional logic.
And what if you don’t have any PHP skills? No problem. WP All Export has plenty of code samples. You can also ask their support team for additional guidance.
What About Exporting User Passwords?
The first thing to understand about WordPress user passwords is that they’re encrypted when they’re stored, so the original text version of the password never exists in the database. You can see this in an export preview:
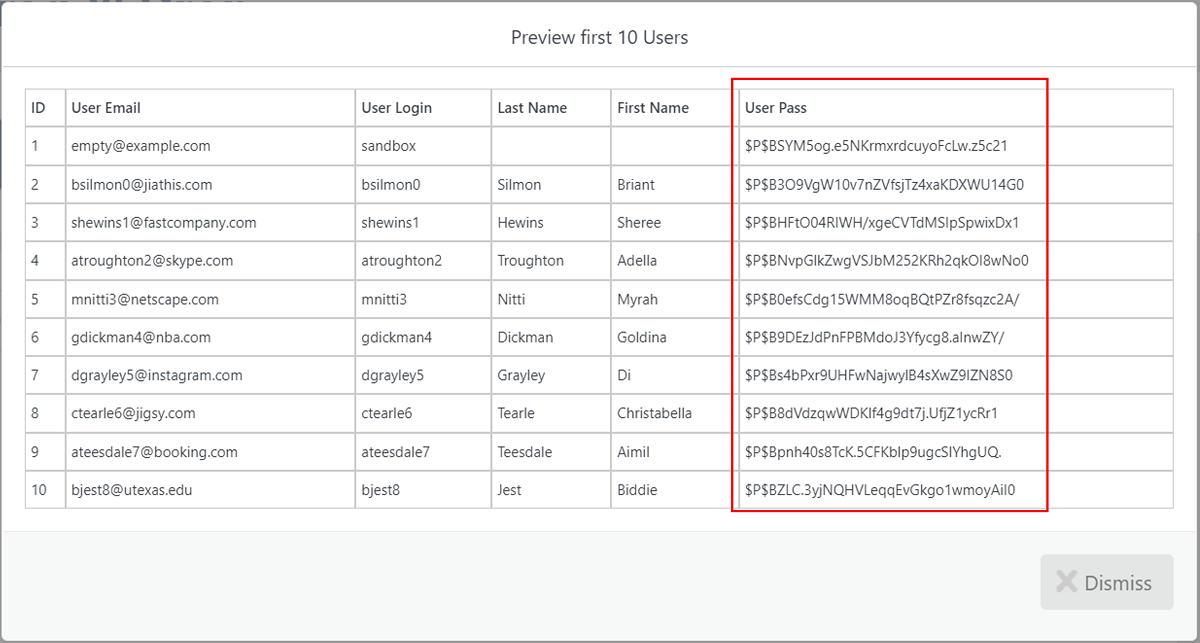
How does WordPress authenticate against that encrypted password when users try to log in? Simple. It applies the same encryption algorithm to the password you enter in the login process, then compares that encrypted value against the one stored in the database.
Why should you care? Because this means that you can never export the actual user passwords along with other user data.
This is a good restriction if you’re sending the exported users to an external system, as that would pose a big security risk.
It’s not so good if you’re sending this info to another internal system that isn’t powered by WordPress, and you want users to be able to log in there using the same passwords. Unless you captured the text version of the passwords when they were created, you’re simply out of luck.
But you’re okay if you’re sending the user data to another WordPress system because they all use the same encryption algorithm, meaning users can still log into the second system using their original passwords.
Import WordPress Users – The Basics
Importing data into WordPress is slightly more difficult than exporting it, mainly because the import site is the one with rigid layout and data format requirements.
Fortunately, WP All Import gives you the same flexibility when importing data that WP All Export gives you when exporting it.
Let’s start with a basic walkthrough. Go to All Import > New Import:

- Load your import file. There are multiple ways to do this, including downloading a file from SFTP/FTP or a URL.
- Choose New Items.
- Select Users.
- Click Continue to Step 2.
This brings you to the Review Import File screen:
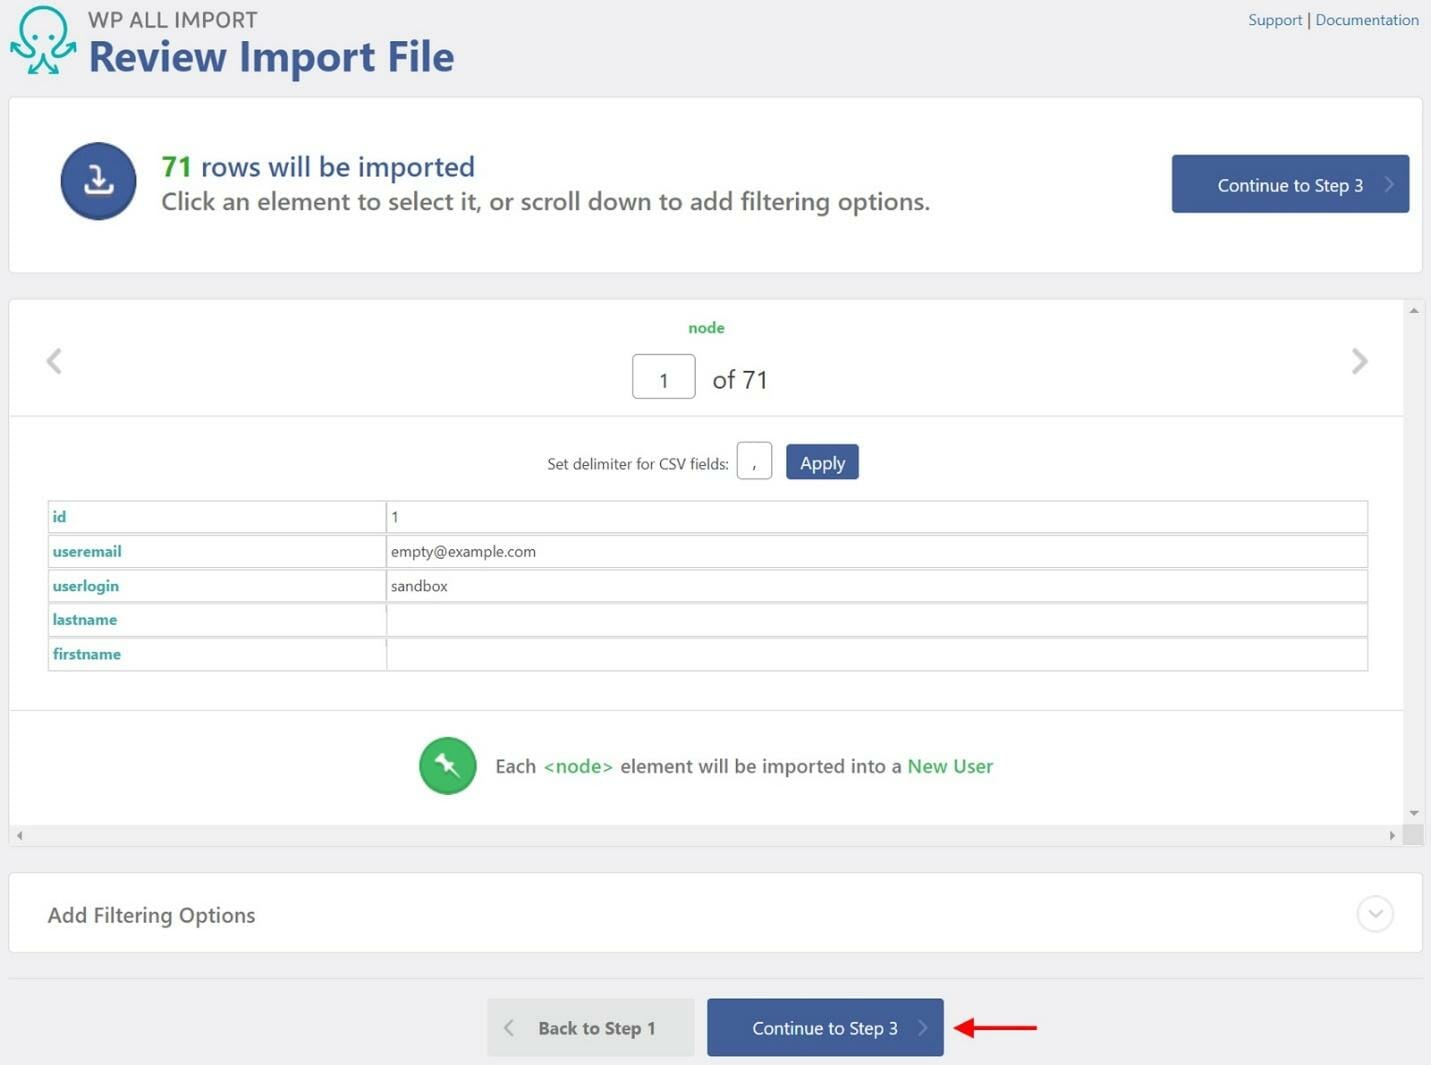
This screen gives you an opportunity to review how your import file was parsed before you decide whether to proceed.
In this case, let’s pretend that everything is okay and click Continue to Step 3, which brings you to the Drag & Drop screen:
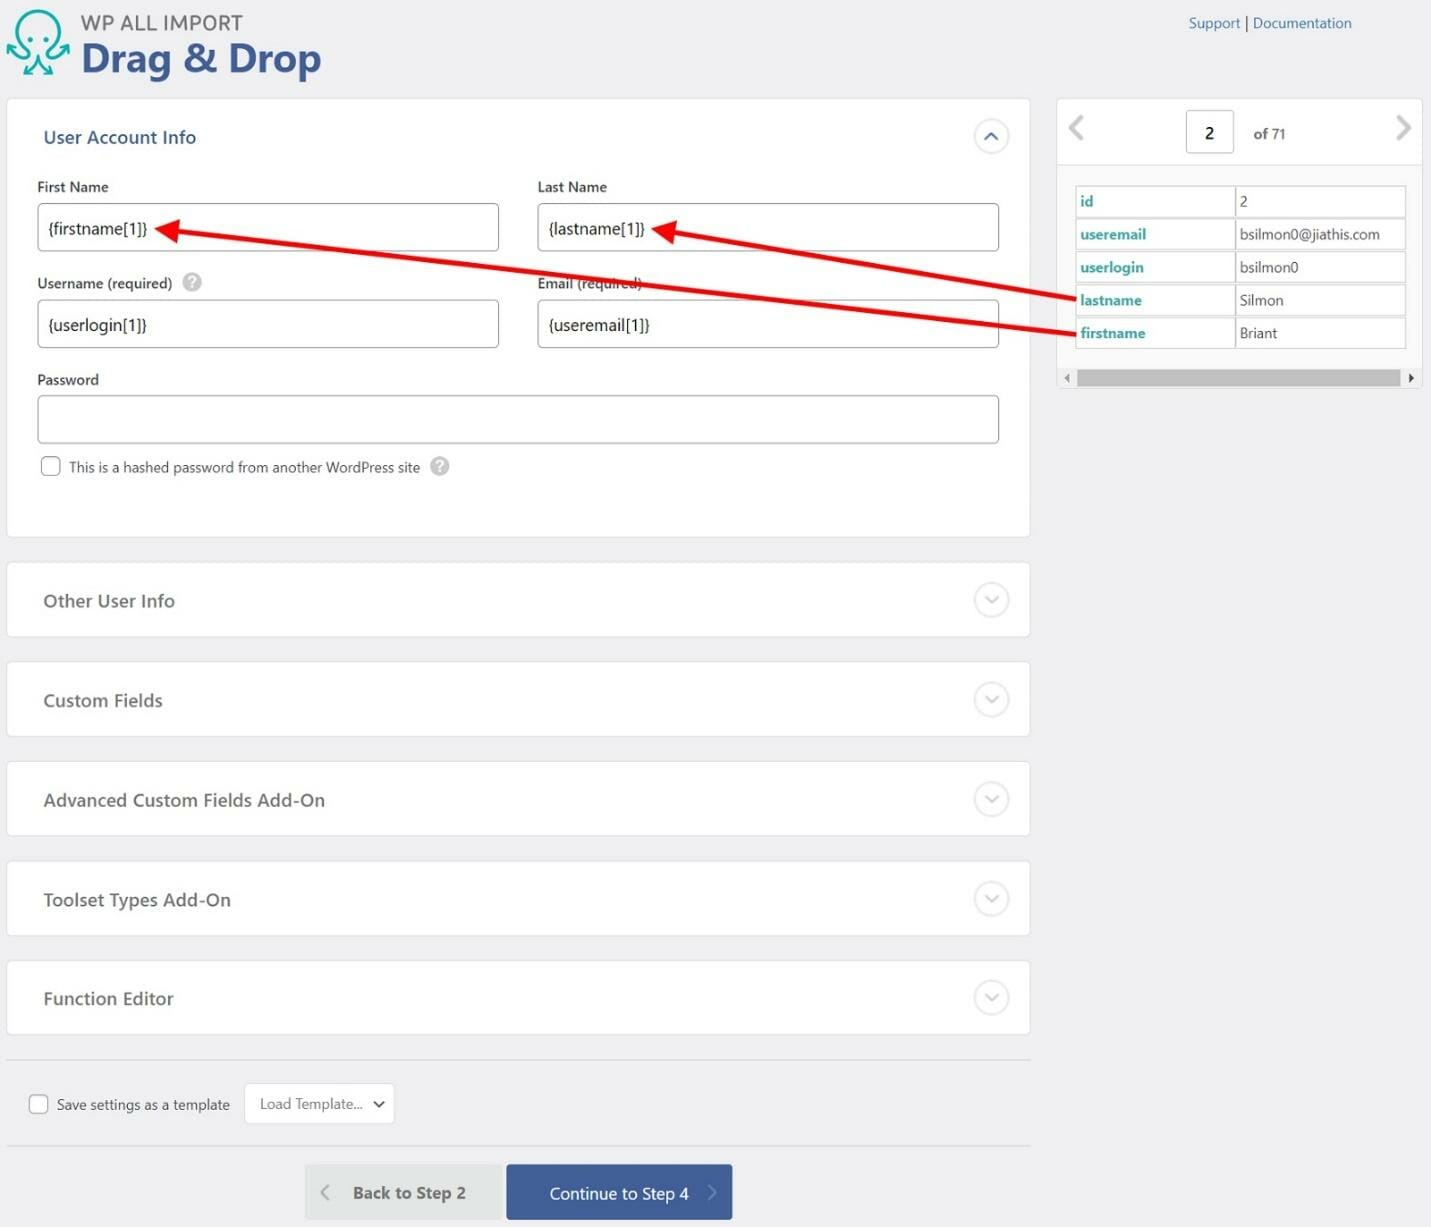
The basic idea behind this screen is simple: you drag incoming data elements from the right to their appropriate WordPress user fields on the left. In other words, you’re essentially telling WP All Import where to put the data.
Click Continue to proceed to the Import Settings screen:
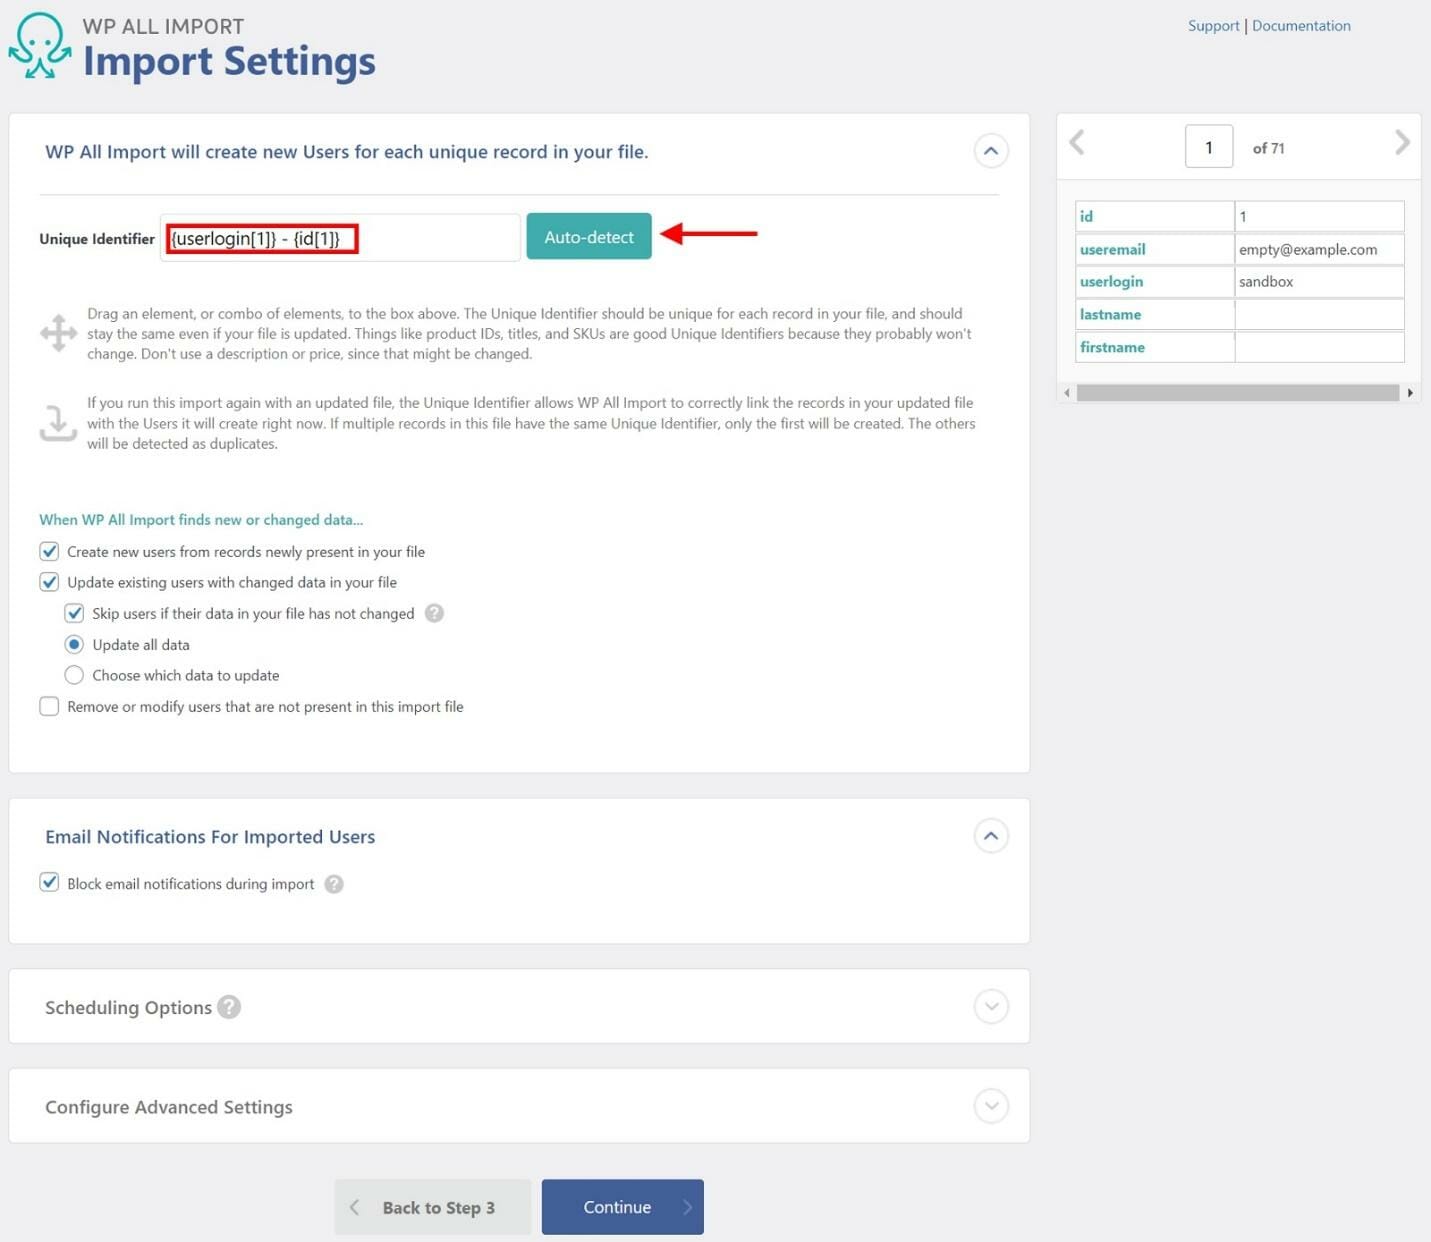
This screen actually has a number of advanced functions, but let’s focus on the one task that’s essential: defining a unique identifier for the incoming users.
Achieving this is easy. In most cases, you can just hit the Auto-detect button and have WP All Import do it for you.
The question is: why is this important? The answer is that the Unique Identifier value is used to distinguish users from each other so that you don’t accidentally create duplicates. It also helps identify which users to modify when you’re performing an update.
For now, click the blue Continue button at the bottom. This brings you to the Confirm & Run screen:
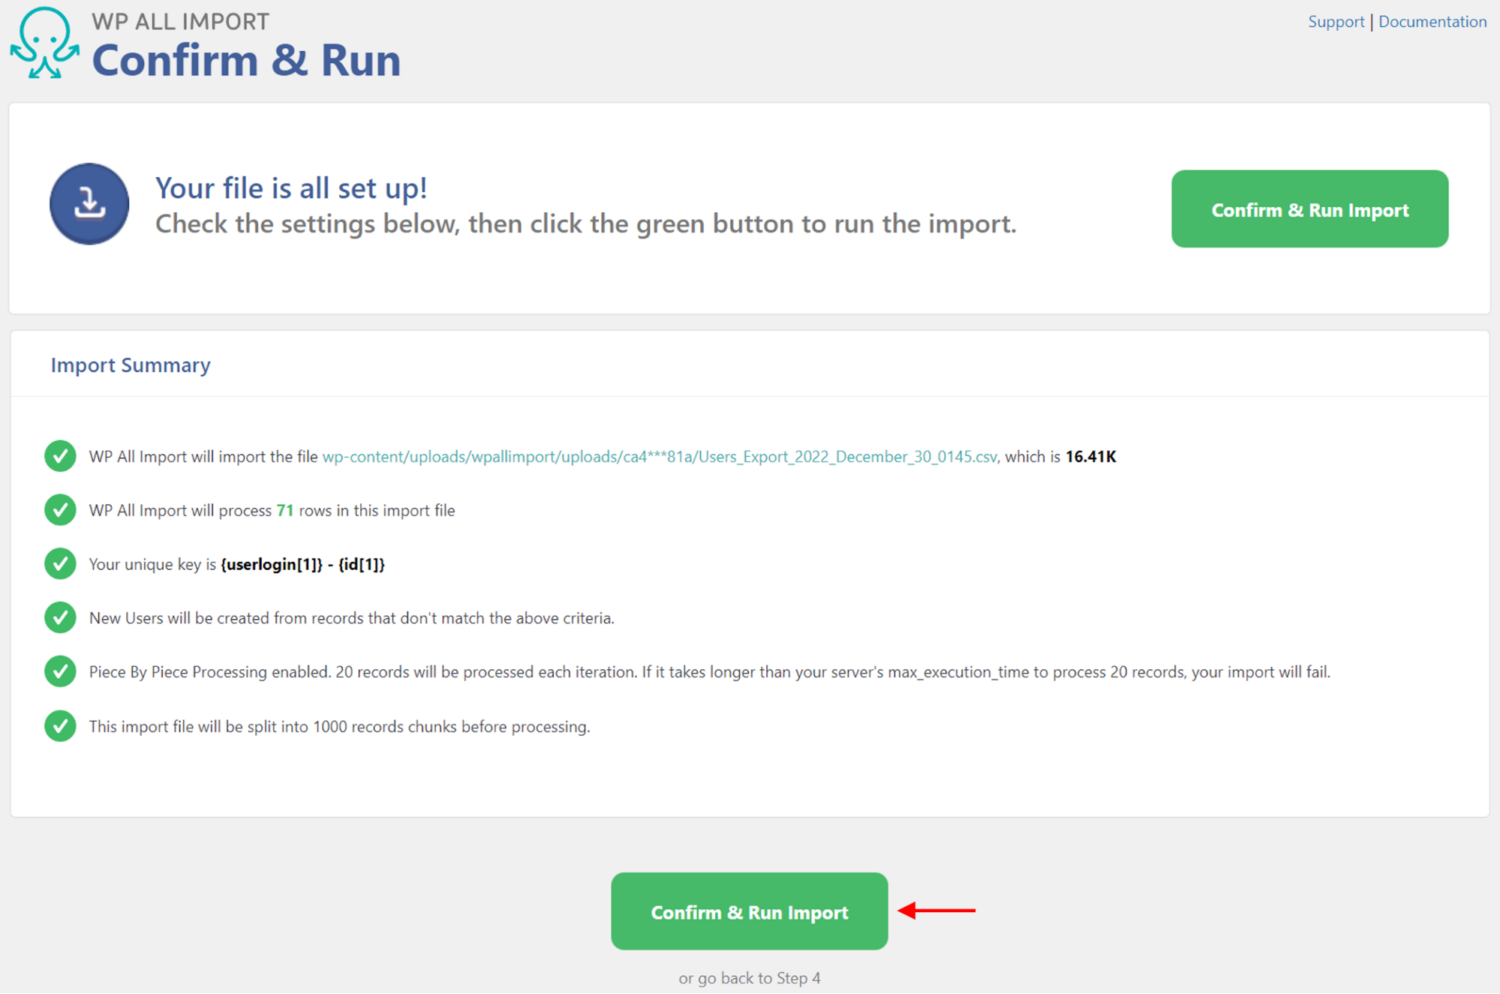
The most important section of this screen is the Import Summary. This allows you to review the exact steps that WP All Import is going to perform during the import. If you don’t like what you see, click the or go back to Step 4 link at the very bottom.
Otherwise, click the Confirm & Run Import button.
WP All Import will then run your import. After a short while, you’ll get an Import Complete! message that will summarize what happened.
As a final step, you should then go to Users > All Users to check the imported records.
And that’s it! This is a little more involved than exporting users, but if everything goes smoothly, you should still be able to complete a simple import in a few minutes.
Import WordPress Users – Potential Complications
The Need to Modify Incoming Data
As mentioned, WordPress has its own strict requirements about what you can and can’t put in its various tables and fields.
If someone has sent you a data file with new users from a non-WordPress system, it is very unlikely that the contents of that file will meet WordPress’s requirements “out of the box.” It is far more likely that you’ll have to adjust some incoming data elements.
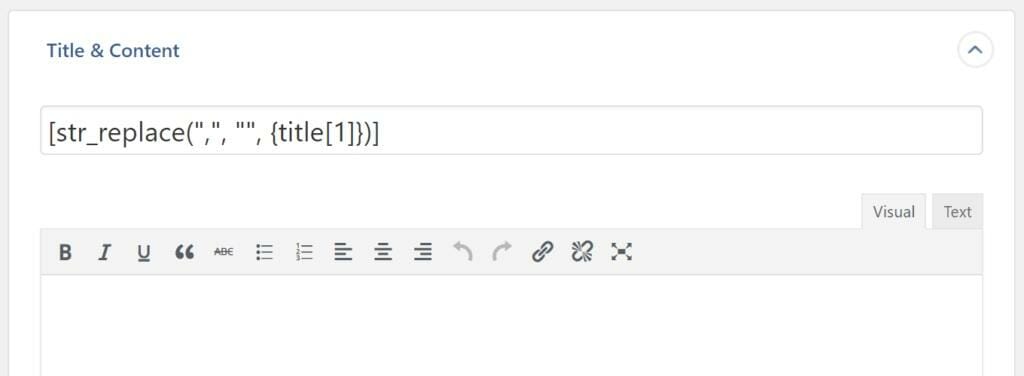
How do you achieve this on the import side? Fortunately, you can use inline PHP in every field exposed through WP All Import’s interface.
For example, say you’re importing posts, and you want to remove commas from the post’s title. Just drag the incoming data element into the Title field and then wrap it in a built-in PHP function like this:
Need something more sophisticated? Go to All Import > Settings and use the Function Editor at the bottom of the screen to create your own custom PHP functions, which you can then use exactly like a built-in function.
This means that you can modify any incoming data element to whatever degree is necessary to meet WordPress’s field requirements. Put another way: regardless of how messed up your data import file is, as long as it contains the data that you need in some manner, WP All Import can successfully get it into WordPress for you.
And, again, if you don’t know PHP (and don’t want to know PHP), there are code samples and support staff ready to assist you.
The Update Process
In some cases, imports occur on a regular process. In the case of users, this might occur if they regularly sign up through another platform or system.
When this happens, you have to account for the possibility of receiving updates on existing users.
WP All Import handles this in the Import Settings screen, which we’ll now take a closer look at:
We’ve already described the Unique Identifier value, which is the basis of matching incoming users to existing users. If you look below this, you’ll see the following options under the When WP All Import finds new or changed data heading:
- Create new users from records newly present in your file
- Update existing users with changed data in your file
- Skip users if their data in your file has not changed
- Update all data
- Choose which data to update
- Remove or modify users that are not present in this import file
If you select Choose which data to update, WP All Import will expand that section to allow you to make update decisions at the field level:
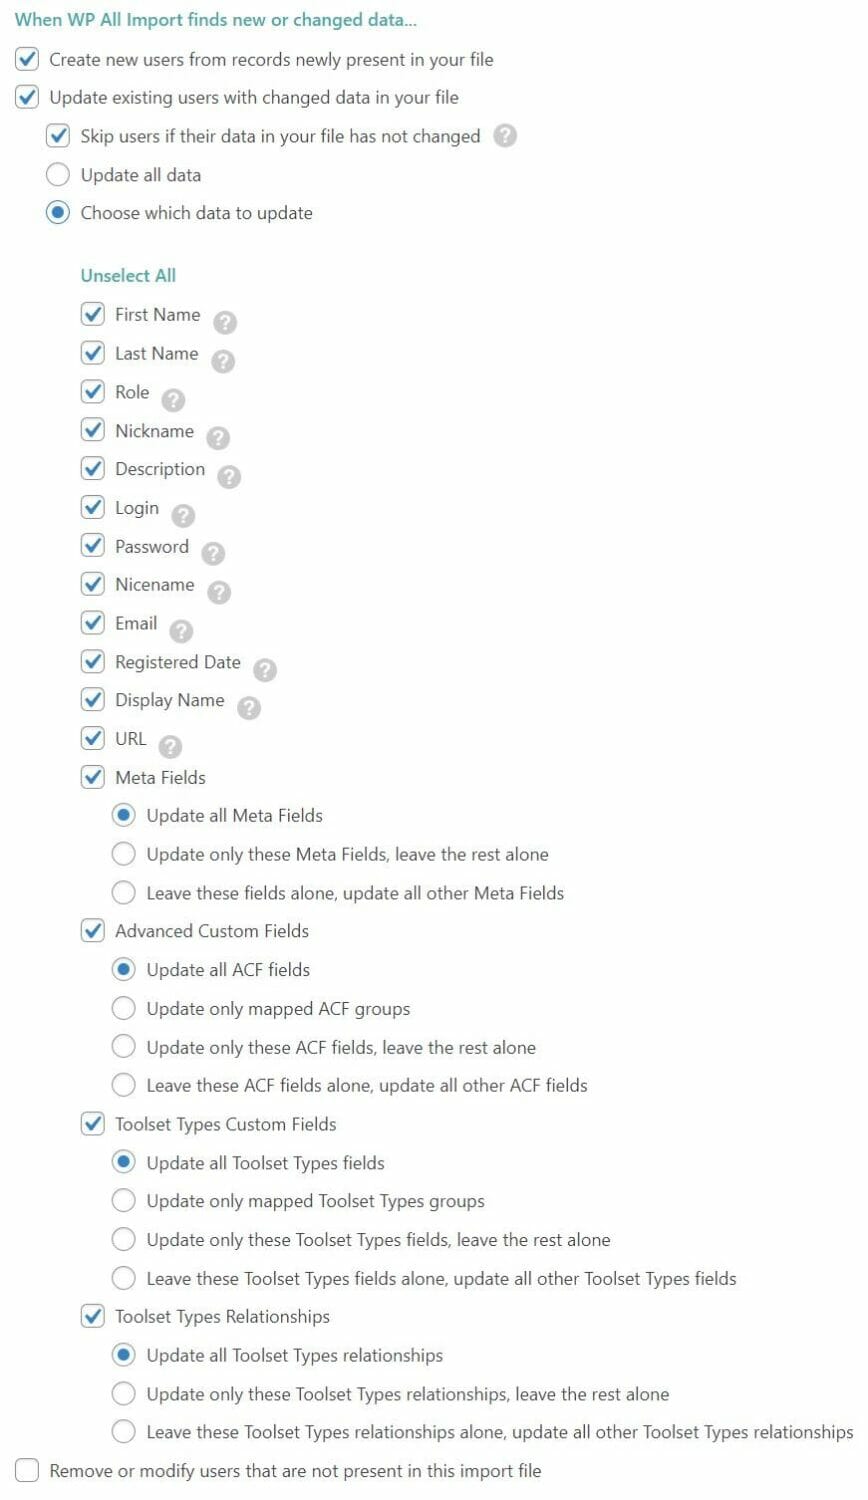
We’re not going to walk through a detailed example of this in this article. The point is, WP All Import gives you granular control over not just the values that go into fields but also which fields get updated.
Maintaining Old User IDs
When you import a user into WordPress, that user will automatically get assigned a new user ID. This may be okay in most circumstances, but you may have a situation where you are importing other data into WordPress that is related to the new users via their old user IDs. In this case, you’ll probably want to keep that old user ID to preserve those relationships.
This is tricky, but it can be done by following these instructions: Keep Old IDs When Migrating Users or Customers.
Migrate WordPress Users – The Basics
At its simplest level, migrating users from one WordPress site to another is just a combination of exporting and importing the users in question.
Fortunately, WP All Export and WP All Import have a few tricks up their sleeves to make this process much more efficient.
On the export side, WP All Export lets you download a special Bundle file:
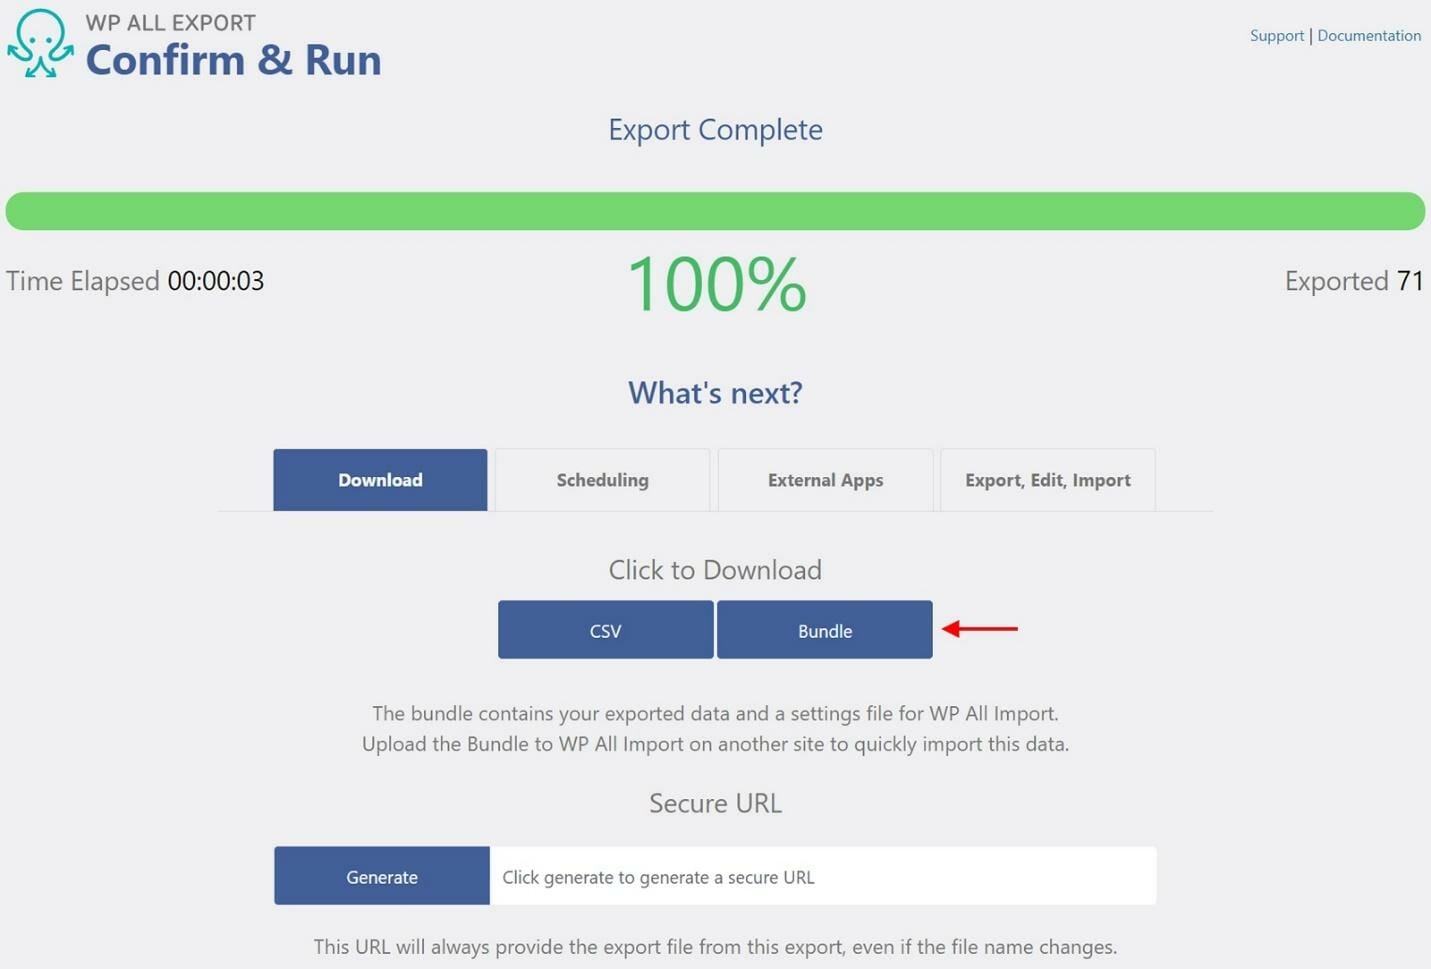
In addition to the exported user data, this bundle file contains an import template.
To complete the migration, just import this bundle file on the destination site:
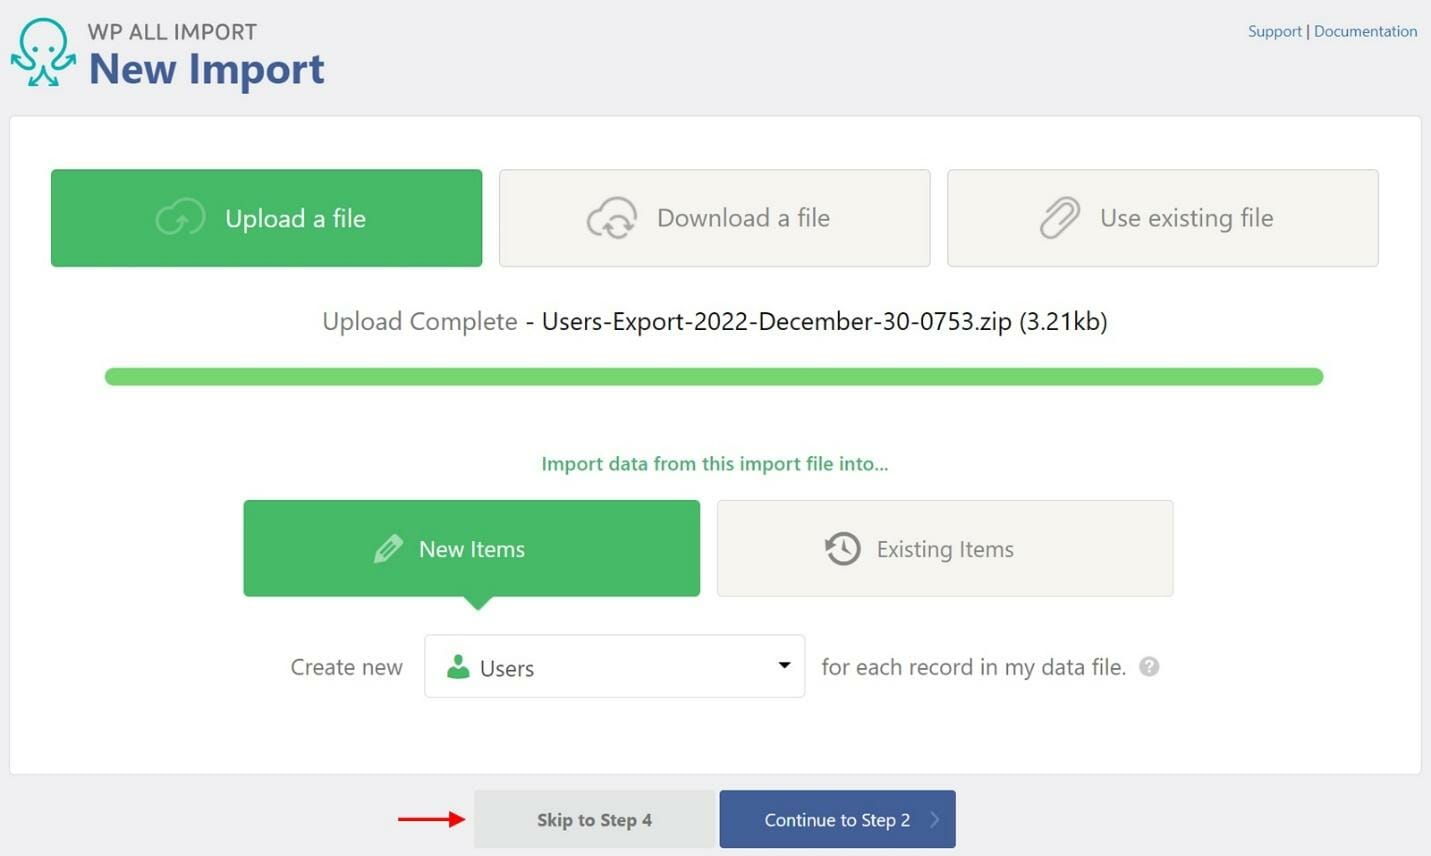
This gives you the option of just clicking the Skip to Step 4 button, which will bring you to the Import Settings screen with all your incoming data elements already mapped to the correct fields.
In other words, the bundle file reduces the import portion of the migration process to just a few clicks!
Migrate WordPress Users – Potential Complications
None that aren’t already covered in the export and import sections.
Scheduling Your WordPress User Exports, Imports, and Migrations
WP All Export and WP All Import offer two scheduling solutions:
- Manual scheduling using cron jobs on your server.
- A paid Automatic Scheduling Service, which can be configured directly within the plugin interfaces.
Here’s a quick look at the screen used for the second option:
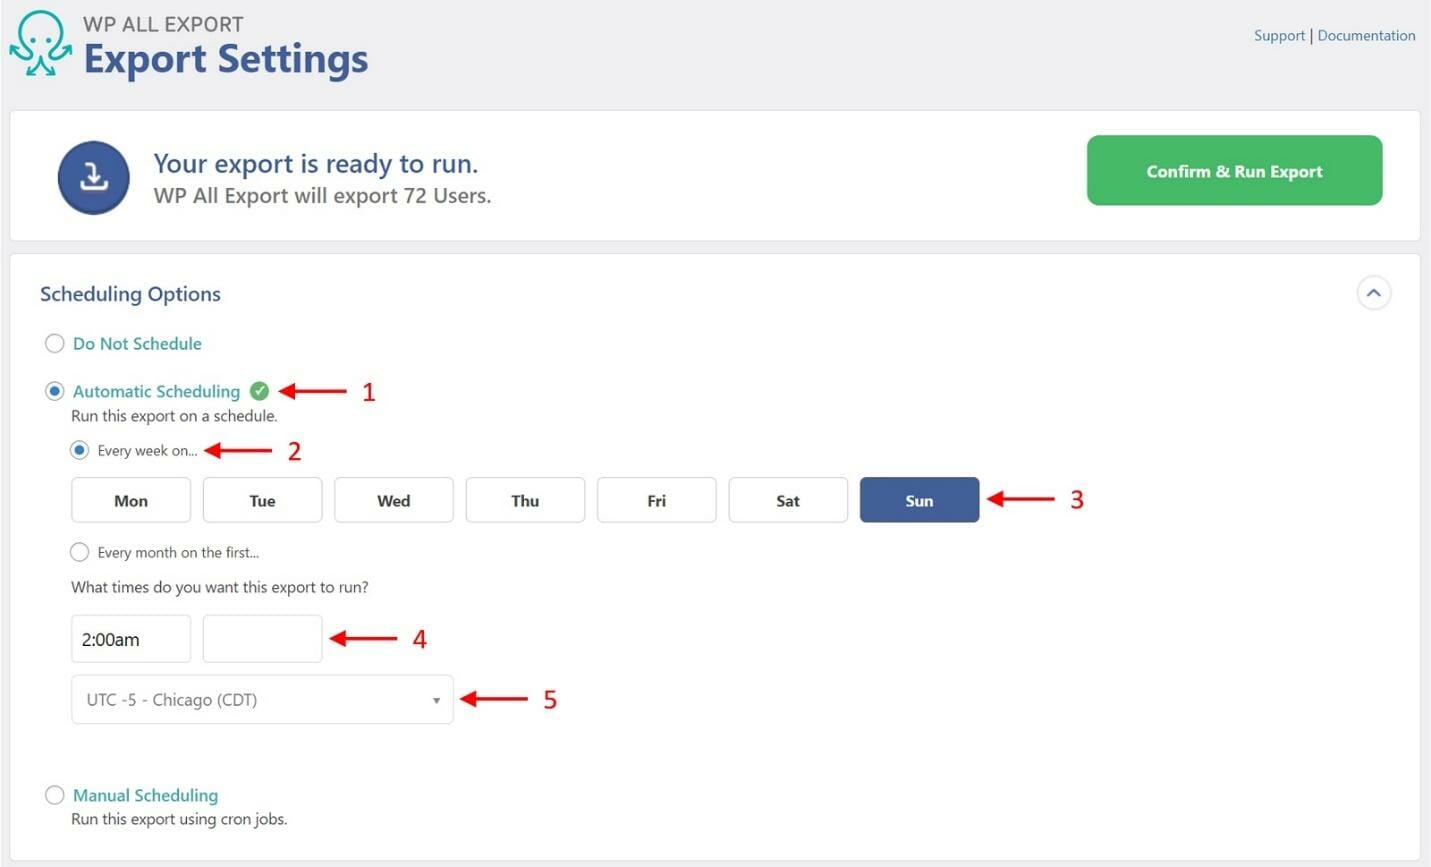
Here is the process:
- Choose Automatic Scheduling.
- Decide on the frequency (i.e., every week or every month).
- For the weekly schedule, choose the day of the week (for the month, choose the day of the month).
- Specify the time(s) when you want the report to run.
- Choose the applicable time zone.
And that’s it! You can basically schedule a process in just a few seconds.
If you are doing anything that involves both an export and an import (such as migration), make sure to schedule your import to start after the export has finished.
If you’re scheduling multiple datasets that share relationships, make sure you take into account the data dependencies. For example, if you need to import custom tables that reference user IDs, you should import the users before you import other tables that depend on those users.