How to Redirect Users After Login in WooCommerce
Are you looking for an efficient way to redirect users after they log in to your WooCommerce store?
Redirecting users to a specific page after login is a powerful tool for enhancing the user experience. Whether you want to guide customers to their account dashboard or a custom landing page designed to increase engagement, this simple action can significantly impact them.
In this article, we’ll walk you through what login redirect is, why you should redirect users after WooCommerce login, and how to use ProfilePress to redirect WooCommerce users after login.
What Is Login Redirect?
A login redirect is a feature that automatically redirects users to a specific page or URL immediately after they log in to a website. Instead of landing on a default page, users are redirected to a designated page that site administrators choose.
For example, in an eCommerce store like WooCommerce, you might want to redirect customers to a special offer page or a members-only section after they log in. This can enhance user experience, streamline navigation, and improve engagement by ensuring users land on pages that are most relevant to them.
Why Redirect Users After Login in WooCommerce?
Redirecting users to a specific page after WooCommerce login is not just about navigation. It significantly improves customer experience by ensuring they land precisely where you want them to.
Here’s why this feature is beneficial:
- Custom User Experience: You can direct users to the pages they find most useful, such as a product catalog, dashboard, or account page.
- Increase Engagement: Redirecting users to promotional pages, product recommendations, or exclusive member content boosts their engagement on your site.
- Personalization: Create a personalized experience by redirecting different user roles to different pages. For example, subscribers can be taken to their subscription page, while admins can be directed to a dashboard.
- Retention and Conversions: A well-placed redirection could result in higher conversions, especially if users are sent to a page with targeted offers or featured products.
Setting Up WooCommerce Login Redirect
To set up a WooCommerce login redirect, you need to have the WooCommerce plugin installed and configured on your WordPress site. WooCommerce is the foundation of your eCommerce store, and it must be fully functional to apply login redirects.
Next, you will need the ProfilePress plugin to implement custom login redirects. This plugin is an all-in-one solution for creating and managing user registration, login, password reset forms, and membership sites. It integrates seamlessly with WooCommerce, allowing site administrators to customize user login redirects, registrations, and more.
Follow the steps below to install the ProfilePress plugin and set up WooCommerce login redirects.
Install and Activate ProfilePress Plugin
To get started, you’ll need to purchase a ProfilePress license. Visit the ProfilePress website and choose the pricing plan that best fits your requirements.
Once you’ve completed your purchase, you’ll receive an email with the plugin download link and your license key. Alternatively, you can download the plugin directly from your account page on the ProfilePress website.
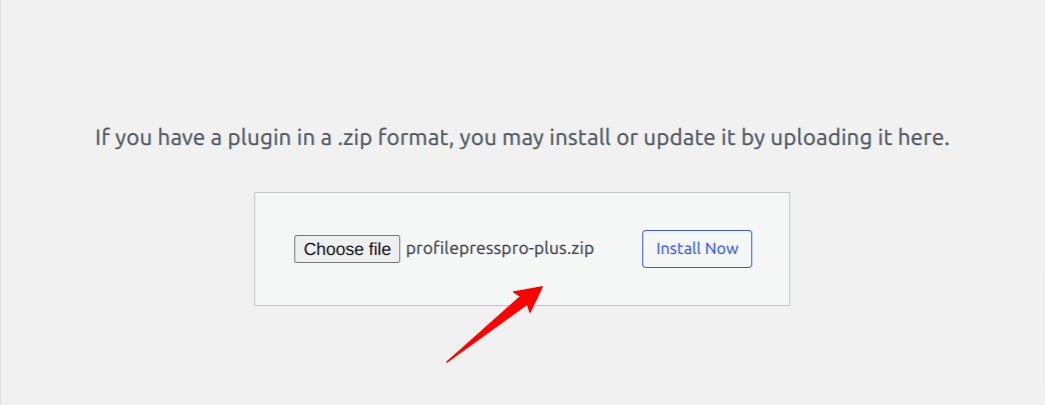
Next, log in to your WordPress admin dashboard and navigate to Plugins > Add New. Then, click Upload Plugin, select the ProfilePress zip file you previously downloaded, and click Install Now.
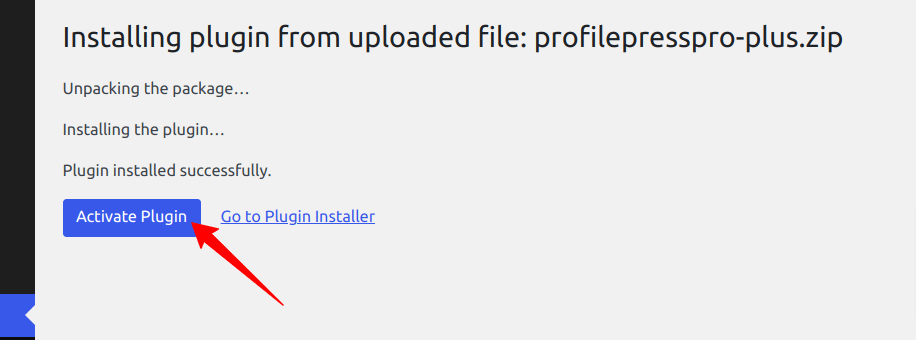
Wait a few seconds for the installation to be completed. Once the plugin is installed, click on Activate Plugin to activate it on your site.
Types of WooCommerce Login Redirects
ProfilePress provides extensive customization options, enabling you to configure login redirects exactly as you need. The plugin allows you to set up four distinct types of login redirects:
- Global redirects, which serve as general, site-wide redirects.
- Membership level redirects that allow redirection based on membership tiers.
- User role-based redirects, where users are redirected based on their specific role.
- Custom shortcode redirects
Let’s explore each of these login redirect setups in more detail.
Global Login Redirects
ProfilePress allows you to set a page or specify a custom URL to redirect all users after they log in to WordPress.
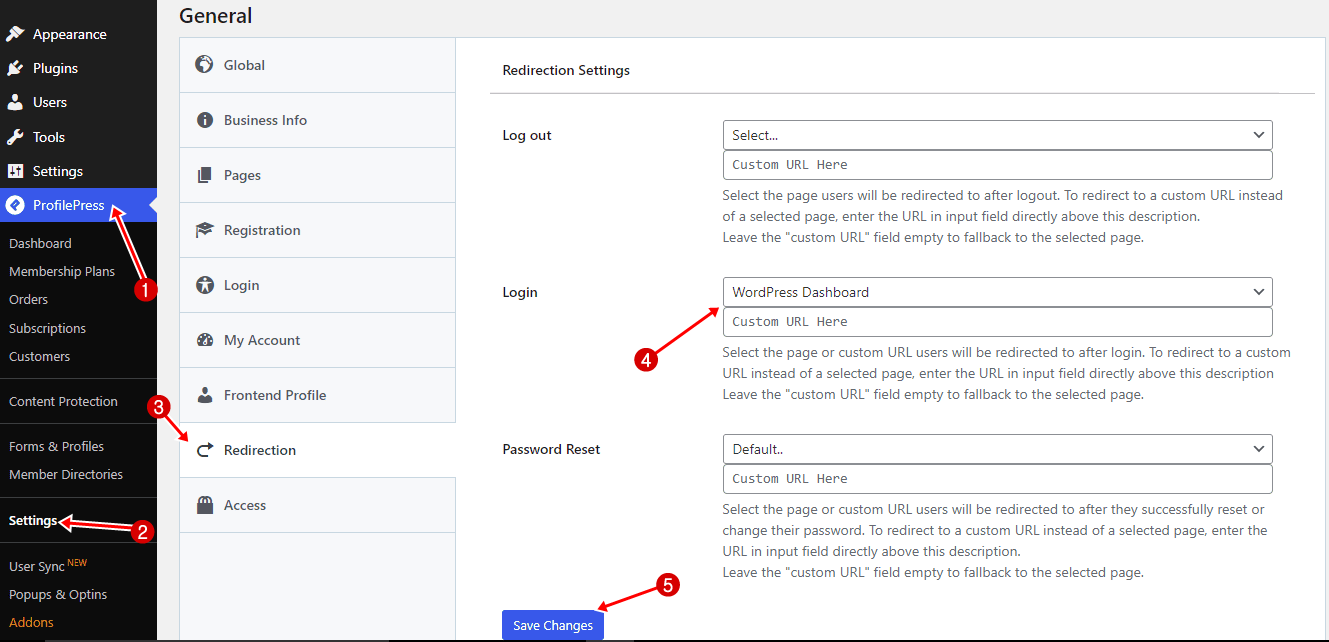
To set up a global redirect, navigate to ProfilePress >> Settings >> Redirection.
In the Login section, you can either enter a custom URL or choose a specific page for the redirect. Once you’ve made your selection, click Save Changes to apply the settings.
Membership Level Login Redirect
With ProfilePress, you can create login redirect rules that redirect users based on their active membership plan after WordPress login. This feature allows you to offer a customized user experience by guiding members to different pages depending on their membership tier.
To set up conditional login redirection based on membership level, go to ProfilePress >> Settings >> Login Redirect in your WordPress dashboard.
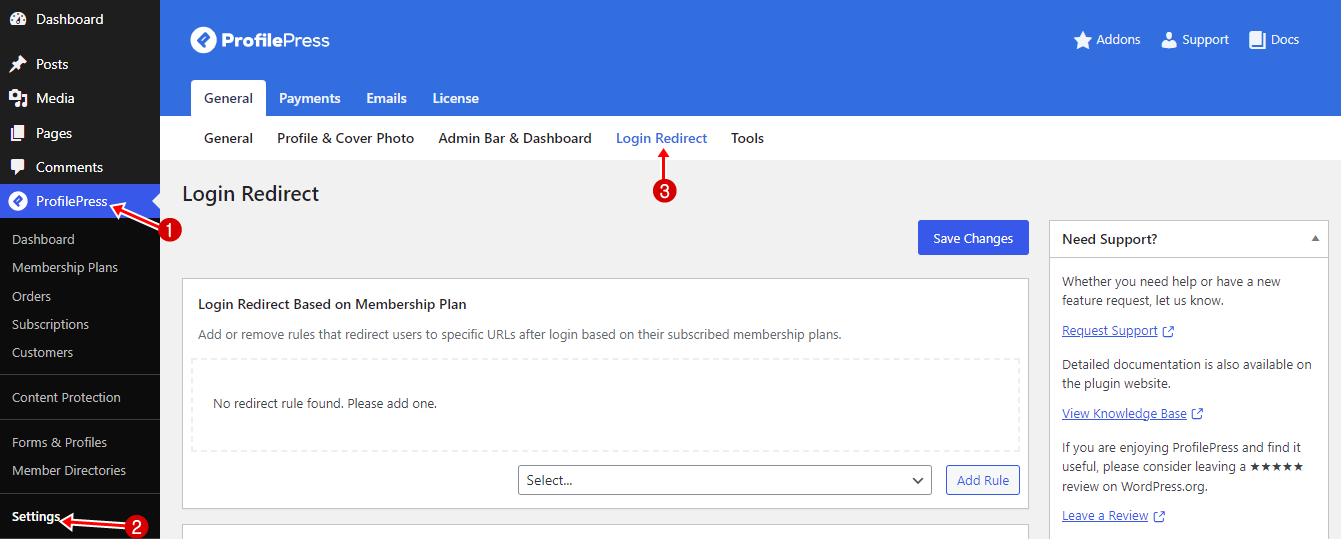
Scroll down to the section labeled “Login Redirect Based on Membership Plan.” This is where you can create redirection rules based on specific membership levels.
At the bottom right corner of this section, select the membership plan you’d like to create a custom login redirect rule. For example, you can set up different redirects for each tier if you have multiple membership tiers (e.g., Bronze, Silver, Gold).
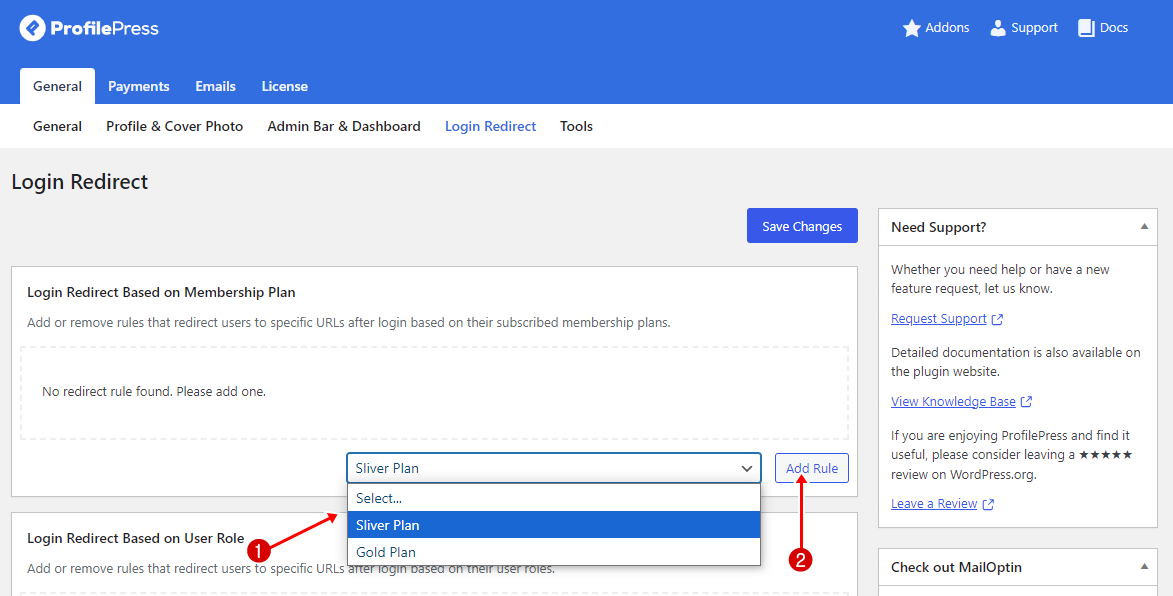
Click the Add Rule button to begin configuring your redirect.
In the rule settings, enter the URL path or slug where you want the user to be redirected after they log in to WooCommerce. This could be a welcome page, exclusive content, or a members-only product section.
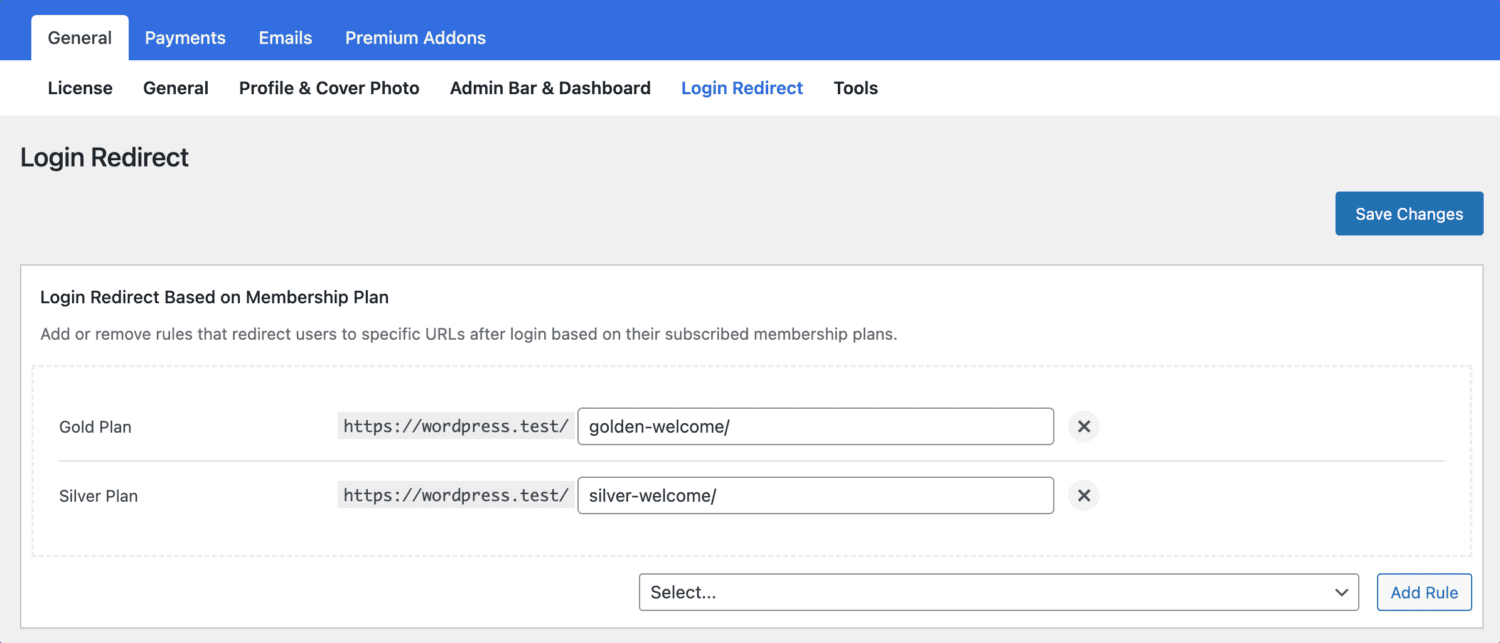
In the screenshot above, WordPress users subscribed to the Gold plan will be redirected after login to https://wordpress.test/golden-welcome/, while those subscribed to the Silver plan to https://wordpress.test/silver-welcome/.
Role-Based WooCommerce Login Redirects
ProfilePress also allows you to create WooCommerce login redirects based on specific user roles in WordPress. This feature is handy for websites with multiple user roles.
By redirecting users based on their role (e.g., customer, shop manager, administrator), you can guide them to the most relevant page after login, enhancing their overall experience and ensuring they access the right content quickly.
To set up user role-based login redirects for WooCommerce, navigate to ProfilePress >> Settings >> Login Redirect in your WordPress dashboard.
Scroll down to the section labeled “Login Redirect Based on User Role.” This is where you’ll configure redirection rules for different WordPress roles such as admin, editor, customer, subscriber, etc.
At the bottom right corner of this section, you’ll see a dropdown menu listing the various user roles on your site. Select the specific role you want to set up a login redirect.
After selecting the desired user role, click the “Add Rule” button. This action opens a new rule configuration specific to that role.

In the new rule setup, enter the URL path or slug where you want the selected user role to be redirected upon login.
Once you’ve defined the redirect URL, click Save Changes to ensure your configuration is applied.
Custom Shortcode Redirects
ProfilePress also offers the flexibility to redirect users after login or registration by specifying a URL within your custom WooCommerce registration and login form shortcodes. This feature is helpful for developers or site administrators who prefer to embed forms on specific pages while maintaining control over the redirection process without modifying general settings.
How Custom Shortcode Redirects Work
Custom shortcode redirects allow you to set up unique redirection paths directly within the shortcode used to create login or registration forms. Adding a “redirect” attribute to the shortcode lets you define where users are sent after logging in or registering. This method provides an added layer of customization and precision, ensuring that different forms on different pages can lead to specific destinations.
Examples
In the shortcode below, users who log in via the login form will be redirected to https://xyz.com/welcome after the WooCommerce login. This is because the URL was specified in the “redirect” attribute of the login form shortcode.
[profilepress-login id="2" redirect="https://xyz.com/welcome"]Similarly, for registration pages, use the ProfilePress-registration shortcode with the redirect attribute to guide users to a specified URL after successful registration:
[profilepres-registration id="1" redirect="https://xyz.com/welcome"]In cases where you prefer users not to be automatically logged in before redirection, modify the attribute to “no-login-redirect” like so:
[profilepress-registration no-login-redirect="https://xyz.com/welcome"]To redirect users to the previous page they were on after they are auto-logged-in, replace the “redirect” attribute with “previous_page” like this:
[profilepress-registration redirect="previous_page"]Set Up Login Redirect for WooCommerce Right Away!
By following this guide, you can seamlessly set up login redirects for your WooCommerce WordPress site, whether you’re redirecting users based on their user roles and membership plans or via a custom WordPress login form.
Implementing these WooCommerce login redirects improves user experience and helps increase engagement, retention, and, ultimately, conversions on your store. The ProfilePress plugin makes this process easy, giving you complete control over your users’ journey from login to logout.
Get the ProfilePress plugin today and start redirecting your users to the perfect page after logging in to WooCommerce.