How to Accept Credit Card Payments in WordPress With Stripe
Do you want to accept credit card payments on WordPress? This guide will show you how to accept credit card payments today!
As a business owner who sells physical or digital products, you will need a way to get paid, and one of the best ways to get paid online is through a payment gateway like Stripe.
The WordPress platform does not come with credit card payment processing or any form of payment processing, so to start accepting payments, you need to use a WordPress payment plugin.
In this guide, you will learn how to start accepting credit card payments in WordPress with Stripe using a payment plugin you can trust completely.
Requirements for Accepting Credit Card Payments with Stripe
Credit card payment is one of the most preferred modes of payment for online shoppers because it is convenient and secure. But before you can start accepting card payments with Stripe, there are some requirements that you need to fulfill.
1. SSL – Secure Sockets layer (SSL) is the primary security method for the web. SSL encrypts all data transferred to and from your website. It will help encrypt and safeguard your customers’ credit card information and other details when transferred.
So, a secured connection via SSL is mandatory if you want to start accepting credit card payments. Luckily, most web hosting companies offer free SSL certificates, and they can easily install this for you. It is a simple but essential process before integrating Stripe into your website.
2. Stripe Account – You will need to create a Stripe account before accepting payments with Stripe. Creating a Stripe account is straightforward. You can head to their website to fill out the signup form with the necessary information, and your account will be created.
3. Payment Plugin – as I said earlier, WordPress does not come with any payment processing feature. Therefore, you need a reliable WordPress payment plugin to handle your payment processing.
The plugin you choose should be flexible, support multiple payment options, and fit your specific needs. This will help you provide customers with the best payment/checkout experience regardless of their payment method.
There are a lot of WordPress plugins for Stripe, but in this guide, we will use the powerful ProfilePress plugin.
ProfilePress is an eCommerce and WordPress membership plugin that allows you to build powerful eCommerce websites. It is one of the best WordPress credit card payment plugins, and it offers a simple and easy way to start accepting credit card payments on your website.
It supports sales of digital and physical products, and its eCommerce functionality can be further enhanced by integrating it with Woocommerce, one of the most popular eCommerce plugins. Some of its features include:
- Multiple Payment Gateways
- Multiple modes of payments
- Support for physical and digital products
- Coupons and discounts functionality
- PDF Receipt
- Email marketing
- Optimized Checkout
- Easy Paywall Setup
- And more.
Now that you know which payment plugin to use, let’s start installing and activating ProfilePress, integrating the Stripe gateway, and using it to create payment forms on your WordPress site.
Install and Activate ProfilePress
The first step in this process is to install and activate the ProfilePress plugin. You will need to purchase a ProfilePress Pro License and install the ProfilePress plugin. To do that, go to the ProfilePress website to purchase a suitable license plan.
After purchasing your copy of the ProfilePress Plugin, you will receive a confirmation email with a link to download the plugin zip file and your license key. You can also download the plugin from your account page on the ProfilePress website.
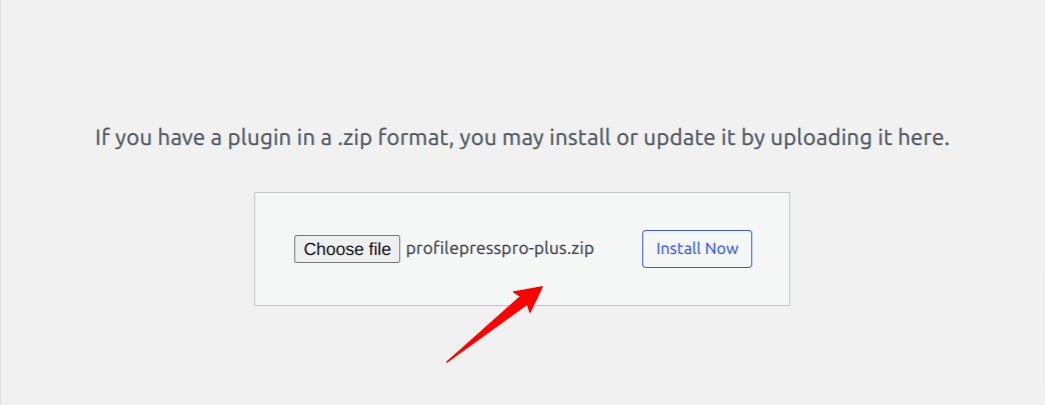
Once you have downloaded the plugin, login to your WordPress admin dashboard, and navigate to the Plugins page; click on the “Add New” button and click “Upload Plugin“.
Next, click “Choose file” to select the previously downloaded plugin zip file. Click “Install Now.”
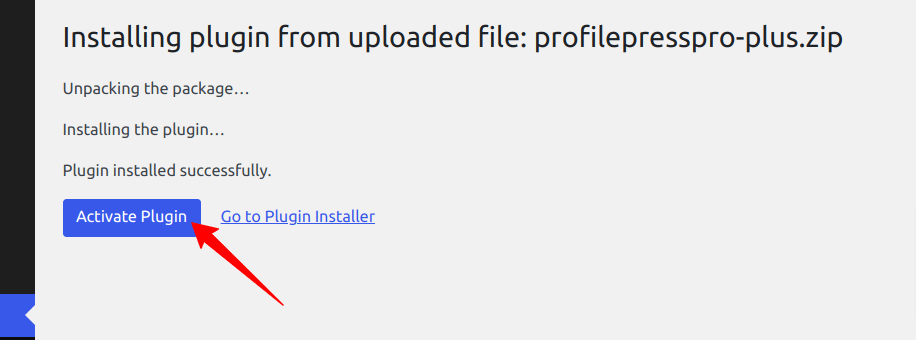
After installation is complete, click the Activate Plugin button.
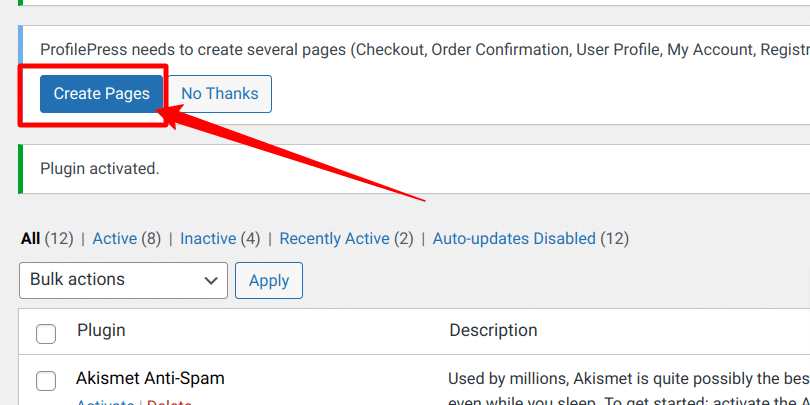
At the top of the page, you will see a notification that says, “ProfilePress needs to create several pages,” Click on the “Create Pages” button to complete the plugin setup.
If you do not see this notification, navigate to ProfilePress > Dashboard and click the “Create pages” button to complete the plugin setup.
With this done, we have completed the initial setup of the ProfilePress plugin on our WordPress site.
Integrate Stripe Payment Gateway in WordPress
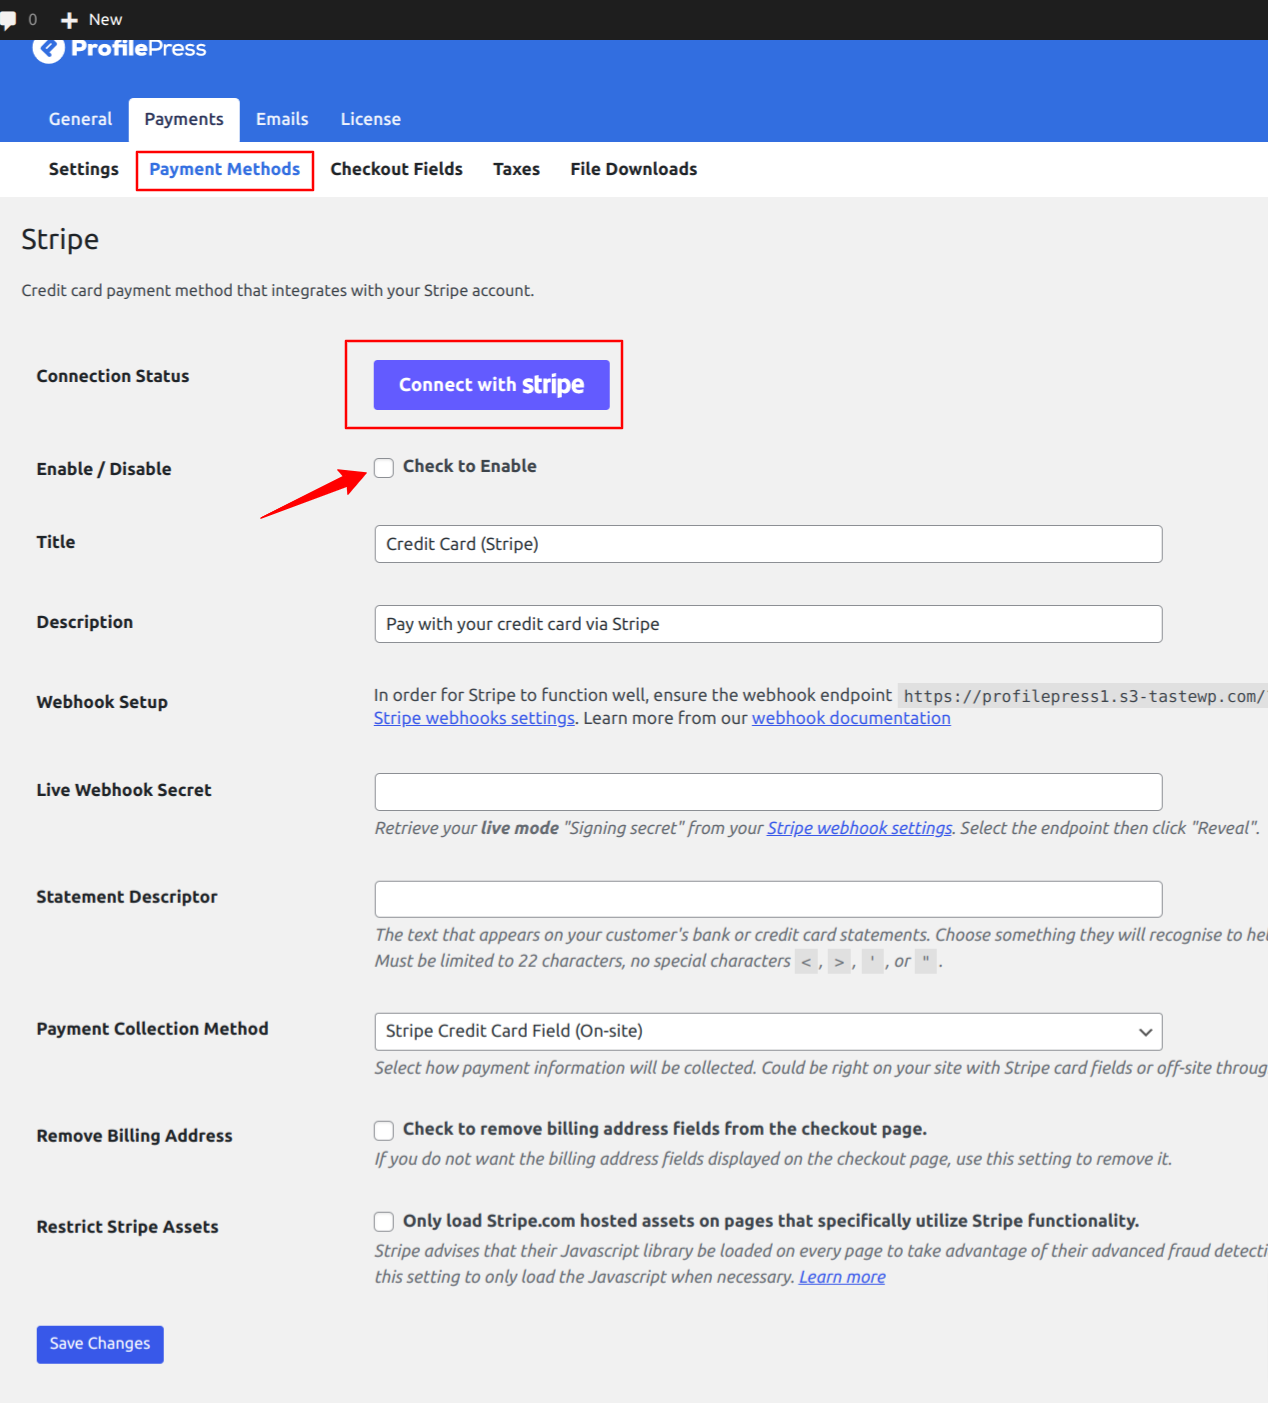
After installing and setting up ProfilePress, the next step is to set up the Stripe Payment gateway for our WordPress payment forms. You can configure the Stripe payments on your site by navigating to ProfilePress > Settings > Payments > Payment Methods and choosing Stripe.
Click on the “Connect Stripe” button, follow the prompts, and you are all set to start accepting payments from your customers.
Create Checkout and order Confirmation Pages
The checkout page lets customers enter payment and billing details before purchasing your product or subscription plan. In contrast, the order confirmation page displays the order details, including the order status and amount paid.
By default, these pages are created on installation. If they are missing on your site, go to Pages > Add New. Name the page as Checkout and then add the checkout shortcode.
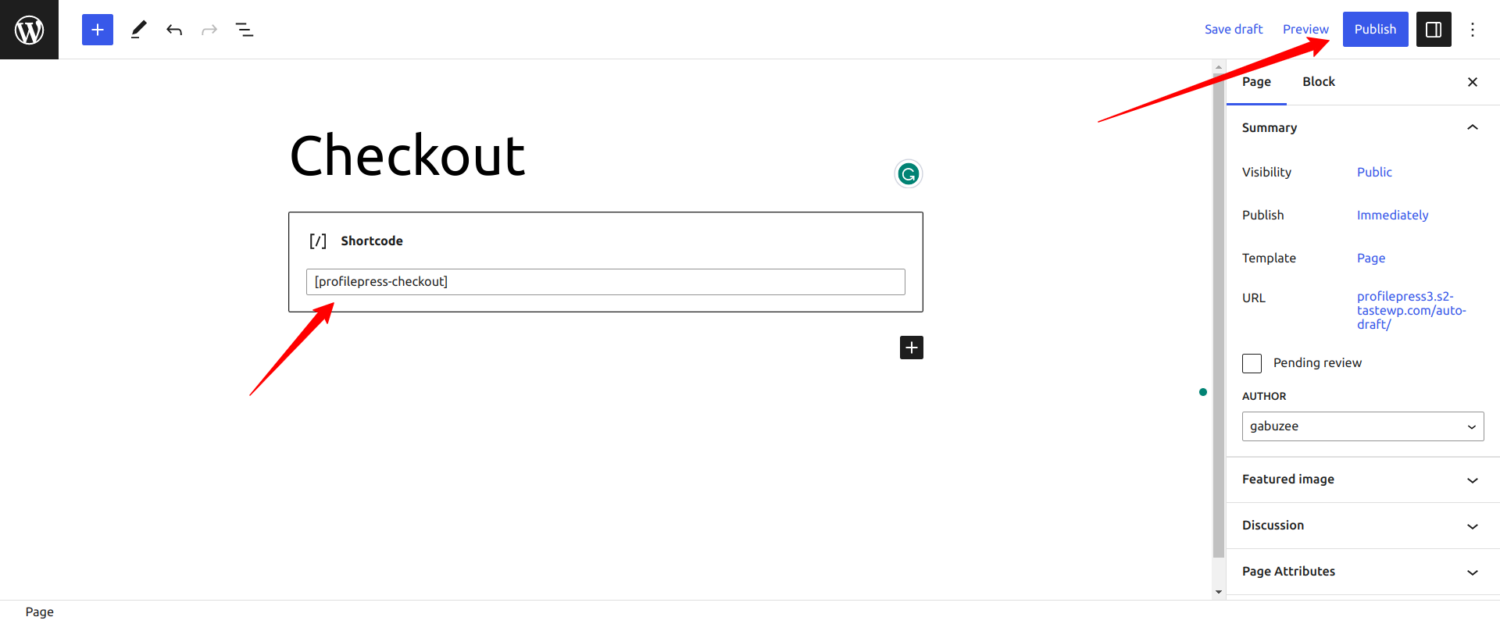
Also, create another page, name it “Order Confirmation” and add the payment receipt shortcode.
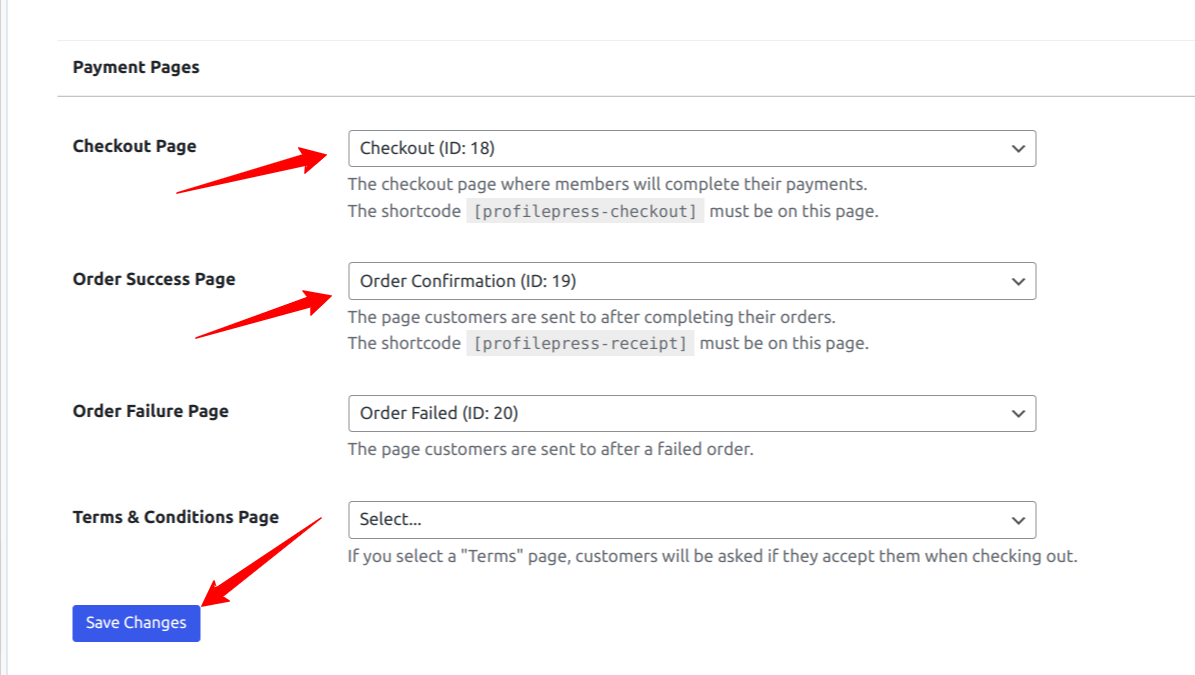
Finally, go to ProfilePress > Settings > Pages. Scroll to the “Payment Pages” section and select the “Checkout Page” and “Order Success Page“.
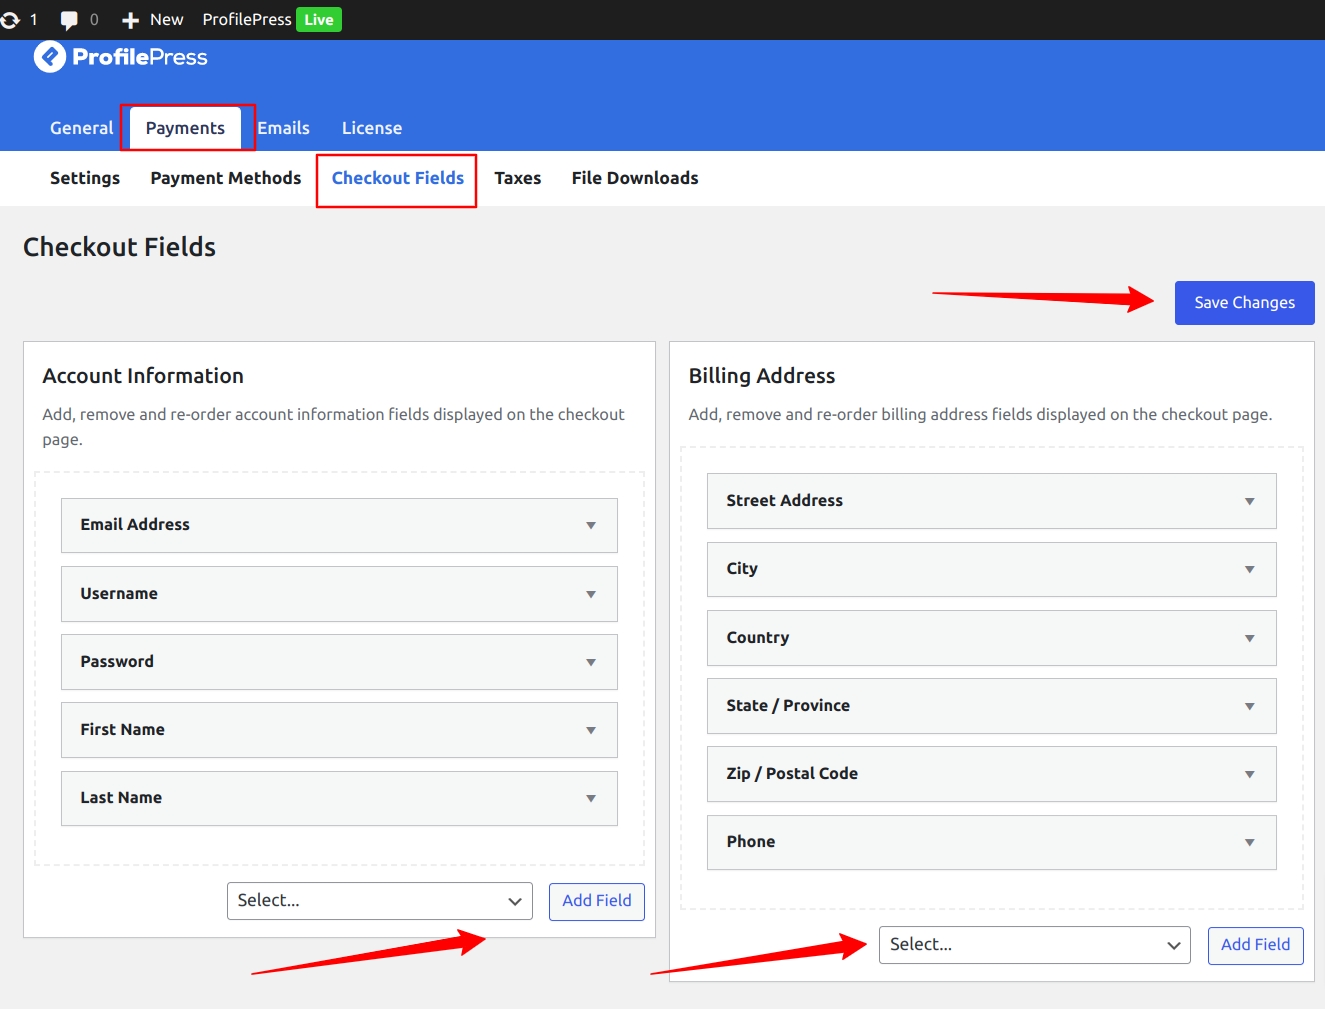
If you wish to modify the checkout fields, navigate to ProfilePress > Settings > Payments > Checkout Fields to add or remove fields according to your need.
Create a WordPress Payment Form
To create a payment form in ProfilePress, you must create a membership plan first. In ProfilePress, a membership plan allows you to sell a product or service. It is a simple way to quickly start selling items on your WordPress site.
In this guide, we will be creating an eBook membership plan. This will allow us to sell our recipe book to our site visitors.
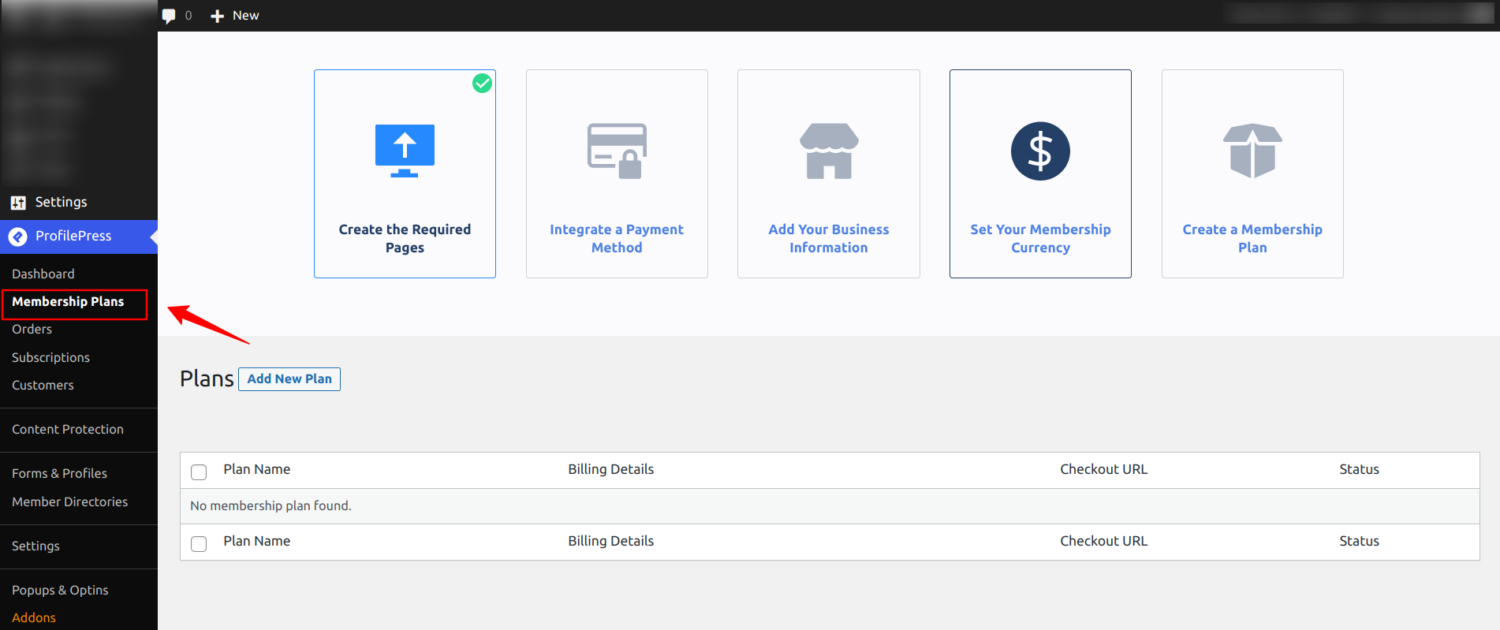
Go to ProfilePress >> Membership Plans to create a new membership plan.
Click on “Add New Plan“, and you will be taken to the page where you can add a plan and set up the details for your product. After filling in the details, set the subscription length, price, and billing frequency you want to associate with this plan.
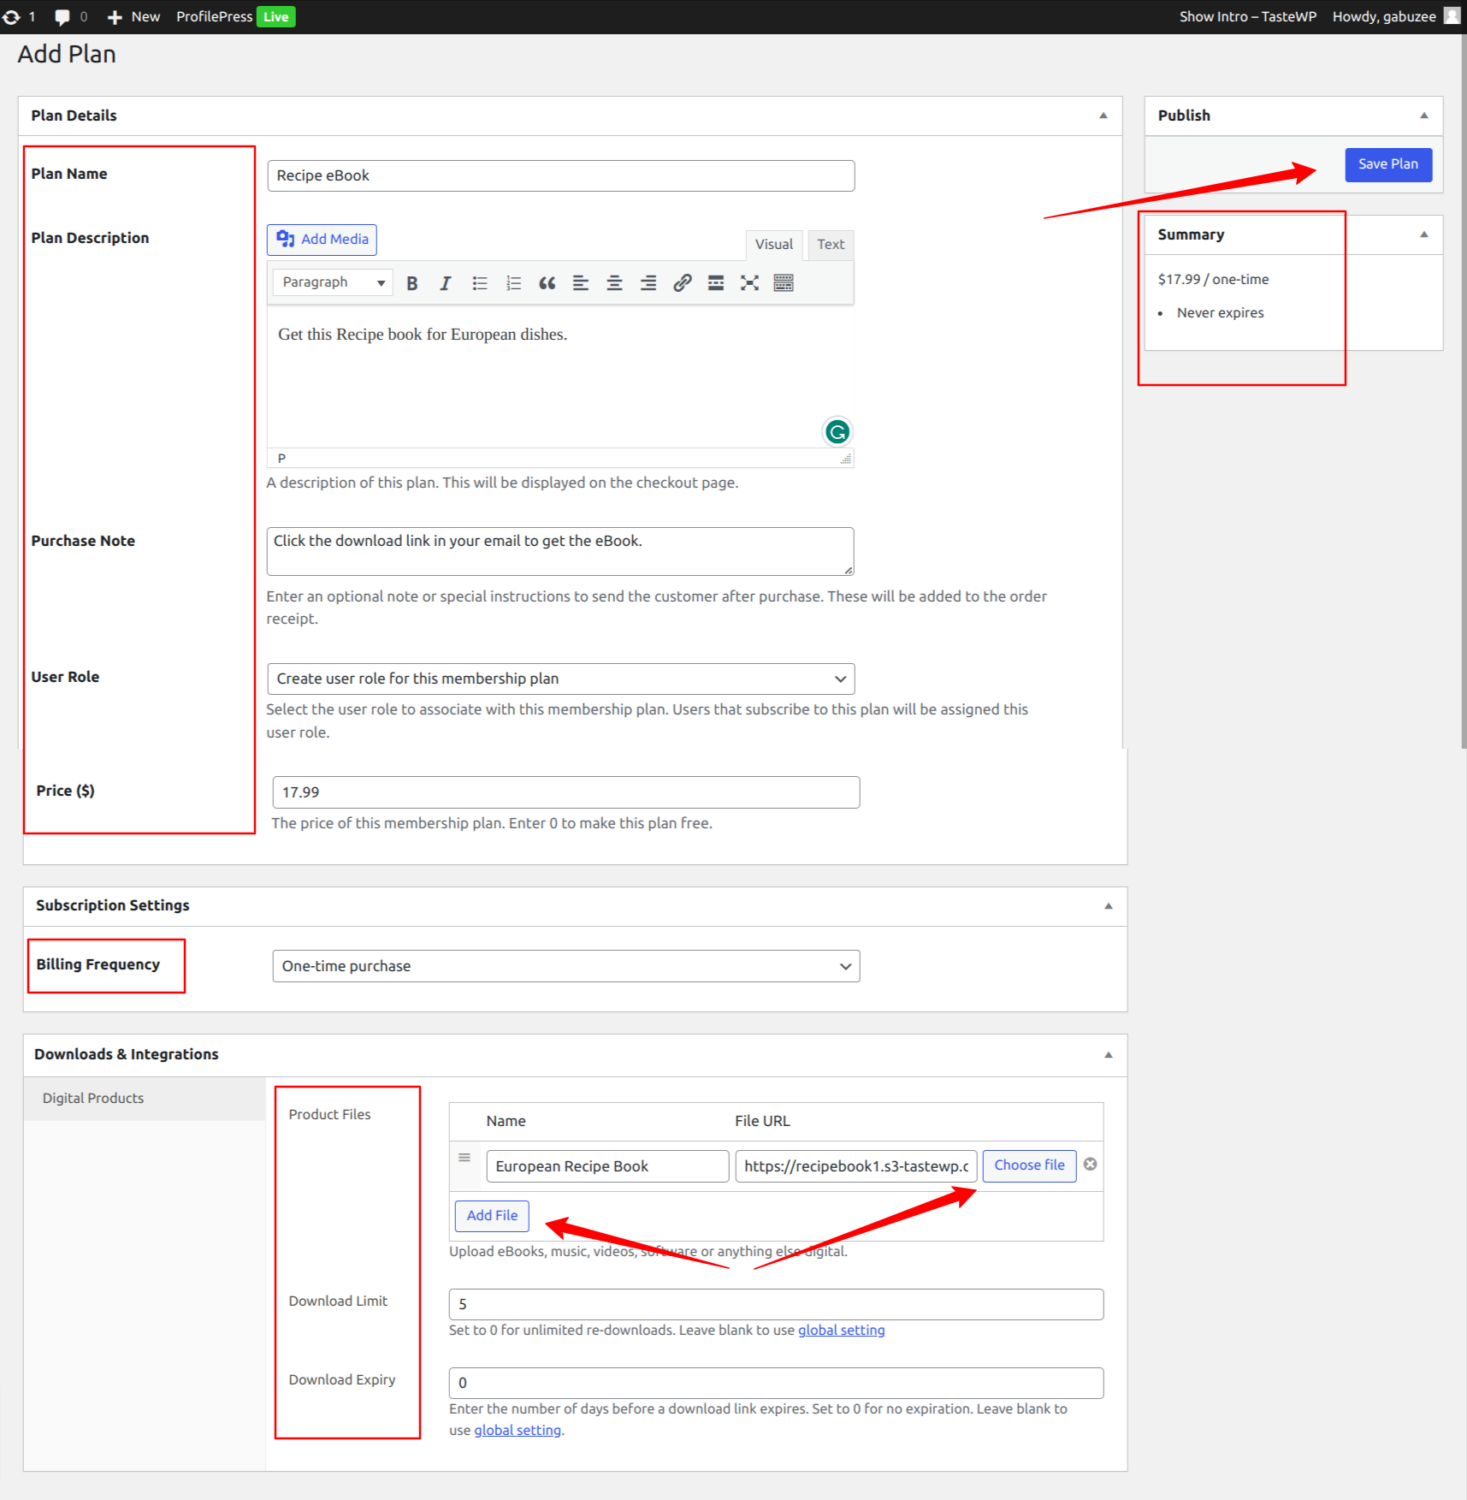
In the Subscription Settings section, you get to select the billing frequency. You can ask your potential customers for a one-time payment or allow them to subscribe to a recurring payment plan.
In the subscription length option, customers can renew indefinitely until they cancel or set a fixed number of payments. You can offer a free trial and a one-time signup fee, depending on your business type.
Once you are done editing the membership plan, click the “Save Plan” button to save your changes. You can create more than one plan by following the above steps.
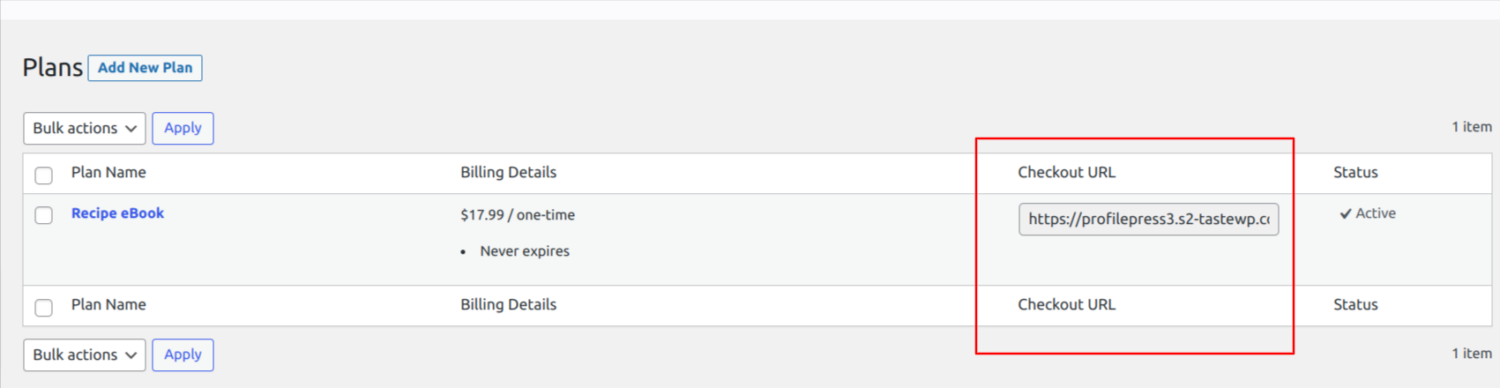
Every membership plan includes a checkout link to add to your product landing page or pricing page where users can purchase the product.
Go to ProfilePress > Membership Plans, and you should see a checkout page link associated with the membership plan we created above.
Add the WordPress Payment Form to Your Site
Now that we have created a product for sale and have a checkout URL allowing our customers to pay for our product, we set up our site so that users can find their way to the payment form on our checkout page.
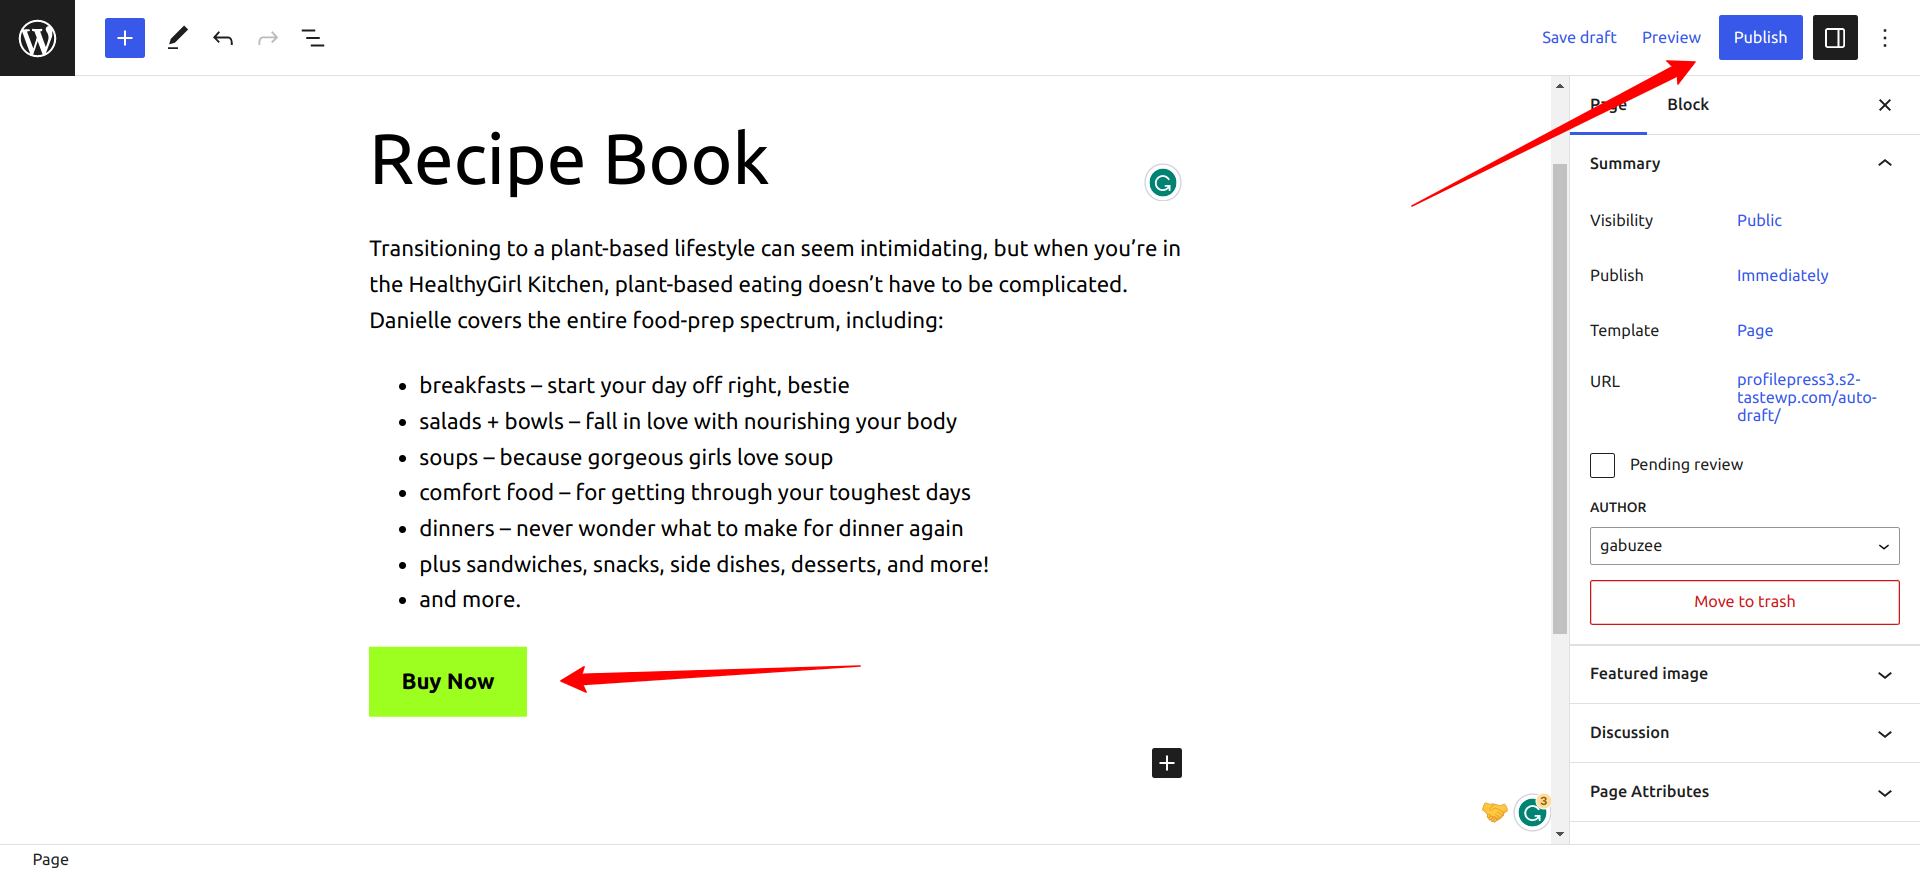
So, we will create a landing page for our eBook and then add a “Buy Now” button to redirect our users to the payment form when they click on it.
Navigate to Pages > Add New, enter a title for the page – Recipe Book, add some information about the product, and then insert a button block with a “Buy Now” text.
Next, click the link icon on the button and paste your checkout URL in the link field.
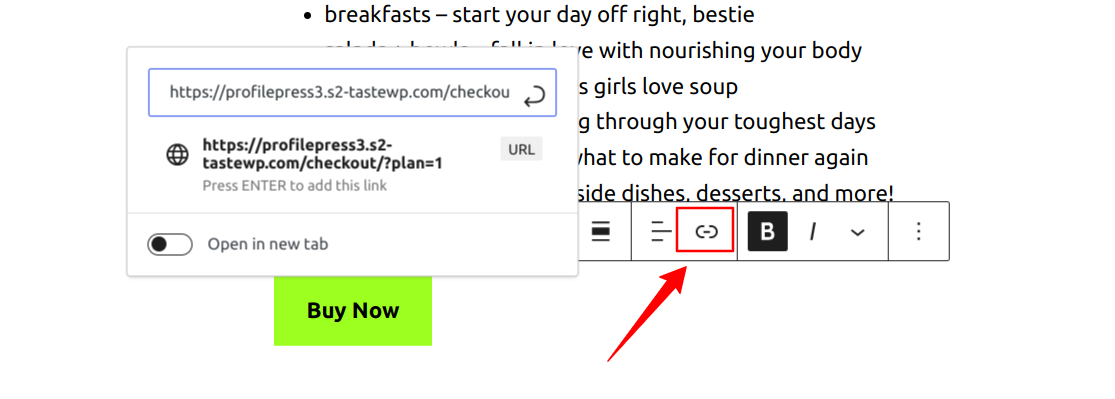
This will ensure that users are redirected to the Stripe payment form when they click the buy button to complete their purchase. Alternatively, you can use hyperlinked text to the checkout page.
It is important to include the checkout URL somewhere on your site where your visitor can find it.
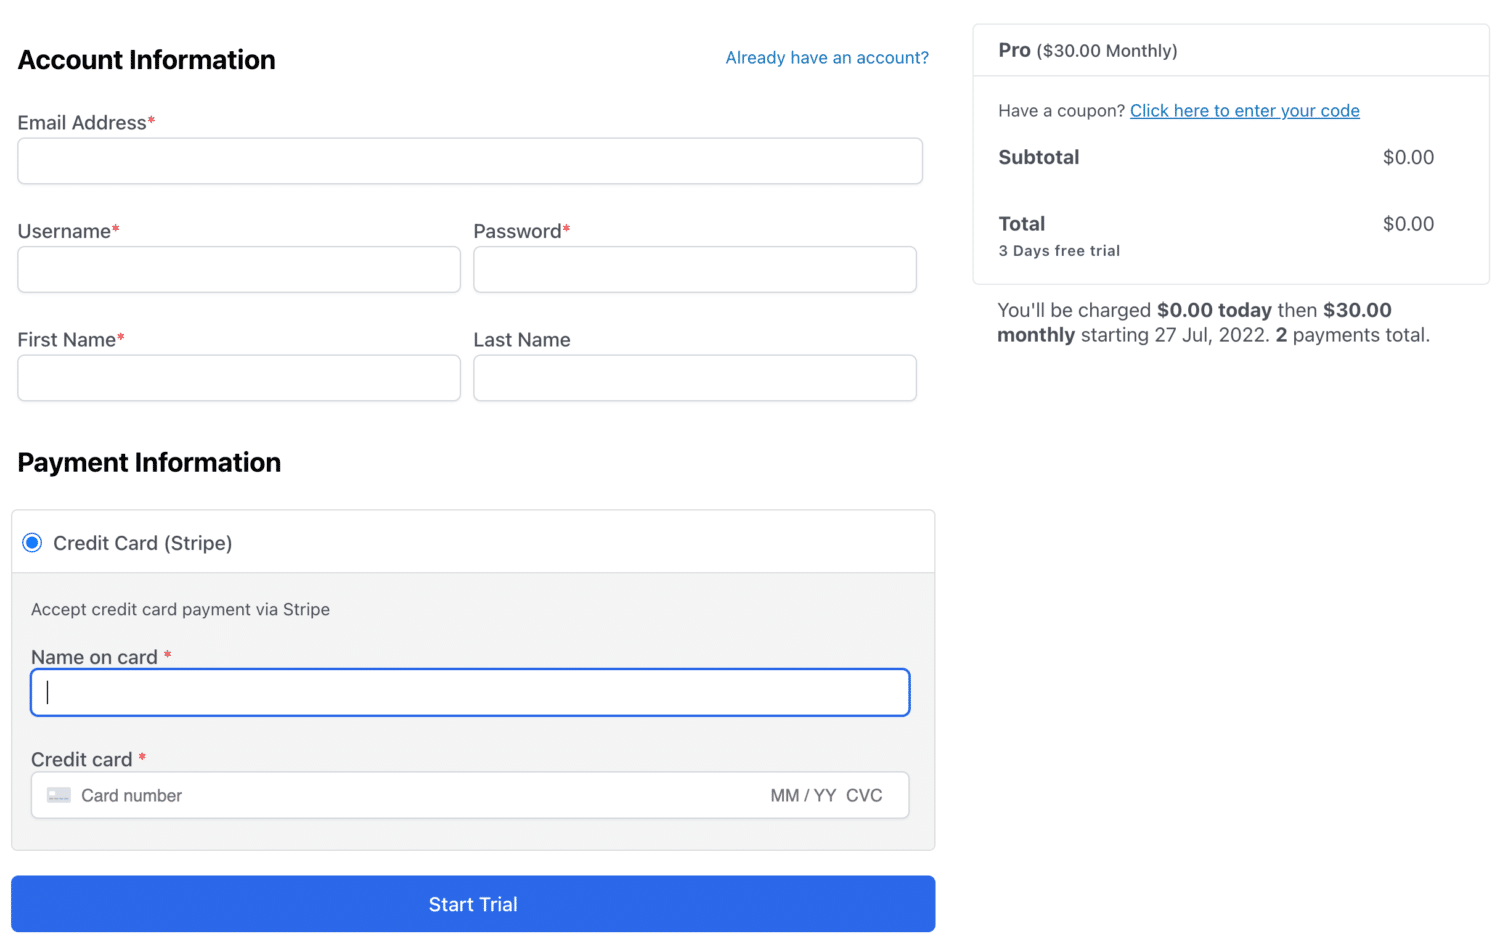
As you can see in the image above, the payment form allows us to collect personal information about the customer and enable them to make payments with their credit card using Stripe.
This is how simple it is to start accepting credit card Payments with Stripe in WordPress with the ProfilePress plugin.
Final Words
Accepting credit card payments on your WordPress site does not have to be complex. You can quickly achieve this with the help of a payment plugin like ProfilePress.
ProfilePress is one of the most powerful payment plugins for WordPress sites. It is easy to set up and allows you to accept credit card payments within a few minutes.
Aside from Stripe, ProfilePress also supports other payment gateways, allowing you to ensure you have a payment option for all your customers regardless of their preferences.