How to Set Up WordPress for Google, Bing & Yandex Indexing
Do you want to set up WordPress for instant indexing in Google, Bing, and Yandex?
CrawlWP is a WordPress SEO plugin that automatically notifies search engines when content is published, updated, or deleted. Instead of waiting for search engines to discover your content through sitemaps (which can take days or weeks), CrawlWP actively pings them immediately.
The plugin integrates with three main systems:
- IndexNow Protocol – Notifies Bing, Yandex, Naver, Seznam.cz, and Yep
- Google Indexing API – WordPress posts and pages submission to Google
- Bing URL Submission API – Redundant Bing submission (IndexNow already covers Bing)
Based on user reports and official CrawlWP documentation, pages typically get indexed within 24-48 hours of submission, compared to the traditional 5-14-day wait.
Before You Start: What You’ll Need
Required:
- WordPress site
- CrawlWP plugin (free or paid version)
- Google account
- Bing Webmaster Tools account (free)
Optional:
- Yandex Webmaster account (only if targeting Russian/Eastern European markets)
Time Required:
- IndexNow setup: 2-5 minutes
- Google Indexing API setup: 15-25 minutes
- Bing API setup: 5 minutes (optional, IndexNow already covers Bing)
- Yandex setup: Skip unless you need it (IndexNow covers Yandex)
Part 1: Installing and Activating CrawlWP
Step 1: Install CrawlWP
Log in to your WordPress admin dashboard.
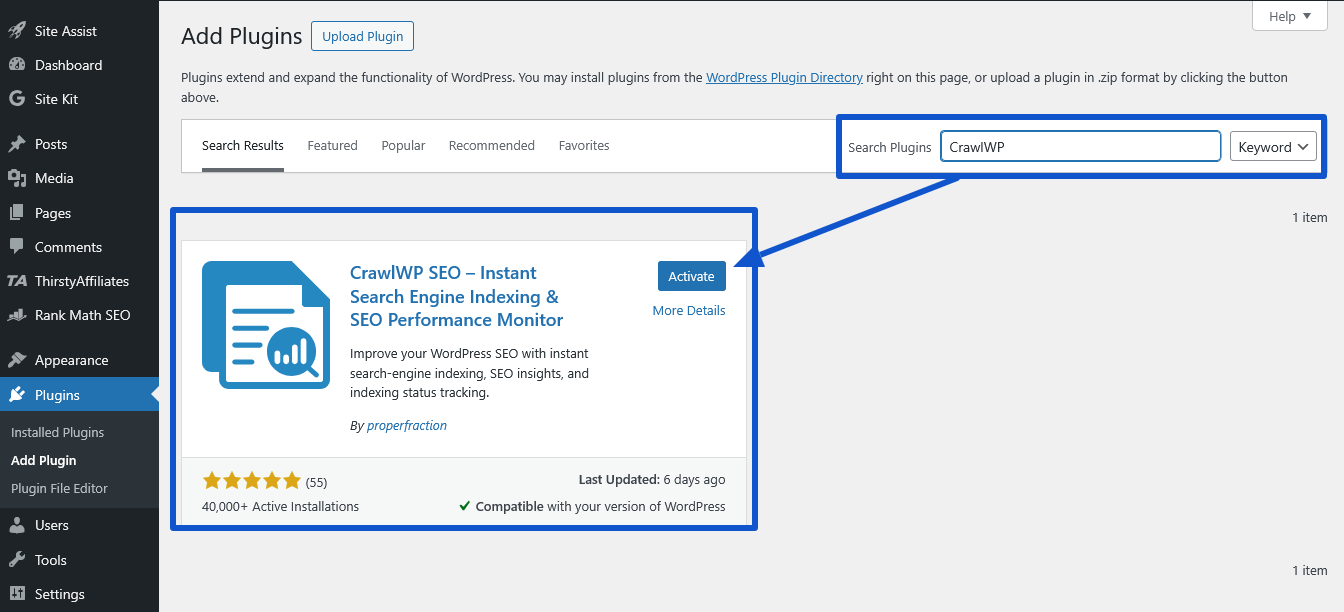
Go to Plugins → Add New.
In the search bar, type “CrawlWP”.
Click Install Now, then Activate.
Alternatively, download from crawlwp.com or WordPress.org, then upload via Plugins → Add New → Upload Plugin.
Step 2: Access CrawlWP Settings

After activation, you’ll see CrawlWP in your WordPress sidebar.
Click CrawlWP → Settings.
You’ll see multiple tabs:
- General Settings
- API Settings (where we’ll connect to search engines)
- Indexing
Part 2: Configuring General Indexing Settings
Before connecting to search engines, configure which WordPress content types should be submitted for indexing to Google, Bing, Yandex, Yep, and others.
Step 1: Select Post Types
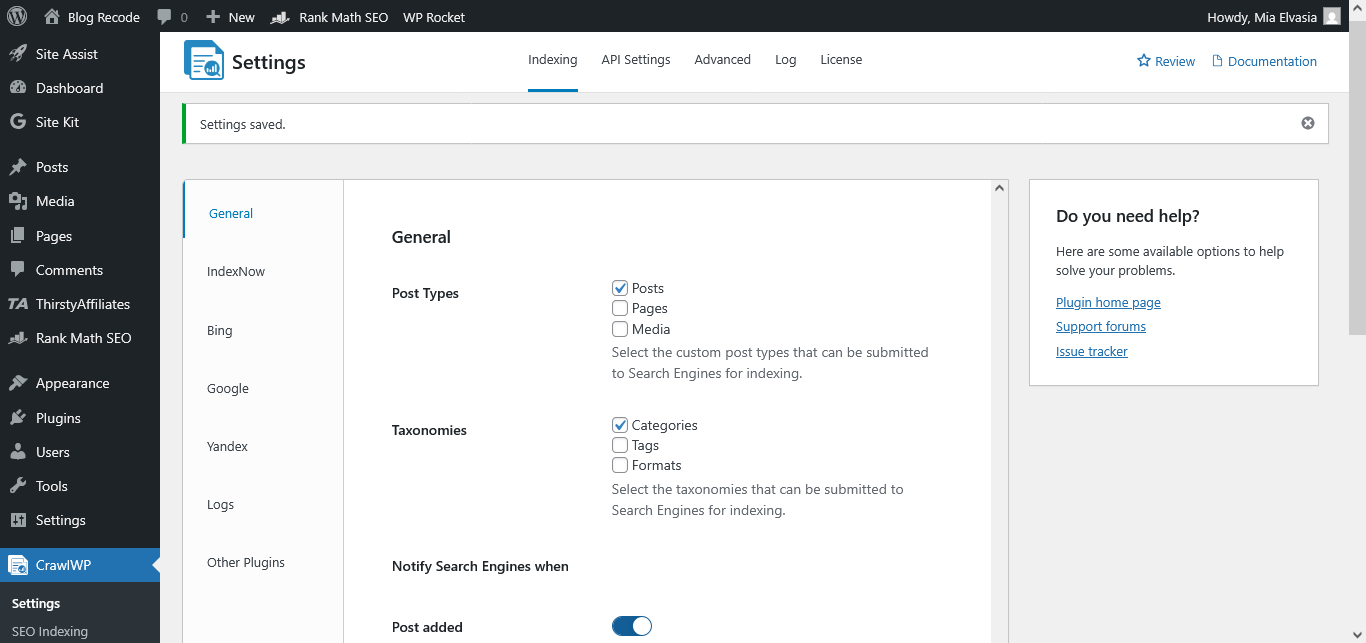
Navigate to CrawlWP → Settings → Indexing → General.
Under Post Types, check the boxes for the content you want indexed:
- ✅ Posts
- ✅ Pages
- ✅ Custom Post Types (if applicable – products, courses, events, etc.)
Recommendation: Enable all public-facing content types. Don’t enable admin pages, media attachments, or internal content.
Step 2: Configure Notification Triggers
Under Notify Search Engines When, select:
- ✅ Post Published (new content)
- ✅ Post Updated (content changes)
- ❌ Term Added (optional – for category/tag creation)
Recommendation: Enable publish and update notifications. Leave term notifications disabled unless you specifically need them.
Click Save Changes.
Part 3: Setting Up IndexNow (Easiest – Start Here)
IndexNow is the simplest setup and supports multiple search engines (Bing, Yandex, Naver, Seznam.cz, Yep) with a single configuration.
Step 1: Enable IndexNow

Navigate to CrawlWP → Settings → Indexing → IndexNow.
Toggle Enable IndexNow to ON.
Step 2: Generate API Key
You’ll see a field labeled API Key.
The API key must be between 8 and 128 hexadecimal characters (only lowercase letters, uppercase letters, numbers, and dashes).
Click the “Show example” link below the field.
CrawlWP will automatically generate a valid key (example format: a1b2c3d4e5f6g7h8i9j0k1l2m3n4o5p6).
Copy this generated key and paste it into the API Key field.
Step 3: Select Search Engine Endpoint
Under Search Engine, select any option from the dropdown:
- Bing
- Yandex
- IndexNow.org
Important: It doesn’t matter which you choose. IndexNow is a shared protocol, so pinging any endpoint notifies ALL participating search engines.
Recommendation: Select Bing (most reliable endpoint based on user feedback).
Step 4: Save Settings
Click Save Changes at the bottom of the page.
That’s it for IndexNow. Every time you publish or update content, CrawlWP will automatically ping Bing, Yandex, Naver, Seznam.cz, and Yep.
Verification
To verify IndexNow is working:
- Publish a test post
- Wait 1-6 hours
- Check Bing Webmaster Tools → URL Inspection → Enter your test URL
- If Bing received the ping, you’ll see confirmation
Part 4: Setting Up Google Indexing API (Important for Google)
Google doesn’t support IndexNow, so you need their official Indexing API. This is more complex than IndexNow but provides improved Google indexing.
Note: Google officially recommends the Indexing API for job postings and livestreams. However, it works for all content types, and thousands of users successfully use it for blogs, products, and pages. IndexNow and Bing API are completely safe and officially recommended.
Step 1: Create a Google Cloud Project
Open a new browser tab and go to Google Cloud Console.
Sign in with your Google account.
Click the project dropdown menu at the top-left (near the “Google Cloud” logo).
Click New Project.
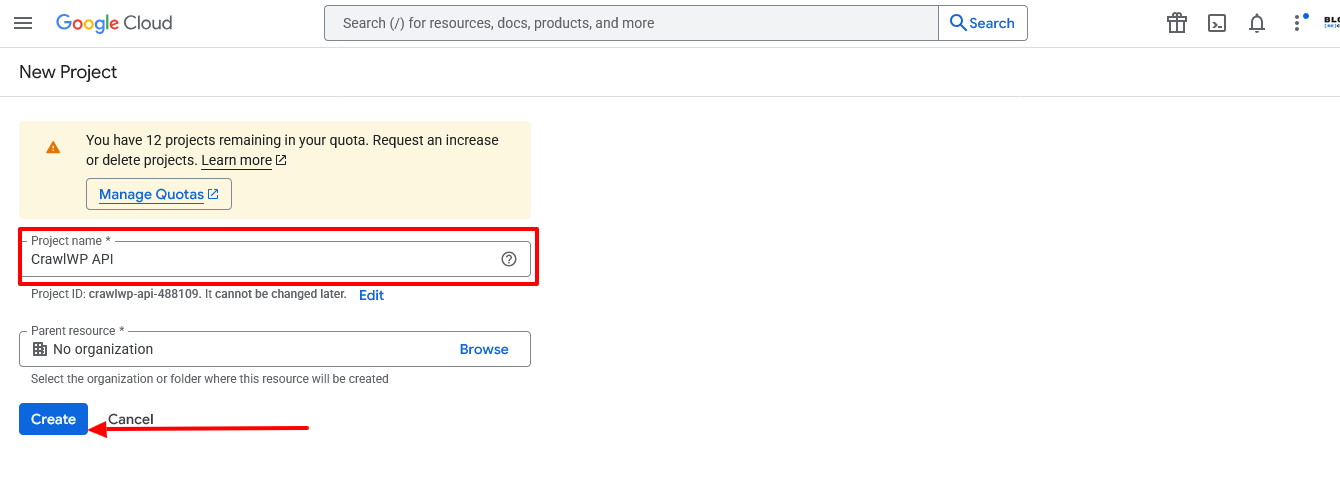
Enter a project name (e.g., “WordPress Indexing” or “CrawlWP”).
Leave Organization blank unless you have one.
Click Create.
Wait 10-20 seconds for the project to be created.
Step 2: Enable Required APIs
After selecting your new project, you need to enable two APIs.
Guided Setup (Recommended)
Go to this guided setup page: https://console.cloud.google.com/flows/enableapi?apiid=searchconsole.googleapis.com
Follow the prompts to enable the Google Search Console API.
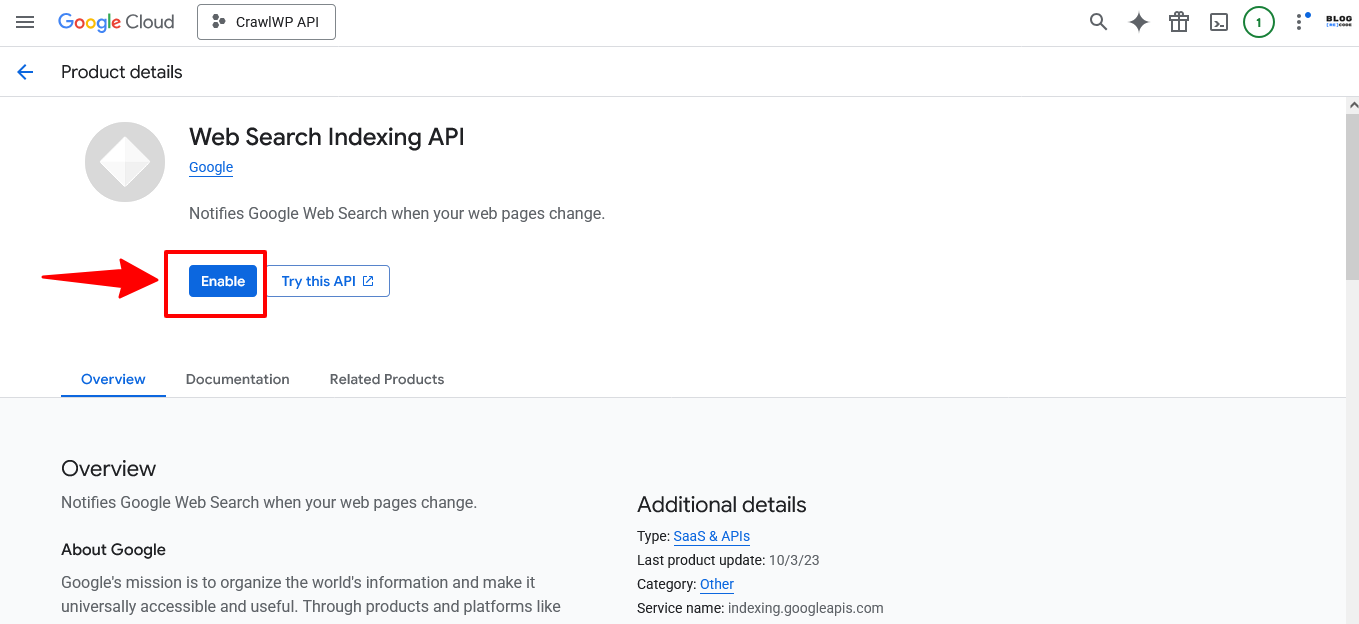
Then visit: https://console.cloud.google.com/flows/enableapi?apiid=indexing.googleapis.com
Follow prompts to enable Web Search Indexing API.
Step 3: Create Service Account
Navigate to IAM & Admin → Service Accounts.
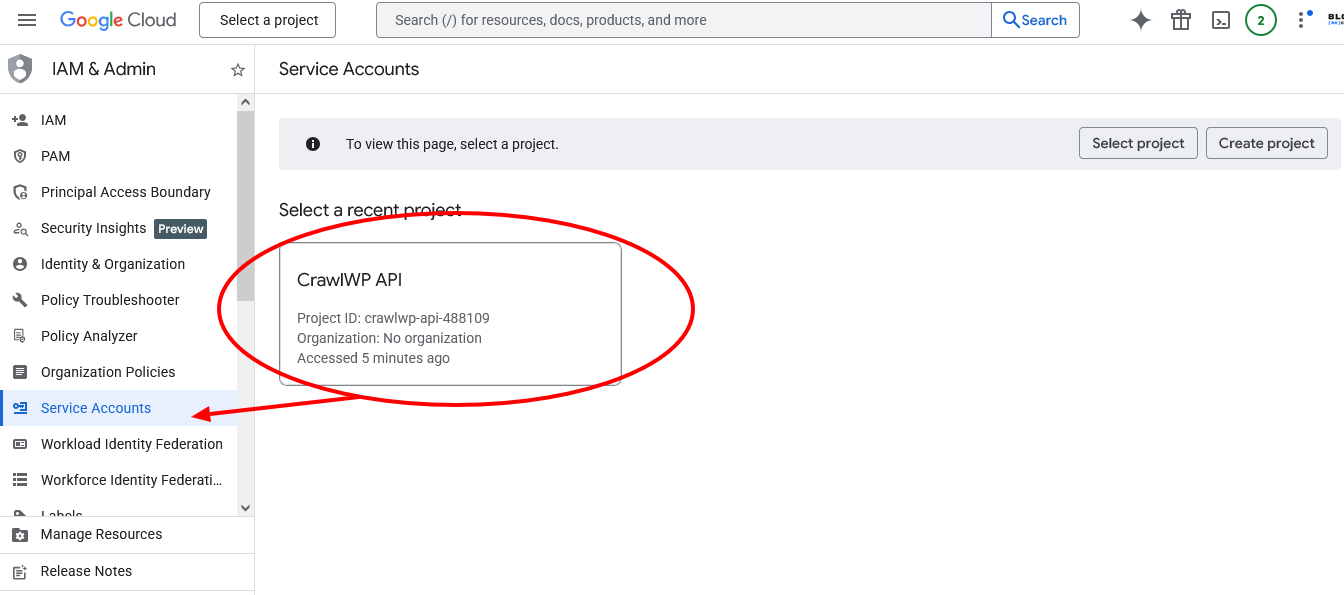
If prompted, select your project.
Click the ” Create Service Account button (top of page).
Service account details:
- Service account name: Enter a descriptive name (e.g., “CrawlWP Indexing”)
- Service account ID: Auto-generated (leave as-is)
- Description: Optional (e.g., “WordPress instant indexing service”)
Click Create and Continue.
Grant access:
- Role: Select Owner from the dropdown menu
Click Continue.
Grant users access to this service account:
- Skip this section (leave blank)
Click Done.
You’ve created the service account.
Step 4: Generate JSON Key File
On the Service Accounts page, find the service account you just created.
Click on the service account email (looks like [email protected]).
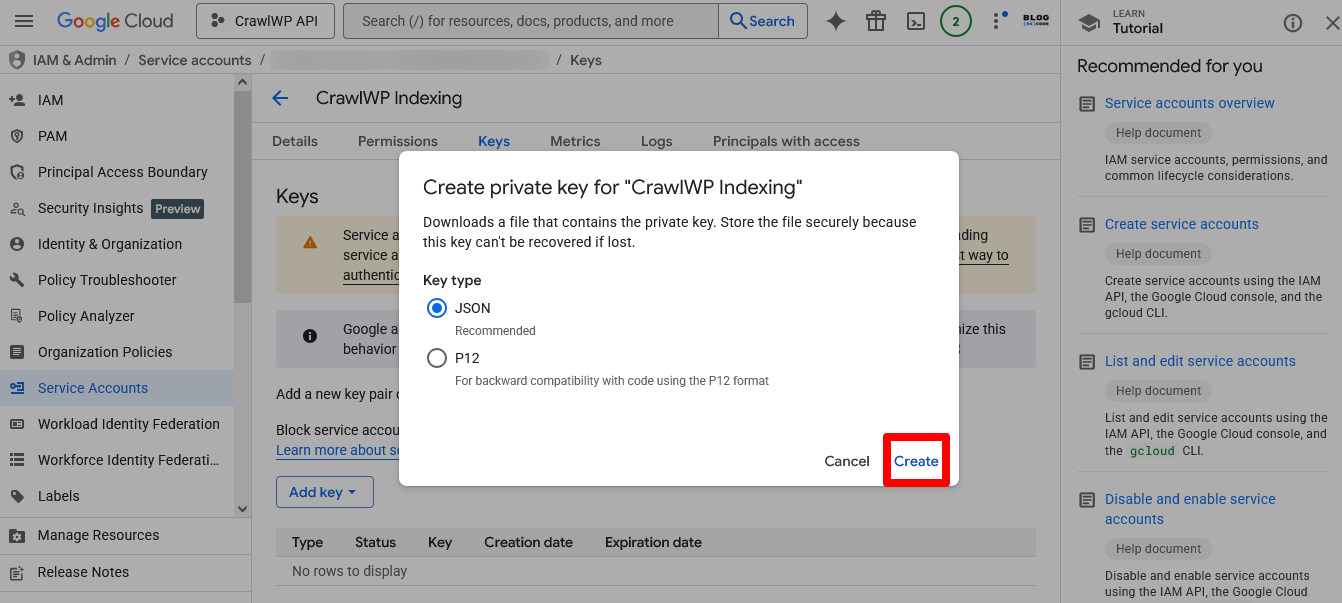
Click the Keys tab at the top.
Click Add Key → Create new key.
Select JSON as the key type.
Click Create.
A JSON file downloads automatically to your computer (filename: your-project-xxxxx.json).
Important: Keep this file secure. You’ll need it in the next step.
Step 5: Add Service Account to Google Search Console
Before CrawlWP can submit URLs, the service account must have permission in Google Search Console.
Open Google Search Console.
Select the property (website) you want to enable indexing for.
Click Settings in the left sidebar (bottom).
Scroll to Users and permissions.
Click Add user.
Email address: Enter the service account email from Step 4 (format: [email protected]).
Copy the email exactly from the JSON file or from the Service Accounts page.
Permission: Select Owner.
Click Add.
The service account now has access to submit URLs for this property.
Important: If you have multiple websites, repeat this step for each property in Search Console.
Step 6: Configure CrawlWP with JSON Key
Return to your WordPress dashboard.
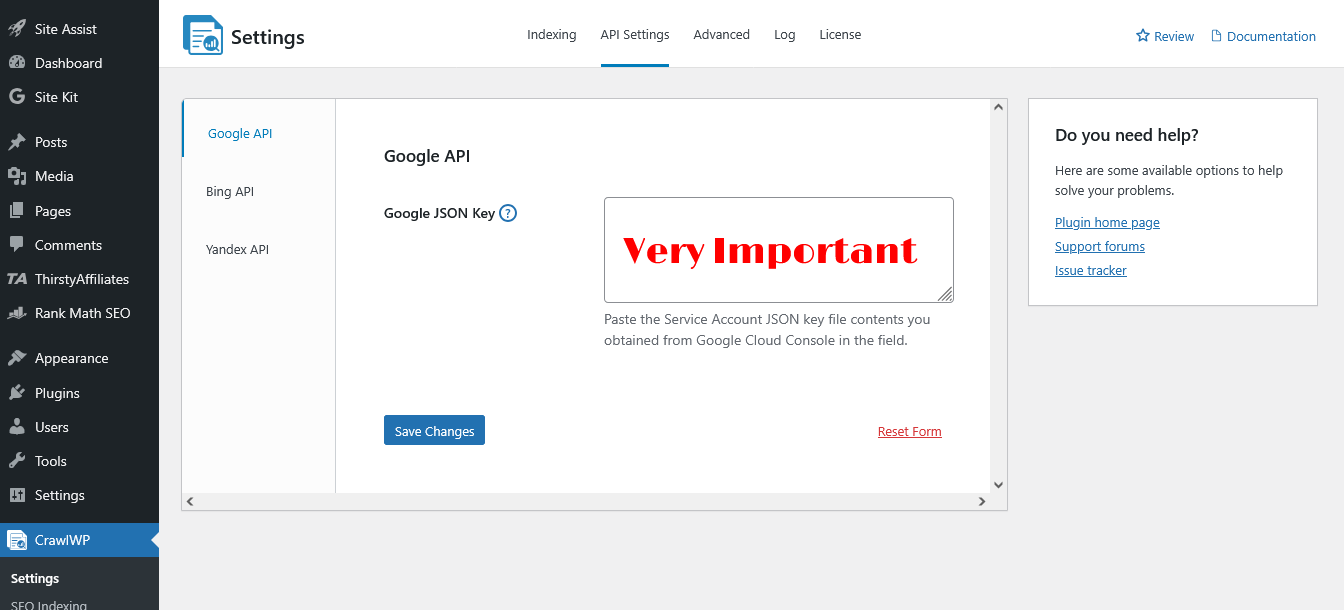
Go to CrawlWP → Settings → API Settings → Google API.
Toggle Enable Google Indexing API to ON.
Open the JSON file you downloaded (Step 4) with a text editor (Notepad on Windows, TextEdit on Mac).
Copy the entire contents of the file (from opening { to closing }).
Paste it into the Google JSON Key textarea in CrawlWP.
Click Save Changes.
Step 7: Verify Connection
If configured correctly, you’ll see a success message after saving.
To test: Publish a new post or update an existing one.
Within 4-24 hours, check Google Search Console:
- Go to URL Inspection
- Enter your post URL
- Check if Google received the indexing request
You can also check CrawlWP → Indexing Log (if available in your version) to see submission records.
Troubleshooting Google Setup
Error: “Invalid JSON”
- Copy the entire JSON file contents again
- Make sure you got the opening { and closing }
- No extra spaces or characters
Error: “Service account not authorized.”
- Verify you added the service account email to Google Search Console
- Ensure you selected “Owner” permission
- Wait 5-10 minutes after adding, then try again
Error: “API not enabled.”
- Return to Google Cloud Console
- Verify that both APIs (Search Console API and Indexing API) are enabled
- Check that you’re in the correct project
Part 5: Setting Up Bing URL Submission API (Optional)
IndexNow already covers Bing, so this step is optional. However, the dedicated Bing API provides redundancy and slightly faster processing.
Step 1: Access Bing Webmaster Tools
Go to Bing Webmaster Tools.
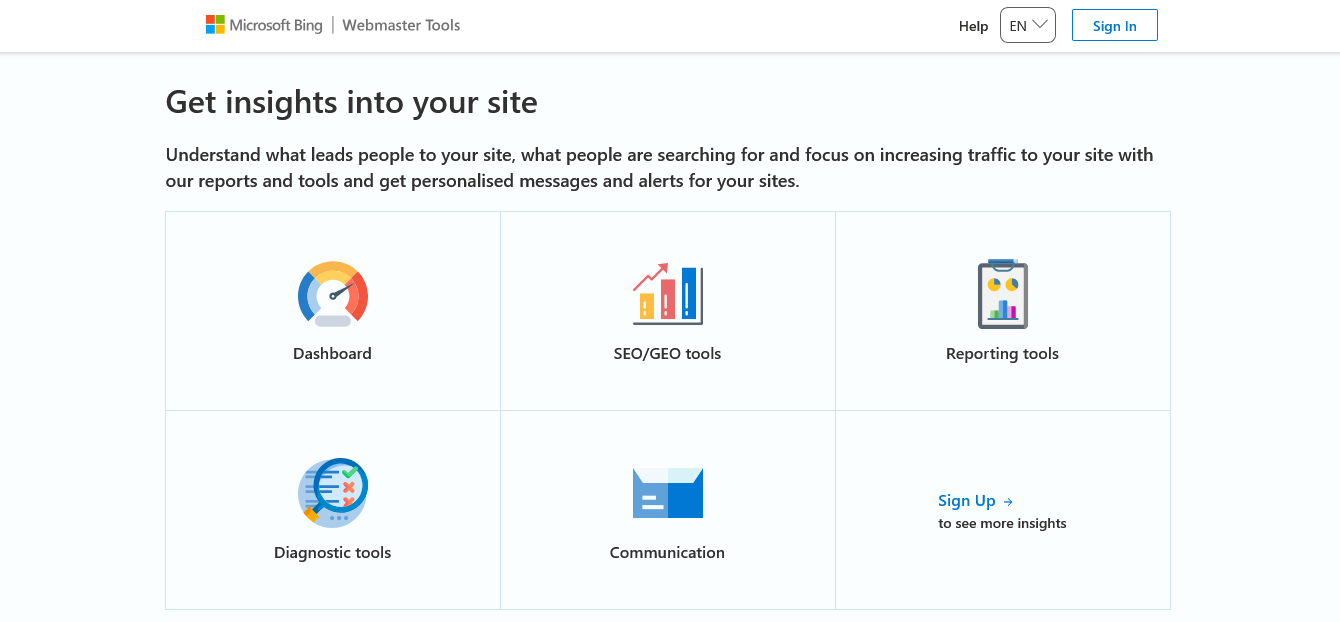
Sign in with a Microsoft, Google, or Facebook account.
If you haven’t added your site yet:
- Click Add a site
- Follow Bing’s verification instructions (HTML file, meta tag, or DNS verification)
Step 2: Generate API Key
Once your site is verified, click the Settings icon (gear icon) in the top-right corner.
Select API Access from the dropdown.
If this is your first time, you’ll see terms and conditions. Read and accept them.
Click Generate API Key button.
Your API key appears (a long alphanumeric string).
Copy the API key.
Important Notes:
- One API key per user (works for all your verified sites in Bing Webmaster Tools)
- If you need to regenerate (due to a security compromise), click Delete, then Generate.
- New keys take up to 30 minutes to activate
Step 3: Configure Bing API in CrawlWP
Return to the WordPress dashboard.
Go to CrawlWP → Settings → Indexing → Bing API (or API Settings → Bing API, depending on CrawlWP version).
Toggle Enable Bing URL Submission API to ON.
Paste your Bing API key into the API Key field.
Click Save Changes.
Verification
Publish or update a post.
Within 1-6 hours, check Bing Webmaster Tools:
- Go to the URL Submission section
- Verify that the URL of your WordPress website was received
Note: You don’t strictly need the Bing API if IndexNow is working. It provides redundancy but isn’t essential.
Part 6: Setting Up Yandex (Optional – For Russian Markets Only)

Skip this section unless you specifically target Russian-speaking or Eastern European audiences. IndexNow already covers Yandex for most users.
Why you might skip this: IndexNow already notifies Yandex. The dedicated Yandex API is only needed if you want direct redundancy similar to Bing’s setup.
Yandex API setup is more complex than Google or Bing because it uses OAuth authentication. For most users, IndexNow coverage is sufficient.
If you absolutely need the Yandex API:
- Create a Yandex Webmaster account at webmaster.yandex.com
- Verify your site ownership
- Contact CrawlWP support for detailed instructions on Yandex OAuth configuration.
Recommendation: Use IndexNow for Yandex. Skip the dedicated API unless you have specific requirements.
Part 7: Testing Your Setup

Now that everything’s configured, verify it’s working correctly.
Test 1: Publish New Content
Create a test blog post in WordPress (can be draft quality, you’ll delete it later).
Publish the post.
What should happen:
- If IndexNow is enabled, Bing, Yandex, and other IndexNow engines receive notification within seconds
- If the Google API is enabled, Google receives a notification within seconds
- If the Bing API is enabled, Bing receives redundant notifications
Test 2: Check Submission Logs
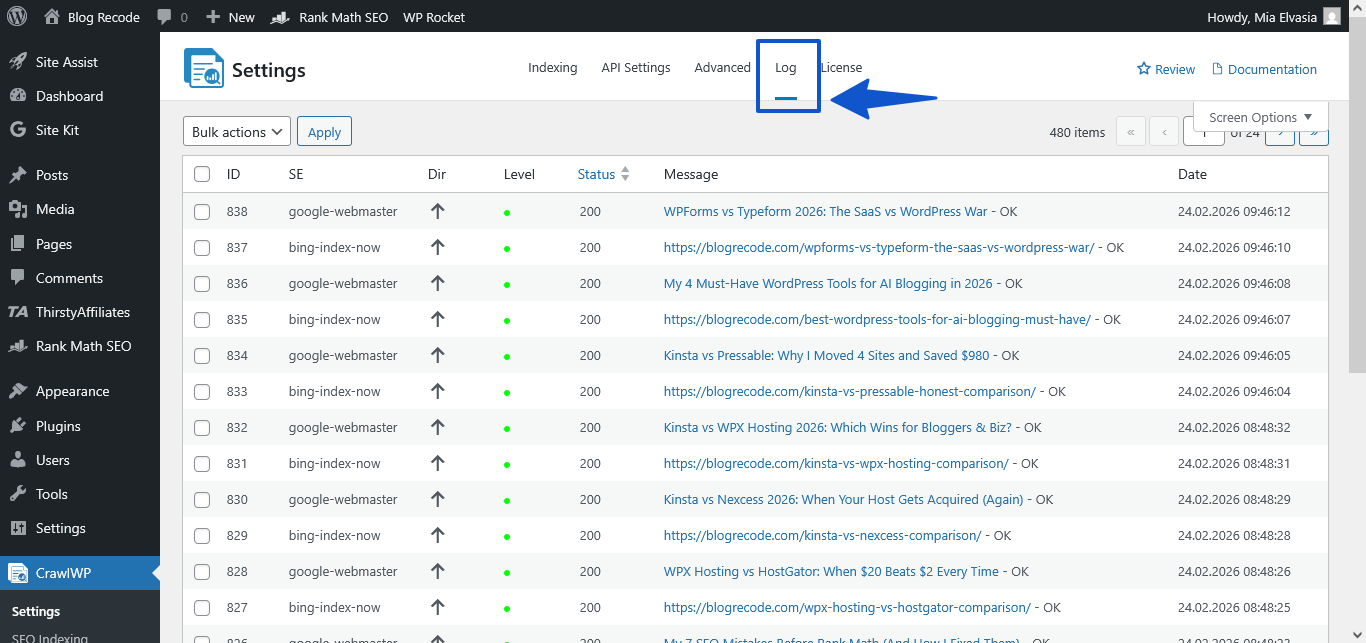
CrawlWP includes indexing logs.
Go to CrawlWP → Settings (check top bar for ” Log”).
Look for your test post URL.
Status should show “200”, Level “Green”, Message “OK”
Test 3: Verify in Search Consoles
Google Search Console:
- Wait 4-24 hours
- Go to URL Inspection
- Enter your test post URL
- Check if Google received the indexing request
Bing Webmaster Tools:
- Wait 1-6 hours
- Go to the URL Inspection or URL Submission section
- Enter your test post URL
- Check if Bing received the submission
Test 4: Update Existing Content
Edit an existing blog post (minor change is fine).
Click Update.
CrawlWP should ping search engines about the update.
Check logs to confirm.
If all three tests work, your setup is complete and functional.
Part 8: Understanding CrawlWP Features
Automatic Submission
With CrawlWP configured, submissions happen automatically:
- On Publish: New content submitted immediately
- On Update: Changed content, resubmitted
You don’t need to do anything manually. CrawlWP handles it in the background.
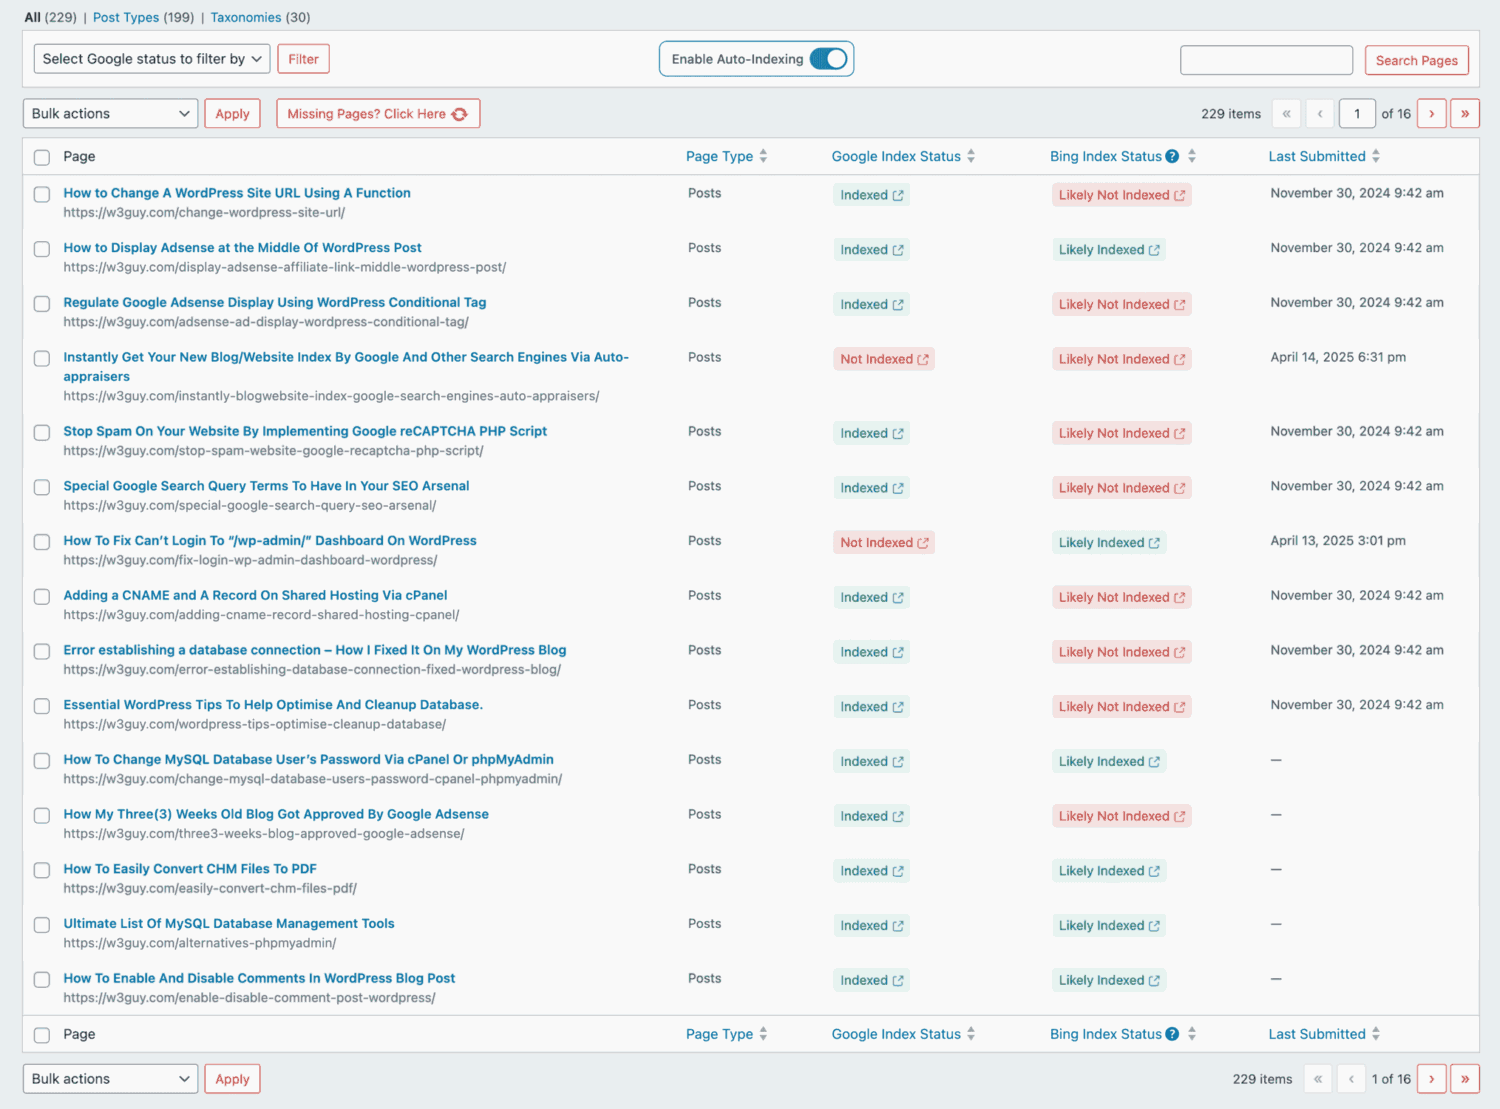
Index Status Indicators
CrawlWP shows index status directly in WordPress:
- Green indicator = Indexed by Google
- Red indicator = Not indexed
- Yellow/Orange = Submitted, pending indexing
This appears on the Posts/Pages list in WordPress admin.
Bulk Submission
CrawlWP includes bulk URL submission:
- Go to CrawlWP → SEO Indexing
- Select 5-10 old posts that aren’t indexed.
- Use bulk submission to send them to Google.
- Wait 24 hours.
- Check Google Search Console to see if they’re indexed.
- If all three tests work, your setup is complete and functional.
Important: Respect Google’s quota limits (default 200 requests/day). The bulk submissions queue has excess URLs for the next day.
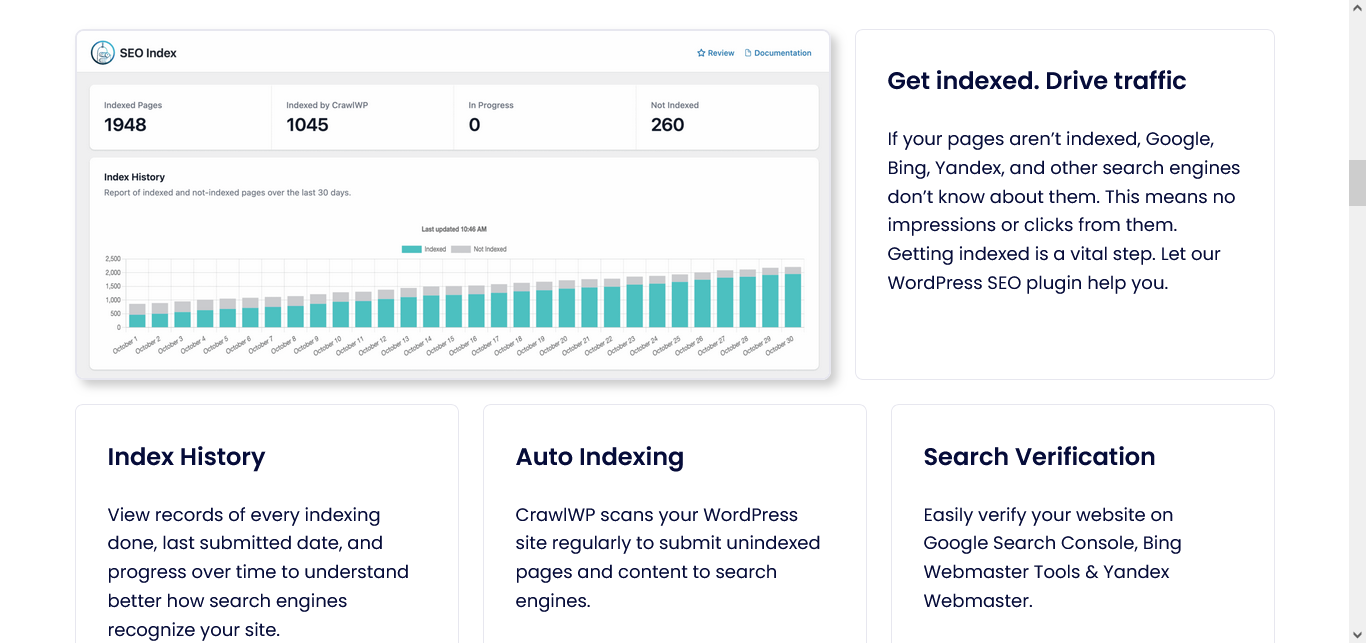
Auto-Indexing
Auto-indexing scans your site regularly to find unindexed pages and submits them automatically:
How it works:
- CrawlWP scans your site
- Identifies pages not indexed by Google
- Automatically submits them
- Repeats on schedule (daily, weekly, or manual)
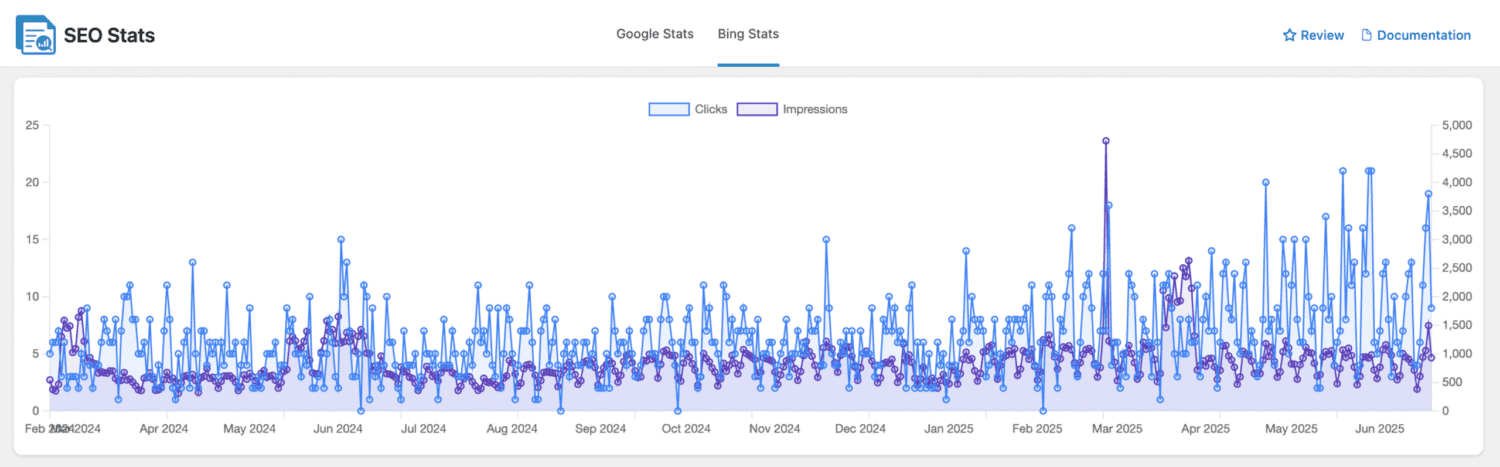
SEO Stats Dashboard
CrawlWP integrates with Google Search Console and Bing Webmaster Tools, displaying data in WordPress:
- Clicks, impressions, CTR, Position tracking
- Keyword performance
- Bing performance metrics
Access via CrawlWP → SEO Stats or similar menu item.
Part 9: Best Practices and Limitations
What to Submit
Do submit:
- Blog posts
- Product pages
- Service pages
- Important landing pages
- Updated content
Don’t submit:
- Pagination pages
- Archive pages
- Tag/category pages (unless they have unique content)
- Search result pages
- Thank you pages
- Admin pages
Submission Frequency
Good practices:
- Submit new content immediately (automatic)
- Resubmit when making significant updates
- Don’t submit the same URL multiple times per day
Google’s quota:
- Default: 200 requests per day
- Can be increased to 200,000 with Google approval
- CrawlWP respects these limits automatically
IndexNow:
- No strict quotas
- Be reasonable (don’t ping thousands of URLs per hour)
Understanding Indexing vs. Submission
Critical distinction:
- Submission = Notifying search engines (CrawlWP’s job)
- Indexing = Search engines deciding to add your page to their index (search engines’ decision)
CrawlWP guarantees submission. It does NOT guarantee indexing.
Why pages might not get indexed even after submission:
- Thin content (not valuable enough)
- Duplicate content
- Technical errors (noindex tags, robots.txt blocks)
- Quality guidelines violations
- Low site authority
IndexNow vs. Google API: When to Use What
IndexNow:
- Safe for all content
- No quotas
- Officially recommended
- Use freely and frequently
Google Indexing API:
- Officially for job postings and livestreams
- Works for all content, but use conservatively
- Respect quota limits
- Best for truly important/time-sensitive content
Recommendation: Enable both. Let CrawlWP handle automatic submissions. Don’t overthink it.
Part 10: Troubleshooting Common Issues
Issue 1: “Invalid JSON Key” Error
Cause: JSON key pasted incorrectly or corrupted.
Solution:
- Open the JSON file with a text editor
- Copy entire contents (from { to })
- Paste carefully into CrawlWP
- Ensure no extra spaces or characters
- Save changes
Issue 2: “Service Account Not Authorized”
Cause: Service account not added to Google Search Console, or the wrong email was used.
Solution:
- Go to Google Search Console → Settings → Users and permissions.
- Verify the service account email is listed with “Owner” permission
- If missing, add it using the exact email from the JSON file
- Wait 5-10 minutes, then retry
Issue 3: “Quota Exceeded” for Google API
Cause: Exceeded daily submission limit (default 200/day).
Solution:
- Wait 24 hours for quota reset
- Submit fewer URLs per day
- Request quota increase from Google Cloud Console → Quotas
Issue 4: IndexNow Not Working
Cause: Invalid API key or endpoint down.
Solution:
- Regenerate IndexNow key in CrawlWP (click “Show example”)
- Save the new key
- Try a different IndexNow endpoint (switch from Bing to Yandex or IndexNow.org)
- Test by publishing a post
Issue 5: Pages Submitted But Not Indexed
Cause: Search engines received the submission but chose not to index.
Solution:
- Check content quality (is it substantial and valuable?)
- Verify no noindex tags in page source
- Check robots.txt isn’t blocking
- Use Google Search Console → URL Inspection to see rejection reasons
- Improve the content, then resubmit
Issue 6: Can’t Generate Service Account in Google Cloud
Cause: Insufficient permissions or billing not enabled.
Solution:
- Ensure you’re the project owner/editor
- Billing doesn’t need to be enabled for these APIs (they’re free)
- Try creating a project in a different Google account
- Clear browser cache and retry
Part 11: Monitoring and Maintenance

Regular Maintenance
Check API credentials:
- Verify Google JSON key is still valid (test by submitting a URL)
- Verify Bing API key is working (check Bing Webmaster Tools)
Review performance:
- How many WordPress pages were submitted vs. indexed?
- Average time to indexing improving?
- Any patterns in rejected pages?
Update CrawlWP:
- Check for plugin updates regularly
- Read changelogs for new features or fixes
Regular Review
Google Cloud Console:
- Review service account permissions
- Check API usage stats
- Request a quota increase if hitting limits regularly
Search Console:
- Ensure the service account still has Owner access
- Remove old service accounts if you’ve changed setups
FAQs
Q: How long does CrawlWP setup take?
A: IndexNow setup takes 2-5 minutes. Setting up the Google Indexing API takes 15-25 minutes (mostly creating the service account and JSON key). Total setup time: 20-30 minutes for full configuration.
Q: Do I need technical skills to set up CrawlWP?
A: IndexNow requires no technical skills (2 clicks). Google Indexing API requires the following step-by-step instructions in Google Cloud Console. If you can follow a recipe, you can set it up.
Q: Is using Google Indexing API safe for non-job/livestream content?
A: Google officially recommends it for job postings and livestreams. However, thousands of users successfully use it for blogs, products, and pages without issues. IndexNow and Bing API are completely safe and officially recommended.
Q: What’s the difference between IndexNow and Google Indexing API?
A: IndexNow is a protocol supported by Bing, Yandex, Naver, Seznam.cz, and Yep (but not Google). Google Indexing API is Google-specific. You need both for complete coverage of all major search engines.
Q: How fast will pages get indexed after setup?
A: Based on user reports and CrawlWP documentation, pages typically get indexed within 24-48 hours after submission, often within a few hours. Compare this to a traditional 5-14 day wait.
Q: Does CrawlWP guarantee my pages will be indexed?
A: No. CrawlWP guarantees submission (notification to search engines). Search engines make the final decision whether to index. Low-quality content, duplicates, or guideline violations may not get indexed.
Q: Can I use CrawlWP without the Google Indexing API?
A: Yes. You can use only IndexNow, which covers Bing, Yandex, and other engines. Google will still index your site via traditional sitemaps (slower). The Google API is optional but highly recommended.
Q: What’s Google’s API quota limit?
A: Default is 200 requests per day. This can be increased to 200,000 requests per day by requesting a quota increase in Google Cloud Console. Most sites don’t need more than the default.
Q: Do I need the Bing API if I have IndexNow?
A: No. IndexNow already covers Bing. The dedicated Bing API provides redundancy, but it isn’t necessary. Most users can skip it.
Q: Should I set up the Yandex API?
A: Only if targeting Russian/Eastern European markets AND you want redundancy beyond IndexNow. For most users, IndexNow coverage of Yandex is sufficient. Skip unless you have specific needs.
Q: What happens if my JSON key expires?
A: JSON keys don’t expire automatically. If deleted or compromised, generate a new one from Google Cloud Console, add the service account to Search Console again, and update CrawlWP settings.
Q: Can I use CrawlWP on multiple WordPress sites?
A: Yes. The CrawlWP free version works on one site. Paid plans cover multiple sites (Pro: 5 sites, Agency: unlimited). Each site needs its own configuration.
Q: Does CrawlWP work with WooCommerce?
A: Yes. Configure CrawlWP to submit “Products” post type. New products are automatically submitted for indexing.
Q: Can CrawlWP submit my entire site at once?
A: Yes, using bulk submission (Pro feature). However, respect Google’s quota (200/day default). Large sites should submit in batches over multiple days.
Q: What if I exceed Google’s daily quota?
A: Submissions fail with “quota exceeded” error. Wait 24 hours for a reset, or request a quota increase from Google Cloud Console.
Q: Does CrawlWP slow down my website?
A: No. CrawlWP runs background processes that don’t affect page load times. User reports confirm negligible performance impact.
Q: Can I disable automatic submissions?
A: Yes. In CrawlWP settings, uncheck post types or disable notification triggers. You can also disable individual search engine APIs.
Q: How do I know if CrawlWP is working?
A: Check CrawlWP logs for submission records. Verify in Google Search Console and Bing Webmaster Tools that URLs were received. Monitor indexing time improvements.
Q: What’s the difference between CrawlWP free and Pro?
A: Free version includes IndexNow and basic manual submission. Pro adds Google API integration, bulk submission, auto-indexing, SEO performance dashboard, and index status indicators.
Q: Can I remove the service account later?
A: Yes. Delete it from Google Cloud Console and remove it from Search Console. This disables Google API submissions.
Q: Does CrawlWP work with Rank Math or Yoast?
A: Yes. CrawlWP handles the indexing and display of website SEO performance on search engines. SEO plugins handle optimization. They work together without conflicts.
Q: What should I exclude from indexing?
A: Don’t submit pagination, archives, low-value tag pages, search result pages, thank you pages, or admin pages. Focus on valuable content pages.
Q: Can I resubmit URLs that weren’t indexed?
A: Yes. Use manual submission or wait for auto-indexing to resubmit. However, fix quality issues before resubmitting, or search engines will reject again.
Conclusion: You’re Ready for Faster Indexing
With CrawlWP properly configured, your WordPress site now automatically notifies Google, Bing, Yandex, and other search engines whenever content is published or updated.
What you’ve accomplished:
✅ IndexNow protocol configured (Bing, Yandex, Naver, Seznam.cz, Yep)
✅ Google Indexing API connected (direct Google submissions)
✅ Optional: Bing URL Submission API for redundancy
Expected results:
- Pages indexed in 24-48 hours instead of 5-14 days
- Better coverage across all major search engines
- Automated submissions (no manual work)
- Faster discovery of time-sensitive content
Maintenance: Check API credentials quarterly. Monitor Search Console weekly. Update CrawlWP when new versions are released.
The setup takes 20-30 minutes. The benefit lasts as long as you run your WordPress site.
Welcome to instant indexing.