How To Create WordPress Private Pages and Posts – Easy Guide
A WordPress private post or page is hidden from the public and is not visible to anyone except if they have the correct permissions.
As a content creator or a business owner, there may be times you would want to keep some pages of your website private for various reasons, especially if you have members-only content, and this is where the private page functionality of WordPress comes in handy.
In this article, we will look at what private pages and posts are, how to create them, and finally, look at a plugin that makes the process easier and more robust.
What is a WordPress Private Post and Page?
A WordPress private post is a regular WordPress post protected or hidden from public access. If a visitor were to find their way to the private post, they would not be able to view any content on the page; instead, they would be redirected to a “404 Not Found” page.
However, anyone with the proper access levels, such as administrators and editors on your WordPress site, can view and edit a private post’s content.
On the other hand, a WordPress private page is a regular, static WordPress page hidden or protected from public access.
A WordPress page is similar to a WordPress post; the significant difference is that a page serves as a standard web page, like a contact page or an about page, while a post serves as an article or content page, adding to the rolling content feed of a WordPress site.
Like with a private post, a WordPress private page is also accessible to people with the right permission, such as editors and admin users of a WordPress site. Anyone with the proper user role and permissions can log in to the dashboard to view and manage all private pages and posts.
How to Create a Private Post in WordPress
Creating a WordPress private post and page is easy; you can quickly create a basic private post with WordPress’s built-in visibility settings.
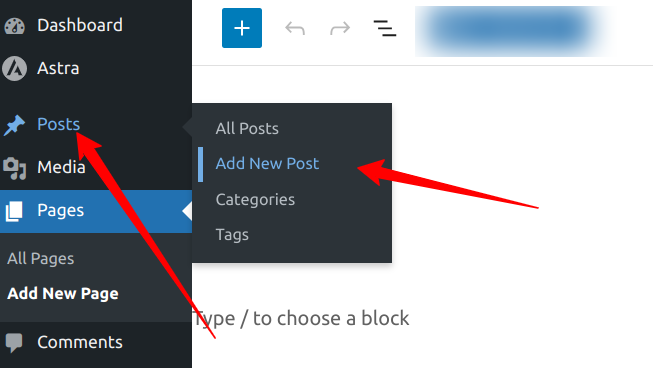
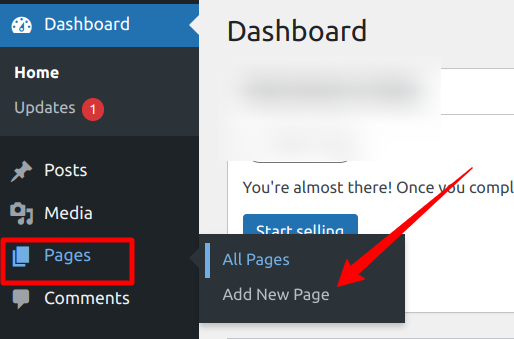
To make a WordPress post private, log in to your WordPress dashboard and navigate to Posts > All Posts if you want to make an existing post private, or navigate to Posts > Add New if you create a new private post.
For this example, we will create a recipe post that users can only view with the correct permissions.
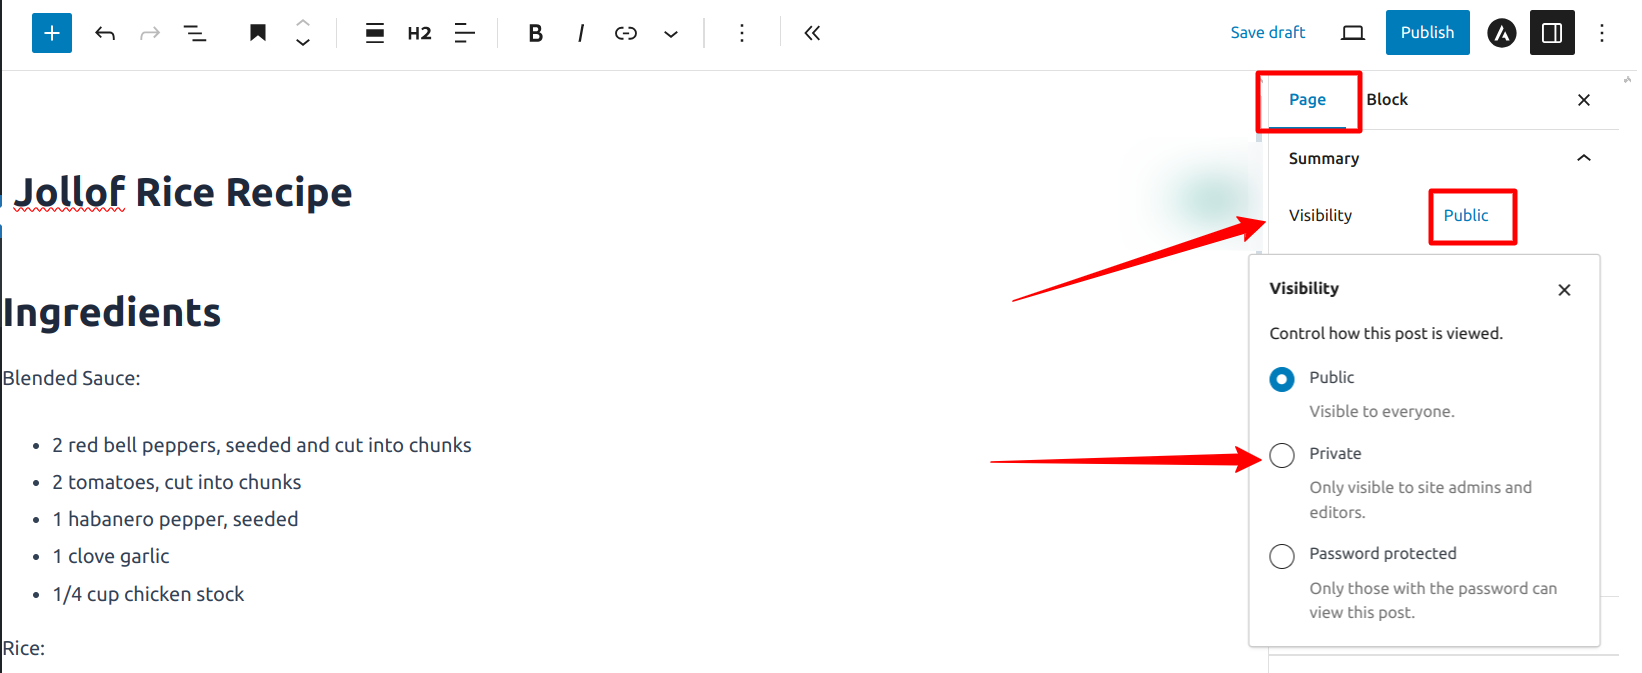
Under the “Post” tab of the post editor, locate the “Visibility” option and click on the “Public” link; by default, all posts are public.
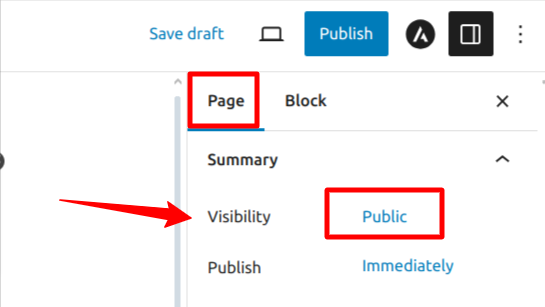
A dropdown menu will appear; choose the “Private” option to make this post private and accessible only to admins and editors. Click on the “Publish” button to save your changes.
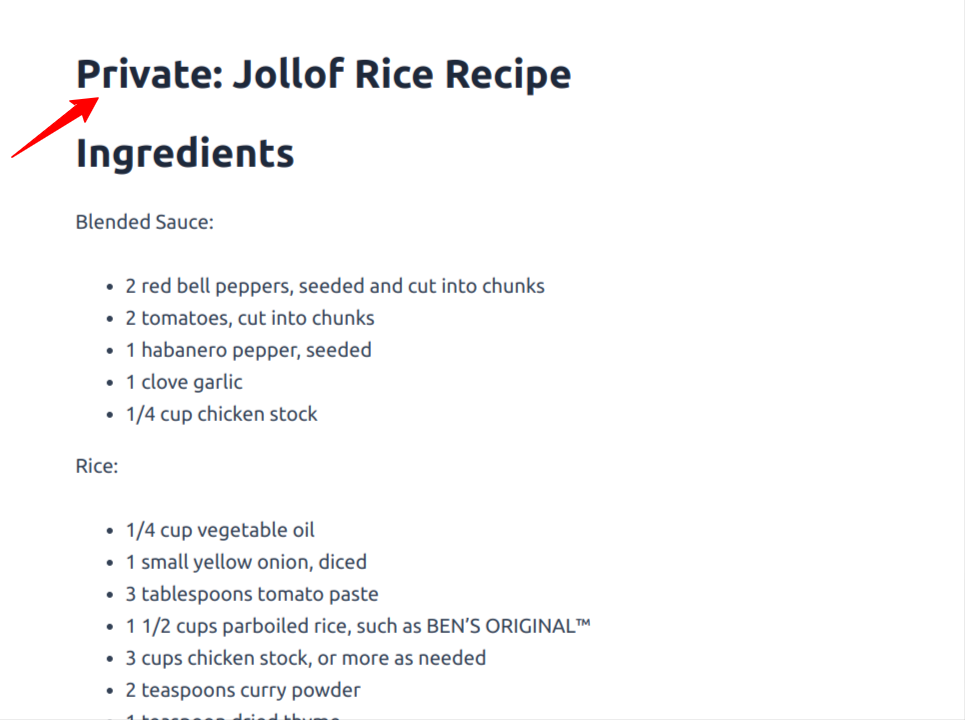
Now, if you view this post as a logged-in admin or editor, you will be able to see the content of this post with a “Private” tag before the post title.
However, the same post no longer shows if you log out of your admin account.
You will get a “Page not found” page, indicating that the post is private and unavailable to non-logged-in users.
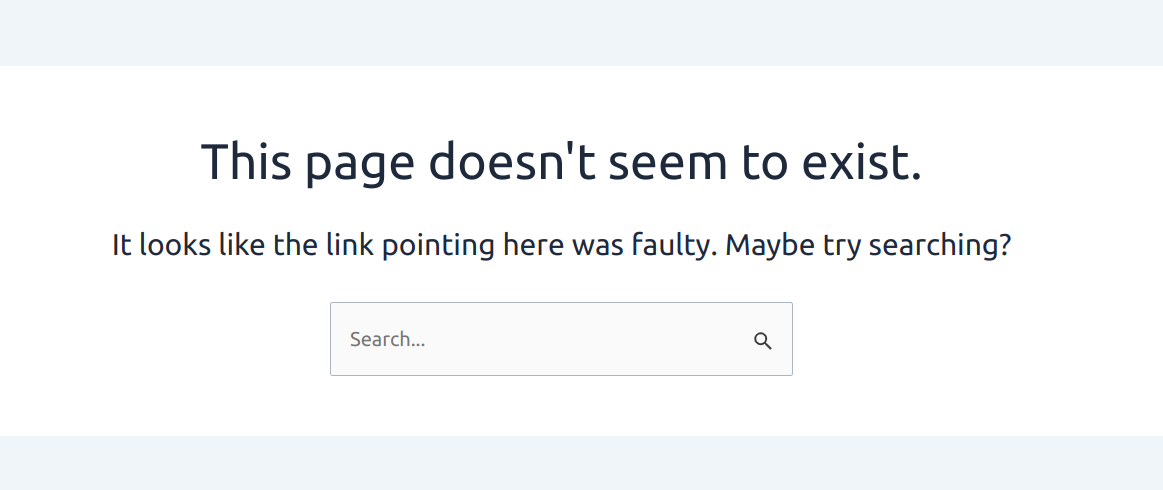
This shows that our private post feature is working correctly.
How to Create a WordPress Private Page
Creating a private page in WordPress is almost the same as creating a private post. The only difference is the starting point. Instead of going to the Posts post-type menu section, we will go to that of Pages.
Navigate to Pages > All Pages to make an existing page private, or go to Pages > Add New to create a new private page.
Once on the page editor, follow the steps above, as explained in the private posts section.
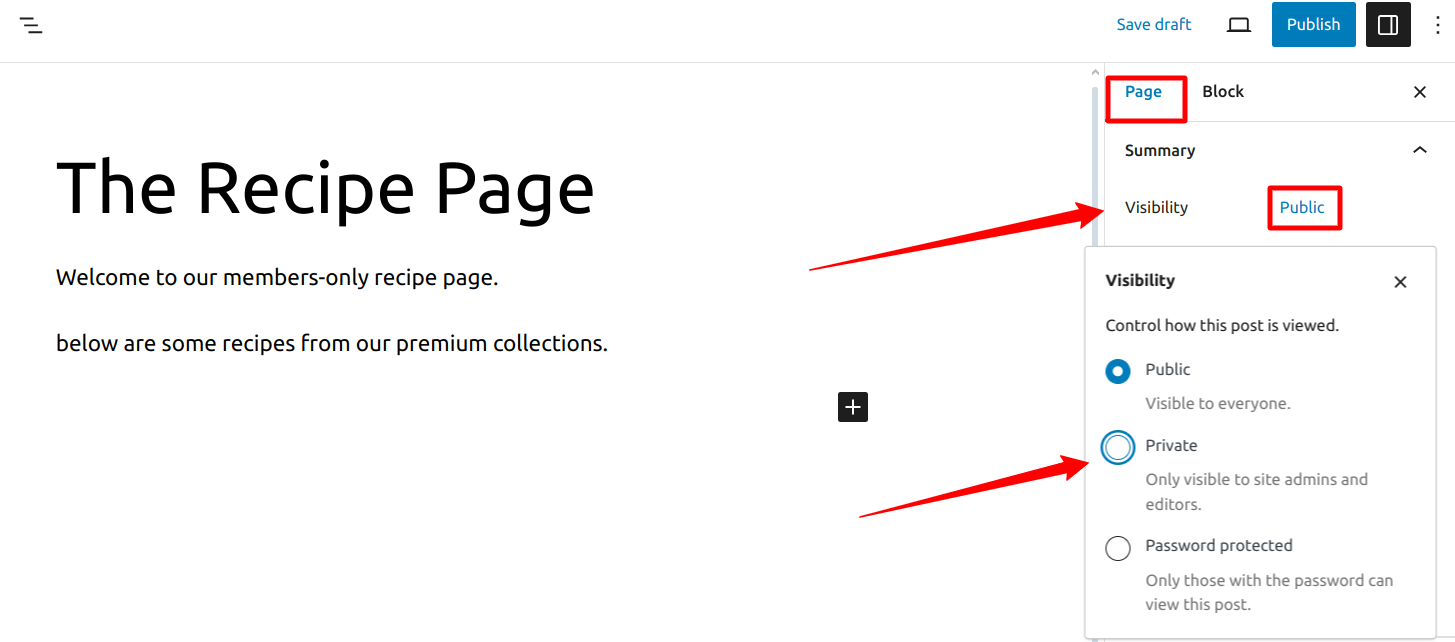
Under the Page tab of the page editor, locate the “Visibility” option and click on the “Public” link; by default, all pages are public.
A dropdown menu will appear. Choose the “Private” option to make this page private and accessible only to admins and editors. Click on the “Publish” button to save your changes.
Now, log out of the admin account and try to visit this page URL. You will discover that the page returns a “Page not found” response, indicating that the post is private and unavailable to non-logged-in users.
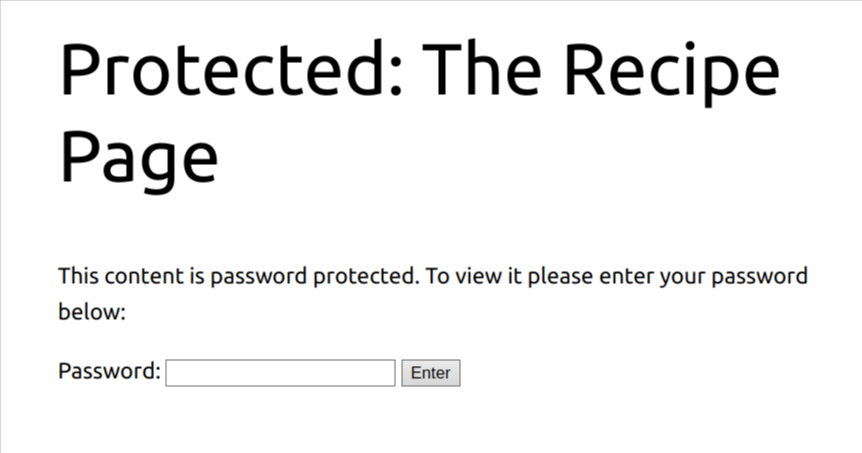
Aside from making a post or page private, WordPress also allows you to restrict access to a page or post by setting a password for the page. This way, anyone (not just admins and editors) with the correct password can access the post or page.
To create a private, password-protected page or post, go to the post editor, under the “Page tab,” go to the “Visibility” dropdown, and select the “Password Protected” option instead of the “Private” option.
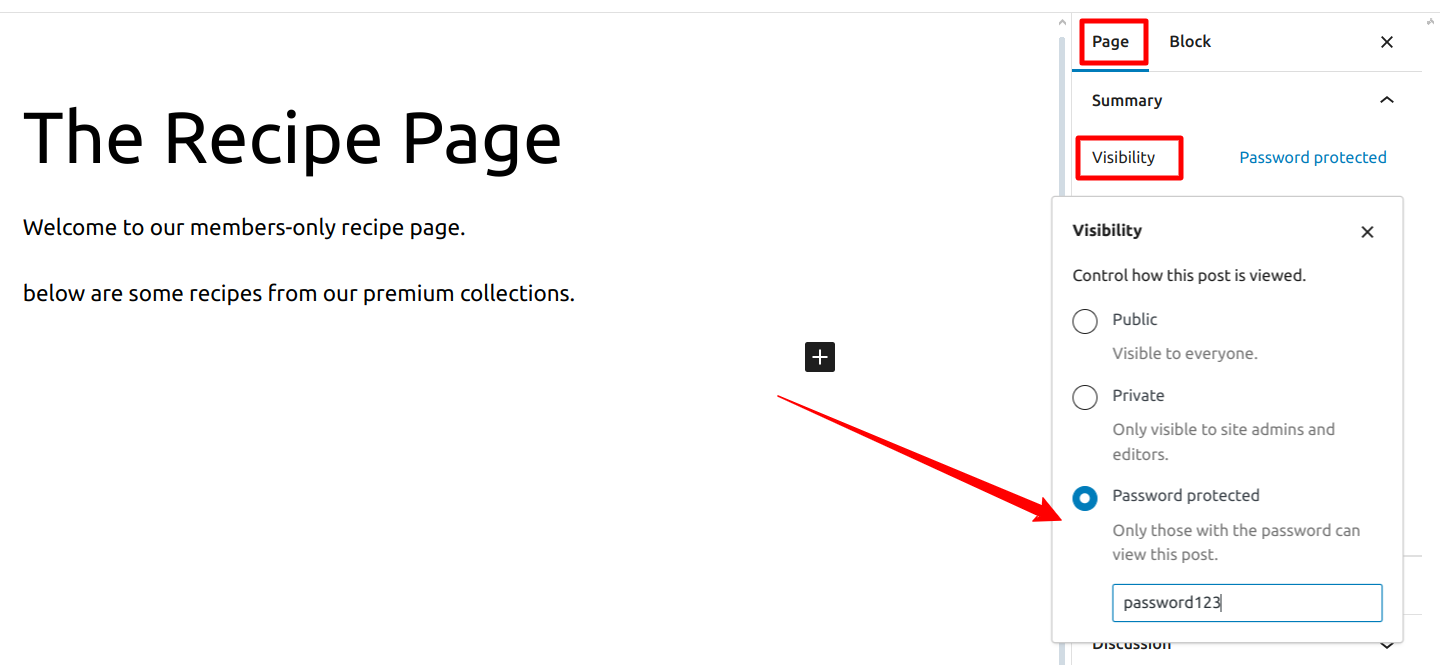
Enter your desired password and click the “Publish” button to save your changes.
Next, go to the page URL. You should see that the page is protected and that it requires you to enter a password. Enter the password you created earlier, and you should be able to view the page content.
So far, we have learned how to make a WordPress post or page private using the built-in WordPress visibility settings. However, the built-in visibility settings can only offer you basic restriction features. If you want advanced control over your content visibility, you must use a restrict content WordPress plugin such as ProfilePress to restrict access to your posts and pages.
Using ProfilePress to Private Posts & Pages
ProfilePress is an eCommerce and WordPress membership plugin that allows you to sell digital products, create membership sites, and control access to your content.
In this guide, we will focus on the content restriction feature of ProfilePress. This feature gives you complete control over your posts and page visibility. You can restrict content based on user roles, membership plans, usernames, logged-in status, and more.
To get started with ProfilePress, you need to install the ProfilePress plugin. You can get a copy of ProfilePress from their website.
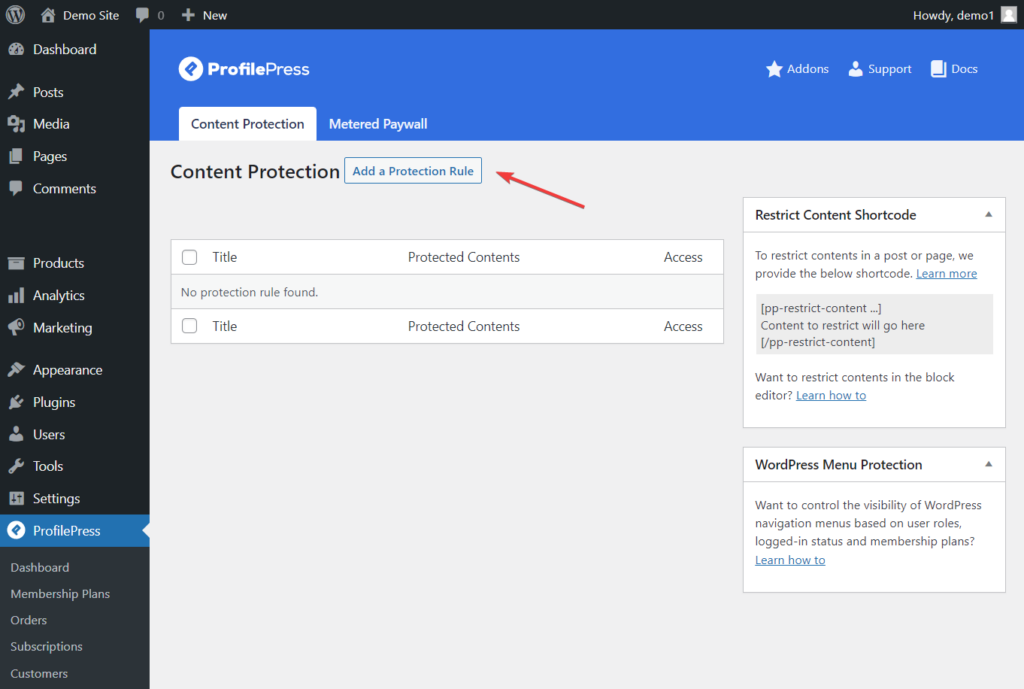
After installation and setup, navigate to ProfilePress > Content Protection.
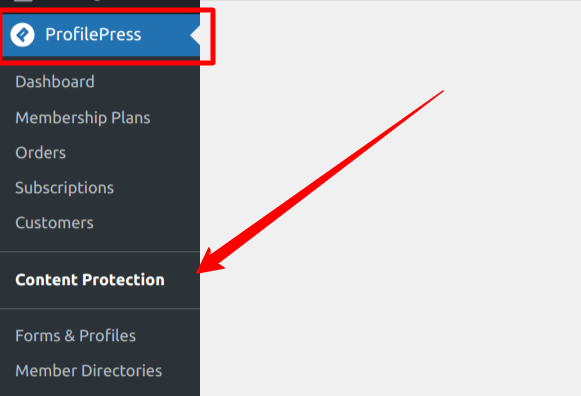
Click on the Add a Protection Rule button.
When you click the button, you will be taken to the Protection Rule editing page. This is where we will build our content protection rule.
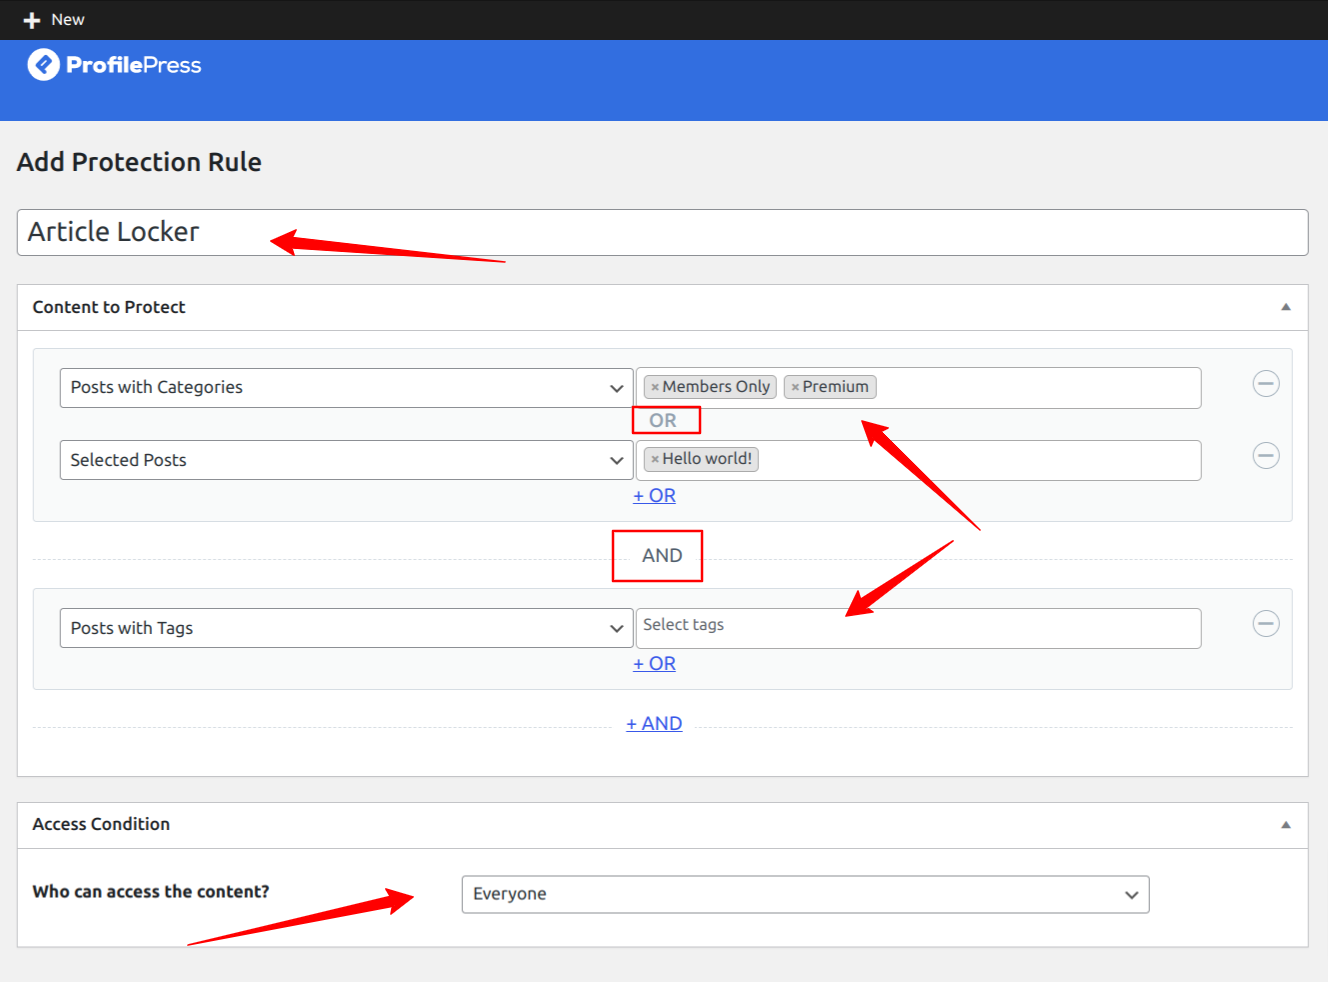
Enter a descriptive title for the rule you create, select the content you want to make private, use the logical OR/AND to set the rules and use the access condition to select who can access the content.
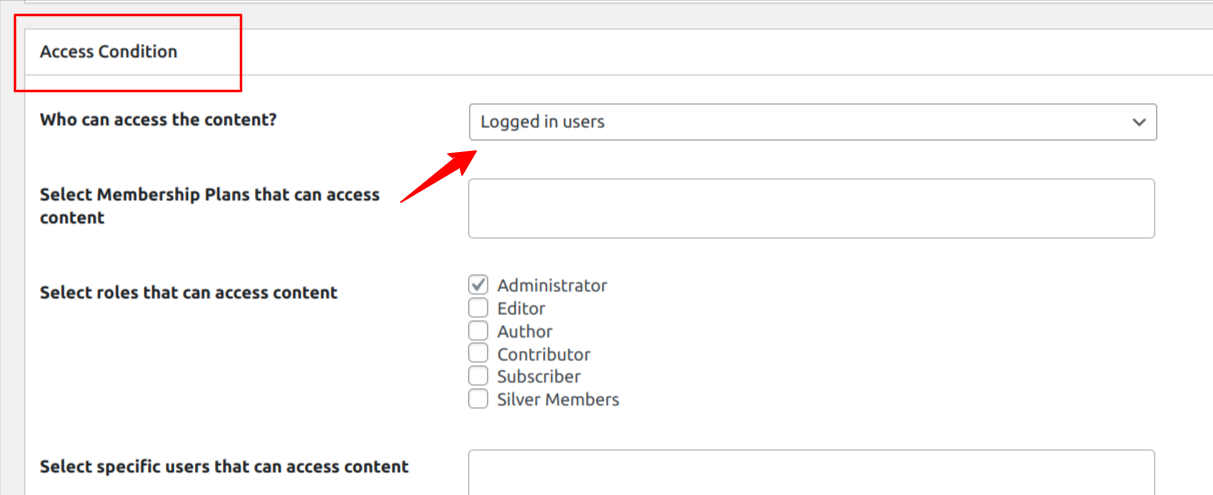
The Access Condition section allows you to assign who can access the content you want to protect, such as:
- Everyone (all users will have access to the content),
- Logged-in users (only those who are logged in can access the content)
- Logged-out users (only those not logged in to your website can access the protected content).
The Logical AND rule only kicks in when all grouped conditions are true, and the Logical OR rule happens when one of the conditions in a group is true.
In the screenshot above, we used the OR logic, where the protection rule will kick in when anyone accesses either of the selected posts or pages. Of course, this means you want everyone to access the selected post and page.
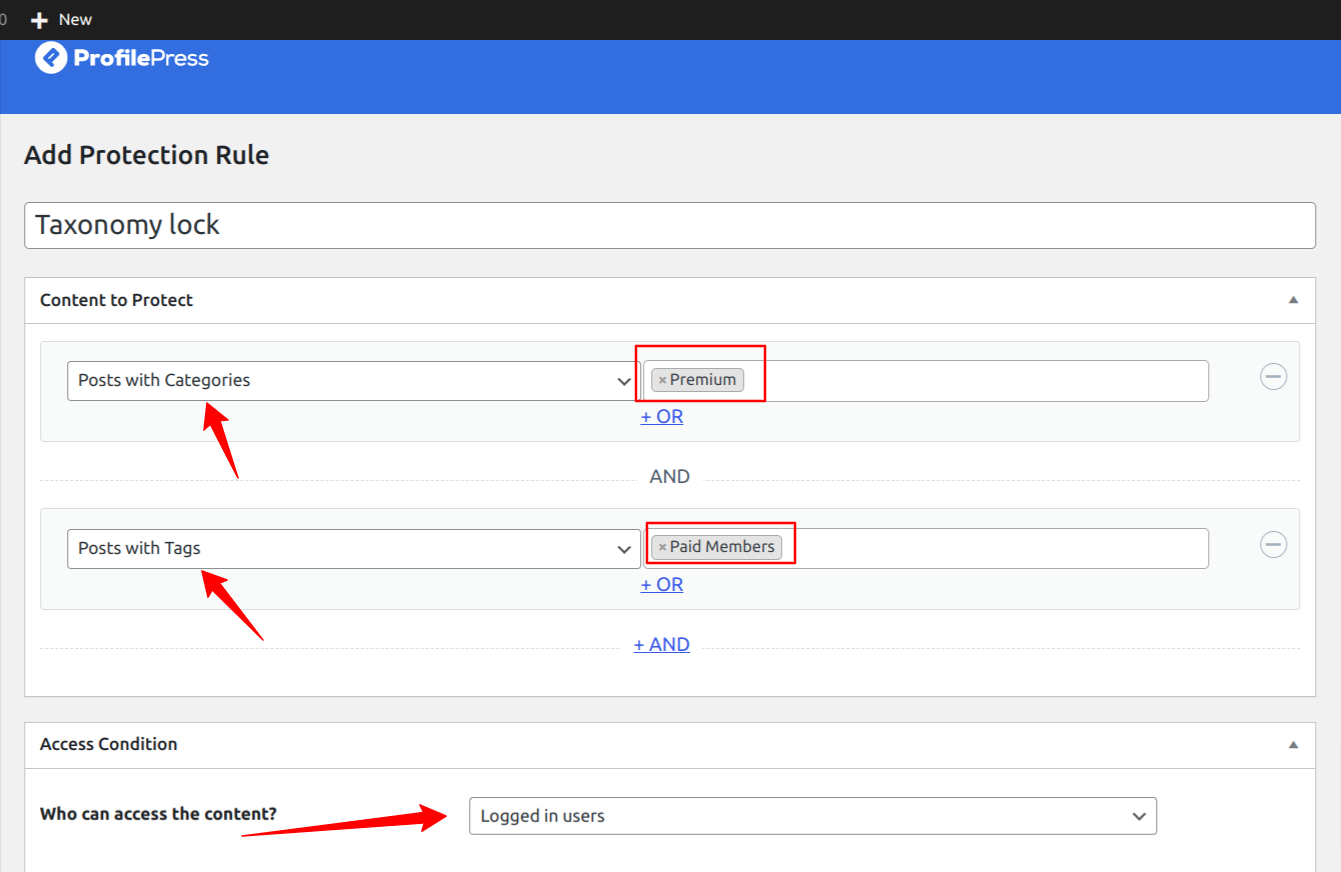
The rule above will restrict posts on your site that belong to the “premium” category and “Paid members” tag to logged-in users only. With this setup, any new post added to either of the categories will also become private.
Next, you must go to the Access Condition section on the rules editing page to configure who can access the premium content.
In the Access Condition section, select “Logged in users” from the dropdown menu against the “Who Can Access the Content?” option.
You can show unauthorized users the global restriction message, a custom message, or the post excerpt or redirect them to a specific page.
As soon as you select the Logged in users option, several new options appear in the Access Condition section.
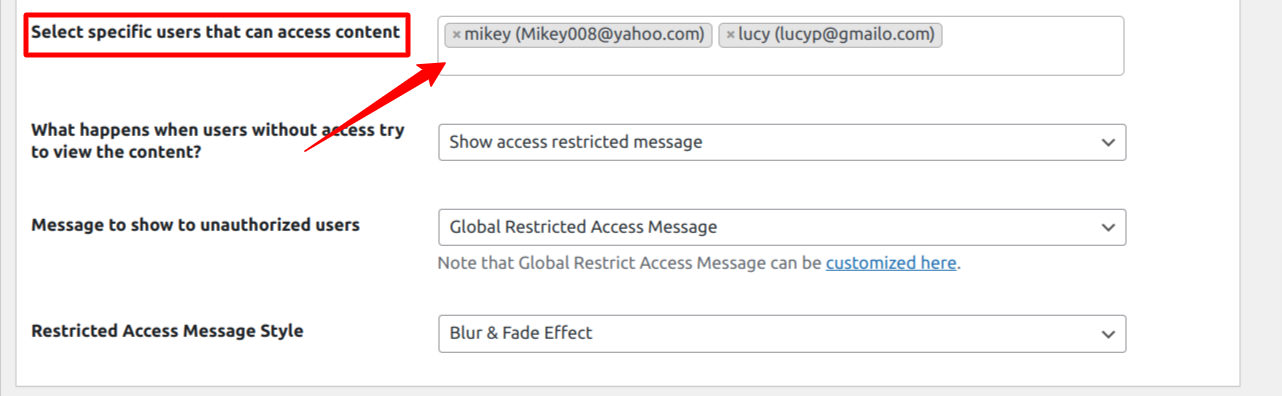
In the “Select specific users that can access content“, you can select specific users who will be the only ones to view a post or page on your WordPress website. This is particularly useful if you want to give access to a page or post to your staff or partners or just one user on your WordPress website.

Under the “What happens when users without access try to view the content?” option, you can choose whether to “Show access restricted message” or “Redirect user” to another page.
If you choose the “Redirect user” option, you can select an existing page on your WordPress site or redirect the user to a custom URL.
If you choose the “Show access restricted message” option, you will be presented with additional configuration options, as shown in the image above.
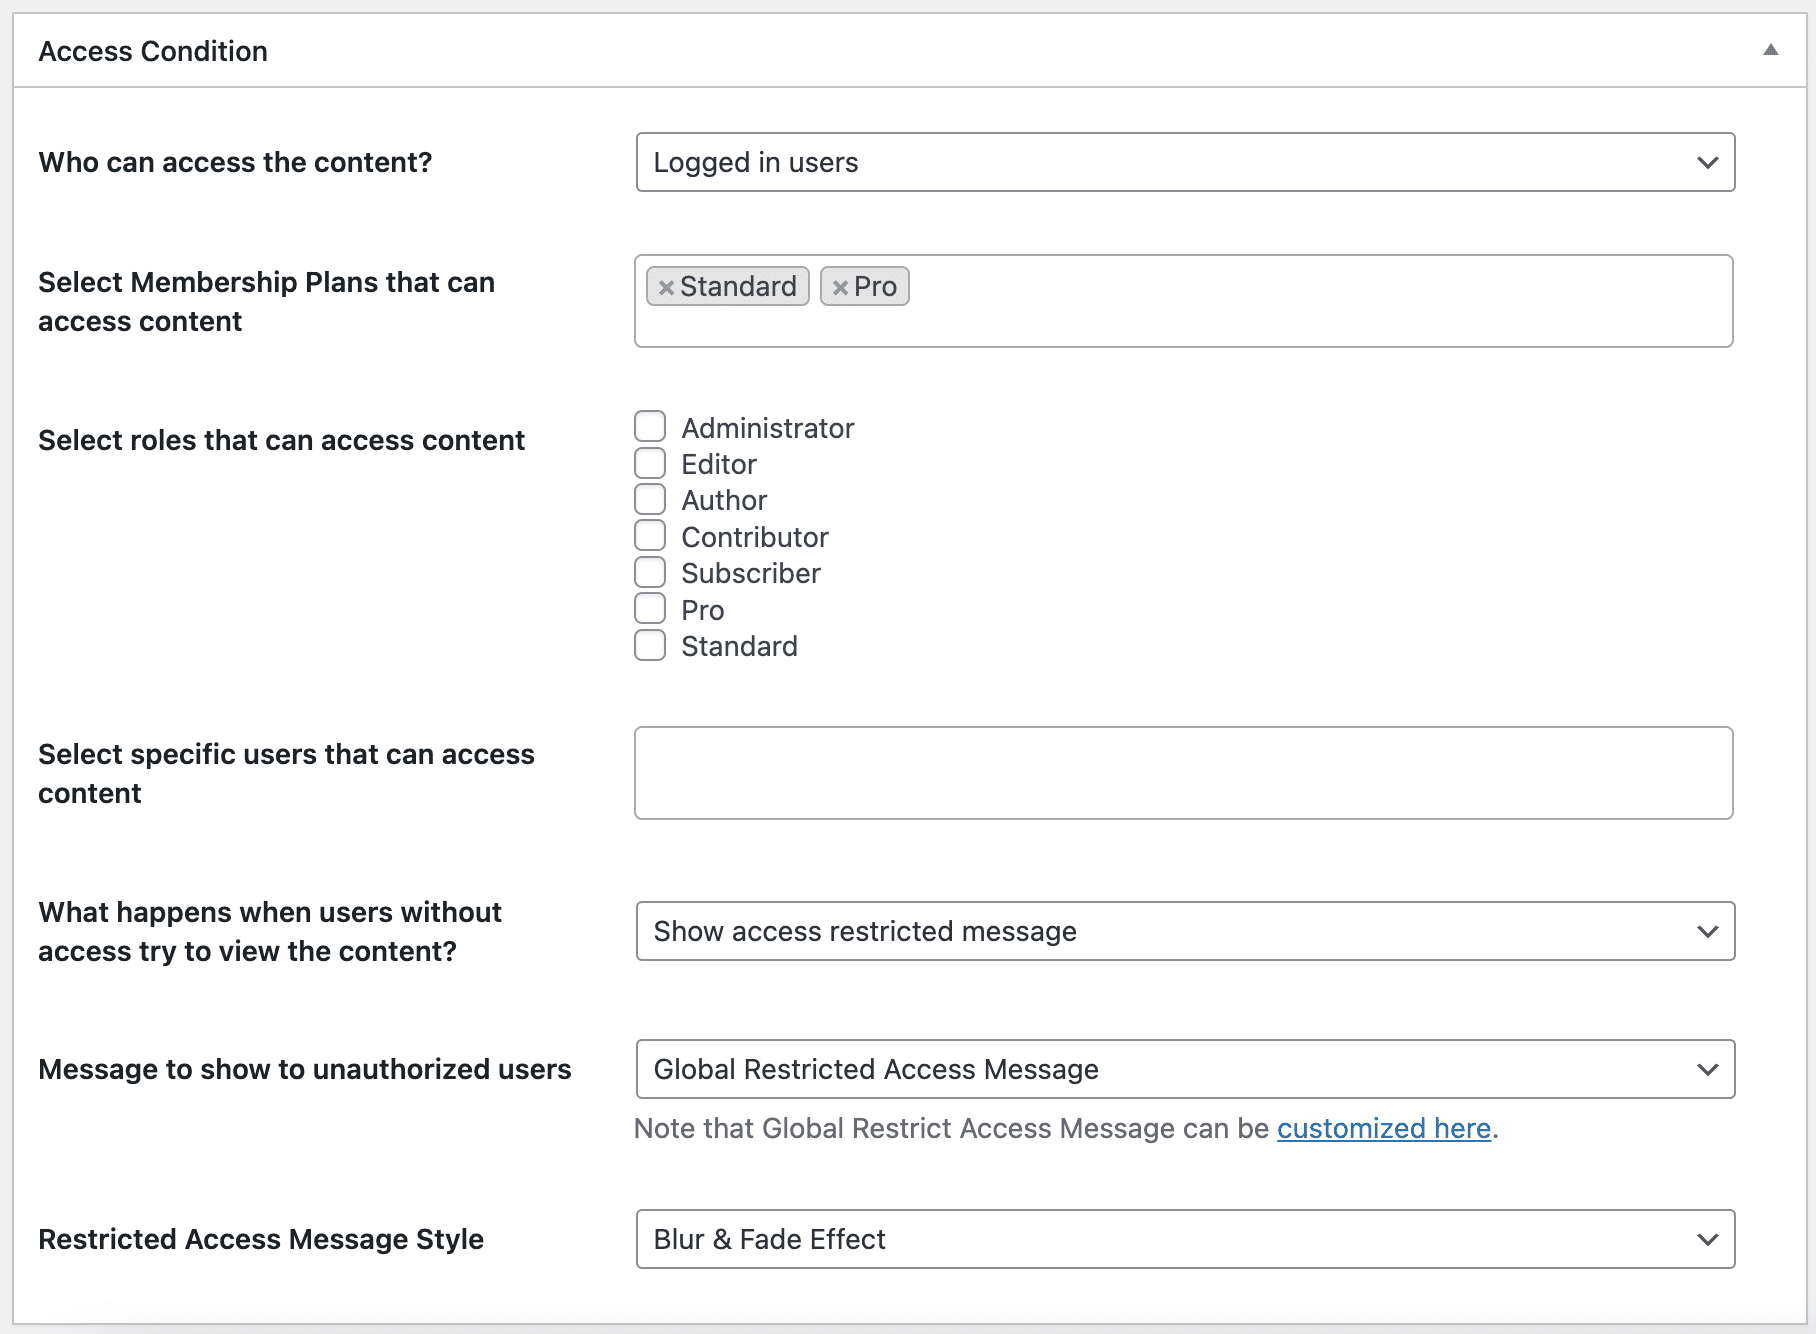
Next, select the Restricted Access Message Style Option and select Blur & Fade Effect from the dropdown menu. Next, under Message to Show to Unauthorized Users, select the Post Excerpt + Global RestrictedAccess Message.
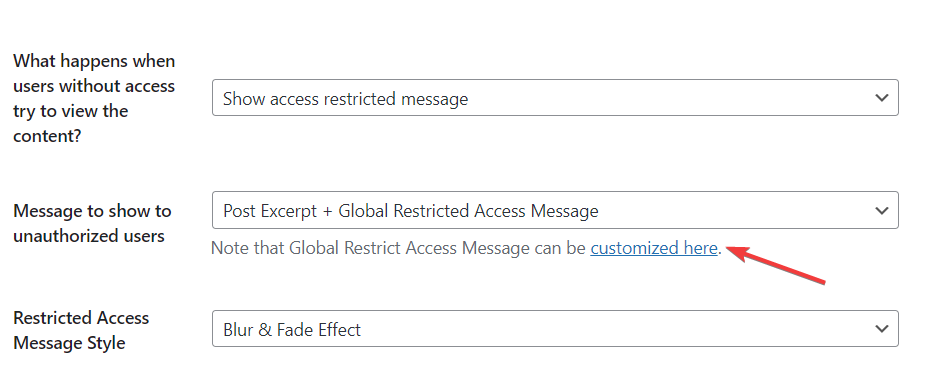
Click on the “customized here” link, as shown in the image above, to add a custom message for your content restriction to inform visitors they need to become premium members to access the full content.
Hit the Save Rule button to save your settings.
If we visit any locked posts based on the above rules, we will see a notification as shown below.
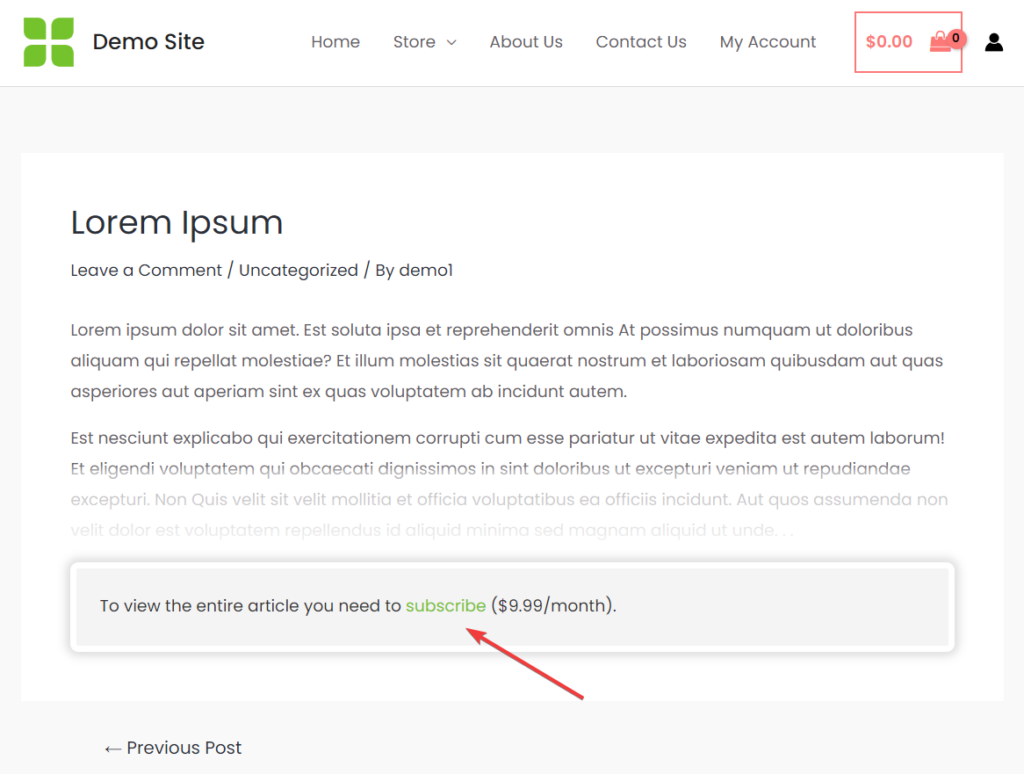
By completing this setup, we have successfully made all posts in the premium category private. Only paid subscribers or selected user roles can access them.
Note that you can create as many content protection rules as you want. You can also deactivate/activate any rule from the Rules listing page.
This is how simple it is to create private pages and posts with the ProfilePress plugin.
Wrapping it Up
We have learned about WordPress private posts and pages, how to create them using the visibility settings in WordPress, and the ProfilePress plugin.
Suppose you want a password-protected or hidden page on your site; the default WordPress visibility options will suffice. But if you need more granular and flexible privacy options, use ProfilePress.
ProfilePress is the best WordPress content restriction plugin. Also, it allows you to create a complete WordPress membership site that could make you money.