How to Start an Online Weight Loss Business with WordPress
Are you thinking about starting an online weight loss business with WordPress?
The global weight loss industry is worth hundreds of billions of dollars, and more people than ever are turning to the internet for guidance, coaching, and support. Whether you’re a fitness coach, nutritionist, personal trainer, or just someone passionate about health, there’s a golden opportunity to turn your knowledge into a profitable online business.
With WordPress and a powerful e-commerce and membership plugin like ProfilePress, setting up your membership site is easier than you might think. You don’t need to be a tech wizard or spend thousands hiring developers.
In this guide, you’ll discover why a membership site can be a game-changer for your weight loss business, the benefits of using WordPress, and how ProfilePress helps you create a professional, subscription-based website. You’ll also get a step-by-step walkthrough to launch your online business the right way.
Why a Membership Site Can Benefit Your Weight Loss Business?
A membership site requires subscribers to pay for access to your exclusive content. Unlike a regular website where anyone can view your fitness tips or meal plans, a membership site places your premium resources like workout programs, coaching videos, and nutrition guides behind a secure paywall. This means only paying members can unlock the full value of what you offer.
Here’s why this model works so well:
Consistent, Recurring Revenue: Instead of relying on one-off product sales or services, a membership site gives you predictable income through monthly or yearly subscriptions. This steady stream of revenue helps you plan better, grow faster, and focus more on delivering value than constantly hunting for new customers.
Long-Term Client Engagement: Fitness and weight loss are long-term journeys, not quick fixes. A membership model allows you to guide your clients consistently over time. You can introduce weekly meal plans, monthly challenges, and progress-tracking to keep them motivated and engaged.
Encourages Accountability and Motivation: When people pay for access, they’re more likely to stay committed. They’ve invested financially, and psychologically, they don’t want to waste that investment. This built-in accountability is powerful; it helps drive results and keeps your members coming back for more.
Build a Community and Support System: A membership site enables you to foster a community of like-minded individuals. Whether it’s through comment sections, discussion boards, or private groups, your members will feel connected and supported. That social aspect can dramatically improve retention and encourage progress.
Now that you understand why a membership site is an excellent choice for your weight loss business, let’s explore the benefits of using WordPress and ProfilePress to bring it to life.
Benefits of Using WordPress
When launching an online weight loss business, choosing the right platform is critical. You need something reliable, flexible, and beginner-friendly.
Here’s why WordPress is the ideal platform for your fitness business:
Free and Open-Source: WordPress itself is completely free to use. You need to pay for a domain name and hosting. That means more of your budget can go toward growing your business, like marketing, content creation, or investing in a membership/ecommerce plugin like ProfilePress.
Beginner-Friendly: You don’t need to be a web developer to use WordPress. With its clean dashboard, easy-to-navigate interface, and thousands of themes, you can set up a beautiful and functional website without writing a single line of code.
Thousands of Plugins: Need to add a contact form, improve SEO, accept payments, or send emails to your members? With WordPress, there’s a plugin for nearly everything. Its vast plugin ecosystem makes it easy to expand your site’s features without touching a single line of code.
Benefits of ProfilePress for Weight Loss Business
Now that we’ve covered why WordPress is the ideal platform, let’s talk about the real powerhouse behind your weight-loss membership website, ProfilePress.
This all-in-one plugin is designed to handle everything from user registration to content restriction and subscription payments. It’s a must-have for anyone serious about building a professional, scalable, and user-friendly online weight loss business.
Here are the benefits that make it an essential part of your setup:
Member Registration and Login: ProfilePress allows you to create beautiful, branded registration and login forms that match your site’s design. You can also customize fields to collect important information, such as health goals, age, or fitness level, helping you serve your members better from day one.
Create and Manage Membership Plans with Ease: Want to offer different access levels, like a free plan for tips and a premium plan for full meal and workout plans? ProfilePress makes it incredibly easy to set up multiple membership tiers. You decide what content each plan unlocks, set the pricing, and even offer free trials or discounts to boost sign-ups.
Protect Content: ProfilePress lets you restrict access to members only. You can protect entire pages, specific posts, or even sections within a post.
Seamless Payment Integration: ProfilePress integrates with popular payment gateways like PayPal, Stripe, Paystack, Razorpay, and Mollie.
Custom Redirects and User Experience Control: With ProfilePress, you control what happens after login, registration, or logout. This level of control helps you craft a smooth, on-brand experience for your users.
Lightweight and Fast: Unlike bloated plugins that slow down your site, ProfilePress is optimized for performance. It’s lightweight, fast, and built with clean code so your users enjoy a smooth, responsive experience on both desktop and mobile.
ProfilePress Addons: ProfilePress has an extensive collection of powerful addons that allow you to expand your site’s functionality and customize your online weight loss business to meet your goals. Some of the available addons include Mailchimp, Campaign Monitor, MailerLite Addons, Social Login Addon, WooCommerce Integration Addon, Google reCAPTCHA Addon, Metered Paywall Addon, Custom Fields Addon, and more.
Setting Up Your Online Weight Loss Business with WordPress
In this section, we’ll walk you through the steps of building an online weight loss business with WordPress.
To begin, you’ll need a live WordPress site. If you don’t have one yet, no worries; setting up a WordPress site is easy. Check out this Getting Started guide to get rolling.
Once your WordPress site is up and running, follow these steps:
Step 1: Design Your Weight Loss Program
Before setting up your membership site with ProfilePress, it’s important to map out what your weight loss program will offer. This step lays the foundation for your business and helps define the value you’re providing to your members.
Here’s how to design a structured and results-driven weight loss program:
Define Your Niche and Target Audience: Start by identifying who your program is for. Are you targeting busy moms, working professionals, people with specific dietary needs, or beginners just starting their weight loss journey? Defining your audience will help you craft content that truly resonates and drives results.
Choose Your Program Format: Decide how you want to deliver your weight loss program. Common formats include:
- Video Courses: Step-by-step workout routines or meal prep tutorials.
- Meal Plans: Weekly or monthly diet guides designed for different goals (e.g., fat loss, keto, plant-based).
- Workout Plans: Printable or digital schedules, including strength training, cardio, and flexibility routines.
- Live Coaching or Webinars: Weekly check-ins or live Q&A sessions to keep members engaged.
- Challenges: 30-day weight loss challenges to drive motivation and accountability.
You can use one format or combine several to create your online weight loss business.
Structure Your Program Content: Break down your content into manageable modules or sections. For example:
- Week 1: Detox and goal setting
- Week 2: Clean eating habits and grocery lists
- Week 3: Beginner workout routines
- Week 4: Mindset and motivation tips
Structuring your program helps guide your users through a logical, progressive journey toward achieving their goals.
Set Milestones and Deliverables: People are more likely to stay committed if they can track their progress. Build in milestones like:
- Weekly check-ins
- Progress tracking forms
- Badges or rewards for completing phases
- Certificates of completion
This not only encourages consistency but also adds perceived value to your program.
Decide What’s Free vs. Paid: Determine which parts of your content will be freely accessible and which will require a membership. For example:
- Offer free previews, tips, or sample meal plans to build trust.
- Reserve full workout programs, coaching, or advanced nutrition guides for paid members.
This structure is easy to implement using ProfilePress’s content protection feature.
Gather or Create Your Content: Now that your structure is in place, start creating or collecting your assets:
- Shoot videos
- Write guides or blog posts
- Design downloadable resources like checklists or planners
- Create custom images or infographics
Make sure your content is high-quality, easy to follow, and visually appealing.
Once your weight loss program is designed, you’re ready to start building your WordPress site with ProfilePress and turning your program into a membership-based business.
Pro Tip: You don’t need to have everything ready before launching your site. Begin by creating a clear outline of your program, focusing on a few core elements, such as a video lesson and a downloadable meal plan. You can continue adding new content and expanding your offerings as your business grows.
Step 2: Install and Activate ProfilePress
To do this, visit the ProfilePress website to choose a plan and complete your purchase.
Once purchased, download the plugin ZIP file from your account dashboard to your computer.
Next, log in to your WordPress admin area and navigate to Plugins > Add New.
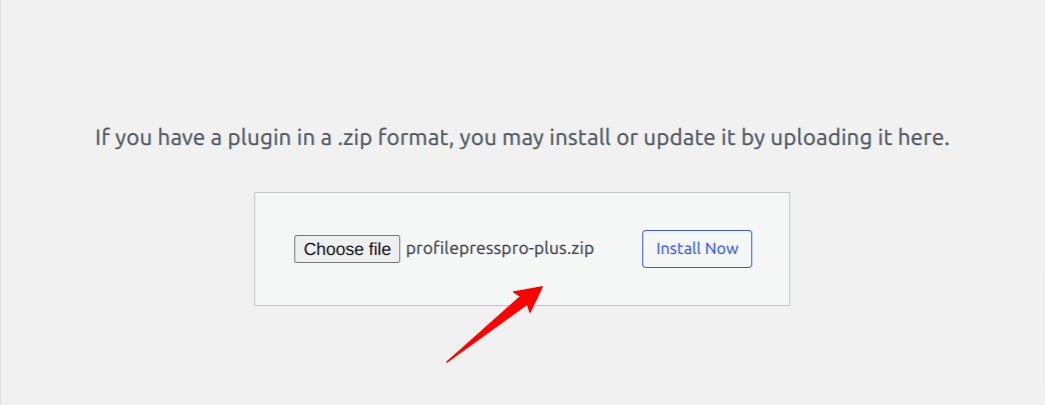
Click Upload Plugin, then drag and drop the ZIP file you just downloaded. Next, click Install Now, and once the installation is complete, hit Activate to enable ProfilePress on your site.
After installing and activating ProfilePress, the next step is to activate your license key. This is important for unlocking all premium features and ensuring your plugin stays up-to-date with the latest improvements and security updates.
To activate your license, head to the ProfilePress > Settings section in your WordPress dashboard and click on the License tab. Enter the license key you received after purchase, then click Save Changes.
Next, configure the general settings in ProfilePress to match the structure and goals of your online weight loss business.
Step 3: Set Up Your Weight Loss Membership Plans
Now that ProfilePress is installed and activated, it’s time to create membership plans for your weight loss program. These plans act as access levels, allowing you to deliver different content, features, or coaching services based on the membership tier your users choose.
To set up your plans, go to ProfilePress > Membership Plans > Add New to create your first plan.
The next screen is split into three main sections: Plan Details, Subscription Settings, and Downloads & Integration. Each section helps you set up important parts of your membership plan.
Let’s go through each one.
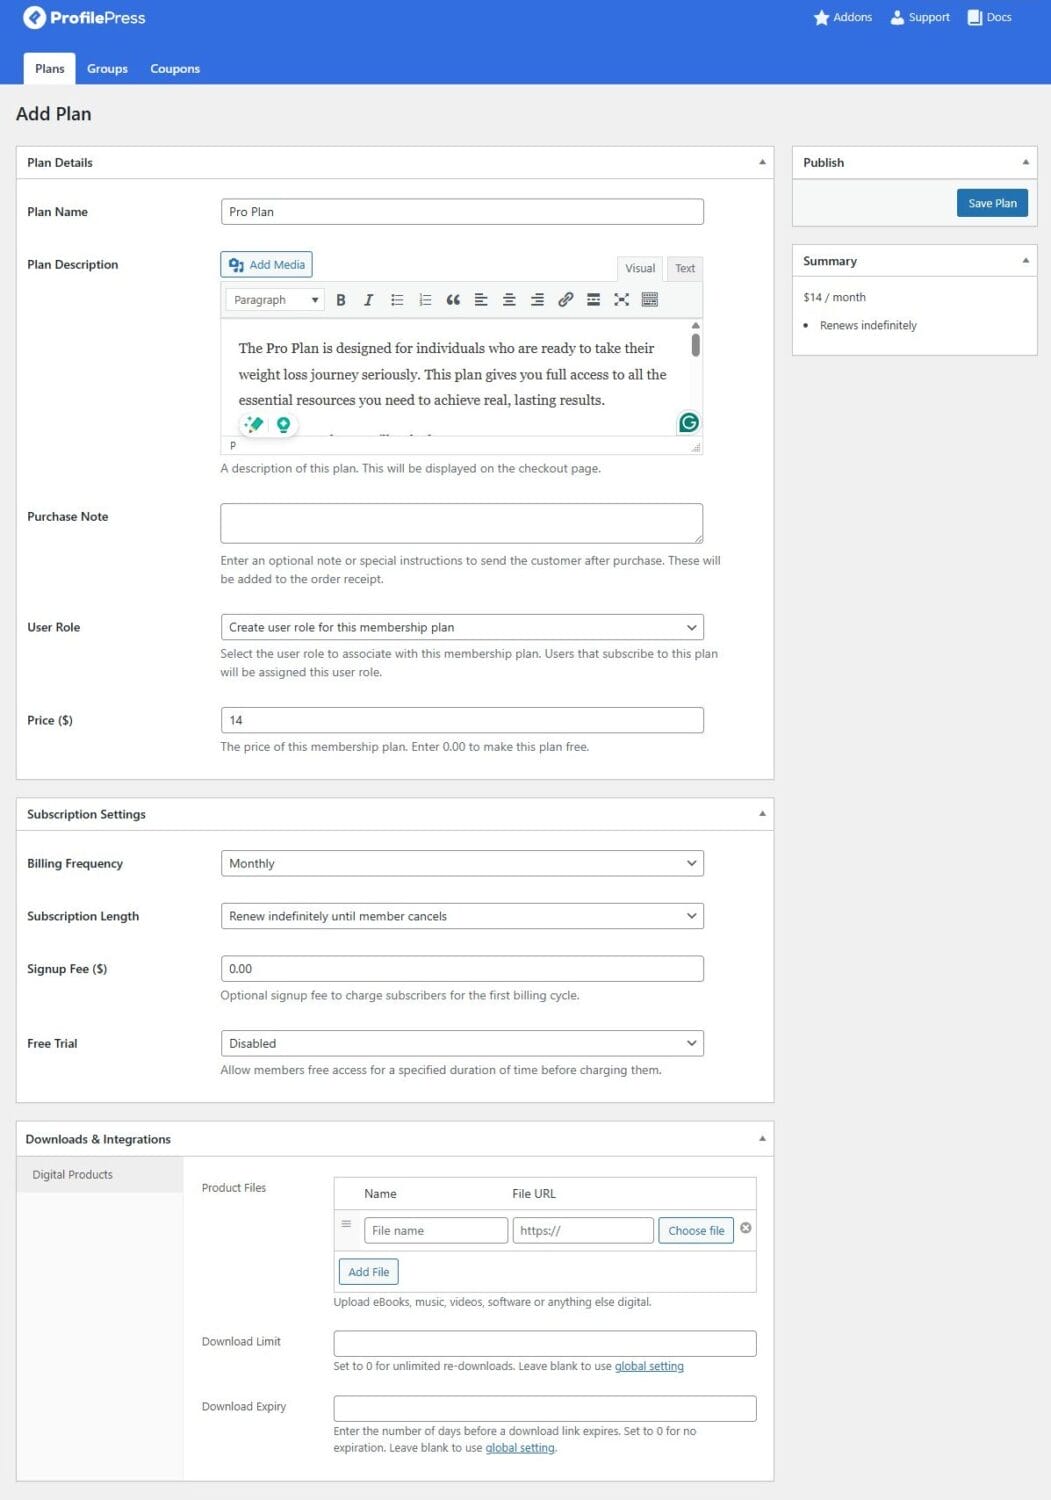
Plan Details Section
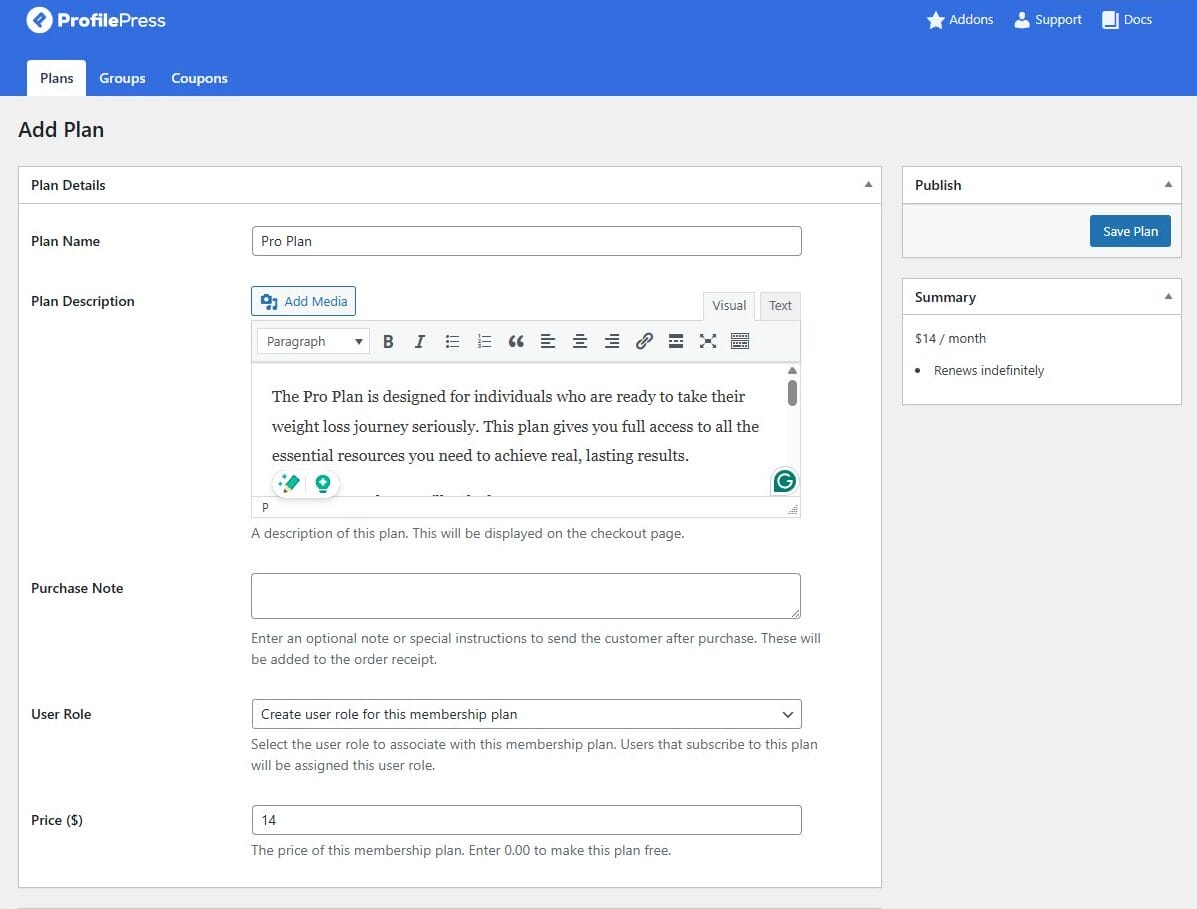
This is where you set up the basics of your membership plan.
Plan Name: This is the title of your membership plan. It will show on your website, so choose a name that clearly explains what the plan is and catches people’s attention.
Plan Description: Use this space to describe what members will get. Mention the benefits, what’s included, and why it’s worth joining. This text appears on your pricing or subscription page, so make it appealing and helpful.
Purchase Note(optional): In this section, you can add a thank-you message or important information that gets sent to the member after they sign up.
User Role: You can assign a special role to people who join this plan. If you choose the option to “Create a user role for this membership plan,” WordPress will automatically create a new role and assign it to each member. This helps you organize your members easily.
Price: This section allows you to set how much this plan will cost. Ensure the price reflects the value of what you’re offering while remaining reasonable for your audience.
This section is where you shape your membership offer, so take your time to make it clear, helpful, and inviting for potential customers.
Subscription Settings Section
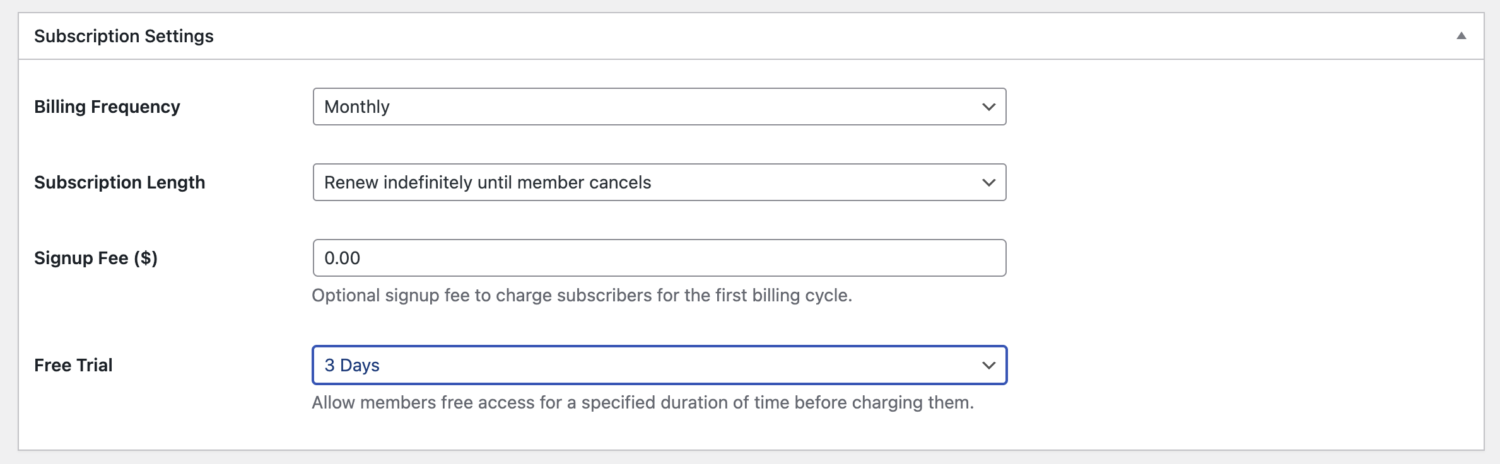
In this part, you’ll set how your membership plan works; things like how often members are charged, if there’s a free trial, and whether to include a signup fee.
Below is a quick explanation of the settings you’ll find:
Billing Frequency: Choose how often members should be billed. You can set it to daily, weekly, monthly, every three months, twice a year, once a year, or make it a one-time payment.
Subscription Length: Decide how long the subscription should last.
- Ongoing Subscription: This means members will keep getting billed until they cancel. It’s excellent for programs intended to run continuously.
- Fixed-Term Subscription: Here, you can set a specific number of payments, like monthly payments for 12 months. This works well if you’re offering a time-based program, such as a 6-week or 12-month weight loss journey.
Signup Fee: You can charge a one-time joining fee when someone signs up. This is useful if there are initial setup costs or extra value given at the beginning.
Free Trial: Offer new users a free trial to try out your program before they commit. You can set this to 3, 5, 7, 14, 21, or 30 days. It’s a great way to let potential members experience the value of your plan, which can help increase paid signups later.
These settings help you control how your membership is billed and how new users get started, so take your time to choose what works best for your online weight loss business and your audience.
Downloads & Integration Section
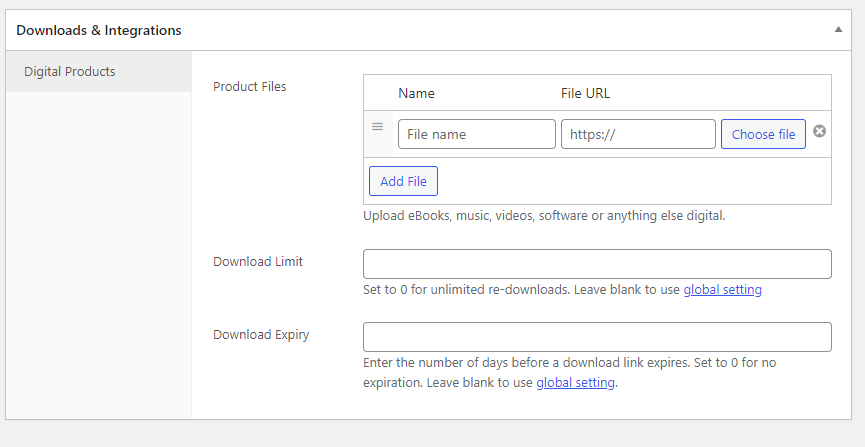
This section is instrumental if your weight loss membership includes digital resources such as meal guides, recipe books, or video files.
Here, you can upload the digital file that members will receive as part of their plan. You can also control how many times they can download the file and how long the download link stays active.
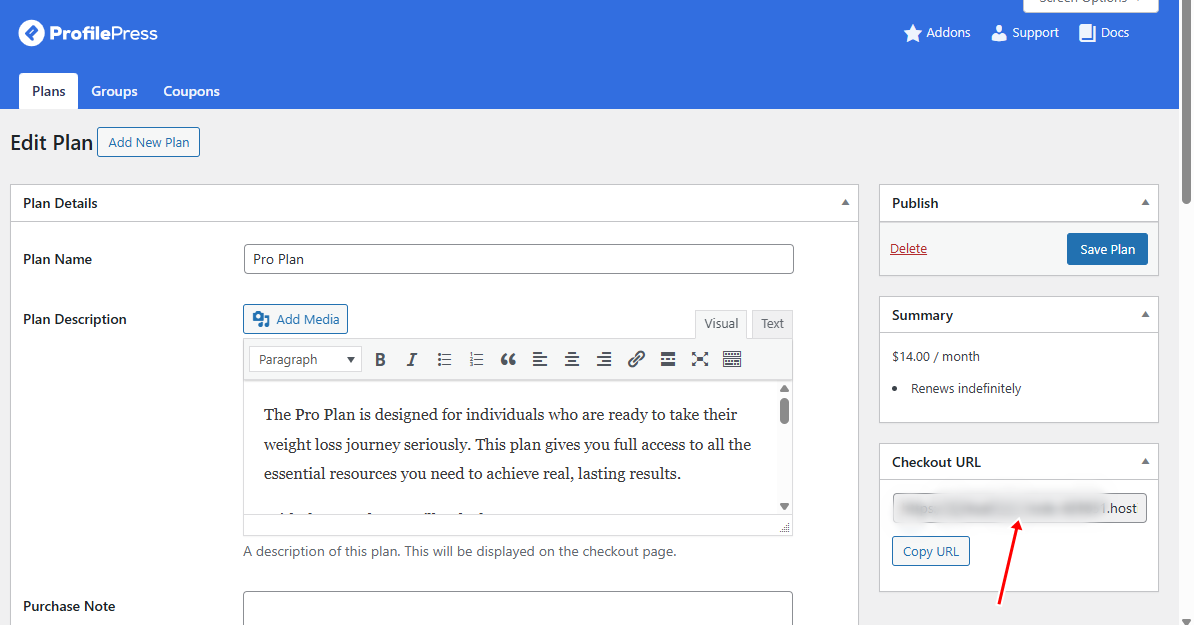
When you’re done setting everything up, click the Save Plan button to make your membership plan live.
Once it’s published, a checkout link will be created. You can use this link anywhere on your website to start accepting new members right away.
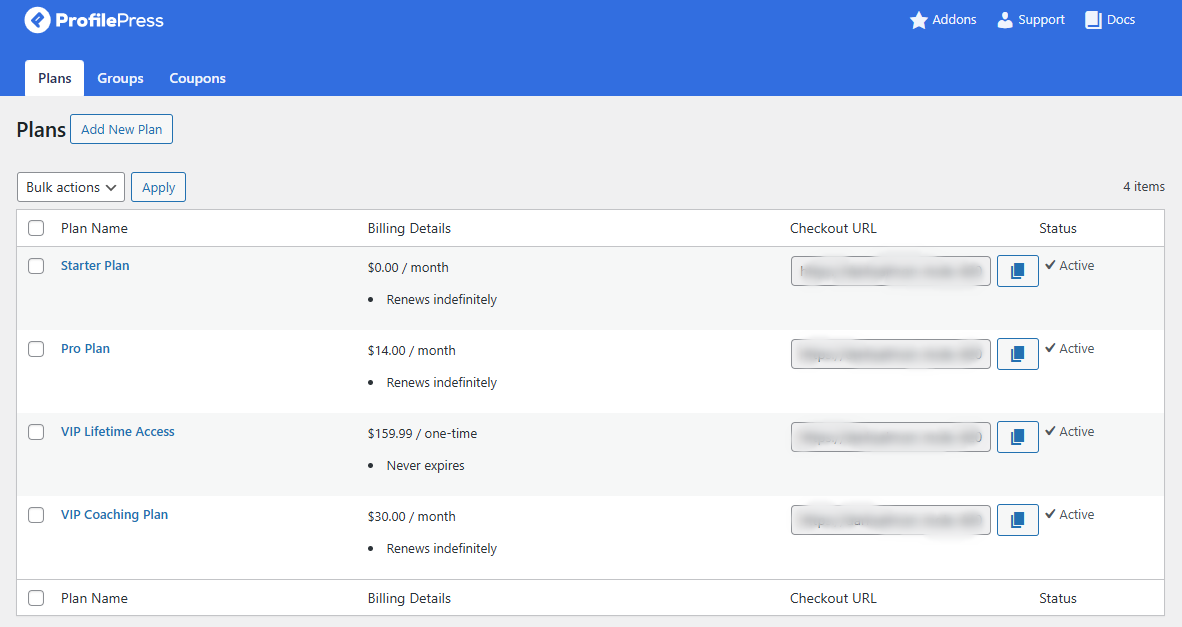
To create additional membership plans, follow the same steps you used to set up your first plan.
Once your plans are set up, the next step is to configure the payment gateways so you can start accepting payments. Let’s walk through how to do that.
Step 4: Setting Up Payment Gateways
ProfilePress makes it easy to manage and accept subscription payments right from your WordPress dashboard. To get started, go to ProfilePress > Settings and click on the Payments tab.
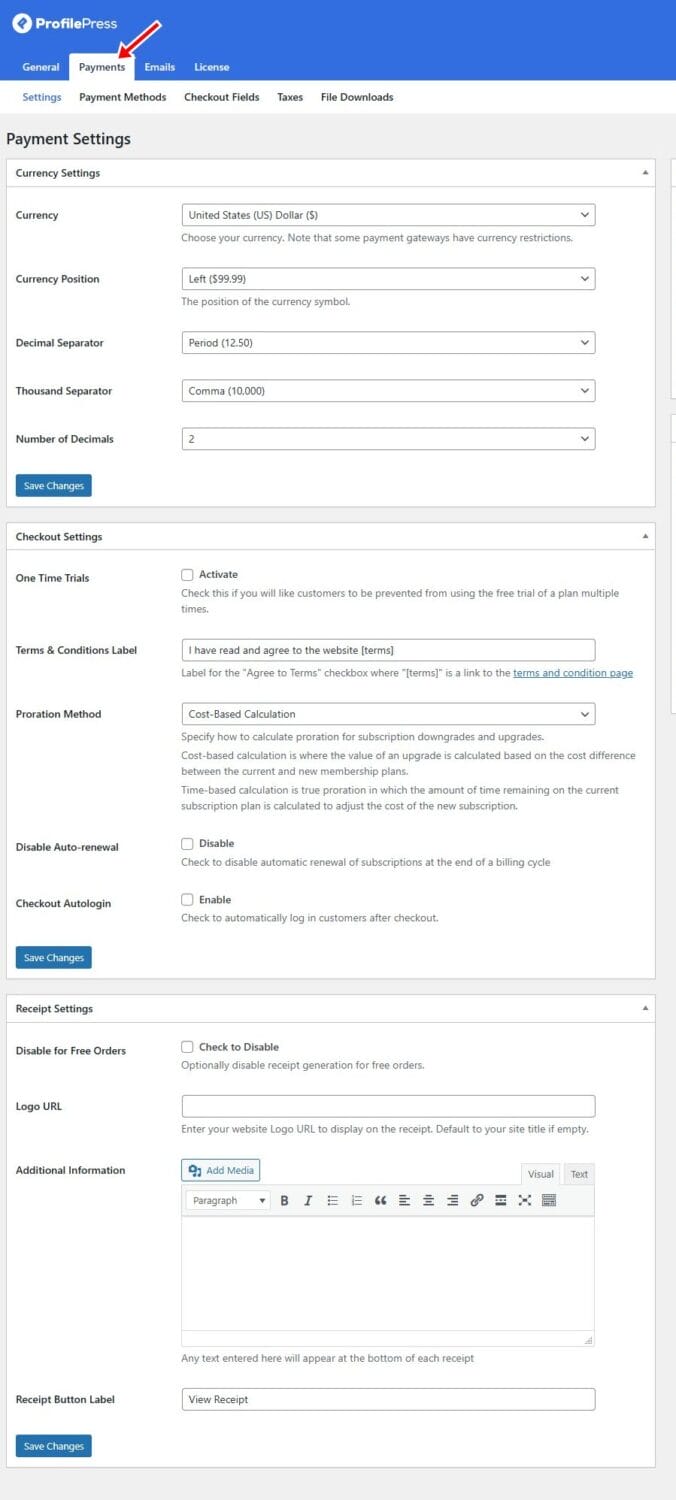
In this section, you can set your preferred currency and adjust basic payment settings. Next, click the Payment Methods tab at the top of the page to access the gateway setup options.
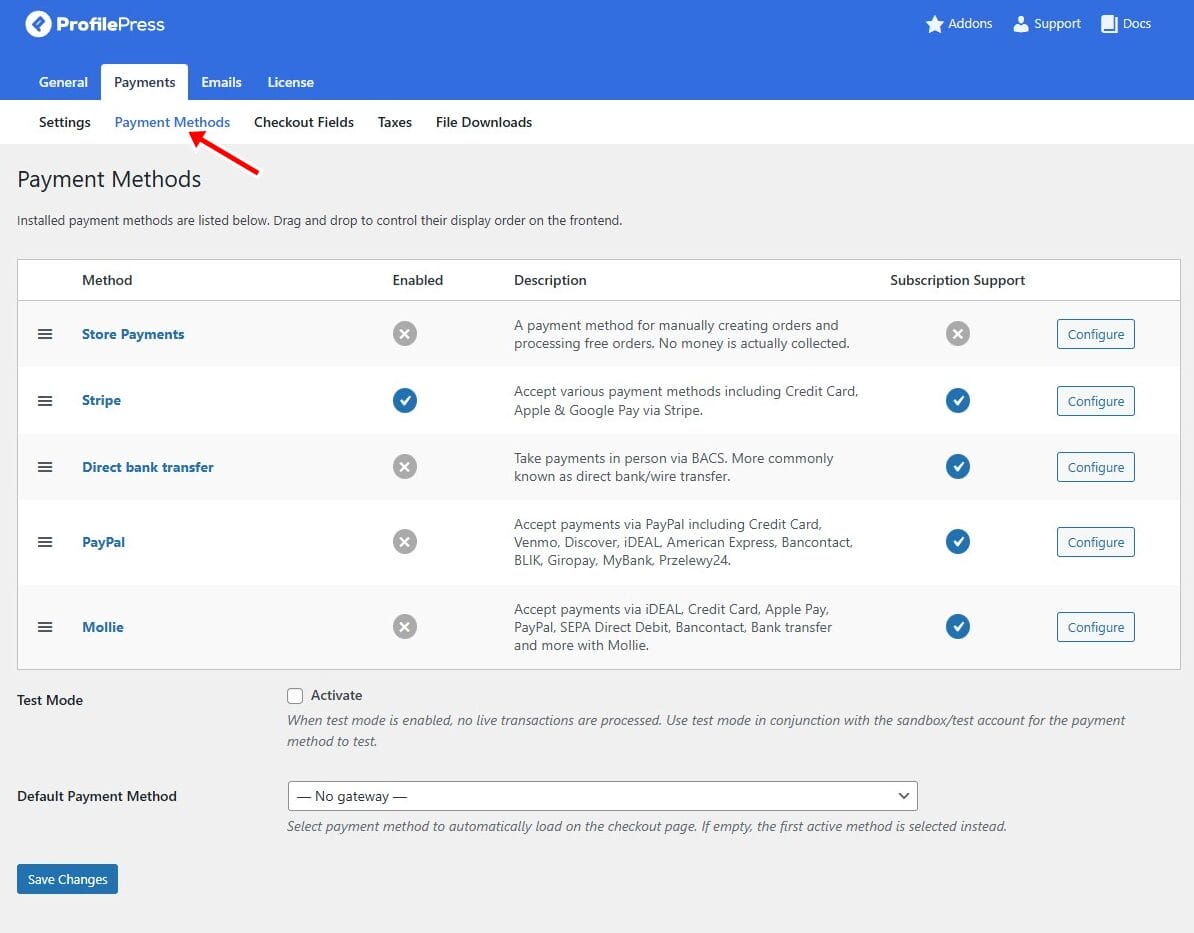
ProfilePress supports a variety of payment gateways, including Stripe, PayPal, Razorpay, Paystack, Direct Bank Transfer, and Mollie, giving you flexible and secure ways to collect payments from members.
To enable a payment method, select your preferred option and enter the required API keys or credentials provided by the payment provider. This step connects your site to the gateway so you can start processing transactions.
After adding your payment details, click Save Changes to activate the gateways and start accepting membership payments on your website.
Step 5: Creating Content Restrictions
With your membership plans and payments set up, the next step is to protect your premium content, such as exclusive weight loss programs, diet plans, or workout guides, so that only paying members can access them.
To do this, go to ProfilePress > Content Protection and click the Add a Protection Rule button.
Then give your rule a name and choose the content you want to restrict. This could be specific pages, posts, categories, tags, or even custom post types.
ProfilePress lets you set advanced access conditions using AND/OR rules, giving you full control over who can access what.
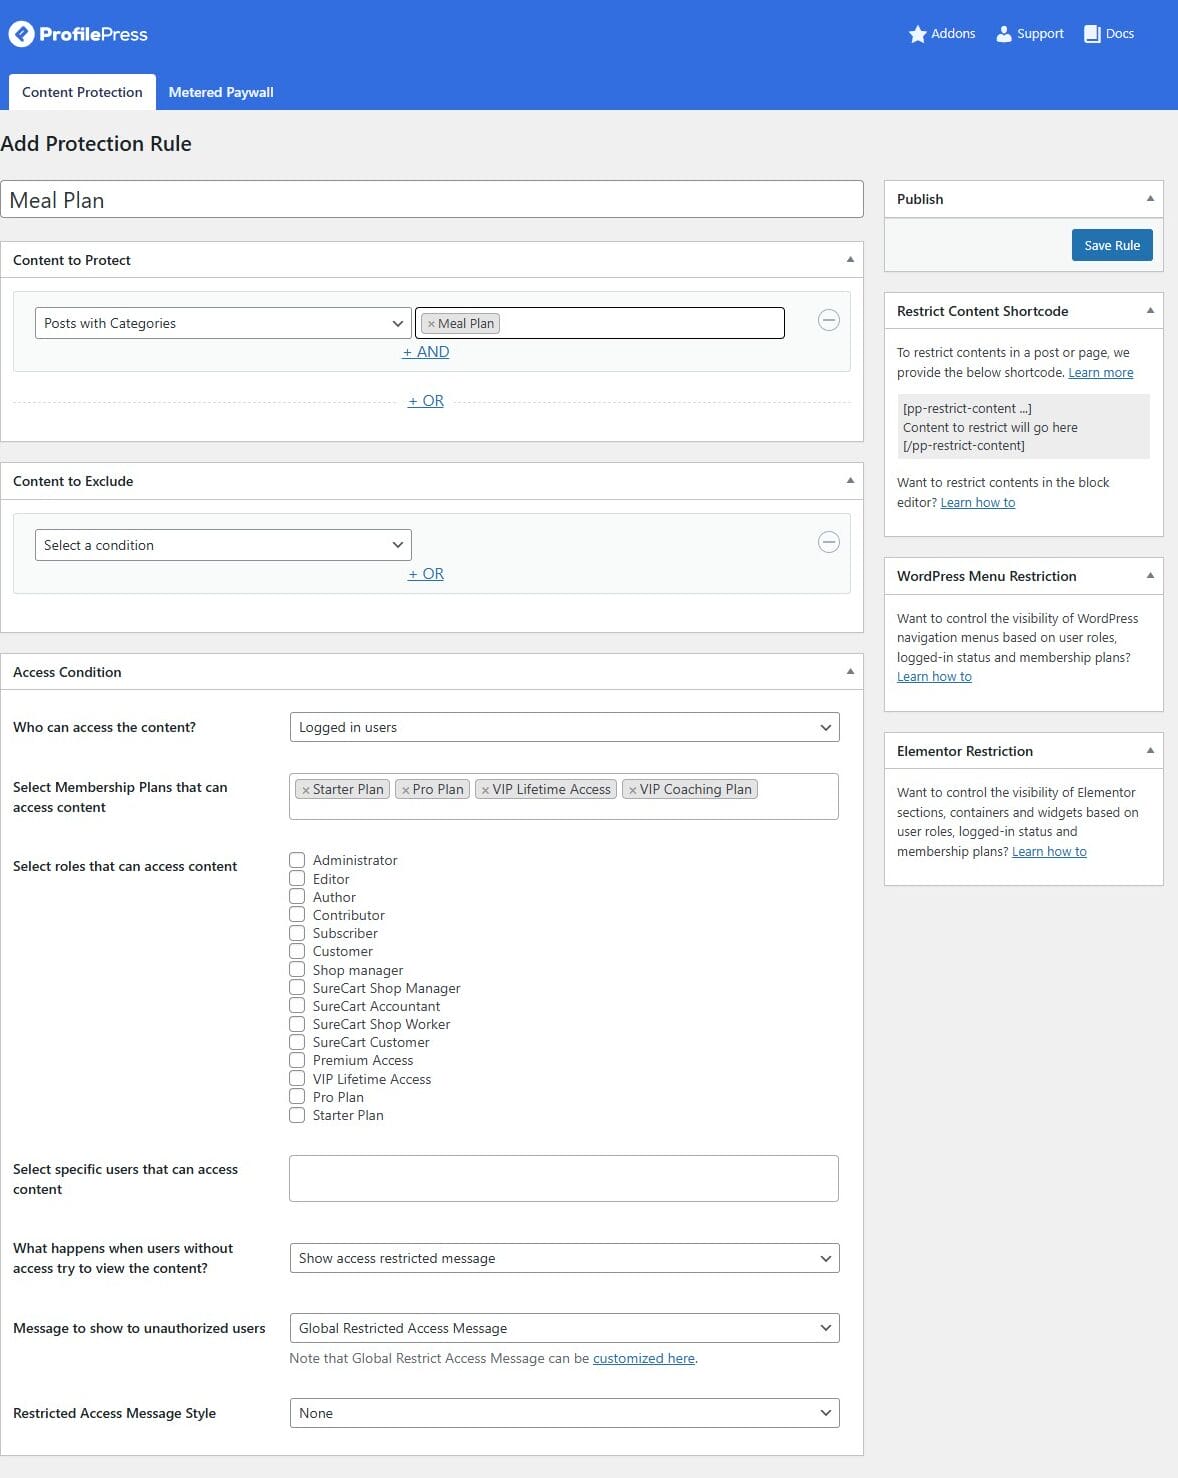
Next, choose who should have access. You can restrict content to logged-in users, specific membership plans, user roles, or even individual usernames.
You’ll also decide how to handle visitors who don’t meet the access conditions. You can show a custom restriction message, redirect them to a specific page, or display a teaser with a prompt to sign up.
To customize the restriction message, click the Customization link below the dropdown and write something that encourages users to join, like:
This premium content is available to members only. Sign up to unlock the full plan!

Once everything is set, click the Save Rule button to activate your content restriction.
Additionally, ProfilePress supports metered paywalls, allowing visitors to access a limited number of premium content pieces before requiring a membership.
Enabling Metered Paywall
To set up the metered paywall feature in ProfilePress so you can grant limited free access to premium resources on your WordPress website, go to ProfilePress > Addons in your WordPress dashboard and activate the Metered Paywall addon.

Once activated, click on the Settings button next to the addon to open the configuration screen. You can also access the settings anytime by going to ProfilePress > Content Protection > Metered Paywall.
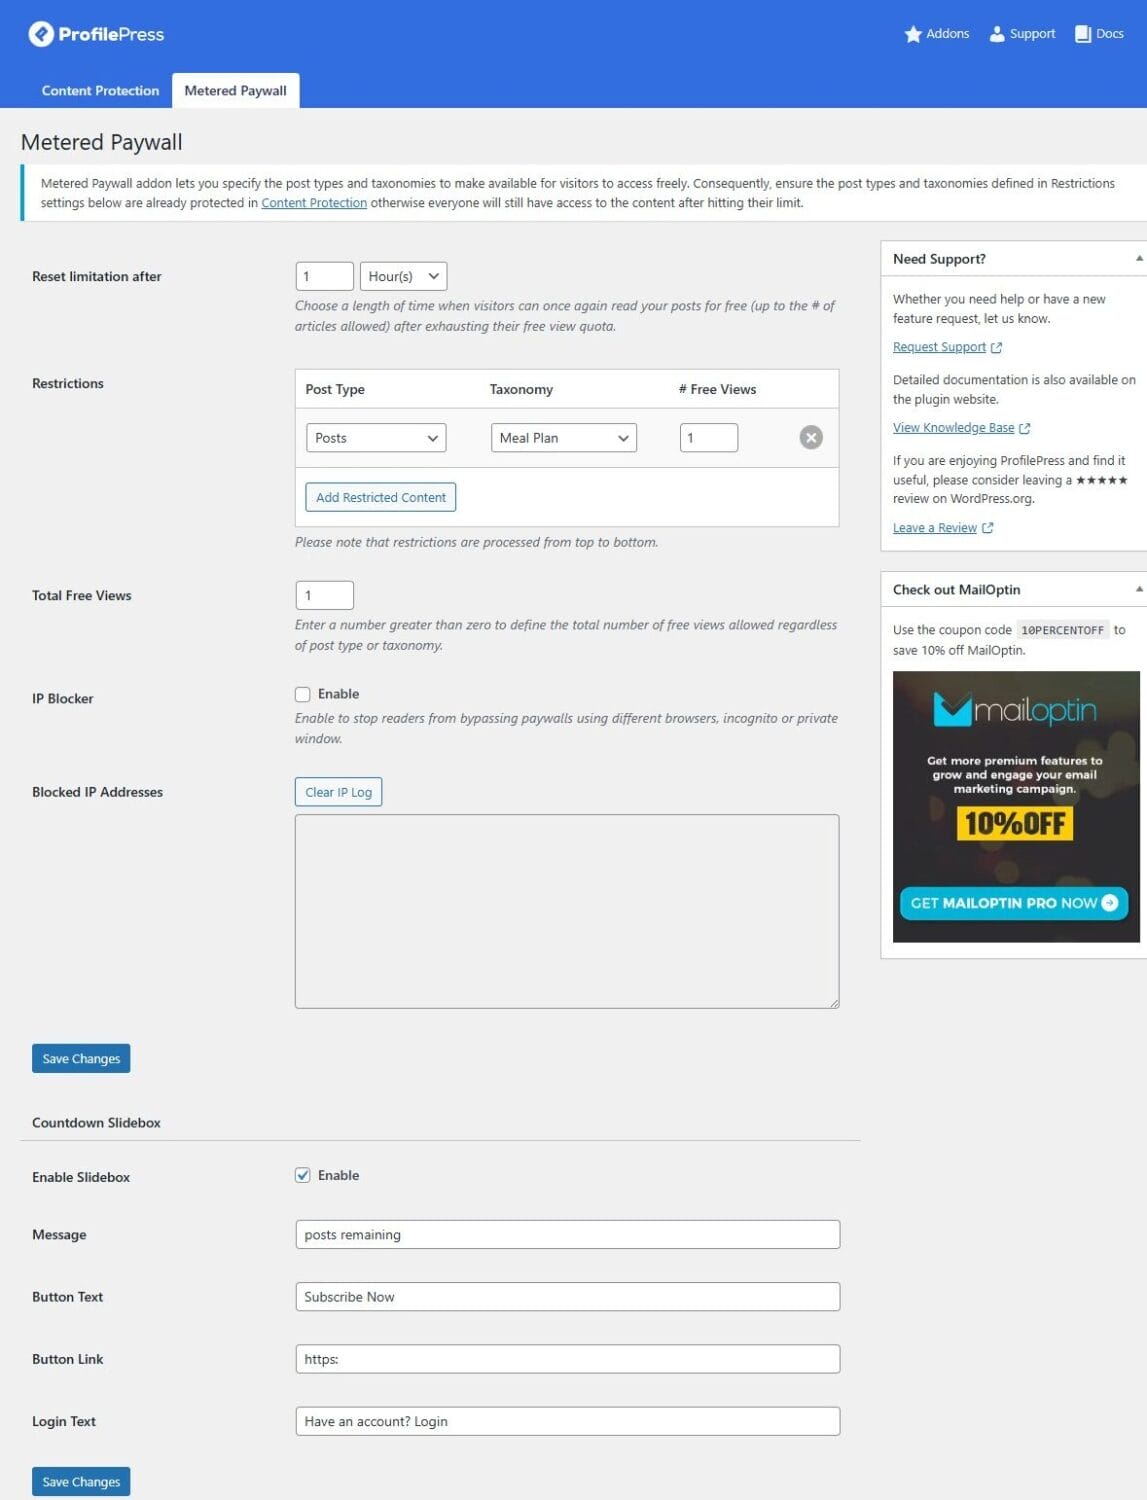
Here’s how to configure it:
Reset Limitation: This option lets you set how often the free view limit resets (e.g., every 7 days). You can define the reset interval in hours, days, weeks, months, or years.
Restriction Settings: With this option, you can choose which post types and taxonomies are eligible for free views, and set the number of free views each visitor gets. You can also tie this access to specific membership plans.
Total Free Views: This option allows you to define a global limit on how many protected posts a user can view for free across your entire site.
IP Blocker: This option helps you to prevent users from bypassing the view limit using incognito mode or VPNs..
Countdown Slidebox: With this feature, you can show a small, customizable popup to create urgency and encourage signups. You can edit the message, button text, link, and even add a login prompt.
When you’re done, click Save Changes to apply your settings.
Step 6: Design Your Registration and Login Pages
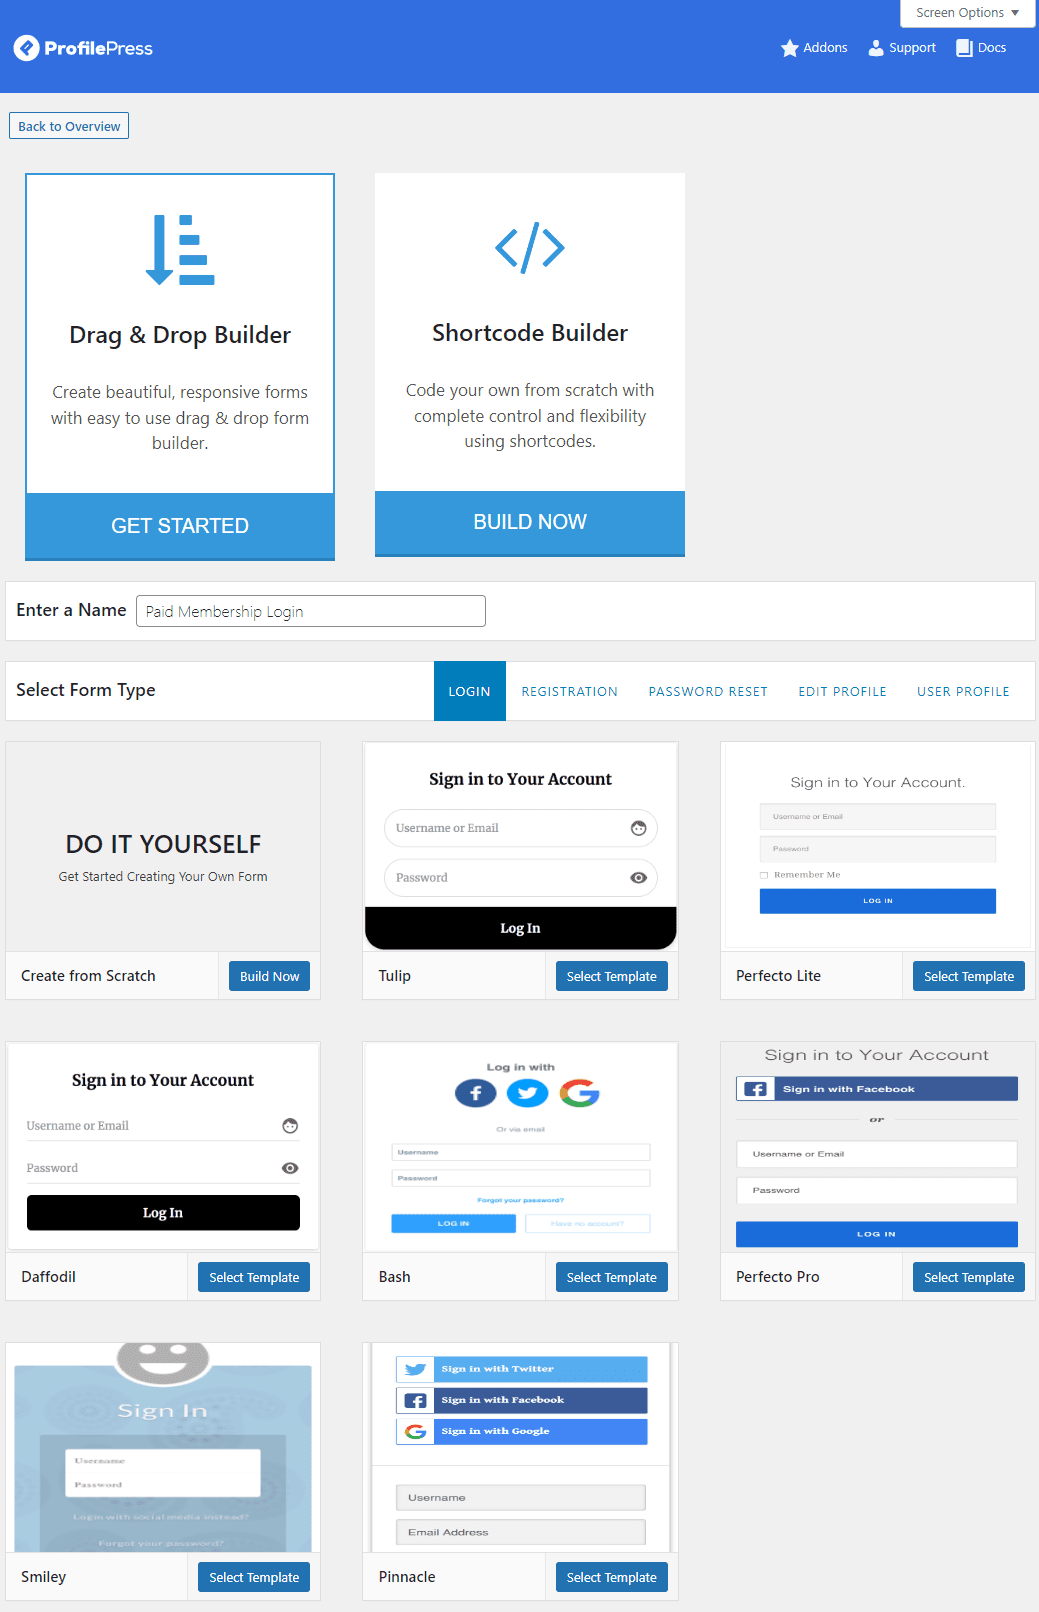
To do this, head to ProfilePress > Forms & Profiles in your WordPress dashboard and click Add New.
Choose the Drag & Drop Builder, give your form a name, and select Registration as the form type.
Next, select a pre-designed template. Then click on Select Template to customize it to your liking.
Use the drag-and-drop editor to add or rearrange form fields, edit labels, and include any custom fields relevant to your membership site.
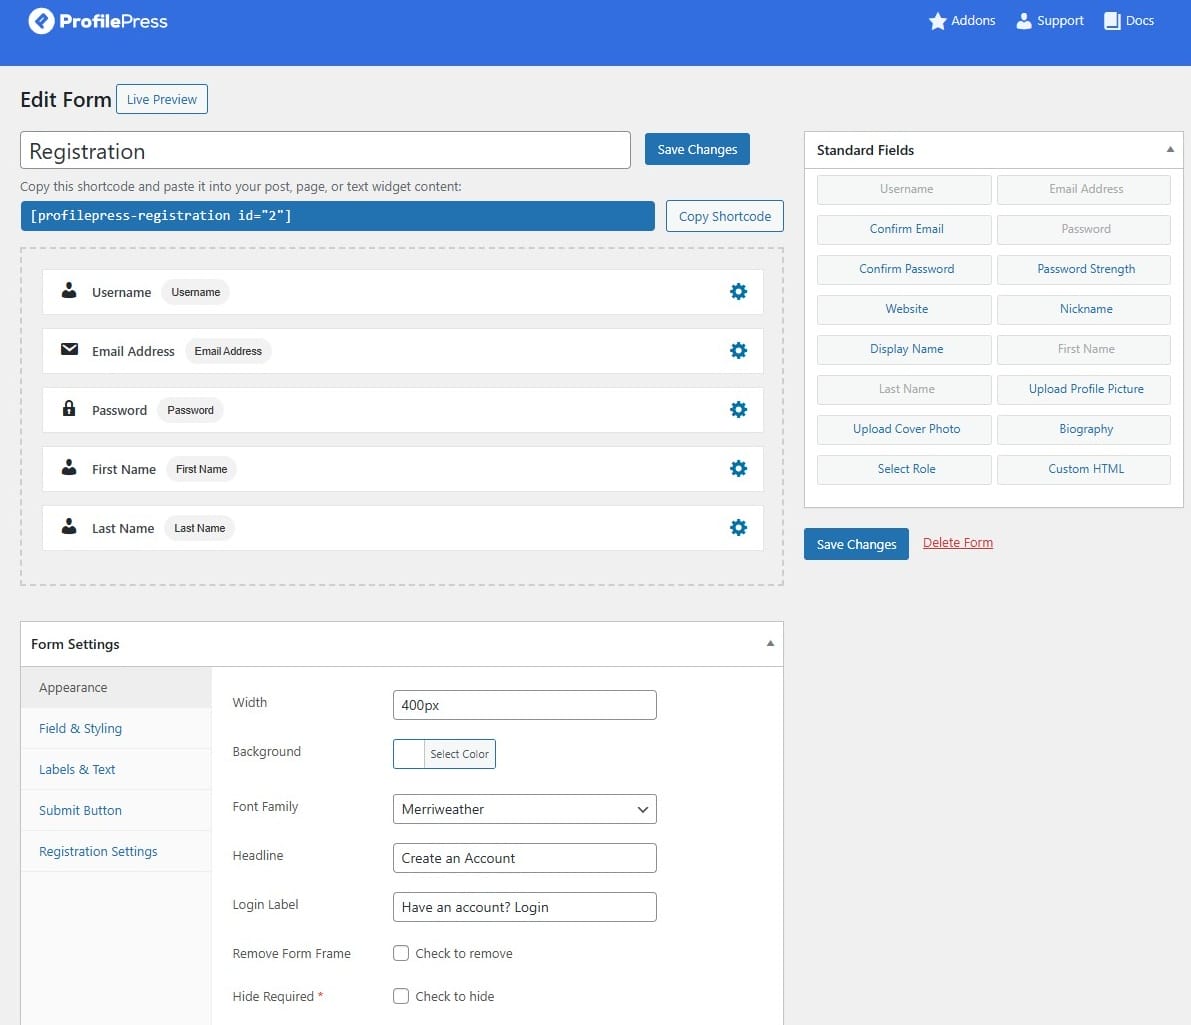
Once done, click Save Changes and copy the shortcode generated for the form.
Next, create a new registration page (or edit an existing one) and paste the shortcode into a Shortcode block.
To create a login form, follow the same process, choose Login as the form type.
After customizing it, add the login form shortcode to a separate page or replace the default WordPress login form.
Next, we need to make these pages the default. To do this, go to ProfilePress > Settings > General tab > Pages.
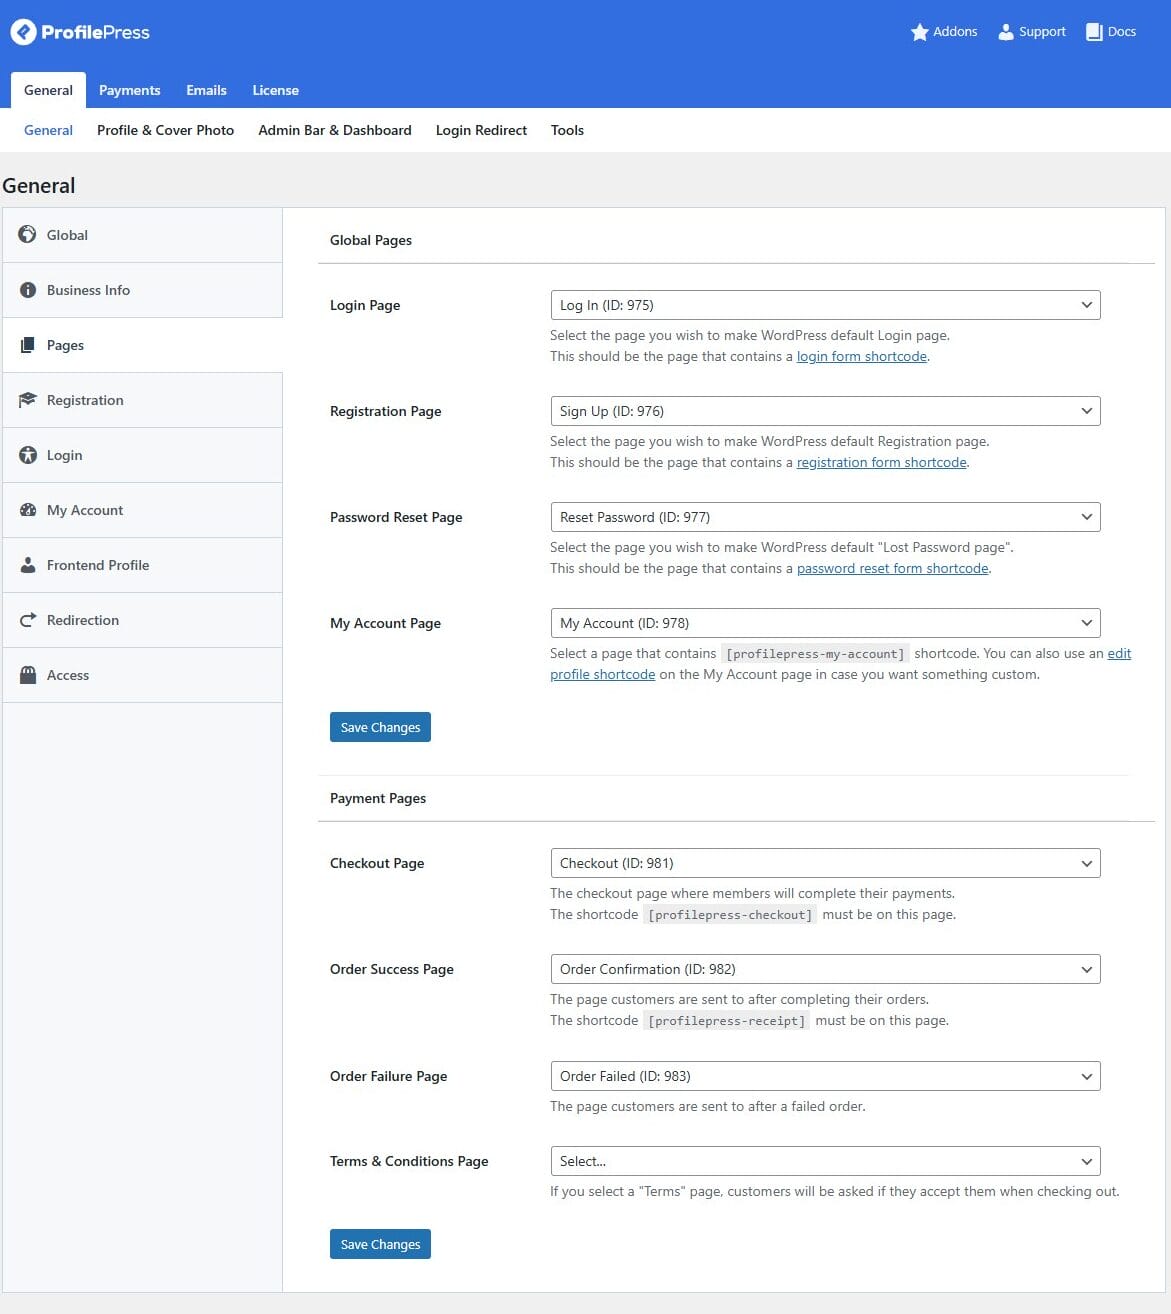
In the Login Page dropdown, select the page where you added the ProfilePress login form shortcode. Do the same for the Registration Page by choosing the page containing your registration form shortcode.
Click Save Changes to confirm and apply your settings.
ProfilePress also offers built-in support for social login, making it even easier for users to sign in using platforms like Google or Facebook.
Step 7: Launch Your Website
With your membership plans, payment gateway, content protection, and user registration pages all set up, it’s time to launch your online weight loss business officially.
Before going live, take a moment to test your site thoroughly. Ensure your registration and login forms work correctly, memberships grant proper access, and your checkout or payment process functions without issues.
Once everything looks good, publish your pages and announce your launch.
To attract members, start promoting your website through different channels such as social media, email newsletters, fitness forums, and influencer partnerships. Share valuable content, such as tips, transformation stories, and free resources, to build credibility and drive traffic.
You can also run targeted ads on platforms like Facebook, Instagram, or Google to reach people actively searching for weight loss solutions.
Finally, optimize your website for search engines using a CrawlWP WordPress SEO plugin, which helps boost your website’s visibility on search engines by instantly submitting your content and pages for indexing to Google, Bing, Yandex, Naver, Yep, Seznam.cz, etc. It also helps detect pages on your website that are not indexed and automatically submits them for indexing. Additionally, it provides an SEO Stats feature where you can view and monitor your website’s performance on search engines.
Launch Your Online Weight Loss Business Today
Starting an online weight loss business is no longer just for big fitness brands. With WordPress and ProfilePress, you can launch a professional, membership-based platform that delivers real value.
From building custom registration forms and setting up subscription plans to accepting payments and protecting content, ProfilePress provides everything you need to run a successful fitness site.
The online fitness industry is thriving, and your business can be part of it. By following the steps in this guide and putting in consistent effort, you’ll be well on your way to building a sustainable income while helping people achieve their health goals.
Start today and make your impact.