How to Add Public or Private Document Library to Your WordPress Site
There are many organizations that need to share documents or other types of resources with their clients, members, or users. The best way to set this up is by creating a WordPress document library.
Instead of creating a basic list that links to the different documents or resources, you might consider offering a searchable way to find documents to improve the user experience. This way, people will have an easier time finding the documents they’re looking for.
Depending on your specific needs, the document library can be public and visible to anyone that accesses it or private to specific people who require access.
In this tutorial, I will reveal the easy and professional way to create a WordPress document library that can be public or private (or a bit of both!).
We’ll explain how you can do this in WordPress using the Document Library Pro plugin.
Types of Document Libraries
Different organizations have different document libraries in terms of how they’re structured and the types of files they contain. Here are some popular types of document libraries to inspire yours:
- Document library. A standard document library may contain important documents for staff members or users, such as articles, forms, guidelines, downloadables, and printables.
- Resource database. A resource database typically contains documents that users might need to access from time to time, such as a code of conduct, policies, and other helpful resources.
- Audio library. An audio library might contain various audio files like training courses, podcasts, music, or lectures.
- PDF library. You can create a PDF library to keep things organized if you have lots of PDFs. It also makes it easier for users to search and find the PDFs they’re looking for.
- List of meetings. A list of meetings document library might contain various documents that staff members might find useful such as agendas or minutes.
- Company documents. A company documents library is a perfect way to keep important documents like invoices, confidentiality agreements, employment agreements, contractor agreements, and business registration files organized and easily accessible.
Document Library Pro – the Best WordPress Document Library Plugin
The Document Library Pro plugin has everything you need to add a public or private document library to your WordPress site.
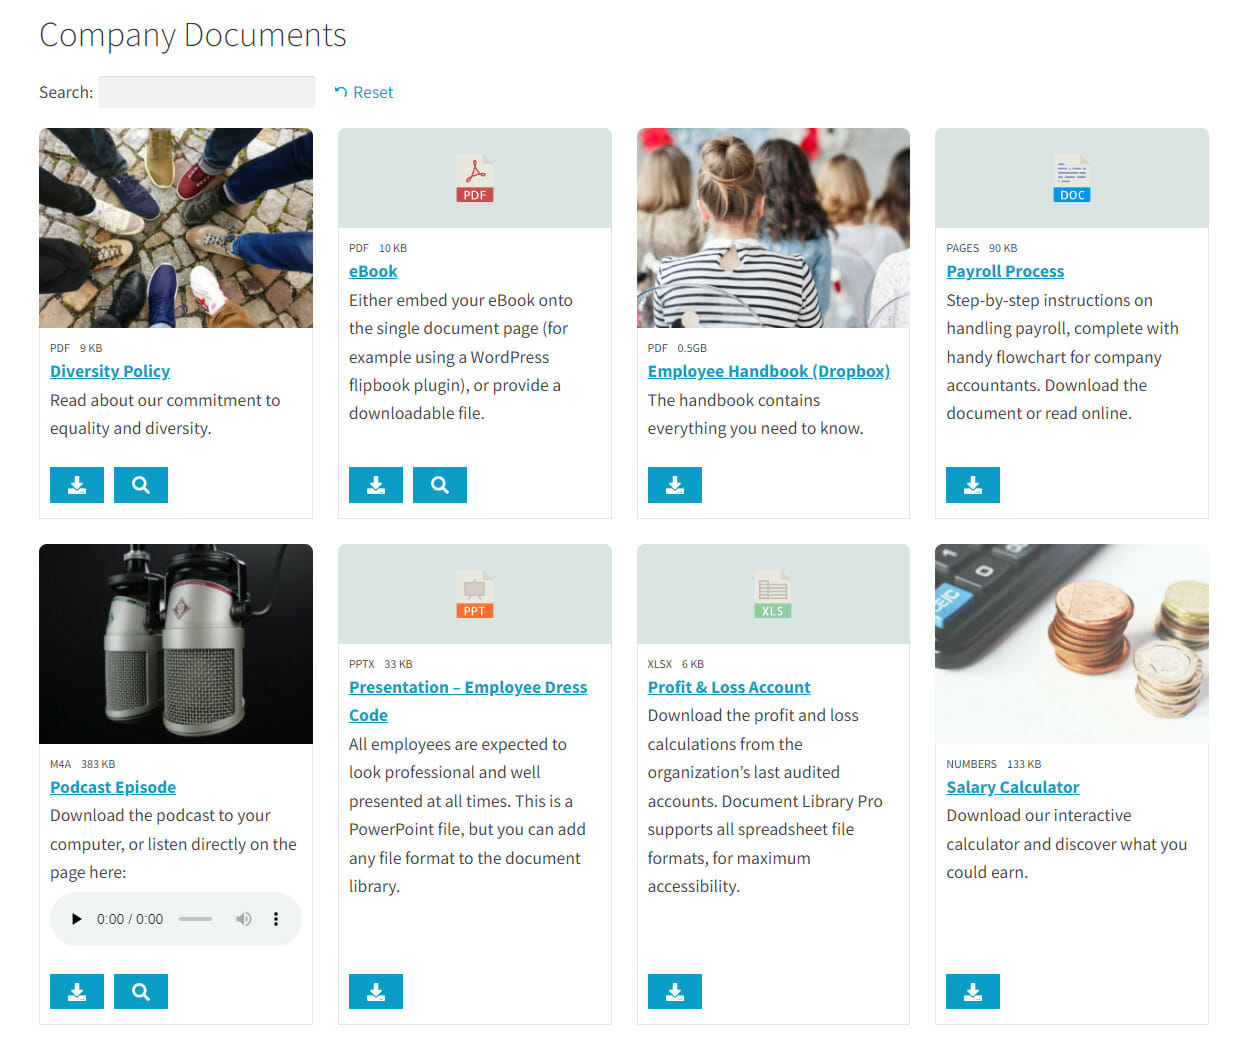
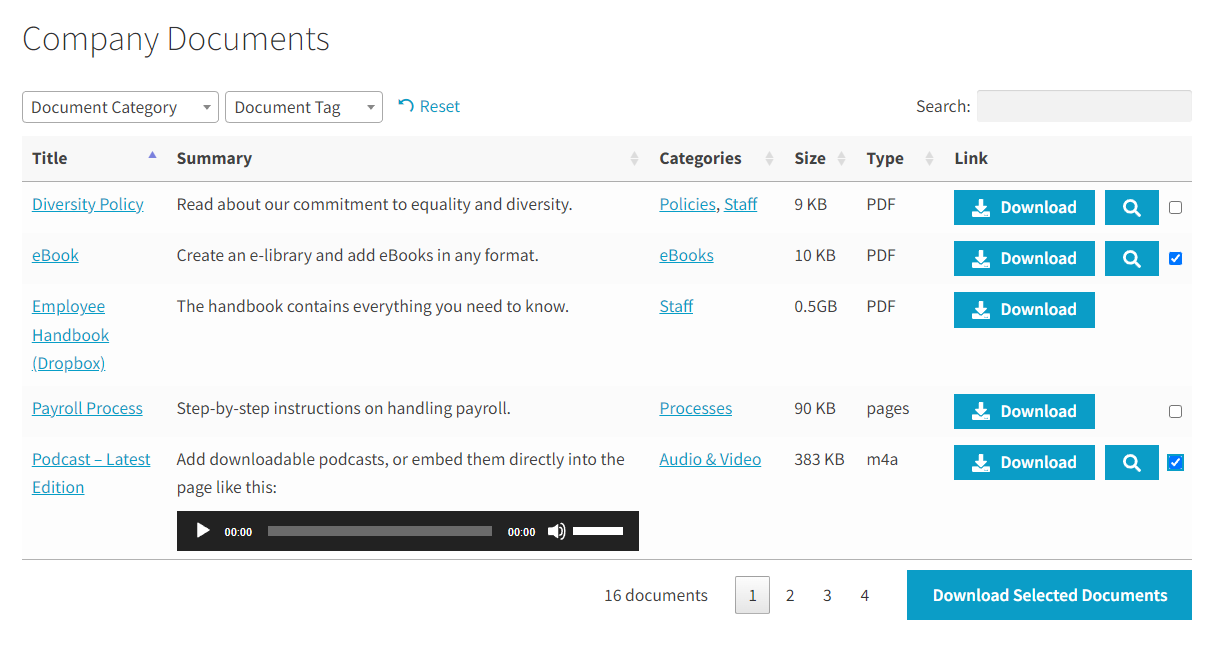
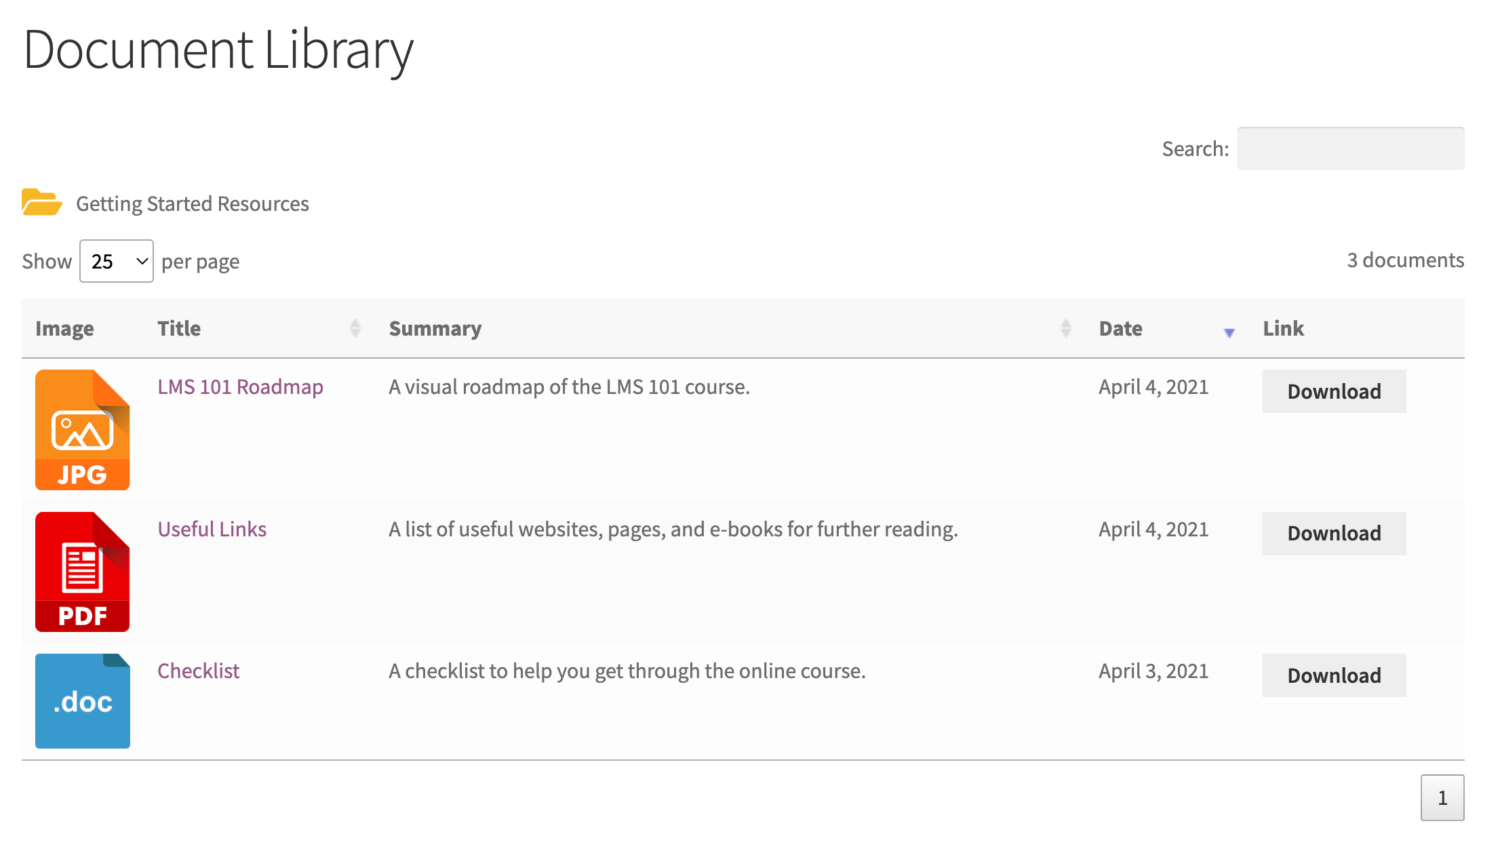
- Search, sort, and filter documents. You can instantly list documents in a searchable and sortable table layout with filter options.
- Supports any file type. The WordPress document library plugin supports all types of files or resources, including PDFs, embedded audio and video, third-party documents (like Google Drive links, Office 365 links, Dropbox links, and YouTube links), as well as any file type that can be stored in the WordPress Media Library.
- Store extra data about documents. You can make the WordPress document library more accessible by adding extra information about each document. For example, you can add a title, excerpt, description, and image to go with each document. File data – like file size, file type, data, and last modified date – are automatically added by the plugin.
- Flexible download links. You can choose to show download buttons, text links, or file-type icons on the document library page. The WordPress document library plugin also lets you choose whether to provide instant, on-page downloads or a separate page for each document.
How to Create a Public Document Library
Next, I’ll show you how to add a public or private document library to your WordPress site using the Document Library Pro plugin.
Step #1: Install the WordPress Document Library Plugin
Get the Document Library Pro plugin and install it on your WordPress site. You can download the plugin files from the order confirmation page or email. Copy the license key for the plugin to your clipboard.
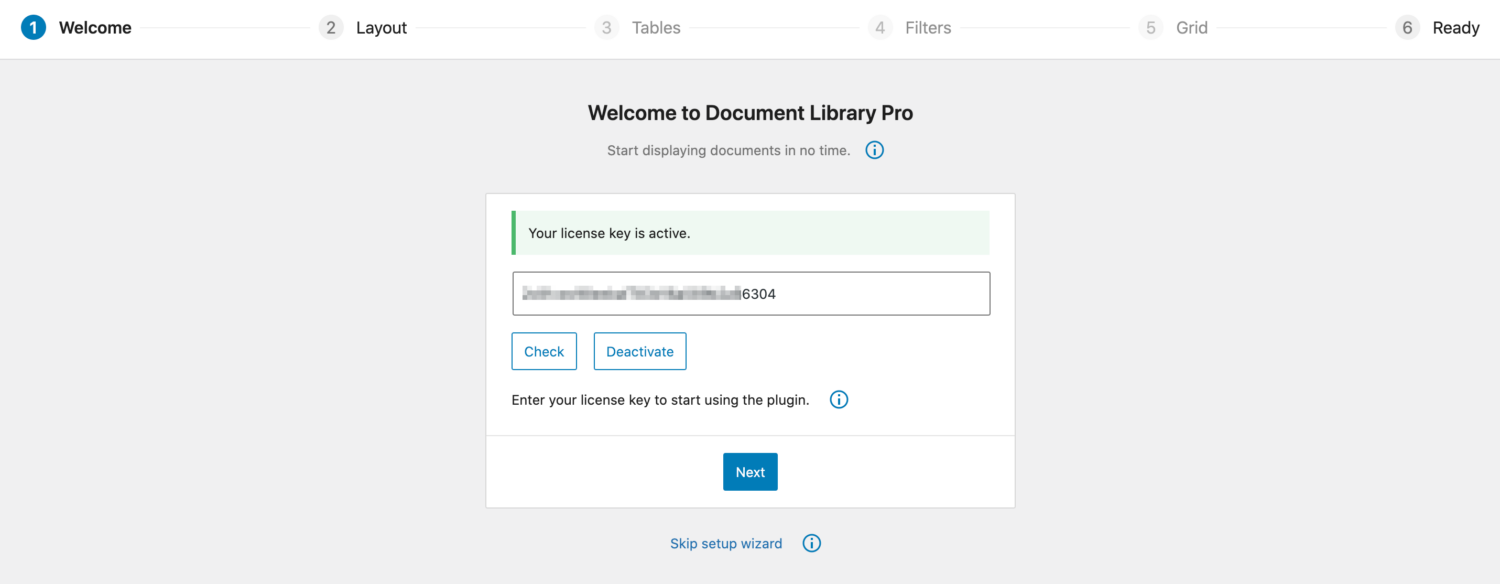
Setup Wizard
Once you install and activate the plugin on your WordPress site, a setup wizard will walk you through the setup process. Activate the license key and choose settings in the setup wizard to get started.
Next, choose a layout for the document library – either Table or Grid. You can also choose to display the document library in folders.
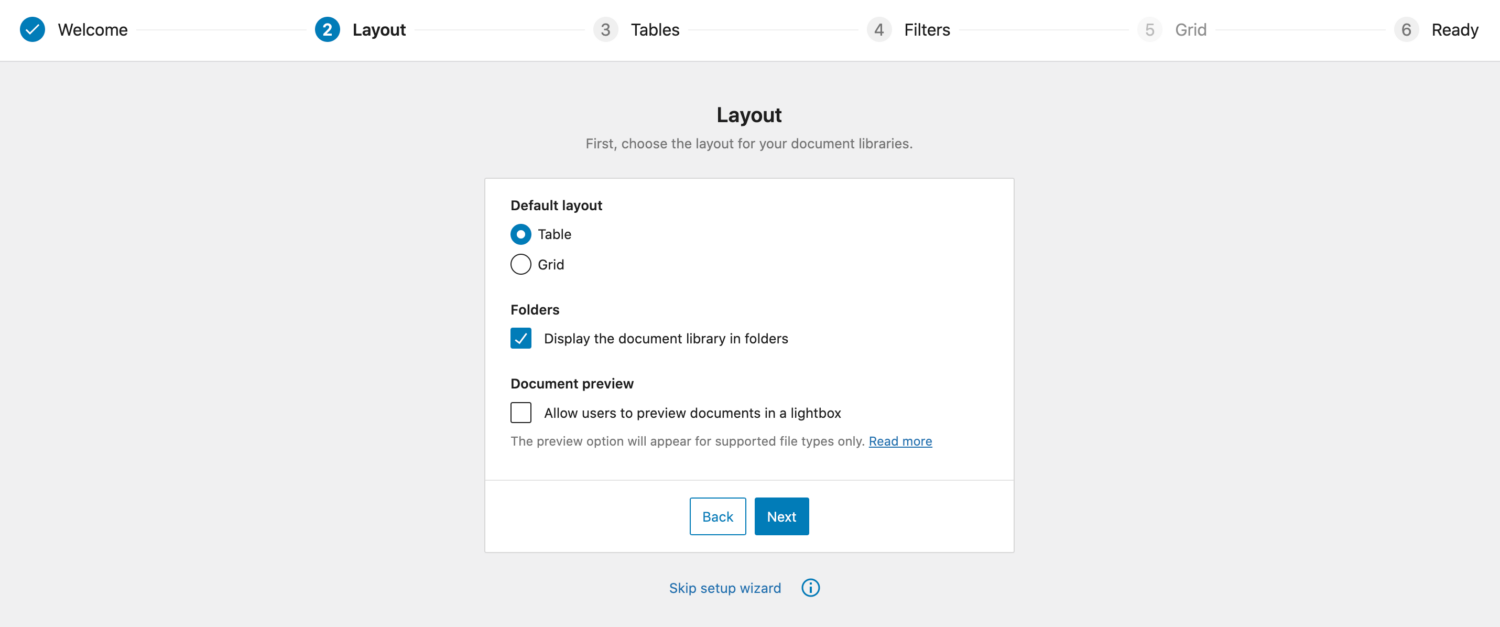
Each category you create is a folder, more on this later. If you want to let customers preview the document in a lightbox, tick the Document preview checkbox.
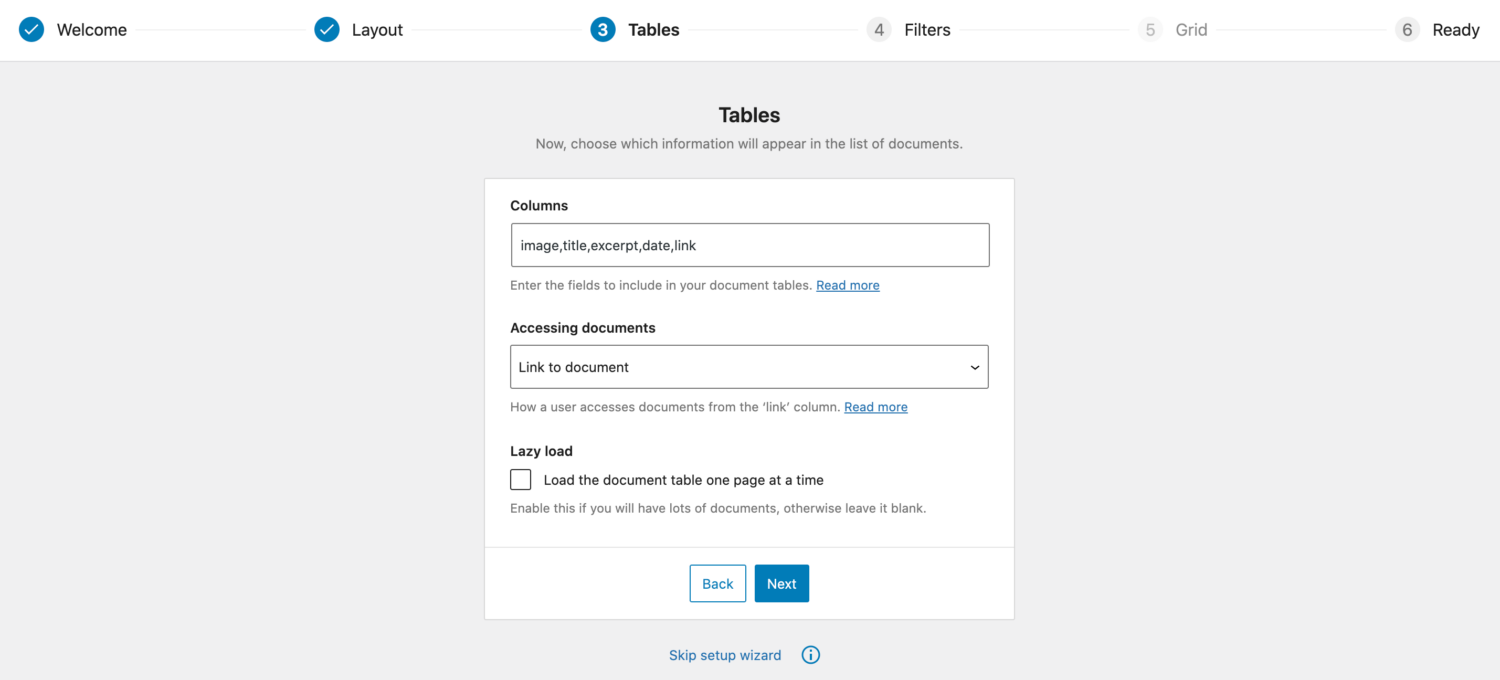
In the next step, you can choose which columns to display in the document library table. You can also choose how users access the documents and enable lazy loading.
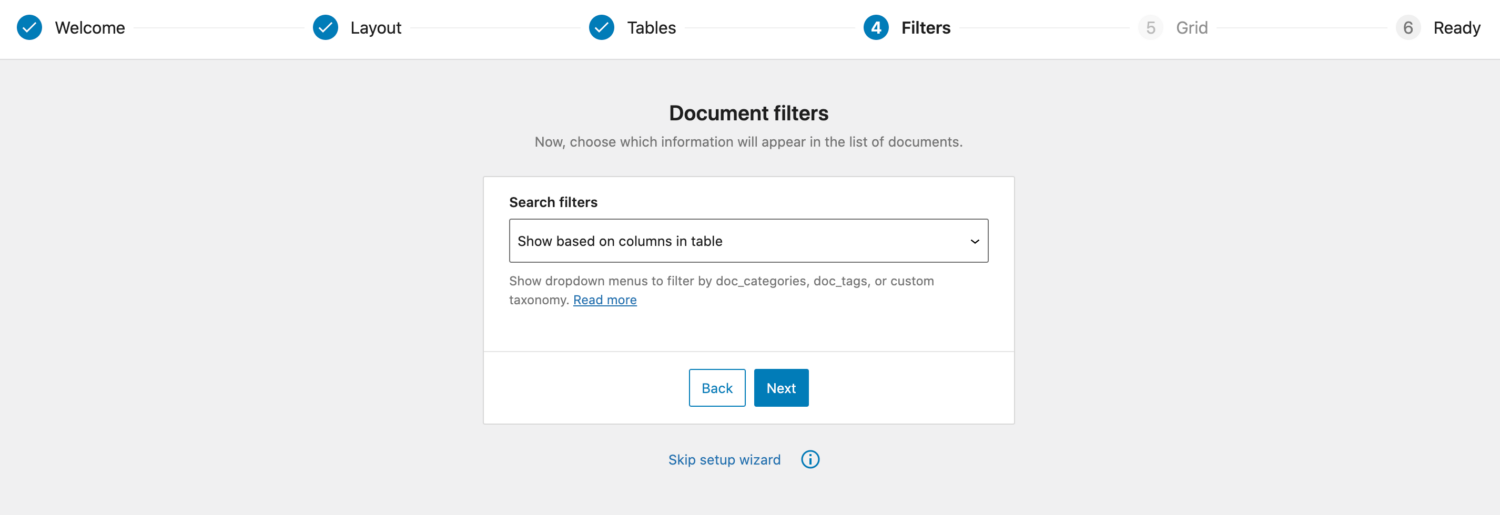
You can choose if you want to show filters above the document library table in the filters step. Filters make it easy for users to narrow down their search.
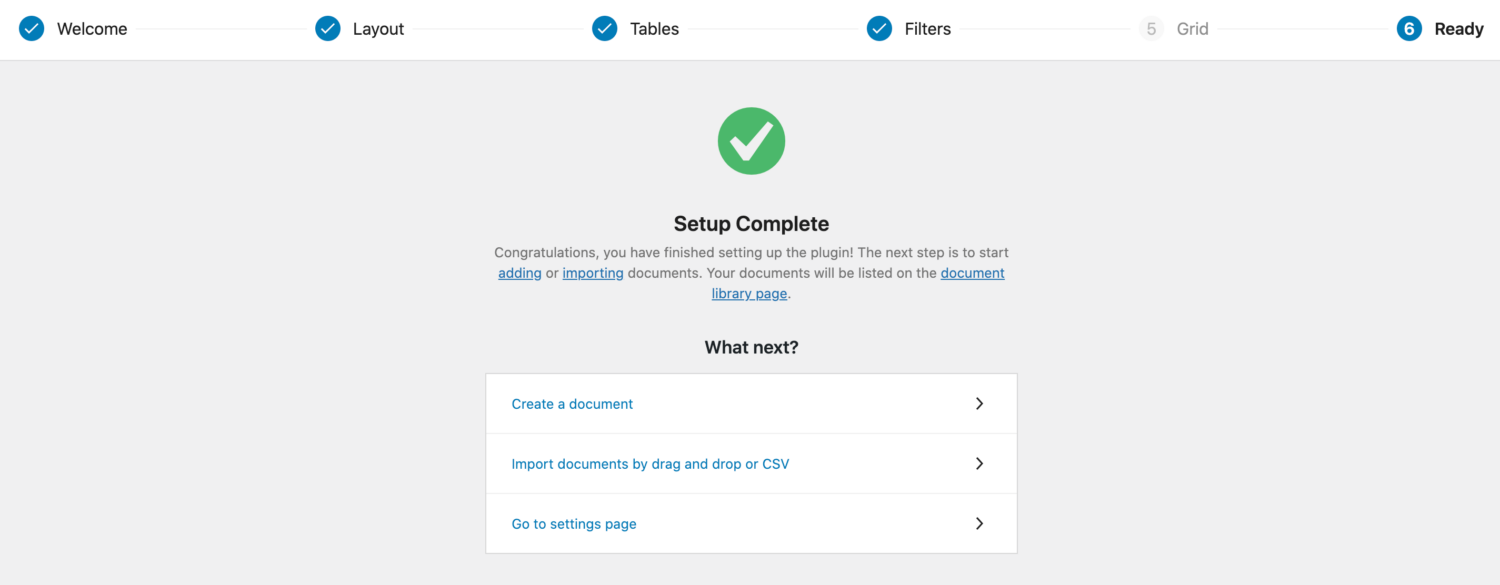
Finally, you’ll be prompted to create document or import documents to your WordPress site. Once that’s done, you can view your document library page on the front-end – the plugin creates this for you automatically!
Step #2: Create a Document
Head over to Documents → Add New from the WordPress admin panel to create a new document. Give it a title, enter a description and excerpt, and upload a file (or link to it) using the Document Link meta box.
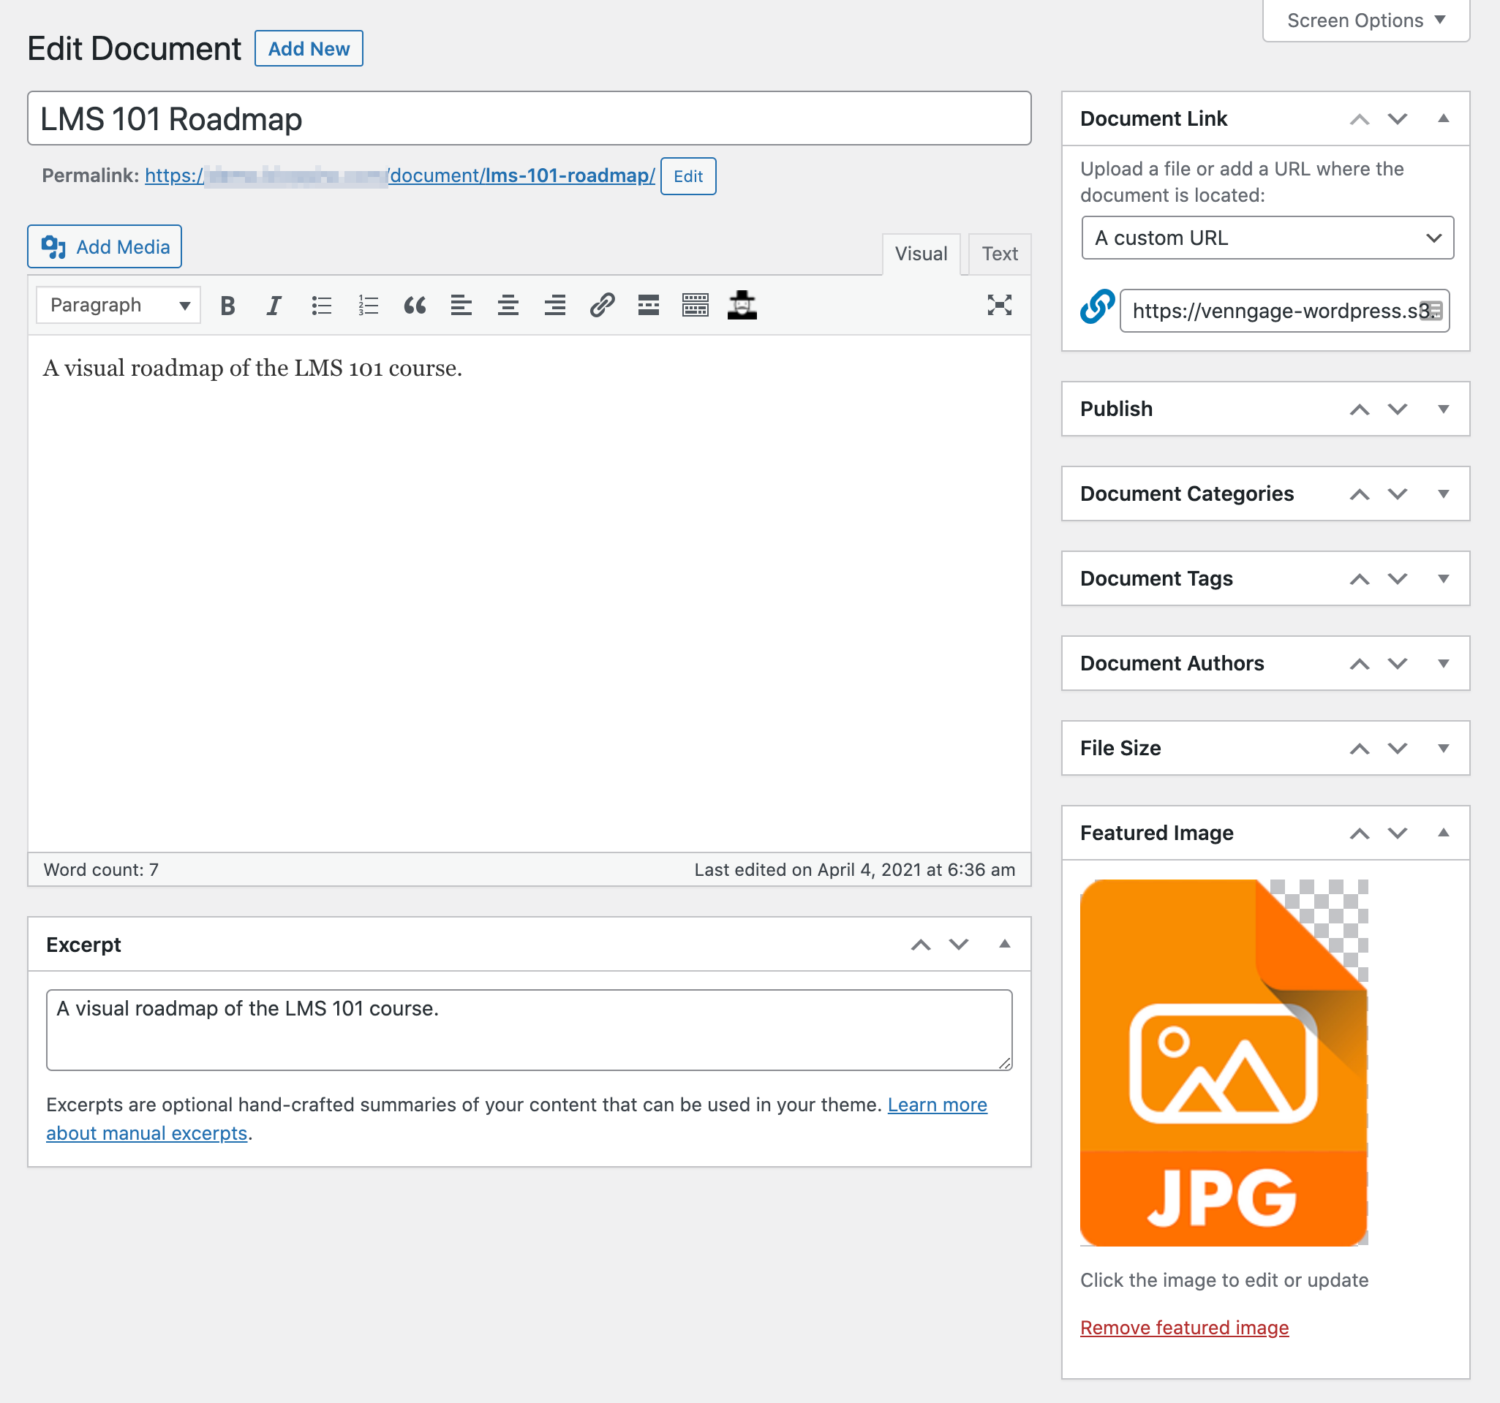
You can also set document categories and tags. This makes it easy to keep documents organized. The plugin also lets you upload a featured image for each document.
Step #3: Make Your Document Library Private
An easy way to make your WordPress document library private is using a membership plugin like ProfilePress.
The core idea is pretty simple: you can use the ProfilePress plugin to restrict access to your document library page. You can set it up in a way so only specific users or specific user roles can access the document library.
Here’s what you need to do to set it up:
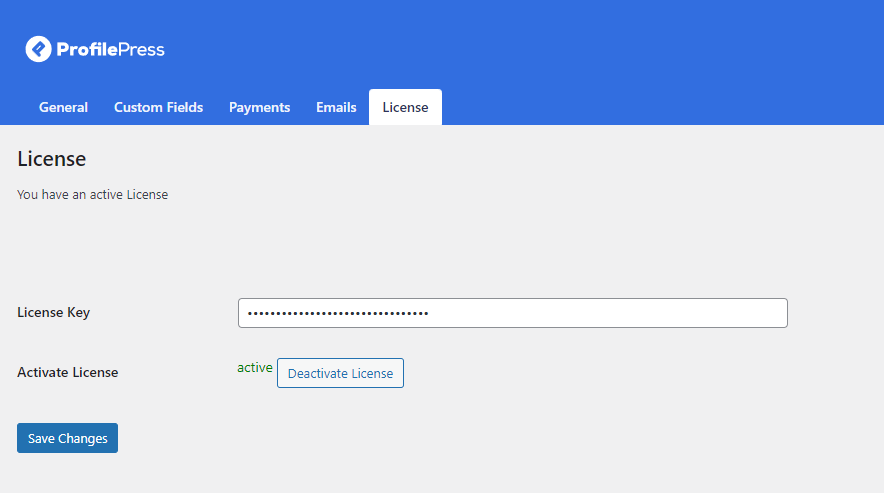
Get the ProfilePress plugin and install it on your WordPress site. Activate the plugin, head to ProfilePress → Settings → License, and enter the license key to get started.
Go to ProfilePress → Content Protection and click the Add a Protection Rule button. Give the protection rule a title.
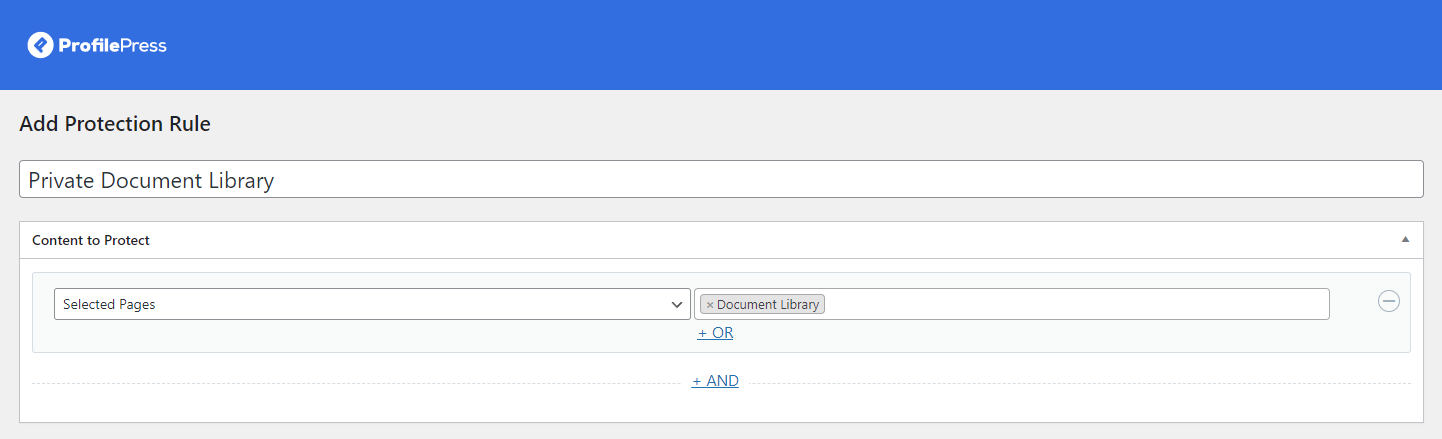
Select the content to protect using the dropdown box. We want to restrict access to the document library so we’ll select Selected Pages and then select Document Library using the dropdowns.
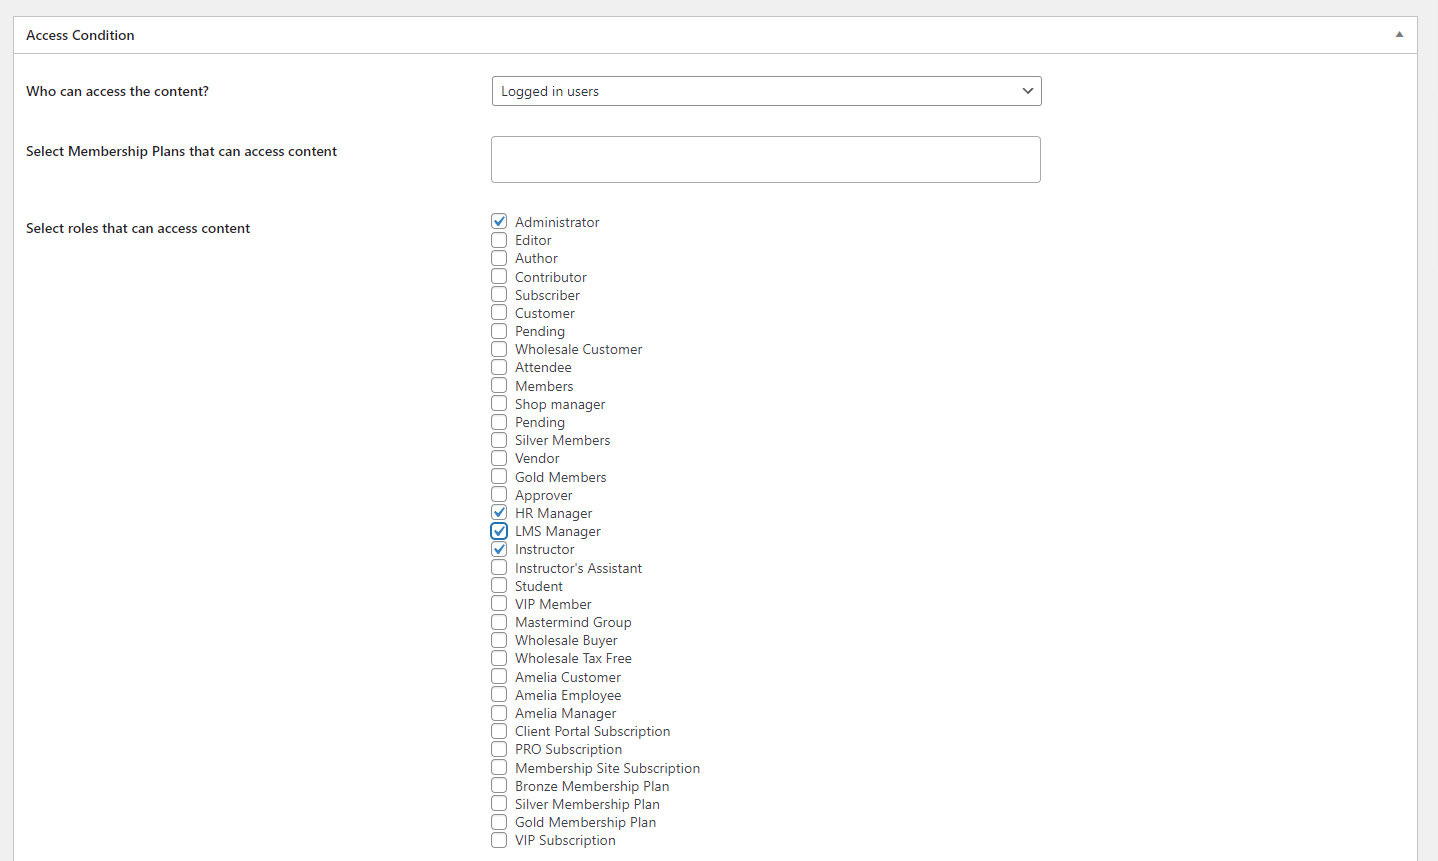
Set the Access Condition using the dropdown. We want to make a private document library, so we’ll set this to Logged in users.
- Select the user roles that can access content by ticking the checkbox next to the user roles.
- Alternatively, you can also select specific users that can access the content.
Enter a message to show to unauthorized users. Click the Save Rule button to continue.

Now, only users with the user roles we selected will be able to view the private WordPress document library on the front-end.
Step #4: Managing Your Document Library
Here are some additional tips on how to manage your document library:
Set Categories and Tags
We recommend using categories and tags to keep your WordPress document library organized from the get-go. Update the structure of your document library as you add more documents to make it easy for users to find the documents they’re looking for.
Version Control
The Document Library Pro plugin comes with version control features out of the box. You can enable these on the plugin’s settings page. Version control is used for documents that have a downloadable file to go with them that’s stored in the WordPress Media Library.
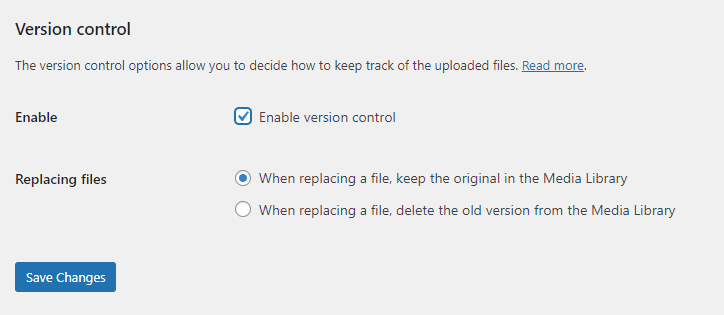
Note: Version control doesn’t work for documents hosted on third-party sites like Google Drive.
Each time you replace a file with a document from the Edit Document page, the plugin’s version control system will store some information about the previous version.
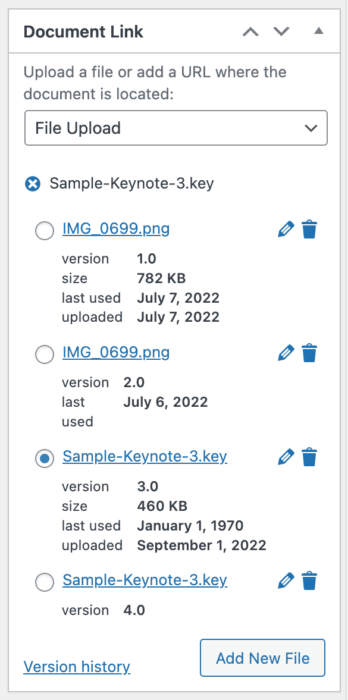
When the Version control option is enabled, you’ll see a Version editor in the Publish section of the Edit Document screen. The options available to you depend on whether you’ve configured the Document Library Pro plugin to keep or delete previous versions.
Updating Documents
The easiest way to update files is by uploading a new one directly on the Edit Document page in WordPress. To avoid accidental duplication, you can use the free Enable Media Replace plugin to override old versions of a document or file when you upload a new one. The best part is that it does this without changing the URL.
Add a Public or Private Document Library to WordPress Today!
If your organization publishes documents or needs to make documents and files available to users, you need to create a WordPress document library. It makes it easy for users to quickly find the documents they’re looking for using searchable, sortable tables with filters.
The easiest way to create a document library is using the Document Library Pro plugin. And, if you want to create a private document library, you can use the ProfilePress plugin to restrict access to it by users or by user roles.
Ready to add a public or private document library to your WordPress site? Get the Document Library Pro plugin and ProfilePress plugin today!