How to Create & Sell PDF (Ebooks) on WordPress – Complete Guide
Looking for ways to sell ebooks and PDFs online?
Selling digital products like PDF ebooks is a much better business model than selling physical products like smartphones, toys, self-care products, etc.
Selling physical products involves manufacturing or importing products, maintaining stocks, adhering to local laws, creating shipping channels, etc. None of this is required when you are selling digital products like PDFs.
To sell PDFs and ebooks, you need a website and ensure that the file can be downloaded only by paid customers of your site.
This article will show you how to build a website for selling PDFs online. But first, let’s take a quick look at the benefits of selling PDF files and the different types of PDFs that can be sold online.
Let’s get started.
Why Sell PDF Files Online?
The benefits of selling PDF files online are:
- PDFs are often cheaper than physical books and can therefore attract a large number of customers.
- Unlike many other document types, PDFs can be opened and viewed on all devices (i.e., smartphones, laptops, computers, and tablets), prompting different device owners to buy PDF files.
- PDFs never run out of stock. You need to create them once and then keep selling them for as long as you want.
- PDFs are light weighted and can be downloaded in an instant. Since customers love fast transactions, this could boost your customer satisfaction.
- You can expose your product to a larger audience by selling PDFs online.
These are the main benefits of selling PDFs online. In the next section, we will look into what type of PDFs you can sell, along with some advice on what the PDF should contain.
Types of PDFs to Sell Online
You can sell the following documents in PDF format: how-to guides, digital magazines, courses, white papers and industry reports, manuscripts, screenplays, manuals, artwork, comics, and manga, nutrition and workout plans, sewing and knitting patterns, templates for arts, crafts, and letterheads, etc.
You can sell any kind of PDF if you put your content on digital paper and convert the document into a PDF file.
That said, customers will buy the PDF only when they feel it is worth their money. This means you need to go the extra mile to create a PDF that offers value. You could be offering solutions to problems or dropping knowledge nuggets for the benefit of the customers.
Besides the content, presentation is also an important factor in selling PDFs. No one likes reading dry or incomprehensible text. Ensure your content is easy to digest and entertaining enough to keep the reader hooked.
If you can make the PDF valuable, entertaining, and easy to read, then there’s a good chance it would bring a continuous income stream if marketed properly.
How to Sell PDF Files Online
To sell PDF and ebook files online, you need to take the following steps:
- Create the PDF file
- Build a website
- Install ProfilePress plugin
- Create membership plans
- Secure PDF files
- Create Shop page
- Add membership plans to the shop page
- Set up the checkout page
- Set up payment
Let’s start with the first step.
Step 1: Create PDF File
Choose one of the following programs to create your document: Microsoft Word, Google Docs, Adobe Acrobat, or Canva.
We will show you how to create PDFs using Canva because it’s super easy to use and offers many templates, so you don’t have to start from scratch.
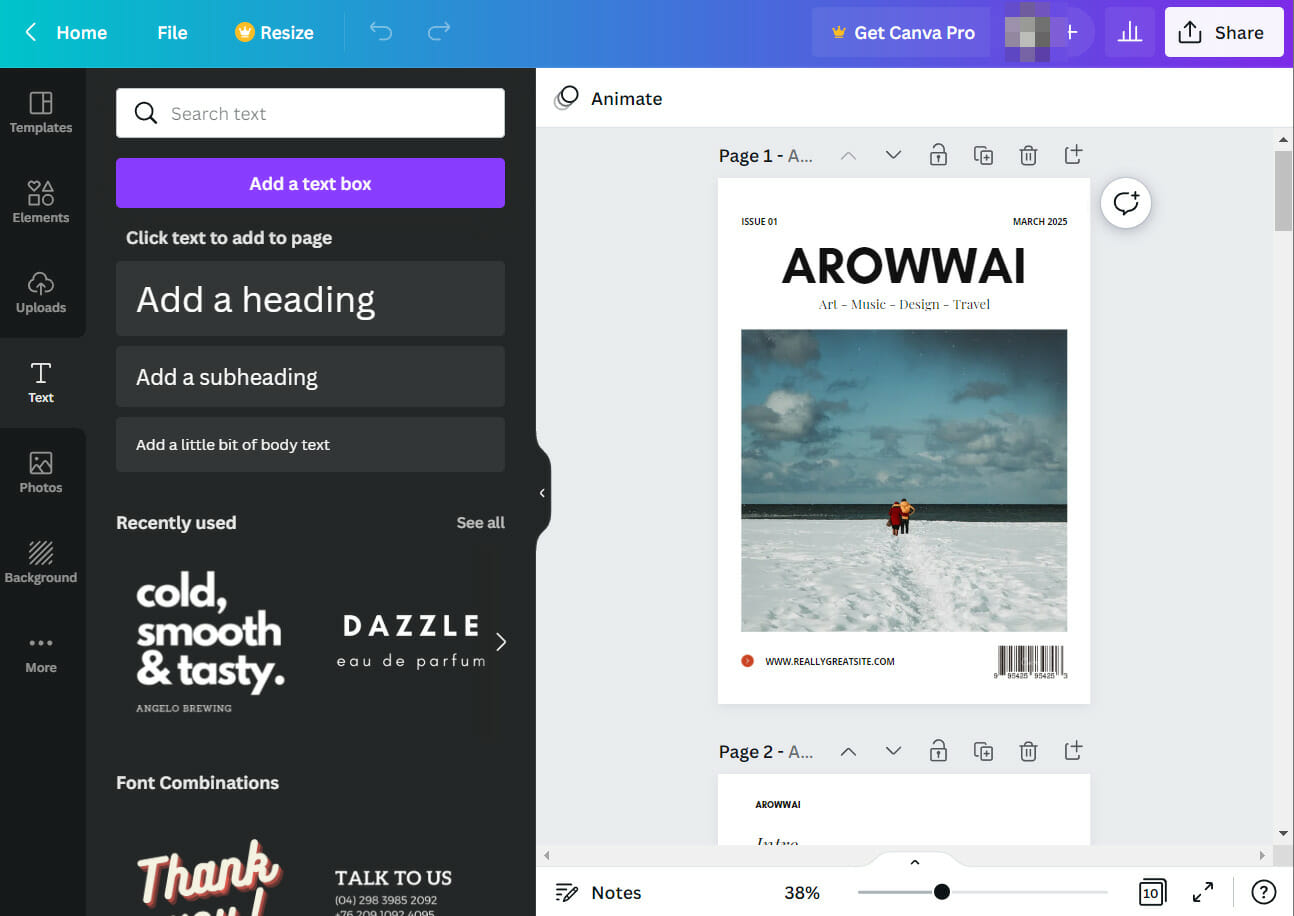
Let’s say you want to create an online magazine. Go to Canva.com and search for “magazine” in the search box. Dozens of templates will show up. Select a template and start editing it.
We recommend choosing templates with a couple of pages, not just the cover page. Some elements (like photos) inside the template are not free. You will either need to replace them or get Canva Pro for an annual fee of $119.99.
Editing the templates are easy enough. You can insert elements, upload pictures, change the text style, size, and color, change background colors, and even add audio, video, and charts to the document.
Make sure you add your branding elements, like the logo and website URL.
All your changes are auto-saved on Canva, so there’s no need to worry about losing your work.
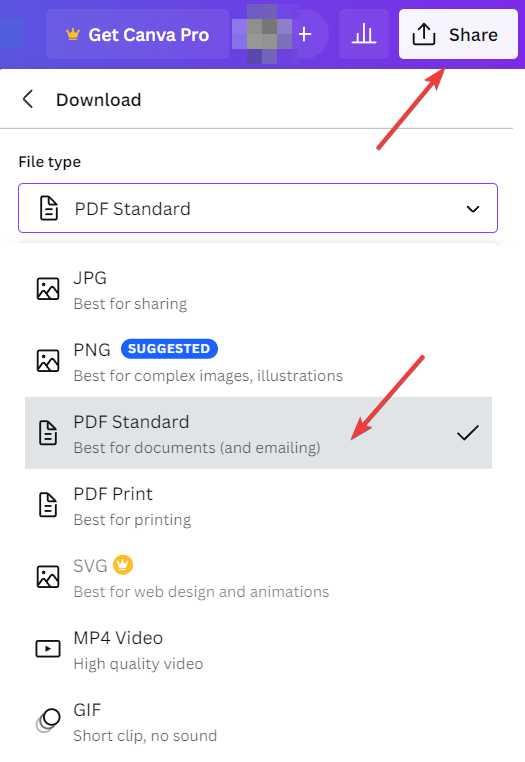
When the document is ready, select the Share button in the screen’s right-hand corner. Then go to Download, select PDF Standard, and hit the Download button.
The document will be downloaded in PDF format.
Step 2: Build a Website
Many of you are probably wondering what the point of creating a website from scratch when sites like Amazon, Google Play, Kobo, Barnes & Noble, etc., allow you to sell on their platforms is!
These are highly competitive spaces, and it’s super challenging to get your product to the front page where potential customers can discover it.
Moreover, you would have to give the site a commission for every sale you make, and you can’t bargain the commission fee.
Selling PDFs on your site is an excellent idea if you already have a subscriber base or have the time and resources to market your website to potential customers.
Either way, selling a product is difficult and time-consuming work.
To create a website where you can sell your PDF files, you need to do two things: First, buy a hosting plan and a domain name. Then install WordPress and set it up properly.
Showing you all the steps you’d need to take to build a website is beyond the scope of this article. Luckily there are plenty of excellent guides on the subject. We recommend following this one.
Once the website is up and running, move on to the next step.
Step 3: Install ProfilePress Plugin
ProfilePress is a powerful plugin that helps sell digital products online. You can set up payments and create custom checkout pages using this plugin. You can also ensure that your PDF files can be downloaded by only paid members of your website.
These are just some of the features offered by the plugin. We recommend looking at the feature page to learn about all the things you can do using the ProfilePress plugin.
To use ProfilePress, you will need to purchase a license that costs $99 for a single website.
After you’ve made the purchase install and activate the plugin on your WordPress website.
Next, activate the plugin license by going to ProfilePress > Settings > License. Enter your license key in the License Key field and hit the Save Changes button.
Step 4: Create Membership Plans
You will need to create a membership plan for every PDF you want to sell on the site. Let’s say you want to sell three ebooks in PDF format. You will need to create three membership plans. Here’s how:
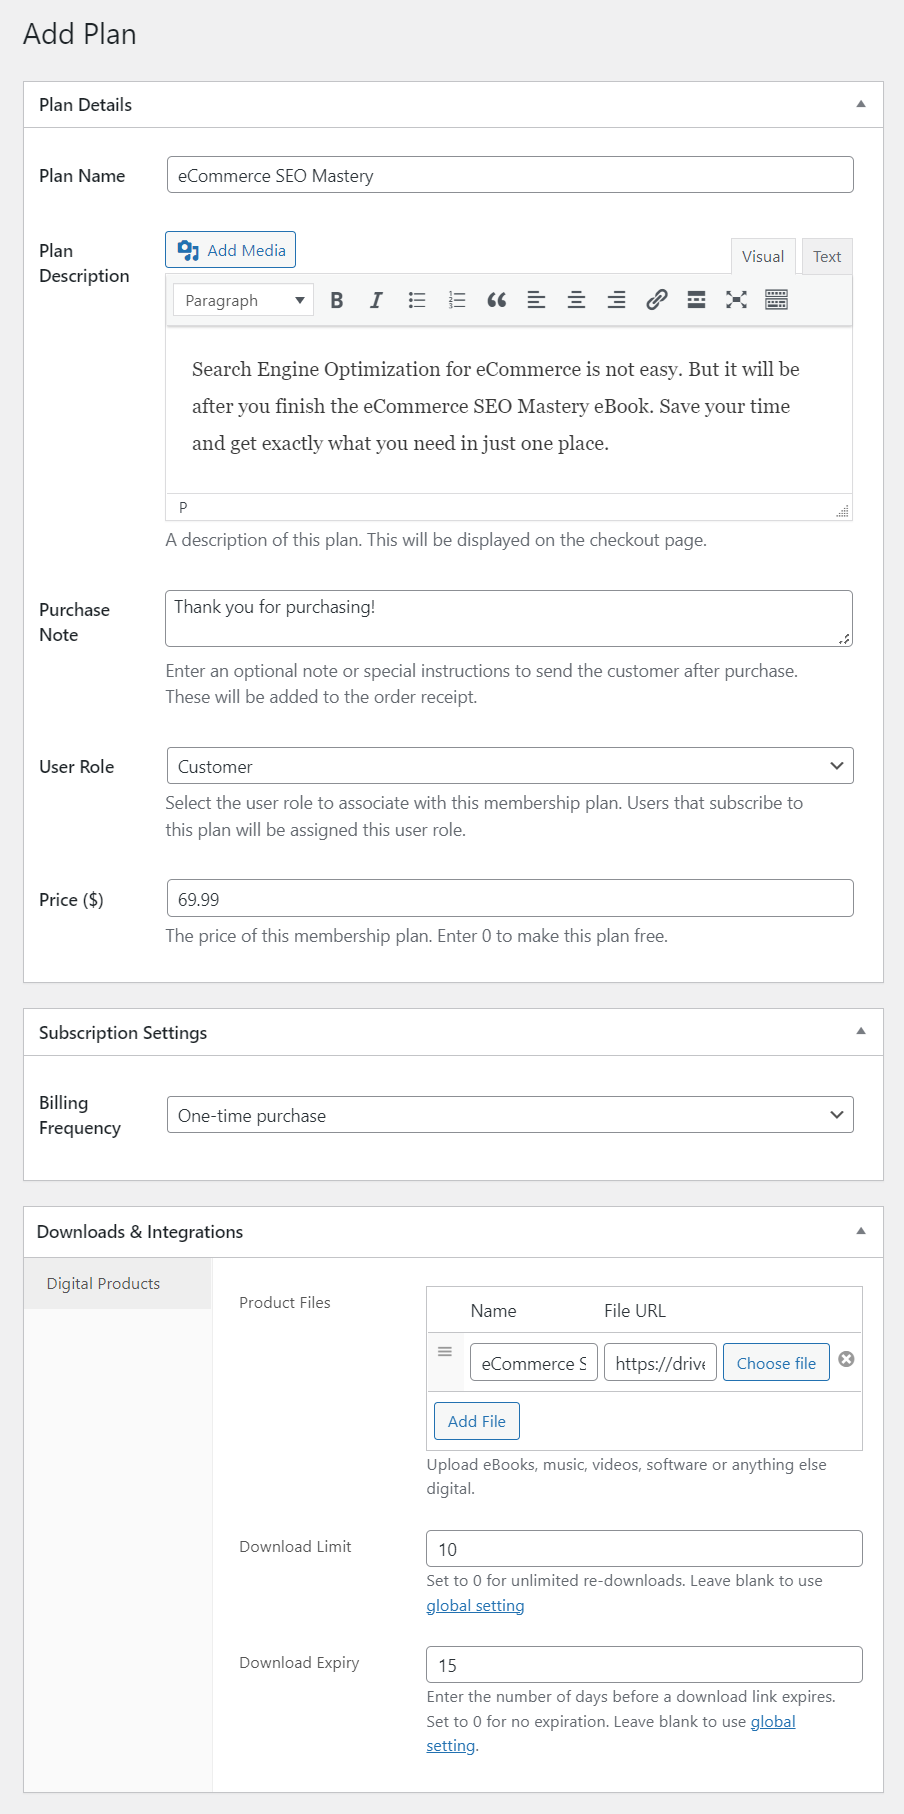
Open your WordPress wp-admin and go to ProfilePress > Membership Plans > Add New Plan.
On the next page, there are three sections that you need to fill in: Plans Details, Subscription Settings, and Download & Integrations.
Using these options, you can:
- In the Plan and Description field, add the name and description of the PDF
- Assign default user roles for anyone who signs up and purchases your product
- Set the price for the PDF file
- Set a recurring or one-time fee for the product
- Add the PDF file and set the download limit and expiry time for the download link
When you are done filling in the fields, hit the Save Plan button. Create more plans if you want to sell more PDFs.
Step 5: Secure Digital Files
Using ProfilePress, you can ensure that only paid members of your website can access the download link. Here’s how:
Go to ProfilePress > Settings > Payments > File Downloads. Under Download Method, choose Forced Download. This method ensures that files are protected from direct linking.
But if your file is large and you worry it will overwhelm the server and cause downtime, choose X-Accel-Redirect/X-Sendfile. This, too, will protect your file from direct linking.
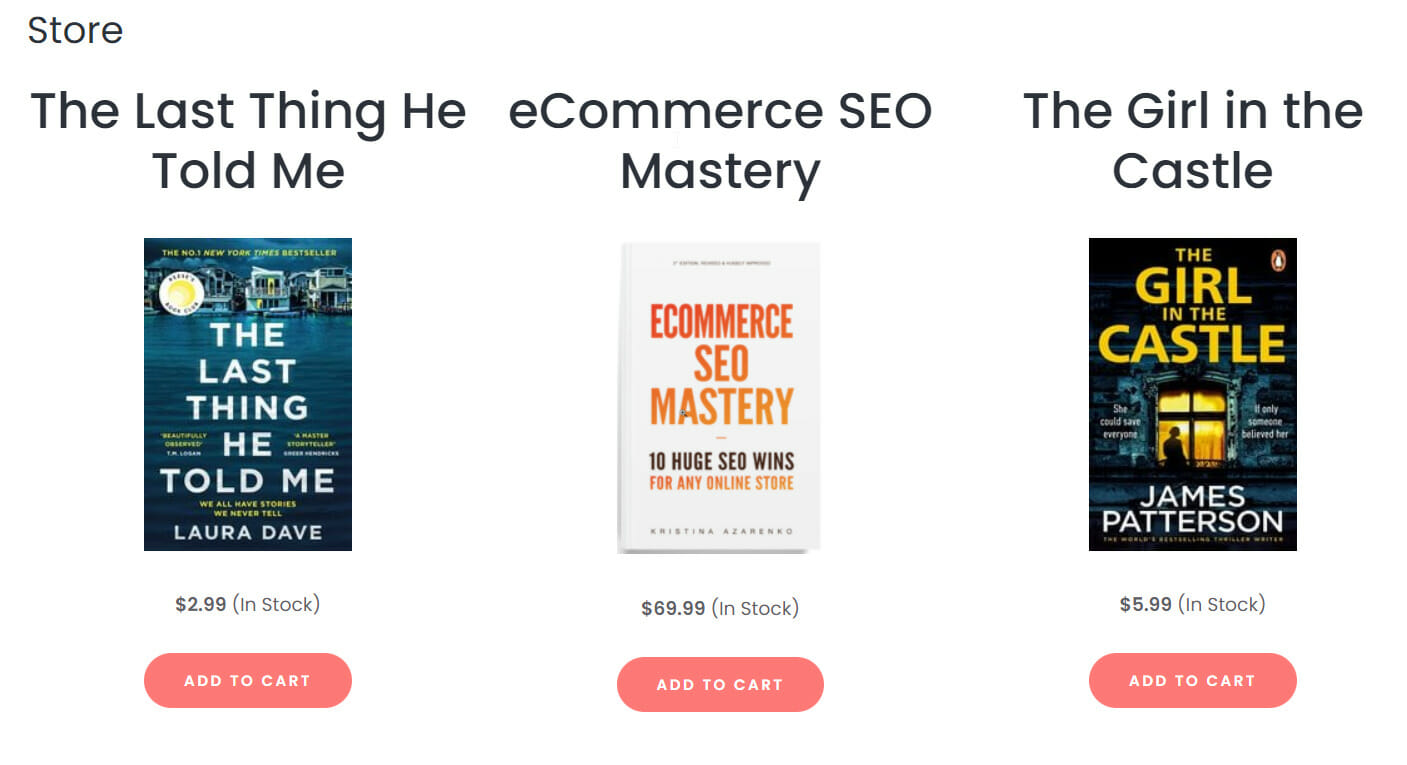
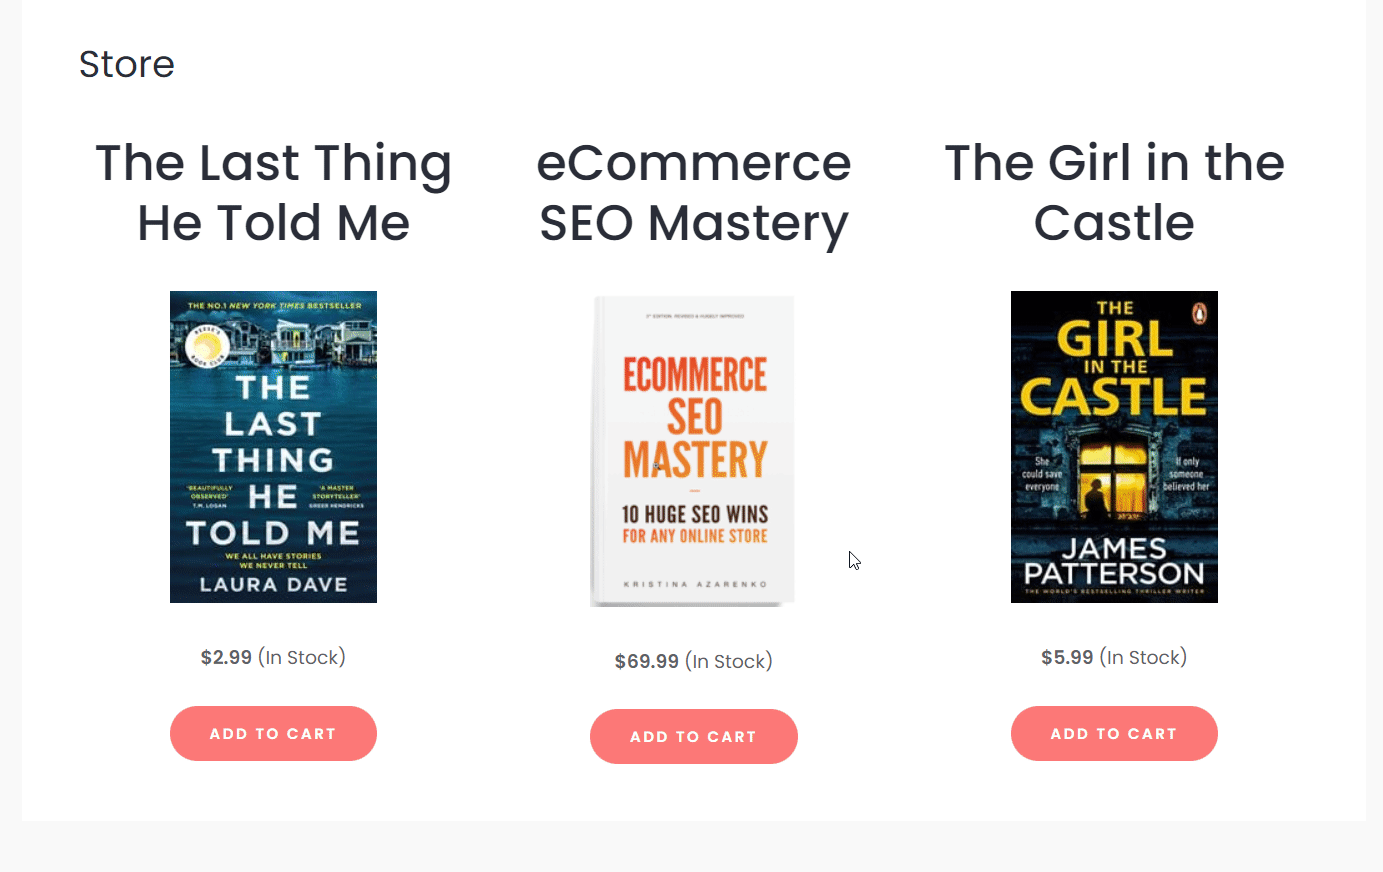
Step 6: Create a Shop Page
The membership plans are ready, and the PDF files are secure; now it’s time to create a page to display all your PDF files. Let’s call it a Shop page.
You can create a simple Shop page using WordPress’ native editor, or you can opt for ready-made templates from page builders like Elementor, Beaver Builder, etc.
You will likely have to buy a subscription from these page builders to access the templates.
No matter what you use to create the Shop page, ensure, each product has a price and a buy button.
When the Shop page is ready, add it to the header menu and other places where it’s visible and easily accessible to your site visitors.

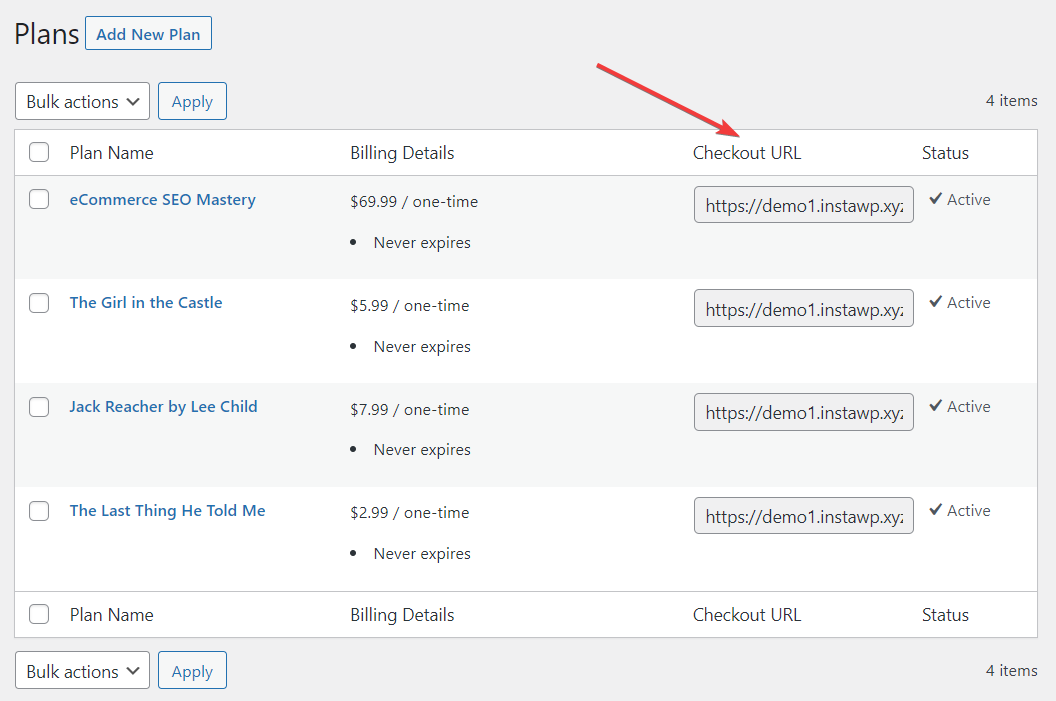
Step 7: Add Membership Plans to Shop Page
When you add a membership plan, a dedicated checkout page for the plan is automatically created. If you create more than one membership plan, every plan has a dedicated checkout page.
The checkout page is where customers add their account and shipping details and proceed to buy the product.
In this step, we will show you how to get the URL of the dedicated checkout pages and add it to the buy button on the Shop page. When customers click on the buy button of a PDF file, they are taken to the dedicated checkout page of that PDF.
Now the question is, where do you get the dedicated checkout page URLs?
Go to ProfilePress > Membership Plans and see the URL associated with each plan. Copy the URLs, open your Shop page, and insert them in the buy buttons. Make sure you are not mixing up the URLs.
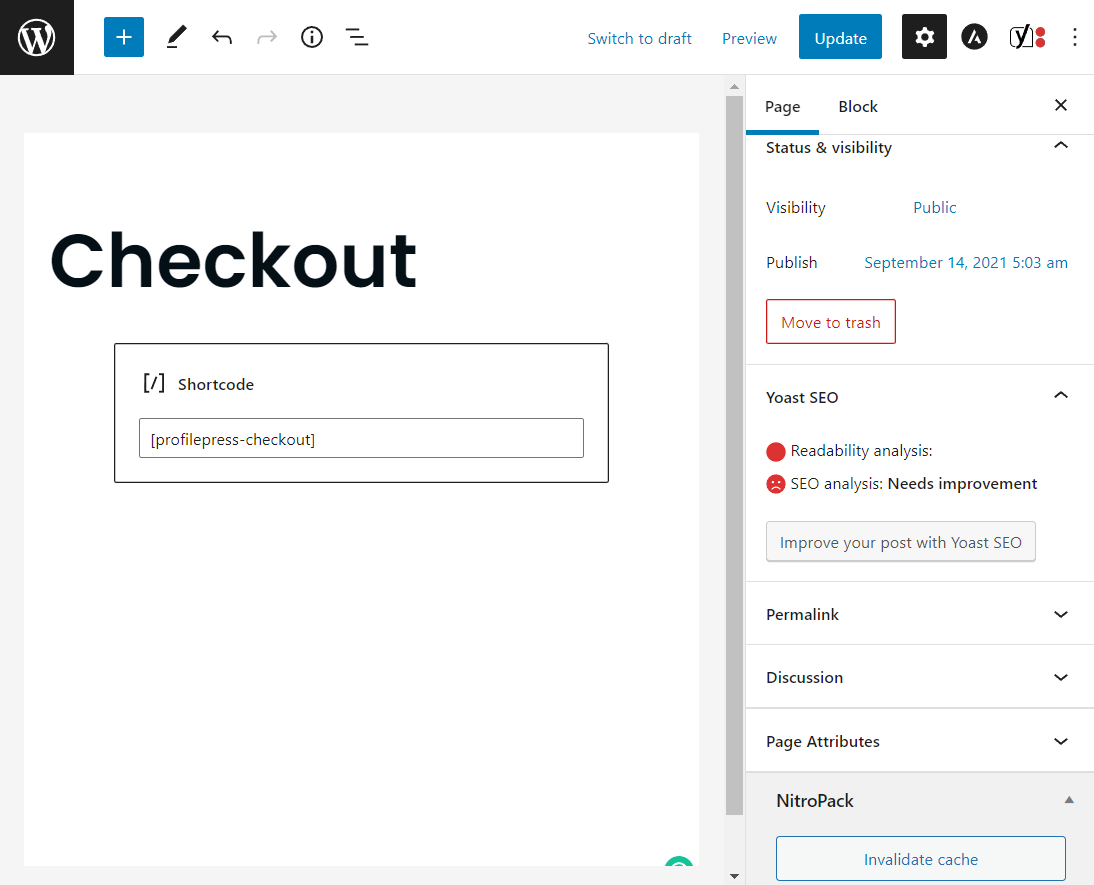
Step 8: Enable Checkout
Now that you have inserted the checkout page URL, it’s time to enable the checkout function on your website. If you skip this step, the checkout link on the Shop page won’t work.
To enable the checkout function, go to Pages > Add New and insert the checkout shortcode.
Add a title to the page and hit the Publish button.
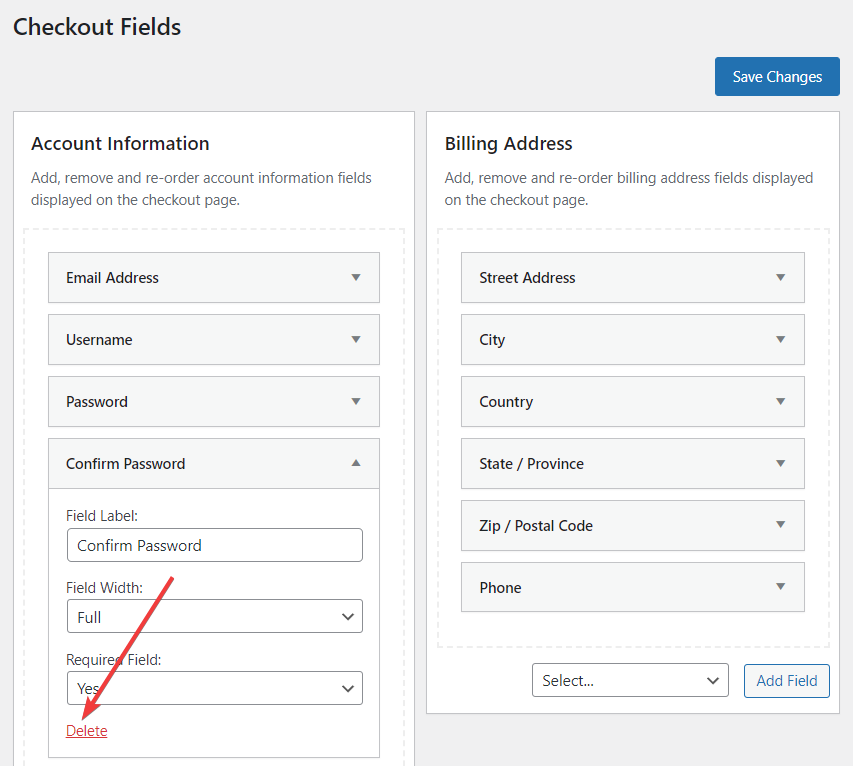
If you want to add or remove any checkout fields, you can do that by going to ProfilePress > Settings > Payments > Checkout Fields.
To add a checkout field, choose a field from the dropdown menu and hit the Add Field button. To remove a field, select that field and when it expands, choose the Delete button.
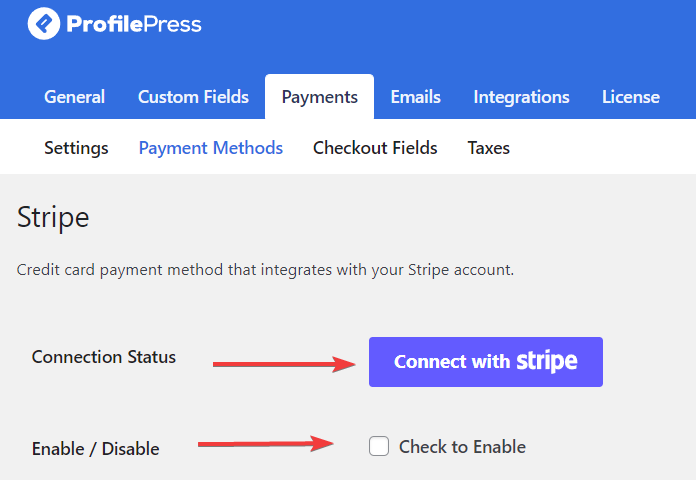
Step 9: Connect With Payment Gateway
To collect payment from customers, you need to have an account with a supported payment method such as Stripe, PayPal, Razorpay, Paddle, Paystack, Direct Bank Transfer, Mollie.
Once the account is ready, go to ProfilePress > Settings > Payments > Payment Methods.
Next, select your payment methods and connect your account.
Next, make sure you select the Check to Enable option.
And that’s it. Your website is now ready to sell PDFs.
Conclusion
Selling ebooks and PDFs online is a great way to generate income, and it’s relatively easier than selling physical products.
Selling PDFs on popular platforms like Amazon, Kobo, etc., is difficult, so creating your website might be a better idea. It can work if you have an existing follower base or the resources to draw visitors to your site.
Building a website is not a herculean task these days and is not expensive either. The tricky part is to ensure that your PDFs can be accessed only by people who paid for them. This is where ProfilePress comes in handy.
The plugin offers many other features like connecting your site with payment gateways, setting up checkout pages, managing customers, creating custom registration and login pages, etc.
Try ProfilePress now!