How to Password-Protect a WordPress Page & Entire Site
Do you want to learn how to password-protect a WordPress page or your entire site so that only specific people can access your content?
There are many situations where this can be useful. You may want to share private information with clients, hide pages that are still under development, or restrict access to premium resources on your website. Instead of allowing every visitor to view everything on your site, WordPress provides ways to control who can access certain pages or sections of your content.
In this guide, we will show you how to password-protect a WordPress page and how to use ProfilePress content protection, which offers more advanced access control options. Finally, you will learn how to restrict access to your entire WordPress website using our Global Site Access feature.
How to Password Protect WordPress Pages & Posts
WordPress includes a built-in visibility setting that lets you password-protect any page or post directly from the editor.
You do not need a WordPress password-protect plugin to protect posts and pages.
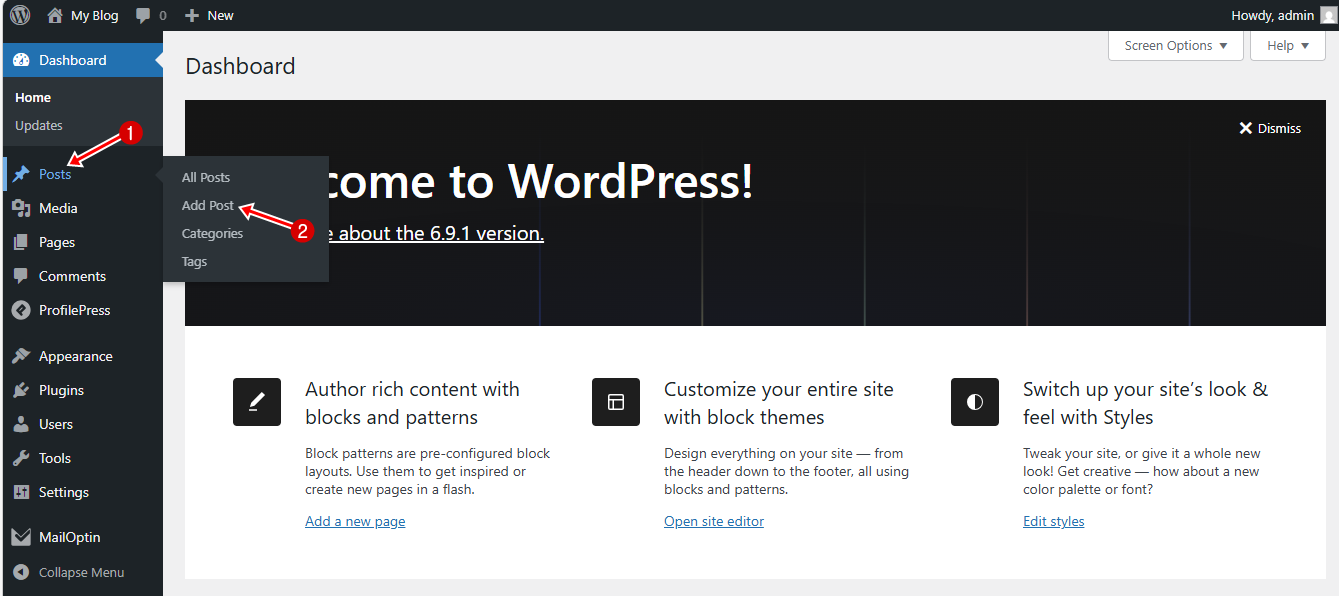
To use this feature, log in to your WordPress dashboard and create a new page or post by navigating to Page or Post > Add New.
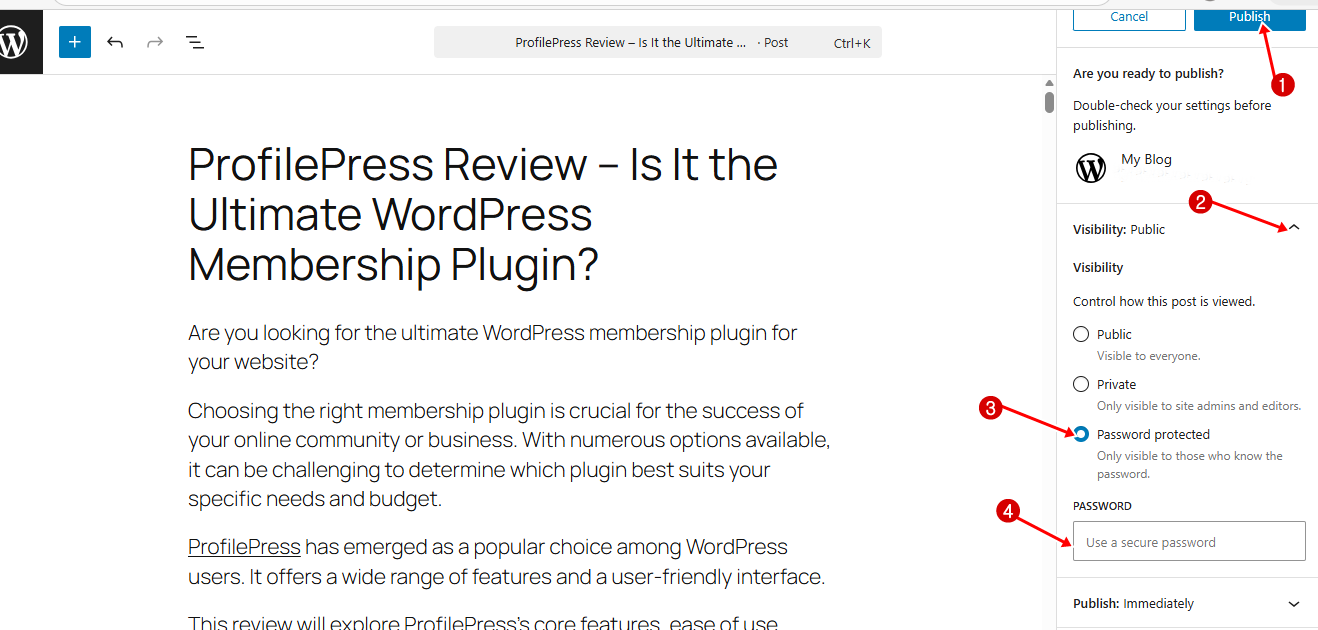
Once you finish editing your page, click Publish and then open the Visibility setting.
In the Visibility panel, choose Password Protected and enter your password in the field provided.
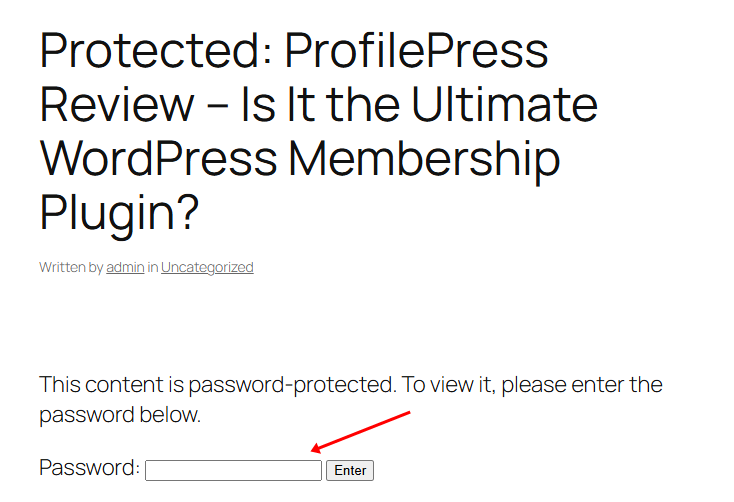
When someone visits the password-protected page, they will see a prompt asking them to enter the password before they can view the content.
Although this method is convenient, it is quite simple. It works well if you only need to password-protect a few WordPress pages, but it quickly becomes limiting when you require more control over how your content is accessed.
For example, the default WordPress password protection feature does not allow you to restrict access based on user roles, lock specific sections of a page, or create content access rules that automatically control who can view certain content.
It also does not provide an easy way to protect multiple pages at once or restrict access to your entire website. As a result, you would need to manually apply password protection to each page individually, which can become difficult to manage as your website grows.
Given these limitations, we recommend using our ProfilePress plugin, which is a better alternative to password-protecting posts, pages, and custom post types in WordPress.
ProfilePress Content Protection (A Better Way to Restrict WordPress Content)
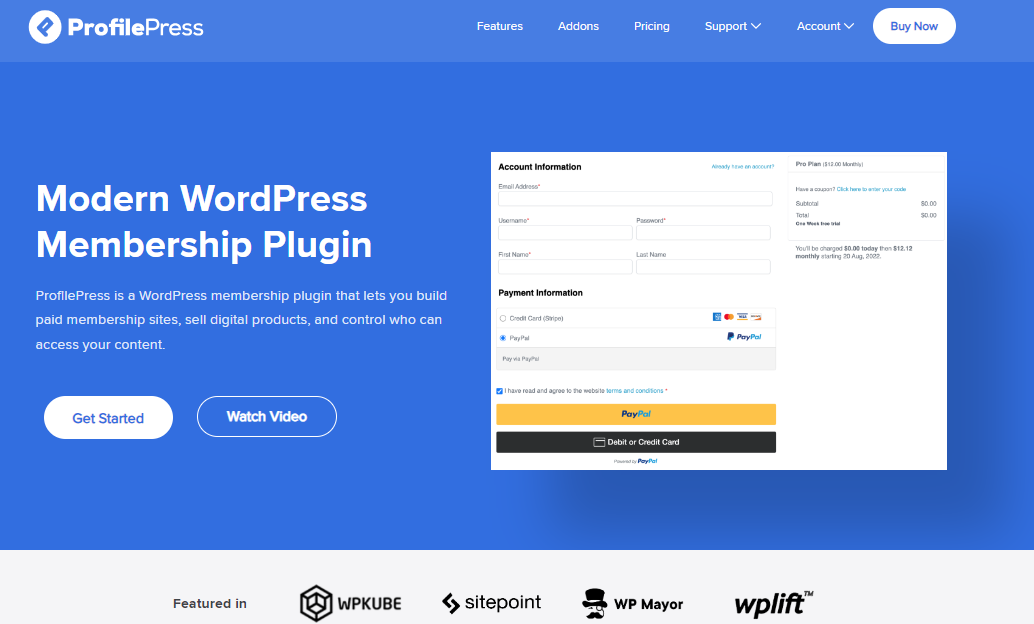
ProfilePress is a powerful WordPress membership and ecommerce plugin that allows you to protect content and manage user access on your website.
Instead of relying on a single password for a page, ProfilePress allows you to create content protection rules that determine exactly who can view specific content, posts, and pages in WordPress.
With ProfilePress, you can restrict access to posts, pages, categories, custom post types, and other parts of your website. You can decide what content users can see based on conditions such as membership plans, user roles, usernames, or whether the user is logged in. This makes it easy to build members-only areas, private content sections, and paywalled resources without manually protecting each page.
Why ProfilePress Is Better?
The default WordPress password protection feature is helpful for quickly locking a single page, but it is quite limited when you need more advanced control.
ProfilePress solves many of these limitations by providing advanced content protection. Below are some of the main reasons why it is a better option than the default WordPress method.
- Flexible Access Control: The default WordPress feature protects content using a single password. Anyone who knows the password can access the page. ProfilePress, on the other hand, allows you to control access based on conditions such as logged-in status, user roles, usernames, or active membership plans.
- Protect Multiple Pages: With the default method, you need to manually password-protect each page individually. This can become time-consuming if you have many pages to protect. ProfilePress allows you to create WordPress content protection rules that automatically apply to multiple pages, posts, categories, or custom post types.
- Built-in Paywall and Membership Support: WordPress’s built-in password protection does not allow you to sell access to content. ProfilePress includes paywall and membership features, allowing you to restrict premium content and grant access only to users who have subscribed to a membership plan.
- Partial Content Protection: The default WordPress feature locks the entire page. ProfilePress allows you to protect specific sections of content within a page. This is useful if you want visitors to see a preview of your content while keeping the rest available only to members.
- Better User Experience: With WordPress password protection, visitors must enter a password every time they want to access protected content. ProfilePress provides a better experience by allowing users to register, log in, and access content through their accounts, making it easier to manage permissions and track users.
Setting Up ProfilePress Content Protection Rules
To start restricting content on your WordPress site using ProfilePress, you first need to install and activate the ProfilePress plugin.
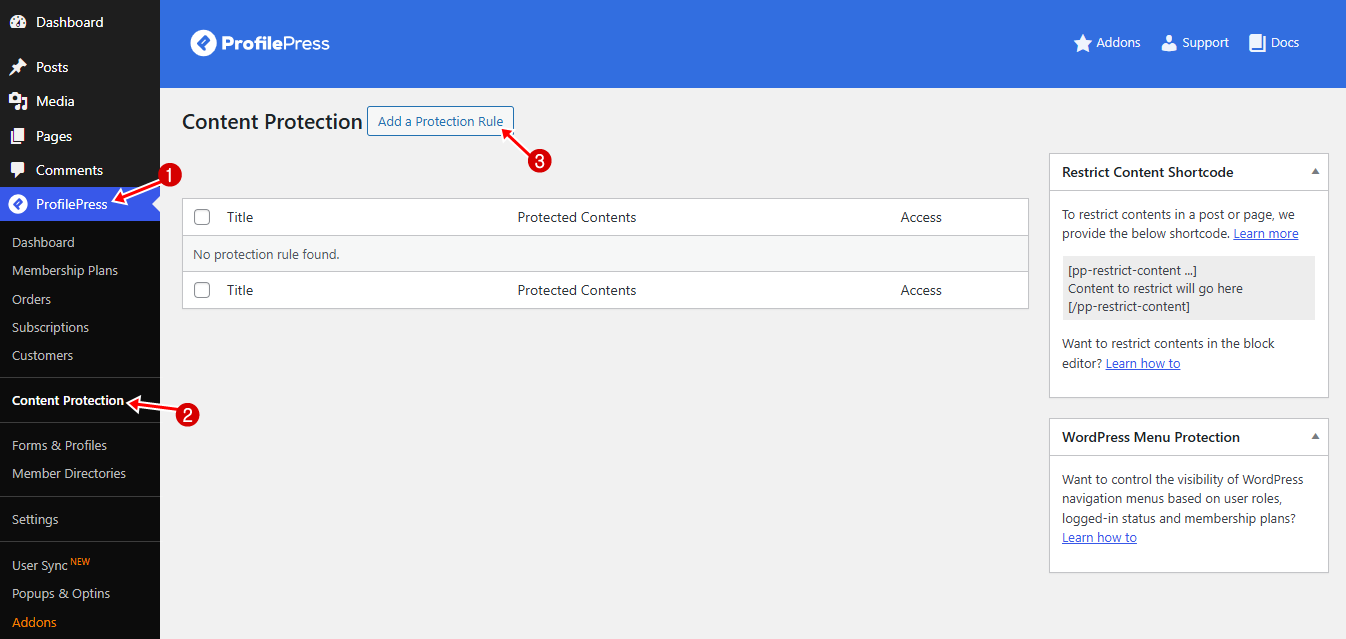
After activation, navigate to ProfilePress > Content Protection in your WordPress dashboard, then click Add a Protection Rule to create a new content restriction rule.
Enter a descriptive title for the WordPress protection rule so you can easily identify it later.
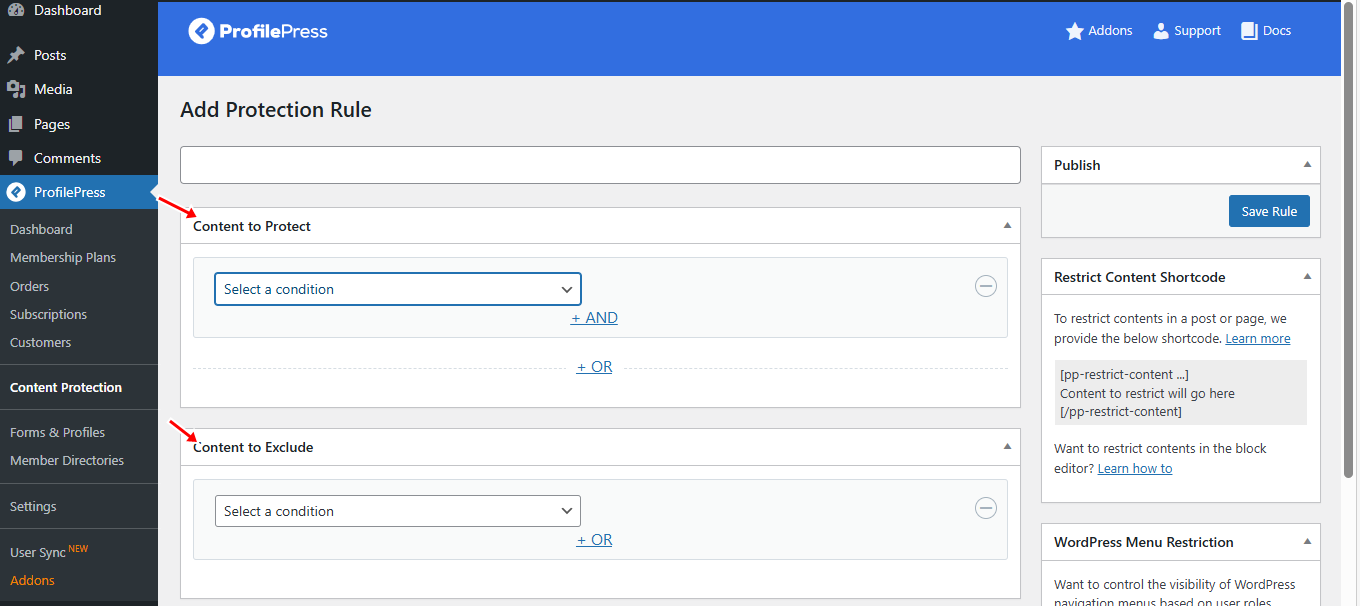
Next, scroll to the Content to Protect section. In this section, you can select pages, posts, categories, or other content types. ProfilePress allows you to combine these selections using AND or OR conditions.
ProfilePress also includes a Content to Exclude option. This allows you to exclude certain pages or posts from the rule, even if they match the protection criteria. For example, if you protect an entire category, you might want to exclude the “Free Preview” page so visitors can still see a sample of the content.
Once you have selected the content to protect and any items to exclude, move to the Access Condition section to choose who should be allowed to view the protected content.
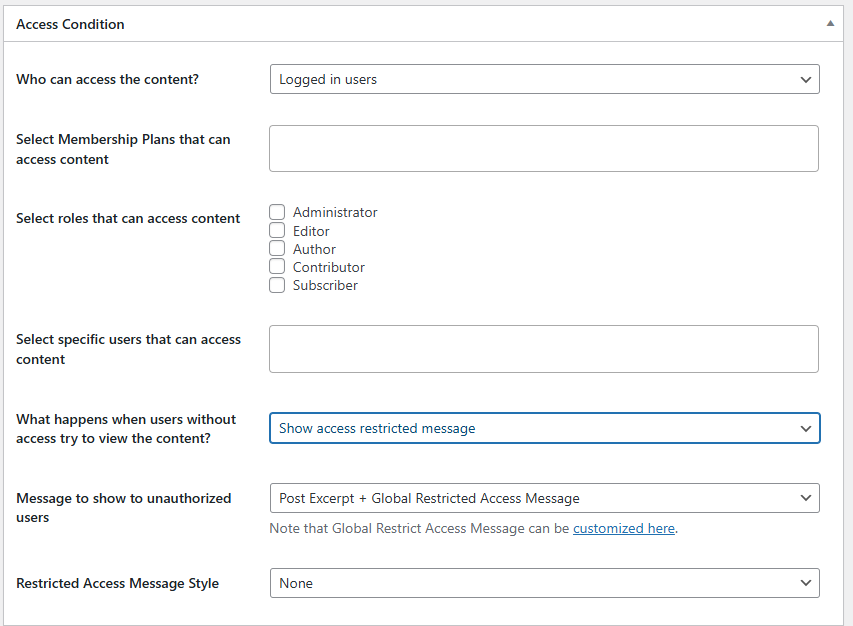
In the Access Condition section, you decide who is allowed to view the protected content.
First, choose who can access the content. You can allow access to: Everyone, Logged-in users, or Logged-out users.
For example, if you want only registered members to see the content, select Logged-in users.
Next, you can further refine access by selecting specific membership plans that are allowed to view the content.
You can also restrict content based on user roles. This allows you to grant access only to certain roles.
If needed, you can go even further by selecting specific users who are allowed to access the content.
After defining who can access the content, you can decide what happens when someone without permission tries to view it. ProfilePress provides two options:
- Show an access-restricted message
- Redirect the user to another page
If you choose Show Access Restricted Message, you can enter the message that unauthorized users will see. For example, you might display a message like “This content is available to members only. Log in or subscribe to access it.” You can also choose the Restricted Access Message Style.
If you choose Redirect User, you can select the page to which visitors should be redirected. Many websites redirect users to a login page, registration page, or pricing page where they can subscribe to gain access.
Once you have finished configuring the settings, click the Save Rule button to apply the content protection rule.
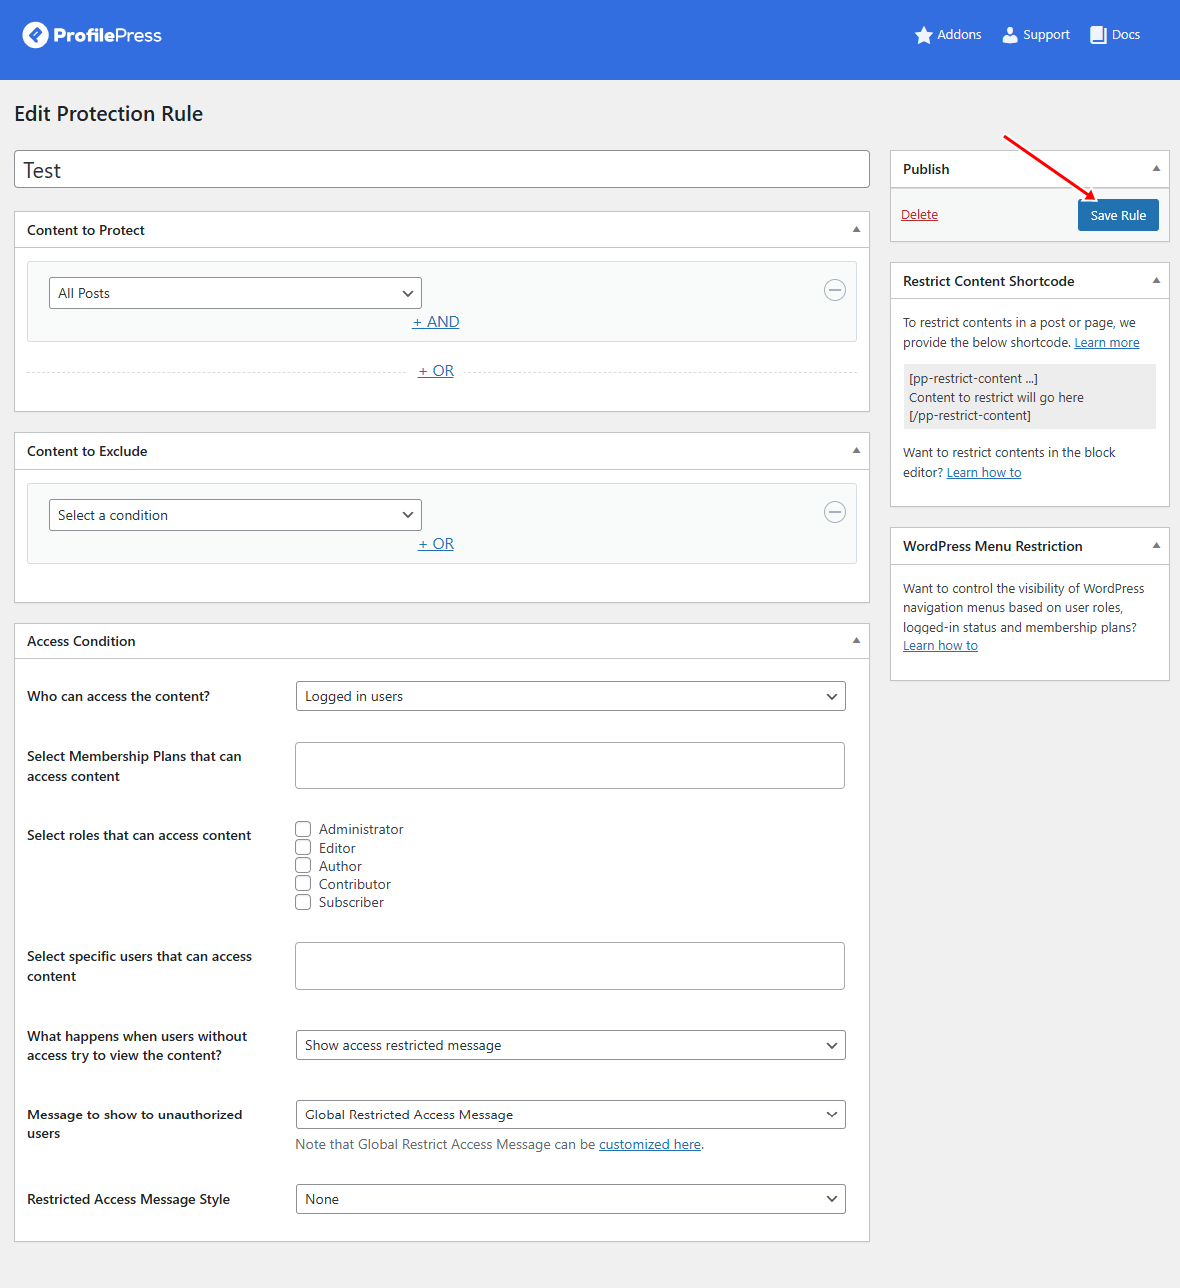
In the screenshot above, we are protecting all posts on the website, with no posts excluded from the rule.
For the Access Condition, we selected Logged-in users, meaning only signed-in users can view the posts.
For the option “What happens when users without access try to view the content?”, we selected Show Access Restricted Message.
This means that anyone who is not logged in will see a restriction message instead of the content.
Below is what visitors who are not logged in will see when they try to access any post on the website.
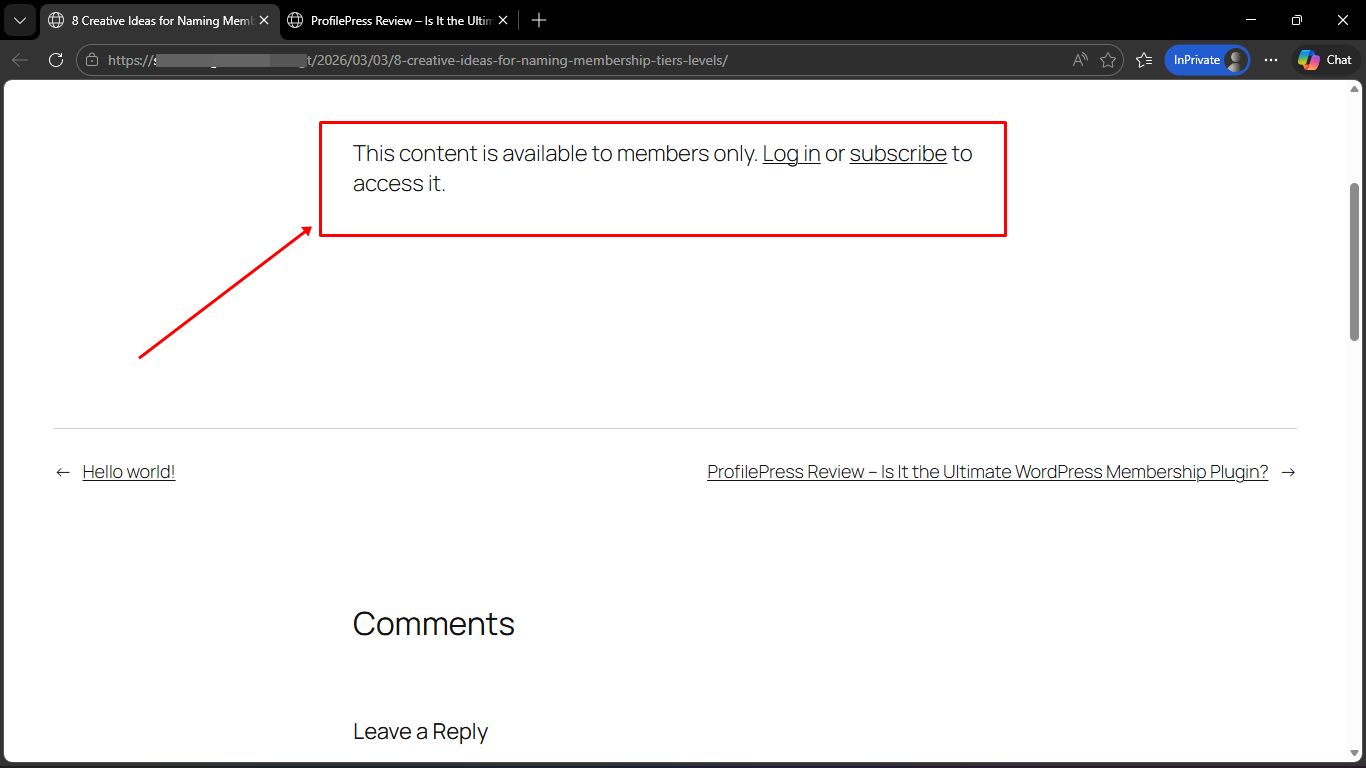
As you can see, ProfilePress gives you much more control over how your website’s content is protected than the default WordPress password protection feature.
In the next section, we will look at how to take things further by restricting access to your entire website using our Global Site Access.
Restricting Access to Your Entire Website with ProfilePress Global Site Access
So far, we have looked at how to password-protect individual pages and how to restrict specific sections using ProfilePress content protection rules. However, there are times when you may want to limit access to your entire website, not just a few pages or sections.
For example, you might want to make your website available only to registered members, create a private client portal, or temporarily prevent public access while your website is still under development. Instead of protecting pages one at a time, ProfilePress includes a feature called Global Site Access that lets you control access to your entire website.
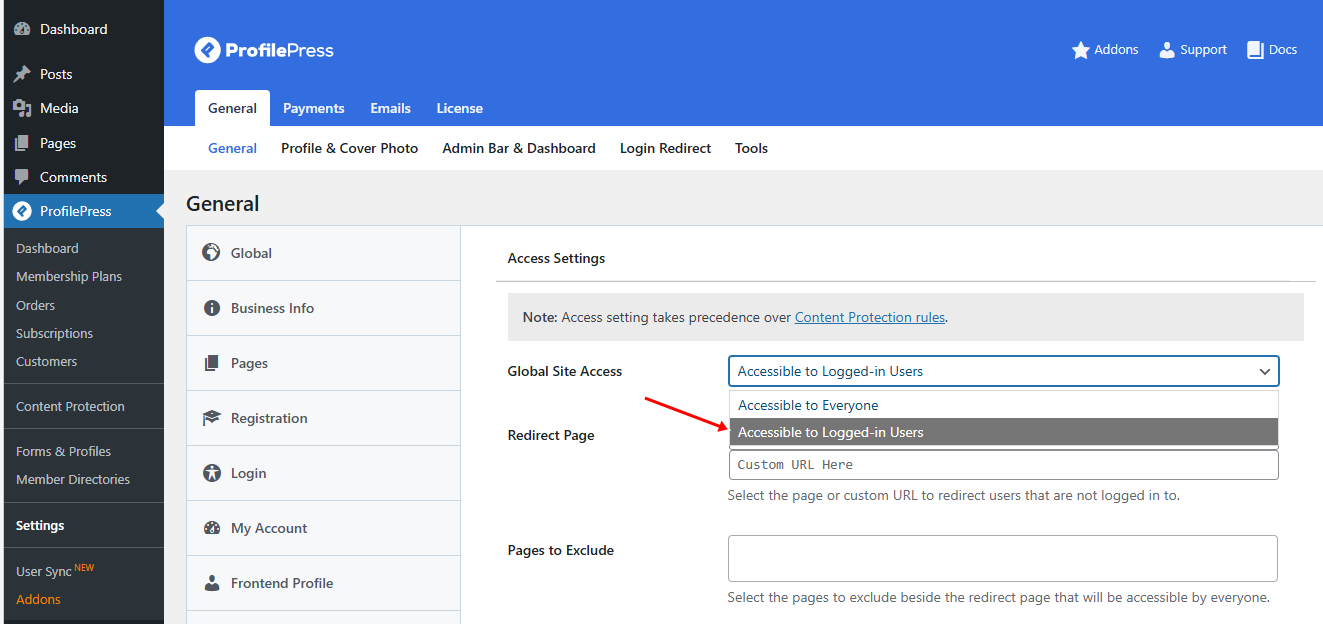
To enable this feature, go to ProfilePress > Settings > Access in your WordPress dashboard.
Here you will find several options to control how visitors interact with your site.
Global Site Access: This setting lets you determine who can access your website. You can keep the site accessible to everyone or restrict it so that only logged-in users can view your website.
Click on “Accessible to Logged-in user.”
Redirect Page: When access to your website is restricted, visitors who are not logged in need to be redirected to another page. Here, you can choose a page from the dropdown menu or enter a custom URL to redirect users to when they try to access restricted pages.
For example, you might redirect visitors to a page explaining that the site is members-only or to a WordPress login or registration page.
Pages to Exclude: Sometimes you may want certain pages to remain publicly accessible even when the rest of the site is restricted. This option allows you to exclude specific pages from the restriction rule, such as the login, signup, or pricing pages.
Accessible Homepage: If you want your homepage to remain visible to everyone, you can enable this option. This allows visitors to view your homepage while other parts of the website remain restricted.
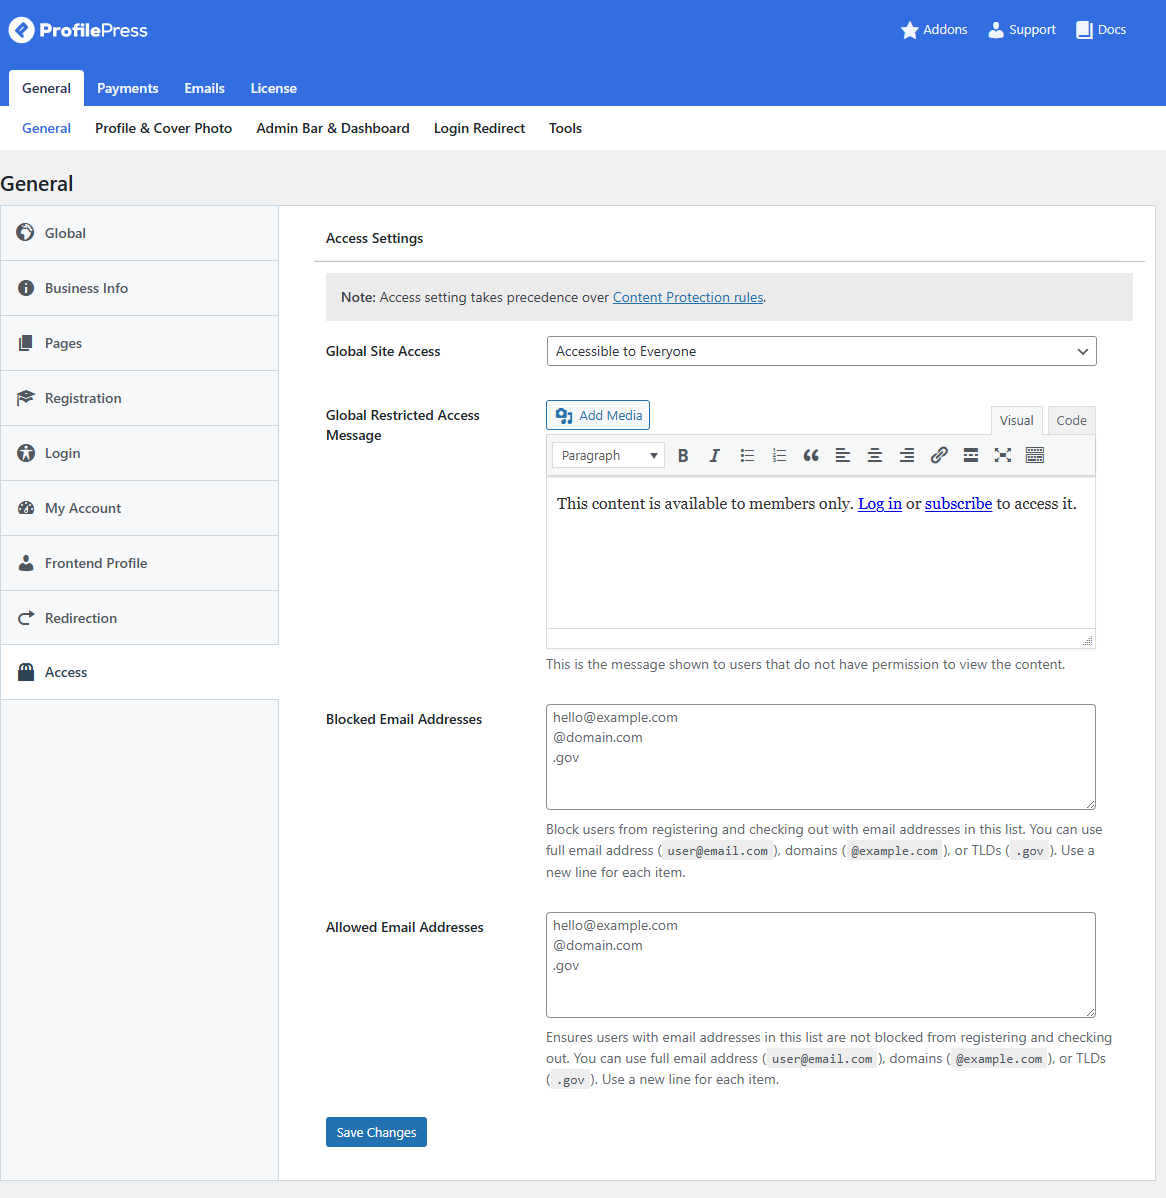
Global Restricted Access Message: This option allows you to display a custom message to visitors who try to access a page they are not permitted to view. You can edit the message to explain why the content is restricted or provide instructions on how they can gain access.
Blocked Email Addresses: This setting lets you block users from registering or checking out on your website using specific email addresses. You can block individual email addresses, entire domains, or domain extensions.
Allowed Email Addresses: If you want to ensure that specific email addresses are always allowed, you can add them to this list. Even if their domain appears in the blocked list, email addresses added here will still be permitted to register or make purchases.
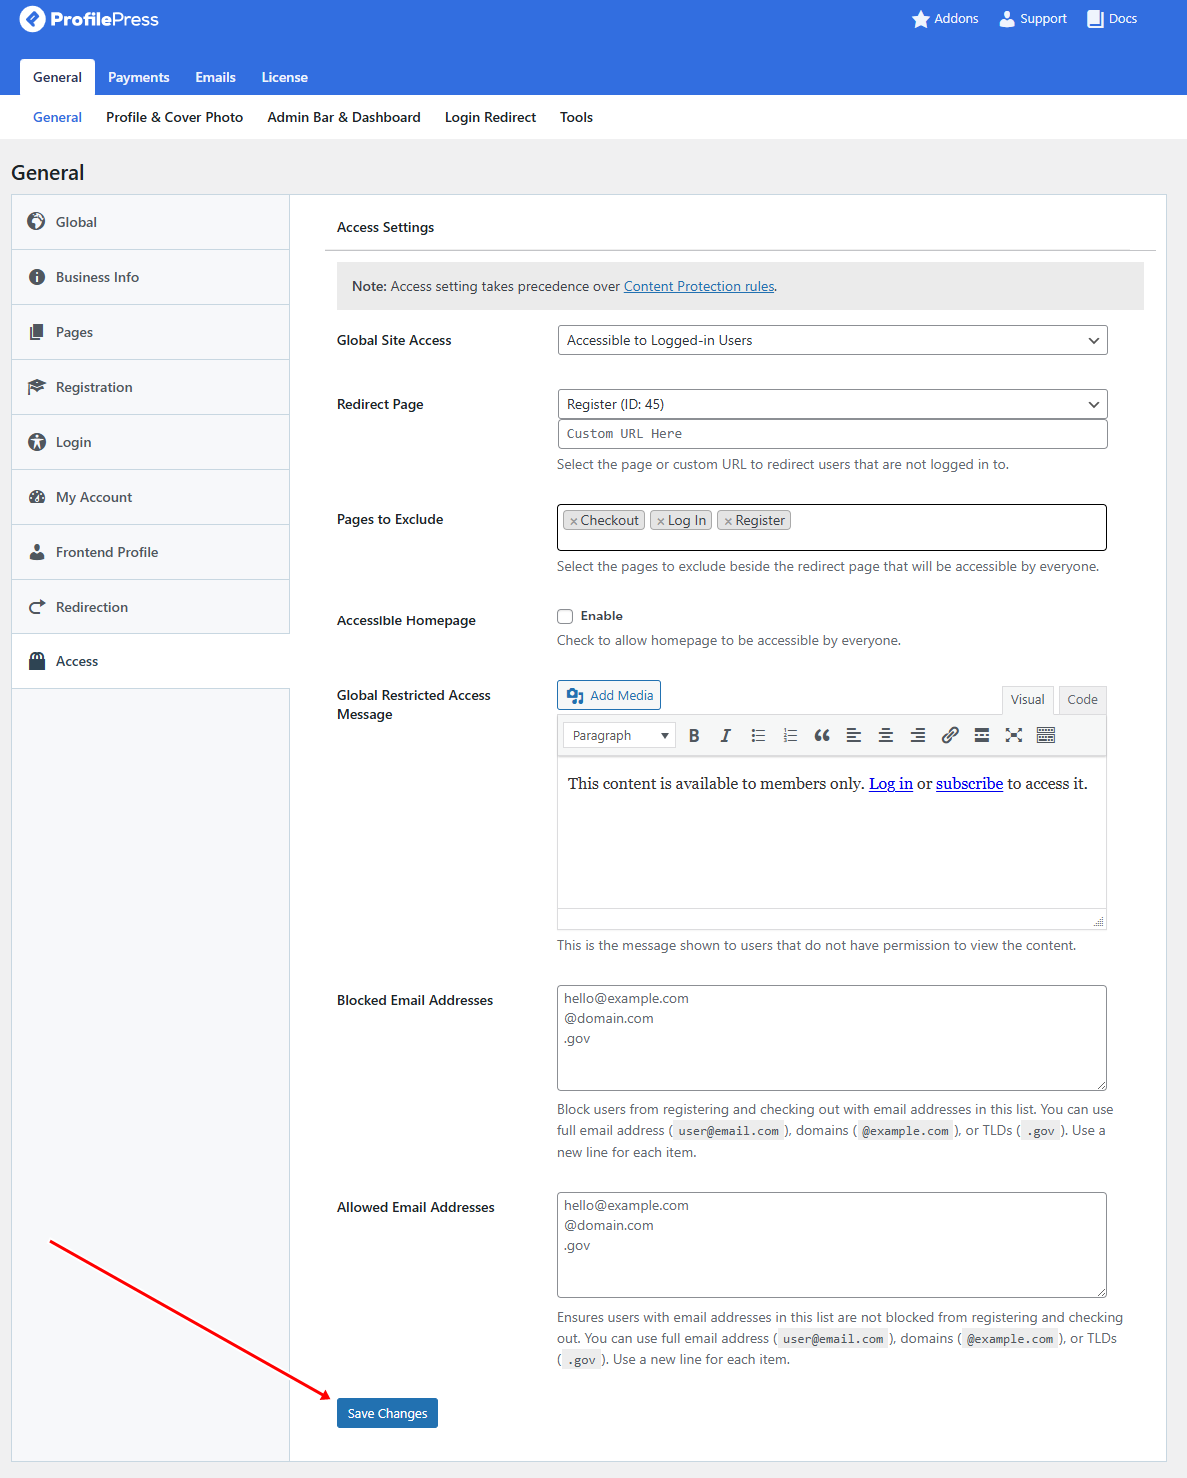
After configuring the settings according to your needs, click Save Changes to apply the restrictions.
When Should You Use Each Method?
At this point, you might be wondering which approach is best for your website. The answer depends on how much control you need over your content and how your site is structured.
If you only need to password-protect a single page or post, the default WordPress password protection feature can work well. It is quick to set up and does not require installing any additional plugins.
However, if you want more control over who can access your content, such as restricting posts based on membership plans, user roles, or login status, using a plugin like ProfilePress is a much better option. It allows you to create flexible content protection rules and manage access across multiple pages without repeating steps.
For websites that need to be completely private, such as membership communities, online course platforms, or internal company portals, the Global Site Access feature in ProfilePress makes it easy to restrict your entire website and allow only authorized users to enter.
Frequently Asked Questions
Q1: Can I password-protect a WordPress page without using a plugin?
Yes, WordPress includes a built-in feature that allows you to password-protect pages and posts without installing any plugins. While editing a page or post, open the Visibility settings and choose Password Protected, then enter a password. Visitors will need to enter the password before they can view the content.
Q2: Can you protect multiple WordPress pages at once?
The default WordPress password protection feature does not allow you to protect multiple pages at once. You would need to set a password for each page or post individually manually.
Using a plugin such as ProfilePress, you can create protection rules that automatically apply to multiple pages, posts, categories, or custom post types. This makes it much easier to manage access as your website grows.
Q3: Can search engines see password-protected WordPress pages?
No. Search engines generally cannot access password-protected pages because they require authentication. This means protected pages will usually not be indexed or displayed in search results.
Q4: Can I password-protect a WordPress post the same way as a page?
Yes. WordPress allows you to password-protect both posts and pages using the same built-in visibility settings in the editor. Once a password is set, anyone who wants to view that post or page must enter the password.
Q5: Can I use different passwords for different WordPress pages?
Yes, you can assign different passwords to different pages or posts. This allows you to share specific content with different groups of people without giving them access to everything on your website.
Q6: Can I change or remove a password from a WordPress page later?
Yes. You can edit the page or post at any time and update the Visibility settings. From there, you can change the password, remove the password protection, or make the page public again.
Conclusion
We hope this article helped you learn how to password-protect your WordPress page and entire site so you can control who has access to your content.
As you have seen, WordPress includes a built-in password protection feature that works well for protecting individual pages or posts. However, if you need more flexibility, such as restricting content based on login status, user roles, or membership plans, a plugin like ProfilePress offers more advanced options.
By using the approach that best fits your needs, you can protect sensitive information, control how your content is accessed, and provide a better experience for your website visitors.