How to Sell Subscriptions with WooCommerce Subscriptions
Are you interested in learning how to sell subscriptions using WooCommerce Subscriptions?
Subscription-based business models are transforming how companies engage with customers and generate recurring revenue. With the global subscription e-commerce market projected to reach $904.2 billion by 2026, now is an ideal time to explore this lucrative opportunity.
WooCommerce Subscriptions, an extension of the popular WooCommerce platform, allows you to seamlessly add subscription functionality to your WordPress store. It enables you to offer various recurring payment options, providing your customers with flexibility while ensuring a consistent income stream for your business.
In this article, we will provide an overview of selling subscriptions with WooCommerce, guide you through the steps to add subscriptions to your WooCommerce store, demonstrate how to sell recurring memberships using both WooCommerce Subscriptions and ProfilePress, and end by presenting an excellent alternative to WooCommerce Subscriptions.
Overview of Selling Subscriptions with WooCommerce
Generating income online can come in various forms; however, relying solely on one-time purchases may result in inconsistent revenue. Adopting a subscription pricing model becomes essential, creating a steady and predictable revenue stream for your business.
Consider an example you’re probably familiar with: premium WordPress plugins.
You typically sign up for a monthly or annual subscription when purchasing one. This recurring payment grants you access to essential features like plugin updates and customer support, ensuring ongoing value. This model is common with popular plugins like MailOptin or Elementor Pro, where subscribers pay for continual improvements and priority support.
Another excellent example is platforms like Skillshare or MasterClass, which use subscriptions to provide access to a wide range of courses and learning materials. Users pay a recurring fee to enjoy unlimited access to classes taught by experts in various fields. This allows for a steady income for the platform and will enable users to learn at their own pace and explore multiple topics without needing separate purchases.
Online news outlets like The Washington Post and The Wall Street Journal have also turned to subscription models to maintain a steady income. By offering premium articles, in-depth analysis, and investigative reporting behind a paywall, these publications create a sense of exclusivity for their readers. As traditional advertising revenue declines, subscriptions have become essential for sustaining operations and providing high-quality journalism.
Similarly, membership sites allow businesses to offer exclusive perks in exchange for recurring fees. Think of it like a digital version of a Costco membership. Users might get exclusive access to specific products, special promotions, discounts, or other unique offers in exchange for their monthly fees. For example, a fitness website might offer a subscription plan that gives members access to premium workout videos and live classes, offering both value and exclusivity.
These examples demonstrate countless ways to integrate subscription-based products or services into your WooCommerce store. Each approach provides a more reliable and scalable income source, transforming your business into a consistent revenue-generating machine.
How to Add Subscriptions to WooCommerce
Before diving into subscriptions, ensure you have a functional WooCommerce store. If not, head over to the WordPress plugin repository and install WooCommerce. Once activated, read through this guide on how to build an online store on WooCommerce.
When you are done setting up WooCommerce, the next step is to install the WooCommerce Subscriptions plugin.
To do this, you’ll need to purchase the WooCommerce Subscriptions extension.
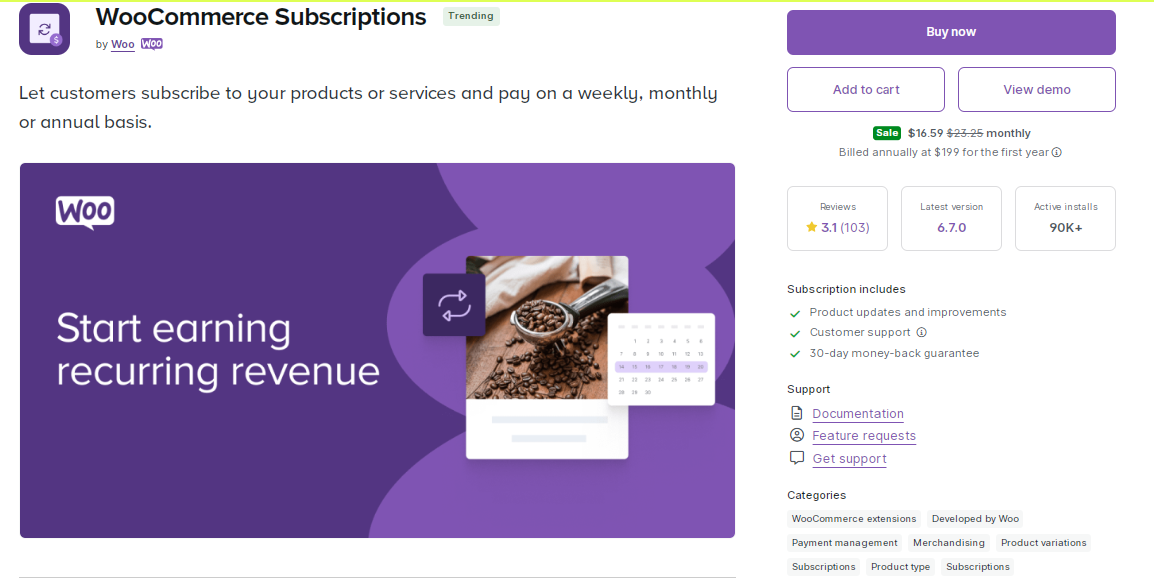
Next, you’ll be prompted to log in to your WooCommerce.com account or create a new one.
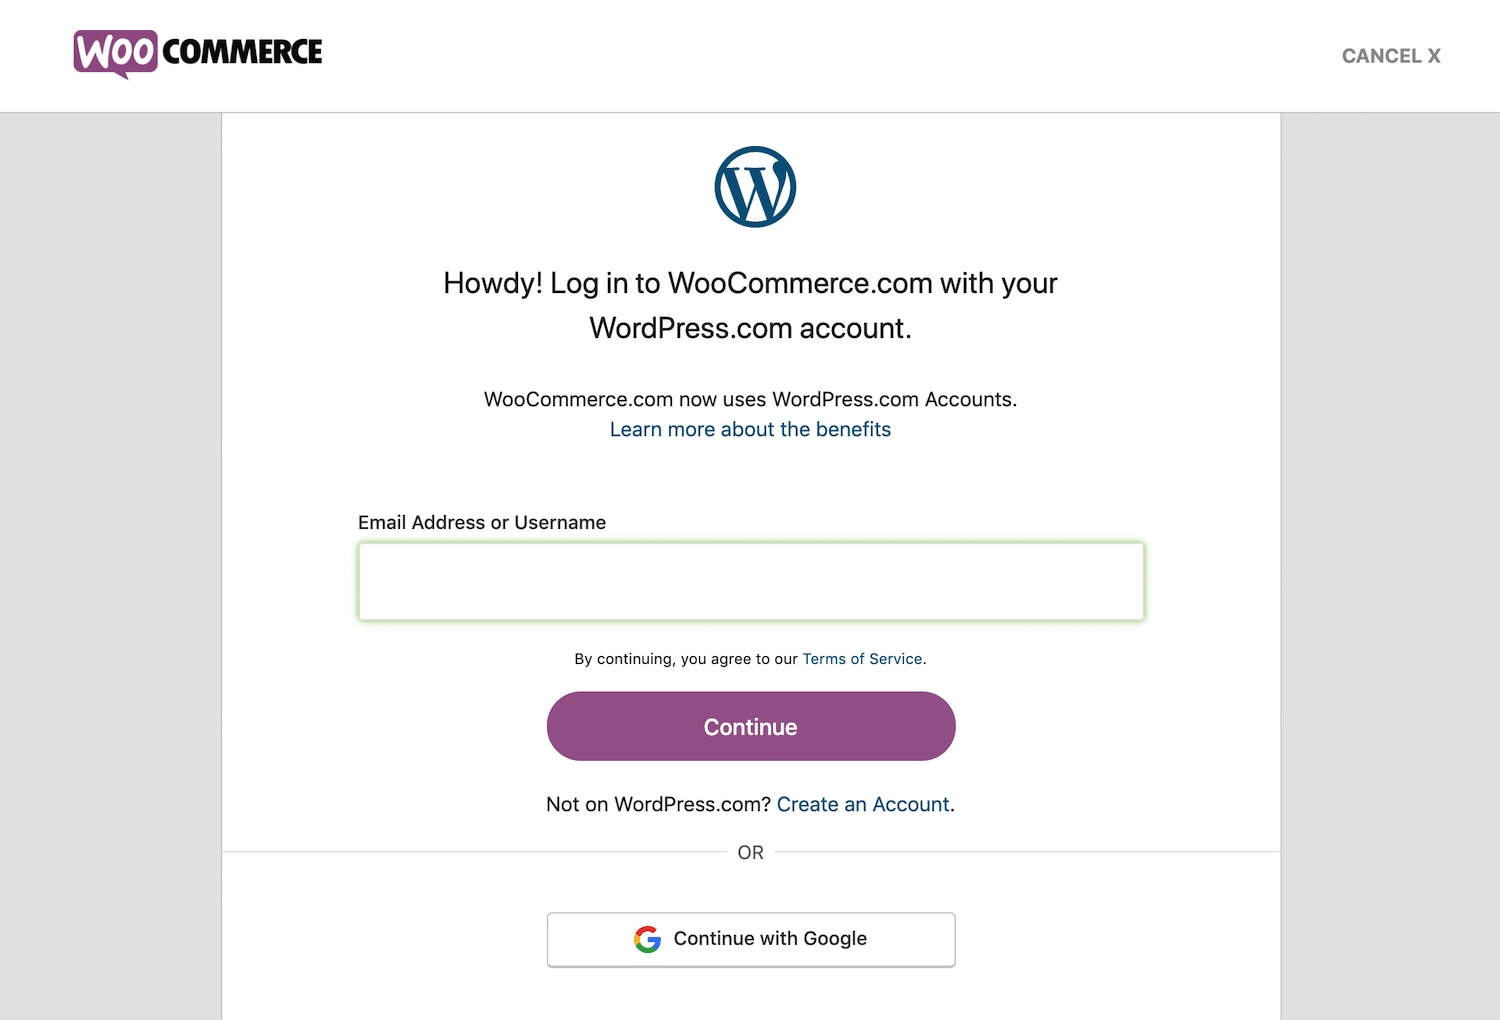
Once you’ve completed the sign-up or login process and finished your purchase, you’ll be directed to a confirmation page with two options for proceeding.
First, click the purple “Download” button to get a .zip file of the WooCommerce Subscriptions extension. Next, go to your WordPress dashboard, and under Plugins > Add New, select Upload Plugin.

Next, drag and drop the previously downloaded plugin file, click Install Now, and then Activate to finish adding WooCommerce Subscriptions to your site.
Alternatively, you can skip downloading the .zip file and directly connect your WooCommerce.com account to your store.
To do this, log in to your WordPress dashboard and go to WooCommerce > Extensions > WooCommerce.com Subscriptions.
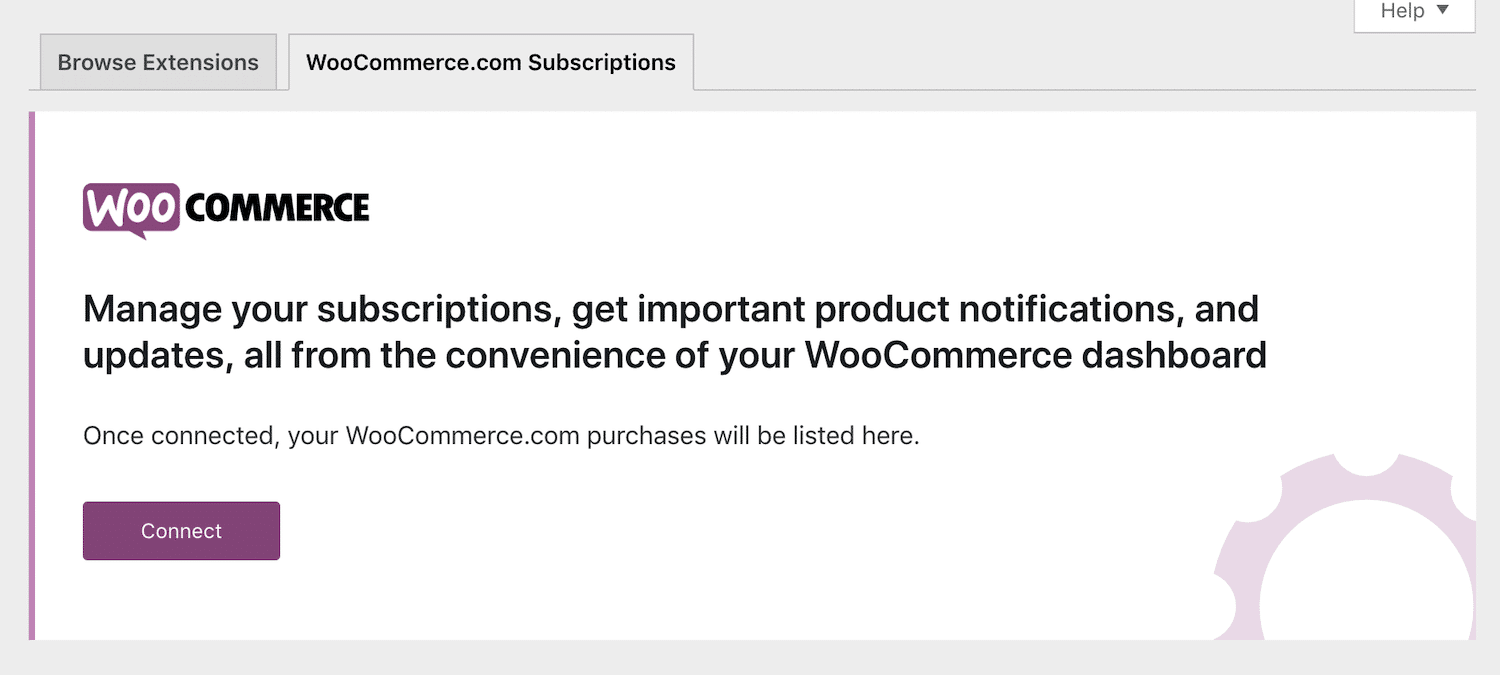
Next, click the purple Connect button. You’ll then be prompted to authorize the connection.
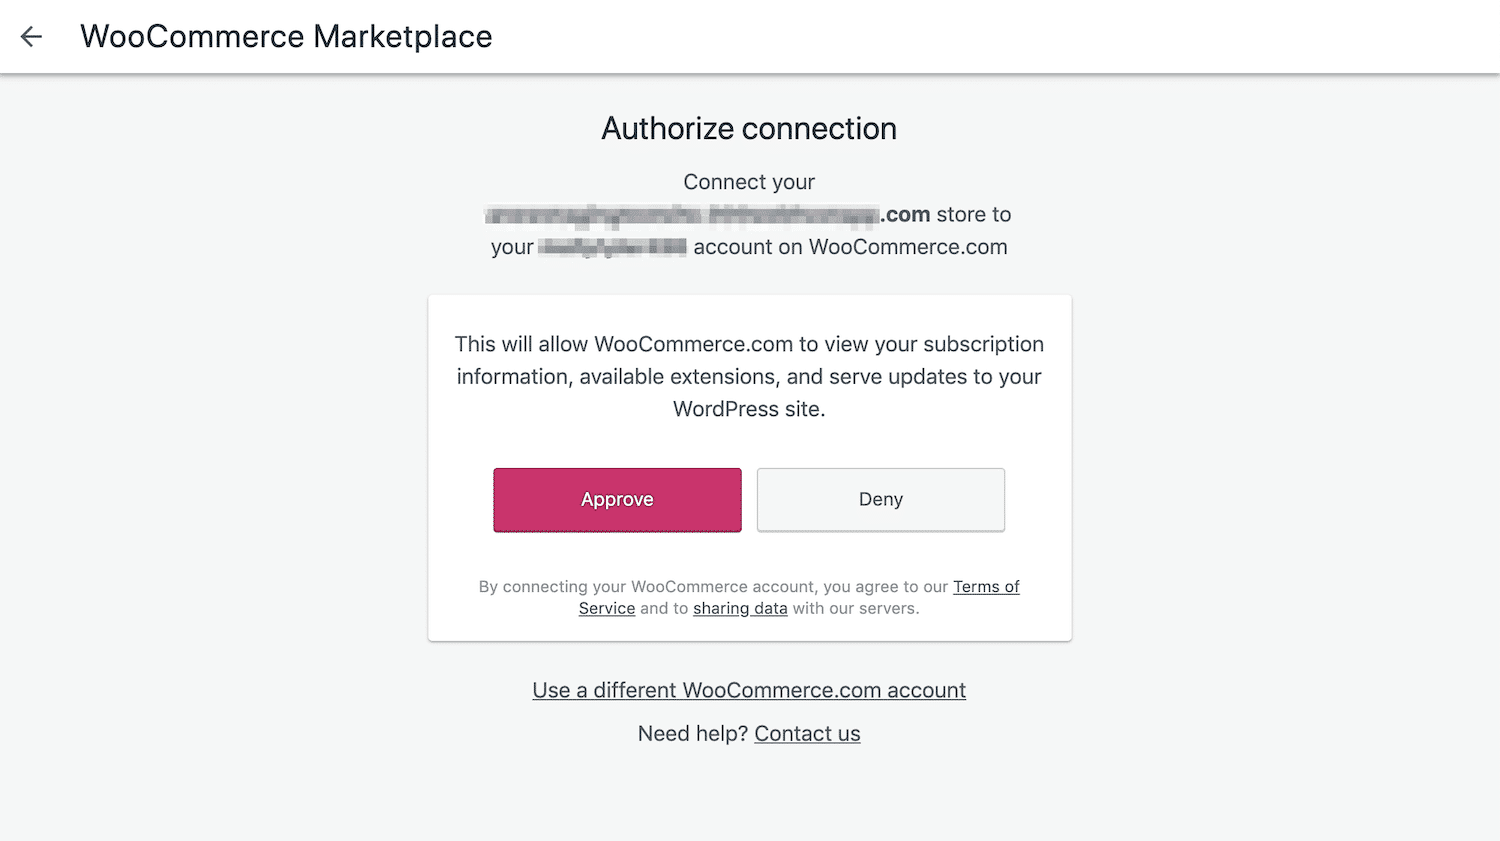
Click the Approve button. Afterward, you should see WooCommerce Subscriptions listed under the WooCommerce.com Subscriptions tab.
From here, click the Download button and toggle the switch to Active to install and activate the plugin on your site.
This method is incredibly convenient if you have other WooCommerce extensions for your store, as it allows you to update, renew, and manage all of them from this central location.
Creating Subscription Products
Now it’s time to create your first subscription product!
In your WordPress dashboard, navigate to Products > Add New. As with regular products, add details such as the title, description, and images.
Next, scroll down to the Product Data section, where you’ll notice differences from the standard WooCommerce product editor.
First, you’ll see two new product types available:
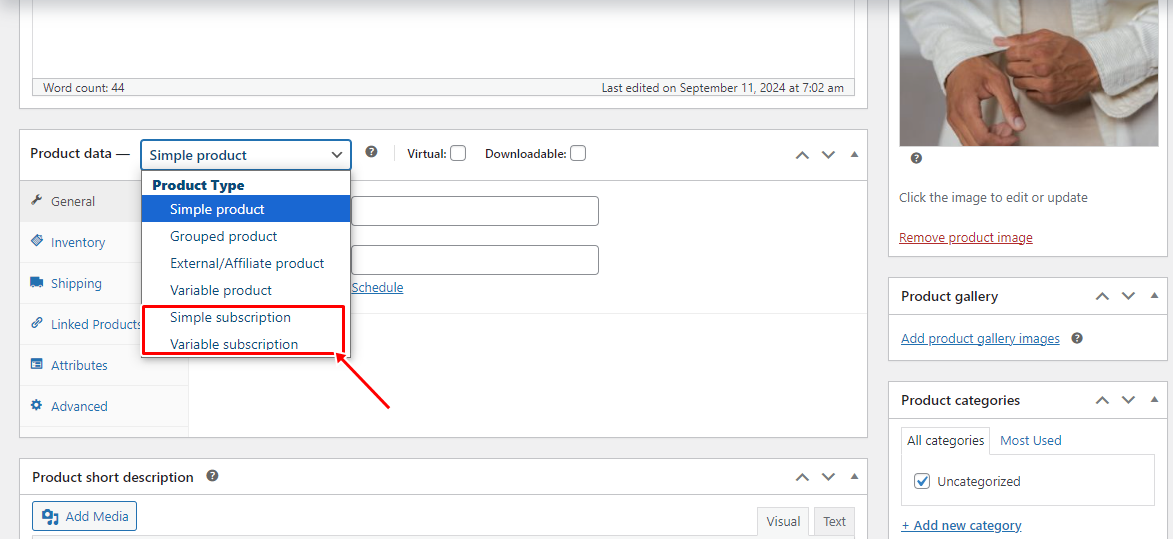
Simple Subscription: This functions like a simple product. Customers subscribe to a single option at a fixed price.
Variable Subscription: This option offers multiple subscription choices, similar to a variable product. You can create different pricing tiers or plans that focus on varying features.
To set up your subscription pricing model, you’ll need to fill out the following fields:
- Price: The cost of the subscription.
- Billing interval: How often customers are charged (every one, two, three, four, five, or six periods).
- Billing period: The frequency of charges (daily, weekly, monthly, or annually).
- Length: The duration of the subscription before it expires.
- Sign-up fee: Any additional fee required at the time of sign-up.
- Trial period: The length of time customers can test the subscription for free before committing to sign-up.
Lastly, you might want to visit the Advanced tab to limit subscriptions. This setting prevents customers from purchasing multiple subscriptions for the same product or service.
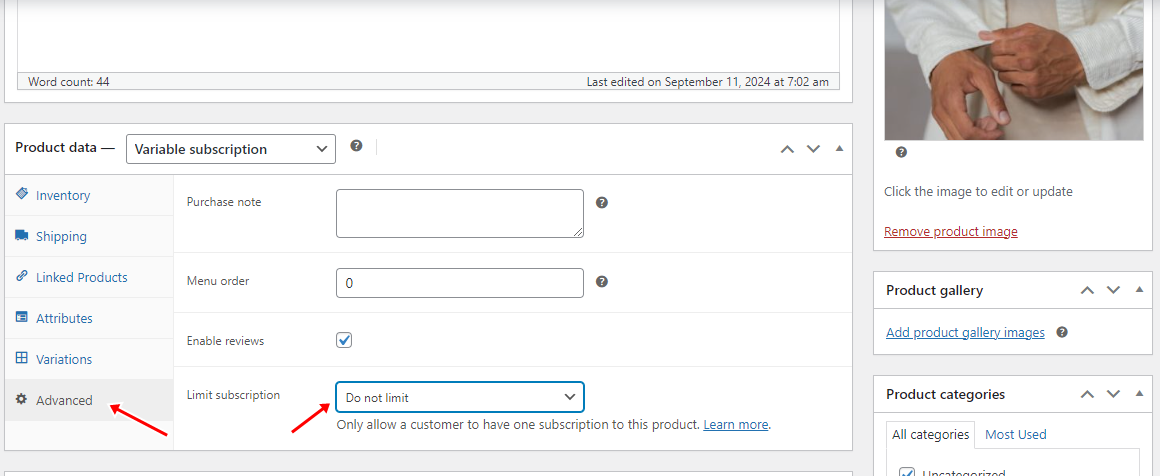
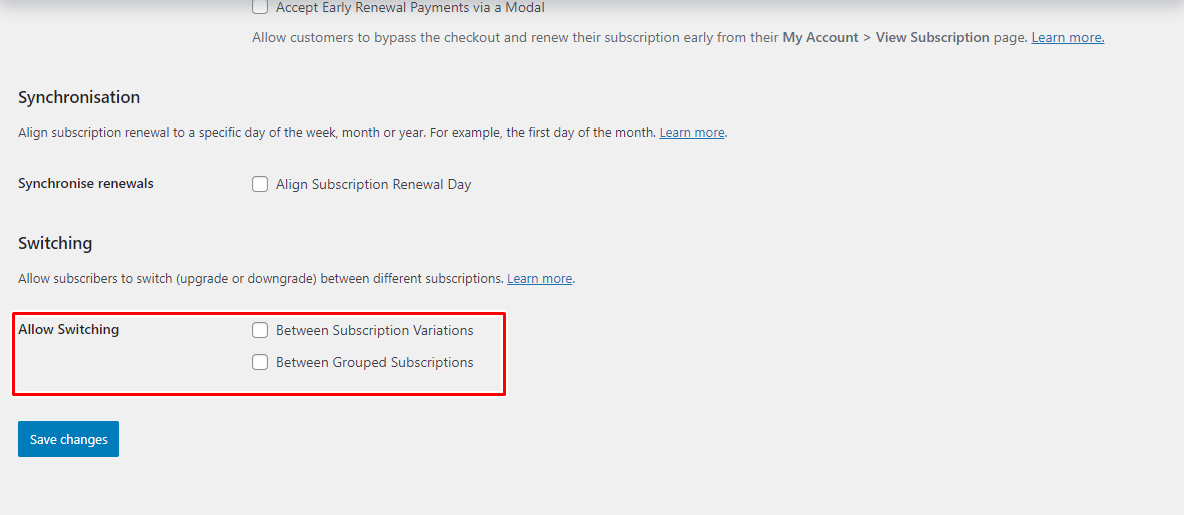
If you decide to limit a variable subscription, consider allowing customers to upgrade or downgrade their plans.
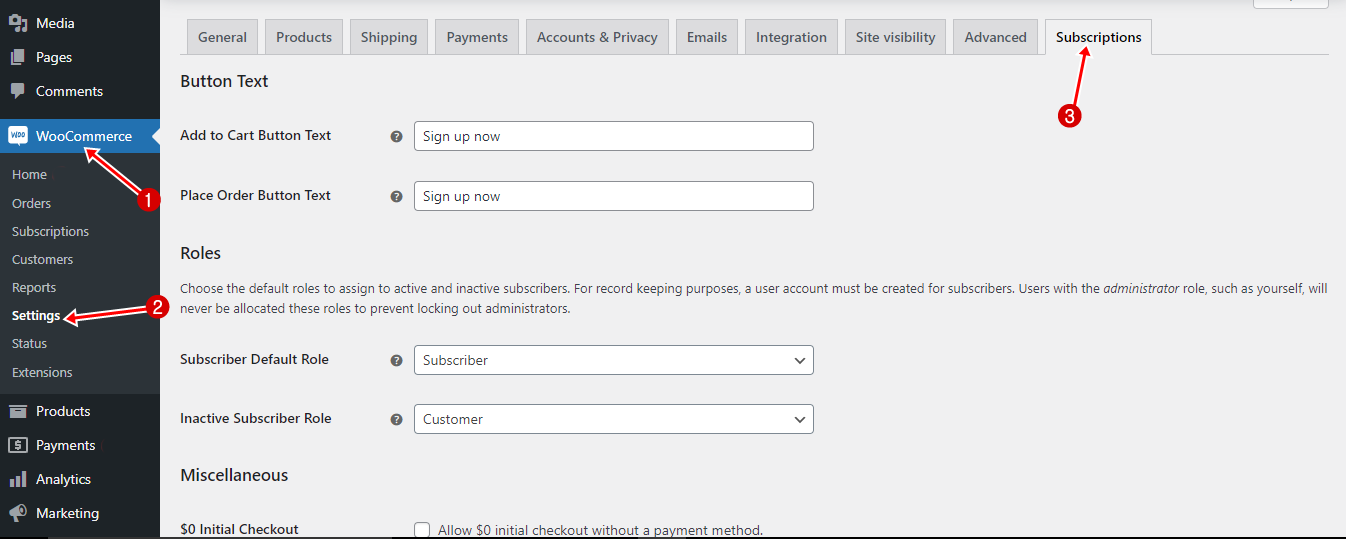
To enable this, navigate to WooCommerce > Settings > Subscriptions
Scroll down to enable plan switching, and once completed, click Save Changes.
Setting up Your Payment Gateways
To start accepting payments for your subscriptions, you must configure one or more payment gateways supporting recurring payments in WooCommerce.
WooCommerce integrates with numerous gateways, including Razorpay, Amazon Pay, PayU India, Authorize.Net, Chase Paymentech, PayPal Powered by Braintree, and Stripe.
Each payment gateway provides unique features, so choosing according to your business needs is essential. When selecting a gateway, consider the following capabilities:
- Subscription Suspension: Allows customers to temporarily pause their subscriptions without canceling them.
- Subscription Cancellation: This lets customers cancel their subscriptions at any time.
- Reactivation: Enables customers to reactivate a suspended subscription when they’re ready.
- Multiple Subscriptions: Enables customers to purchase and manage several subscriptions simultaneously.
- Billing Modifications: You can adjust the recurring price or billing frequency for ongoing subscriptions.
- Payment Method Changes: Enables customers to update their payment methods when necessary.
Your choice of payment gateways should align with the needs of your customers. For example, if you want to offer multiple subscriptions per user, Amazon Pay or PayPal might not be the best fit, as they don’t support this functionality.
Also, keep the cost of gateway extensions in mind. If you plan to offer several premium gateways, ensure your budget can accommodate the necessary purchases. Balancing cost and functionality is essential to providing a seamless payment experience for your customers.
To set up the payment gateway you choose, navigate to WooCommerce > Settings > Payments in your WordPress dashboard, select your preferred gateway, and follow the setup instructions.
Selling Recurring Memberships with WooCommerce Subscriptions and ProfilePress
ProfilePress is a powerful tool for businesses offering memberships that integrate seamlessly with WooCommerce Subscriptions to manage membership access. While WooCommerce Subscriptions provides essential subscription functionality, ProfilePress enhances the experience with advanced user management and content restriction features.
Here’s how to sell recurring memberships in WordPress using this combination:
First, you’ll need to activate the WooCommerce plugin and WooCommerce Subscriptions extension on your website. Next, you’ll need to install ProfilePress.
Install and Configure ProfilePress
To do this, head to the ProfilePress pricing page and buy the plugin. After purchasing the plugin, download the ZIP file from your account section onto your local computer.
First, log in to your WordPress dashboard and go to the Plugins section. Click on the Add New button, then select Upload Plugin. Afterward, choose the downloaded ZIP file. Once it’s uploaded, click Install Now.
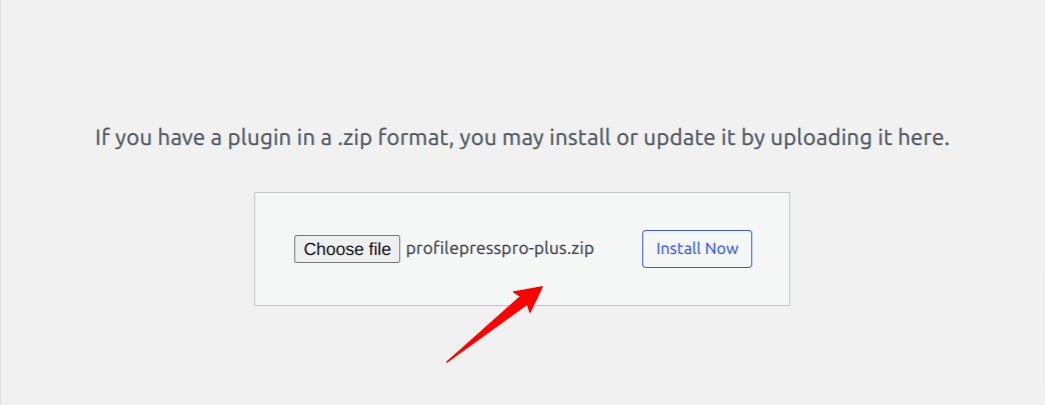
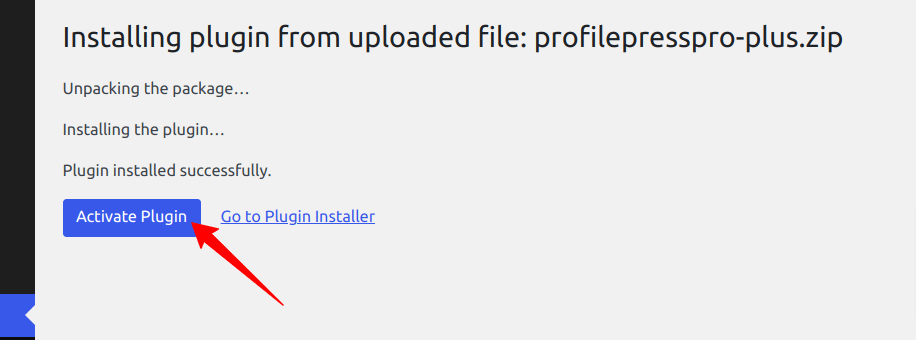
Wait a few seconds for the installation to be completed. Once the plugin is installed, click on Activate Plugin to activate it on your site.
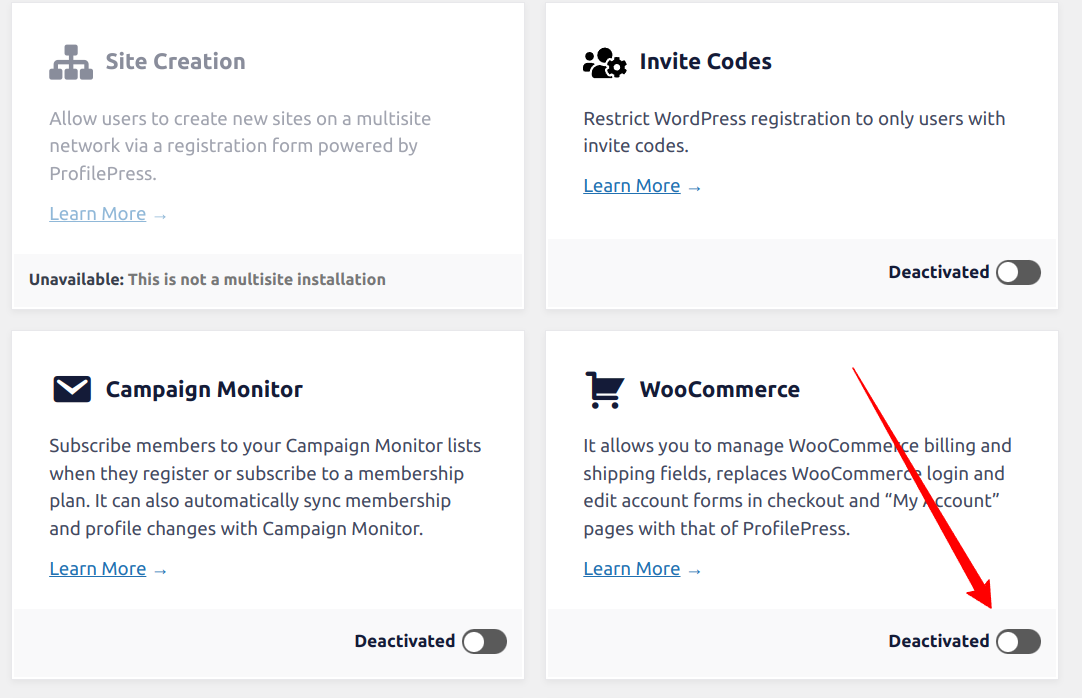
The next step is to activate the WooCommerce addon. To do this, go to ProfilePress > Addons and switch the toggle to enable it.
The way WooCommerce membership websites created with ProfilePress work is that you need to create a product in WooCommerce with a fee, then create a corresponding membership plan in ProfilePress and map the WooCommerce product to it. This way, any users who purchase the product on your website will automatically be subscribed to the membership in ProfilePress.
This section will present a practical example of setting up a Gold Membership plan that charges users a monthly fee of $10.
To begin, we need to create a subscription product in WooCommerce.
Go to WooCommerce >> Product >> Add New.
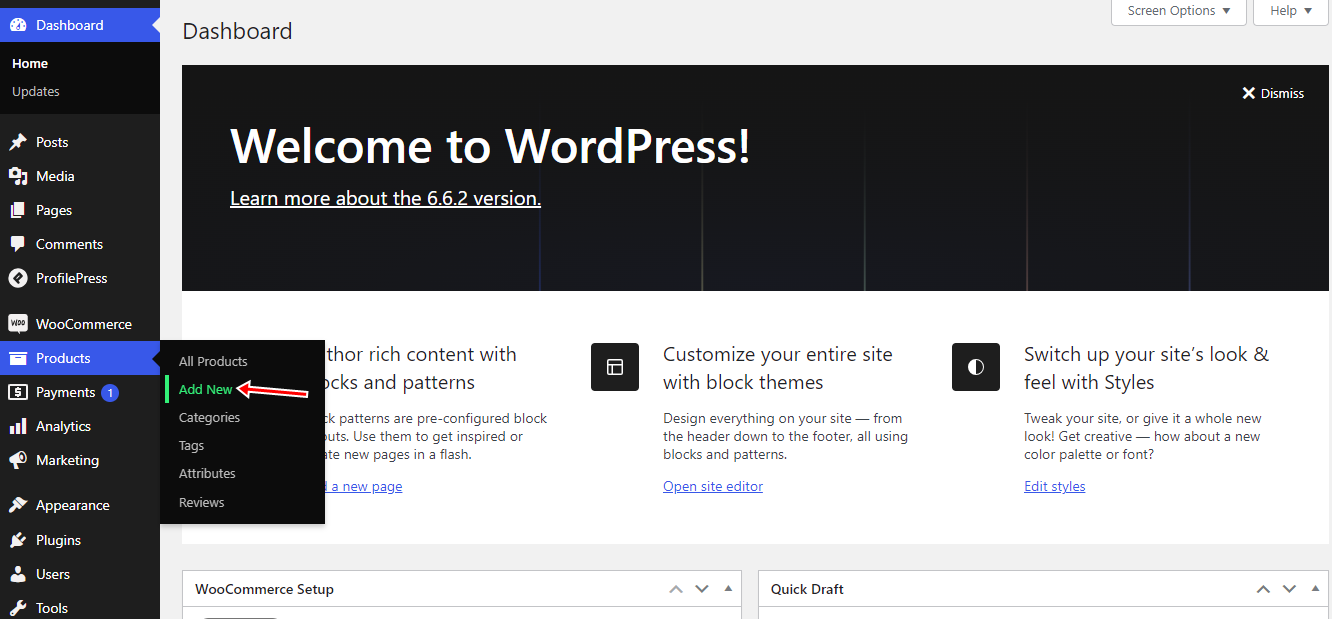
Give the product a title,
In the Product Data section, select the product type as “Simple Subscription,” which indicates to WooCommerce that this is a subscription-based product.
Next, configure the subscription terms. Set the price to $10, and choose the billing interval as monthly (or adjust it to weekly or annually, based on your plan).
You can also specify whether to include a sign-up fee to charge an initial payment. Additionally, decide if there will be a free trial period, such as a 7-day or 30-day trial, to encourage more sign-ups.
Then, set the catalog visibility to hidden to prevent the product from appearing on the Shop and Search Results pages.
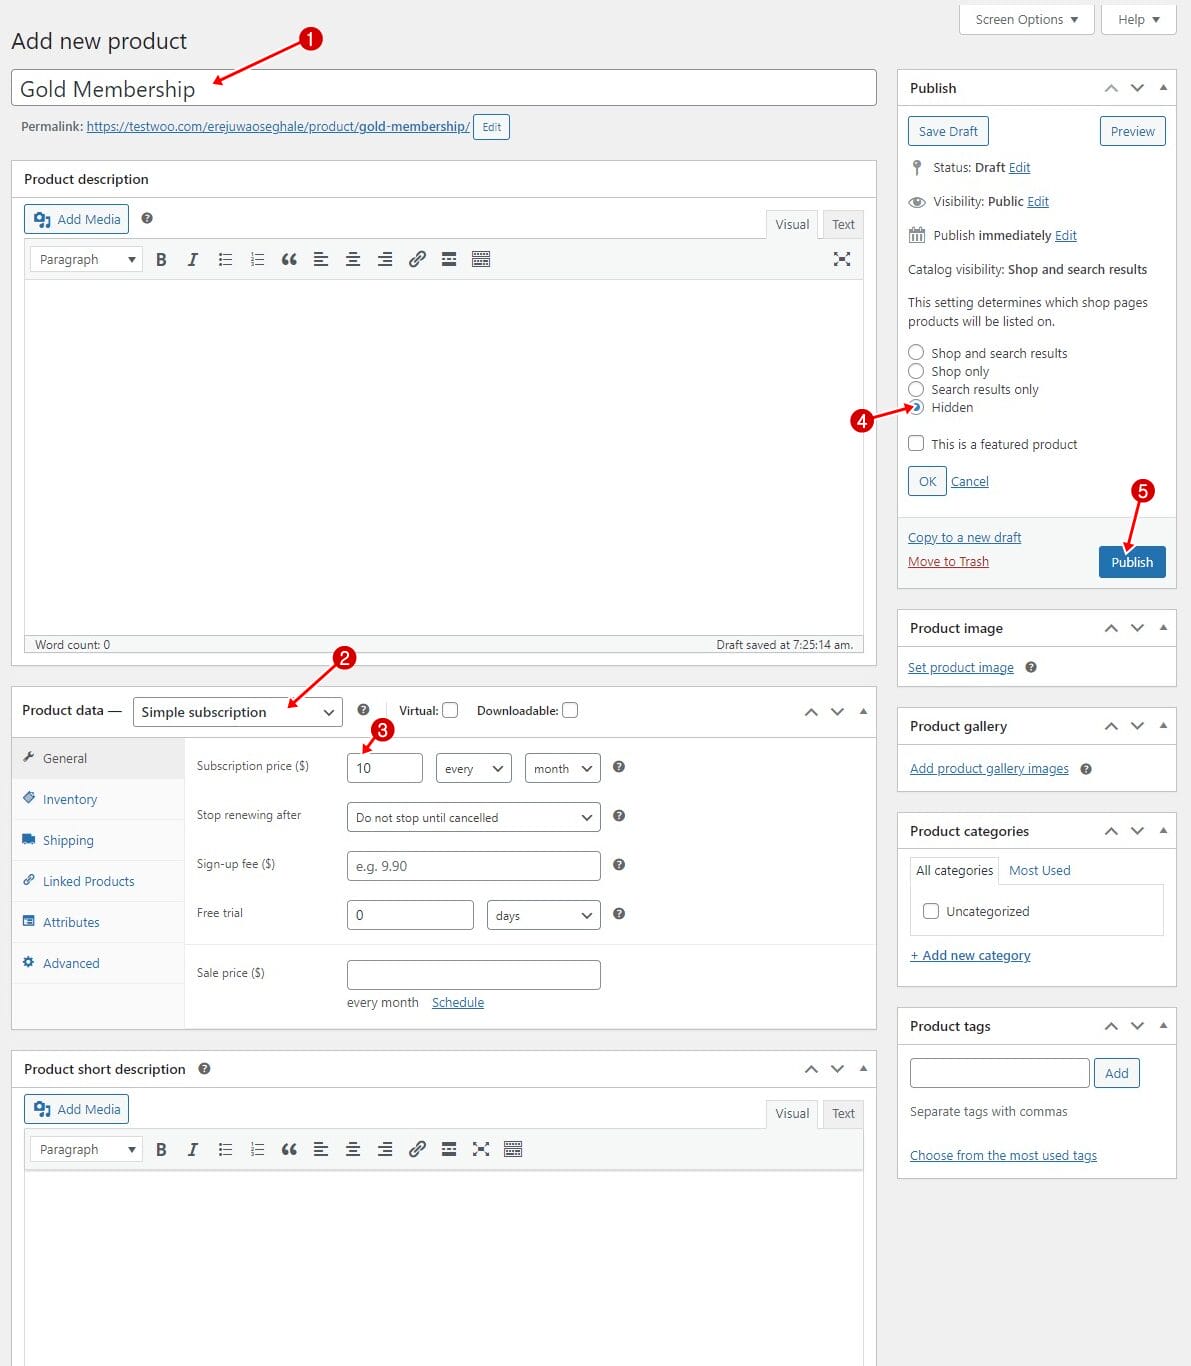
Once you’ve completed these steps, go ahead and publish the product.
Linking the Subscription Product to the ProfilePress Membership Plan
Now that your subscription product is created, the next step is linking it to a membership plan in ProfilePress so that customers are automatically enrolled in the membership program when they subscribe.
To do this, go to ProfilePress > Membership Plans > Add New.
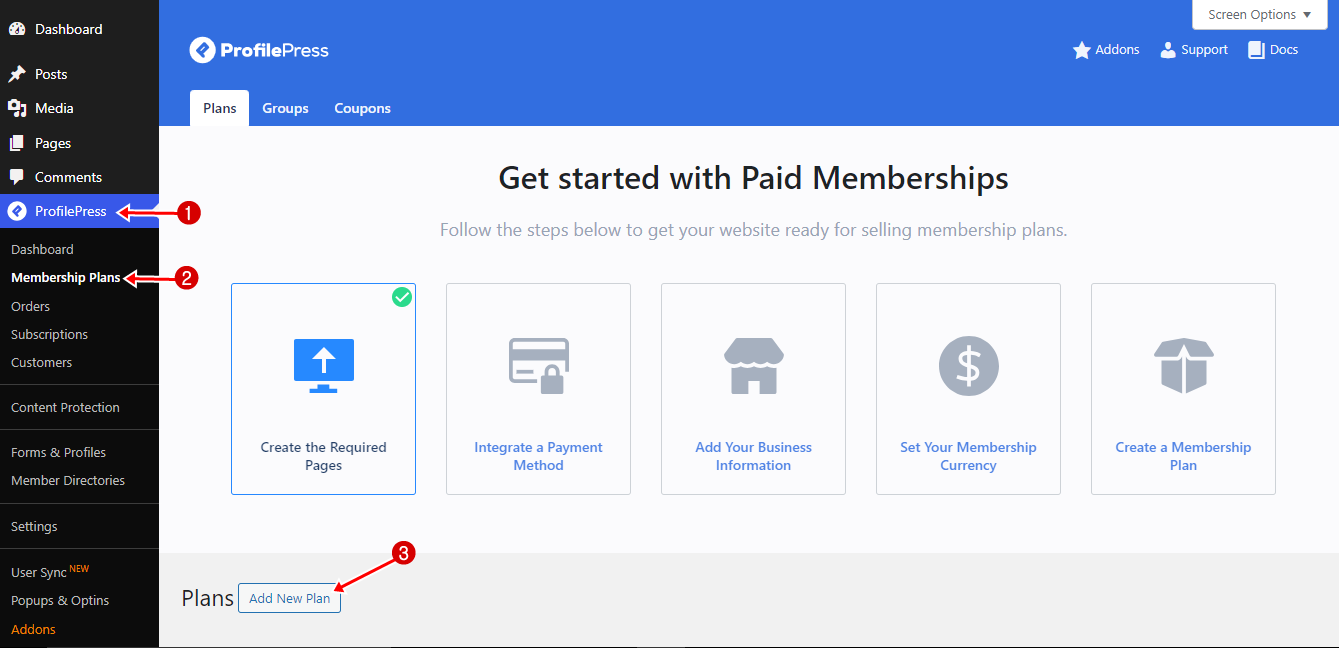
Enter a title and price and set the Billing Frequency to Monthly – same as the WooCommerce subscription product created above.
Then scroll down to the Downloads & Integration section. Under the WooCommerce tab, select the Gold Membership product you created in WooCommerce. This ensures that the customer is automatically enrolled in the membership plan once the product is purchased.
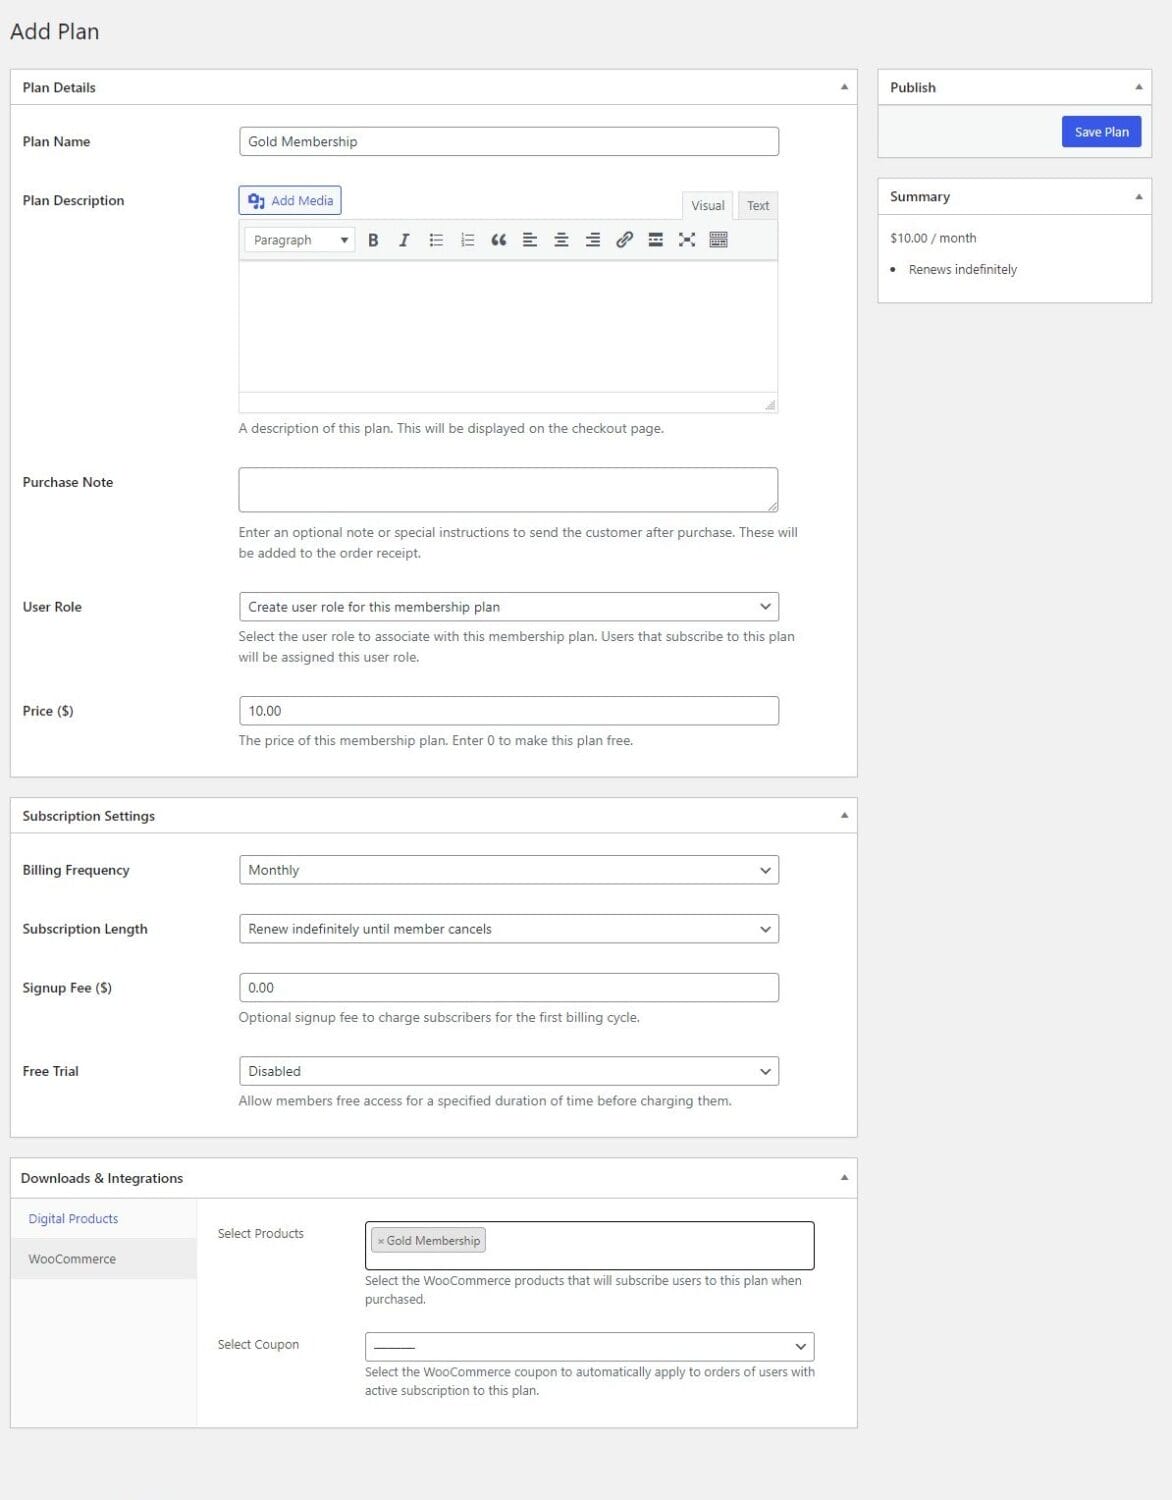
Finally, save the plan.
To subscribe to the Gold Membership, your website users will follow the WooCommerce product URL, add the product to the cart, and complete the purchase on the checkout page.
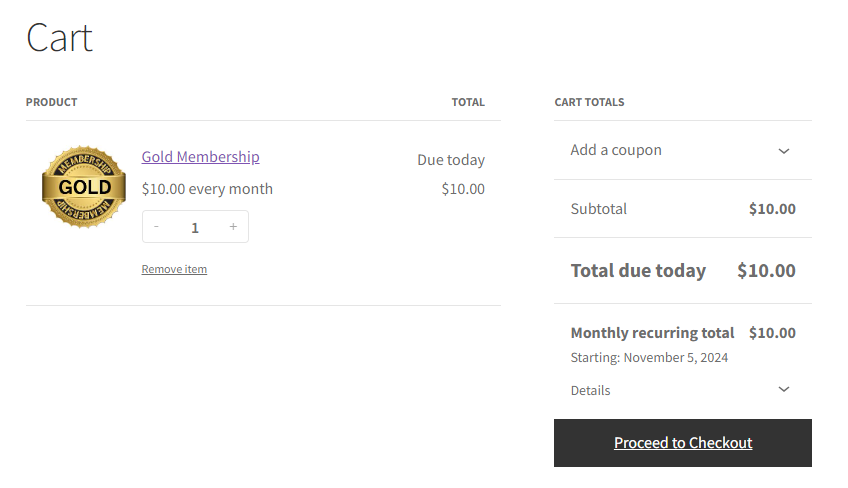
Users who purchase the Gold Membership product via WooCommerce are automatically subscribed to the corresponding membership plan in ProfilePress.
If the WooCommerce subscription for the Gold Membership is canceled, their ProfilePress membership will also be canceled. Similarly, if the WooCommerce subscription expires, the associated membership in ProfilePress will also expire.
Alternative to WooCommerce Subscriptions
If you’re not using WooCommerce to power your e-commerce store, don’t worry. There are various plugins available that allow you to add subscription functionality to your WordPress site, no matter which tools you’re using.
In this section, we will discuss how to utilize ProfilePress, the top alternative to WooCommerce Subscriptions, to sell subscriptions directly on your WordPress website.
Selling Subscriptions with ProfilePress
ProfilePress is an excellent WordPress membership plugin that allows you to build paid membership sites, sell digital products, and control access to your content. It includes invoicing, receipt generation, membership plans, content paywall, and payment gateway integration. Additionally, it offers over a dozen one-click add-ons to enhance site functionality.
Step #1: Install and Activate ProfilePress
Begin by purchasing a ProfilePress license. Go to the ProfilePress website and select the pricing plan that best fits your needs.
After your purchase, you’ll receive an email with the plugin’s download link and license key. You can also access the download link from your account page on the ProfilePress website.
Once you’ve downloaded the plugin, log in to your WordPress admin dashboard. Navigate to the Plugins page, click the ‘Add New’ button, and then select ‘Upload Plugin.’
Click ‘Choose File’ to select the plugin .zip file you downloaded, then click ‘Install Now’ to proceed with the installation.

Wait a few seconds for the installation to be completed. Once the plugin is installed, click “Activate Plugin” to activate it on your site.
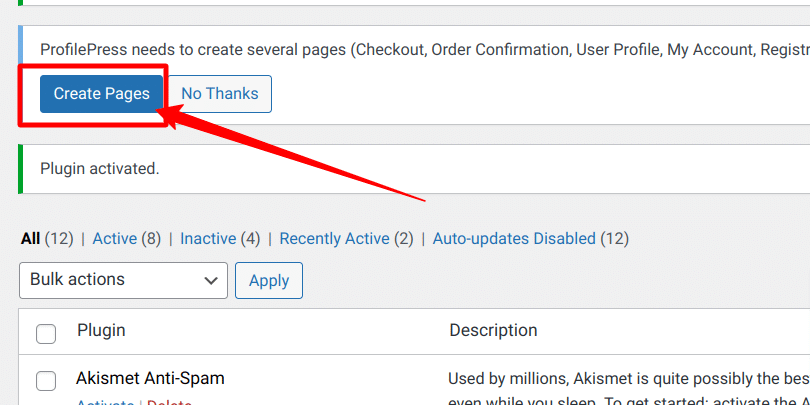
You’ll notice a notification at the top of the page stating, “ProfilePress needs to create several pages.” Click the “Create Pages” button to complete the plugin setup.
Step #2: Integrate a Payment Method
ProfilePress supports a variety of payment gateways to facilitate transactions for your subscription services. These include Stripe, PayPal, Razorpay, Paystack, Direct Bank Transfer, and Mollie.
Stripe offers easy integration; PayPal is globally recognized for secure payments. Razorpay targets the Indian market with various payment methods, while Paystack serves Africa with local options. Direct Bank Transfer allows straightforward payments that need manual verification, and Mollie, based in Europe, features multiple payment methods with transparent pricing.
To begin collecting payments through these gateways, follow these steps:
Go to ProfilePress > Settings > Payments > Payment Methods in your WordPress admin dashboard.
Next, enable the payment gateways you’d like to use. For each one, you’ll need to connect your account to ProfilePress, which typically involves entering API keys or authentication credentials provided by the gateway.
After selecting and configuring your payment methods, save your settings to apply the changes.
Step #3: Add Your Business Information
To add your business information, go to ProfilePress → Settings → General, then select the Business Info section.
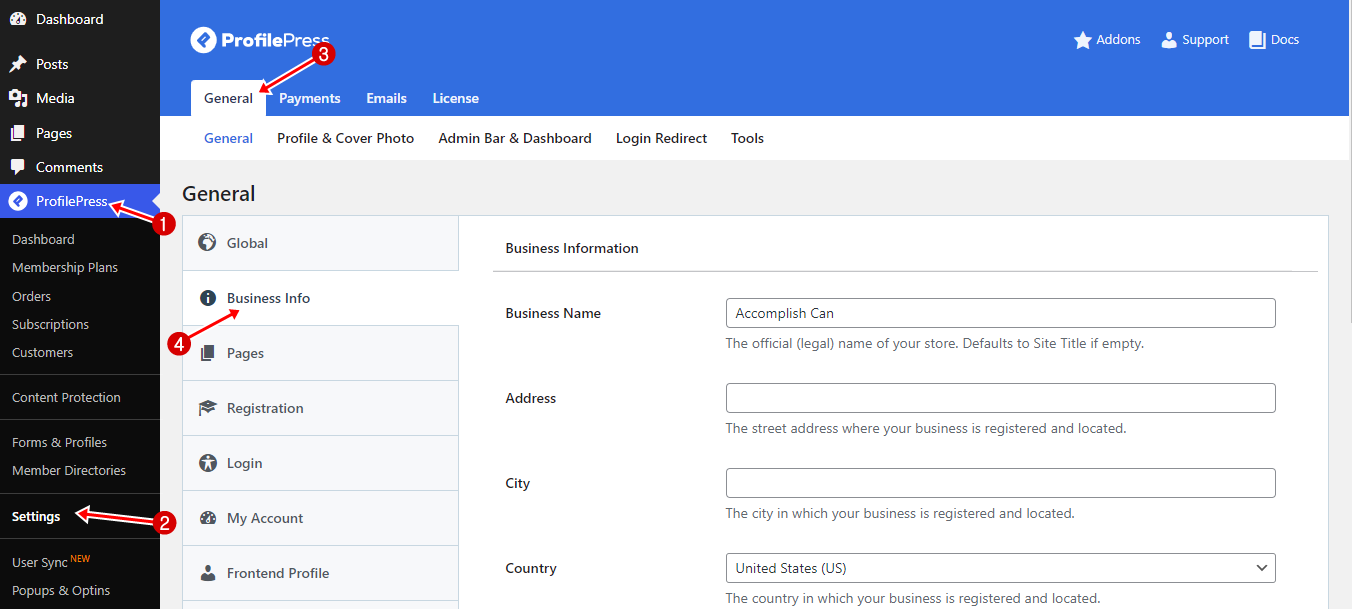
After entering your business details, click the Save Changes button to save your updates.
Step #4: Setting Your Currency
ProfilePress gives you the flexibility to choose the currency in which you want to charge your customers. To configure this:
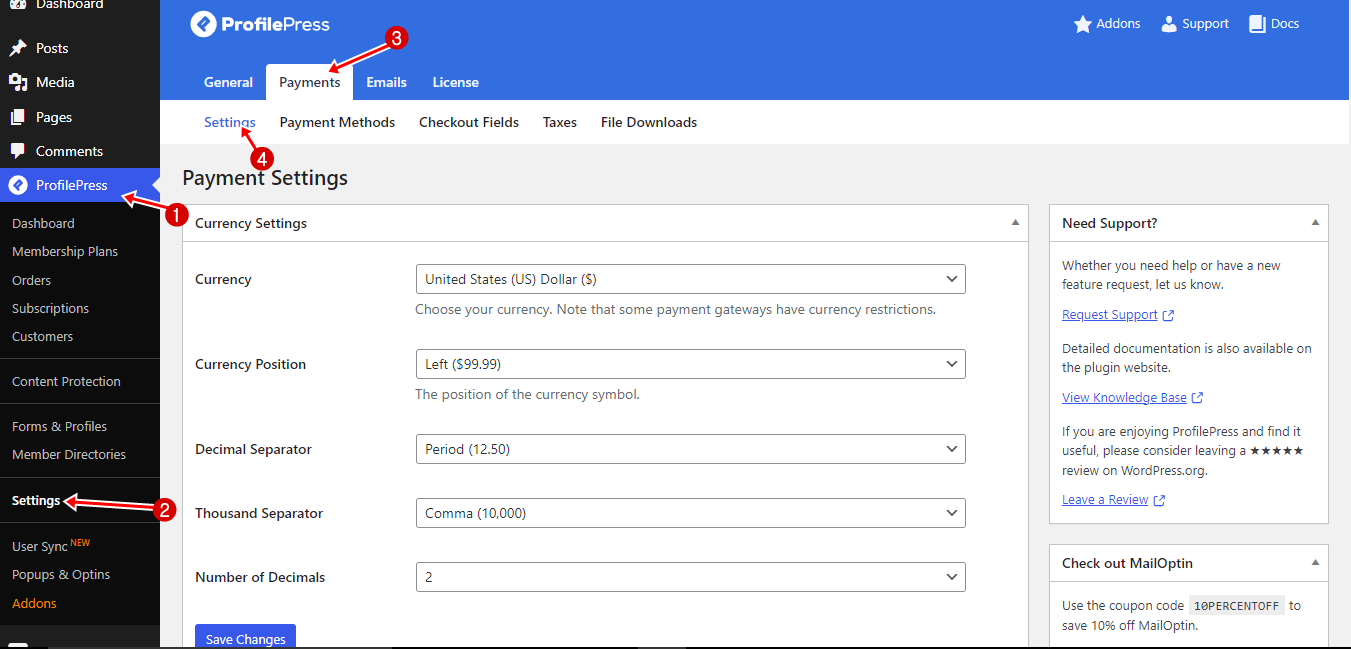
Navigate to ProfilePress → Settings → Payments, then select the Settings tab.
In the Currency Settings section, you can customize the currency, currency symbol position, decimal separator, thousand separator, and number of decimal places.
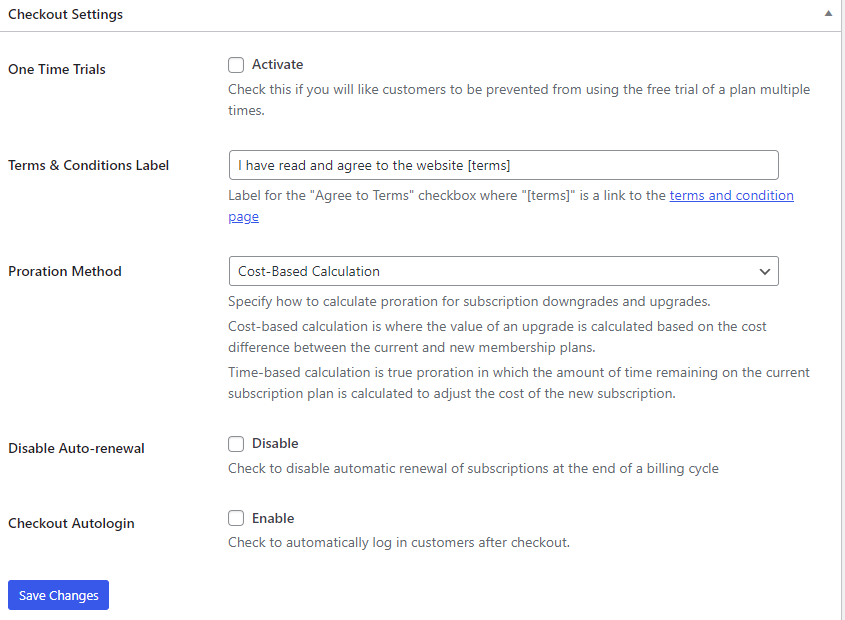
Next is the Checkout Settings section, which lets you adjust payment options such as activating one-time trials, setting a label for the terms and conditions checkbox, configuring the proration method, turning off auto-renewal for subscriptions, and enabling auto-login after checkout.
The last section is the Receipt Settings section, which provides options to turn off receipts for free orders, add a logo URL for customization, insert additional information like a thank-you note, and customize the label for the receipt button.
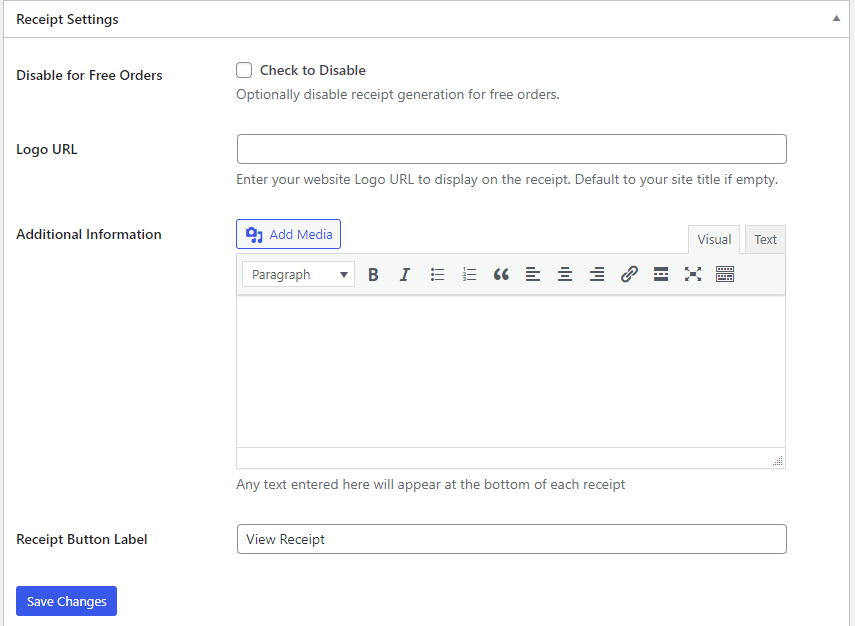
This setup allows you to customize the currency, checkout process, and customer receipt experience to suit your business needs.
Once finished, click the Save Changes button.
Step #5: Set up a Subscription Plan
Go to the ProfilePress option and select Membership Plans >> Add New Plan to do this.
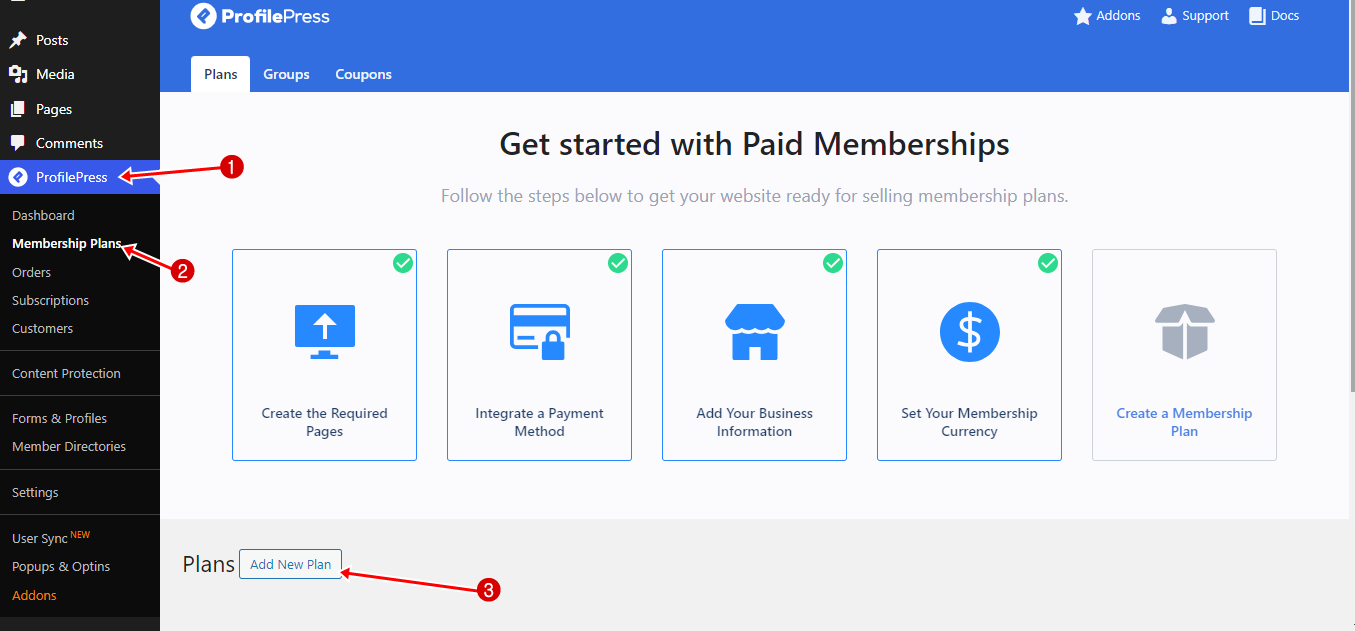
The next page is organized into three sections: Plan Details, Subscription Settings, and Downloads & Integration. Each of these sections is essential for defining the details of your subscription plan.
In the Plan Details section, you’ll configure the essential information for your subscription plan.
Plan Name: This is the title of your subscription plan, which will be visible to potential customers. It’s essential to choose a clear and enticing name that reflects the value of your offering.
Plan Description: The description field lets you outline the plan’s benefits and features. Create a persuasive message to encourage sign-ups, as this will appear on your subscription page for potential customers.
Purchase Note: This option allows you to input an optional note or special instructions to send the customer after purchase. These will be added to the order receipt.
User Role: This option allows you to choose the user role associated with the subscription plan. Selecting “create a user role for this membership plan” is recommended to create and assign a new role to members automatically. This new user role makes tracking new members who sign up for the membership plan easy.
Price: Here, you will define how much you will charge for the subscription. You can choose a price that reflects the value of your product or service.
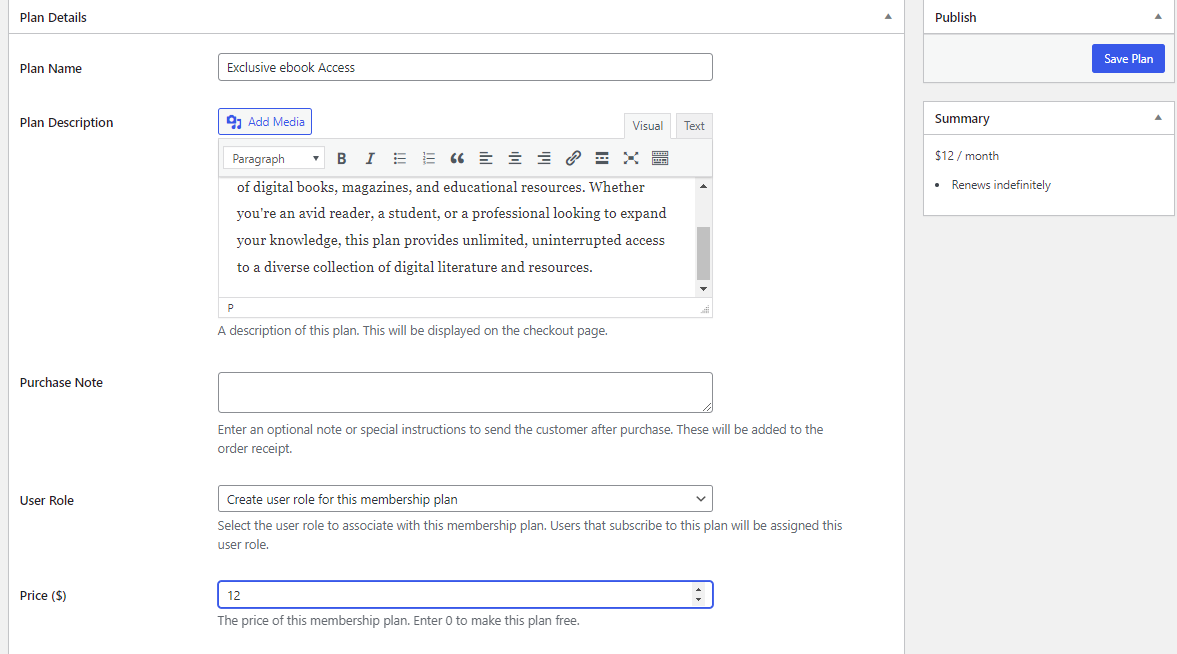
Once you’ve entered the plan’s name, description, purchase note, user role, and price, scroll down to the subscription settings section.
Subscription Settings Section
The Subscription Settings section is where you can configure your subscription plan, including billing, payment cycles, and additional options like free trials or signup fees. These settings are essential for shaping the customer’s payment experience and ensuring that it aligns with your business model.
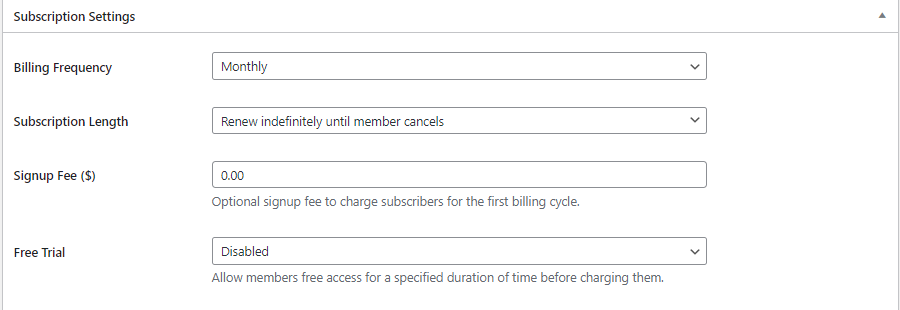
Billing Frequency: The billing frequency determines how often the customer will be charged for the subscription. You can choose between various billing frequency options such as monthly, weekly, daily, quarterly, every six months, yearly, or a one-time payment option.
Subscription Length: This option allows you to define the subscription’s length. You have two primary choices:
- Indefinite Renewal: Customers can maintain their subscription indefinitely until they cancel it manually. This option is common for ongoing services, allowing customers to remain subscribed if they find value in the offering.
- Fixed Number of Payments: You can establish a limit on the number of times a customer will be billed. For instance, you might offer a 12-month program where customers are billed monthly, but the subscription will end automatically after 12 payments. This option benefits structured programs or courses with a defined duration.
Signup Fee: This option allows you to charge an upfront fee when a customer subscribes in addition to their regular subscription payments. A one-time signup fee can help cover initial onboarding or setup costs.
Free Trial: A free trial is a powerful way to attract potential customers. By allowing them to experience your product or service for a limited time at no cost, you reduce the barrier to entry and increase the chances of conversion once the trial period ends. In this section, you can set the length of the free trial (e.g., 7 days, 14 days, or 30 days).
Downloads & Integration Section
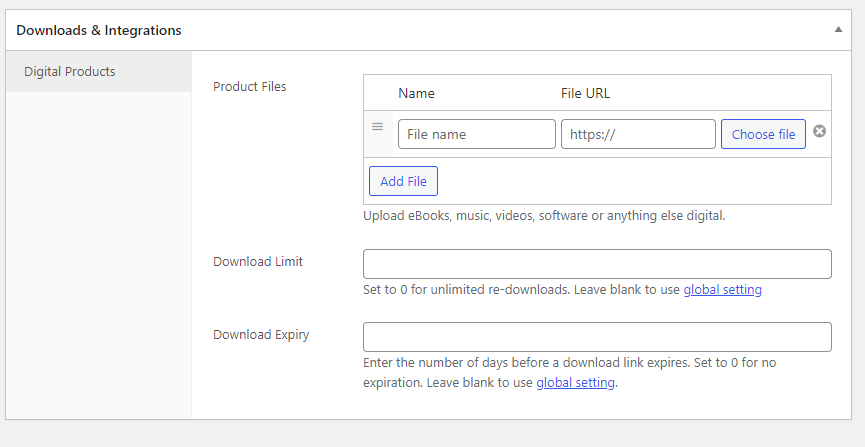
The Downloads & Integration section lets you sell digital products directly from your website via the Digital Products feature. Here, you can upload the product files associated with your membership, set download limits, and define expiration periods.
If you activate ProfilePress add-ons like WooCommerce or LearnDash, they will appear in this section. This allows you to create WooCommerce membership websites, offer member-only discounts, and sell access to LearnDash courses and groups.
Once you’ve finished setting up the plan, click the Save Plan button.
Step #6: Create Checkout & Order Confirmation Pages
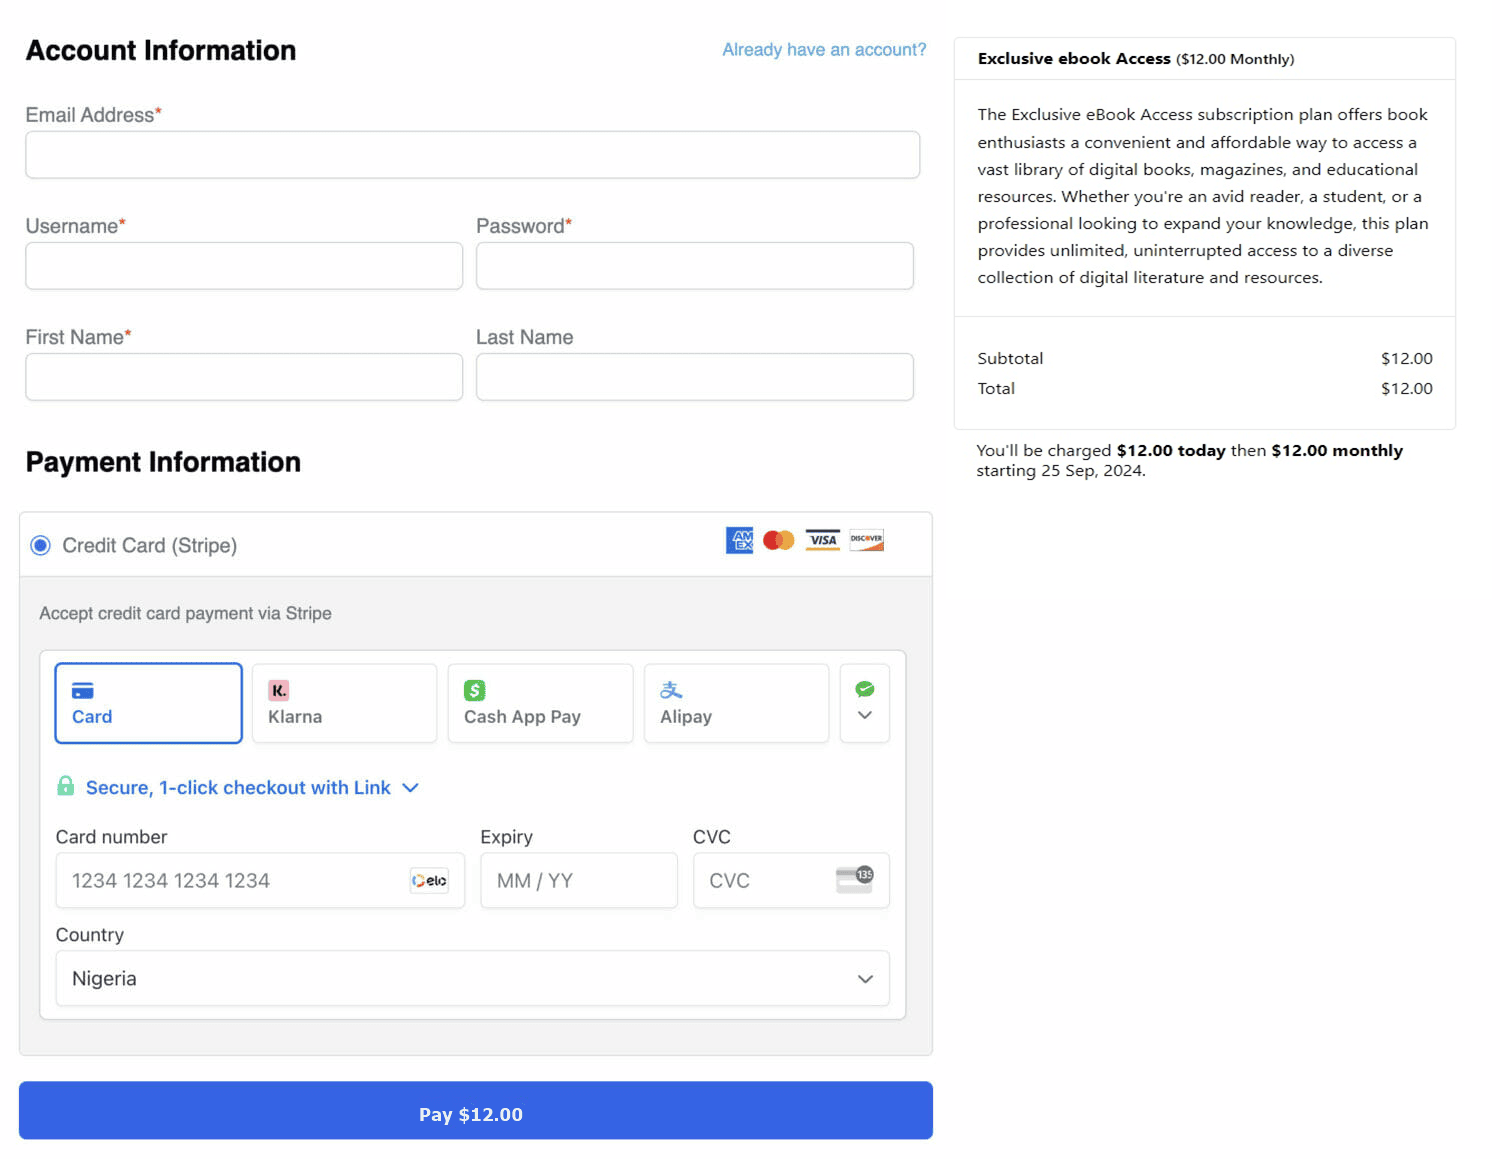
Creating dedicated Checkout and Order Confirmation pages is a crucial step in setting up your subscription business, as these pages facilitate the payment process and provide essential information to your customers.
Checkout Page: The Checkout page is where your customers will input their payment and billing information before finalizing their subscription or membership purchase. This page is vital for:
- Collecting Payment Information: Customers will enter credit card details or other payment methods supported by your payment gateway.
- Billing Details include capturing essential information such as the customer’s name, address, and contact information.
- Reviewing the Subscription Plan: Customers can review their selected plan, including the pricing and billing cycle, before purchasing.
Order Confirmation Page: The Order Confirmation page is displayed after a customer completes their purchase. This page serves several purposes:
- Order Summary: It provides a detailed summary of the order, including the subscription plan selected, the amount paid, and any applicable taxes or discounts.
- Thank You Message: A confirmation or thank you message reassures customers that their transaction was successful and their subscription is active.
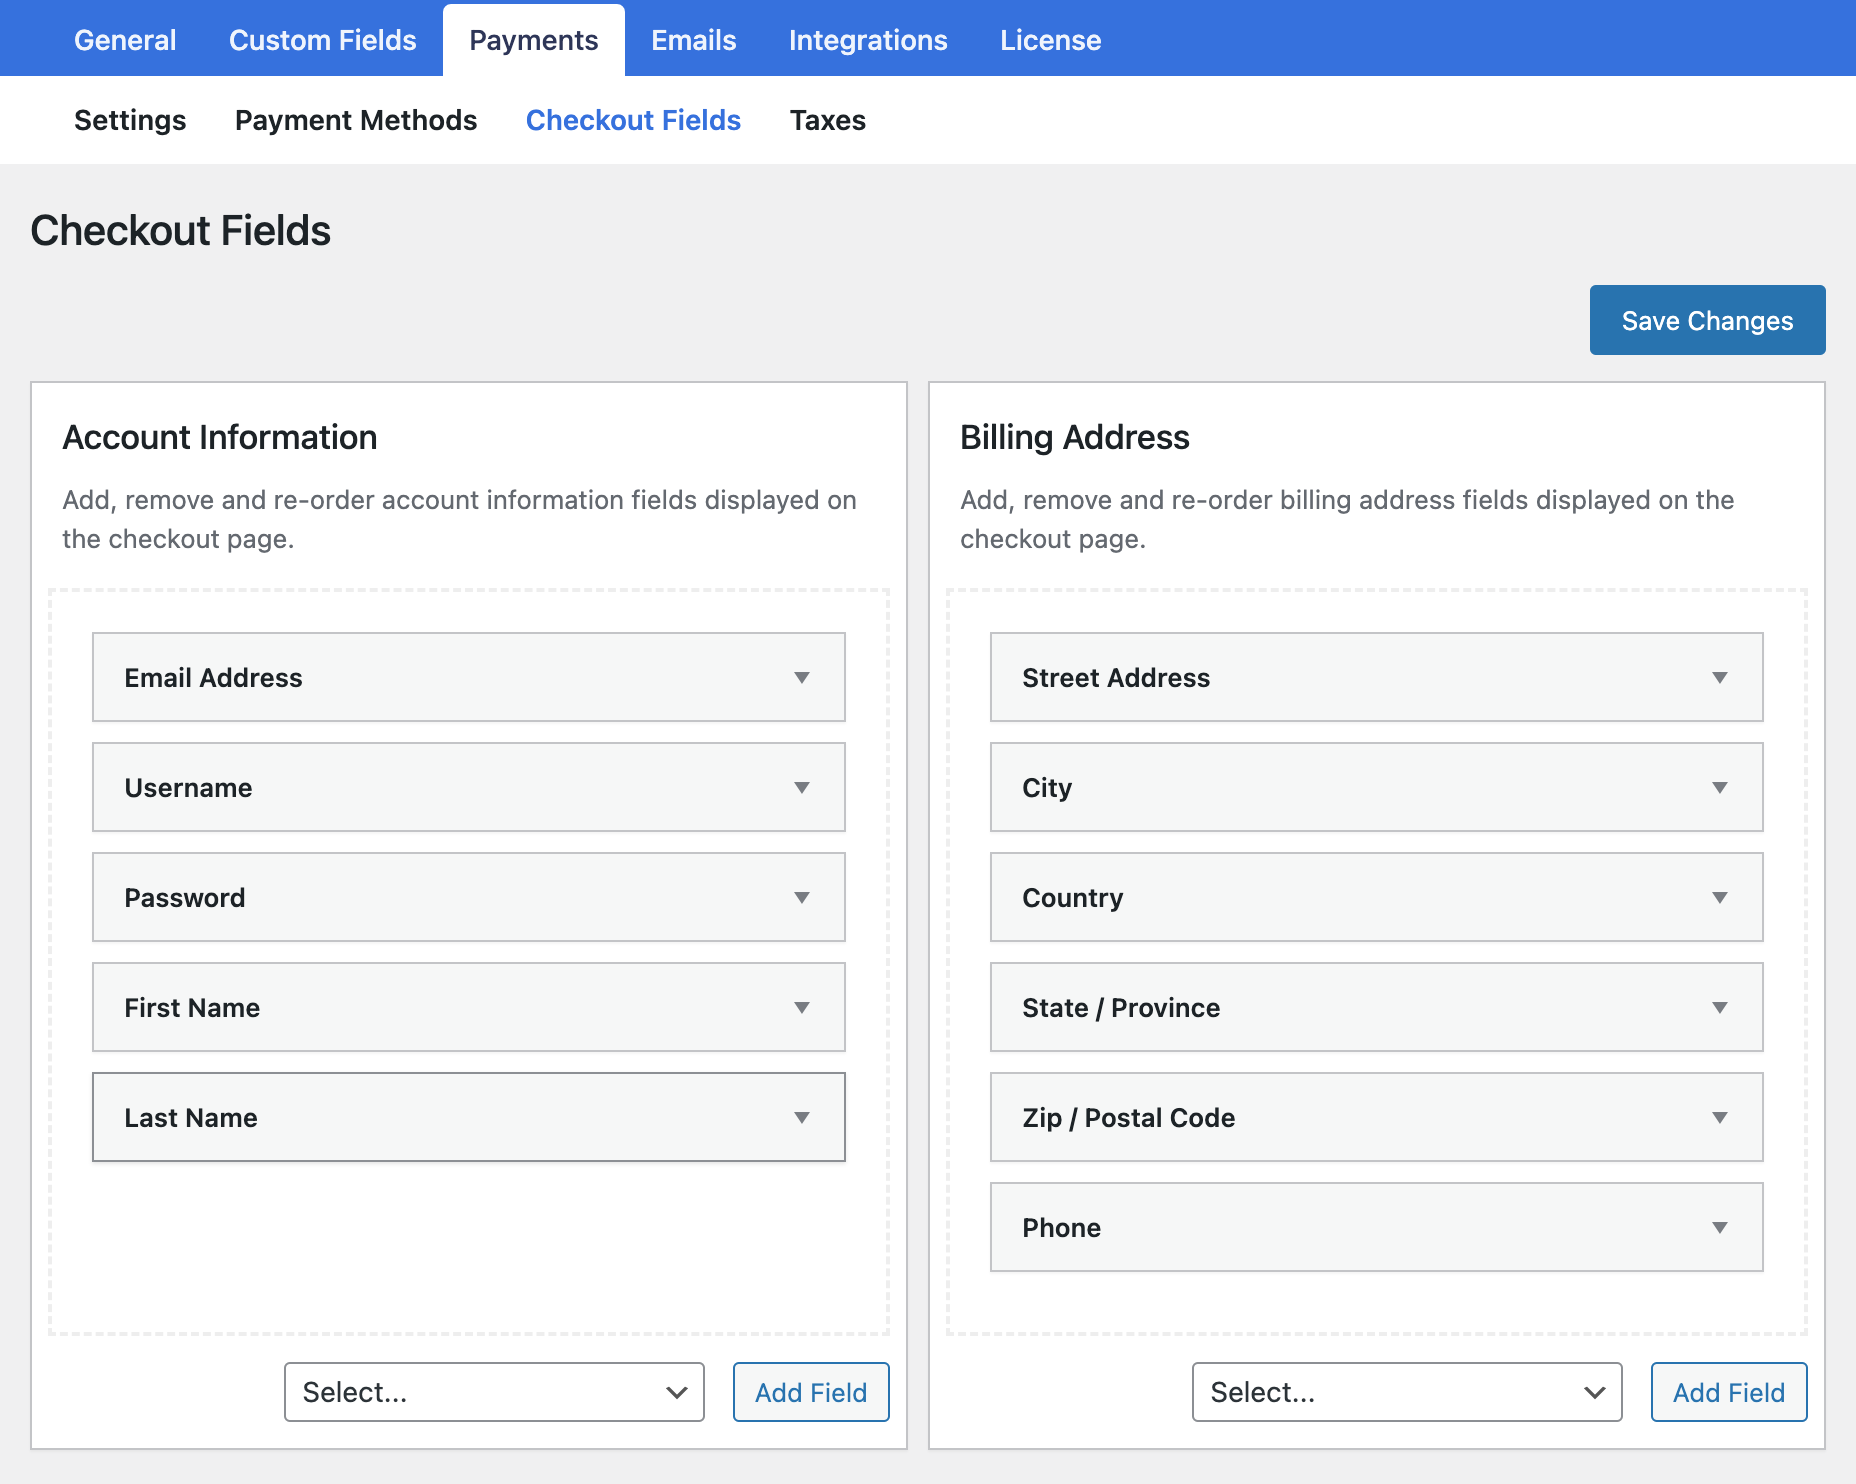
If you want to customize the checkout fields for selling subscriptions on your website, navigate to ProfilePress > Settings > Payments > Checkout Fields. Here, you can add or remove fields based on your requirements.
By setting up these pages correctly, you’ll offer your customers a smooth and professional checkout experience, enhancing their satisfaction and improving your subscription business’s overall effectiveness.
Step #7: Create a Pricing Page & Add the Plans
With your subscription plans and checkout page set up, the next step is to create a dedicated pricing page and add your plans.
Begin by designing a pricing page where potential customers can view and choose from your subscription plans. If you need guidance, check out this page on creating a pricing page.
Once your pricing page is ready, it’s time to integrate your plans. You can easily find the checkout link for each plan in the ‘Membership Plans’ section of the ProfilePress settings.

Paste the copied checkout link into the corresponding sections on your pricing page, ensuring that each plan directs customers to the appropriate checkout page.
By completing these steps, potential customers who click on the link on your pricing page will be redirected to the checkout page for that specific plan.
Conclusion
Implementing a subscription model on your WordPress site, whether through WooCommerce Subscriptions or an alternative like ProfilePress, can pave the way for steady revenue and foster lasting relationships with your customers.
Now that you know how to sell subscriptions, it’s time to take action and grow your business.
Here’s how to get started:
- Evaluate your current offerings and identify products or services that could work well as subscriptions.
- Install WooCommerce Subscriptions or ProfilePress on your WordPress site.
- Set up your first subscription product using the steps we’ve outlined.
- Test your subscription process thoroughly to ensure a smooth customer experience.
- Launch your subscription offering and start building your recurring revenue.
If you have questions or need further assistance, please reach out.