How to Create a WordPress Membership Site & Accept Payments
Looking for a way to monetize content? Create a WordPress membership site that accepts payment from users.
Creating a paid membership website simplifies monetizing your content and helps you generate an income stream for your business. You can restrict content and ask interested users to register as “members” to access premium content on your website.
Many website builders let you build your website easily and quickly, even if you’re not experienced with coding. One of the most popular options for membership site owners is WordPress. Thanks to WordPress membership plugins, setting up your membership site has never been easier.
In this post, we’ll explain step-by-step how to create a WordPress membership site using the robust ProfilePress membership plugin.
How to create a paid WordPress membership site
If you prefer written instructions, then please continue reading.
To create a responsive and professional paid membership site using WordPress, you can rely on ProfilePress. It is an all-in-one solution that simplifies the process of building membership sites for your business.
With the help of a plugin, you can effortlessly restrict content on any part of your WordPress site and prompt your users to purchase a membership plan to gain access to the premium content. Furthermore, the plugin allows you to create various membership plans, including one-time subscription plans, recurring subscriptions, free trials, and custom payment plans, for your WordPress paid membership site.
The best part about ProfilePress is that it comes pre-built with advanced functionality that lets you create custom WordPress registration and login pages on your site. It also makes using custom form fields for your sign-up and login forms easier.
Step #1: Install the ProfilePress plugin
Get the ProfilePress plugin and install it on your WordPress site. Once the plugin is installed, navigate to ProfilePress → Settings and click on the License menu to activate the plugin.
In the text field, enter the license key you received at the time of purchase, and click on the Save Changes button to continue.
Step #2: Set-up plugin options
Next, it’s time to set up the plugin. To do this, navigate to ProfilePress → Settings to view various plugin options.
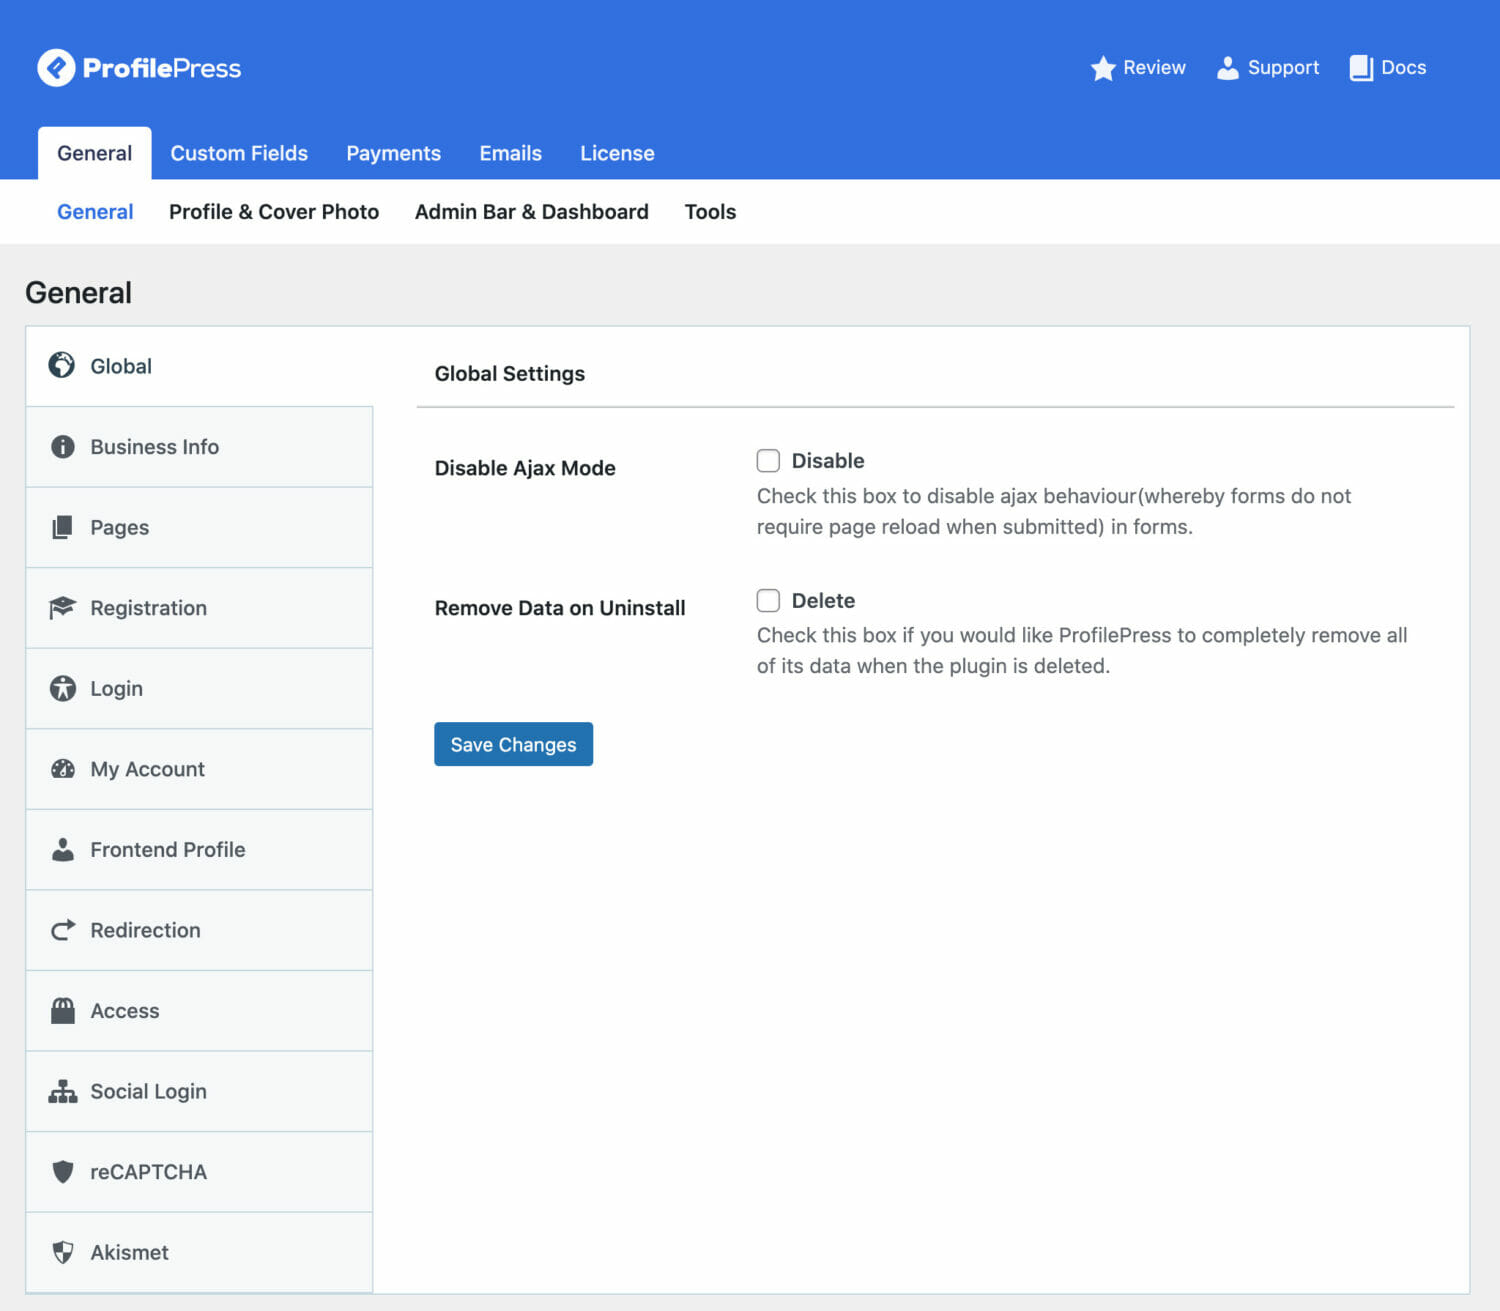
While most of the options under the General page are essential, they are not relevant right now—we’ll address them later in the tutorial. However, if you want to receive money for granting access to premium content, you will need to set up various payment options. Click on the Payments tab from the top.

Under the Settings tab, you can set the Currency Settings so all prices are displayed in a currency relevant to your business and your target audience. For instance, if your business operates in the UK, you must set the Currency dropdown menu to Euro and set other currency options accordingly. This makes creating a membership site for your brand easier, regardless of location.
Using the Checkout Settings meta box, you can also select the Activate checkbox to ensure customers only get to subscribe to the free trial once. Once you’re done making changes, click on the Save Changes button before continuing.
Click on the Payment Methods section from the top to configure payment methods (e.g. Stripe, PayPal, Razorpay, Paddle, Paystack, Direct Bank Transfer, Mollie) for your WordPress membership site.
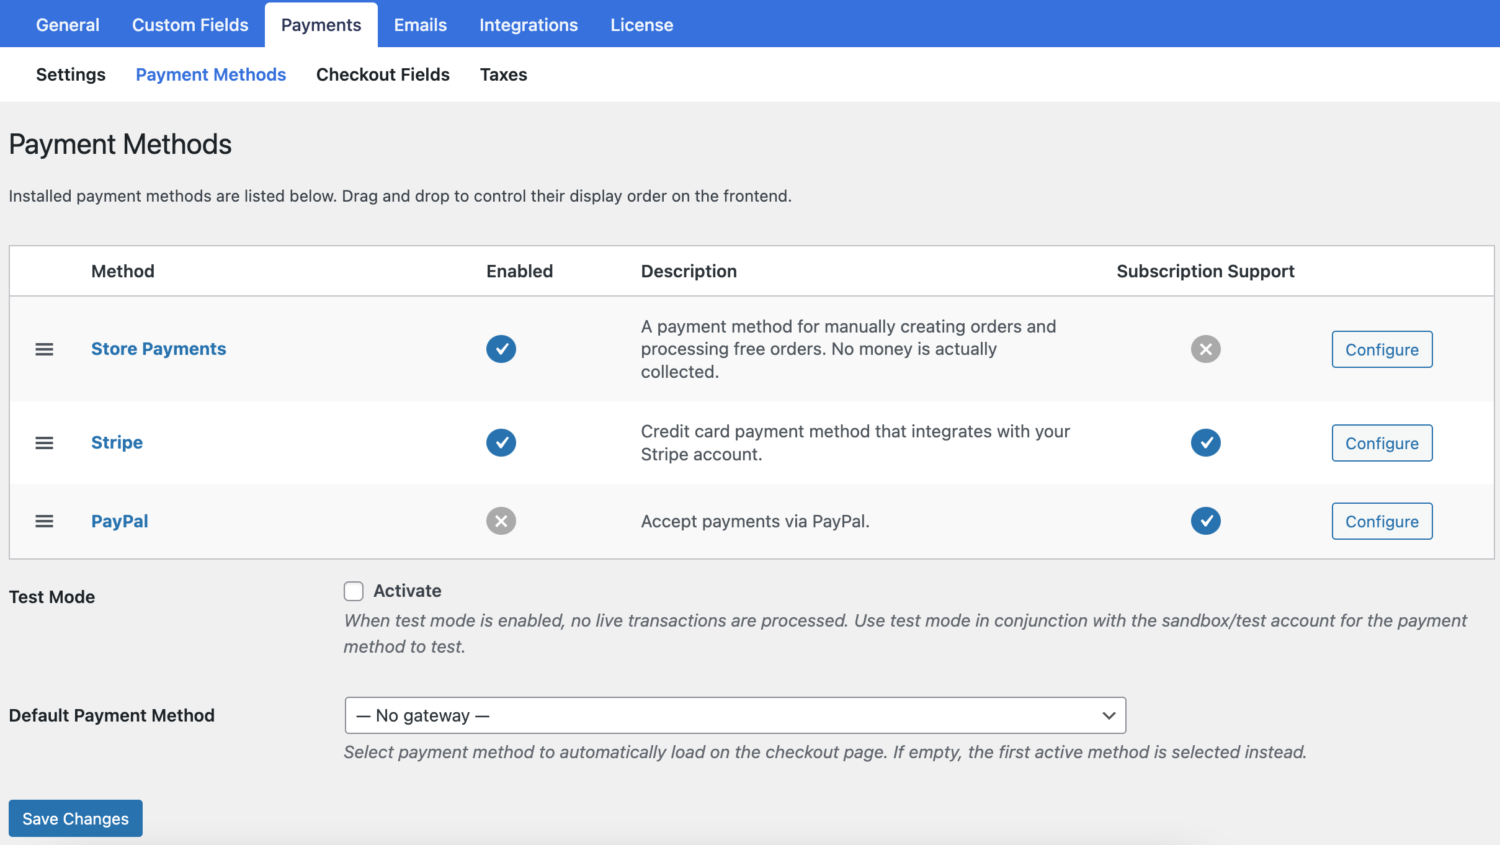
You can view all payment methods enabled on your WordPress site here and configure them based on your needs using the Configure button on the right.
Click on the Checkout Fields tab to configure which fields are displayed to users who subscribe to a membership plan on your WordPress membership site.
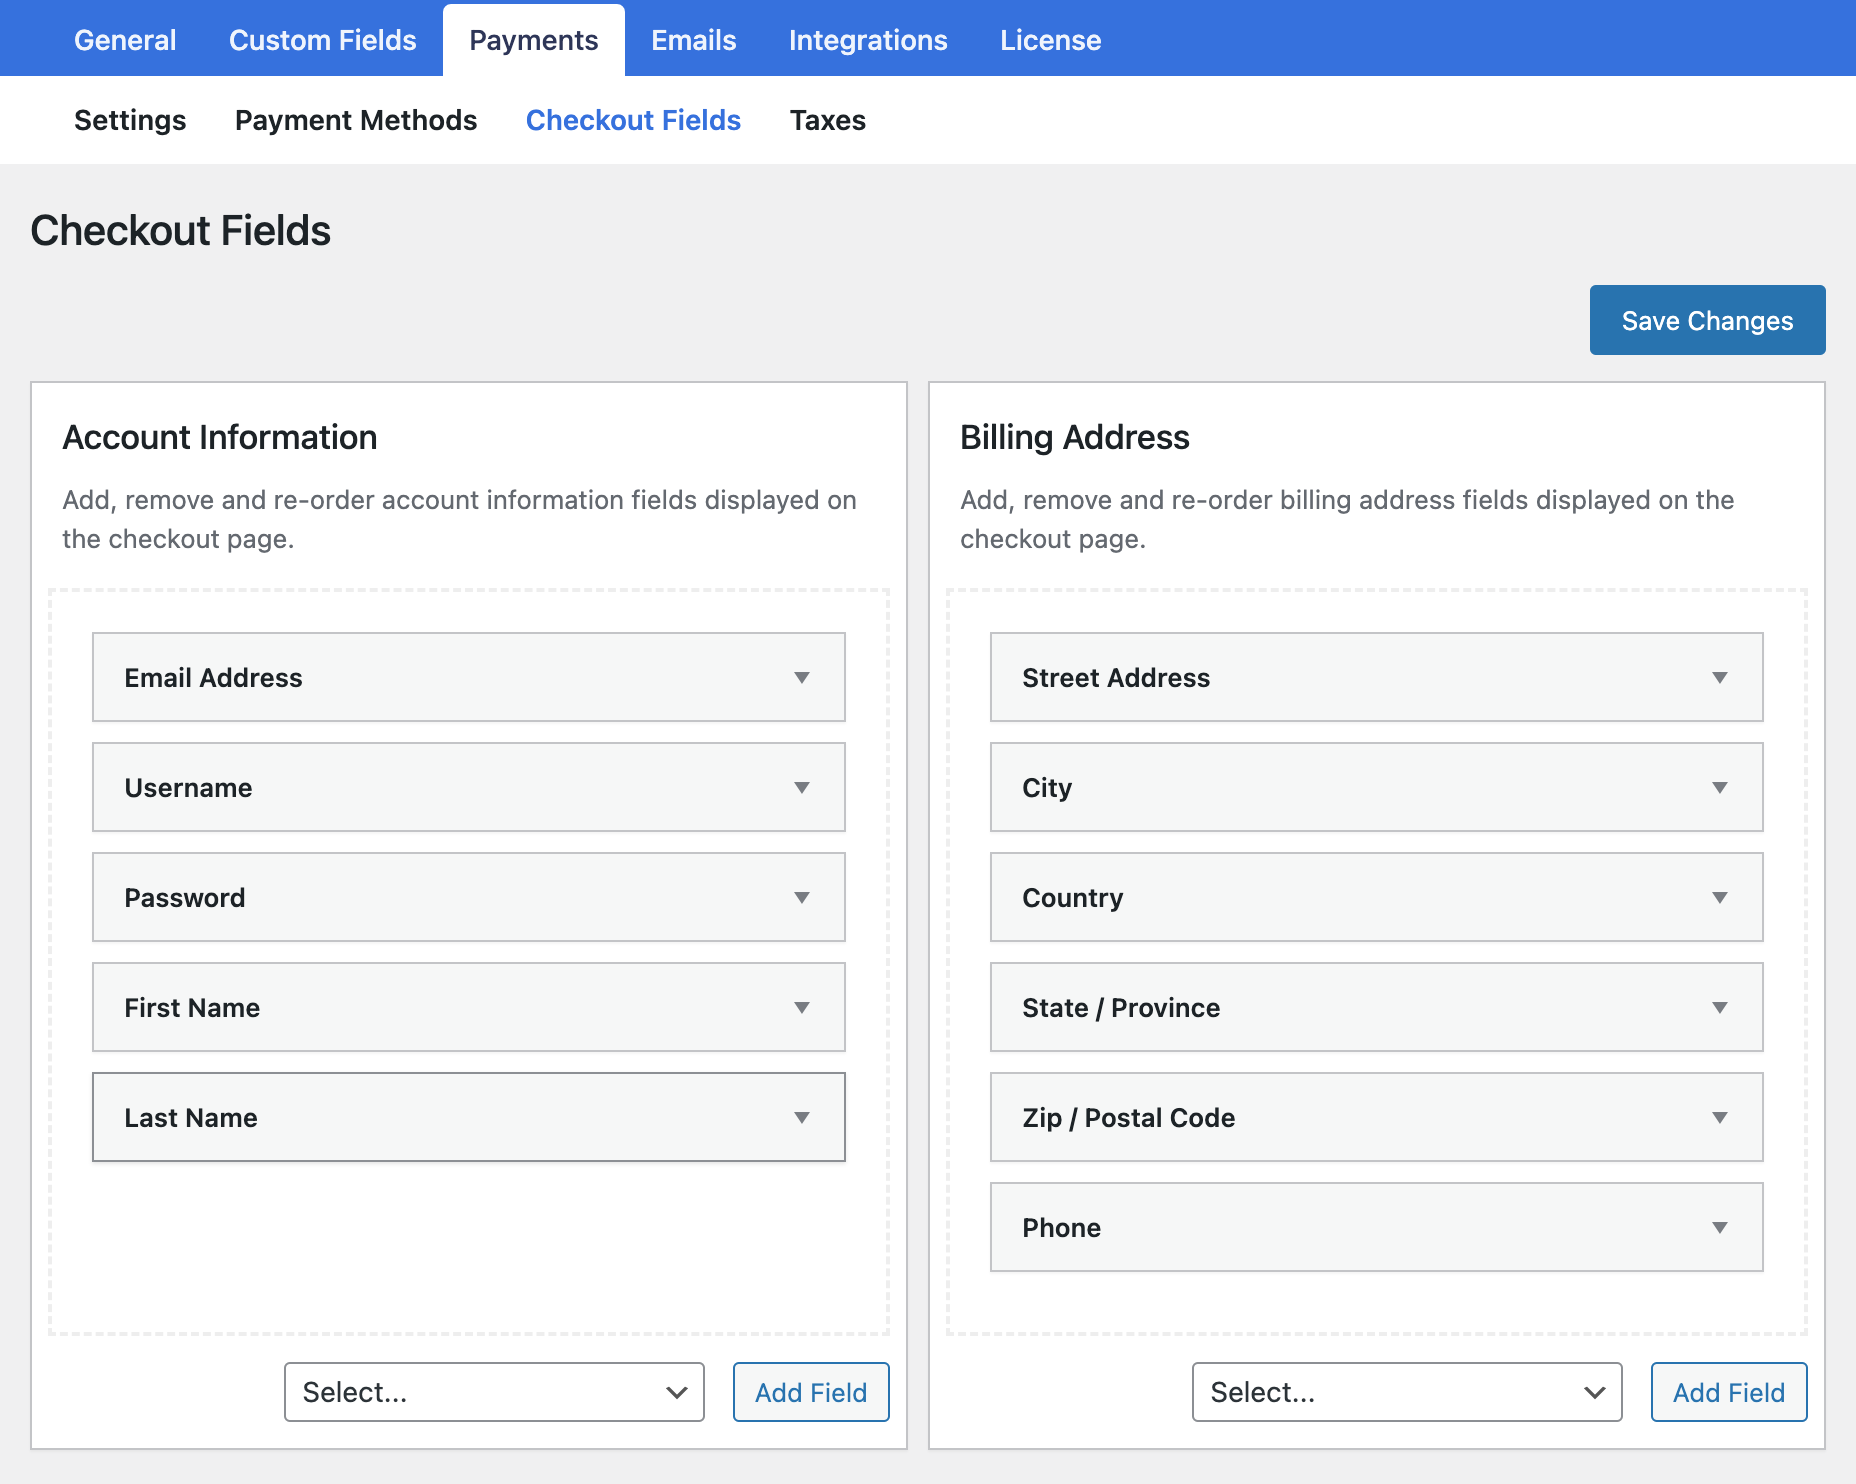
Here, you can use the dropdown menu to select fields and click on the Add Field button to add another field to either the account information section or the billing address section on the checkout page of your membership site. You can also re-arrange and reorder fields according to what you need and set custom field labels.
Once you’re done with customizing the checkout fields, click on the Save Changes button to continue.
Step #3: Create membership levels
With all basic plugin settings in place, it’s time to start creating membership levels on your site so you can sell access to premium content. To do this, navigate to ProfilePress → Membership Plans and click on the Add New button.
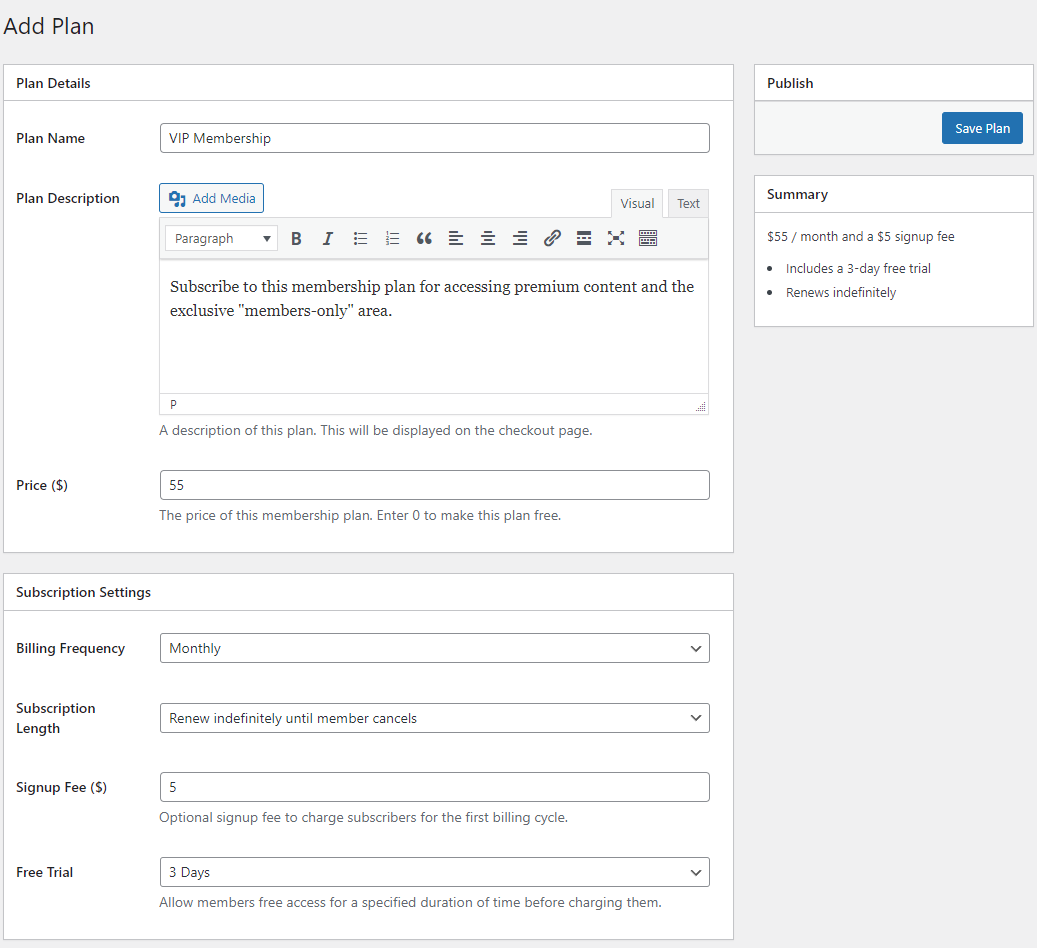
Start by giving your membership plan a title and description that explain what’s included in it and who it’s for. Using the Price text field, enter the fees you want to charge users when they subscribe to your membership plan.
One great thing about ProfilePress is that it gives you complete control over the payment and subscription options for your membership levels. Using the Subscription Settings meta box, you can set the Billing Frequency and the Subscription length fields to create the ideal membership plan for your brand.
This means you can decide how long the subscription period will last before users have to pay the subscription fee again and choose whether the subscription will automatically be renewed or not.
In addition, using the Signup Fee text field, you can also charge customers a small fee when they first sign up for the membership plan. This helps keep non-serious users away and is a great way to cover additional costs associated with onboarding a new member on your site. This also helps prevent trolls and fraudsters from subscribing to your membership plan only to avail the free trial period and cancel their membership.
Once you’re done setting up a membership plan, click on the Save Plan button under the Publish meta box.
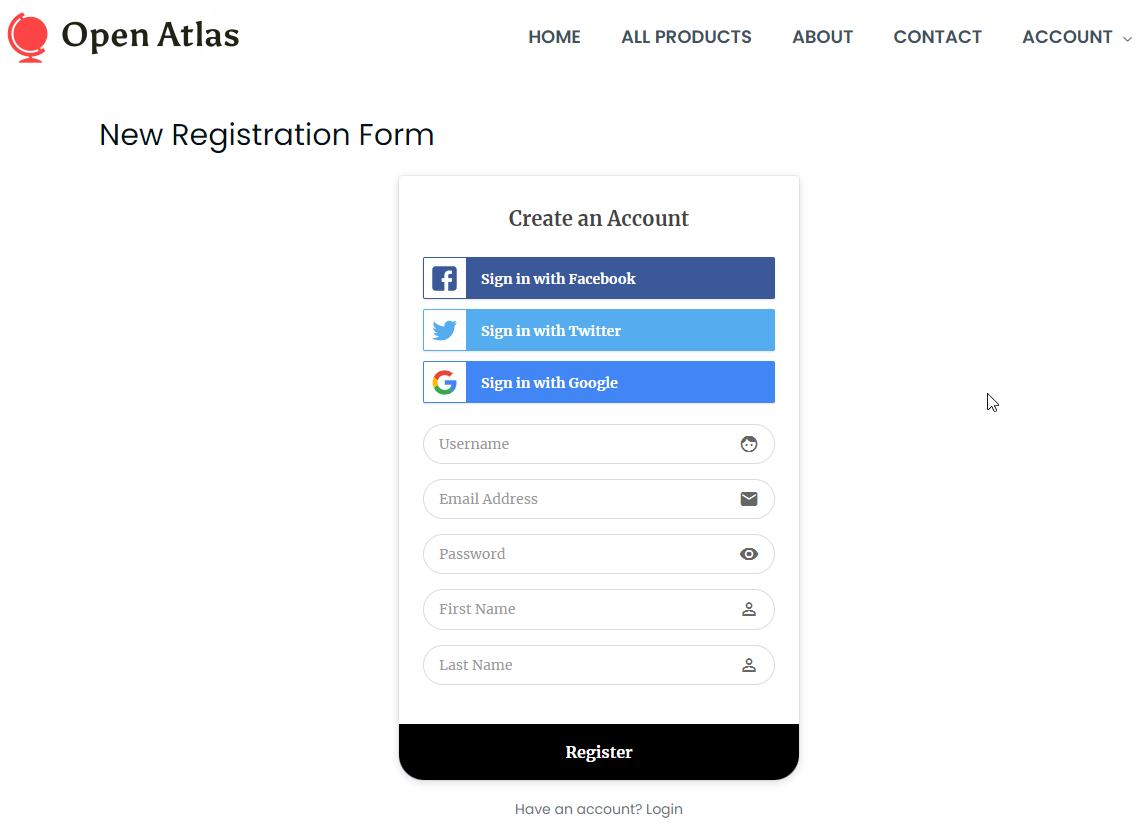
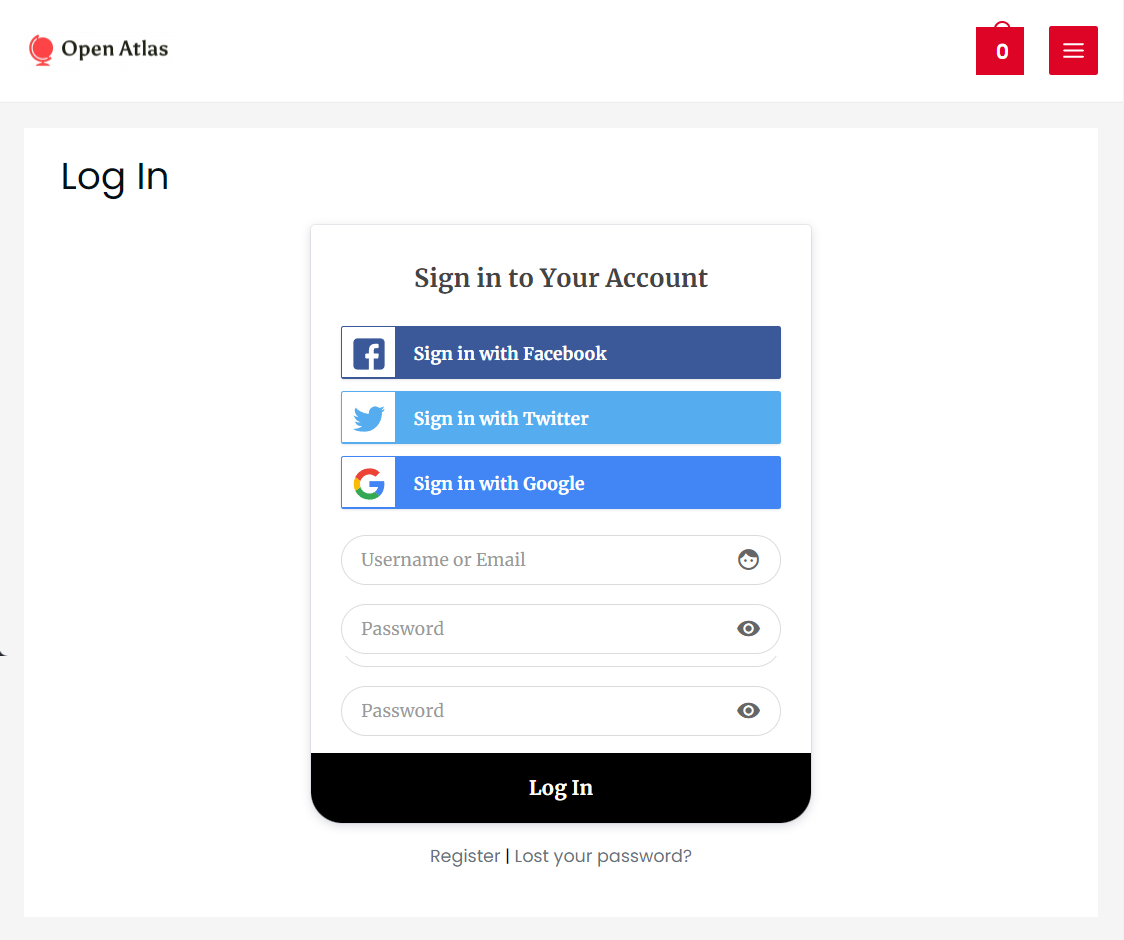
Step #4: Create a member registration and login page
While ProfilePress is a dedicated membership plugin, it also lets you create registration and login pages for your WordPress membership site.
But before we jump into creating these essential pages for your paid membership site, we need to create custom registration and login forms that we can display on the member registration and login pages.
Step #5: Edit registration and login form fields
To create your custom login form, navigate to Profile Press → Forms & Profiles and click on the Add New button.
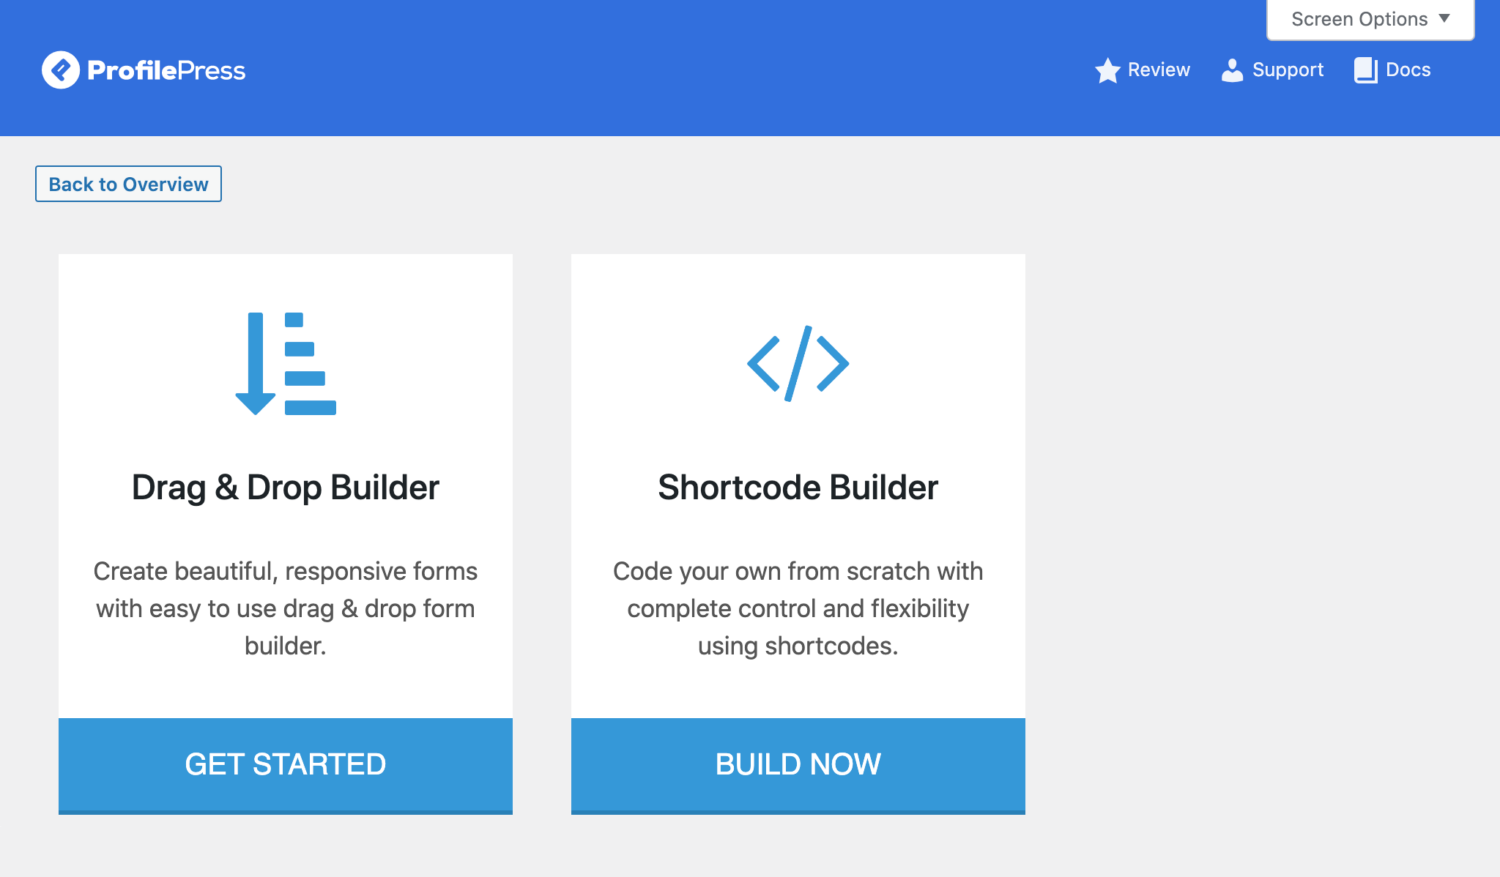
Click on the Drag & Drop Builder button, and it will redirect you to the Edit Form page.
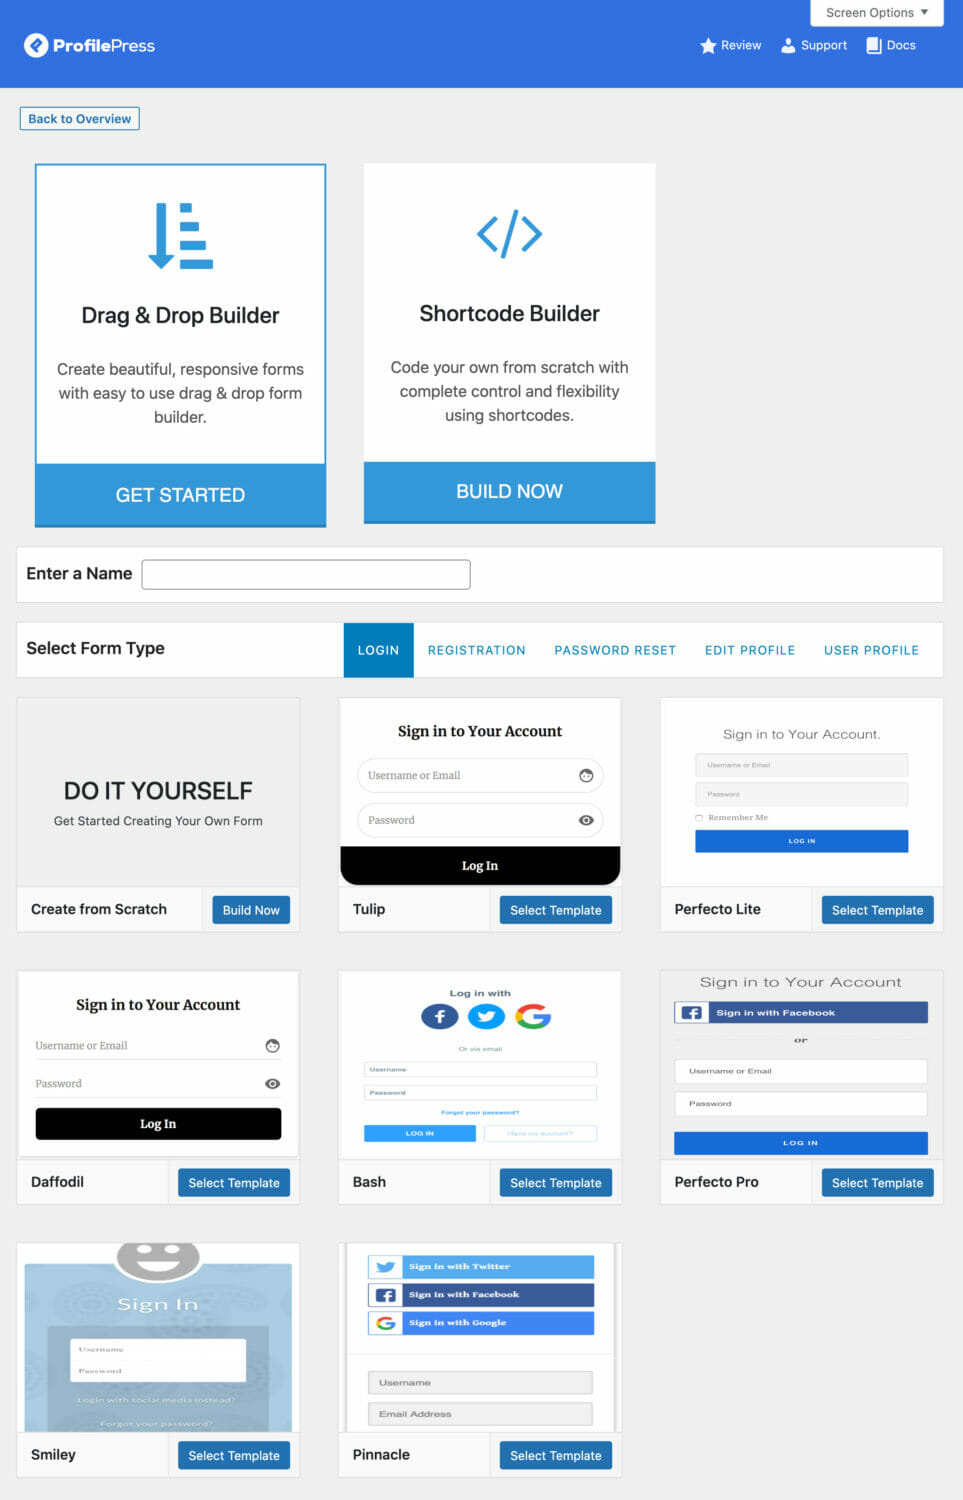
Enter a name for your custom form and select Login from the Form Type menu. You can now create and design a login form yourself from scratch or use one of ProfilePress’s pre-built templates to quickly create a professional-looking custom form within a few minutes. To demonstrate, we’ve selected the Tulip template.
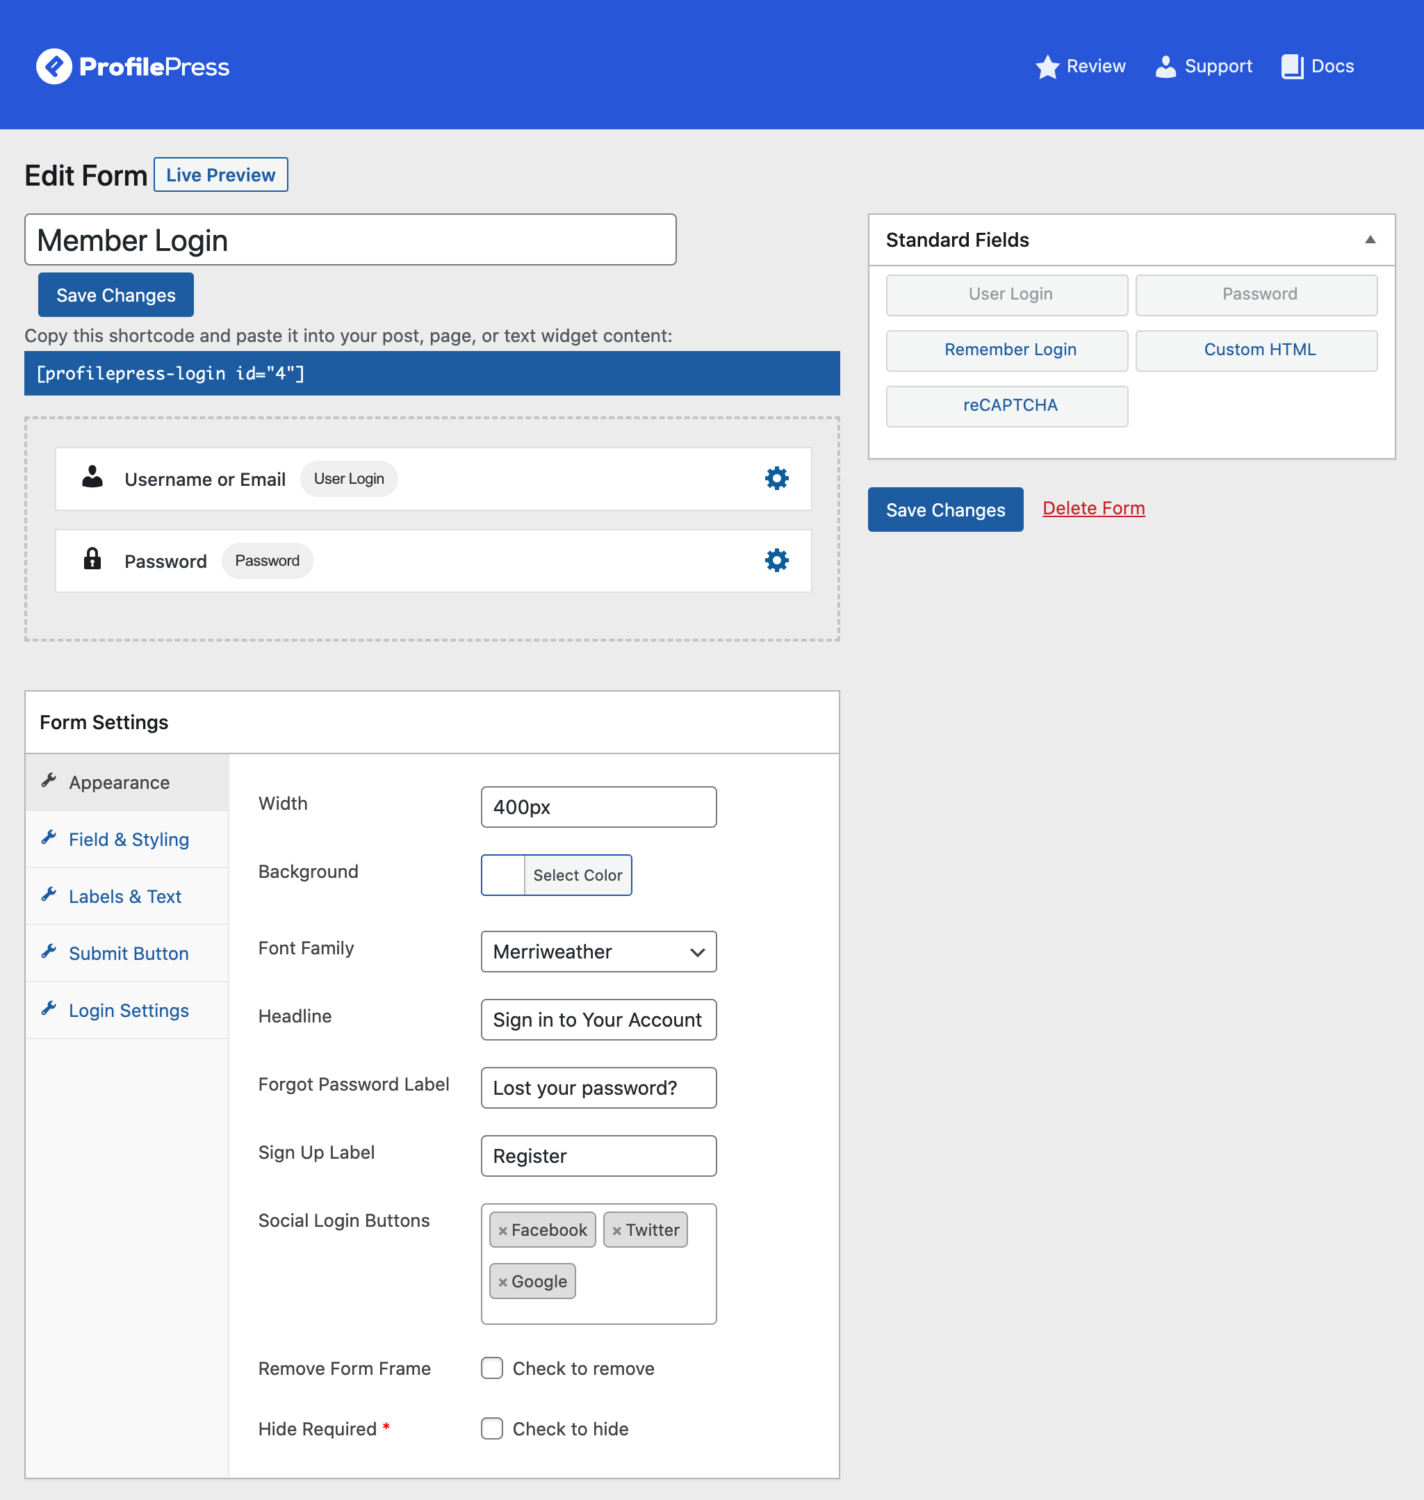
Now, you can start making changes to the form fields, re-arrange them as required, or add new fields using the Standard fields meta box. In addition, you can customize field details and add custom field labels using the little settings icon next to each field.

Depending on the field you’re customizing, you can add custom labels, display a field description or choose to display a custom icon for the field.
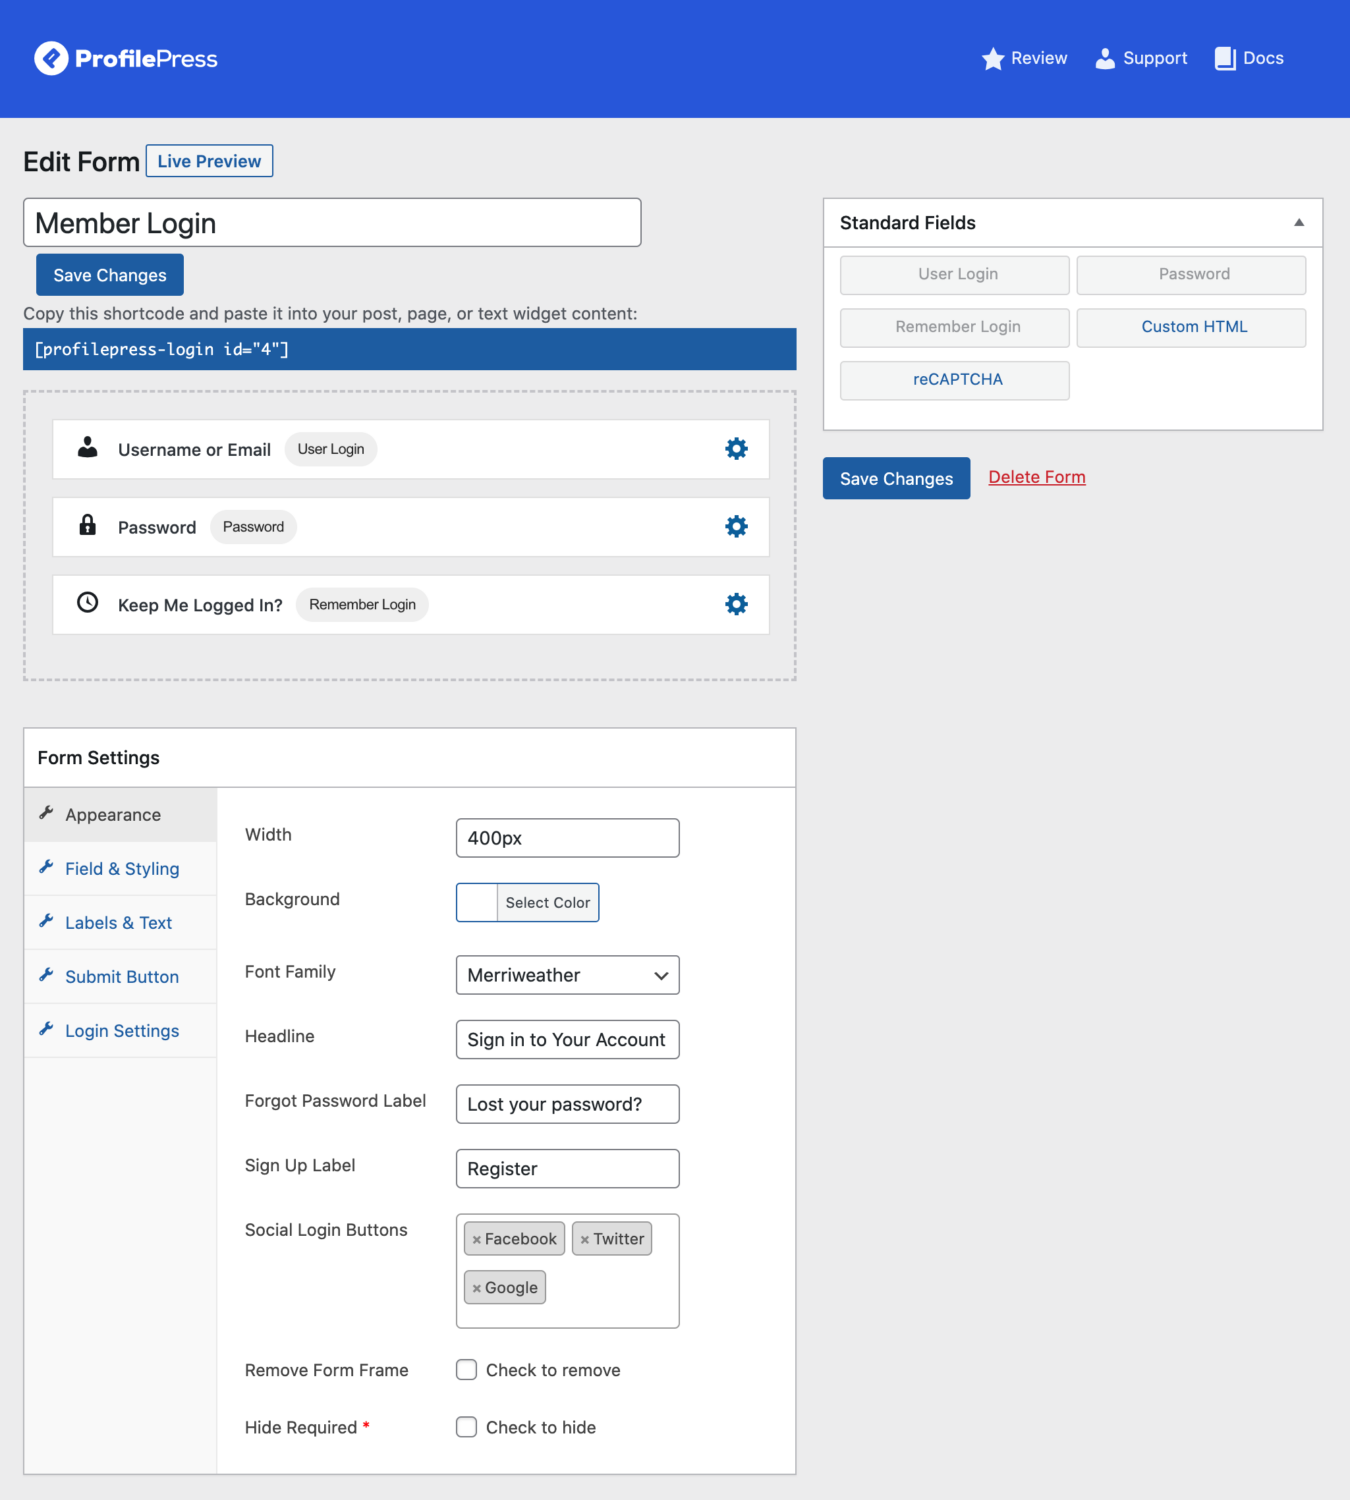
ProfilePress also lets you design your custom forms any way you like. Using the Forms Settings meta box, click on the Appearance menu to change how your form will look on the front-end. Similarly, using the Form Settings meta box, you can change how the “Submit” button looks, change how labels and text are displayed, and customize field display settings.
When making changes, you can click the Live Preview button to see how your form will look on the frontend. Make sure to click on the Save Changes button once you’re ready.
Once the custom login form is created, copy the shortcode of your newly created login form and navigate to Pages → Add New.

Give your login page a new name and paste the custom login form shortcode before clicking on the Publish button.
Similarly, you can create a custom registration form that you can display on a member’s registration page. Like the steps mentioned above, create a new form by navigating to ProfilePress → Forms & Profiles and clicking on the Add New button.
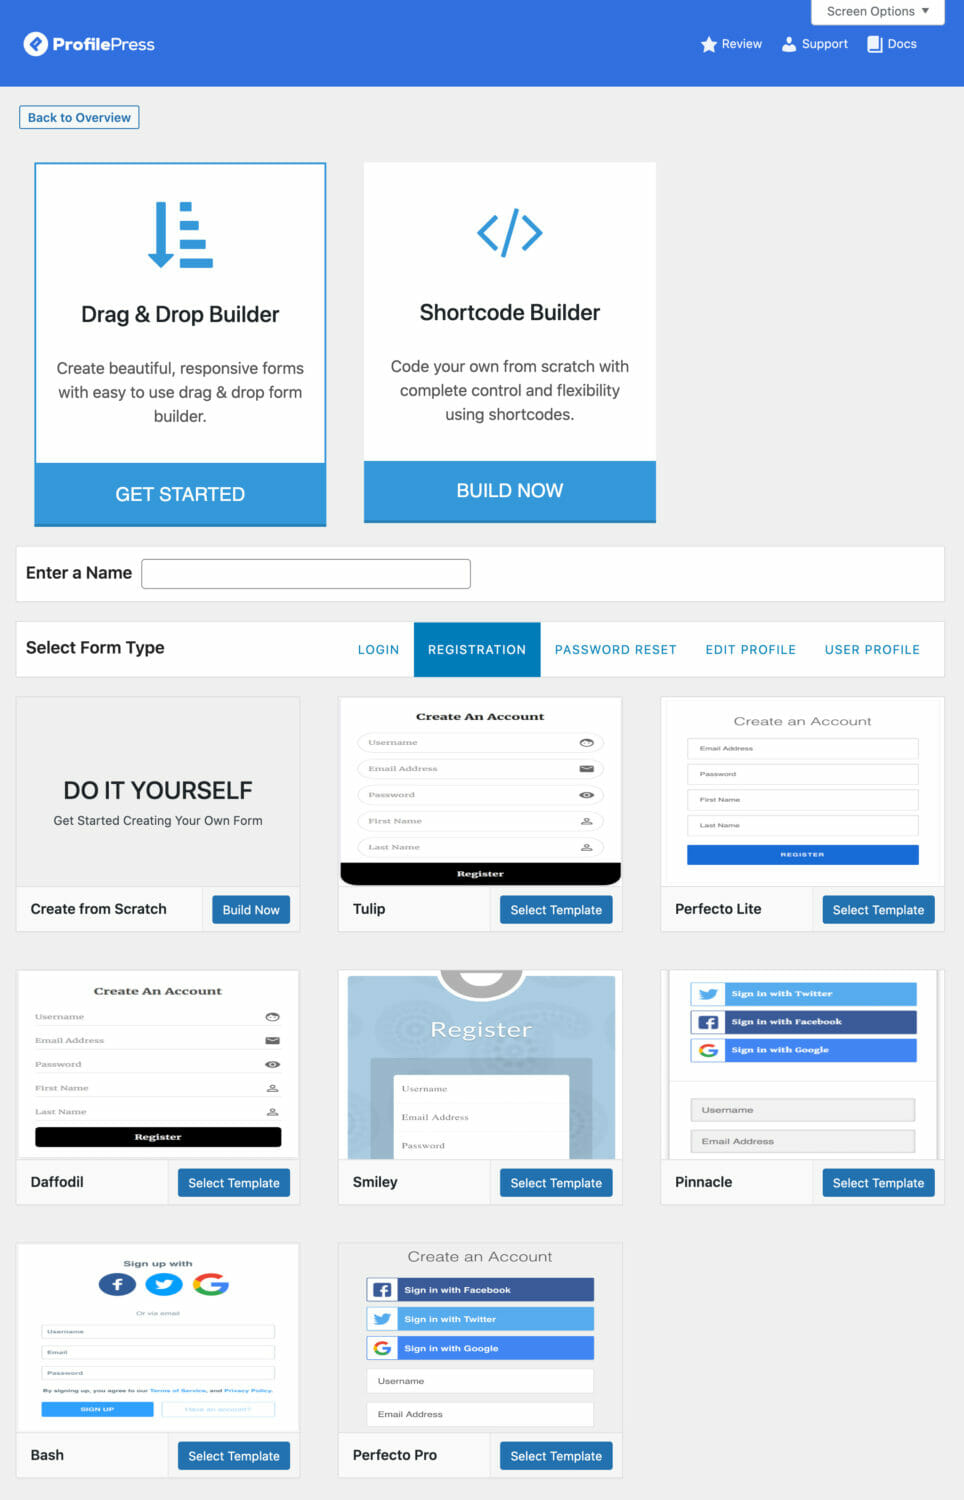
After giving your registration form a new name, select Registration from the Form Type and choose your desired template to begin customizing it. We’ve decided to go with the Perfecto Lite template.
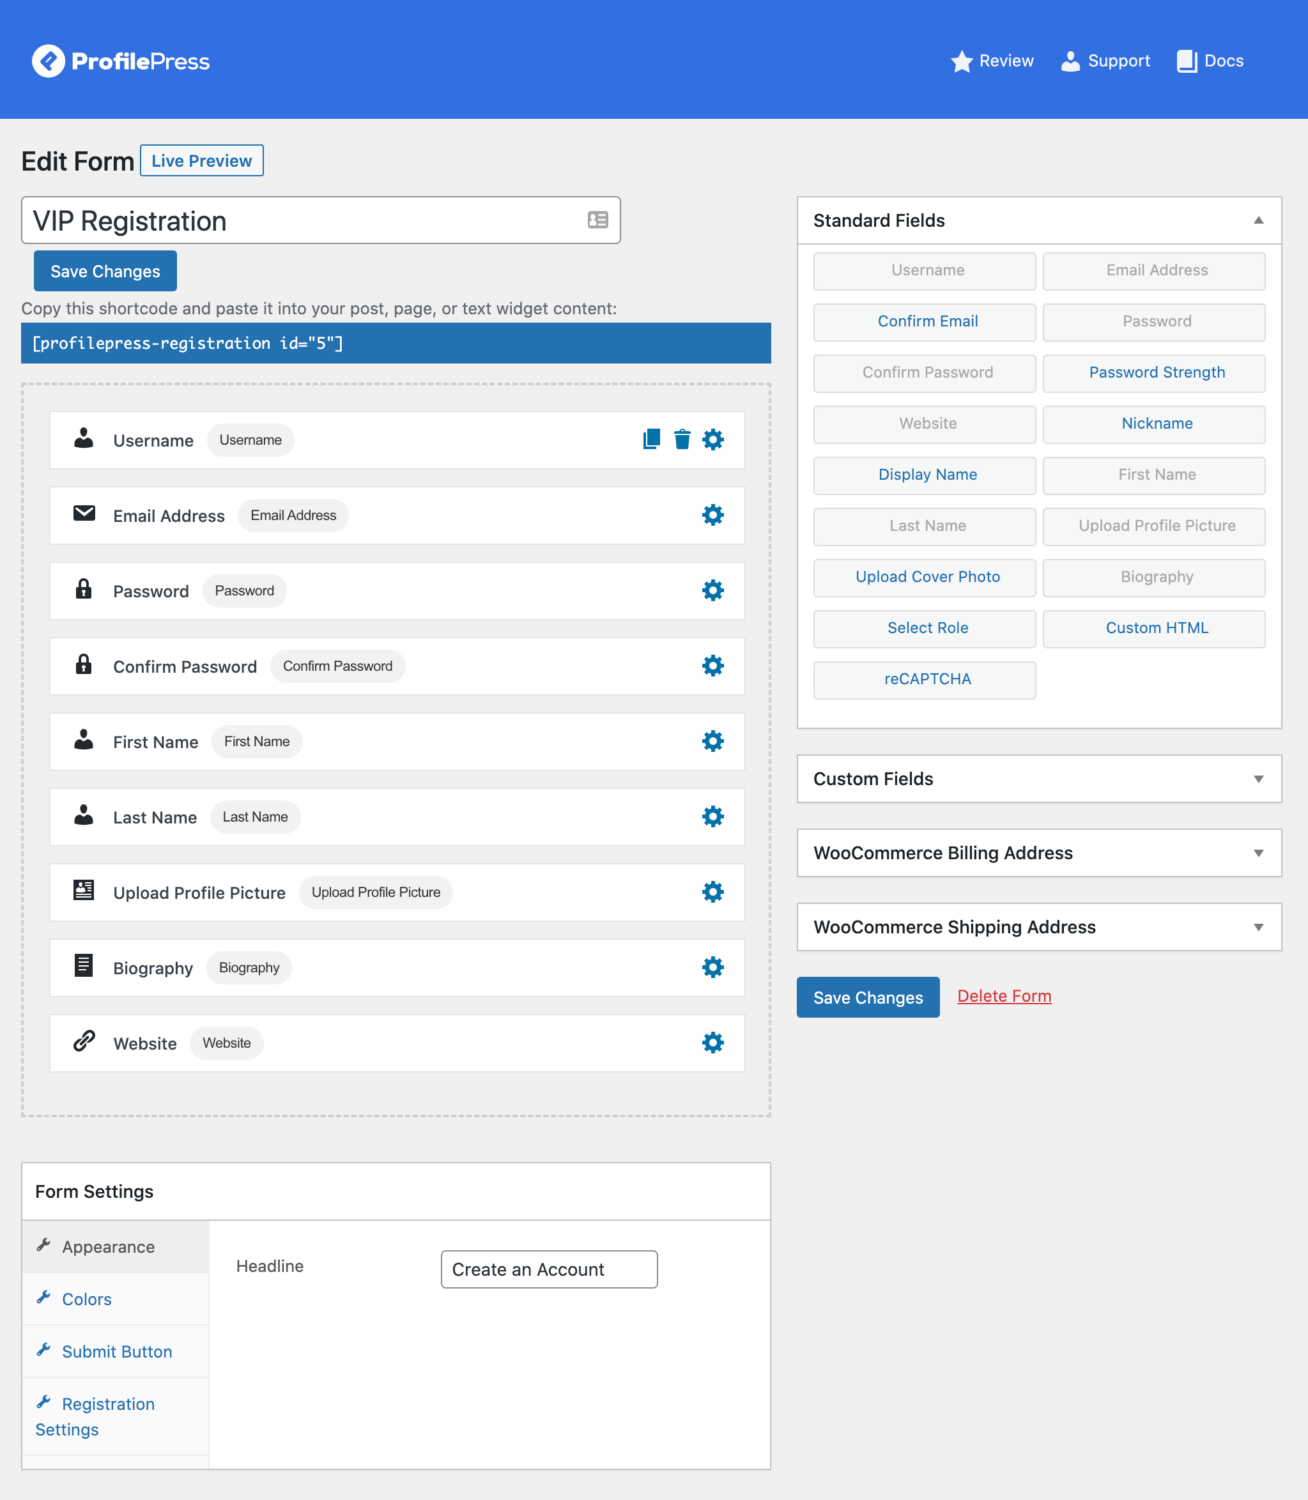
Customize the registration form according to your brand requirements and click the Save Changes button to continue.
Now, create another new page and paste the custom registration form shortcode.
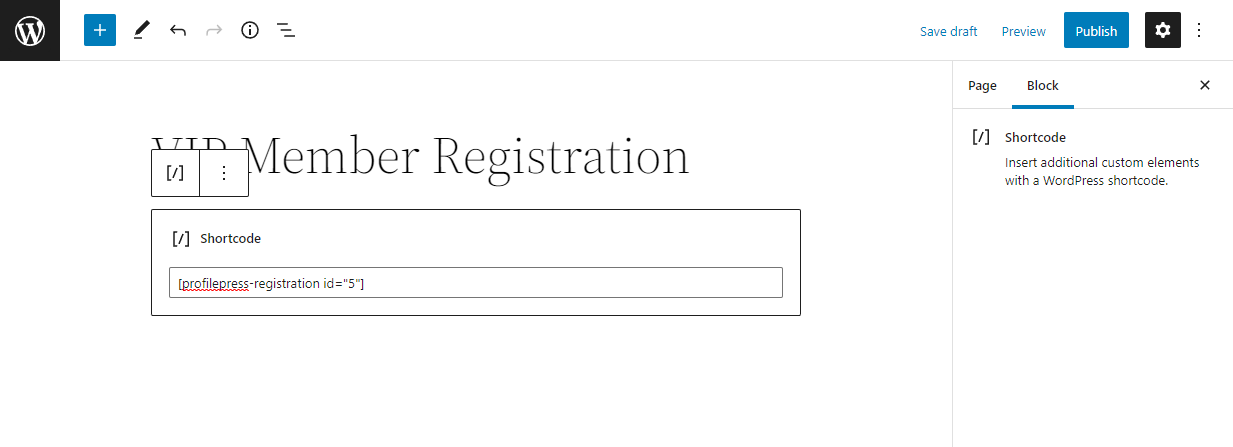
Click on the Publish button to continue.
Now that both the login and the registration page are correctly set up, you can specify important pages using ProfilePress settings. To do this, navigate to ProfilePress → Settings and click on the Pages tab under the General menu.
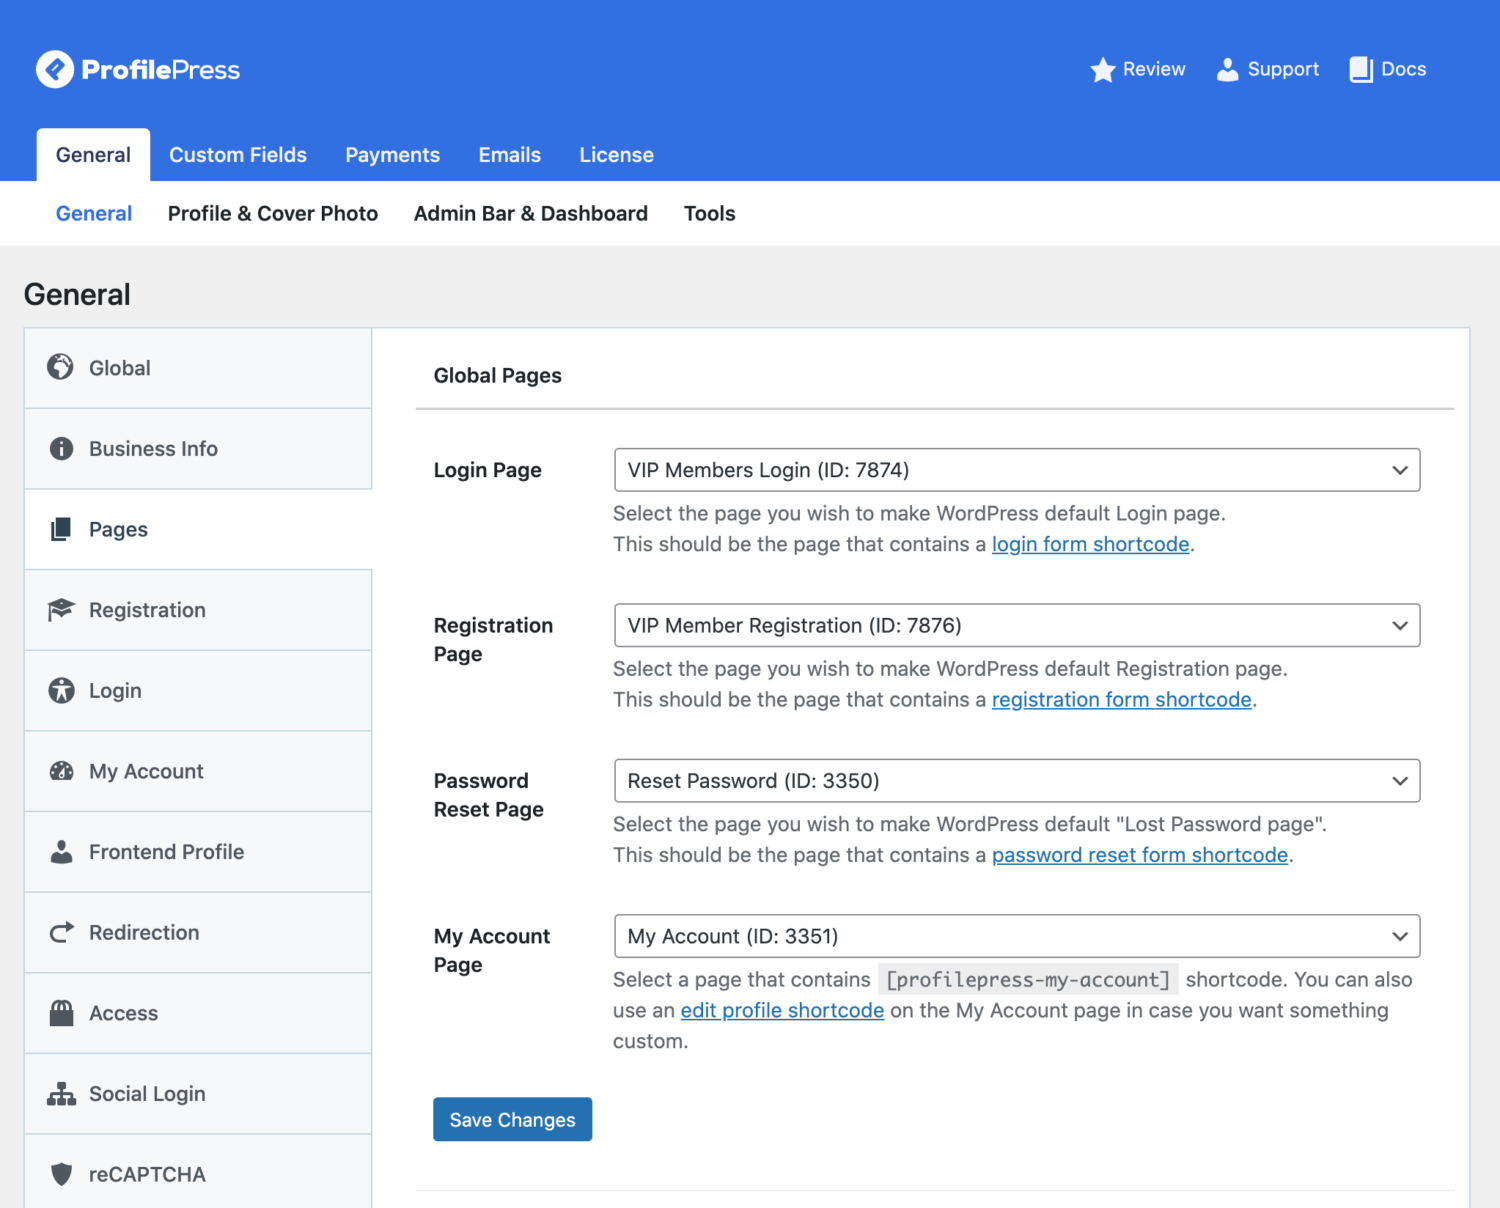
Select your newly created member login page using the Login page dropdown menu. Similarly, select your registration page using the Registration page dropdown menu.
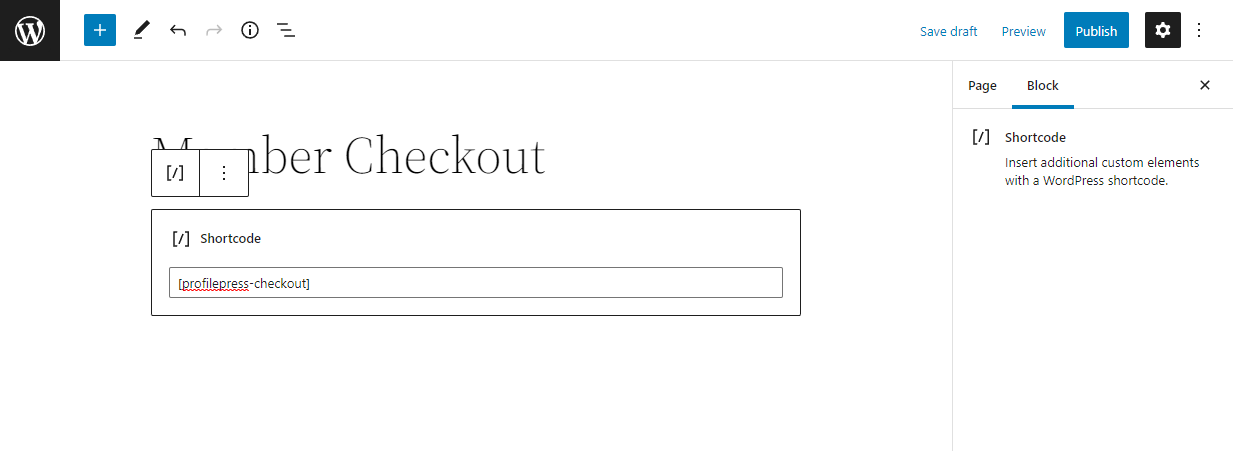
Additionally, it’s important to show users a checkout page and an order success page when users complete the payment process.
To do this, create a new page and paste the Your cart is currently empty. Click here to get started.
For the order success page, please create a new page in WordPress and paste the Invalid order
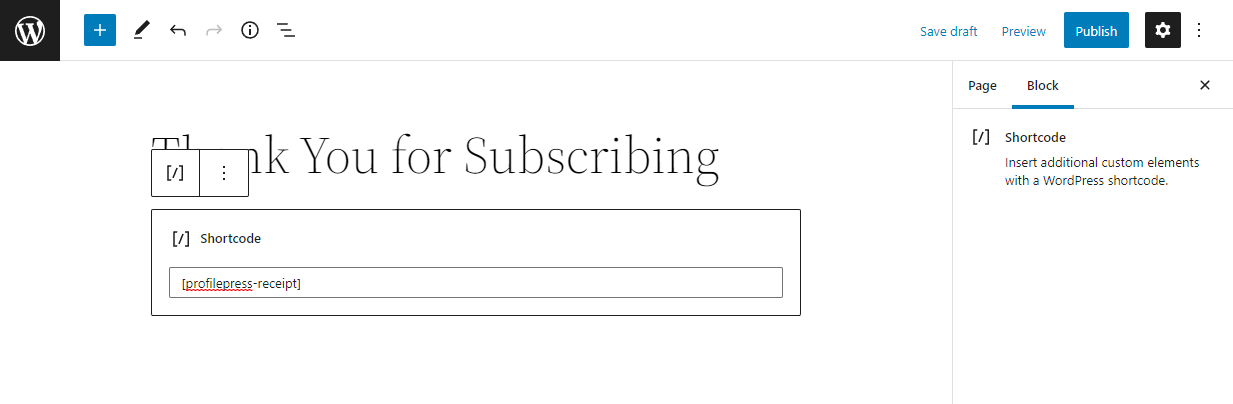
Now select both pages using the Payment Pages section.
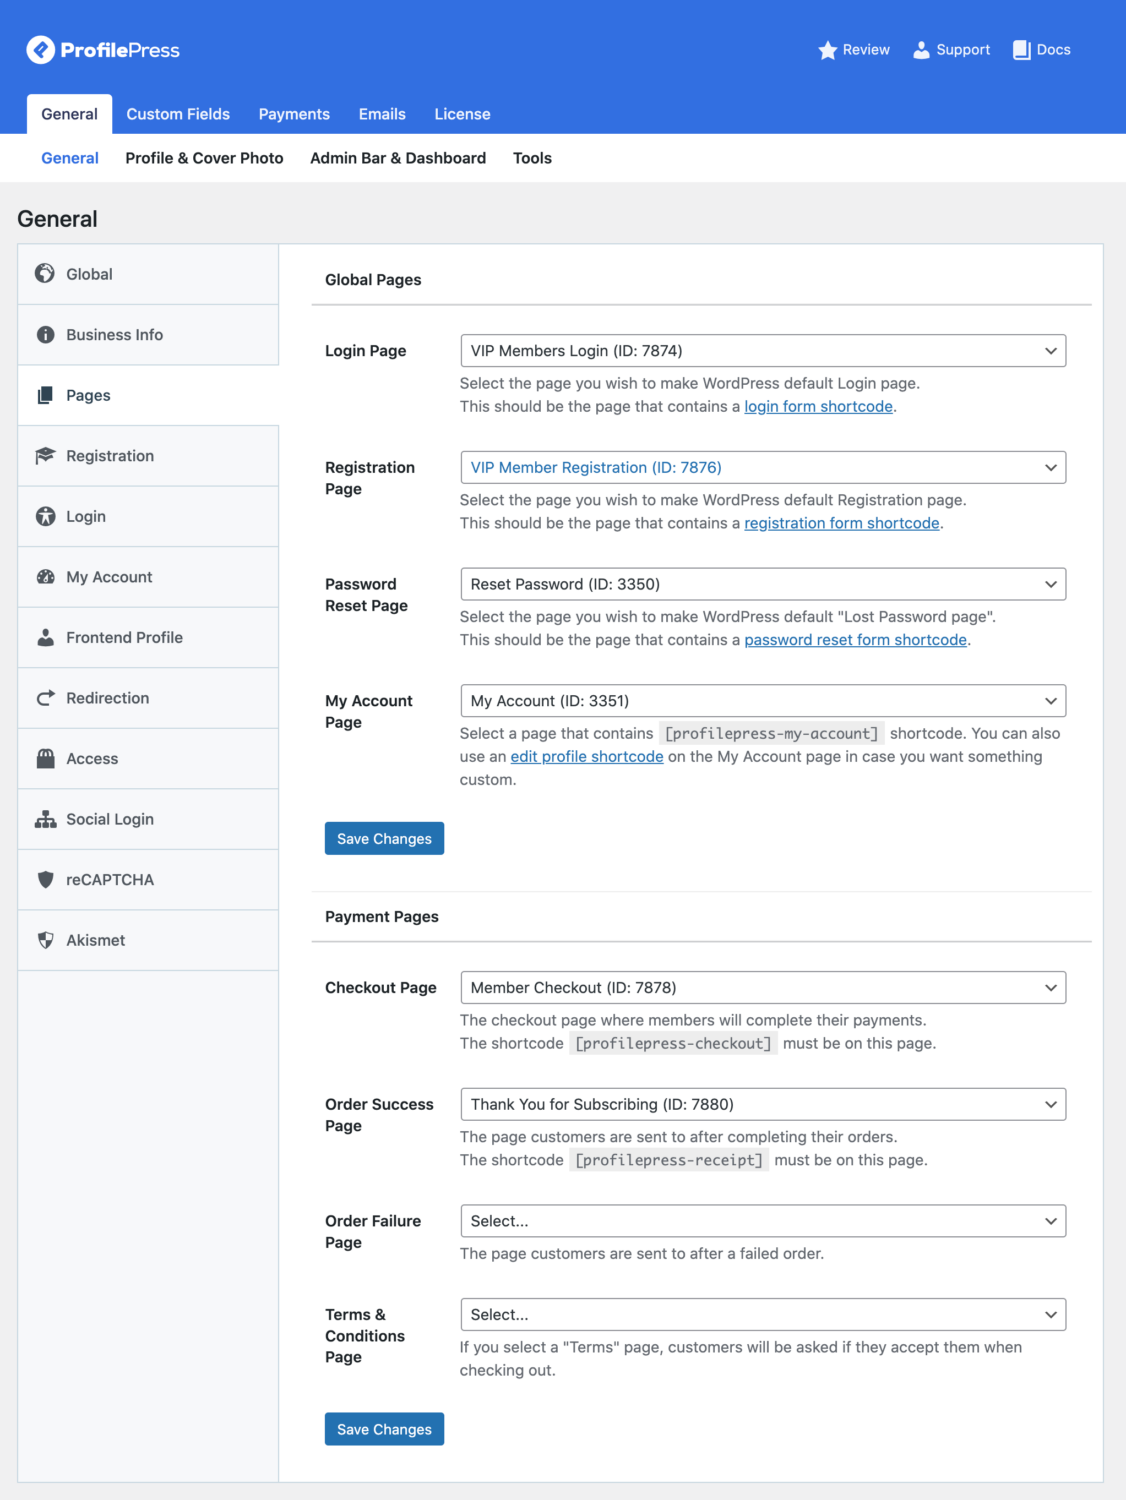
Make sure to click on the Save Changes button before continuing.
Step #6: Restrict content on your membership site
Now that all necessary pages are set up and a membership subscription plan is created, it’s time to restrict access to premium content on your site. Users must subscribe to the newly created membership plan before accessing the premium content.
Navigate to ProfilePress → Content Protection and click the Add a protection rule button.
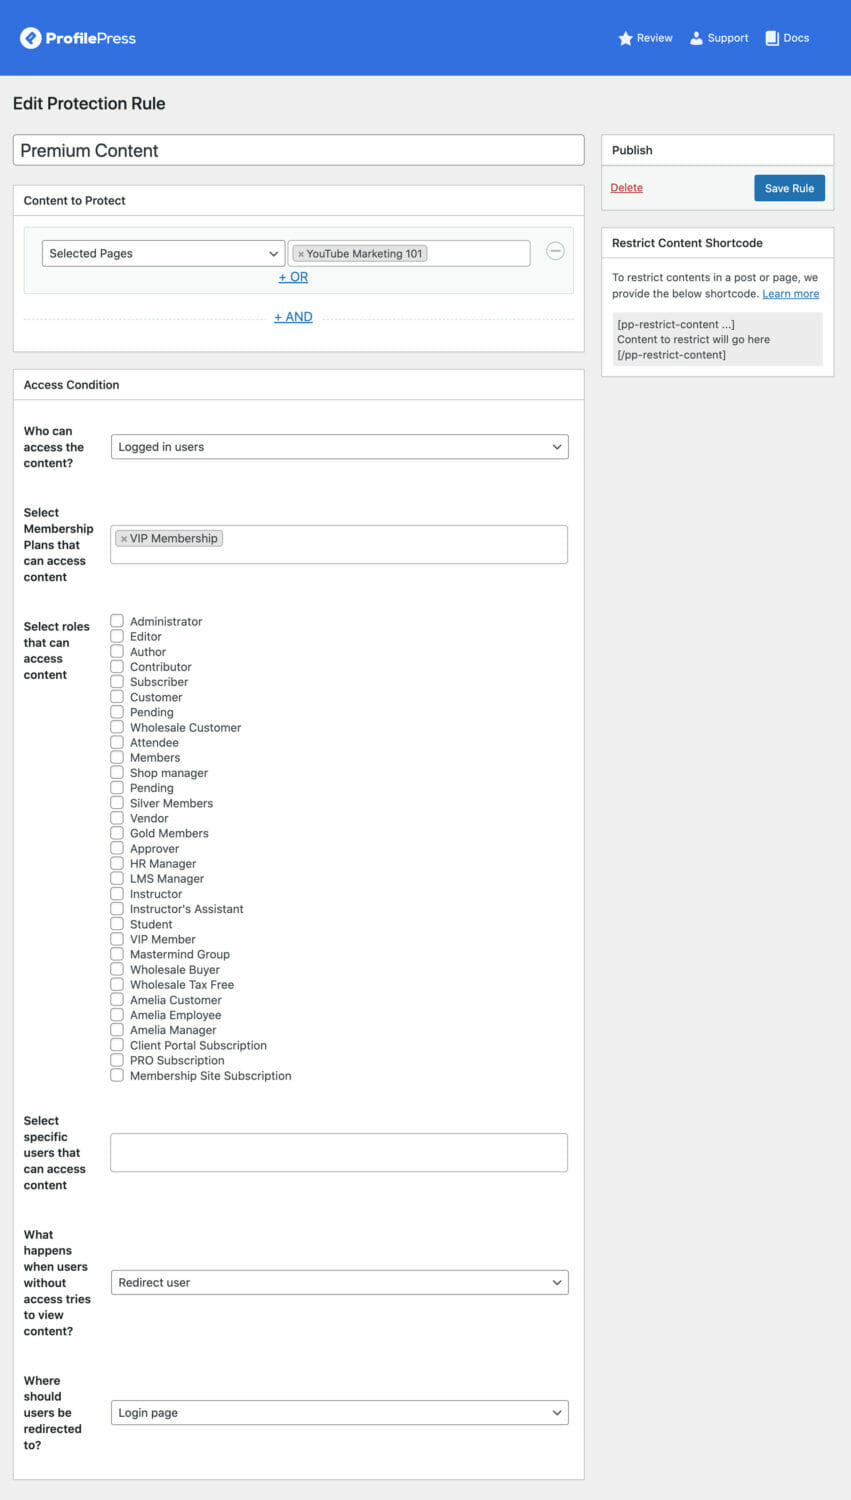
After giving your content protection rule a new name, select what content you want to restrict on your WordPress membership site using the Content to Protect meta box. You can hide content on specific pages, posts, categories, tags, or page formats.
Once you’re done selecting premium content on your site, you can set the Access Condition meta box to decide who gets to see your content. Next, choose your membership plan using the Select Membership Plans that can access the content text field and click on the Save Rule button.
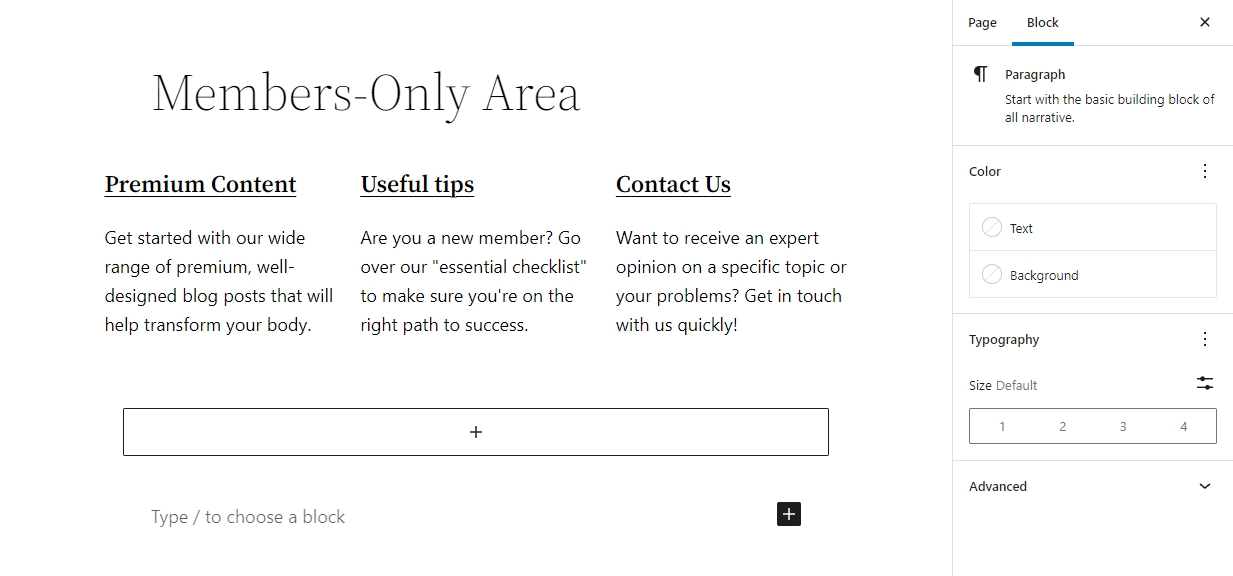
Step #7: Set up a “members-only” area
A “members-only” area on your site allows your members to view their account details, access premium content, find helpful links to pages, or navigate to the community form.
Depending on your brand’s unique requirements and the content you want to showcase, you can create a unique-looking “members-only” area or page on your site to keep your members engaged and help enhance the overall member experience.
Create a new page by navigating to Pages → Add New and set up your members-only area as needed.
After clicking the Publish button, navigate to ProfilePress → Content Protection to hide the newly created members-only area from unauthorized users.
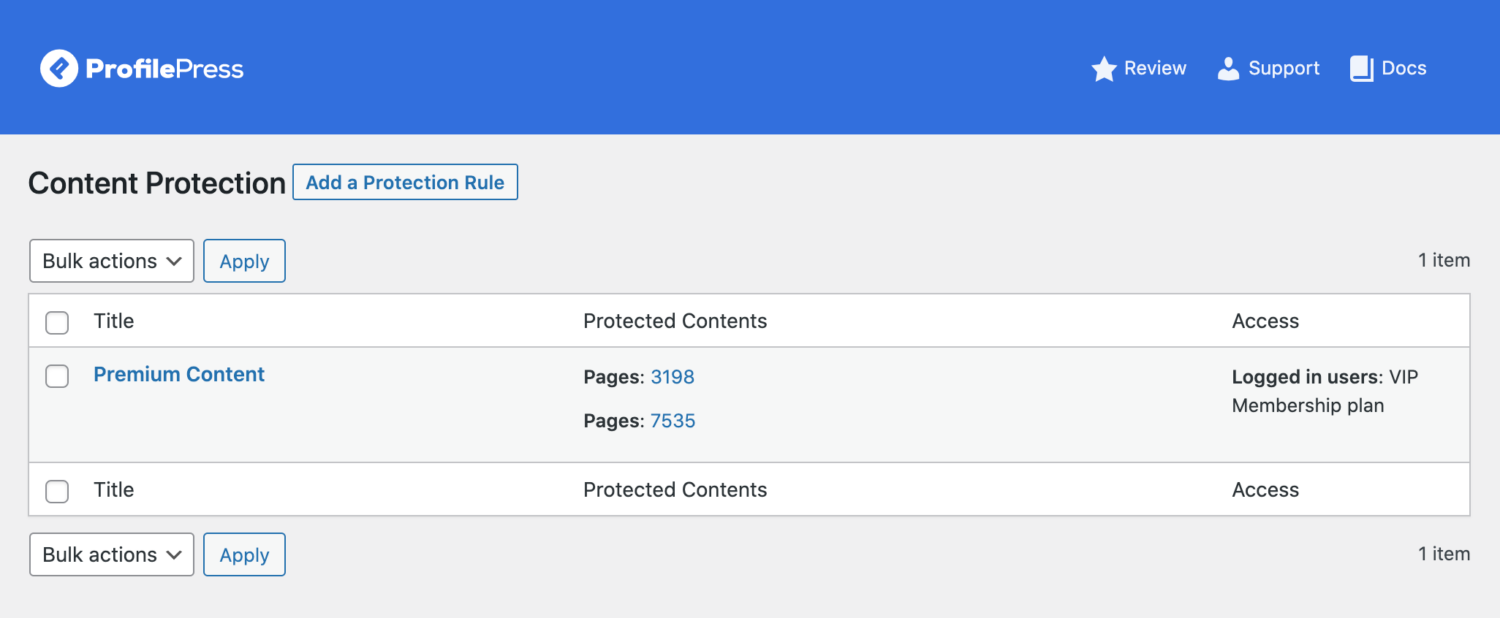
Click the Edit button next to the content protection rule we created earlier.
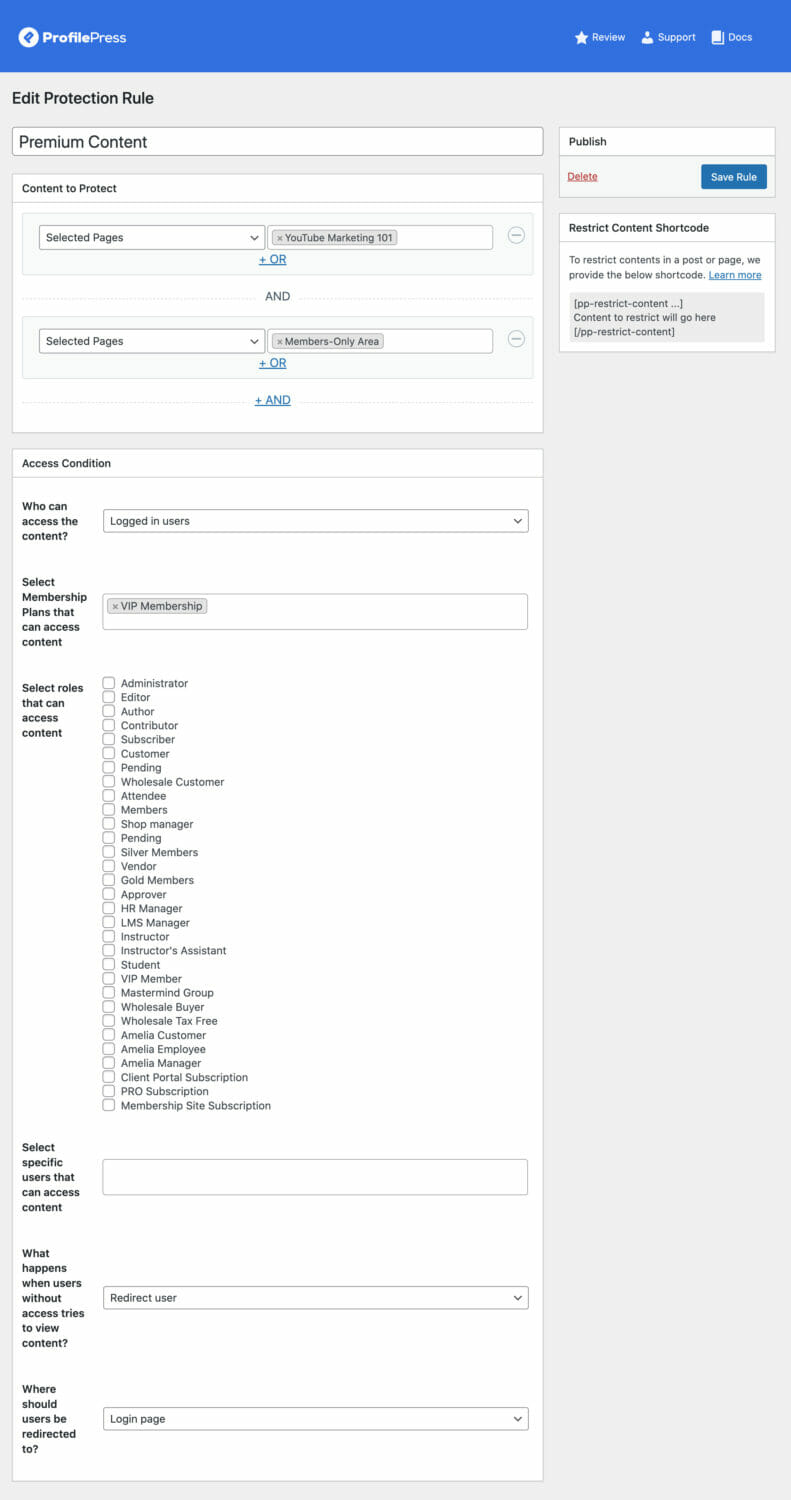
Under the Content to Protect meta box, click on the +Add button to create a new protection rule. Now select the members-only page using the dropdown menu and click the Save Rule button to continue.
Step #8: Create a pricing page
You also want to ensure users can easily subscribe to a membership plan on your paid membership website created with WordPress. Creating a “pricing page” on your membership site is a great way to offer a simple way of subscribing. It also encourages more people to try out your membership plan.
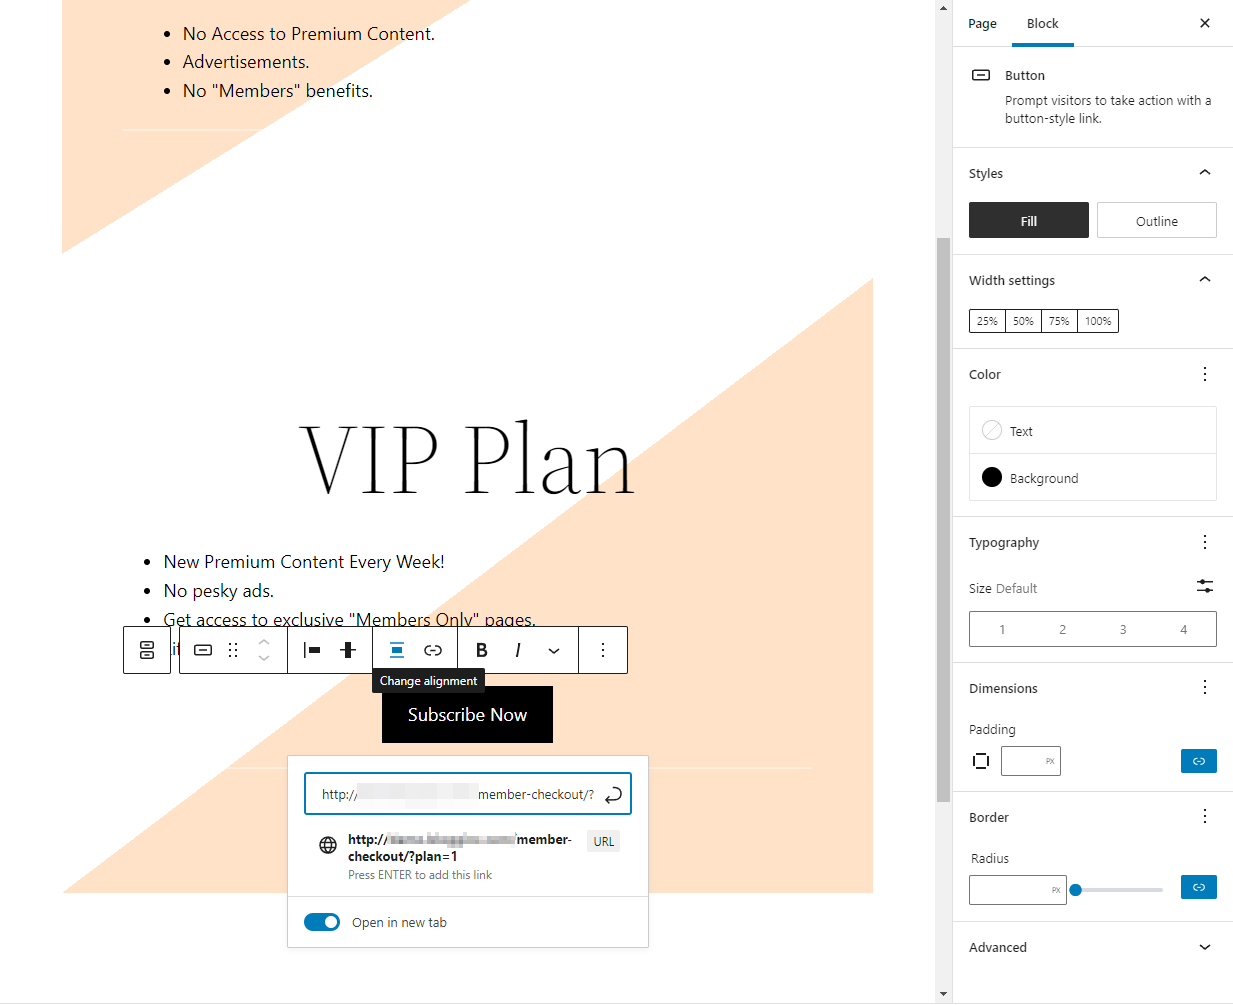
You can inform users what they will miss out on if they register and browse your site without the premium membership plan. You can also include a solid call to action button to let users easily subscribe to the membership plan. To do this, create a new button and add your membership plans’ “Checkout URL” to the link.
You can find the checkout URL of your membership plan by navigating to ProfilePress → Membership Plans. This will automatically redirect users to the membership subscription page.
Step #9: Preview
With everything in place, site visitors can easily register and log in to your membership site using ProfilePress custom forms.
Users who do not subscribe to the membership plan will not get access to premium content on your site. Instead, they can navigate to the Pricing Plan page to view subscription options offered by your brand.

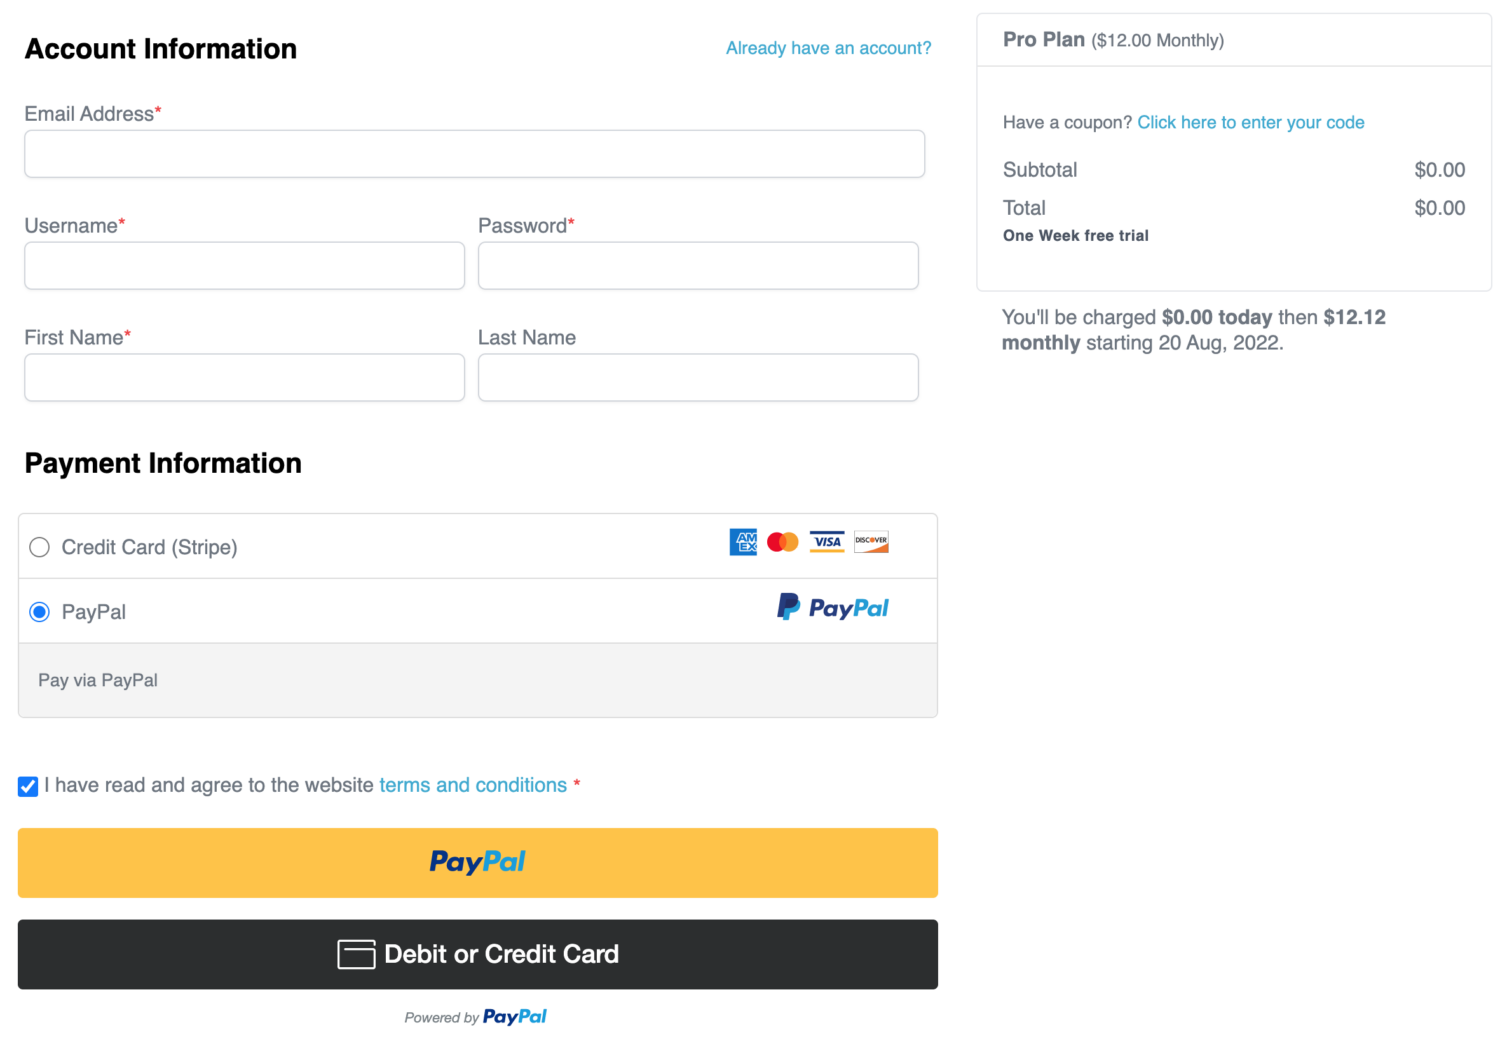
Once users click the Subscribe now button, they will be automatically redirected to the checkout page.
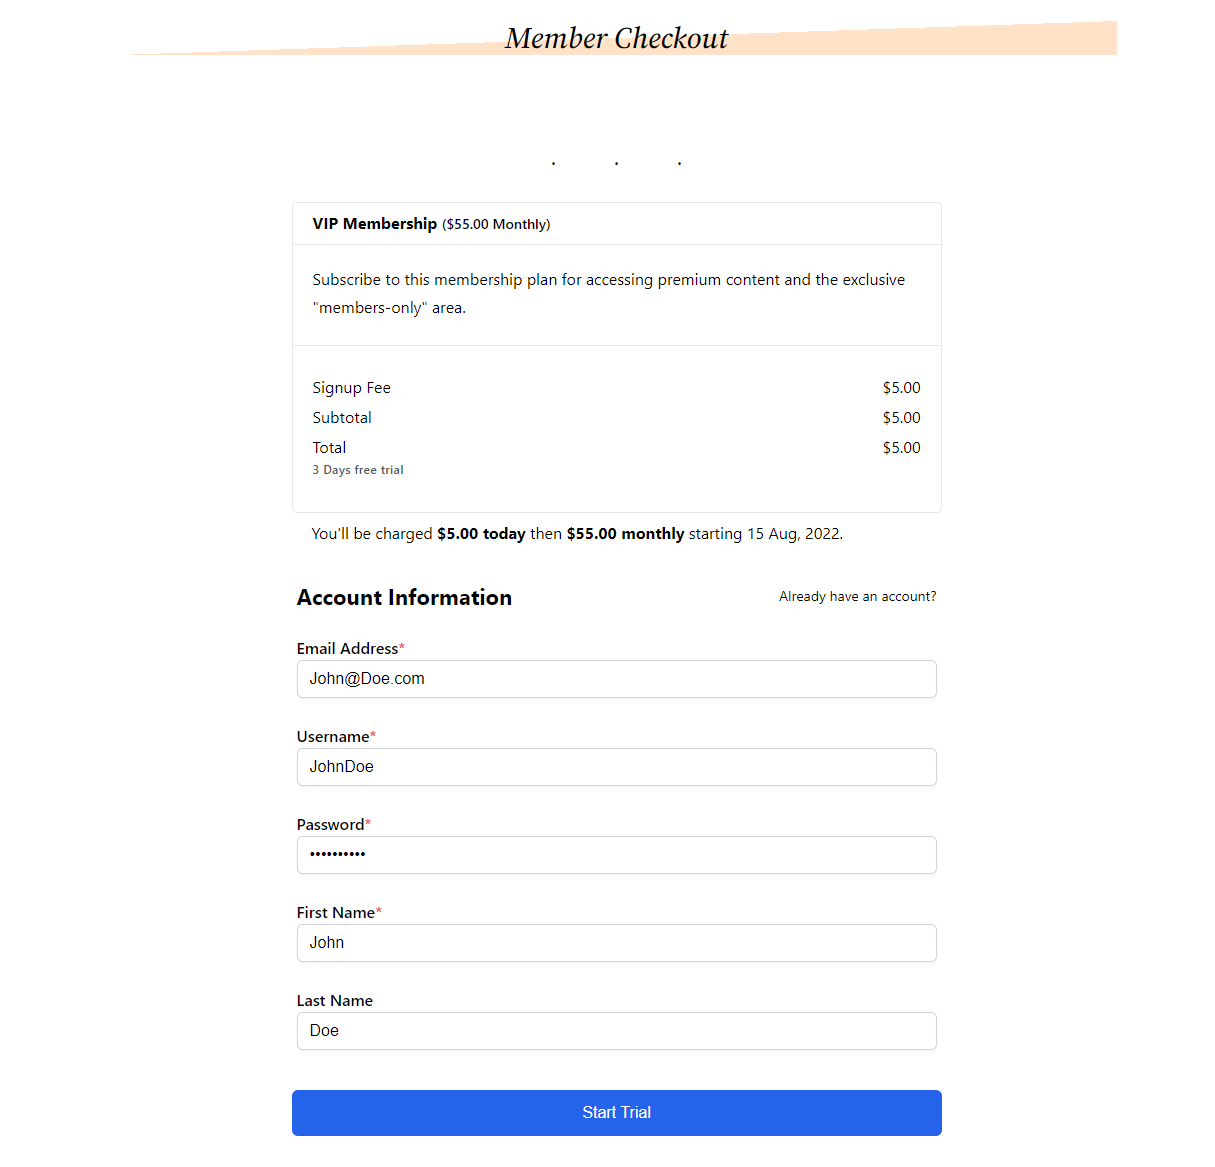
This allows your audience to subscribe to your membership plan and access premium content on your membership site.
Step #10: Managing your WordPress membership site
That’s not all; ProfilePress also features an easy-to-understand dashboard that lets you overview everything on your membership site.
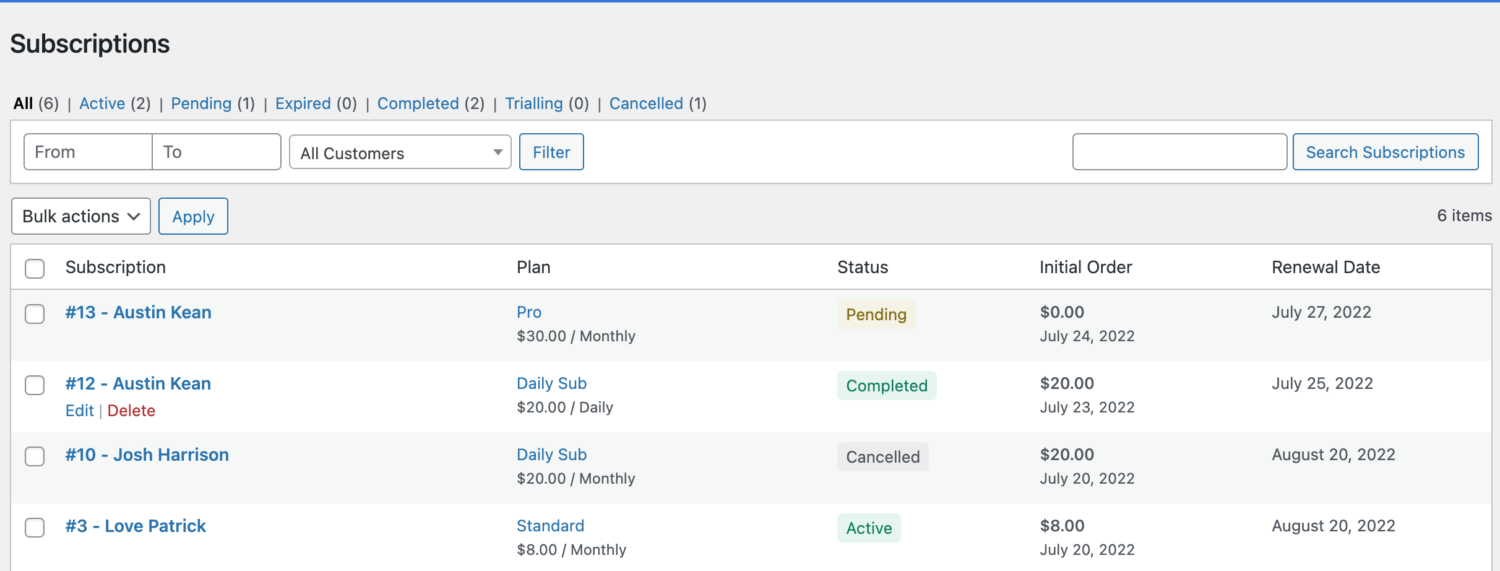
You can also filter and view the performance of each membership plan offered on your membership site. This is a great way to overview the success of your membership plans and see the total revenue it generates for your business.
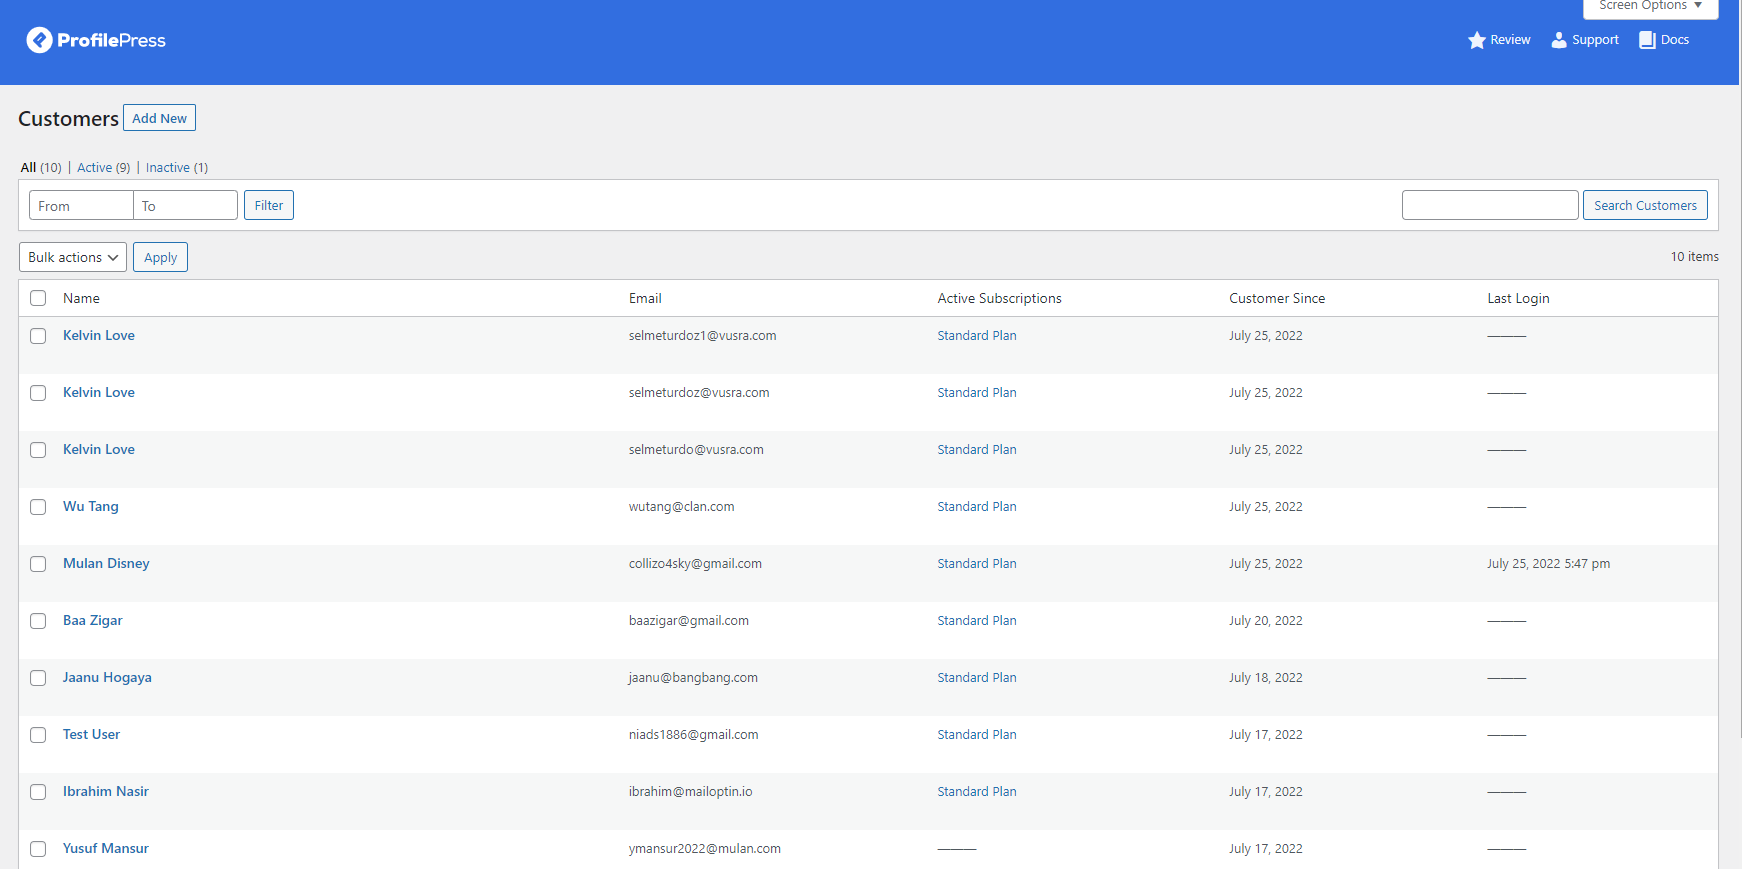
You also have access to easy-to-use Subscriptions and Customers pages that ensure you have an easier time keeping track of all subscriptions and customers your brand caters to.
Create a Membership Website with WordPress Today
Creating a full-fledged WordPress membership site is easy if you use a robust membership plugin such as ProfilePress.
This makes the whole process pretty straightforward and helps you create an awesome-looking paid membership site with all the essential pages in no time, even if you’re not very tech-savvy.
The best part about ProfilePress is that it comes pre-built with many features that make it easier for you to restrict content, create checkout pages, and create membership subscription plans using a single plugin.
Ready to create a WordPress membership site? Get ProfilePress today!