WooCommerce Paywall: How to Set It Up in WordPress
Do you want to set up a WooCommerce paywall to start charging for content in WordPress?
A paywall is a great way to generate revenue from your online content. Many big publishers, such as the Wall Street Journal, the Washington Post, and the New York Times, use paywalls to generate revenue from their content.
Paywalls are one of the simplest monetization strategies for online publishers. It restricts access to your content, requiring visitors to pay before they can view all or part of it. This approach can quickly generate substantial revenue, especially if you offer exclusive content people are eager to access.
In this article, we will learn about the various types of paywalls, how to implement them, and how to implement WooCommerce paywalls on your website.
Types of Paywalls
There are various types of paywalls, and it is essential to understand the differences between them. The three main types of paywalls are soft, hard, and metered. This section will explain each type and highlight how they differ.
1. Hard Paywall
A hard paywall is a type that completely blocks access to all the website content. In this type of paywall, users must pay to access any content on your website.
When users land on your website, they will be greeted with a login or subscribe option if they want to access your content. The hard paywall is common among publications and popular newspapers with high-quality exclusive content and in-depth analysis.
2. Soft Paywall
A soft paywall is a type of paywall that grants limited access to website content. Usually, visitors are offered a limited number of articles for free before they are nudged to pay.
This paywall gives the visitor a peek into what you offer before being asked to subscribe. The soft paywall is commonly used by online magazines that want to give some of their content for free so that visitors can taste what they will get when they subscribe.
3. Metered Paywall
A metered paywall offers site visitors a certain number of free pages, articles, or content within a specified timeframe before asking for a subscription. Once a user hits this specified limit, they must pay to continue accessing the website content.
The specified timeframe for a metered paywall could be daily, weekly, or monthly. Many news websites like The Financial Times use a metered paywall, which usually allows readers to access a certain number of articles daily before asking them to subscribe.
Setting Up a Paywall on Your WooCommerce Site
Before you can set up a WooCommerce paywall, there are a couple of things you need to do. Firstly, you must ensure the WooCommerce plugin is already running on your website.
Secondly, you need to install and activate the ProfilePress plugin, a powerful WooCommerce membership plugin. We will use it to create the various types of paywalls we require.
The following sections will cover all the steps required to add paywalls to your WooCommerce website using ProfilePress.
Install and Activate ProfilePress
Our first action is to purchase a copy of ProfilePress and install it on your WooCommerce website.
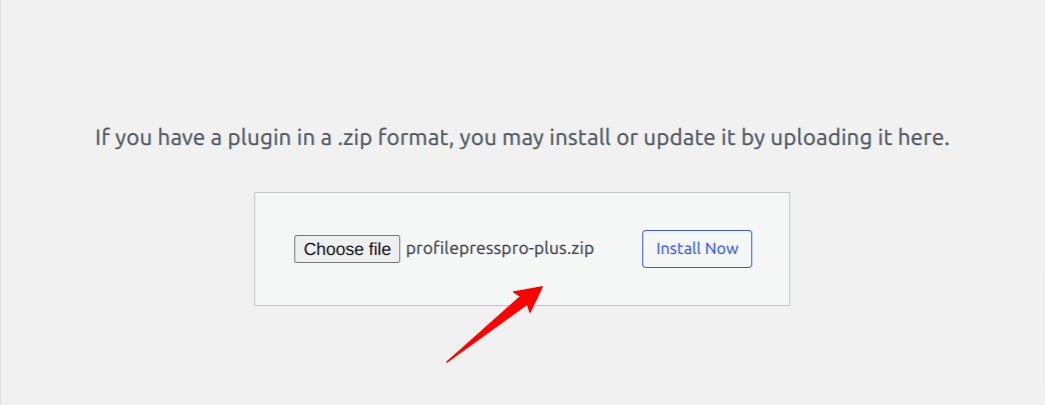
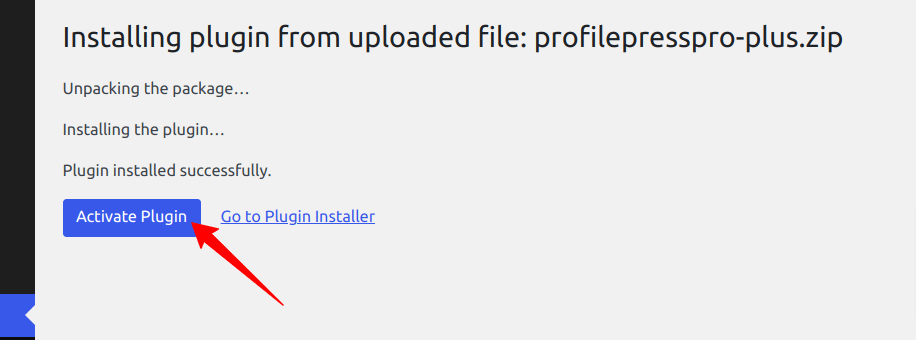
After the installation is complete, click the “Activate Plugin” button.
Activate the Metered Paywall Addon
Since we are creating a WooCommerce paywall called Metered Paywall, enabling its addon in ProfilePress is crucial.
Go to ProfilePress > Addons and toggle on the Activate button in the Metered Paywall section.
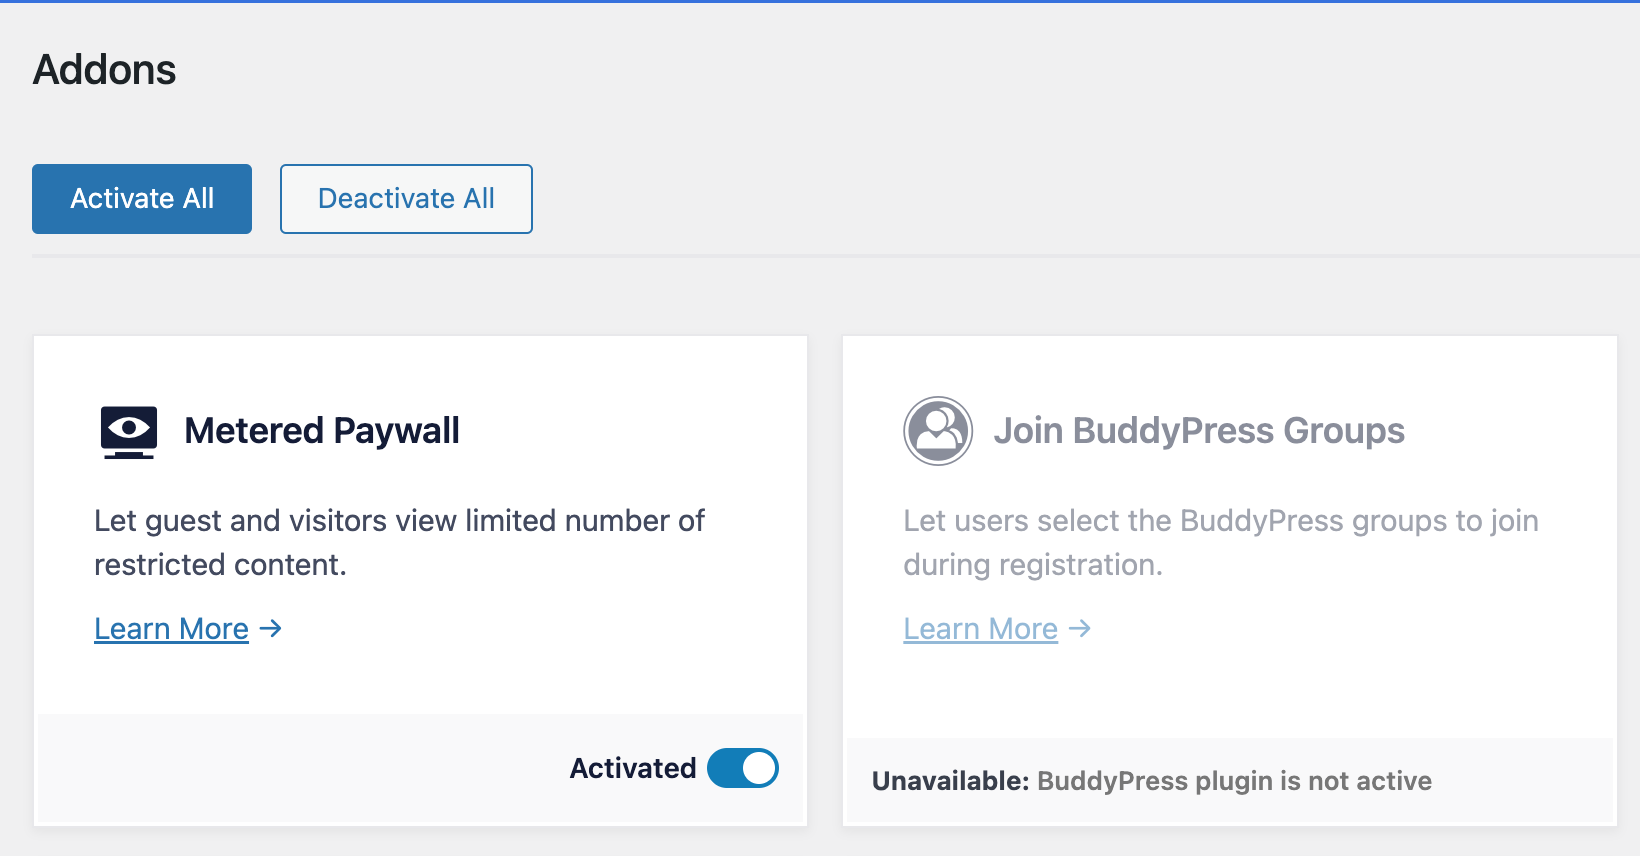
Toggle the button, and the metered paywall feature will become available on your website.
4. Enable the WooCommerce Addon
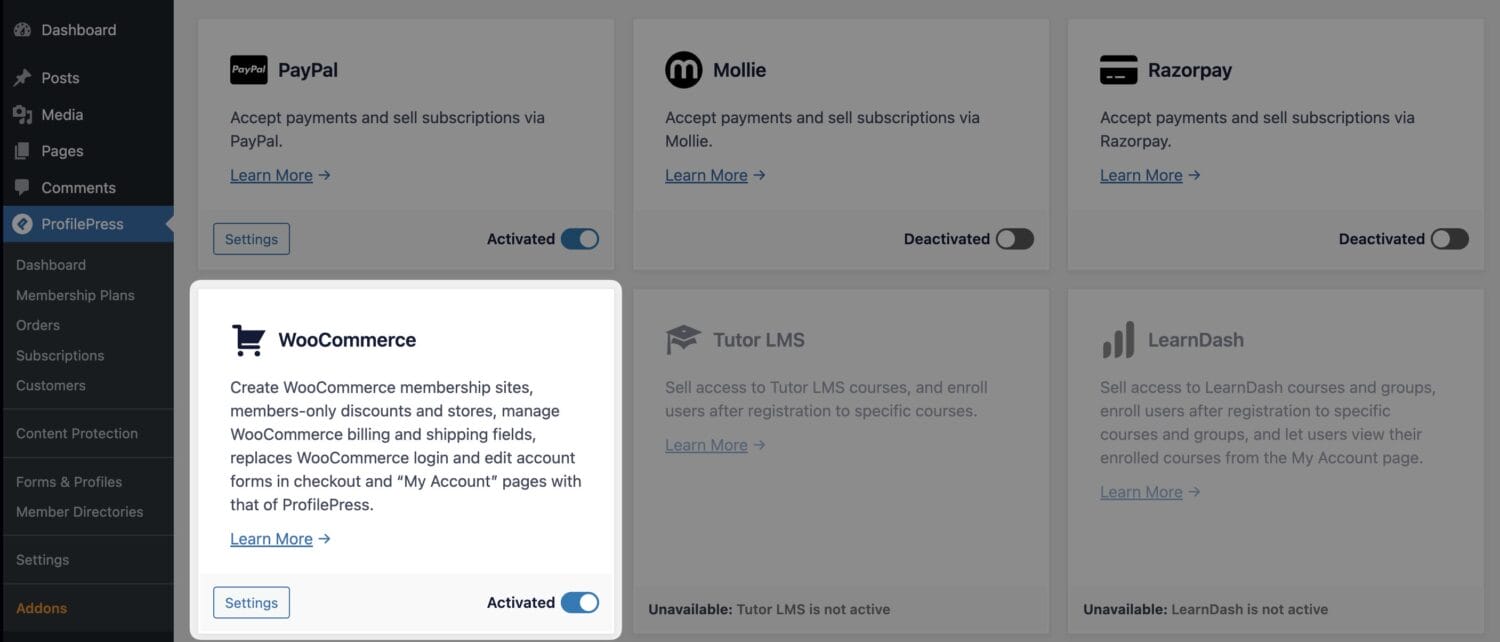
The last step is to enable the WooCommerce addon in ProfilePress. This addon will allow us to synchronize WooCommerce and ProfilePress features to manage our paywalls effectively.
To enable the WooCommerce addon, go to ProfilePress >> Addons and use the toggle switch to activate it.
Creating a Product for the WooCommerce Paywall
As the world’s leading ecommerce solution, WooCommerce is an excellent way to charge for access to your website content.
The way the WooCommerce paywall works is that you need to create a WooCommerce product with a fee and then create a corresponding ProfilePress membership plan and map the WooCommerce product to it such that when any visitor purchases the WooCommerce product, they are automatically subscribed to the ProfilePress membership plan to gain access to your site content.
To create a WooCommerce product for our paywall, login to your WordPress website dashboard and go to Products >> Add New
Enter a title for the product, add a price, and set the product visibility to hidden.
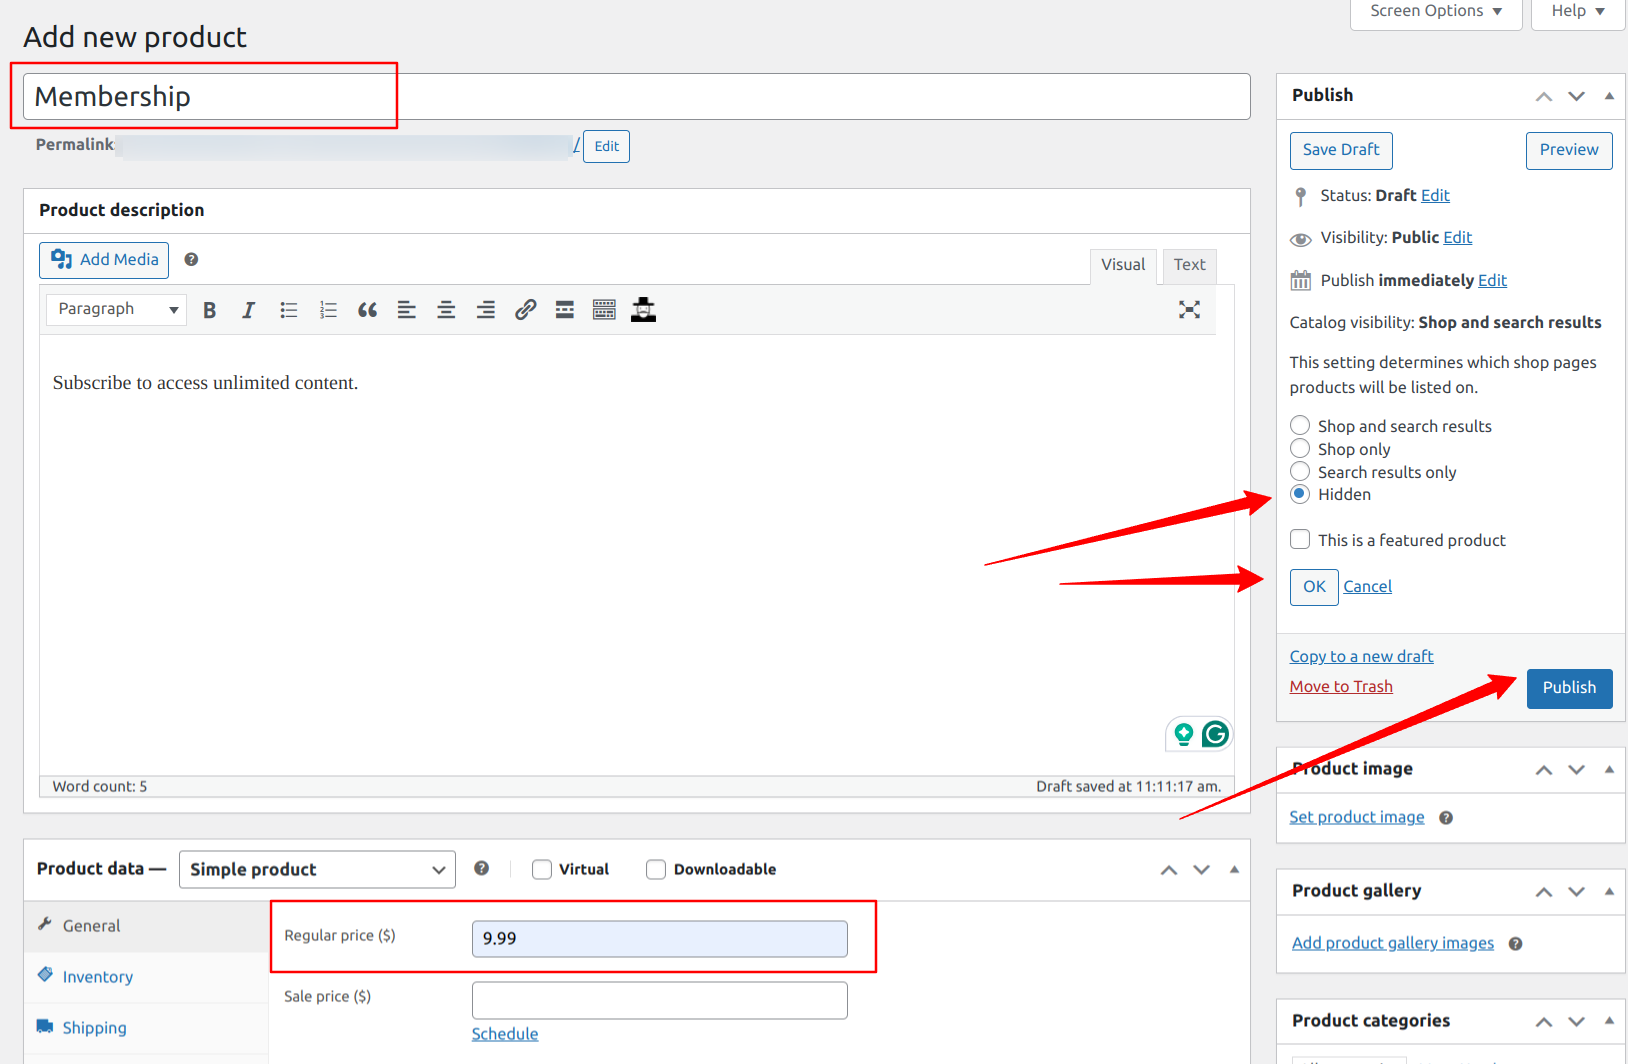
When you set a WooCommerce product to “hidden status”, it means the product will not appear on your site shop page; to buy this product, a visitor will need to follow a direct link to that product page by clicking a link in an article or on your pricing page.
So, you can create a pricing page or Call To Action banners to include the link to this product in your pages. Don’t forget to hit the Publish button.
Create a Membership Plan in ProfilePress
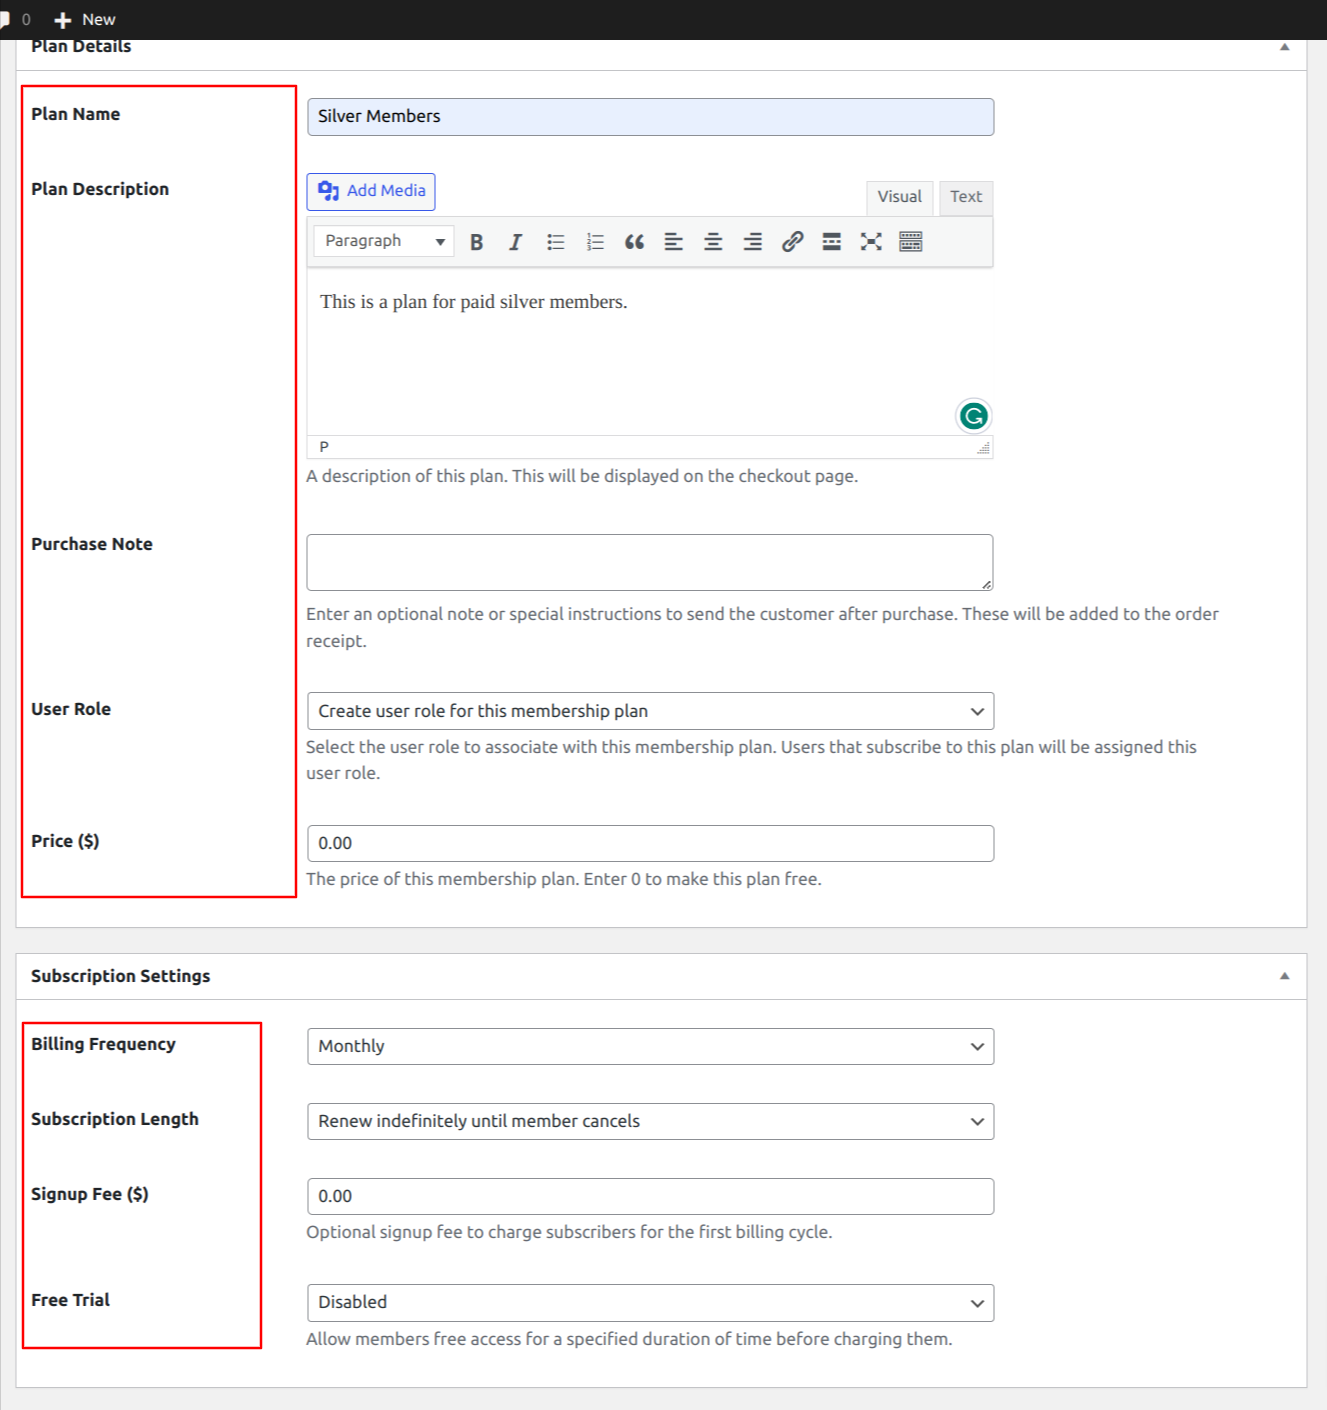
Now that we have a WooCommerce product, the next thing is to create a corresponding membership plan for the product. We will create a Silver membership Plan for our site users for this article.
Navigate to ProfilePress >> Membership Plans to edit an existing membership plan or create a new membership plan.
Click on “Add New Plan”, and you will be taken to the page where you can add a plan and all the details for your product.
After filling in the details, input the price, enter a subscription length, and choose a billing frequency you want to associate with the subscription plan.
Since memberships can only be purchased through WooCommerce, you can set the membership plan price to zero. When creating the WooCommerce product for the membership, choose “One-time purchase” for the billing frequency if it’s not a subscription. Subscription settings are not critical, as billing will be handled by WooCommerce.
The final thing to do is go to the “Downloads & Integration” section. Select the WooCommerce menu tab, and choose the “Membership” product we created earlier.
Doing this ensures that when the selected WooCommerce product is purchased, the customers automatically become active subscribers to the membership plan in ProfilePress.

Kindly note that if the WooCommerce product is a subscription that charges a recurring fee, users will automatically be subscribed to the ProfilePress membership after purchase. If the subscription to the WooCommerce product is canceled, their membership in ProfilePress will also be canceled automatically. Additionally, if their subscription expires, the corresponding membership in ProfilePress will also expire.
When you are done, click the “Save Plan” button.
How to Setup a Soft Paywall in WooCommerce
So far, we have set up ProfilePress and created a WooCommerce membership product we want to sell to our users. In this section, we will use a combination of the WooCommerce product and a ProfilePress membership plan to set up a soft paywall on our website.
To set up a WooCommerce soft paywall, we need to separate our premium content from the free content because a soft paywall is supposed to offer some free content to the visitors and restrict the others to paid subscribers.
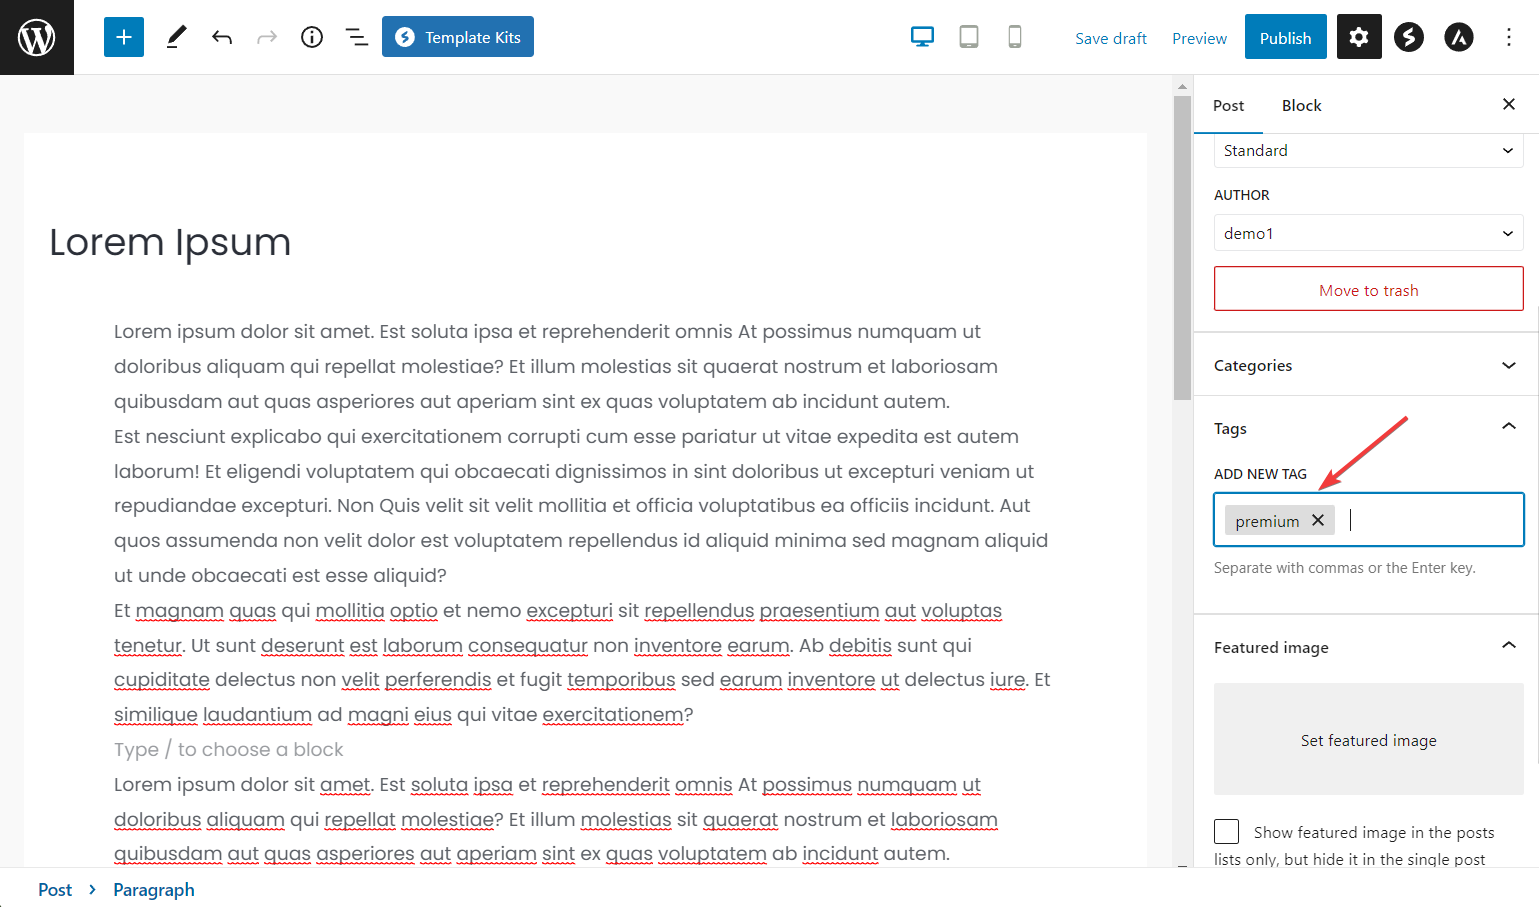
To segment the content, you can use either WordPress tags or categories. You can tag premium content as premium or paid.
The content tagging is done in the WordPress content editor. Open the page or post you want to tag, go to Tags, put paid or premium, and hit enter. You must tag all your premium posts and pages to enable a soft paywall for them.
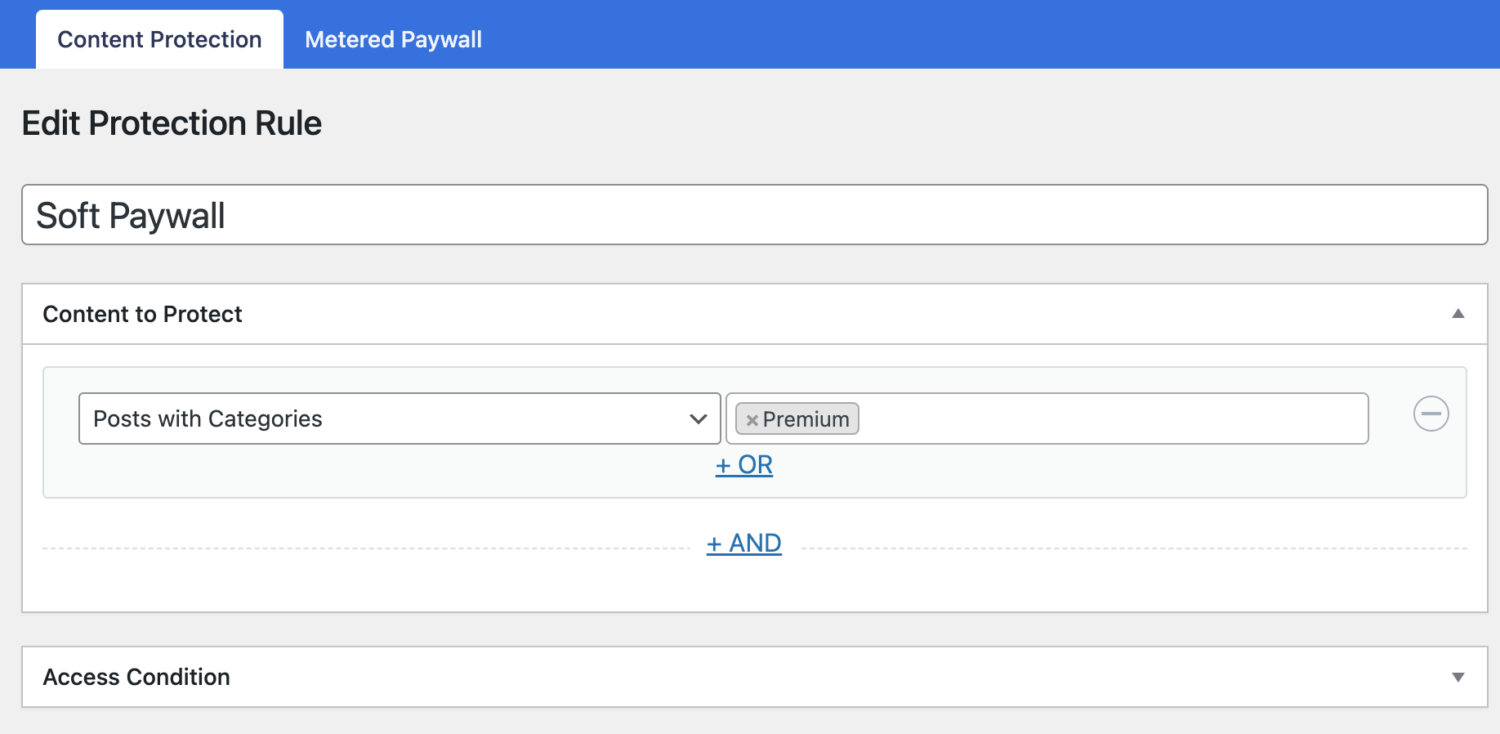
Next, navigate to ProfilePress > Content Protection and click the Add a New Protection Rule button.
On the next page, add a title, and from the dropdown menu under Content to Protect, select Posts with Tags or Posts with Categories if you used categories to define your premium content.
A search box will appear on the right as soon as you do that. In the search box, look for the tag you created. Then, select the tag and hit the Save Rule button.
Next, go to the Access Condition section to set up who can access the premium content. From the dropdown menu against the Who Can Access the Content option, select Logged in Users.
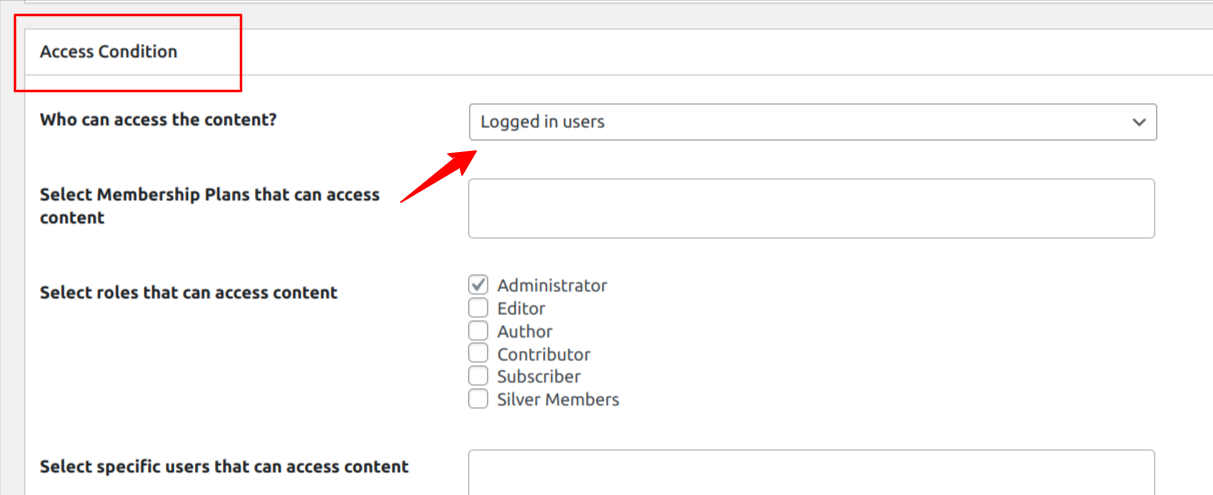
As soon as you select the Logged in users option, several new options will appear in the Access Condition section.
Firstly, go to the “Select Membership Plans That Can Access Content” field and add the membership plan you created in the step above.
You might also want to select additional Roles that can access the content besides paid members with an active subscription. You could select the Administrator and Editor roles.
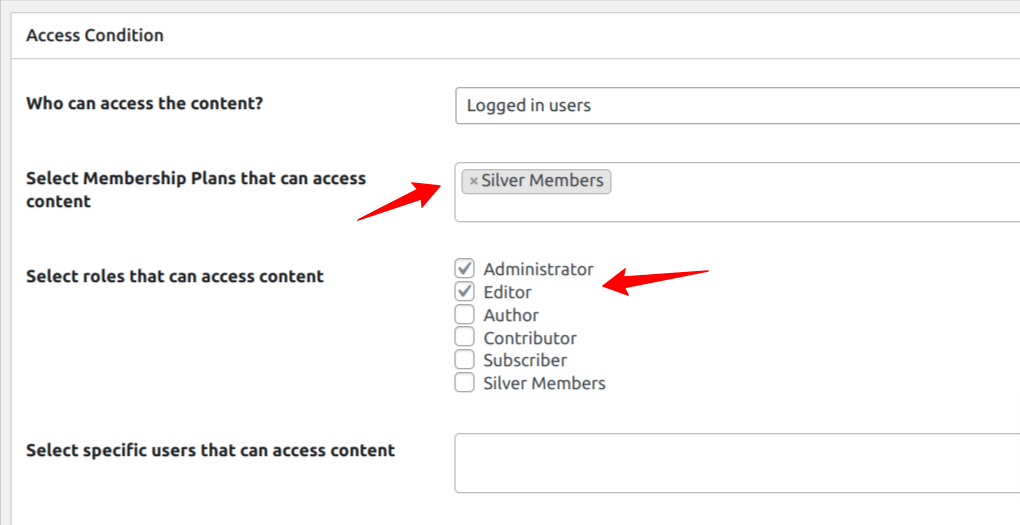
Note: Make sure to choose Administrators in addition to any other user roles you select because you would want admins to access your site’s content and not be restricted by the WooCommerce paywall.
Now, under the Restricted Access Message Style Option, select Blur & Fade Effect from the dropdown.
Next, under the Message to Show to Unauthorized Users option, select the Post Excerpt + Global RestrictedAccess Message.
Hit the Save Rule button to save your settings.

Next, you can add a custom message for your paywall by clicking the “customized here” link, as shown in the image above. This message should inform the users that they must pay or subscribe to access the full site content.
Ensure you include the WooCommerce product URL you created earlier. This link will allow visitors to make payments and subscribe to your website.
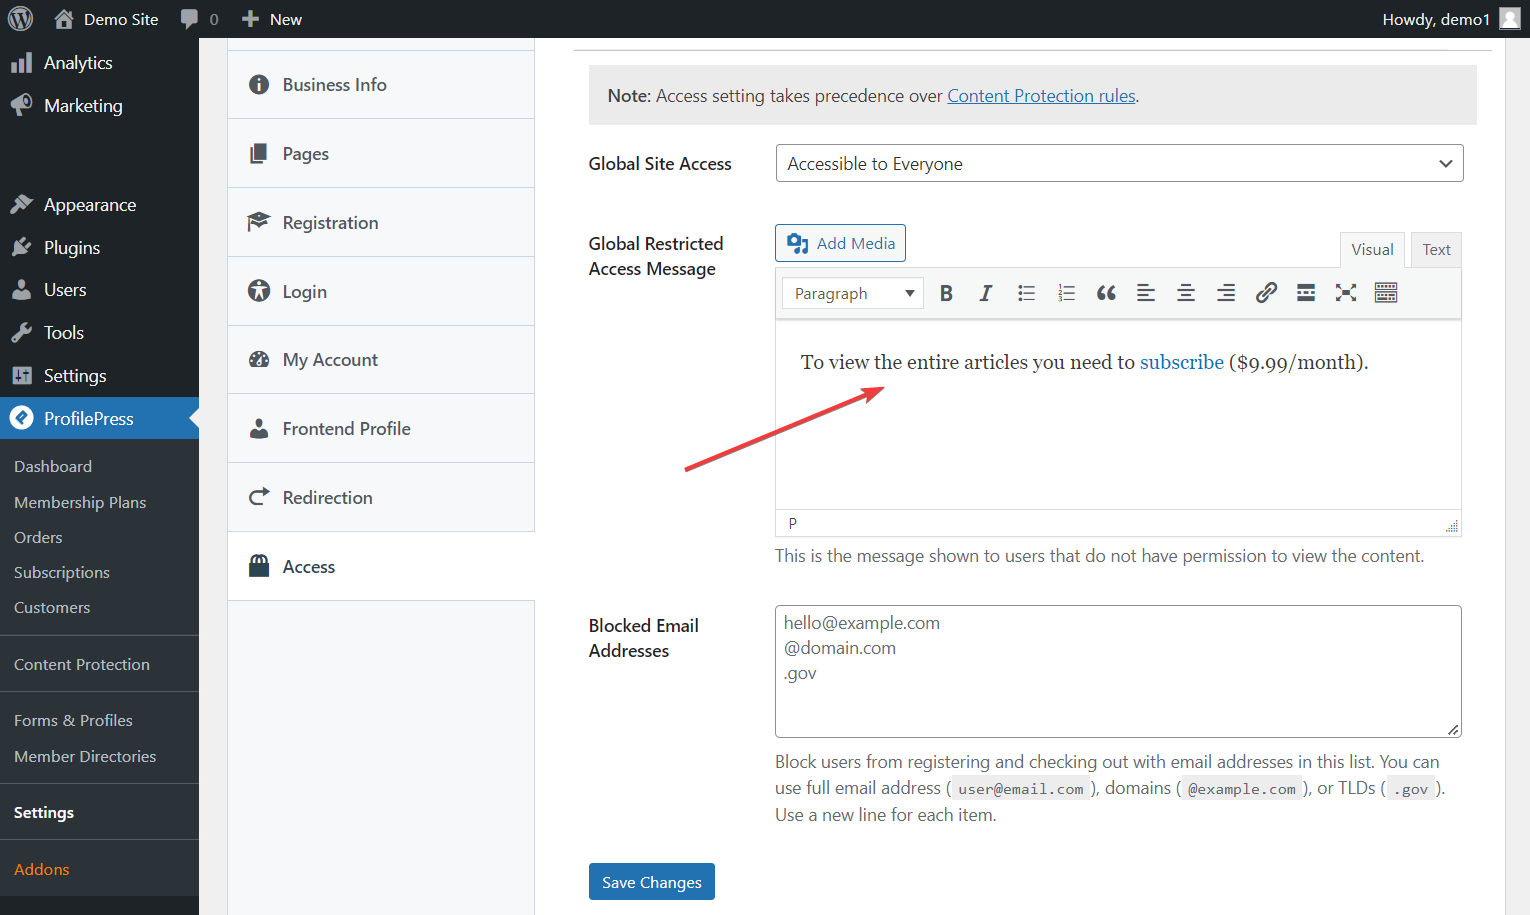
Alternatively, you can select “Post Excerpt + Custom Message” as the Message to show to unauthorized users if you don’t want to use the global restricted message for your WooCommerce paywall.
Setting Up a Hard Paywall in WooCommerce
We created a WooCommerce product and a ProfilePress membership plan in the previous sections. This section will use both to set up our WooCommerce hard paywall.
This type of WooCommerce paywall (hard paywall) is meant to restrict access to all content on your website, making it relatively straightforward to set up.
Navigate to ProfilePress > Content Protection and click the “Add a Protection Rule” button.
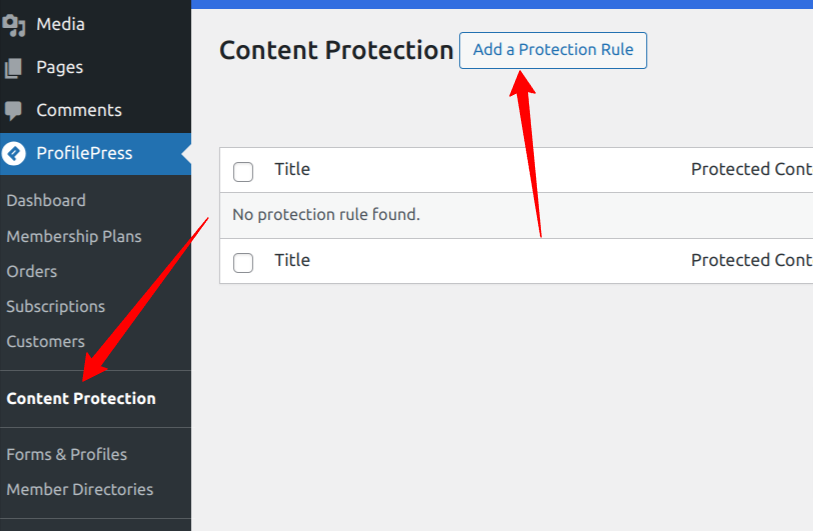
On the next page, add a Title in the title field and select All Posts from the dropdown menu under Content to Protect.
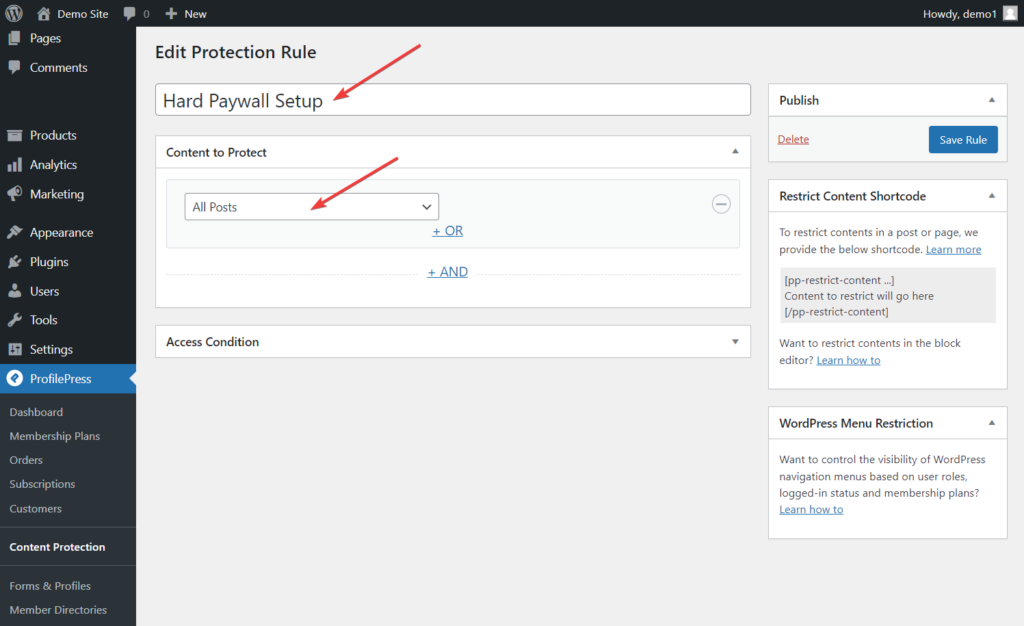
Scroll down to the Access Condition section, and from the dropdown menu against the Who Can Access the Content option, select Logged in Users.

As soon as you select the Logged in users option, several new options will appear in the Access Condition section.
Now, go to the “Select Membership Plans That Can Access Content” field and add the membership plan you created in the step above.

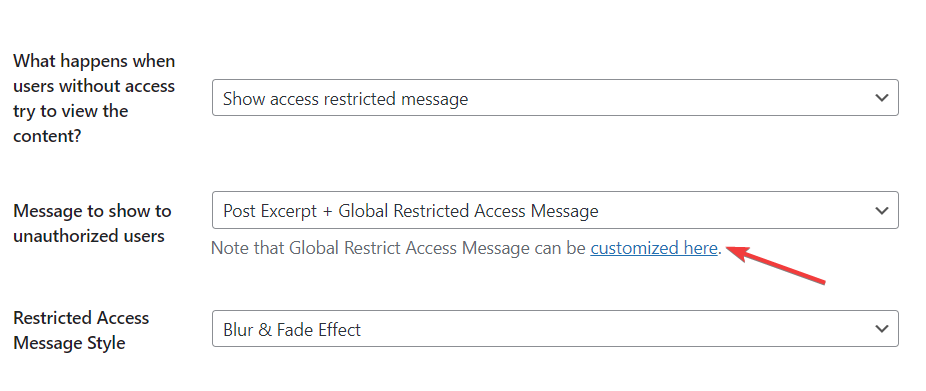
Now, under the Restricted Access Message Style Option, select Blur & Fade Effect from the dropdown.
Next, under the Message to Show to Unauthorized Users option, select the Post Excerpt + Global RestrictedAccess Message.
Hit the Save Rule button to save your settings.
Next, you can add a custom message for your paywall by clicking the “customized here” link, as shown in the image above. This message should inform the users that they need to pay or subscribe to access the full site content and direct them to the WooCommerce membership product page.

That’s it. You now have a Hard Paywall setup on your WooCommerce website.
Setting Up Metered Paywall Using WooCommerce
Setting up the metered paywall in WooCommerce is similar to the Soft and Hard one but requires a few additional steps.
For a metered paywall setup, we need to restrict content, configure a metered paywall, prevent abuse of the paywall, and add a countdown slider.
i. Restrict Content
Firstly, you must restrict your WordPress site content using the guidelines in the Hard Paywall setup section above.
To create a protection rule in ProfilePress, navigate to the Content Protection section, click on “Add a Protection Rule,” enter a title, select “All Posts” as the content to protect, and set the access condition to “Logged in users“.

Click the Save Rule button and proceed to the second step.
ii. Set Up a Metered Paywall
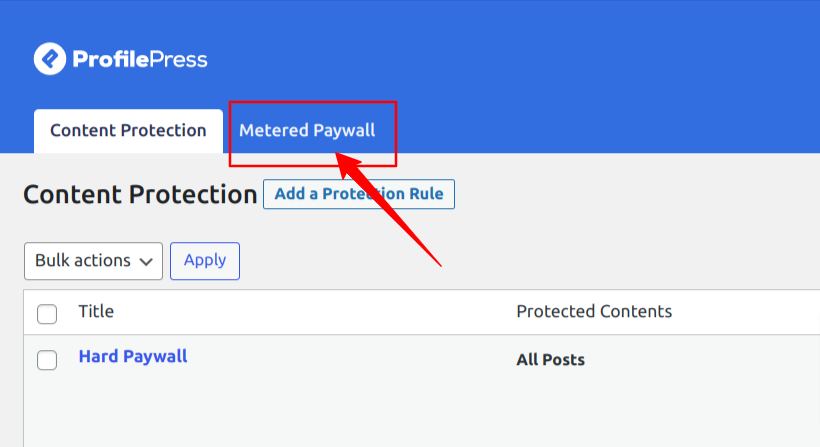
The second step involves opening the Metered Paywall settings page beside the Content Protection menu tab at the top, which can be found by navigating to ProfilePress > Content Protection >> Metered Paywall.
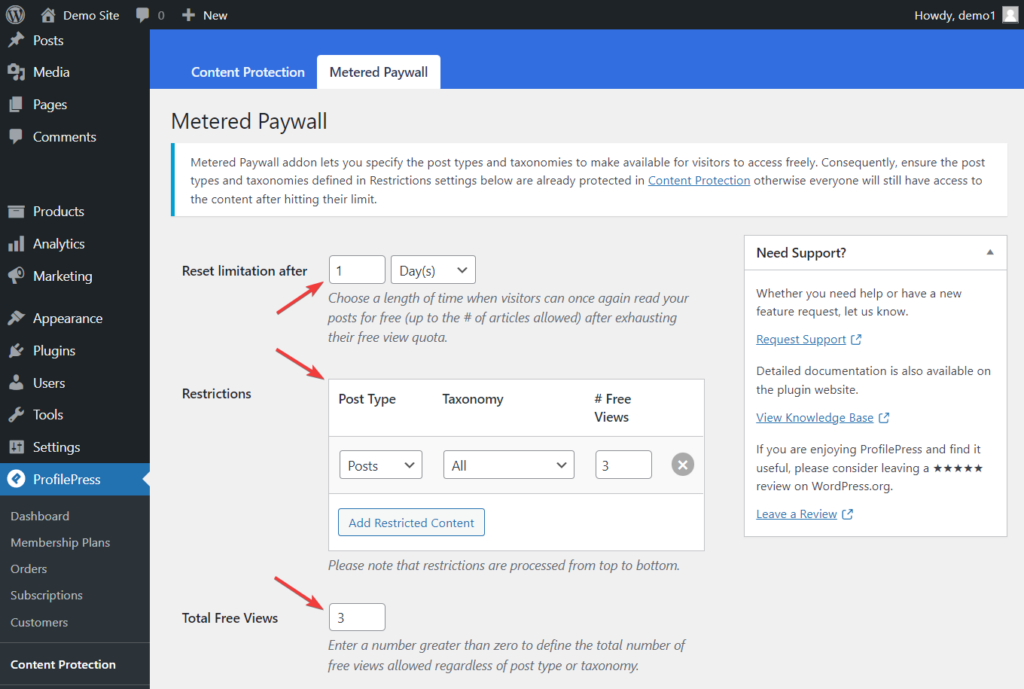
You need to configure the options on the Metered Paywall page. Let’s take a look at each setting option and try to understand what they mean:
- Reset limitation after; enables you to set the length of time when visitors can once again read your posts for free.
- Restrictions; enable you to select which post types you want to restrict and how many posts, pages, or custom post types will be available for free.
- Total free views; enables you to configure the number of posts a visitor can view for free. This is a global setting, and it will override the previous setting on free views.
Click the Save Changes button to save the modifications.
iii. Preventing the Abuse of Paywalls
ProfilePress comes with an abuse prevention system that allows you to protect your premium content from access through an incognito browser. Many users try to bypass the metered paywall restriction by using private browsing windows or incognito mode.
To protect your site, you need to activate the IP Blocker feature. Go to the Metered Paywall > IP Blocker option and select the Enable option to enable the feature. Then, click the Save Changes button to save your changes.
iv. Add a Countdown Slider
Popular websites like The New York Times allow visitors to read a few free premium articles before asking them to sign up for a subscription. Using a countdown slider, they usually inform the visitor of how many views are left. This way, the user will know when they are close to their limit.
ProfilePress allows you to create a countdown slider on your WooCommerce paywall website and inform visitors how many articles they can view before subscribing.
Open the Metered Paywall option on the ProfilePress content protection page (ProfilePress > Content Protection) and scroll down to the Countdown Slidebox section.
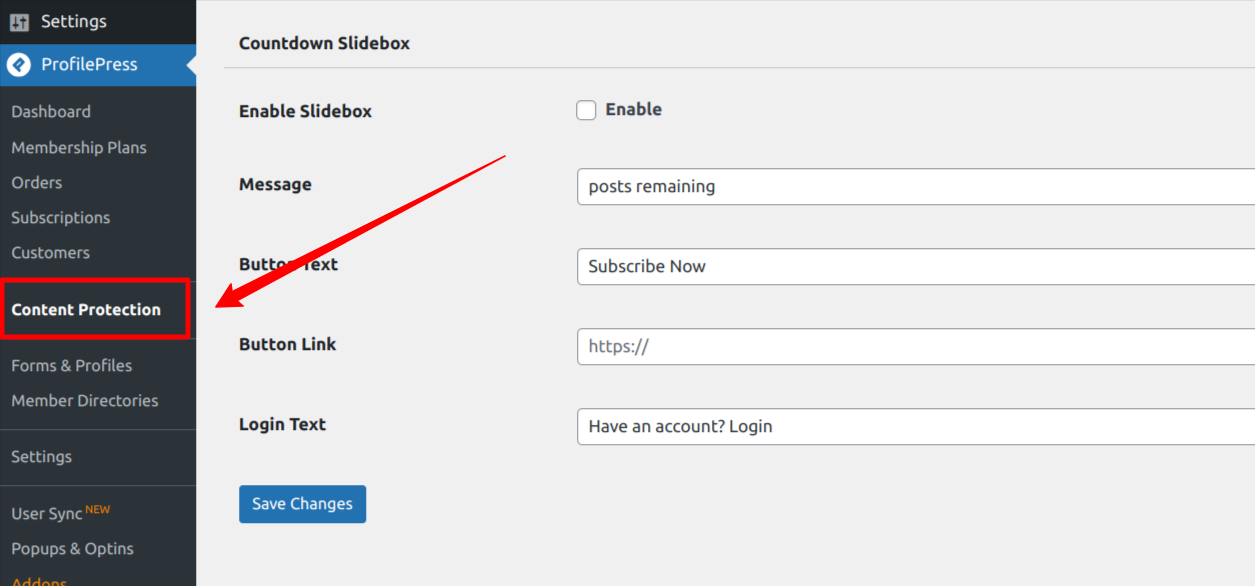
Tick the Enable Slidebox option and insert the link to your pricing or WooCommerce product page in the Button Link option; this link will take your site visitors to the WooCommerce product page, where they can make payments and subscribe to your website.
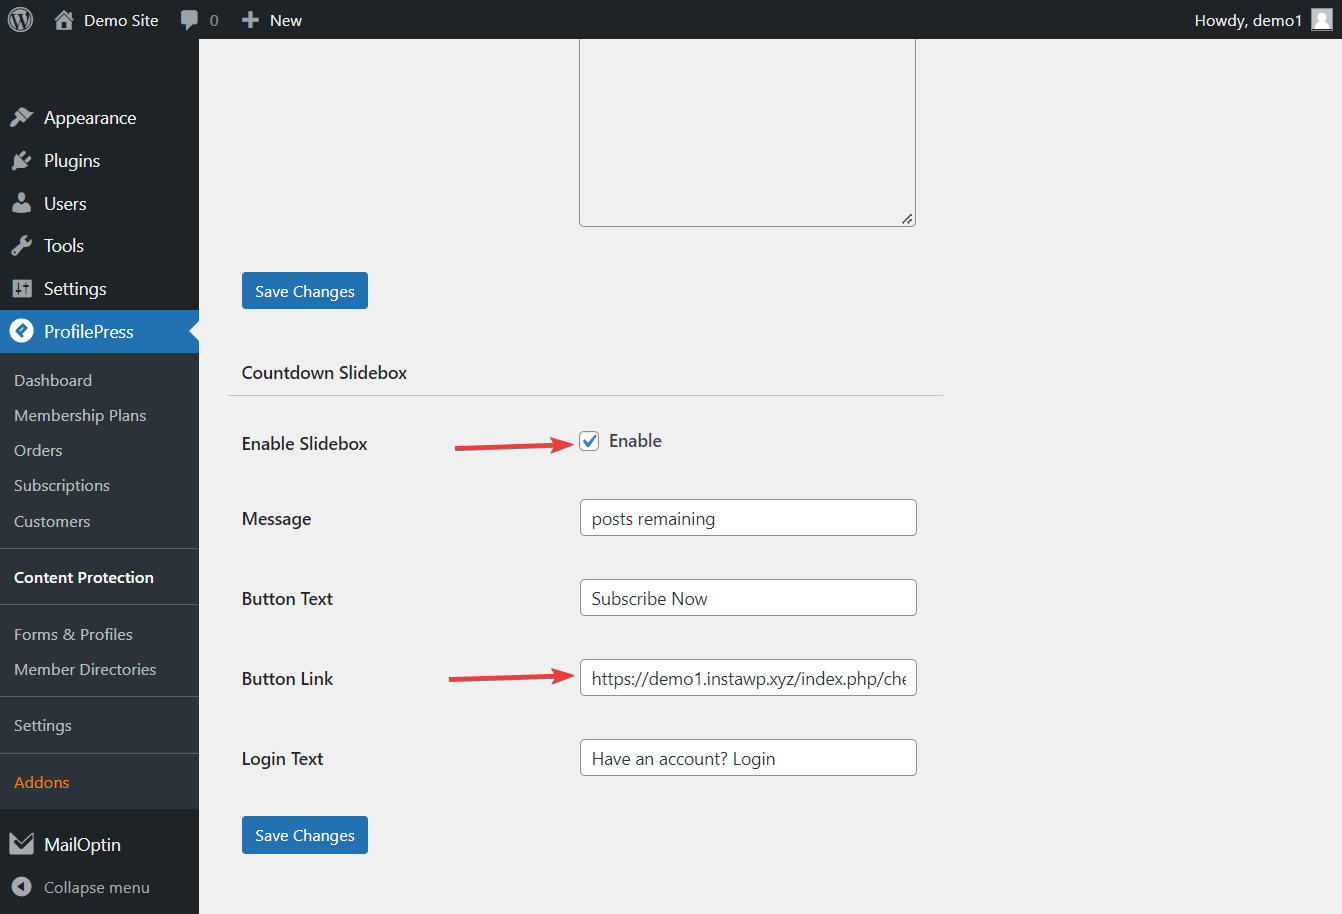
When you are satisfied with your configuration, click the Save Changes button, and the countdown slider will be added to your WordPress site.
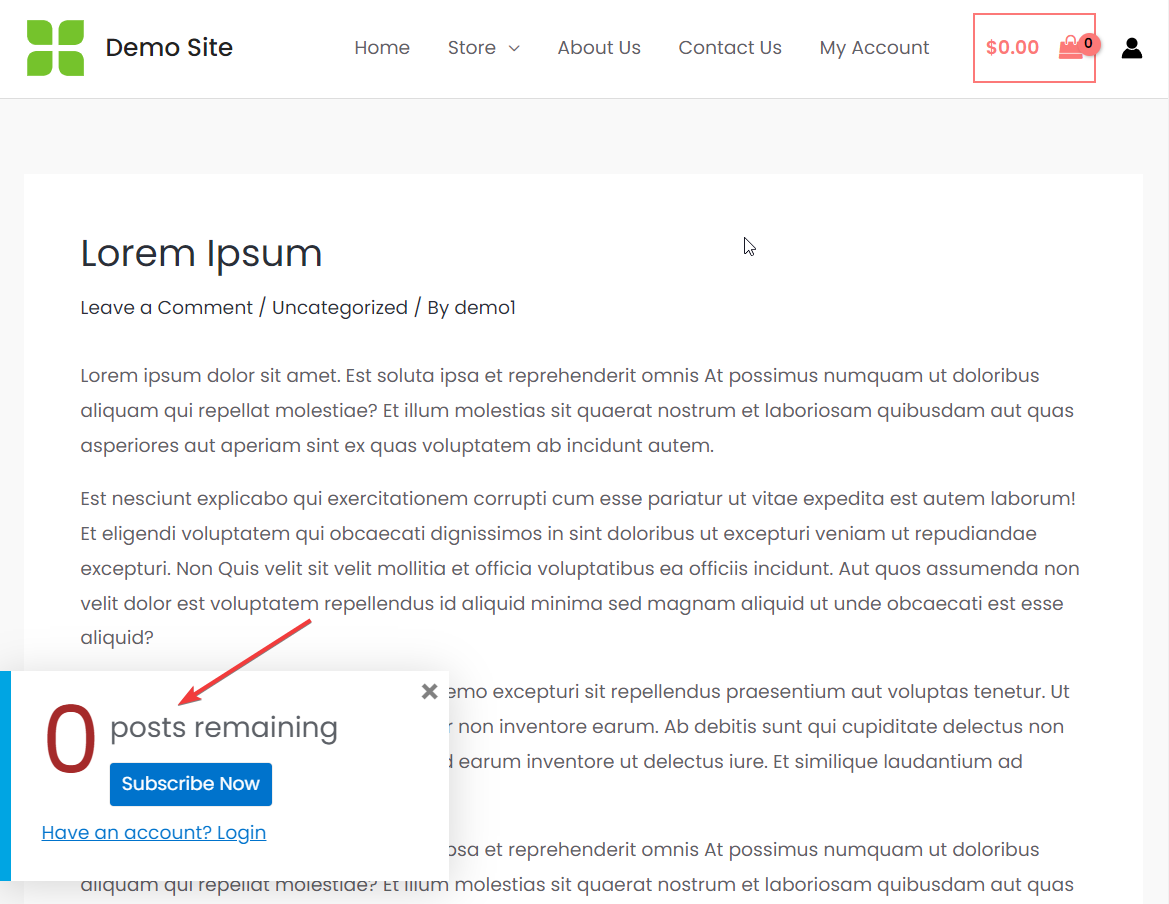
With this done, you have now completed the setup of a metered paywall on your WooCommerce website.
Create a WooCommerce Paywall Today
Setting up a WooCommerce paywall is a simple and quick way to start monetizing your WordPress site. Implementing a paywall or membership subscription is ideal if you want to earn money from your blog without overwhelming your readers with ads and affiliate links.
Paywalls are increasingly popular as content publishers grow comfortable charging fees for access. This monetization method is ideal for anyone, especially those who publish high-quality content.
Setting up a WooCommerce paywall has been made easy with the help of the content protection feature of the ProfilePress plugin.
By following the steps in this article, you can set up any WooCommerce paywall in WordPress.