Meet the Best WordPress Paywall Plugin for Restricting Content
Are you looking for the best WordPress paywall plugin for your website?
If you’re a content creator or publisher, you may have considered implementing a paywall on your site. A WordPress paywall offers an effective way to monetize your website and protect your valuable content. Not sure how to add one to your site? This article will cover everything you need to know about paywalls.
A paywall is a system that blocks access to content until the user pays a specific fee or subscribes to the site. Depending on your particular needs, you can use several types of paywalls on your site. Some of the most popular options include soft, hard, and metered. Each one allows access to premium content in different ways.
This article will guide you through how to create a paywall in WordPress. But before then, we’ll talk more about what a paywall does and show the best WordPress paywall plugin in the market, ProfilePress. By the end, you’ll have a reliable paywall to start monetizing your site and protecting your content.
What is a Paywall, and Why Add One to WordPress?
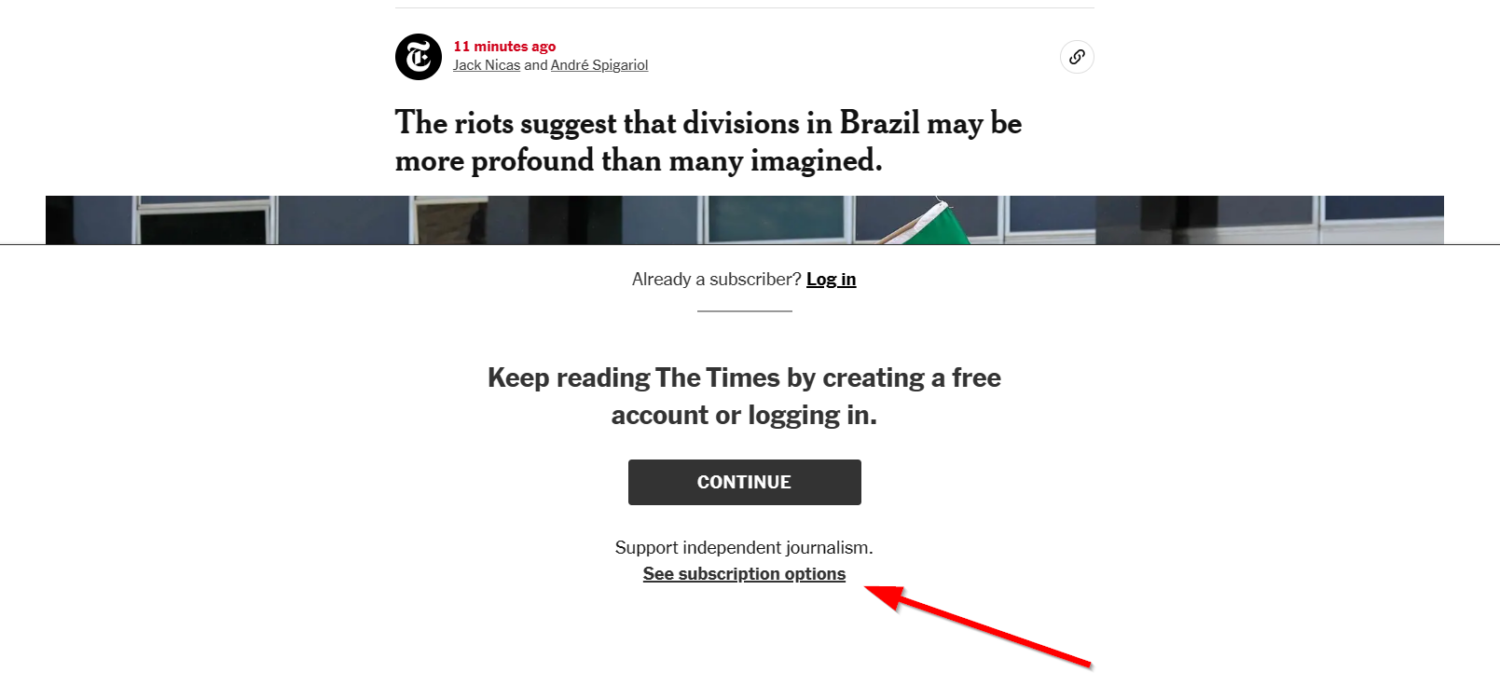
Have you visited a large online publication like the New York Times requiring you to pay a fee before viewing its content? Then, you already have an idea of what a content paywall is. It’s simply a feature that hides or restricts access to certain content on your website. Your site visitors or readers would then have to pay to view this content.
But you can use a WordPress paywall to offer premium content on your website in different ways. In most cases, providing free content and demanding payment for higher-quality premium content makes sense. This type of paywall is referred to as freemium.
In other cases, you may opt for a digital subscription. This paywall allows paying customers access to exclusive content using a recurring payment structure. In the next section, we’ll explore the most popular paywall types for WordPress websites more closely.
In general, adding a paywall to your WordPress site is a brilliant way to make money while providing high-value content over the internet. As you probably already know, WordPress now powers all types of websites, from tiny blogs to large-scale eCommerce sites. So, irrespective of your commercial use case or website needs, there are many ways a WordPress site can benefit from a paywall.
Benefits of Adding a Paywall to a WordPress Site
Here are some of the key benefits a paywall can bring to your WordPress site:
- Generate revenue: A paywall allows users to charge a fee to access certain content on the site. This can be an effective way to monetize a website, blog, or online publication.
- Create and manage exclusive content: Another use case is to offer exclusive content to paying users. This option helps you to drive subscriptions and create a sense of exclusivity to paying customers.
- Control access to WordPress content: You can also use a paywall to control access to certain sections or categories of your site content. For example, you may only allow paying users to access specific articles, videos, or other resources.
- Manage content distribution: Looking for how to manage content distribution to registered site users? A paywall can also help offer different content types to other customers based on their paid subscriptions. For example, you want to share exclusive articles at a certain fee and require a higher price for more premium video content. This can be an effective way to further drive traffic and increase revenue.
Though WordPress doesn’t offer a paywall feature by default, you can use any of the best WordPress paywall plugins like ProfilePress, to implement it.
With ProfilePress paywall plugin for WordPress, you can create multiple types of paywalls. Let’s look at the most popular types you should know.
Different Types of WordPress Paywalls (When to Use Them)
Before deciding on a WordPress paywall plugin and setting up your first paywall, choosing the right type of paywall your site needs is essential. The most popular types of paywalls used in WordPress sites and their common use cases are listed below.
Hard Paywall
This type of paywall completely blocks access to content until the user pays for it. With a hard paywall, users can only view any content when they sign up for a subscription or purchase access.
The most popular use cases for hard paywalls are typically found in the media and publishing industries, where content is the primary product. Some famous use cases for hard paywalls include:
- News Websites: Many major news organizations, such as The New York Times and The Wall Street Journal, use hard paywalls to limit access to their online content to paying subscribers.
- Online Journals and Scientific Research: Academic journals and scientific research publications also use hard paywalls to earn revenue from scholars and academic institutions.
- Business and Financial Services: Some business and financial services, such as investment research firms and economic forecasting services, use hard paywalls to sell industry analysis and market data to paying subscribers.
- Gaming: Gaming companies like EA or Activision use hard paywalls as well. They often require gamers to pay for access to certain features or levels of their games or to access DLCs (downloadable content).
- Entertainment: It’s also commonplace for streaming services such as Netflix, HBO, Showtime, and other premium channels to serve exclusive content behind hard paywalls.
Hard paywalls are less common because they may stop users from evaluating or seeing the content altogether. This often drives the user away to alternative sources. However, if the content is exclusive, you can choose this strategy to monetize your unique content as a publisher.
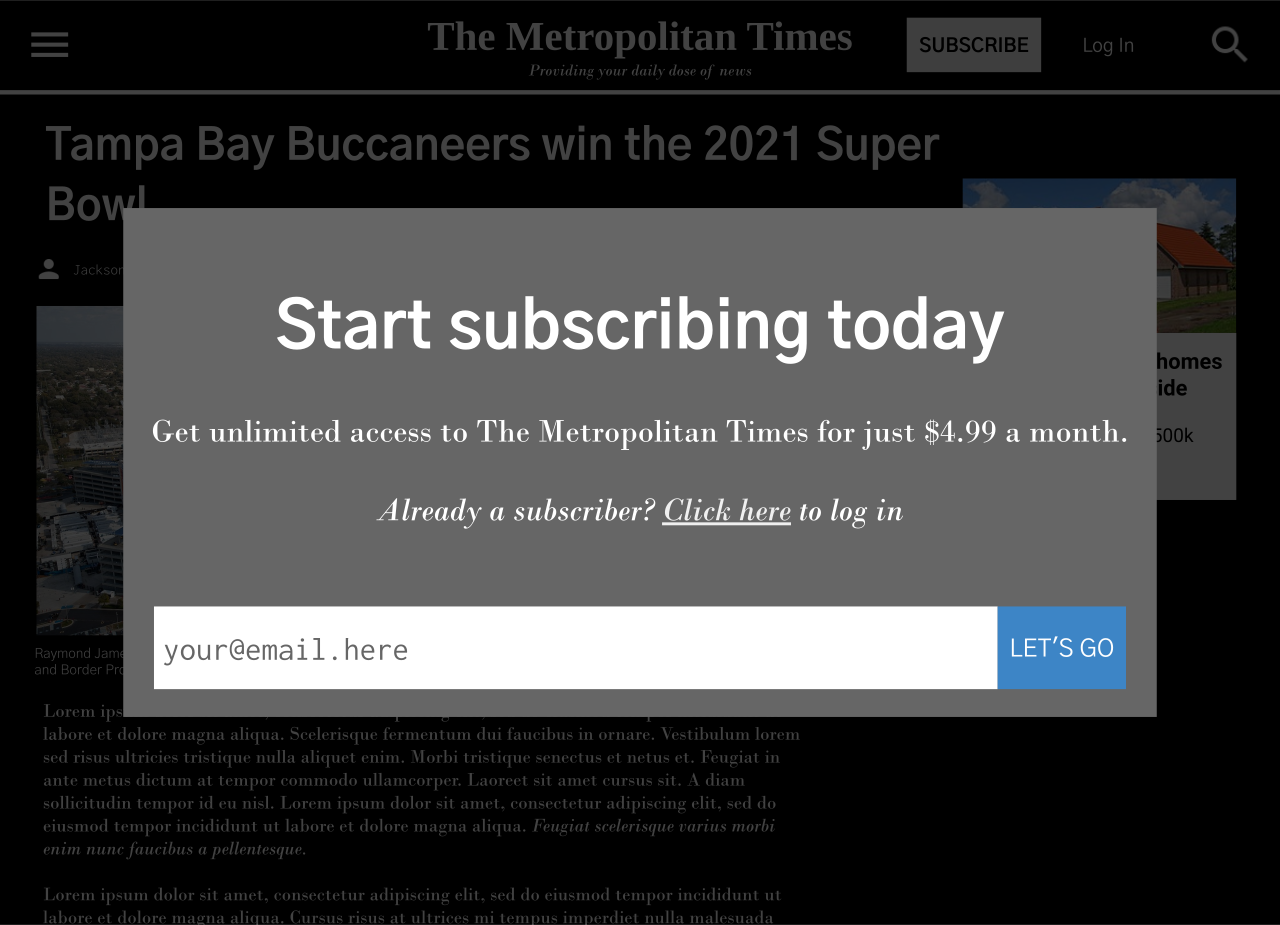
Soft Paywall
Another more flexible approach you can use for your WordPress paywall is the soft paywall. This method allows users to view specific articles for free but requires them to pay for access to other premium content.
This way, your site visitors get a sense of the publication’s content before committing to a subscription. In other words, they make an informed purchasing decision on whether or not the ‘premium content’ is worth the buck.
Like hard paywalls, this model is standard with news websites, financial consultants, and service providers. Other widespread use cases include:
- Blogs and online magazines
- Online learning platforms
- Podcasts
A soft paywall is useful for websites that want to offer some of their content for free to entice users to visit their site and see the benefits of subscribing. It can also be useful for publishers with an extensive archive of content and who want to monetize that content while still allowing users free access to some of it.
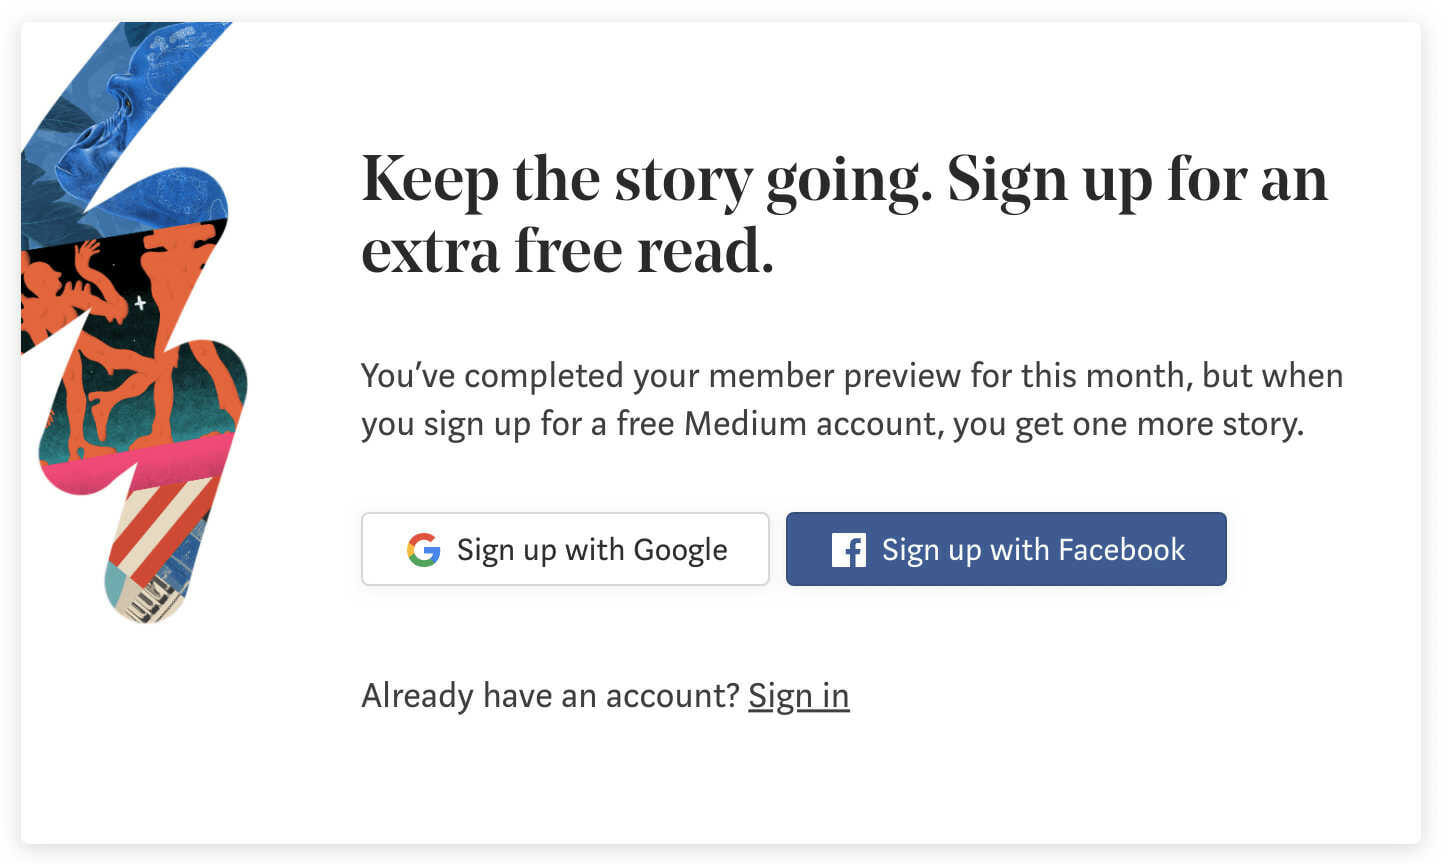
Metered Paywall
This paywall is a particular type of soft paywall. With metered paywalls, users can view a certain amount of content for free before requiring them to pay for access. This can be measured in a specific number of articles, amount of data, or period.
Virtually all the use cases mentioned above for both soft and hard paywalls apply to metered paywalls too. For example, news websites, gaming sites, and podcasts offer their users “meters” including a certain number of free articles, game XPs, or episodes every month.
When deciding which type of paywall to use, you must consider the content you’re offering and your target audience. For example, a hard paywall may be more appropriate for a niche publication with a dedicated readership, while a soft paywall may be better suited for a broader audience.
For even better results, you may want to consider a dynamic paywall. This type of paywall can adapt its restrictiveness depending on the user’s characteristics, such as browsing history, behavior, or demographics.
Ultimately, the most successful paywalls strike a balance between providing value to the user and generating revenue for the publisher. Therefore, it’s essential to test different paywall strategies to see what works best for your audience and your business model.
With that out of the way, let’s examine how to add all three paywall types to your website using our powerful WordPress paywall plugin.
Setting Up The WordPress Paywall Plugin
The easiest way to set up a WordPress paywall is to use a plugin. Adopting this method ensures that you don’t have to hire a developer. The right WordPress paywall plugin is straightforward to use and comes with many features for setting up any paywall you want.
If you want to set up your paywall in minutes without coding experience, we highly recommend ProfilePress, one of the best WordPress paywall plugins on the market, which packs all the paywall functionality any WordPress site needs.
Here are some of the key features that make the plugin stand out:
- Tons of content restriction and customization options: ProfilePress allows you to restrict access to specific pages, posts, or other content on your website. This means you can charge for premium content while keeping other content free. You also get to customize the look and feel of your paywall to match your site’s existing design.
- Flexible membership and subscription management: You do not lack options if you also set up recurring payments for your content paywall. The plugin helps you easily configure different access levels and pricing options. In addition, it supports various payment methods, including Stripe, Mollie, PayPal, and other options.
- Powerful integrations: The tool integrates well with native addons and third-party products. For example, you can use it with major email marketing platforms and CRMs such as Mailchimp and Campaign Monitor. It also has a ‘Metered Paywall‘ that we’ll touch on later.
Ready to create your first WordPress paywall? Follow these five simple steps below.
Step 1: Install and Activate ProfilePress
To get started, get your copy of ProfilePress here. Once you have your copy, you’ll receive the plugin’s downloadable ZIP and the license key in your registered email.
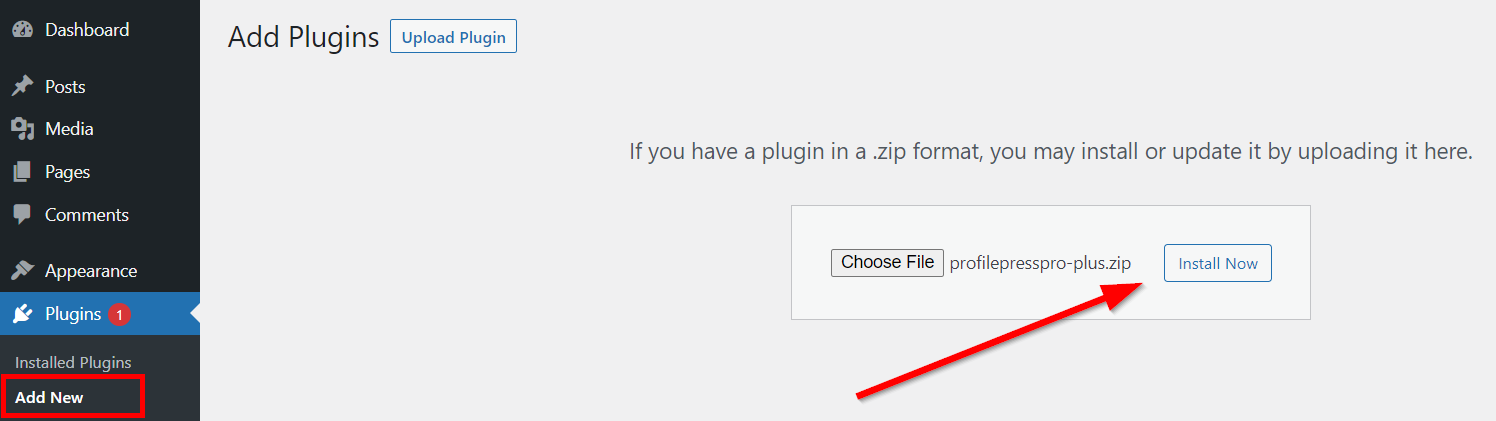
Download this file and log into your WordPress admin dashboard. Next, go to Plugins > Add New > Upload Plugin. Select the ZIP file and click Install Now.
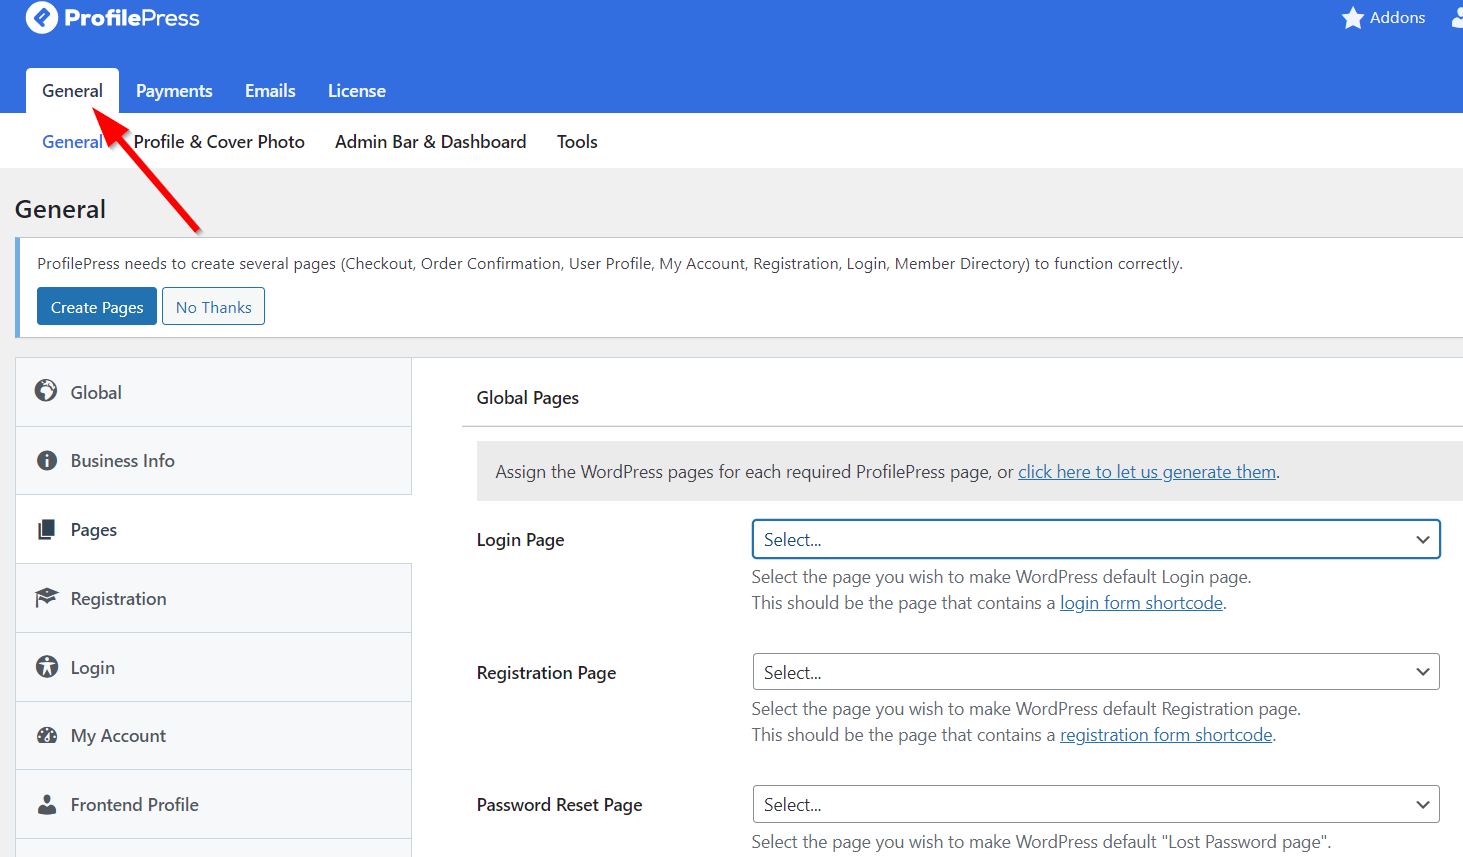
Next, click Activate Plugin and go to ProfilePress > Settings > License. Enter the license key from your email here.
You can also configure other essential settings here, such as setting up the Checkout, Registration, and User Profile pages. You can do these in the General tab.
Next, it’s time to set up your WordPress paywall. But before then, let’s set up the payment settings.
Step 2: Configure the Payment Settings
To start accepting payment on your paywalled WordPress website, you must first set up a payment gateway and a membership plan.
To set up payment, go to ProfilePress > Settings > Payments > Payment Methods.
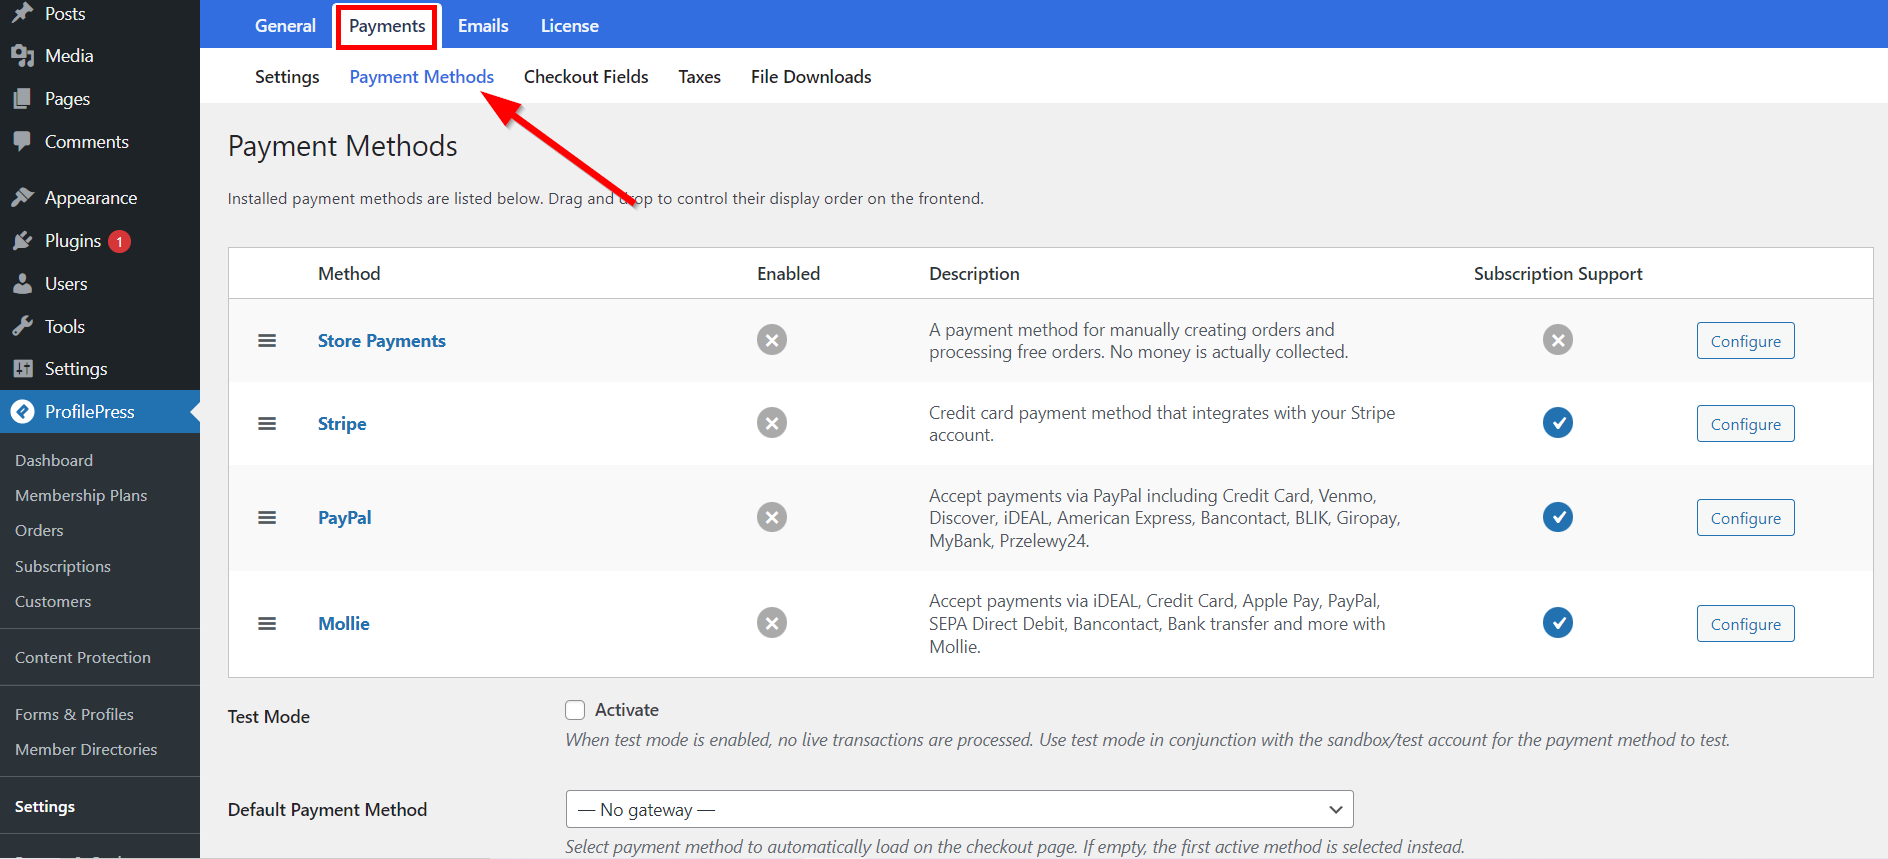
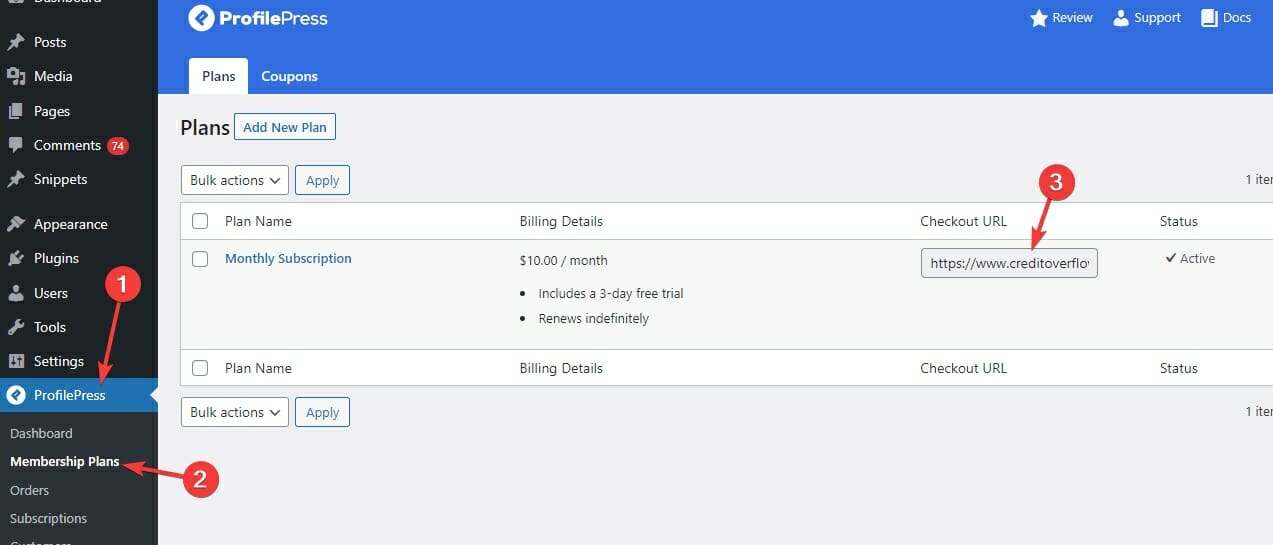
Configure as many payment methods as you want. Then head to ProfilePress > Membership plans to create WordPress membership plans for paying customers. Now, you can add a membership plan to any content protection rule to give subscribers access to that content category.
After creating the membership plan, copy the checkout URL.
Step 3: Create a WordPress Paywall
To create your first WordPress paywall, go to ProfilePress > Content Protection and click Add a Protection Rule.
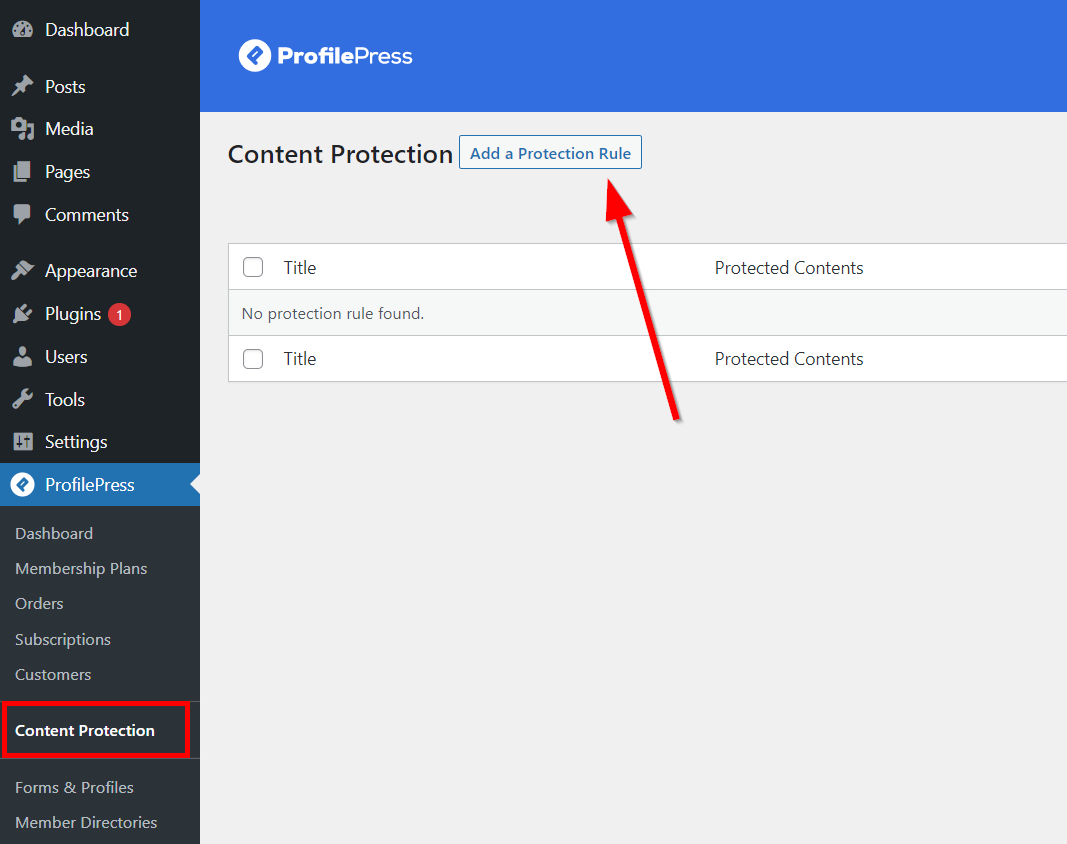
That’s it! You’ve successfully added a paywall to your WordPress site. Now, let’s configure it!
Step 4: Configure Your WordPress Paywall Settings
After adding a protection rule, you need to decide which content to protect and who can access this content. For example, to set up a hard paywall, select All Posts and/or All Pages under the Content to Protect section.
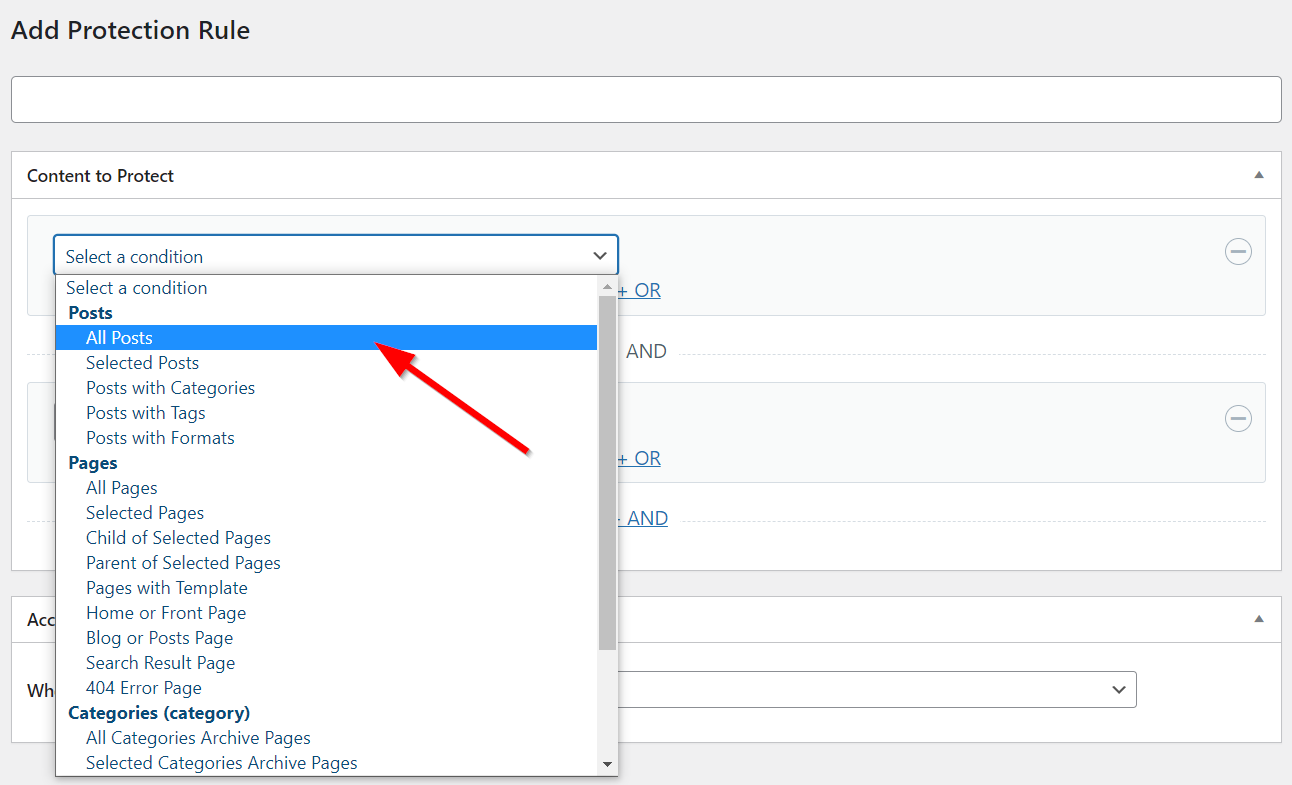
Otherwise, choose Selected Posts, Posts with Categories, etc., to create a soft paywall.
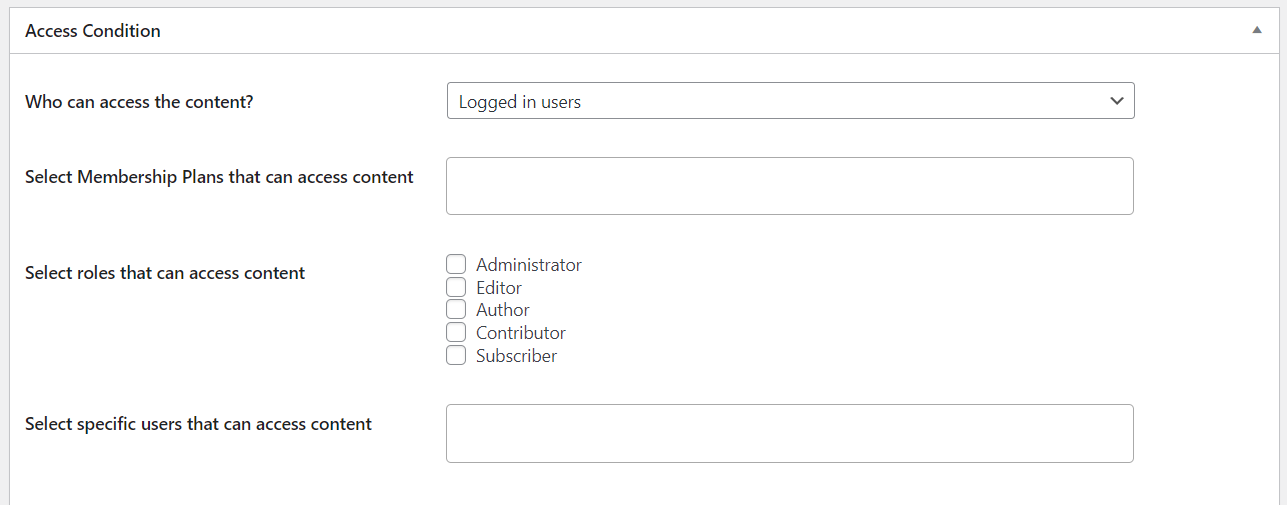
Under Access Condition, select Logged in users. You can restrict access to this content based on a membership plan, user role, or specific user IDs.
To set up a metered paywall with a specific number of free articles or pageviews, you’ll need to activate the Metered Paywall addon. You can do this by going to ProfilePress > Addons.
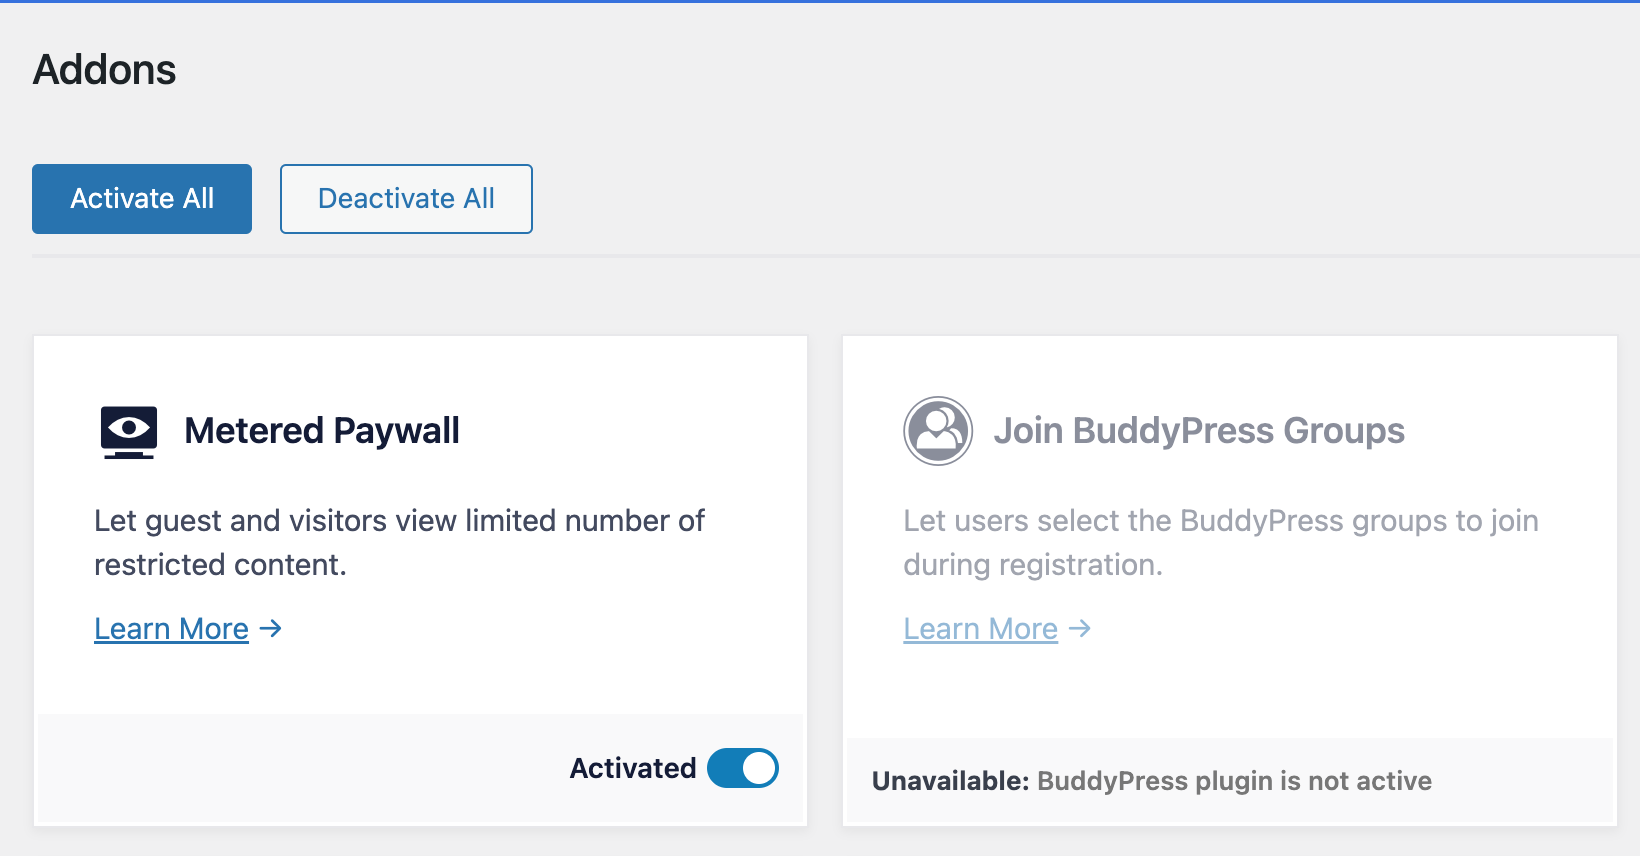
Check out our guide on how to set up a metered paywall in WordPress to learn more.
Step 5: Customize the Restricted Content Message
Still, on the protection rule settings page, you can decide what happens when users want to view content they don’t have access to. You can either show a ‘restricted access’ message or redirect the user.
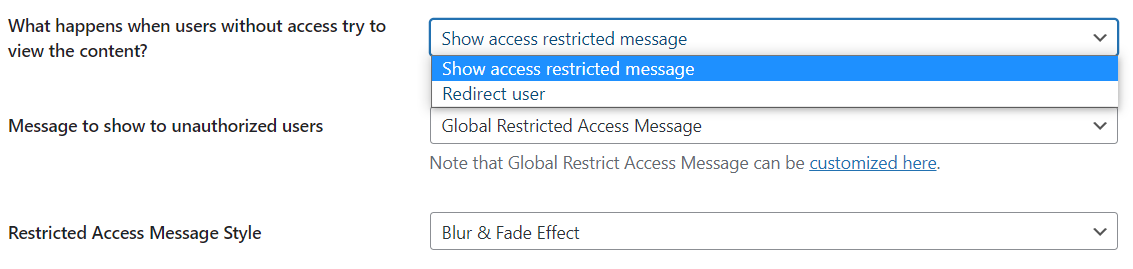
Next, choose the message to show unauthorized users. Then, customize the content of the message. Remember to add a subscribe and login link in the message. The subscribe link should contain the membership plan’s checkout URL we copied earlier.
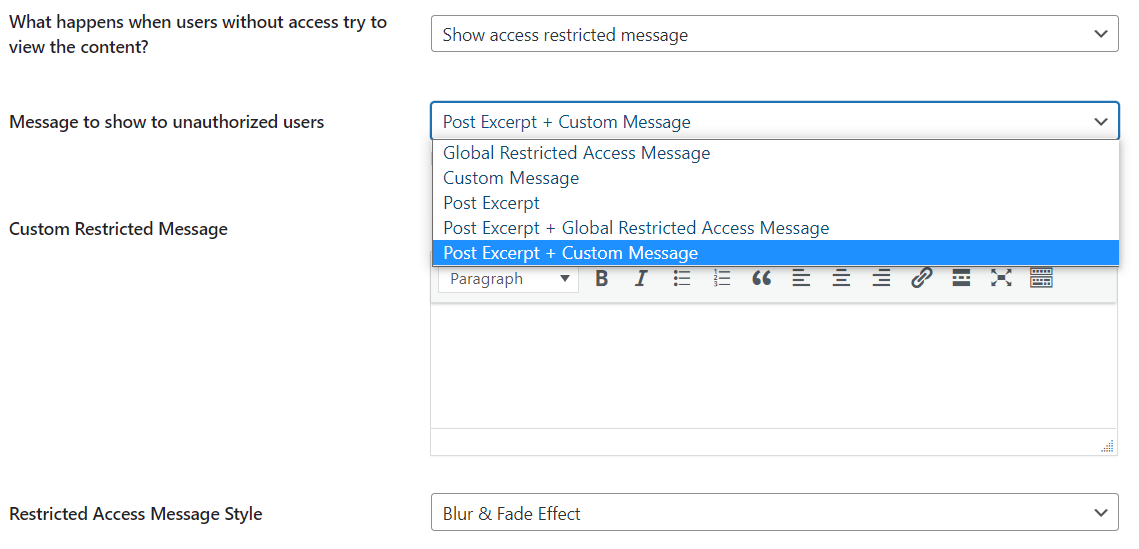
ProfilePress also allows you to add a blur & fade effect to the message. Once you’re done, click Save Rule.
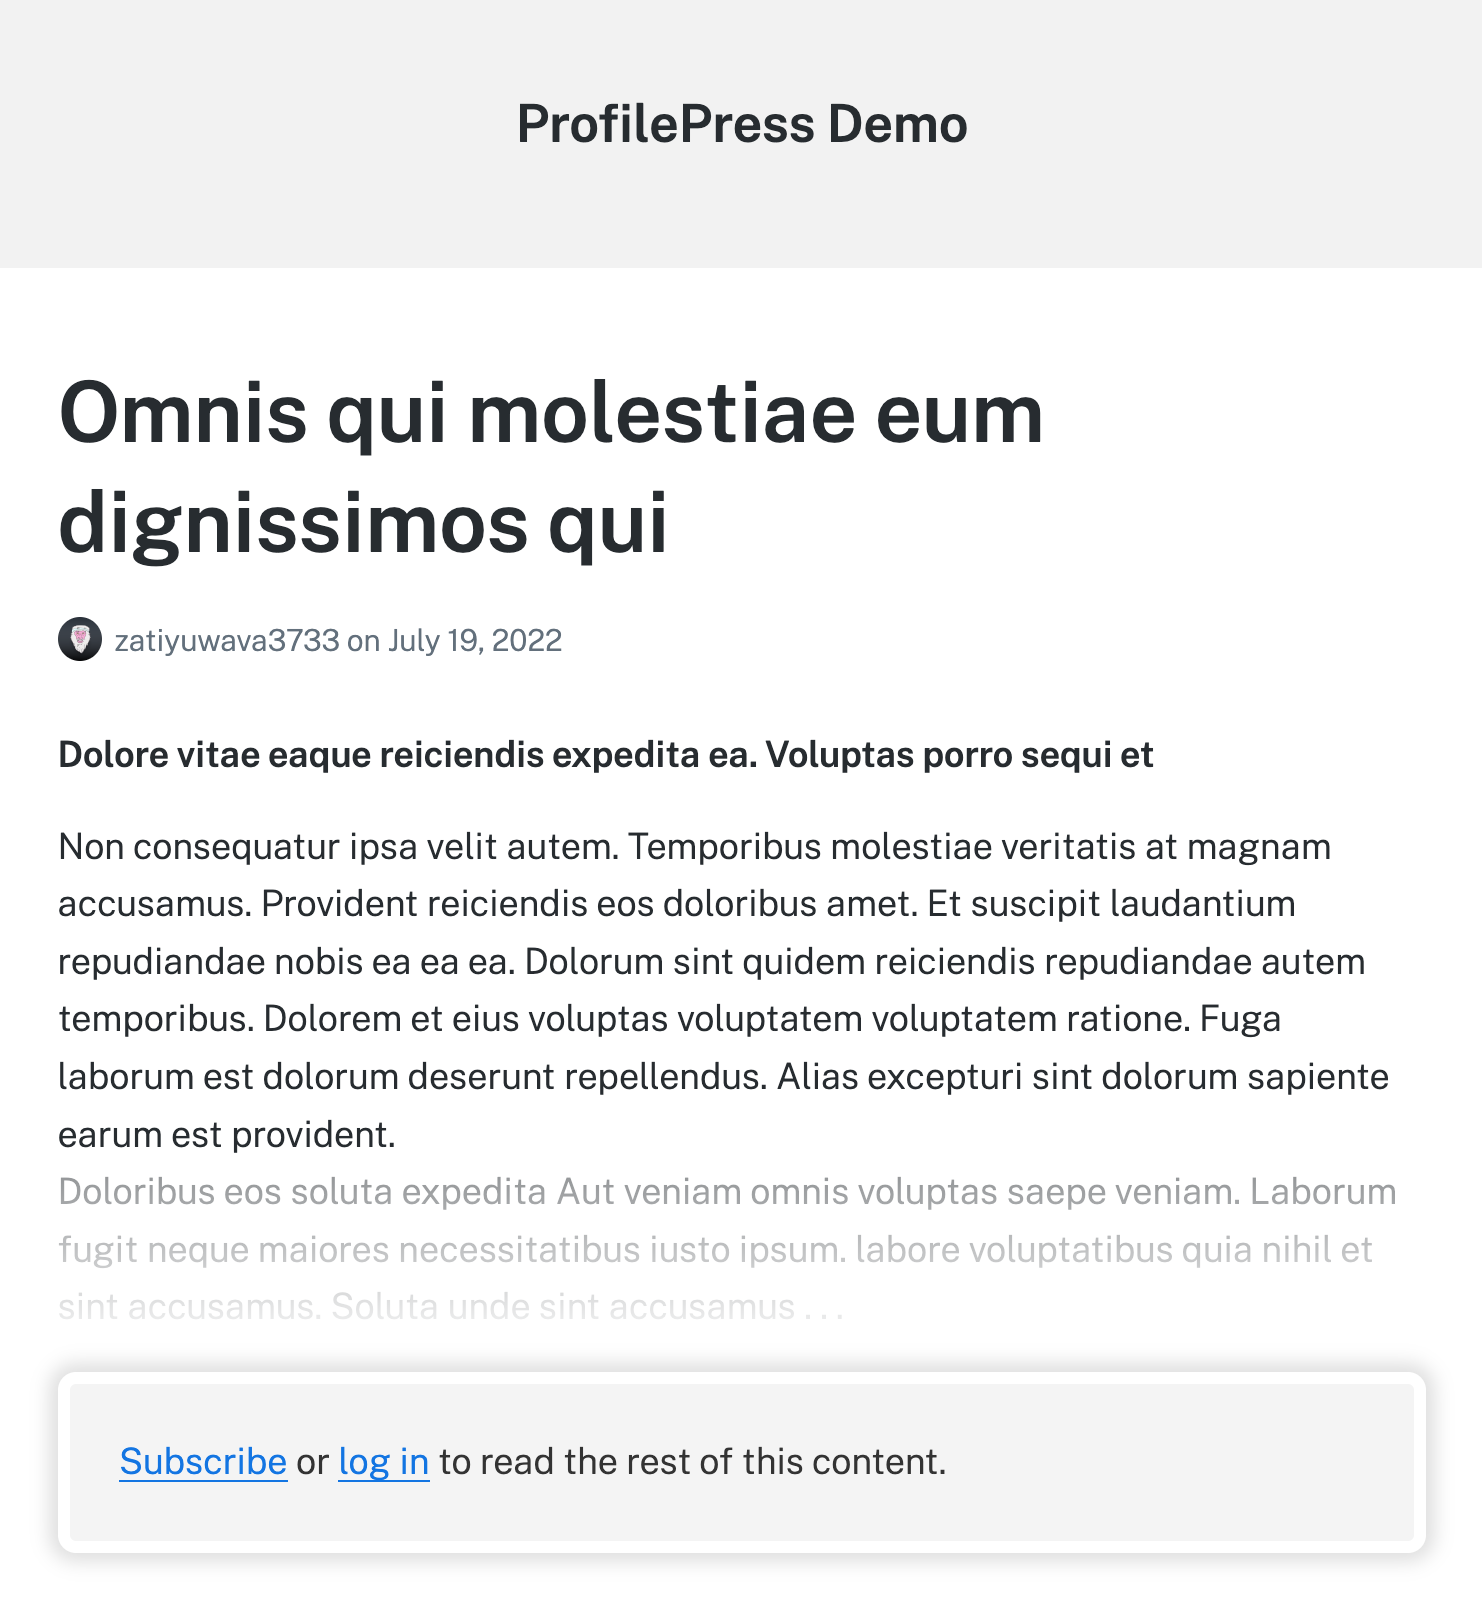
When unauthorized users visit the page, they’ll see something like this.
Conclusion
Setting up a paywall for your WordPress content can significantly increase your website’s revenue, build a loyal subscriber base, and create a sustainable business model for your online content. With ProfilePress, creating a WordPress paywall that works for your website and fits your specific needs is easy.
All you need to do is:
- Install and activate our WordPress paywall plugin
- Set up the payment options
- Create a WordPress paywall
- Configure its settings
- Customize the message unauthorized users see
What are you waiting for? Get ProfilePress and create your first WordPress paywall today!