How To Charge Recurring Monthly Subscription Fees
Do you want to learn how to charge recurring monthly subscription fees on your WordPress site?
Charging recurring monthly subscription fees on your WordPress site involves setting up an efficient, automated system that manages billing cycles, ensures secure transactions, and offers a seamless user experience.
In this article, you will learn about the recurring subscription model, its advantages, and how to charge monthly subscriptions on your WordPress site, including installing and activating ProfilePress, configuring payment gateways, and creating a subscription plan.
By the end, you’ll have a functional subscription system that will generate recurring revenue effortlessly via your WordPress site.
What Is a Recurring Subscription Model?
A recurring subscription model is a business strategy where customers pay for ongoing access to a product or service at regular intervals—typically monthly, quarterly, or annually. Instead of a one-time purchase, subscribers are automatically billed at the start of each billing cycle, ensuring continuous access without needing to renew their subscription manually.
This model offers several advantages, which include:
Predictable Revenue: Businesses benefit from a steady, recurring income stream, making financial forecasting and planning more reliable.
Customer Retention: Automated renewals and ongoing access encourage long-term customer relationships.
Convenience for Users: Subscribers enjoy uninterrupted service and don’t have to remember to renew their subscriptions manually.
Scalability: As the customer base grows, recurring payments help businesses scale efficiently without constantly re-engaging customers for each new transaction.
Charging Monthly Subscriptions on Your WordPress Site
ProfilePress is an all-in-one solution for creating and managing a WordPress membership site, selling digital products, and controlling content access. Even without coding experience, you can quickly set up one-time or recurring subscription plans customized to your brand’s unique needs.
The plugin integrates seamlessly with popular payment gateways like Stripe, Paypal, Razorpay, Paystack, Direct Bank Transfer, and Mollie.
ProfilePress is a perfect choice for charging recurring monthly subscription fees in WordPress.
Installing ProfilePress Ecommerce Plugin
To begin charging recurring monthly subscription fees on your WordPress website, purchase a license at the ProfilePress pricing page.
After purchase, you’ll receive a confirmation email with a download link for the plugin’s zip file and your license key. You can also download it from your ProfilePress account page.
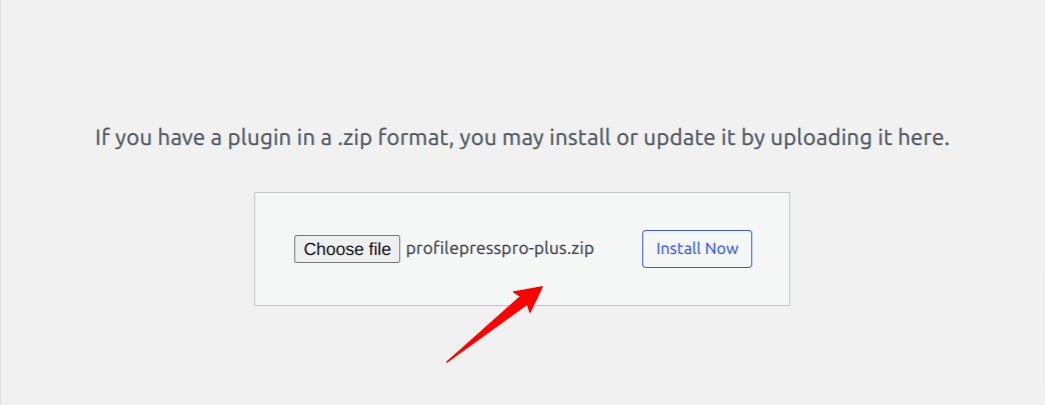
To install the plugin, log in to your WordPress admin dashboard, go to Plugins, click “Add New,” then “Upload Plugin.” Choose the zip file and click “Install Now.”
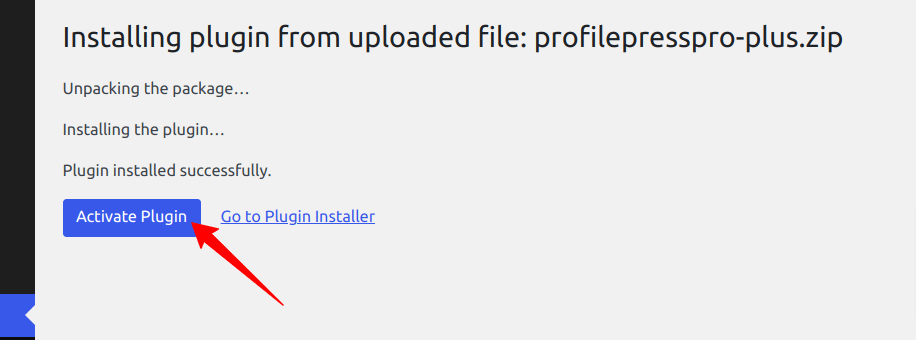
After installation is complete, click the Activate Plugin button.
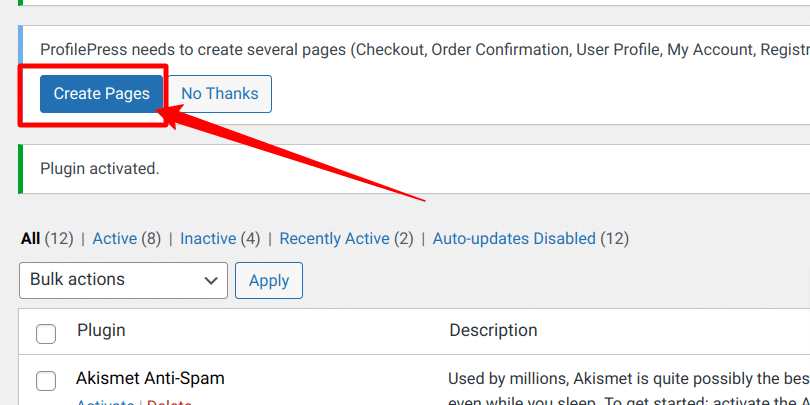
You’ll notice a notification at the top of the page stating, “ProfilePress needs to create several pages.” Click the “Create Pages” button.
Configuring Payment Gateways
ProfilePress makes payment processing easy by integrating with various popular payment gateways. This allows you to select the option that best suits your needs and customers’ preferences. Here’s a brief overview of the available options:
Stripe: This is a favorite because it’s simple to set up and supports various payment methods like credit cards, ACH transfers, and debit cards. It offers a smooth checkout experience, making it a great choice if you want an excellent payment process.
PayPal: One of the most recognized names in online payments. It provides a secure and direct payment processing, allowing customers to pay using their PayPal accounts or credit/debit cards. This is especially useful if you have customers from all over the world.
Razorpay: If you’re based in India or have many customers there, Razorpay is a strong option. It supports several payment methods, including credit/debit cards, Net Banking, and popular digital wallets. Razorpay is known for its user-friendly approach and great payment features.
Paystack: This is a popular payment gateway in Africa, and Paystack makes it easy for businesses to accept payments from various local and international sources. With features like recurring billing and simple integration, it’s a great fit if you’re targeting the African market.
Mollie: Based in Europe, Mollie offers a variety of payment methods, including credit cards, bank transfers, and local options, making it a solid choice for European businesses.
Each gateway has strengths, so consider your audience and business needs when choosing the right one or combination for your site.
Enabling Payment Collection
To begin collecting payments through these gateways, follow these steps:
In your WordPress admin dashboard, navigate to ProfilePress > Settings > Payments > Payment Methods.
Next, enable the payment gateways you’d like to use. For each one, you’ll need to connect your account to ProfilePress, which typically involves entering API keys or authentication credentials provided by the gateway.
After selecting and configuring your payment methods, save your settings to apply the changes.
Creating a Subscription Plan
After completing the integration of your desired payment gateways, we will proceed to create a subscription-based membership plan.
To do this, navigate to the ProfilePress >> Membership Plans >> Add New Plan.
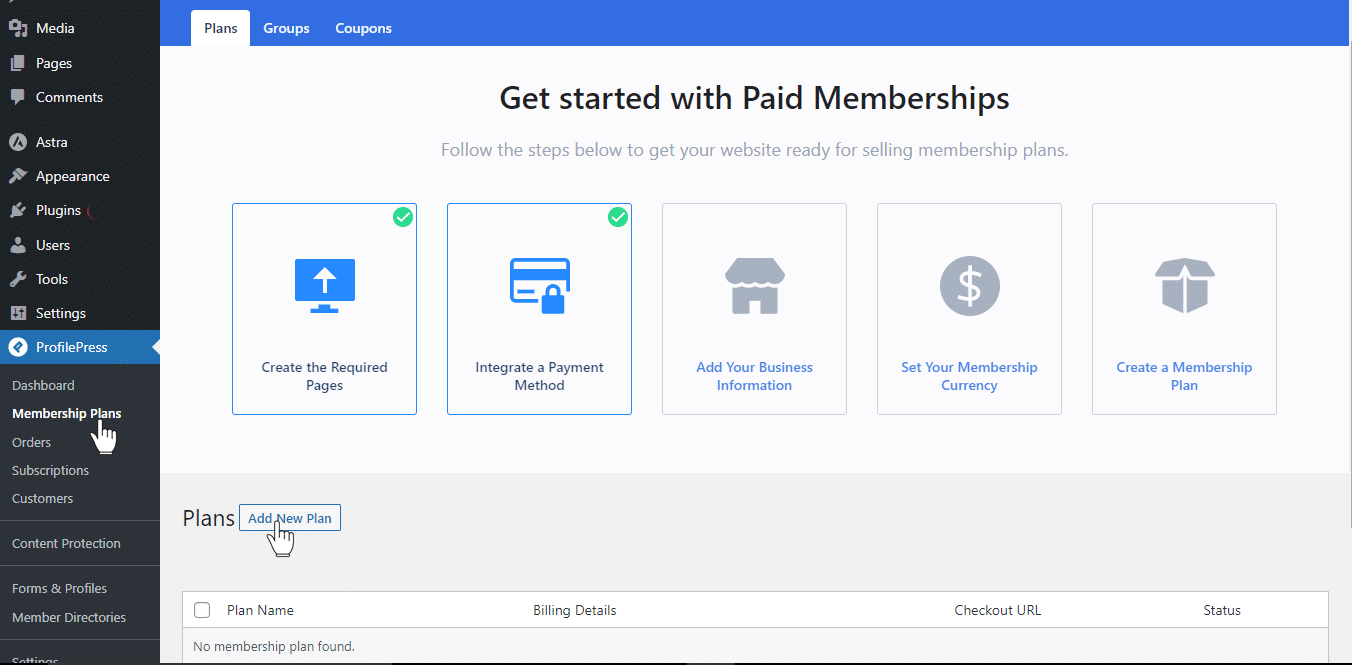
The following page has three sections: Plan Details, Subscription Settings, and Downloads & Integration. Each section is important in defining your subscription plan.
Let’s go through them step by step.
Plan Details Section
In this part, you’ll set up the basics of your subscription plan. Here’s what you need to fill out:
Plan Name: This is the title your potential subscribers will see. Pick a name that clearly shows your plan’s value and catches your audience’s eye.
Plan Description: Use this space to explain what your plan offers. A clear and engaging description helps people understand the benefits and features they’ll get when they subscribe.
Purchase Note: Add a little extra by including a message or special instructions for your customers. This note will appear on their order receipt.
User Role: Decide on a user role for your subscribers. If you choose “Create a user role for this membership plan,” a new role will automatically be created and assigned to your members.
Price: Set the cost for your subscription. Make sure the price reflects the value of your offering and feels right for your target audience.
This section lays the foundation for your subscription offering, so carefully fill in the details.
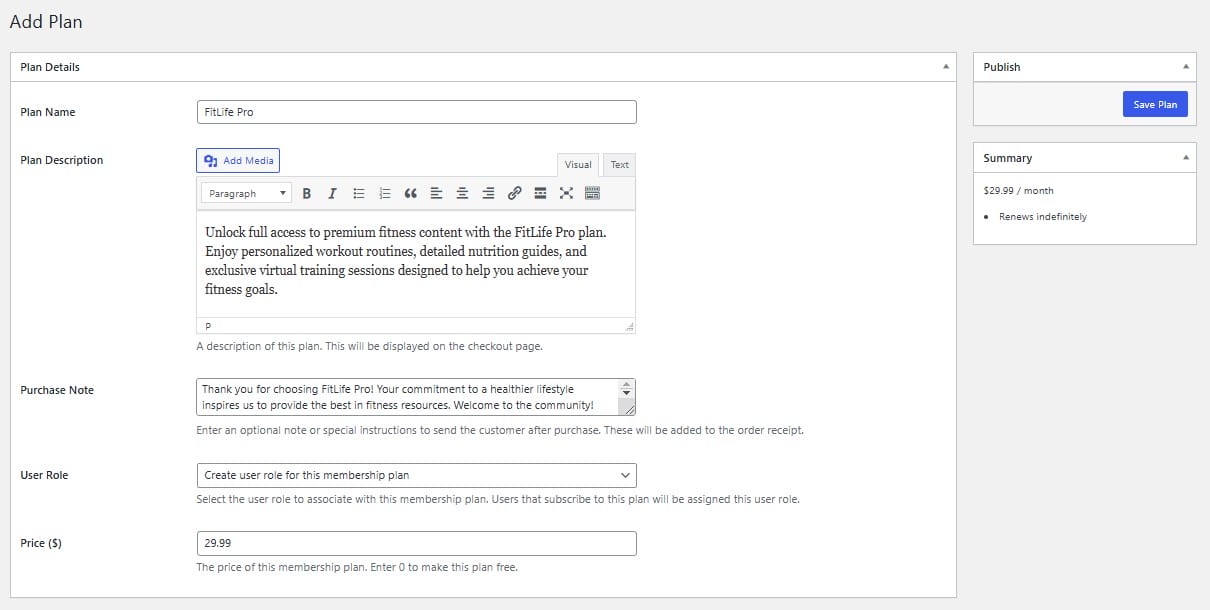
After entering the Plan Name, Description, Purchase Note, User Role, and Price, scroll down to the Subscription Settings section.
Subscription Settings Section
Here, you’ll set the recurring monthly subscription fees and customize how the plan functions regarding billing, payment cycles, and additional options such as free trials or signup fees.
These settings are essential for shaping the customer’s payment experience and ensuring it aligns with your business model.
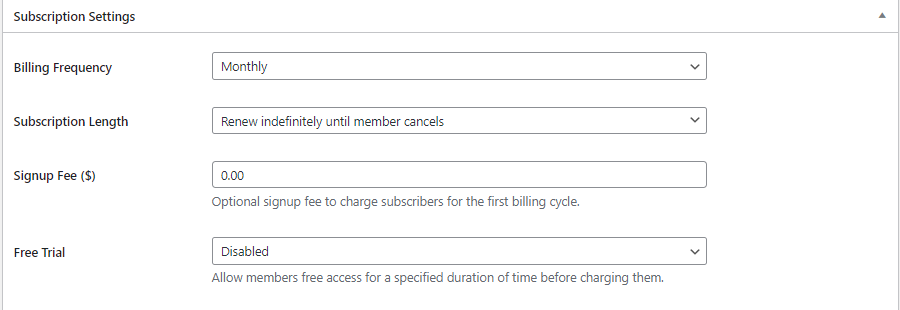
Let’s go over each option:
Billing Frequency: Choose how often subscribers are billed—options include monthly, weekly, daily, quarterly, every six months, or a one-time payment. For this example, we’ll select Monthly, meaning subscribers will be charged repeatedly each month.
Subscription Length: Decide whether the subscription renews indefinitely until canceled or for a fixed number of billing cycles.
Signup Fee: If you want to charge a one-time signup fee during the first billing cycle, you can enable this option.
Free Trial: Offer new members a trial period before their first payment. You can set a free trial duration of 3 days, 5 days, 1 week, 2 weeks, 3 weeks, or 1 month.
Downloads & Integration Section
The Downloads & Integration section is a powerful feature that allows you to sell digital products directly from your site. Here, you can leverage the Digital Products functionality to upload files associated with your subscription, set download limits, and define expiration periods, ensuring controlled access and distribution.
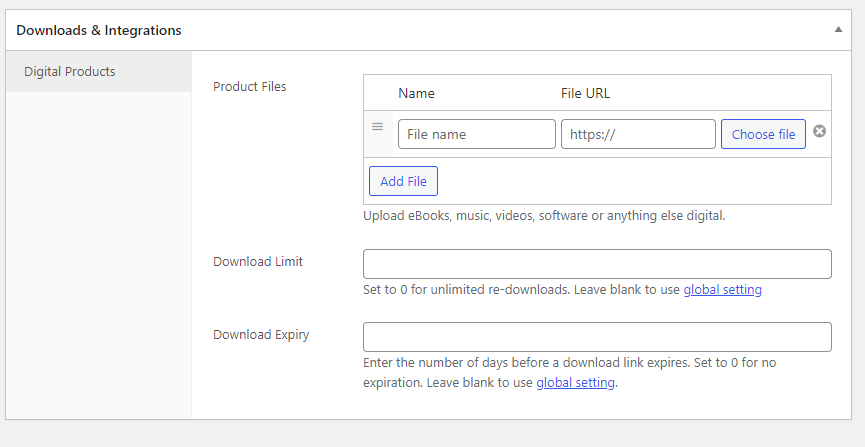
For more detailed instructions, be sure to check out our guide on how to sell digital products on your website.
Additionally, when you activate ProfilePress addons such as WooCommerce or LearnDash, their integration appears in this section, allowing you to create WooCommerce membership websites, offer exclusive member-only discounts, and sell access to LearnDash courses and groups, further enhancing your site’s monetization potential.
Once you’ve configured your subscription settings to match your needs, click Save Changes to finalize your plan.
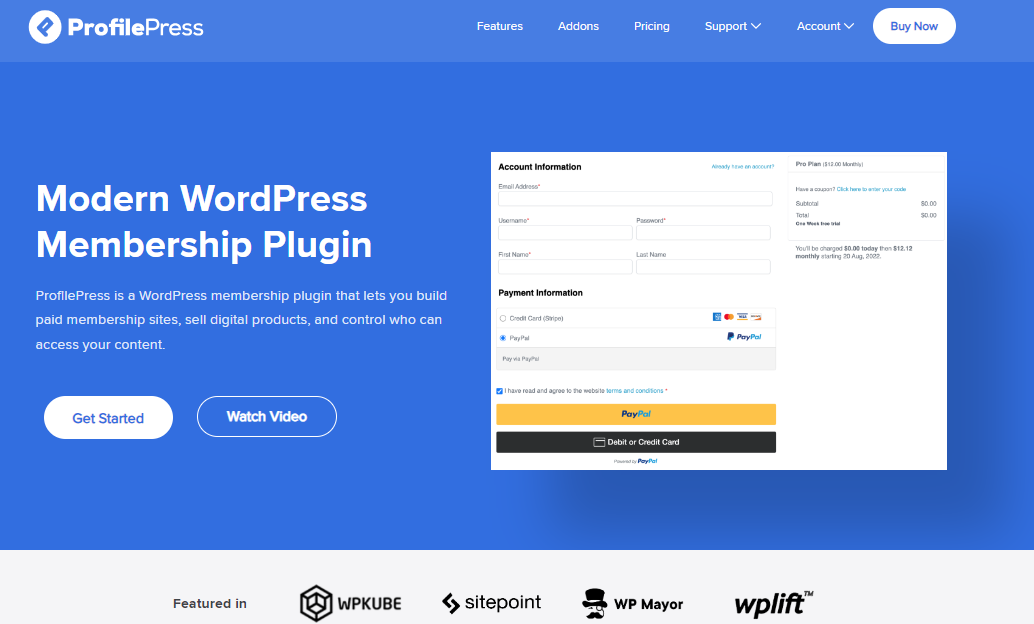
You can find the checkout URL on your ProfilePress Membership Plan page. This URL directs users to the checkout page, where they can complete their subscription purchase.
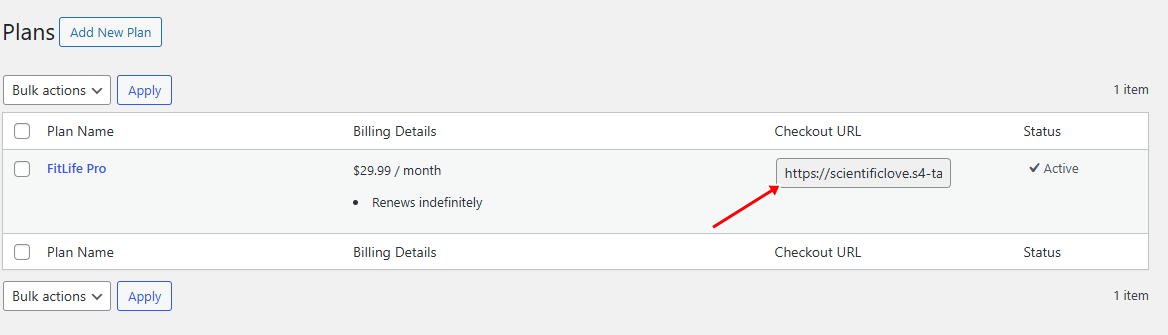
You can use this URL in buttons, email campaigns, or WordPress landing pages to make it easier for potential subscribers to sign up directly.
Here is a screenshot of the checkout page from our demo WordPress website.

Start Charging Recurring Payments in WordPress Today
By implementing recurring monthly subscription fees, you’ve created an automated revenue system that works while you sleep. ProfilePress plugin handles everything from secure payment processing to member access management, letting you focus on creating value for your subscribers.
Whether running a membership site, delivering premium content, or offering exclusive services, you have the foundation to build a thriving subscription-based business.
Remember to regularly monitor your subscription plans, engage with your members, and adjust your offerings based on feedback.
Get ProfilePress and transform your WordPress site into a subscription powerhouse that generates predictable monthly income.