How to Start an Online Store With WordPress (Step-By-Step Guide)
Wondering how to start an online store using WordPress?
WordPress is the world’s most popular website-building platform. It can create casual blogs, business sites, and online stores.
We will show you how to create an online store in this article. You will use WordPress and a plugin called ProfilePress to get the store up and running.
We will walk you through each step, and by the end of the article, you will have an online store with products ready for purchase.
At a glance, the tutorial may seem overwhelming but trust us; the steps are easy to follow. All you need to do is devote some time to the process.
Now, let’s get started.
What is the Cost of Starting an Online Store?
To create a WordPress store, you need a domain name, hosting plan, SSL certificate, theme, and the ProfilePress plugin.
WordPress is a free tool, but you need to pay for your domain name, hosting, and the plugin. Most hosting providers offer a free SSL certificate for the first year, so you don’t need to worry about purchasing one. And as for a theme, there are plenty of professional-looking free themes to choose from. If you feel the need to upgrade, you can switch to a paid theme later in the future.
ProfilePress plugin comes for an annual fee of $99. And a domain name should not cost you more than $15, and cheap shared hosting plans can be purchased for $50-60. This means you can get an online website up and running for under $200.
How to Start an Online Store With WordPress
To buy an online store with WordPress, you need to take the following steps:
Step 1: Buy a domain Name and Hosting Plan
A domain name is the URL of a website. For instance, the domain of this website is “profilepress.com”.
A domain name should be chosen carefully because it is the first thing visitors see on your site. A good rule of thumb is to keep the domain name short, simple, and brandable. For instance, “audible.com” is way better than “buyaudiobooksonline.com.” It’s short, simple, brandable, and relevant to the product they are selling on the site.
There are several domain name registrars out there. We recommend using one that also offers hosting plans.
You are probably wondering why one needs a hosting plan and what a hosting plan is anyway?
To understand what hostings are required, let’s first understand what a WordPress website is.
In simple terms, WordPress websites are made of digital files and folders. These files and folders need storage space online. A hosting service offers an online space where your website can be stored.
There are different types of hosting plans. We recommend starting with a shared hosting plan where you share your hosting space with other websites. As you grow your site and need more and more resources, you can upgrade to better hosting plans.
There are several shared hosting providers to choose from. The most popular ones are:
- Bluehost
- Hostinger
- DreamHost
- HostGator
- SiteGround
- A2 Hosting
- InMotion
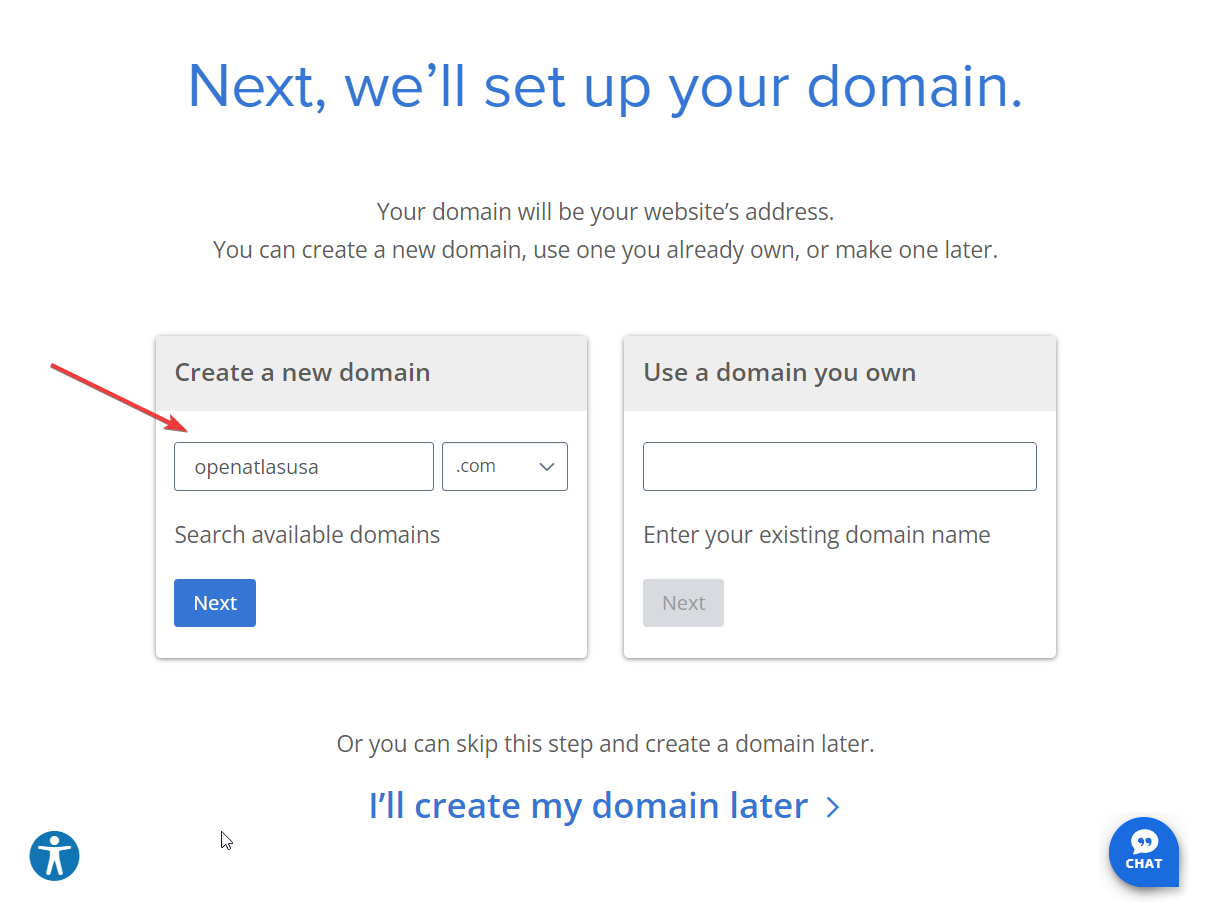
Buying a domain name and a hosting plan from any of these services is easy. All you need to do is open the website and select your preferred hosting plan.
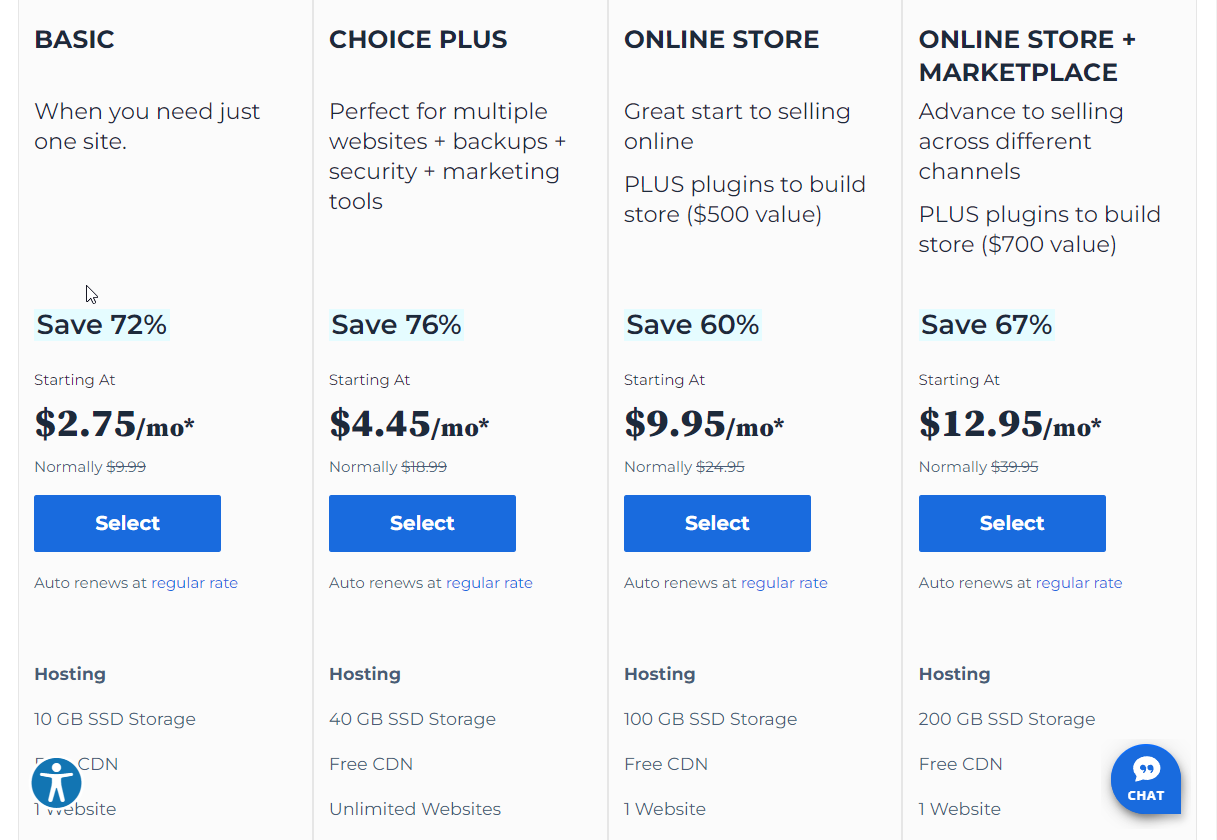
They will ask you to use an existing domain name or buy a new one. You will be doing the latter. Just enter the domain name you came up with and follow the instructions to buy the domain name and the hosting plan.
Step 2: Install an SSL Certificate
An SSL certificate is software that has to be installed on your website to authenticate the site’s identity and ensure secure communication between your site and its visitors.
Typically hosting services offer a free SSL certificate for the first year, and you are required to pay for the certificate from the second year onward.
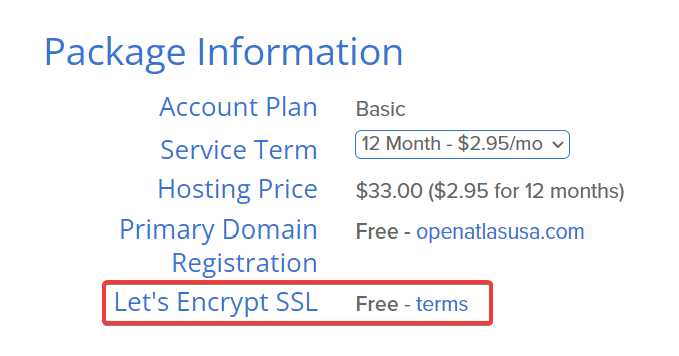
Some hosting providers, however, need you to pay from the first year itself.
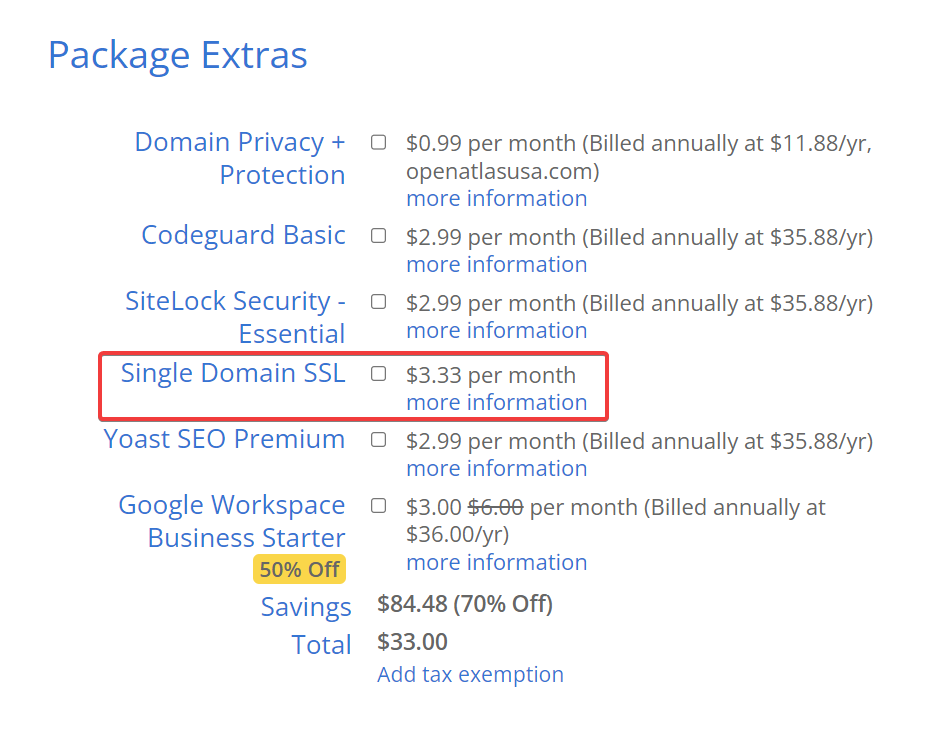
So before choosing a hosting provider, we recommend you check if they offer free SSL certificates for the first year.
You might also want to ask about the cost of the certificate in the second year. Hosting services are likely to quote a reasonable price, and if it looks unaffordable, there are plenty of other hosting services to choose from.
Step 3: Install WordPress & Set It Up Properly
Most hosting providers offer a one-click WordPress installation option. If your hosting provider provides a one-click option, select that and then take the steps you are instructed to carry out to install WordPress into your new domain.
The steps are likely to involve setting up a login username and password. Ensure you copy the login credentials because you will need them to access your site in the next step.
If you are not offered the one-click installation process, you will need to install WordPress from your cPanel manually. It’s not a complicated process and involves only a few steps. Here’s a guide that will help you with the manual installation.
Step 4: Add a Theme
A theme is software that dictates the overall appearance of your website. For example, different themes offer different page layouts, fonts, and colours.
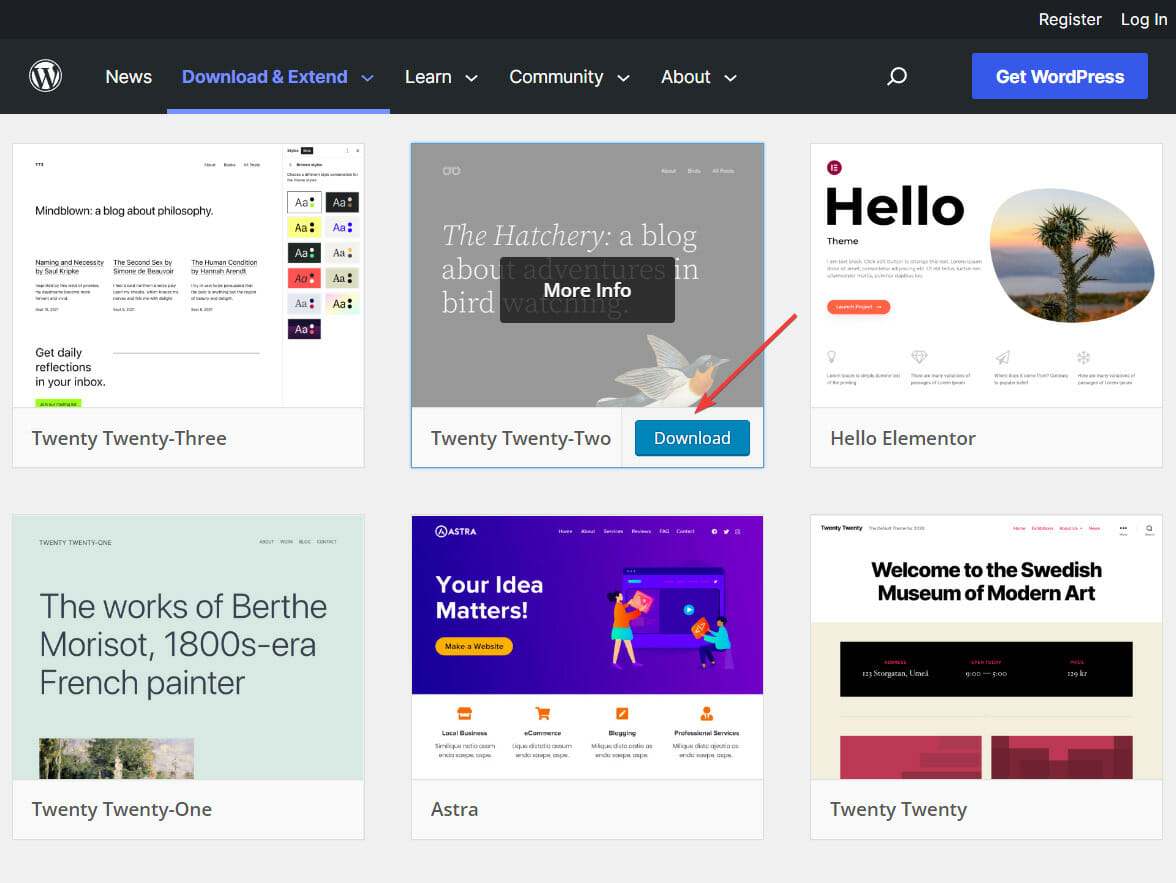
We recommend starting with a simple theme like one of the official WordPress themes and upgrading to a paid theme when you feel the need to in the future. You can also consider using these free themes from the WordPress repository.
Installing a theme is easy. But first, you need to download the theme.
Then log in to your WordPress website using the username and password you had set in the previous step.
The default login page of any WordPress site is “example.com/wp-login.php.”
To access your login page, replace “example.com” with your domain URL.
When the login page appears, enter your username and password. Done? You should see the WordPress dashboard that looks like this –

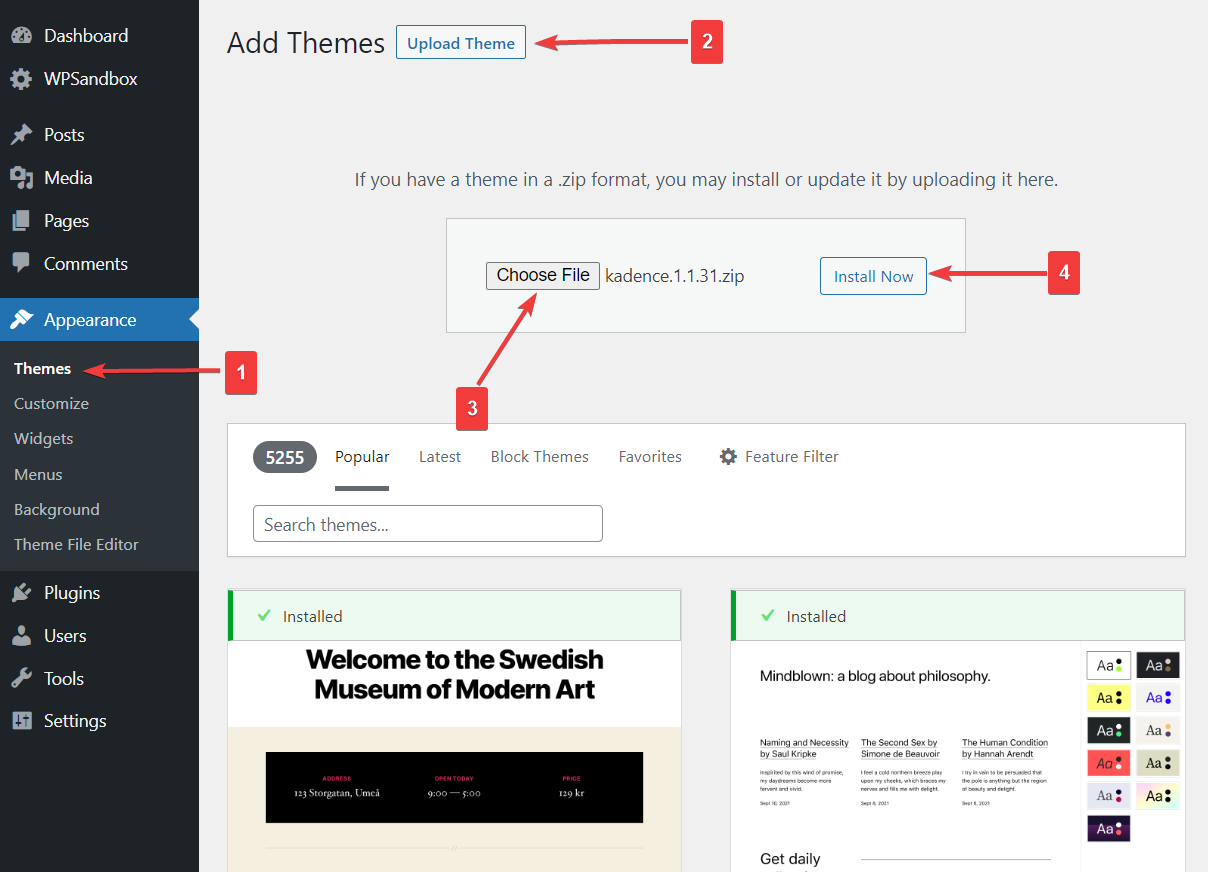
On the left side, you should see several options. Go to Appearance> Themes > Add Now > Upload Themes. Proceed to upload the theme file you have downloaded by selecting the Upload Files option. Then hit the Install Now button.
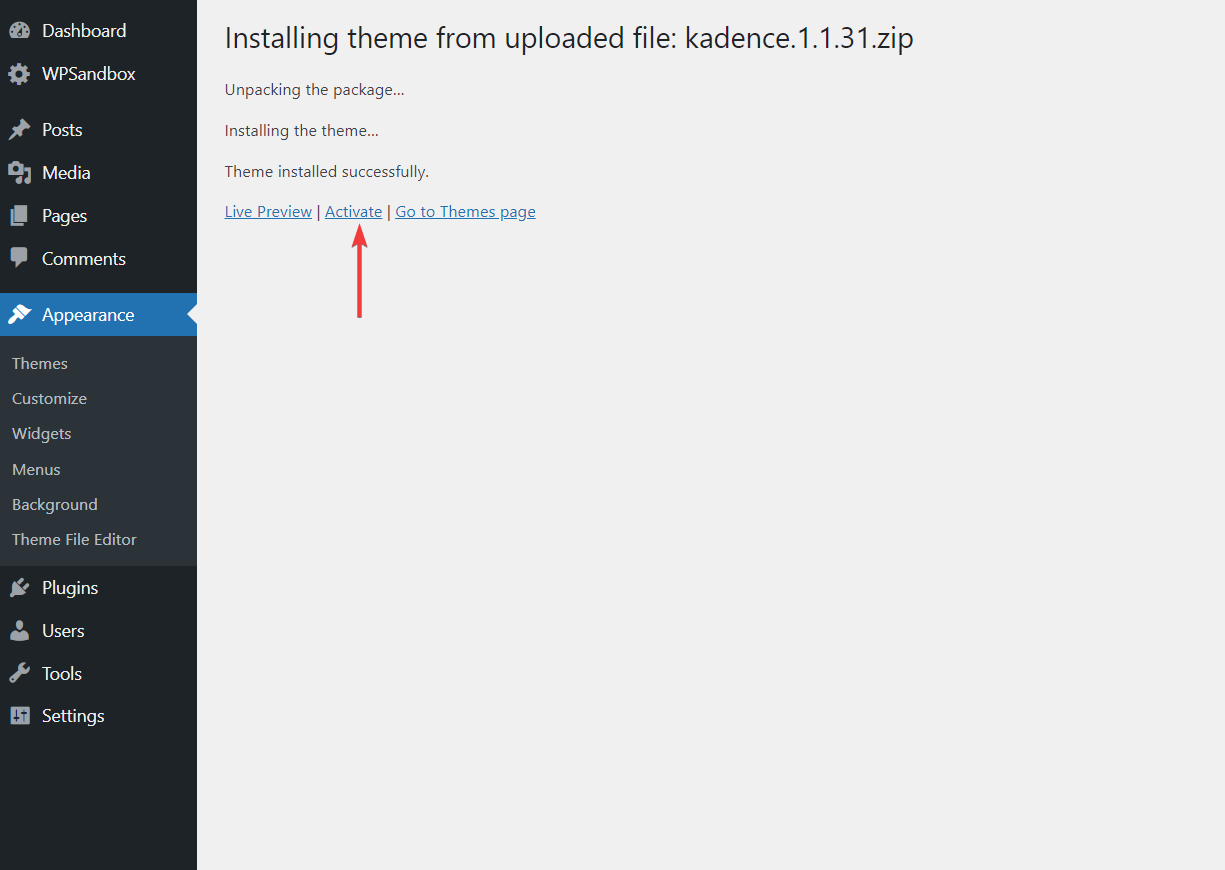
Don’t forget to Activate the theme after installation.
We recommend opening your homepage and checking how the website looks with the new theme.
Step 5: Add Products
Now that your online store is ready let’s start adding products.
To add products to your store, you need a plugin called ProfilePress. It’s an extremely powerful membership plugin. You can use this plugin to secure digital files you sell on your site and set up checkout pages and payment gateways.
ProfilePress is a premium plugin and costs an annual fee of $99. You can sign up for the yearly subscription from here. After you’ve made the payment, you should be able to download the plugin either through a link in the email or from your account page on your ProfilePress website.
1. Install ProfilePress
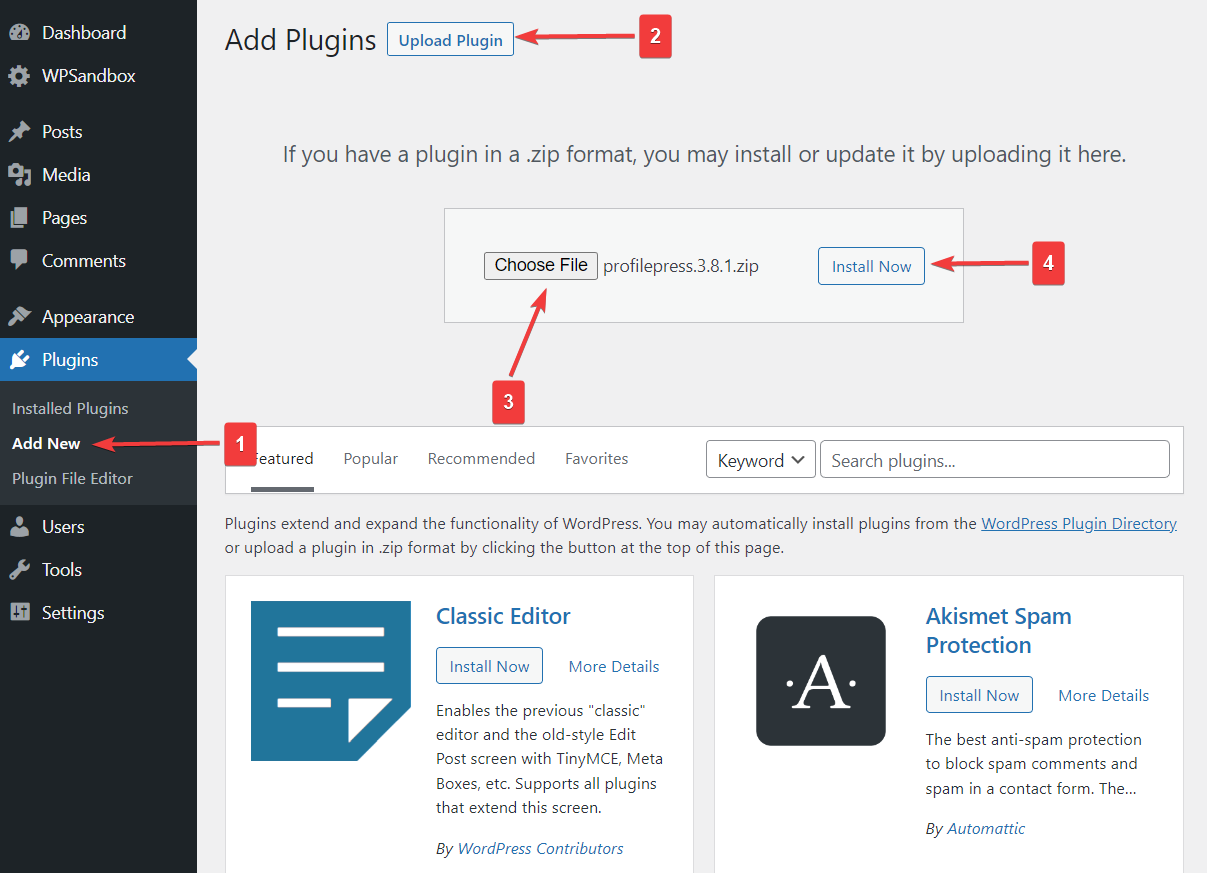
Once you have downloaded the plugin, open your WordPress dashboard and go to Plugins > Add New, then upload, install and activate the plugin on your site.
When this is complete, you will notice a ProfilePress option on the left side of your screen. ProfilePress is now installed on your site, and you can use it to add products to your WordPress store.
2. Create Membership Plans
You will need to create membership plans for all your products. For example, if you plan to sell five products, you need to create five membership plans, ten plans for ten products, and so on.
Let’s learn how to create membership plans.
On your WordPress dashboard, go to ProfilePress > Membership Plans > Add New Plan.
The New Plan page is divided into three sections:
- Plans Details
- Subscription Settings
- Download & Integrations
Let’s take a quick look at what each section covers.
Plan Details: In this section, you can add the name and description of your product. Add a price and set the default user role for your customers. You can even add a purchase note to the product.
Subscription Settings: Here, you get to choose the length of subscription for the product. If you are selling a service, you might select the monthly, quarterly, half-yearly, annual, or even daily and weekly options. But if your product doesn’t warrant recurring payment, choose a one-time payment.
Download and & Integrations: The third section is where you upload your digital files and set download limits and expiry dates.
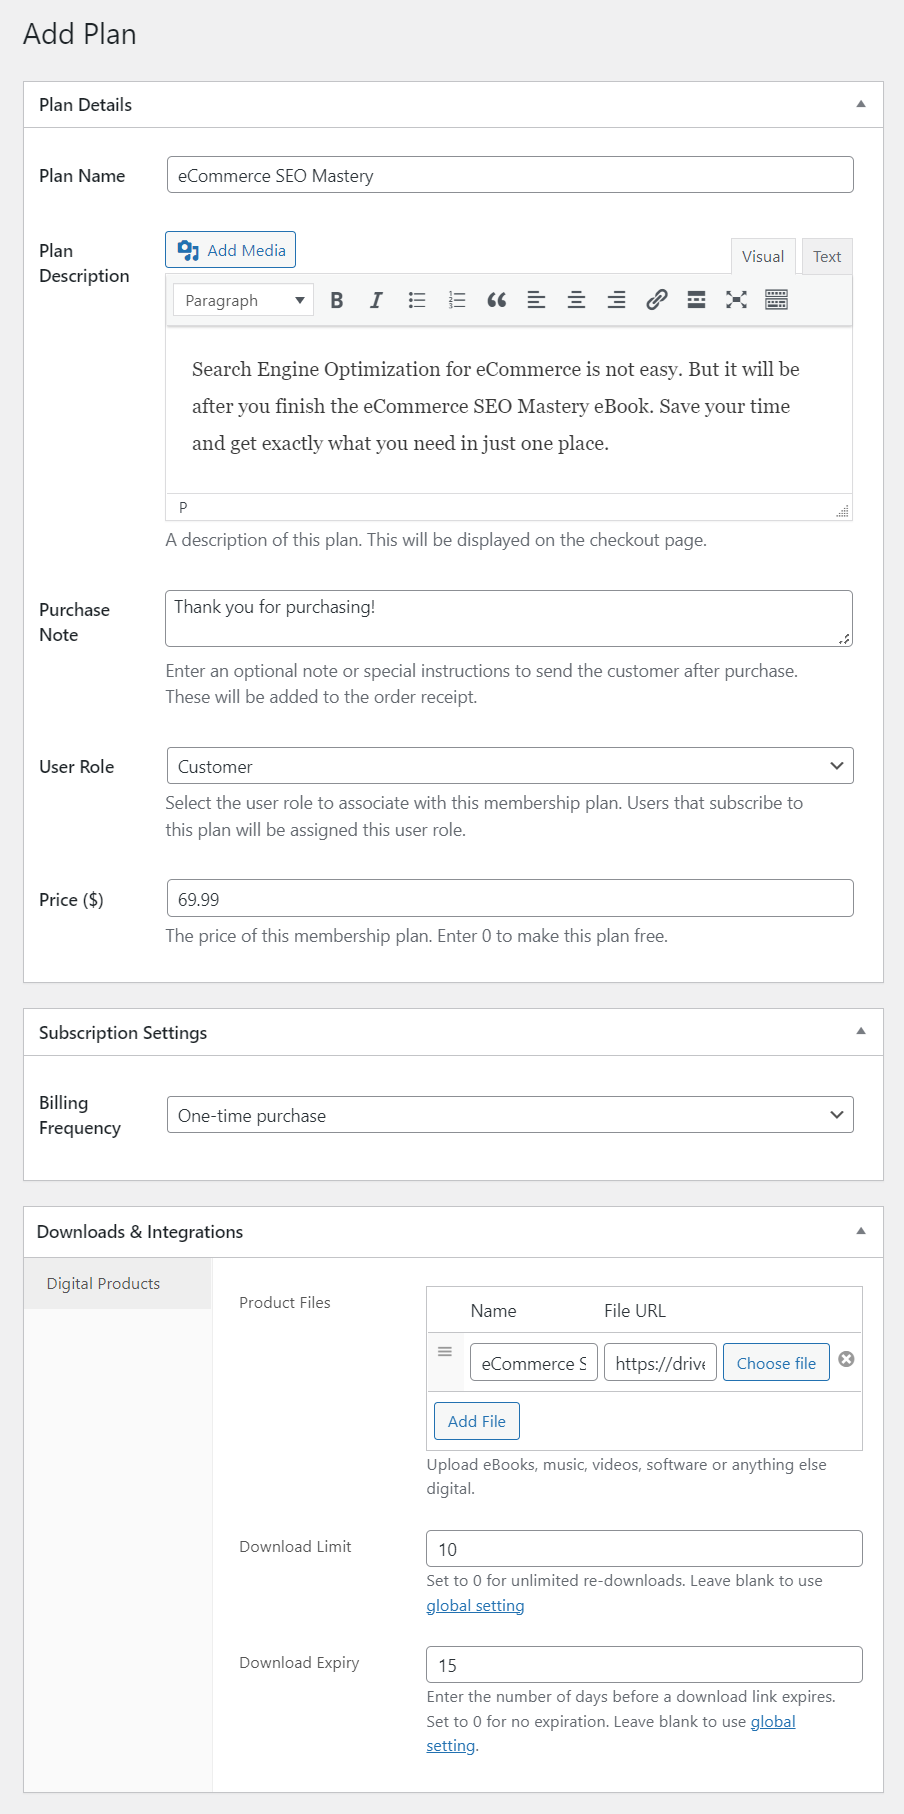
After you have filled up all three sections, Save the plan. Next, go on to create membership plans for all your products.
3. Secure Digital Files
When selling downloadable/digital files on your WordPress store, you need to ensure that the files can only be downloaded by paying customers of your store. ProfilePress will help you secure your downloadable files.
Go to ProfilePress > Settings > Payments > File Downloads > Download Methods.
Under Download Methods, choose Forced Downloads from the dropdown menu. This will ensure that your files are safe from direct linking.
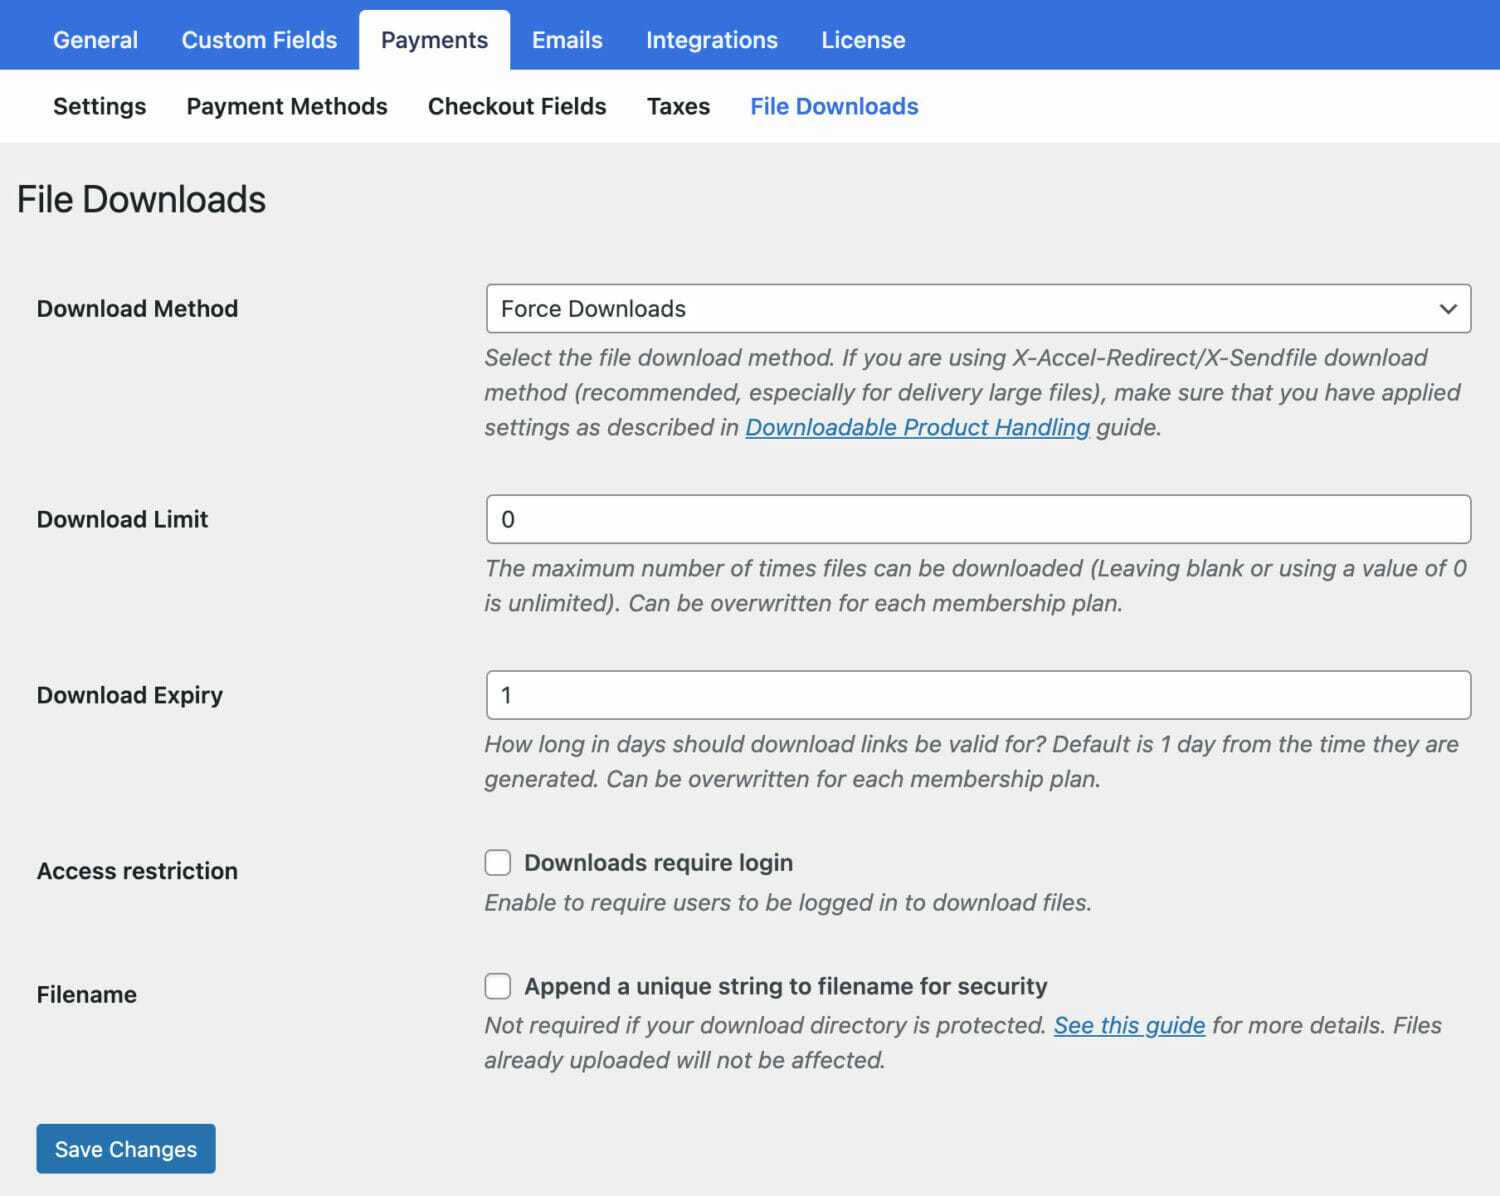
Now, if you are selling a large file that could cause downtime when downloaded, we recommend choosing X-Accel-Redirect/X-Senndfile instead of Forced Download.
Save your settings before exiting the page.
4. Create Shop Page
You need a page where all your products are displayed together so that customers can browse them and purchase the product they like.
You can create a Shop page using the WordPress block editor. But if you don’t want to wait until you know how to use the editor, you can use a shop page template instead.
Website builders like Elementor, Beaver Builder, etc., offer prebuilt shop page templates that you can start using immediately. But these builders are excellent tools, so you will need to purchase them to use the templates they offer.
No matter how you create the Shop page, ensure that the products have a buy button or add to cart button.
We built a simple shop page using the WordPress editor on our demo site. Here’s how it looks:

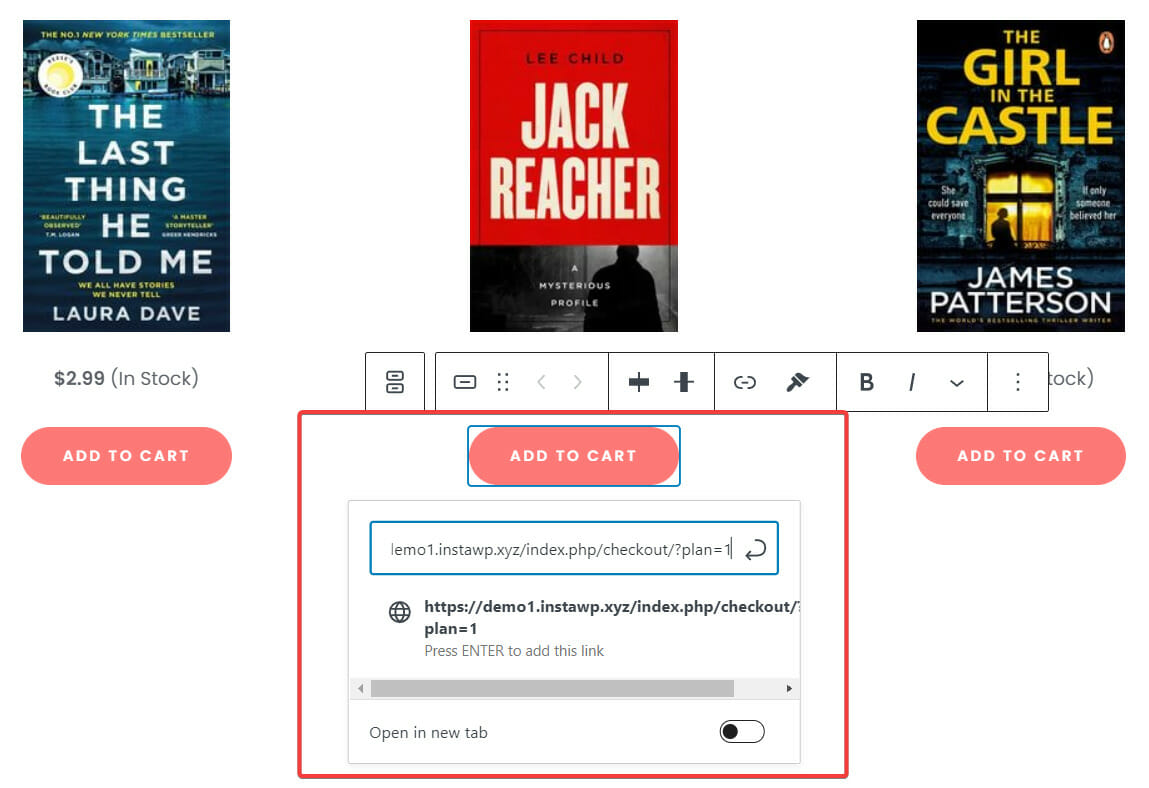
5. Add Membership Plan to Shop Page
Once you have the Shop page up and running, the next step is to add the membership plans to the corresponding products.
All membership plans have a checkout link. You will need to add that link to the add to cart or buy button of the corresponding products. Customers are taken to the checkout page to purchase the product when they click the button.
In the next section, we will show you how to enable the checkout function on your WordPress store, but first, let’s add your membership plan to the shop page.
On your WordPress dashboard, go to ProfilePress > Membership Plans. You will see a list of your membership plans and checkout links for all your products.
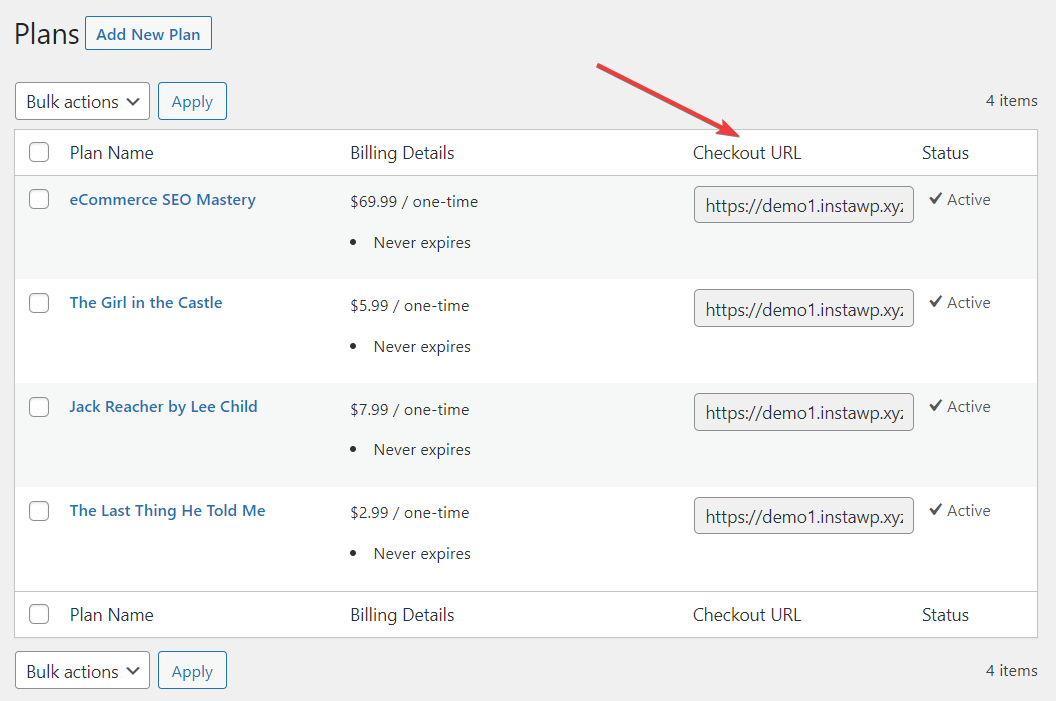
Copy the links and paste them into the add to cart or buy button of the corresponding products.
6. Enable Checkout
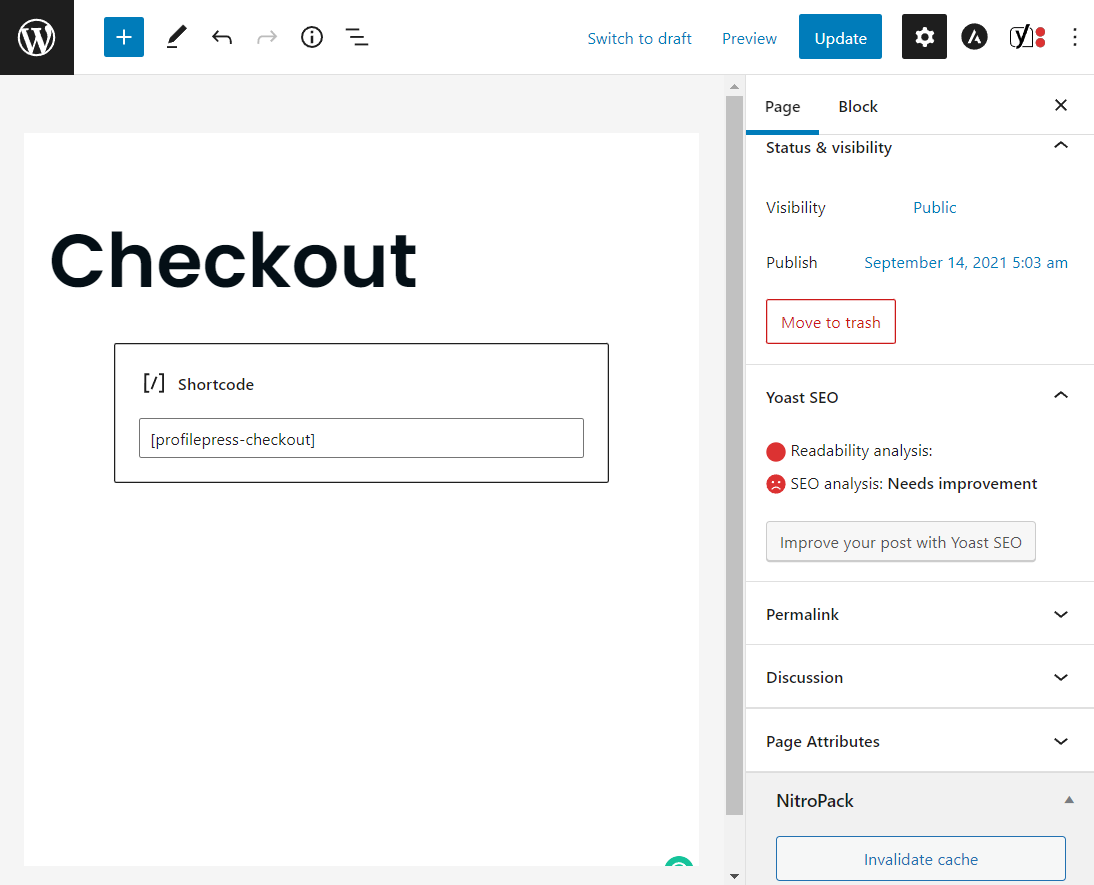
ProfilePress, by default, automatically creates the checkout page. If one wasn’t created, Go to Pages > Add New. Add a Title to the page and insert the checkout shortcode.
Done? Now, hit the Publish button.
Try out the buy button or add to cart button now and see how the checkout page looks.
If you want to add or remove fields from the checkout page, go to ProfilePress > Settings > Payments > Checkout Fields. Choose a field from the dropdown menu and hit the Add Field button to add fields. To remove a field, select it, and the field will expand, revealing a Delete button.
7. Connect With Payment Gateway
Now that the shop is set and ready for customers, there’s one last thing left to be done. You need to set up the payment gateway so people can purchase your products. Here’s how:
Go to ProfilePress > Settings > Payments > Payment Methods. You will be given the option to connect with Stripe, PayPal, Razorpay, Paddle, Paystack, Direct Bank Transfer, Mollie.
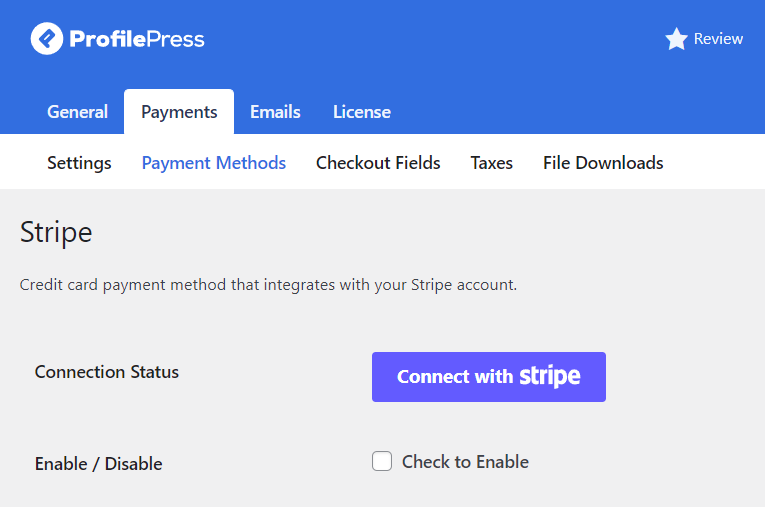
Once you hit the connect button, you will need to log in to your account to connect it with the store. If you don’t have an account with any of these payment gateways, then you need to create one.
Be sure to Save your settings before you exit the page.
Conclusion
Creating an online store with WordPress is not too difficult. All you need to do is follow the steps below:
- Buy a domain name and a hosting plan
- Install an SSL certificate
- Install and set up WordPress
- Add a theme to your site
- Add products using the ProfilePress plugin
You need ProfilePress if you are planning to sell digital files on your WordPress store.
ProfilePress is a powerful membership plugin that will help you secure your digital files so that only paid members can access them. It will also set up checkout pages and payment gateways, among other things.
Get ProfilePress now!