How to Start a News Website That Makes Money – Complete Guide
Do you want to start a news website that generates revenue?
With the rise of online news consumption, more people than ever are turning to the internet for breaking stories, in-depth reports, and niche coverage that traditional outlets often overlook. This shift has opened a massive opportunity for independent publishers and entrepreneurs to create profitable news platforms.
Whether you want to cover global headlines, focus on local stories, or share insights on a specific niche, starting a news website can be both rewarding and financially viable.
In this guide, we’ll walk you through the steps to start a news website that makes money. By the end, you’ll have a clear roadmap to turning your news ideas into a thriving online business.
Step 1: Plan Your News Website
The first step in starting a news website that makes money is to create a clear plan before you write a single article or choose a website design.
This plan will guide every decision you make from the kind of stories you publish to who you’re writing for, to how your site will earn income.
Think of it as the foundation of your news business. Without it, you risk building a site that lacks focus, struggles to attract loyal readers, and has no reliable way to generate revenue.
Let’s start by defining exactly what your site will cover and who it will serve.
Choose Your Niche and Audience
Your “niche” is the specific type of news you’ll cover, and your “audience” is the group of people you want to read it. Picking the right combination is one of the most important choices you’ll make.
If you try to cover everything, you’ll compete with giant media outlets and struggle to get noticed. Instead, focus on a space where you can become a trusted source.
Here are some ways to define your niche:
- By Location: Local news about your city, town, or region.
- By Topic: Technology, politics, business, sports, entertainment, health, travel, or the environment.
- By Audience Group: Parents, students, small business owners, industry professionals, hobby enthusiasts, or activists.
Tip: Choose something you care about. You’ll be spending a lot of time researching and writing about this subject, so passion will help keep you motivated.
Decide How You’ll Make Money
Now that you have chosen your niche and audience, it’s time to figure out how your news website will earn income. This step is important because your revenue model will influence the way you design your site, structure your content, and engage with your readers.
There’s no single “best” way to monetize a news site; in fact, many successful publishers use a combination of income streams.
Here are the most common and beginner-friendly options:
Memberships or Subscriptions: With this model, readers pay a monthly or yearly fee to access premium content. It works best when you consistently publish high-quality, exclusive stories that your audience can’t find anywhere else. This could include in-depth reports, investigative journalism, or even a well-organized archive of local news that adds unique value for subscribers.
Paywalls: This model allows visitors to read a limited number of articles for free each month before requiring payment for continued access. It’s an effective way to encourage casual readers to become paying subscribers while still giving new visitors a taste of your content without locking them out completely.
Advertising: This method involves placing banner ads or sidebar ads on your site to generate revenue. Your earnings will largely depend on the size of your traffic and the type of audience you attract. You can join ad networks like Google AdSense or sell ad spots directly to businesses within your niche for potentially higher rates.
Sponsored Content: In this model, businesses pay you to publish articles that promote their products or services. It can be a profitable option as long as you clearly label the content as “Sponsored,” ensuring transparency and maintaining your audience’s trust.
Donations or Crowdfunding: This approach invites loyal readers to voluntarily support your work, often through small recurring or one-time contributions. Platforms like Patreon or Buy Me a Coffee make the process simple and accessible. It works particularly well if your audience feels strongly connected to the topics you cover and wants to help sustain your reporting.
After choosing your niche and audience and deciding how your news website will make money, there are still a few important planning steps to take before you start building. You’ll need to set a publishing schedule you can realistically maintain, create an editorial calendar to stay on track, and study other news sites in your niche to learn what works and how you can offer something unique.
Completing these steps will give you a solid plan for your news website, one that directs your content, connects with the right audience, and lays the groundwork for steady growth.
In the next part of this guide, we’ll walk you through how to start a news website that makes money, with a focus on creating a strong membership model.
Step 2: Setting Up Your News Website with WordPress
Now that your plan is ready, it’s time to turn your idea into a working news website. For this guide, we’ll be using WordPress, the world’s most popular website platform. It powers over 40% of all websites online, including many major news outlets, because it’s beginner-friendly and packed with excellent features for publishing and monetizing content.
Here’s how to get started:
Choose a Domain Name and Hosting
Your domain name is your website’s address, the link people will type into their browser to find you (for example, YourNewsSite.com).
When choosing one, keep it short, easy to spell, and memorable. A good domain name is simple enough for someone to remember after hearing it once. If possible, make it reflect your niche, such as CitySportsDaily.com for a local sports site or TechPulseNews.com for a tech-focused publication.
In addition to a domain, you’ll need web hosting, the service that stores your website’s files and makes them accessible online. For beginners, it’s best to pick a hosting provider that offers one-click WordPress installation, strong customer support, and reliable uptime so your site is always available. Popular options include WordPress.com, Bluehost, SiteGround, and Hostinger.
Install WordPress
Once you’ve chosen your domain and hosting, the next step is to install WordPress, the platform that will power your news website. Most hosting providers make this incredibly simple with a one-click installation process. This means you can have your site up and running in just a few minutes without any technical skills.
After installation, you’ll be able to log in to your WordPress dashboard. This is your control center, where you’ll write and publish articles, add images and videos, customize your site’s appearance, and manage its settings.
Pick a Professional News Theme
A theme controls the look and feel of your website, from the layout of your homepage to the style of your headlines. For a news site, you’ll want a theme that’s clean, easy to navigate, and mobile-friendly so readers can enjoy your content on any device.
Look for a theme with multiple homepage layouts, straightforward typography for headlines, and the ability to display different types of content such as articles, videos, and photo galleries.
Some popular options for news sites include Astra, Newspaper, and Kadence. These themes are highly customizable, allowing you to adjust colors, fonts, and layouts to match your brand’s style.
Add Essential Plugins
After installing your desired theme, the next step is to add essential plugins to your WordPress site.
Plugins are like apps for WordPress; they add extra features without requiring you to write any code. For a profitable news website, you’ll need a combination of plugins that enhance your site’s design, grow your audience, boost performance, and manage your membership model.
Start with Elementor, an excellent drag-and-drop page builder that makes it easy to design stunning homepages, article layouts, and subscription sign-up pages without touching a line of code. When paired with your chosen news theme, Elementor helps you create a professional, reader-friendly layout that keeps visitors engaged.
For audience growth and engagement, MailOptin lets you build your email list through pop-ups, slide-ins, and subscription forms. FuseWP connects your membership data with your email marketing service, enabling you to send targeted newsletters or exclusive updates to paying members. FeedbackWP allows you to collect valuable feedback directly from your readers, helping you improve your content and overall member experience.
To make sure your stories reach readers quickly, install CrawlWP, a powerful WordPress Instant Indexing and SEO insights plugin that helps search engines find and rank your content faster. Pair this with a caching plugin such as WP Super Cache or W3 Total Cache to ensure your site loads fast, even during traffic spikes.
Finally and most importantly, you’ll need ProfilePress to power your membership system and premium content access.
Why Use ProfilePress?
We will be using ProfilePress because it is an excellent membership and content restriction plugin. It takes the complexity out of creating a membership site, selling digital products, and managing restricted content. Its user-friendly dashboard makes it simple to set up and manage multiple membership levels, giving both you and your readers a smooth, frustration-free experience.
With ProfilePress, you can easily restrict access to exclusive articles, videos, or other premium content. You’re not limited to a single membership level; you can create as many as you like, each with its pricing and benefits.
Payments are seamless thanks to its integration with major gateways like Stripe, PayPal, Razorpay, Paystack, and Mollie. This means you can accept payments from readers all over the world without worrying about technical hurdles, giving them a hassle-free checkout process.
ProfilePress also comes with powerful features like optimized checkout forms, discount codes, metered paywalls (which let readers view a limited number of free articles before subscribing), member directories, and even integrations for online courses if you ever want to expand your offerings.
Other features, such as social logins, user approval controls, automatic tax calculations, fraud prevention, and detailed reporting dashboards, make it a complete solution for running and scaling a membership-based news site.
Below, we’ll walk you through the installation process for ProfilePress.
Install and Activate the ProfilePress Plugin
Now that you understand why ProfilePress is the ideal plugin for building your membership model, it’s time to get it set up on your site.
First, head to the ProfilePress website and purchase the plan that best fits your needs. After completing your purchase, you’ll be able to download the plugin’s ZIP file from your account dashboard.
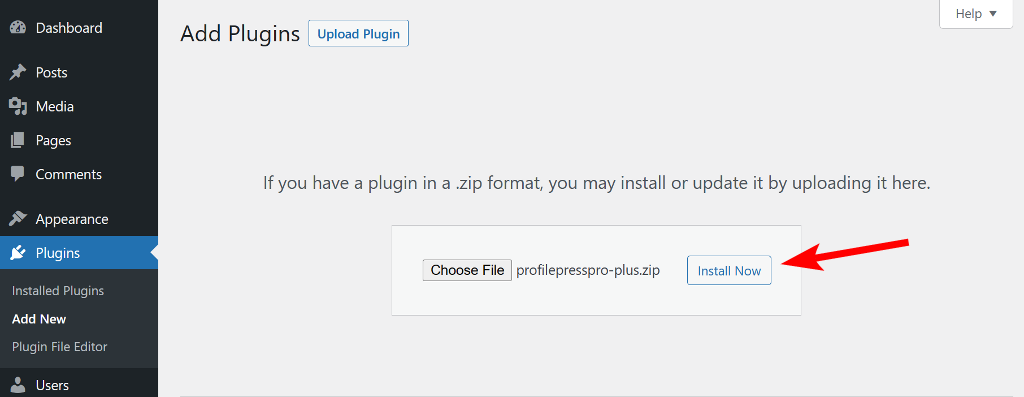
Next, log in to your WordPress admin area. From the left-hand menu, go to Plugins > Add New and click the Upload Plugin button at the top.
Drag and drop the ProfilePress ZIP file into the upload area, or click Choose File to select it from your computer.
Once the file is uploaded, click Install Now, and after installation finishes, click Activate.
After activation, you’ll see a notification at the top of your WordPress dashboard saying that ProfilePress needs to create several pages to function correctly. Click the Create Pages button to let the plugin generate these pages for you.
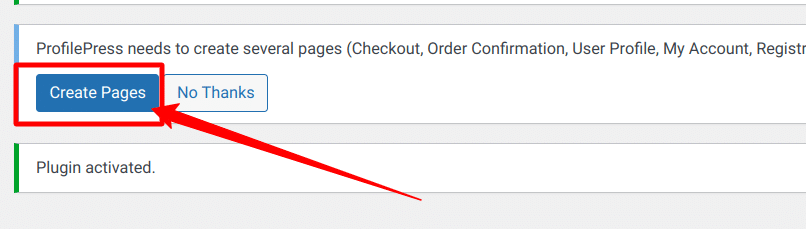
Once that’s done, ProfilePress will redirect you to its settings page, where you can assign the newly created pages to the appropriate options.

When you’re done, click Save Changes to apply your settings.
By combining ProfilePress with the plugins above, you’ll be able to create a professional news website that’s visually appealing, search-optimized, fast-loading, and designed to turn casual visitors into loyal, paying subscribers.
Step 3: Customize Your Site & Publish Articles
Now that you’ve installed the essential plugins, it’s time to set up the basics of your news website.
Begin by creating essential foundational pages, including About Us, Contact, Privacy Policy, and Terms of Service. These pages help build credibility with your audience and cover important legal requirements.
Next, organize your website’s menu so readers can easily navigate to important sections like Latest News, Categories, or Popular Stories. A clean, intuitive menu keeps visitors engaged and encourages them to explore more of your content.
Tip: Spend some time browsing popular news sites you admire. Pay attention to their layouts, color schemes, typography, and how they present headlines. Then, adapt the best elements to suit your own style and target audience.
Once your site structure is ready, the next step is to start publishing articles. Content is the heart of your news website. It’s what attracts visitors, builds trust, and convinces them that your reporting is worth paying for.
Enhance your stories with multimedia. High-quality photos, videos, infographics, or even podcasts can make your reporting more engaging and help break down complex topics. These elements not only improve the storytelling but also make your site more appealing and keep readers engaged for longer.
Finally, commit to a consistent publishing schedule. Whether it’s daily updates, twice-weekly features, or a weekly in-depth analysis, your audience should know when to expect fresh content. A predictable schedule builds reader habits, and those habits are what keep members subscribed month after month.
By the end of this step, your site will not only look professional but also have a solid base of high-quality content that will attract and convert readers. With your foundation in place, you can now move on to the next phase: integrating secure payment methods and setting up membership plans with ProfilePress.
Step 4: Set Up Payments & Membership Plans with ProfilePress
Now that your site is filled with valuable content and looks polished, it’s time to integrate payment gateways, customize the sign-up experience, and create membership plans that suit your audience.
Integrate Payment Gateways
ProfilePress makes it simple to accept payments from readers all over the world. It supports major payment gateways like Stripe, PayPal, Paystack, Razorpay, and Mollie, giving you the flexibility to serve both local and international audiences.
To set up payments, go to ProfilePress > Settings > Payments > Payment Methods in your WordPress dashboard.
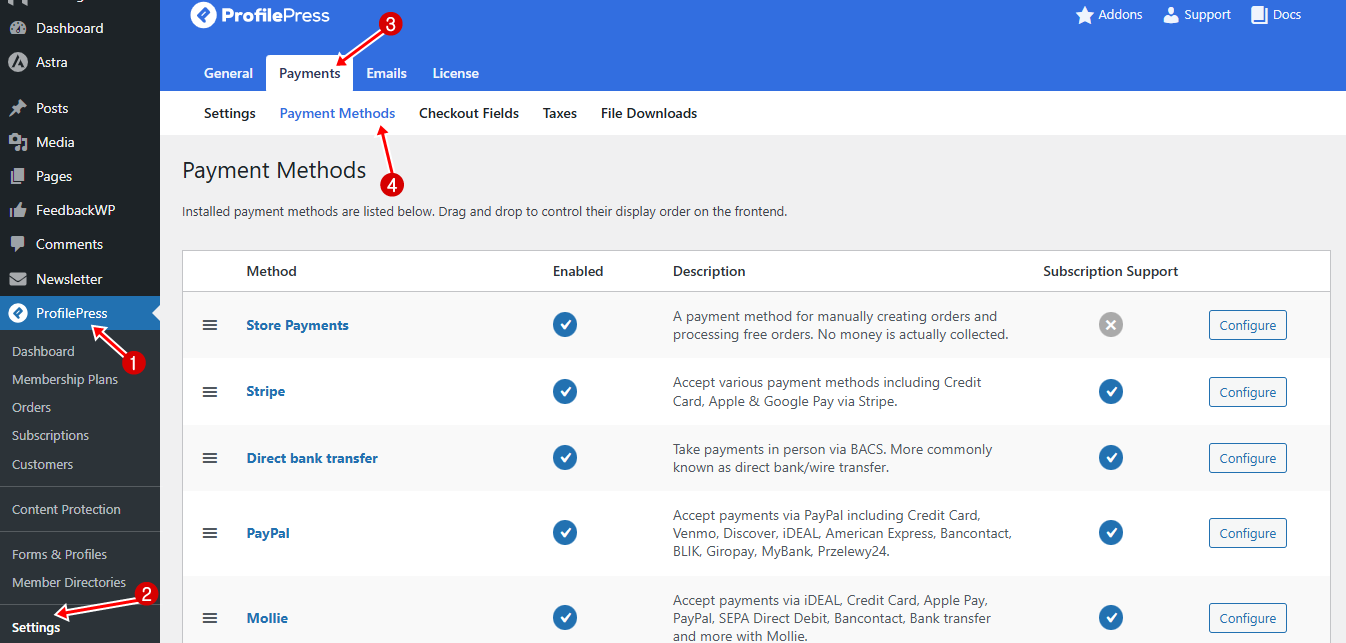
Choose the gateways you want to use and connect them by entering your API keys or account credentials.
Once your payment methods are set up, click Save to apply the changes and start receiving payments.
Tip: You can enable multiple gateways so members can pay using their preferred method.
Create Membership Plans
You will need to create membership plans in ProfilePress to sell access to your premium content and website. To do this, go to ProfilePress > Membership Plans and click the Add New Plan.
The following page has three sections: Plan Details, Subscription Settings, and Downloads & Integration. Each section is essential for configuring your membership plan.
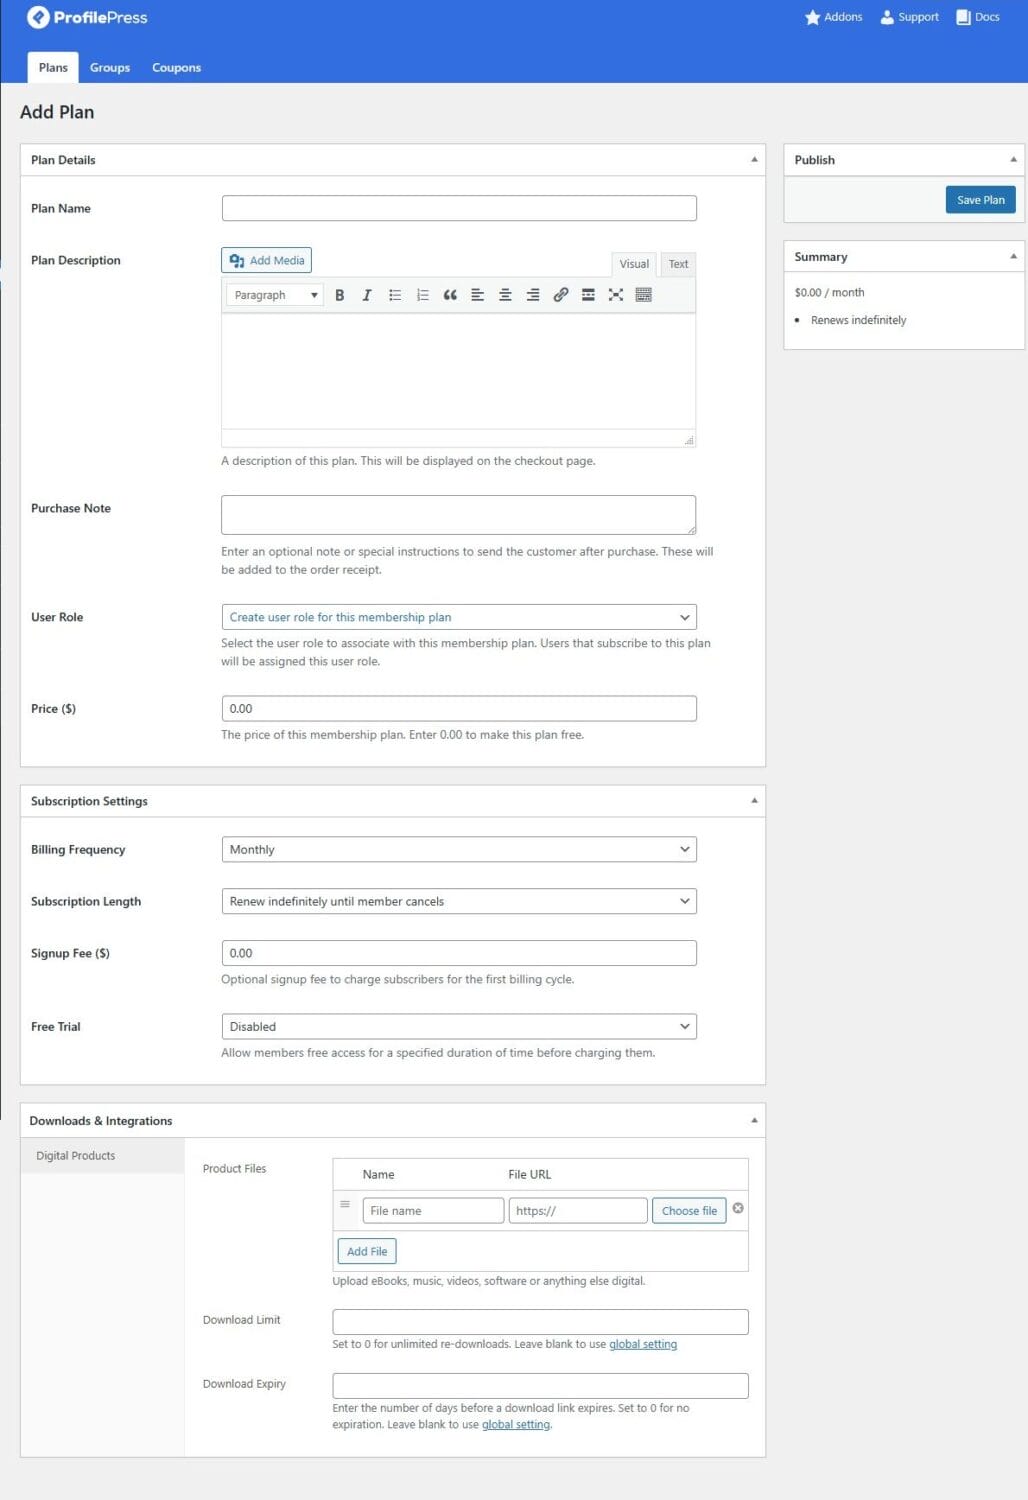
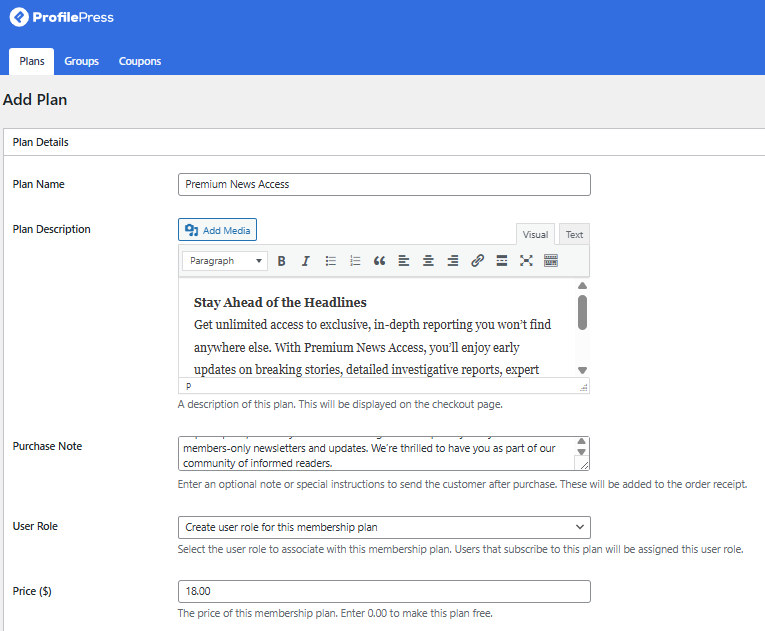
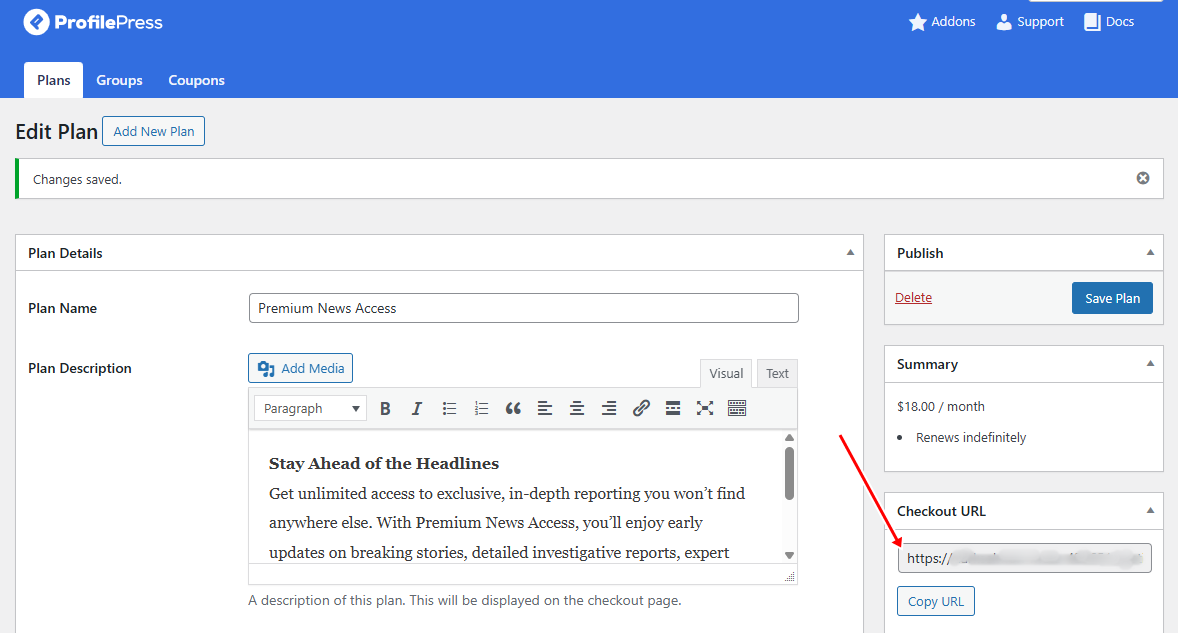
In the Plan Details section, give your plan a name that instantly communicates its value, such as “Premium News Access” or “Insider Reports.” Use the description field to outline what members will receive clearly. For example, in-depth investigative journalism, early access to breaking stories, or members-only newsletters.
Add a purchase note that thanks them or explains how to get the most from their subscription.
Then, for easier management, in the User Role field, choose Create a user role for this membership plan, which will automatically assign a unique role to each subscriber.
Finally, set a price that reflects the quality of your reporting while remaining competitive in your niche.
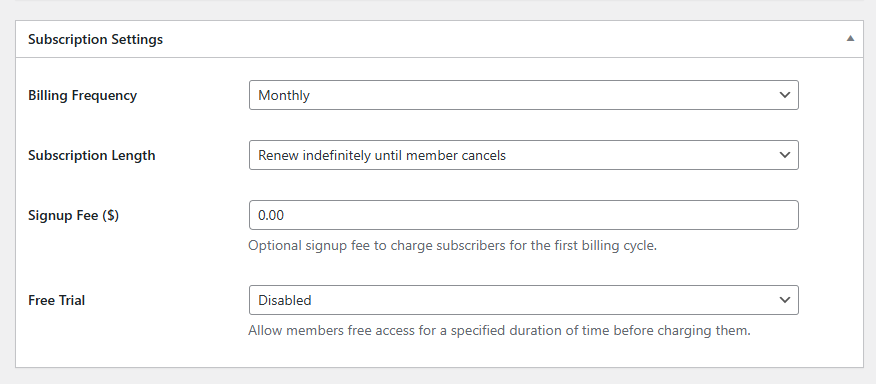
Scroll down to the Subscription Settings section. Here, you decide how often members will be billed daily, weekly, monthly, yearly, or as a one-time payment. You can also set the subscription length, whether it’s ongoing until canceled or a fixed-term membership. If needed, you can include a one-time signup fee to cover onboarding or setup costs. To encourage hesitant readers to try your service, consider offering a free trial of 7, 14, or 30 days so they can experience your premium reporting before committing.
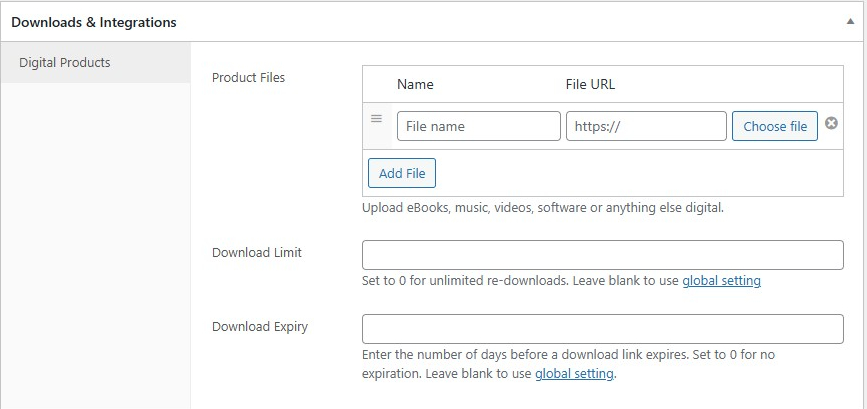
The final section is Downloads & Integration.
Suppose you plan to sell digital products alongside your reporting, such as e-books, special reports, or archived issues. In that case, this section allows you to upload files, set download limits, and add expiration dates for access.
When you’re done with your settings, click Save Plan to publish your membership plan.
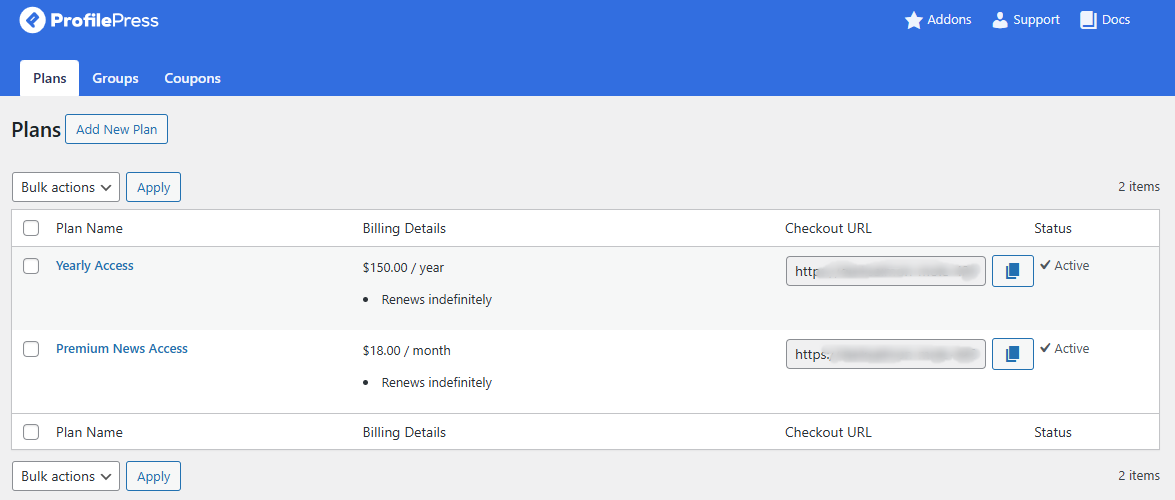
Once it’s live, ProfilePress will generate a checkout link that you can place anywhere on your site, from your pricing page to in-article call-to-actions, so you can start accepting new subscriber sign-ups right away.
You can repeat these steps to create as many additional membership plans as needed.
Now that your payment options and membership plans are in place, you’re ready to lock in your revenue model.
The next step is to ensure that only paying members can access your premium stories.
Step 5: Restricting Premium Content in WordPress
ProfilePress offers a powerful content protection feature for controlling who can view your premium content. You can fully lock articles so that only members with the right subscription can access them, or use a metered paywall that lets visitors read a limited number of posts before requiring a subscription.
Setting Up a Content Protection Rule
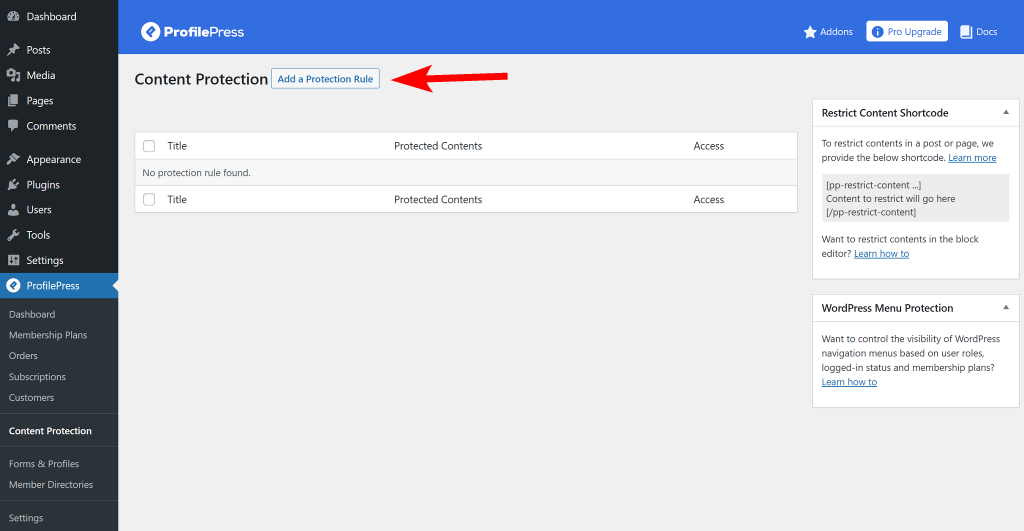
In your WordPress dashboard, go to ProfilePress > Content Protection and click Add Protection Rule.
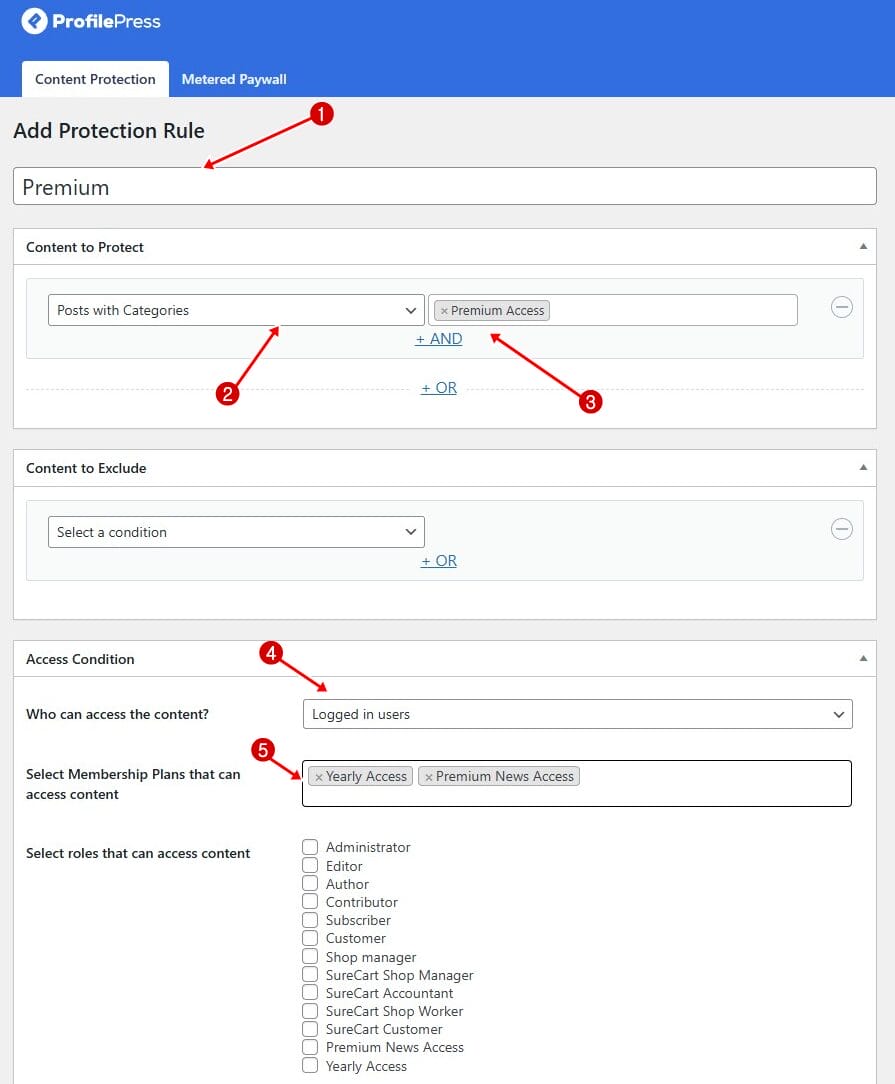
Give the rule a descriptive name and choose which content you want to protect. You can target posts by category, tag, archive, format, or even combine multiple conditions for more precision.
Next, decide who should have access. You can make content visible to everyone or limit it to logged-in or logged-out users.
Depending on your selection, additional settings will appear. You can link the protection rule to a specific membership plan, assign it to a user role, or manually grant access to selected usernames.
For example, in the image below, we’ve named our protection rule “Premium” and set it to protect posts under the “Premium Access” category. For the access condition, we’re allowing only logged-in users to view this content and linking it to the membership plans we created earlier. This means that only logged-in members with an active subscription to Yearly Access or Premium News will be able to read posts in the “Premium Access” category.
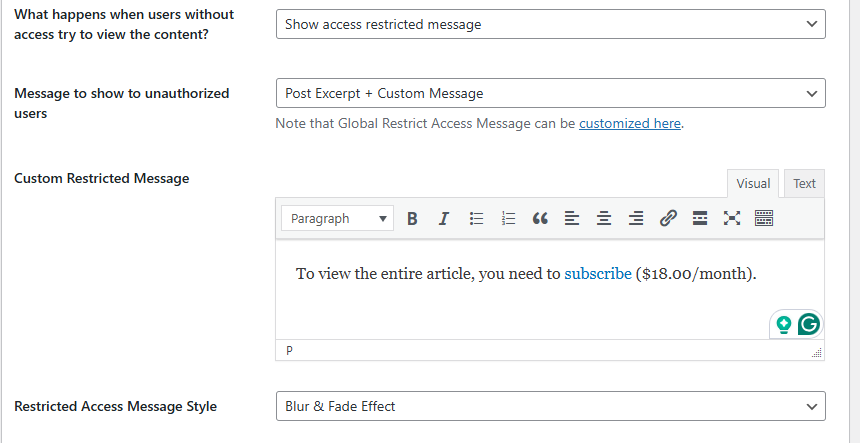
For visitors without access, you have two main options. You can either redirect them to another page or display an access-restricted message directly on the content.
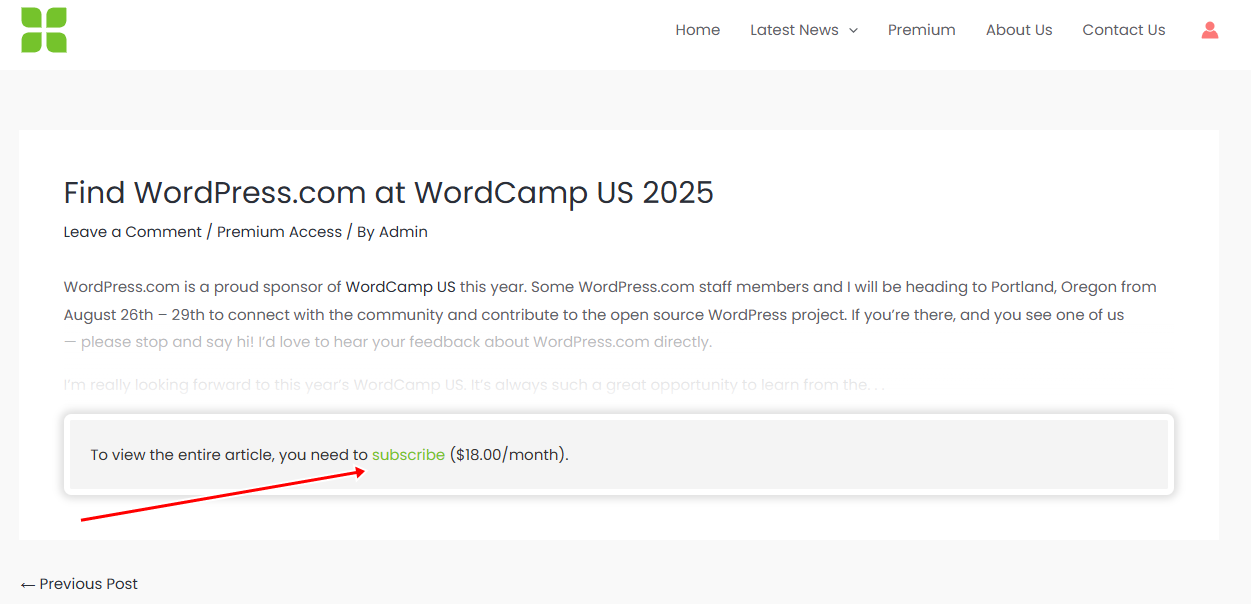
For example, you might redirect them to your pricing page, encouraging them to subscribe so they can unlock your premium stories. Alternatively, you could display a short excerpt from the article, followed by a note explaining that the full content is available only to members and providing instructions on how to sign up.
Once you’ve configured your chosen option, click Save Rule in the right sidebar to apply the changes. From that point on, any post in the restricted category will display your chosen prompt, guiding unauthorized visitors to subscribe before they can continue reading.
Setting Up a Metered Paywall
Metered Paywall allows you to give readers a taste of your premium reporting before asking them to subscribe. Instead of locking content immediately, this option lets visitors view a set number of premium articles before the paywall appears.
To enable it, go to your WordPress dashboard and navigate to ProfilePress > Addons. Find the Metered Paywall addon and toggle the switch to activate it.

Next, click Settings to open the configuration page. Alternatively, you can navigate to ProfilePress > Content Protection in your WordPress dashboard and select the Metered Paywall tab.
Note: Before configuring a metered paywall, make sure the post types and taxonomies you want to meter are already restricted in your Content Protection rules. If they’re not, visitors will still be able to view them without restrictions, even after using up their free views.
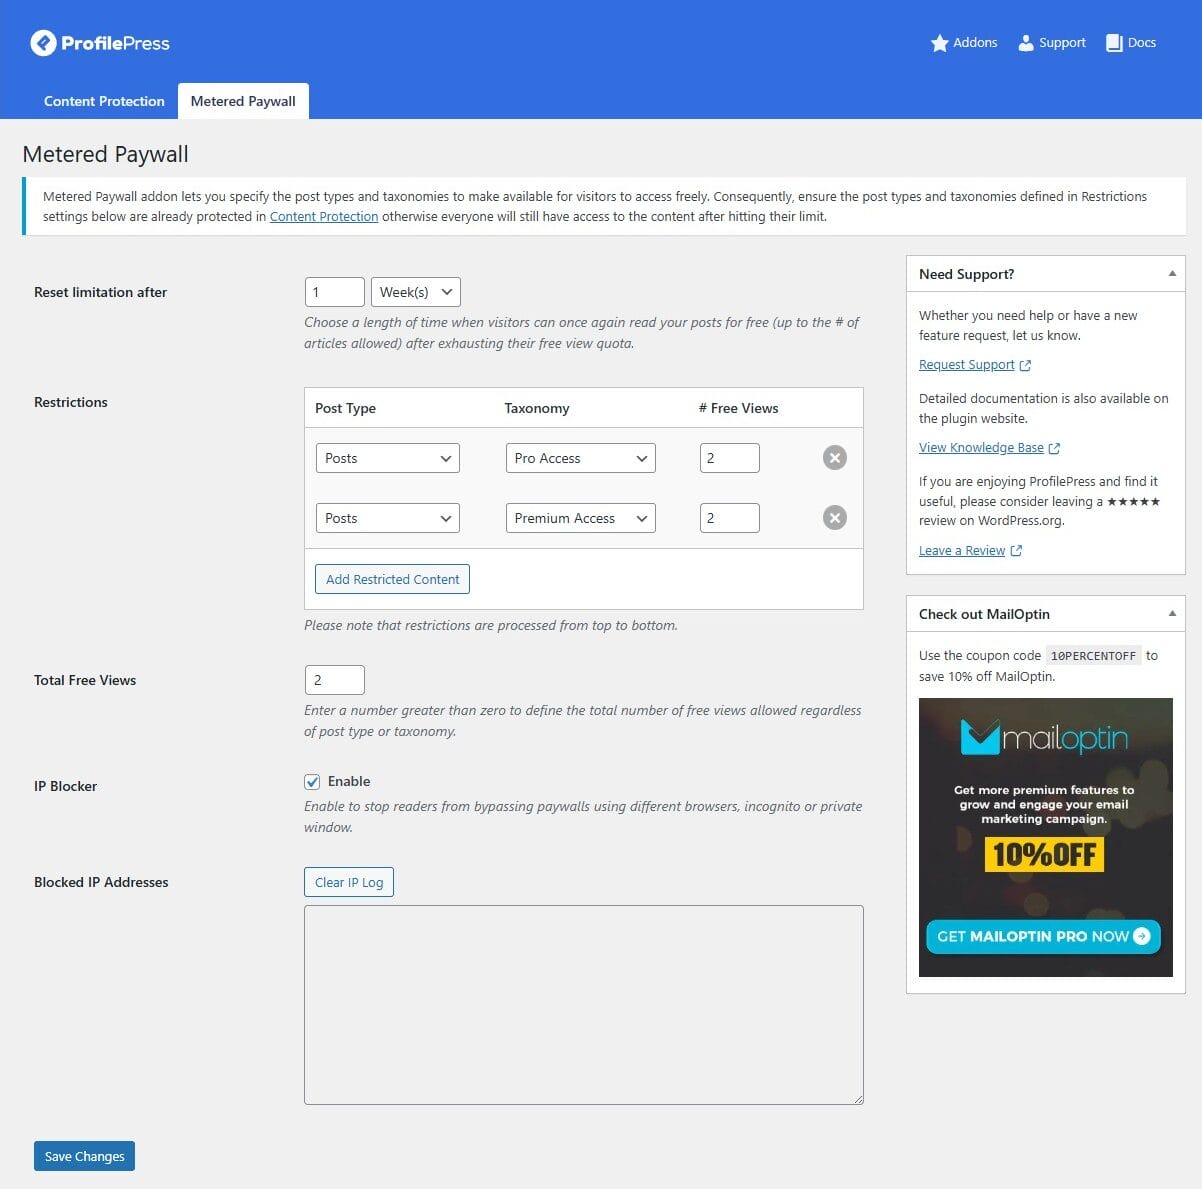
Once that’s set, you can begin configuring the metered paywall. The first setting, Reset limitation after, controls how long a restricted user must wait before getting free access again after hitting their limit. You can set this period in hours, days, weeks, months, or even years.
Then, under Restriction, decide which post types and taxonomies are available for free viewing and how many views each user gets. You can also set a Total Free Views limit across all content. For added security, enable the IP Blocker to prevent users from bypassing limits via private or incognito browsers.
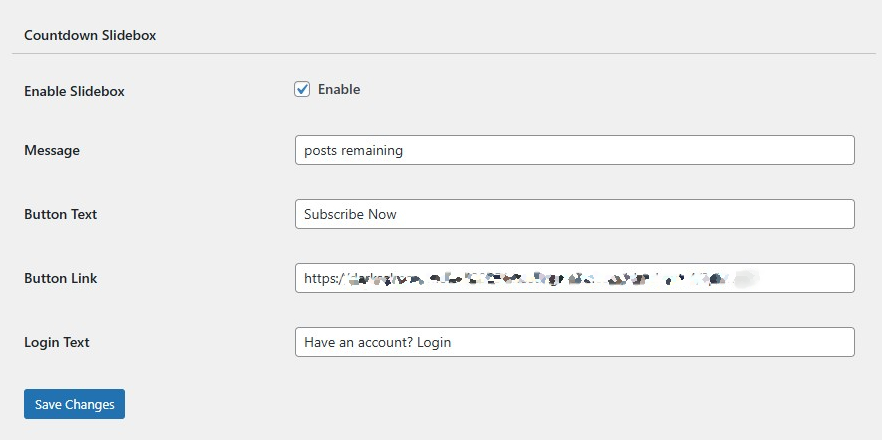
If you want to make your paywall more persuasive, turn on the Countdown Slide feature. This displays a small pop-up box informing visitors of their remaining free articles, along with a button that links to your subscription page (where you can add your membership checkout link).
You can fully customize the button text and message to encourage sign-ups.
Once you’ve finished configuring the settings, click Save Changes to activate the paywall.
From then on, readers will see a notice showing the number of free posts left, along with a clear prompt to subscribe or log in. Clicking the Subscribe Now button will take them directly to your chosen checkout page.
In the image below, a notification box informs the reader that they have zero posts remaining, prompting them to subscribe or log in.
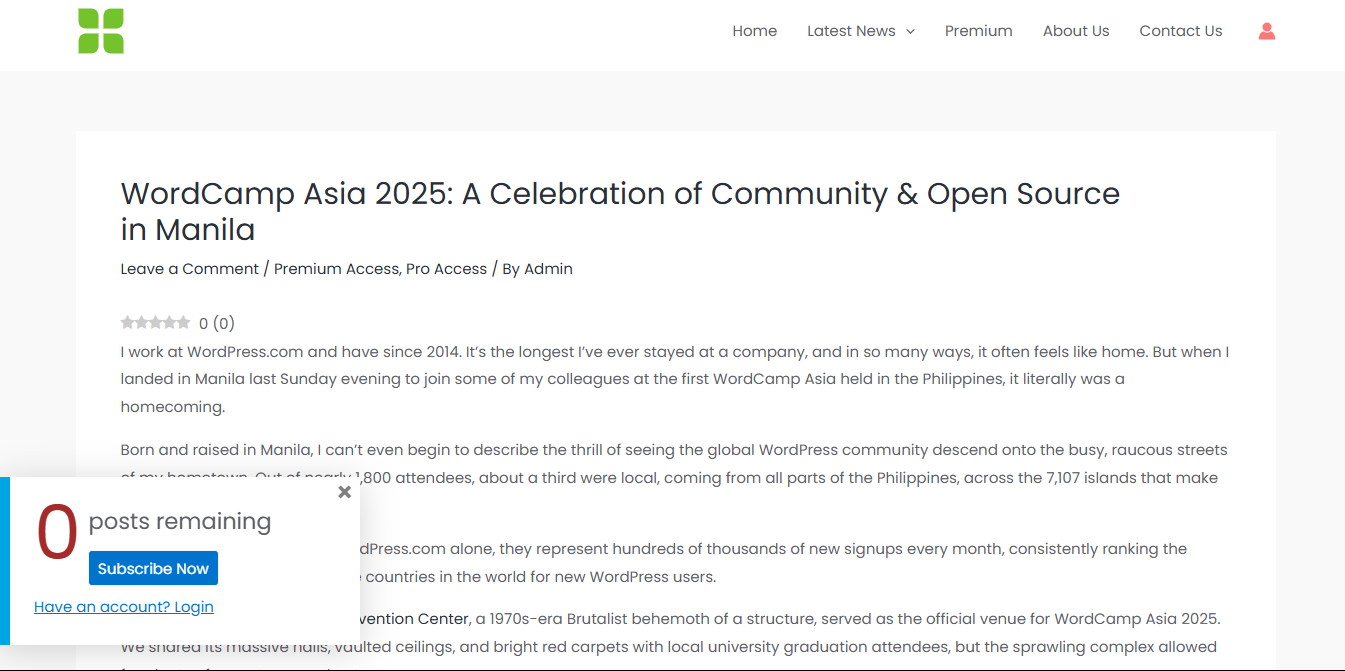
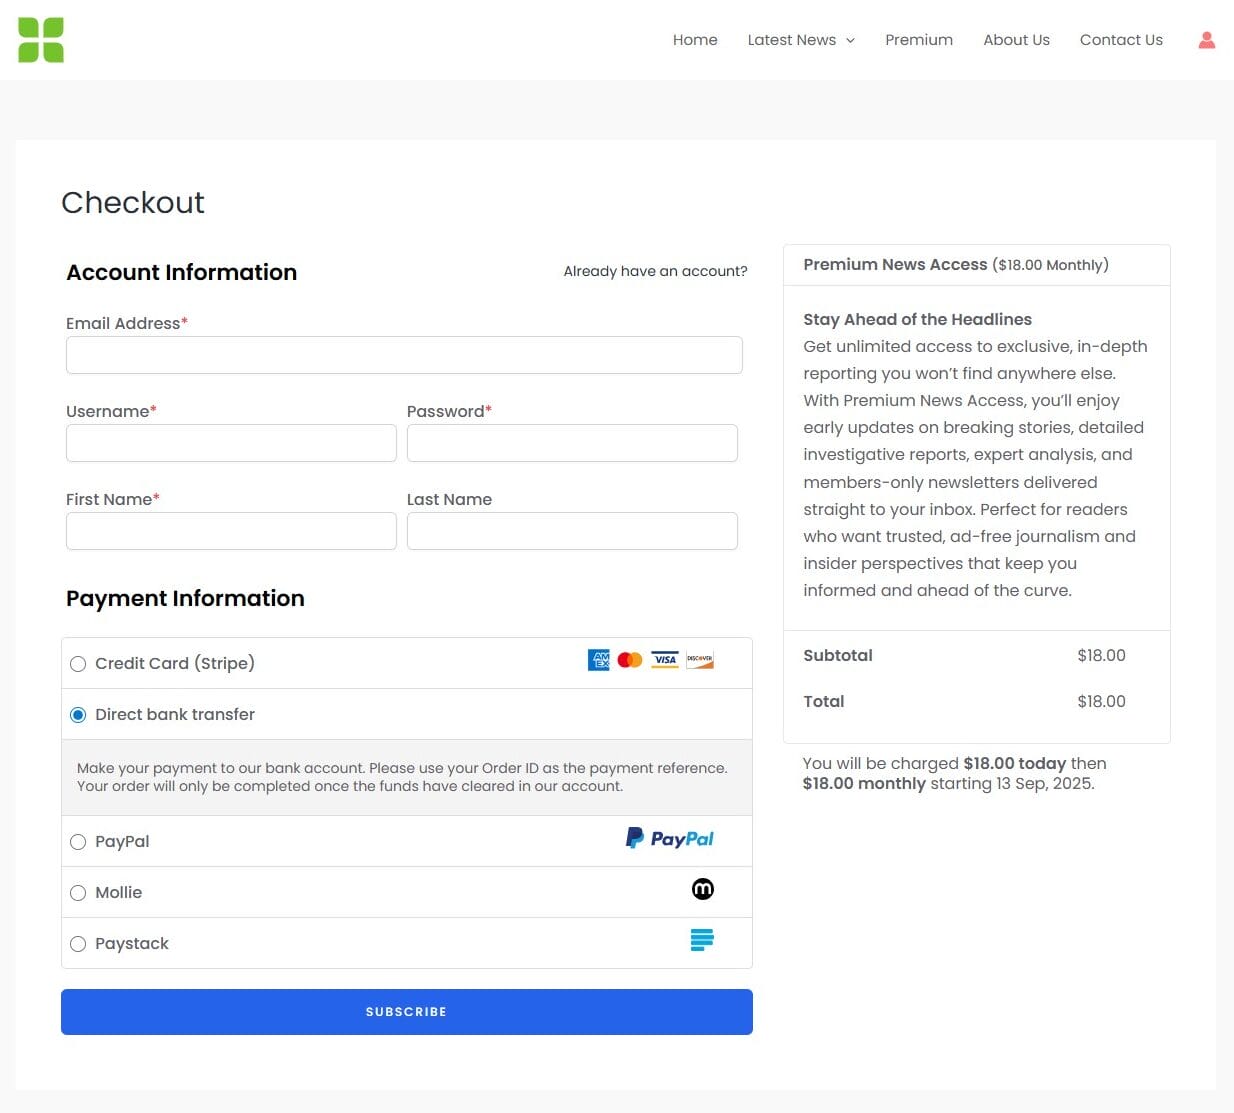
When a reader clicks the Subscribe Now button, they’ll be taken to the checkout page you linked in the Button Link field during the metered paywall setup.
Here’s an example of our checkout page.
That’s it! By following these steps, you can launch a news website that generates income.
Next, let’s look at ProfilePress addons for your news website
Recommended ProfilePress Addons for Your News Website
ProfilePress offers several powerful addons that can enhance your news website, improve audience engagement, and help you manage subscribers more effectively.
Here are some worth considering:
Email Verification: With the Email Confirmation addon, every new user must confirm their email address before gaining full access. This is especially valuable for news websites, as it ensures a genuine user list and reduces spam registrations.
Social Login: The Social Login addon lets readers sign up or log in using popular platforms like Facebook, Twitter, Google, LinkedIn, Yahoo, Microsoft, Amazon, GitHub, VK, and WordPress.com. By making the process faster and more convenient, you increase the chances of readers registering and engaging with your content.
Invite Codes: The Invite Codes addon allows you to set up invite-only registration. You can use it for exclusive communities, private newsrooms, or special launches aimed at journalists and loyal readers.
CAPTCHA: Using the Google reCAPTCHA or Cloudflare Turnstile add-on, you can block fake sign-ups and bot logins that might otherwise flood your site with spam accounts.
Email Marketing Integration: Once your news website is live, keeping readers engaged should be a top priority. With the Mailchimp, MailerLite, or Campaign Monitor addons, you can automatically add new members or subscribers to your email marketing lists. This makes it easy to send newsletters, breaking news alerts, and special announcements that keep readers coming back.
That’s how to start a news website that makes money!
Congratulations! You now have a clear, step-by-step roadmap for launching a profitable online news platform, from choosing your niche and designing your site to integrating membership features and implementing content restriction.
Note that success won’t happen overnight. It takes consistent publishing, strategic planning, and a relentless commitment to delivering high-quality journalism.
Stay consistent with publishing, listen to your audience, and keep refining your approach as your readership grows. Over time, your hard work will turn into a thriving brand that informs, engages, and generates a steady income.
Start today with WordPress and ProfilePress, and take the step toward building your successful news website.