
Do you want to learn how to let customers pay what they want in WooCommerce?
Think about it. A customer might love your product but feel that the fixed price is beyond their budget. Another might find your product so useful that they are happy to pay more than the asking price. With pay-what-you-want pricing, you give both customers the freedom to choose an amount that works for them.
WooCommerce doesn’t offer this pricing model out of the box, but a plugin can fill that gap. You can also set minimum and maximum prices, so customers get flexibility while you keep some control over what you charge.
In this guide, we’ll explain what pay-what-you-want pricing is and why it might work for your store. Then we’ll show you three ways to set it up: using WPC Name Your Price for WooCommerce, Name Your Price for WooCommerce, and ProfilePress.
We’ll also share best practices for running open pricing so it actually pays off, and wrap up with answers to the questions store owners ask most often.
By the end, you’ll know which option suits your situation and how to get it running.
What Is Pay-What-You-Want Pricing?
Pay-what-you-want pricing is a sales model that allows customers to choose how much they want to pay for a product, service, or other offering.
Instead of requiring every customer to pay the same fixed amount, you let them enter a price they can afford or feel comfortable paying. Depending on your pricing rules, you can accept any amount or set a minimum and maximum price.
For example, imagine that you sell an ebook for $20. With regular pricing, every customer must pay $20 to purchase it. With a pay-what-you-want model, customers could enter $10, $15, $20, or even $30, depending on the rules you establish.
The approach can be particularly useful when you want to:
- Accept donations for a charity, church, or community project.
- Sell ebooks, music, artwork, templates, and other digital products.
- Let customers contribute different amounts toward a cause.
- Offer flexible prices for selected services.
- Test how much customers are willing to pay for a product.
- Give customers access to a product at a price they can afford.
However, pay-what-you-want pricing does not guarantee higher sales or profits. Its success depends on your audience, the value of your offer, your costs, and how you present the pricing option.
Why Let Customers Choose Their Own Prices in WooCommerce?
Letting customers set their own prices can create a different shopping experience than the usual fixed-price model. Below are some reasons to consider it for your WooCommerce store.
1. It removes the friction that kills sales: A customer who’s on the fence about a product has two choices: buy it or walk away. Pay-what-you-want gives them a third option. They can pay what feels fair and still get the product. That’s one sale you would have lost, plus a customer who now trusts you.
2. People tend to be generous when they feel trusted: This surprises a lot of store owners. When you stop treating pricing like a guard booth and start treating it like an open door, most buyers respond in kind. Fans of your work often pay above the asking price. They want to support what you do. The ones who pay very little are usually the ones who genuinely couldn’t afford more, and they were never going to buy at full price anyway.
3. It works beautifully for certain products: Donations, ebooks, digital downloads, sample packs, templates, gift cards, community-funded projects, tipping. Anything where the value is subjective or where the buyer’s budget varies wildly is a natural fit.
4. You still keep control: This is the part people miss. Pay-what-you-want doesn’t mean no rules. The plugins we’ll cover let you set a minimum price and a maximum price. You decide the floor. Customers decide where they land above it. That single setting is the difference between a pricing experiment and a pricing disaster.
5. It builds goodwill that turns into repeat business: Someone who chooses their own price remembers the experience. They tell friends. They come back. They leave reviews. That kind of loyalty is hard to buy with a discount coupon, and it costs you nothing to offer.
6. It gives you real data: When customers pick their own prices, you learn what your audience actually thinks your work is worth. That’s information a fixed price tag will never tell you. Run the experiment for a month and look at the numbers. You might find your “real” price sits higher than you thought, or that a lower suggested price pulls in far more buyers overall.
Now let’s show you how to set it up.
How to Let Customers Pay What They Want in WooCommerce Using WPC Name Your Price
WPC Name Your Price for WooCommerce lets customers decide how much they want to pay for products in your store. You can allow them to enter their preferred amount or choose from a list of prices you provide.
You can also set minimum and maximum prices to keep your pricing under control while giving customers some freedom.
Let’s look at how to set up the plugin and let customers choose their own prices in WooCommerce.
Step 1: Install and Activate the Plugin
First, make sure WooCommerce is installed and active on your WordPress website. Without it, the plugin has nothing to work with.
Next, log in to your WordPress dashboard and head to Plugins > Add New Plugin. Search for WPC Name Your Price, then click Install Now
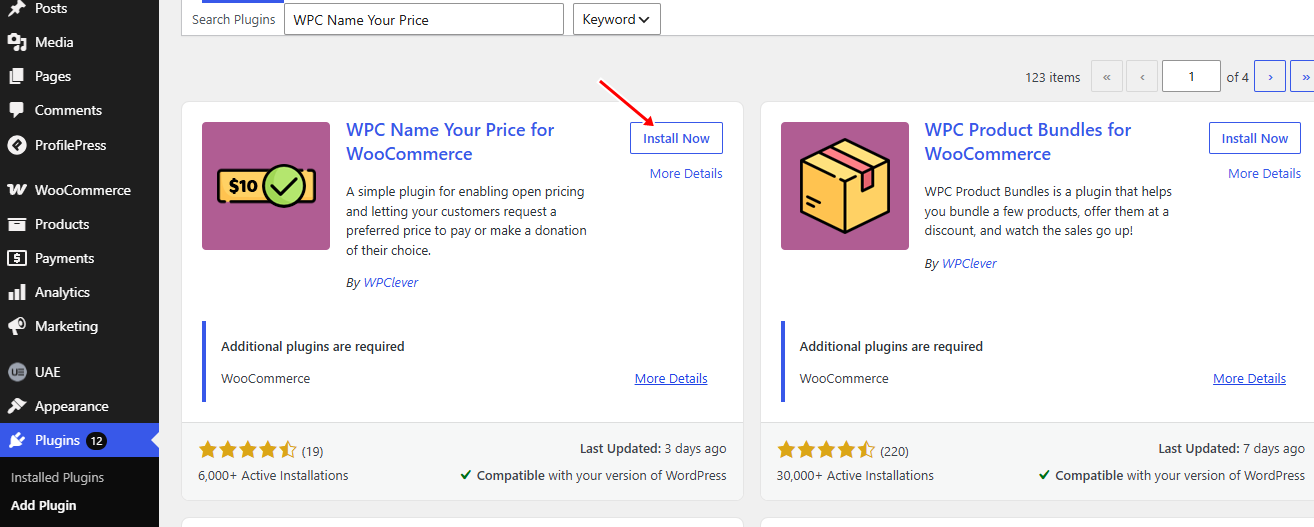
Once the installation is complete, click Activate to enable the plugin on your website.
Step 2: Open the Plugin Settings
After activation, go to WPClever > Name Your Price in your WordPress dashboard.
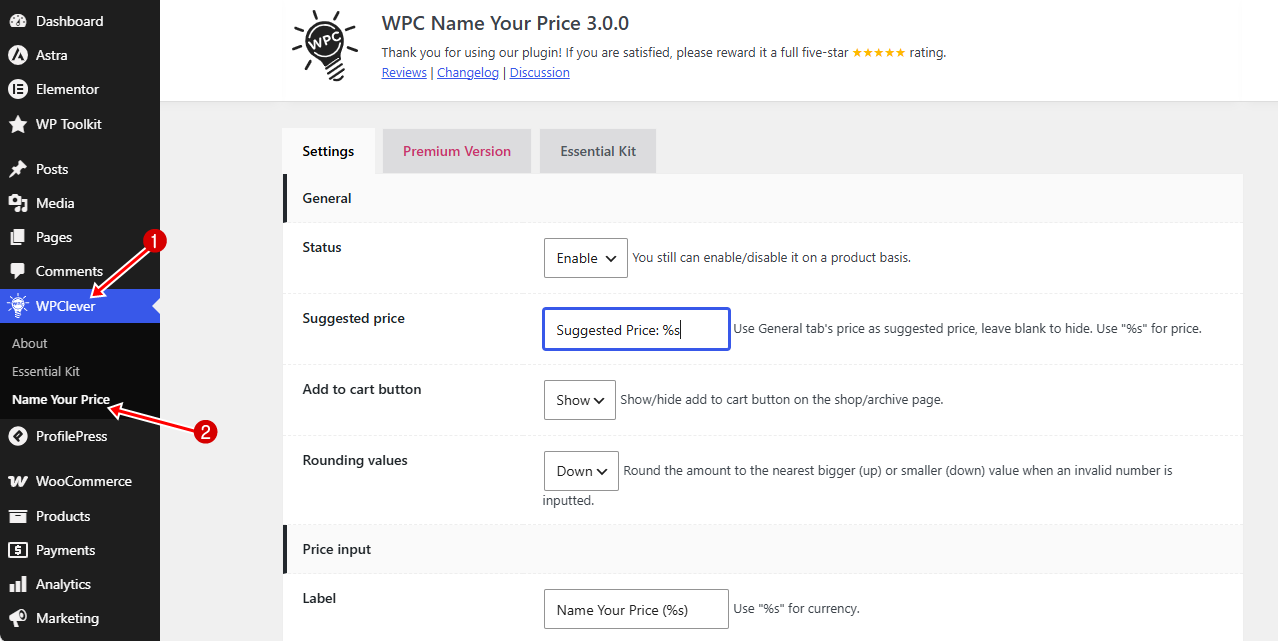
Here, you can configure the plugin’s general settings and decide how customers choose their preferred prices. You can enable or disable the feature globally, set a suggested price to guide customers, and choose whether to display the Add to Cart button on shop and archive pages. You can also customize the price field label, set a default value, and choose the input type customers will use to enter their prices.
The plugin also lets you set minimum and maximum prices to control how much customers can pay.
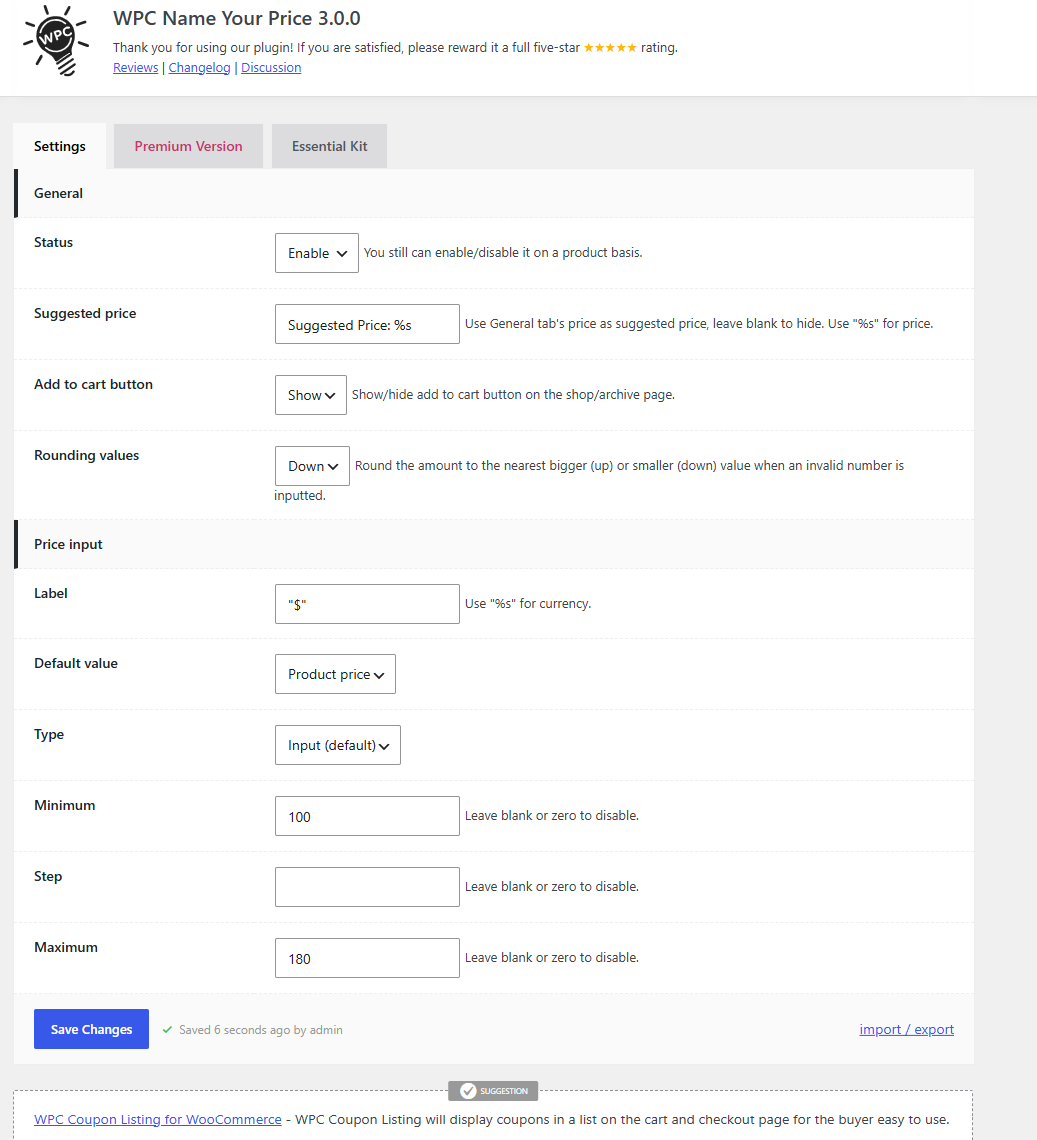
After you finish configuring the options, click Save Changes to apply your settings.
Step 3: Test the Product Page
Visit your product page to see how the new pricing option works.
Check that the custom price field appears correctly and that customers can enter their preferred amount. Confirm that the minimum and maximum price limits work as expected and that the amount entered is reflected correctly in the cart and at checkout. You should also check that the final order records the correct product price.
Test both valid and invalid amounts. For example, if your minimum price is $105, try entering $100 to confirm that the plugin prevents customers from paying below the allowed amount.
Also check the product page on a mobile device and complete a test order to ensure your payment gateway processes the selected price correctly.
Below is a screenshot showing how the custom price field appears on the product page, allowing customers to enter the amount they want to pay.
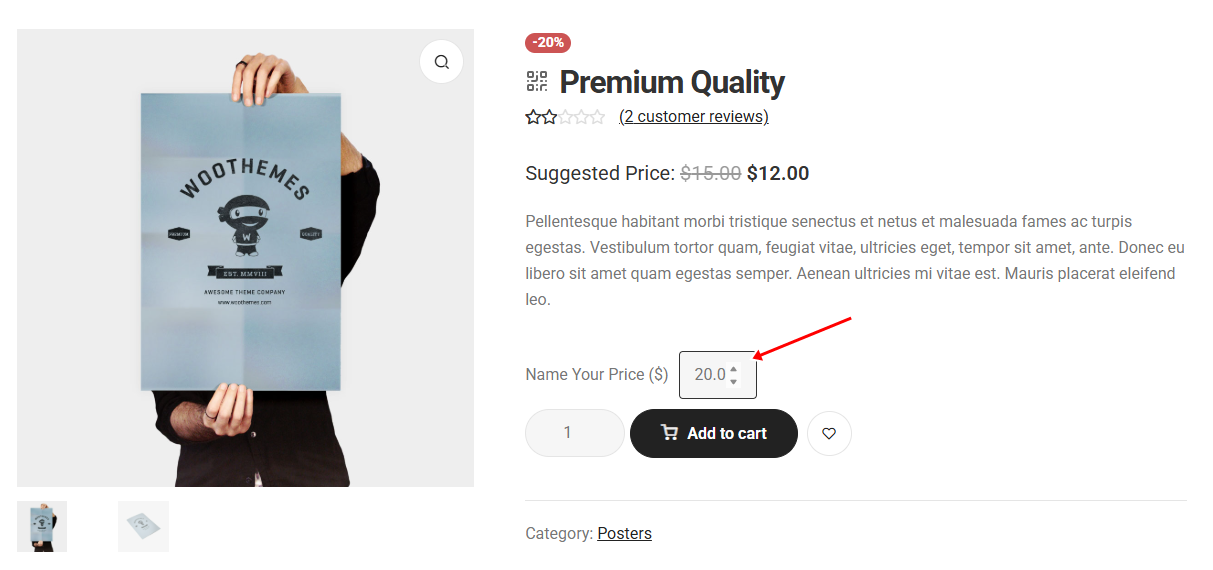
Once you confirm everything works as expected, your WooCommerce store is ready to offer pay-what-you-want pricing to customers.
Another Plugin You Can Use: Name Your Price for WooCommerce
Another option is Name Your Price for WooCommerce by add-ons.org. This plugin lets customers enter the amount they want to pay for selected products in your online store.
Below, we will show you how to set it up.
Step 1: Install and Activate the Plugin
First, make sure WooCommerce is installed and active on your WordPress website. The plugin depends on WooCommerce.
Next, log in to your WordPress dashboard and go to Plugins > Add New Plugin. Search for Name Your Price for WooCommerce, then click Install Now.
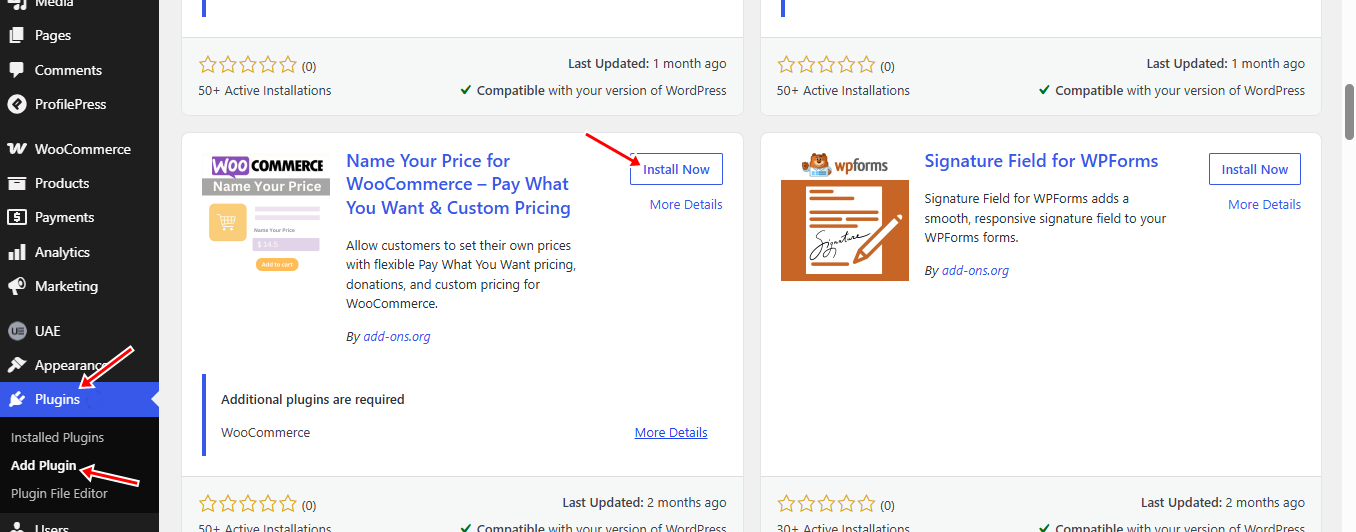
Once WordPress finishes installing the plugin, click Activate to enable it on your website.
Step 2: Create or Edit a WooCommerce Product
After activating the plugin, choose the product for which you want to enable flexible pricing.
From your WordPress dashboard, navigate to Products > Add New to create a product. If you already have a product in your store, go to Products > All Products and click Edit below the product you want to update.
Enter the product name and description, upload a product image if needed, and configure the other details as you normally would.
Next, locate the Product data section on the product editing page and check the Name Your Price box for the product.
A Name Your Price tab then appears in the product data box. In it, you can set the suggested price label, a default amount, the minimum and maximum prices customers can enter, the text that tells customers the minimum price, and the button text shown on shop pages.
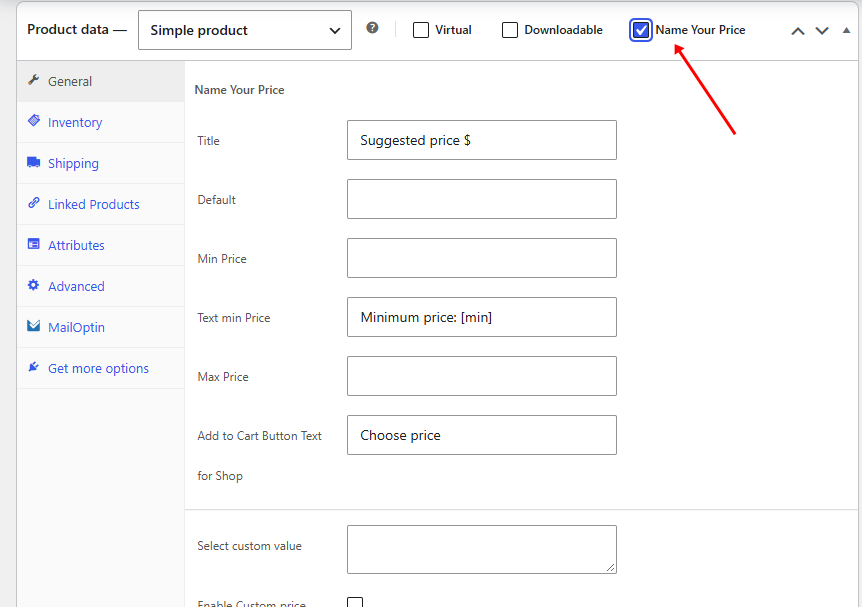
After configuring the product, save your changes or click Publish if you are creating a new product.
Step 3: Check the Product Page
After saving your changes, visit the product page on your website to make sure the plugin is working as expected.
You should see a price field where customers can enter the amount they want to pay. If you have set a suggested price, check that it appears correctly. Also, confirm that the minimum and maximum price limits work as expected.
Try entering different amounts to see how the price field responds. If you have set price limits, check that customers cannot proceed with amounts outside the allowed range.
Next, add the product to your cart and proceed to checkout. Make sure the amount you entered appears correctly in the cart and at checkout before completing a test order.
Below is a screenshot showing how the price field appears on our test product page.

A Simpler Alternative: ProfilePress
ProfilePress is an effective WordPress membership plugin that lets you build paid membership sites, sell digital products, and control who can access your content.
Its Pay What You Want addon lets customers choose how much to pay while giving you control over the minimum and maximum prices they can enter. It’s included in every ProfilePress Pro plan, starting with Standard.
Unlike WooCommerce name-your-price plugins, which add flexible pricing for products in an online store, ProfilePress offers an alternative for businesses that want to accept flexible payments for memberships and digital products without setting up a traditional WooCommerce store. If you already run a WooCommerce store, ProfilePress also integrates with WooCommerce, so you can sell memberships alongside your products.
This makes ProfilePress worth considering if you want to sell paid memberships, provide access to exclusive content, or offer digital products at prices customers can choose themselves.
Below, we will show you how to set up the ProfilePress Pay What You Want addon and let customers choose how much they want to pay on your WordPress website.
Step 1: Install and Activate ProfilePress
Visit the pricing page and purchase a plan. After completing your purchase, log in to your ProfilePress account and download the plugin ZIP file to your computer. For the full steps, see how to install ProfilePress.
Next, log in to your WordPress dashboard and navigate to Plugins > Add New Plugin. Click Upload Plugin, select the ZIP file you downloaded, and click Install Now.
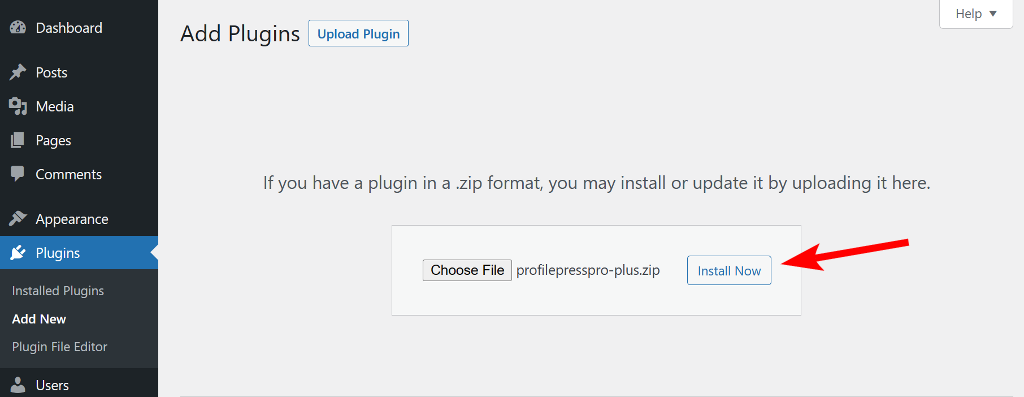
Once WordPress finishes installing the plugin, click Activate Plugin to enable it on your website.
Step 2: Activate the Pay What You Want Addon
To do this, head to ProfilePress > Addons in your dashboard, find Pay What You Want, and activate it.
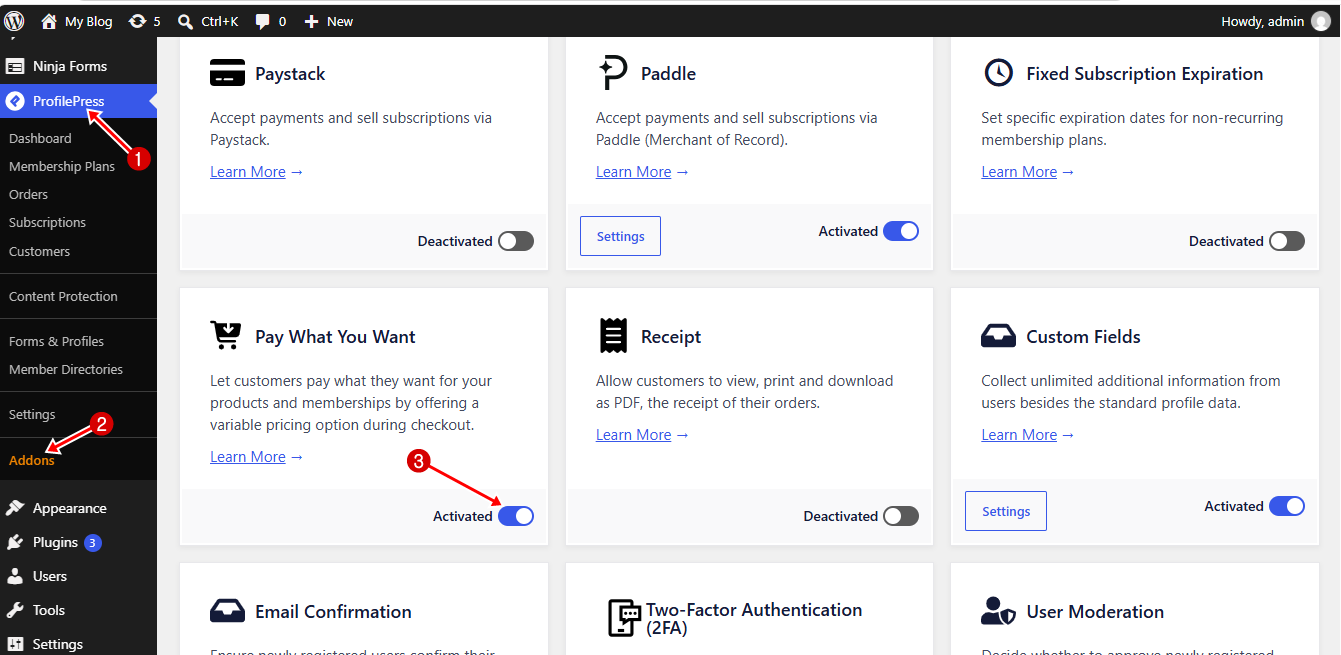
This addon lets customers choose their own amount in WordPress instead of paying a fixed price.
Step 3: Set Up Your Payment Gateway
Now you need somewhere for the money to land. ProfilePress connects with several gateways, including Stripe, PayPal, Paystack, Mollie, Paddle, and RazorPay.
To set it up, go to ProfilePress > Settings > Payments > Payment Methods and click Configure next to the gateway you want to use.
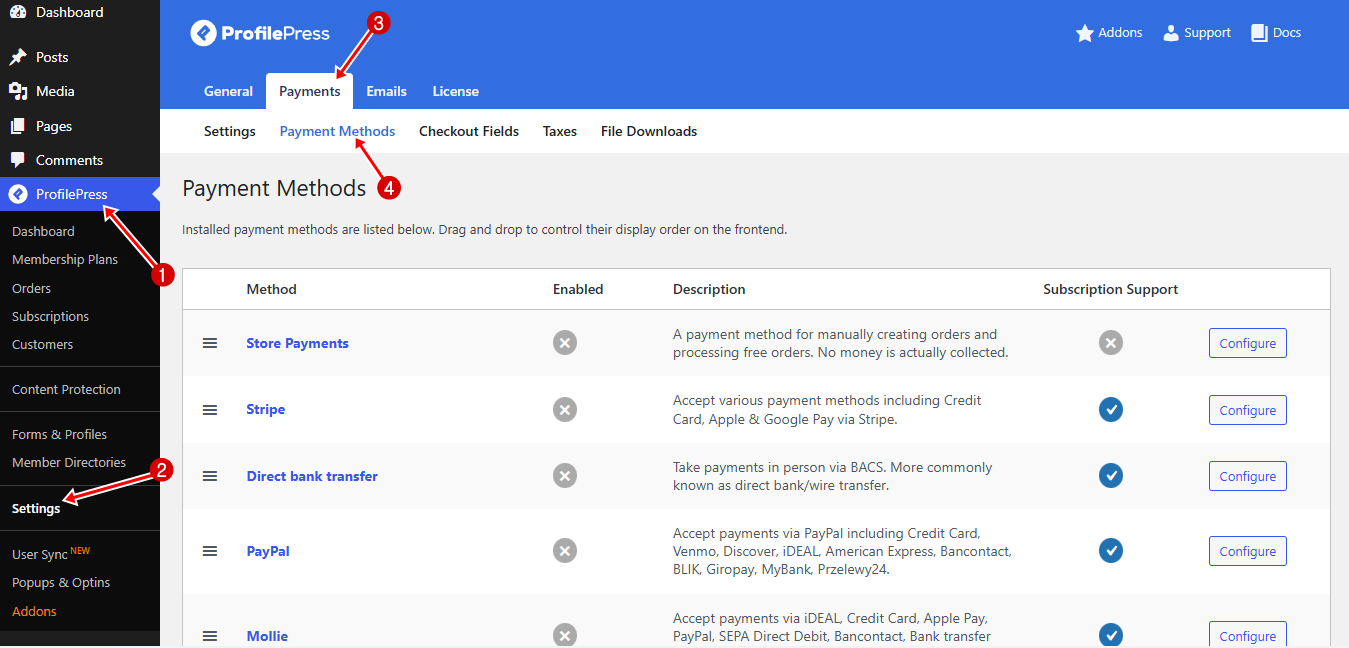
Work through its settings, then hit Save Changes when you’re done.
Step 4: Create a Digital Product
Before adding your digital product, we need to configure the download settings. To do this, go to ProfilePress > Settings > Payments > File Downloads. For more on these options, see selling files and digital downloads.
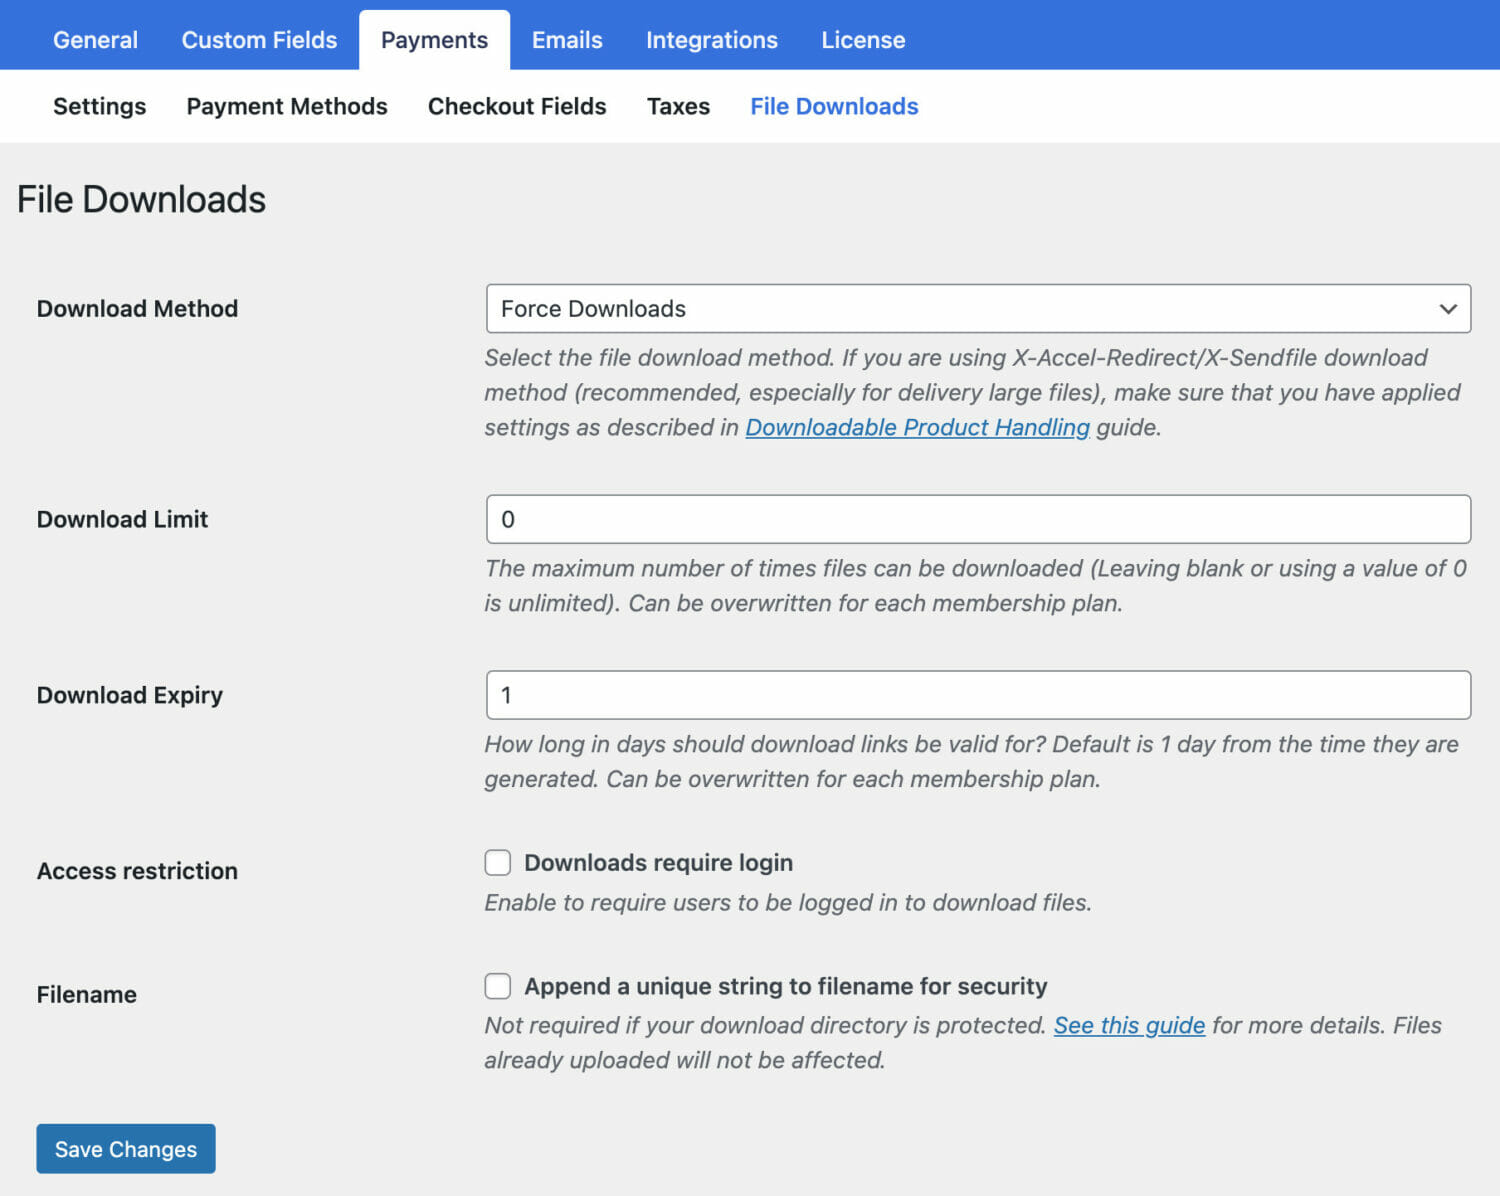
Select a File Download Method from the dropdown, set the Download Limit to control how many times customers can download a file, and Download Expiry to determine when their download links expire.
You can also enable Access Restriction to require users to log in before downloading files. For extra security, enable the option to append a unique string to filenames. Once you have configured these settings, click Save Changes.
Next, go to ProfilePress > Membership Plans > Add New to create a plan. Enter the plan name and price. With Pay What You Want turned on, this price becomes the suggested price. Then scroll down to Pay What You Want and check Allow customers to pay what they want.
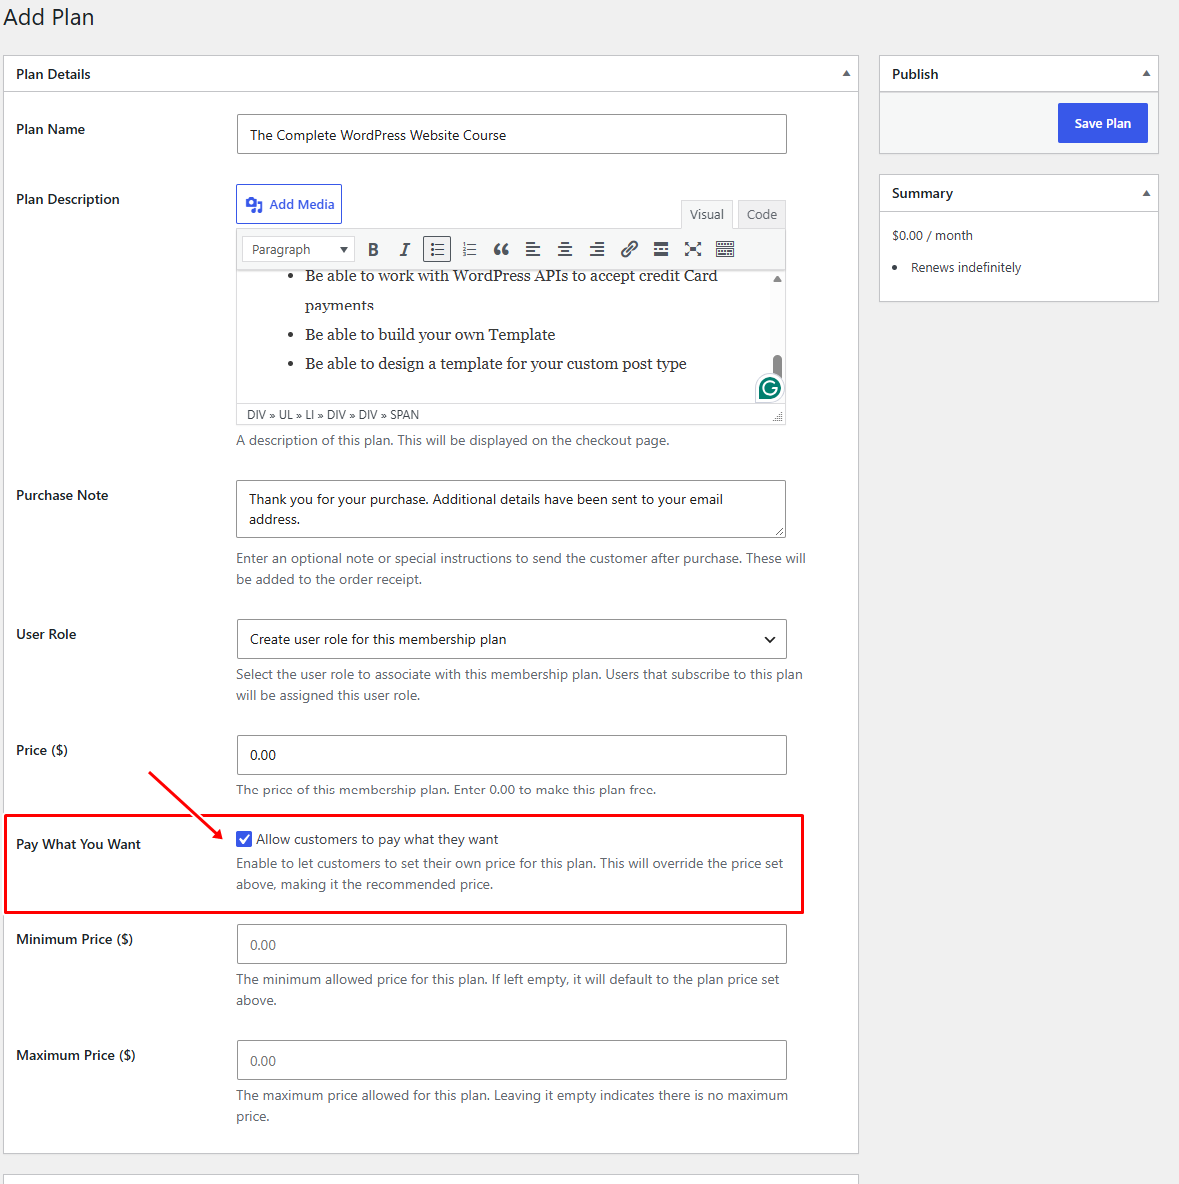
Then set the Minimum Price and Maximum Price. If you leave the minimum empty, it defaults to the plan price. Leave the maximum empty if you don’t want an upper limit. See setting up Name Your Price payments for more detail.
Next, configure the Subscription settings. For a digital product, the subscription settings are usually a one-time payment.
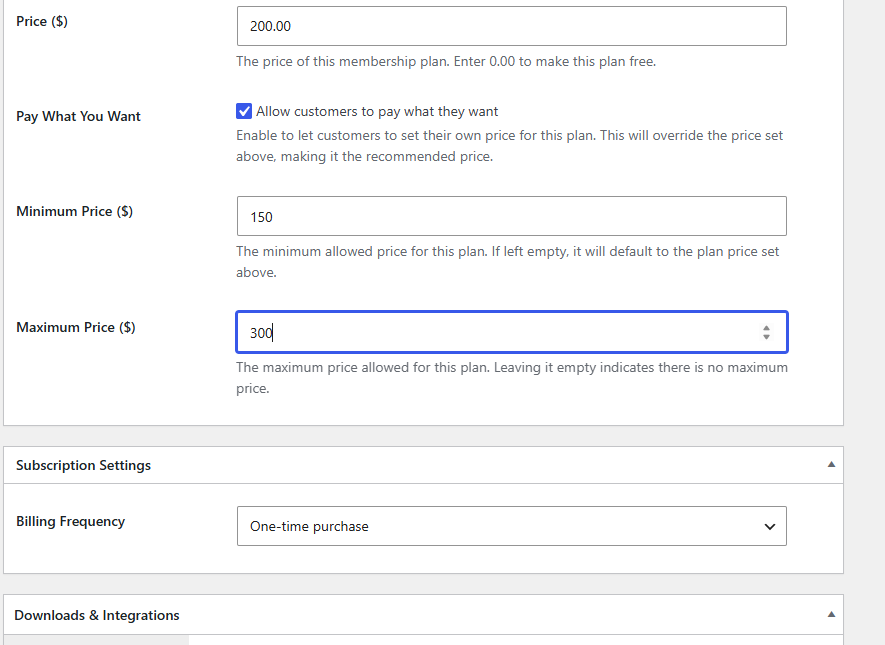
Then scroll to the Downloads & Integration section and open the Digital Product tab.
Click Add File and enter a name for your downloadable product. If the file is hosted elsewhere, enter its URL. Otherwise, click Choose File to select an existing file from your Media Library or upload a new one.
You can also set a download limit and expiry period for the file if needed.
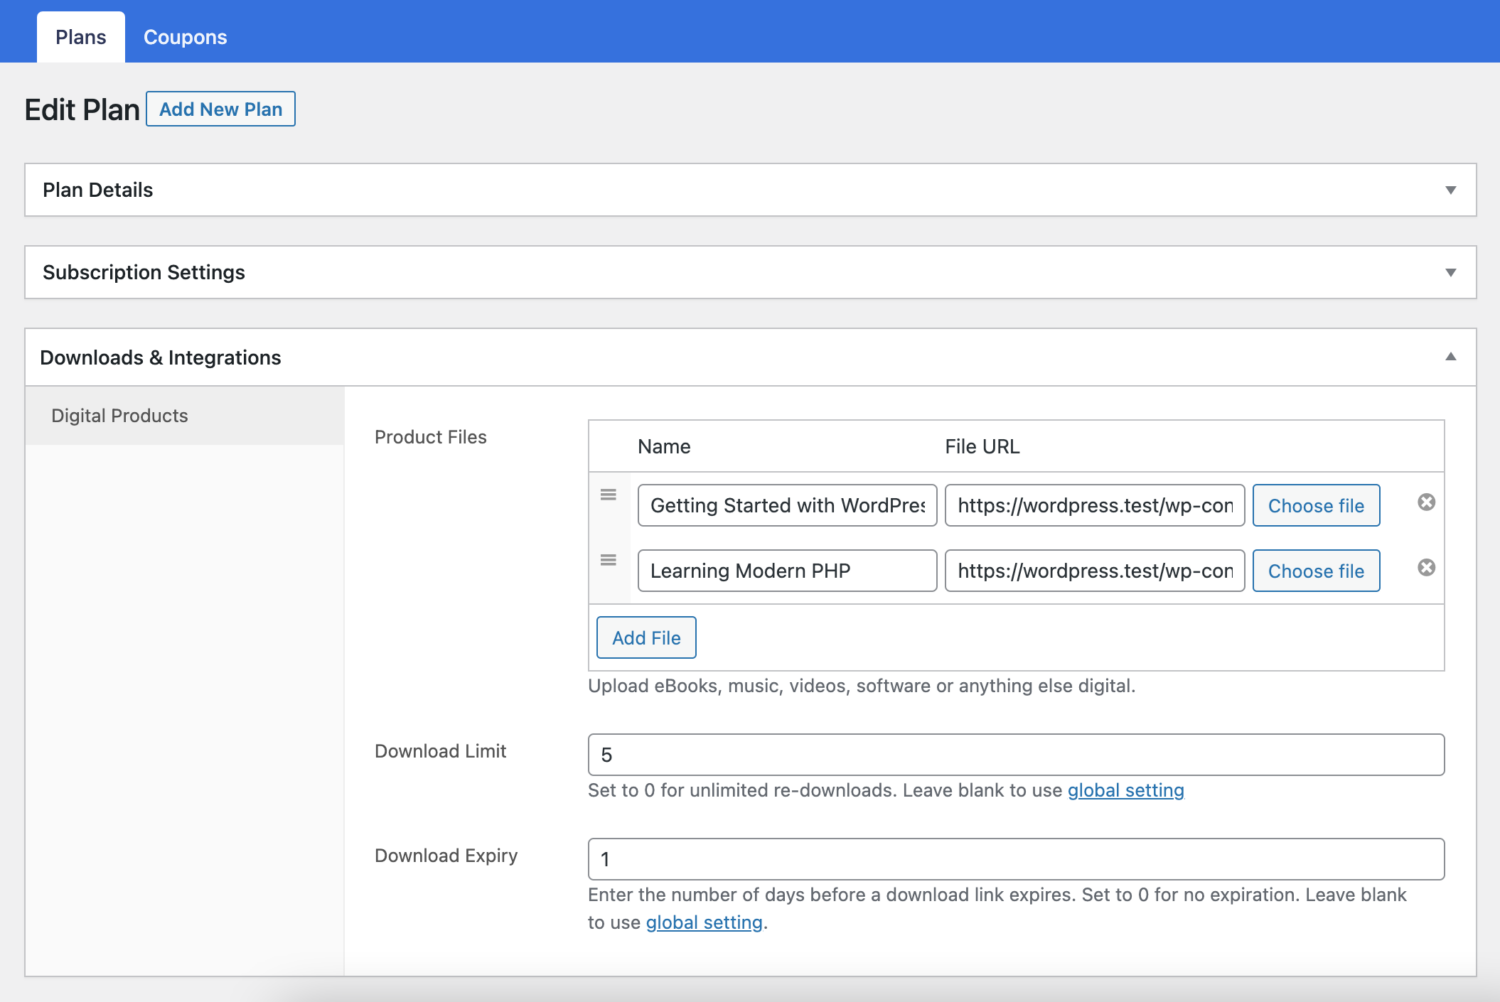
Once you have finished, click on Save Plan.
Step 5: Configure the Checkout Page
Now that your digital product is ready, set up the checkout page. This is where customers enter their details and complete their payments, so you want to make the process as clear and easy as possible.
To set it up, go to ProfilePress > Settings > Payments > Checkout Fields in your WordPress dashboard.
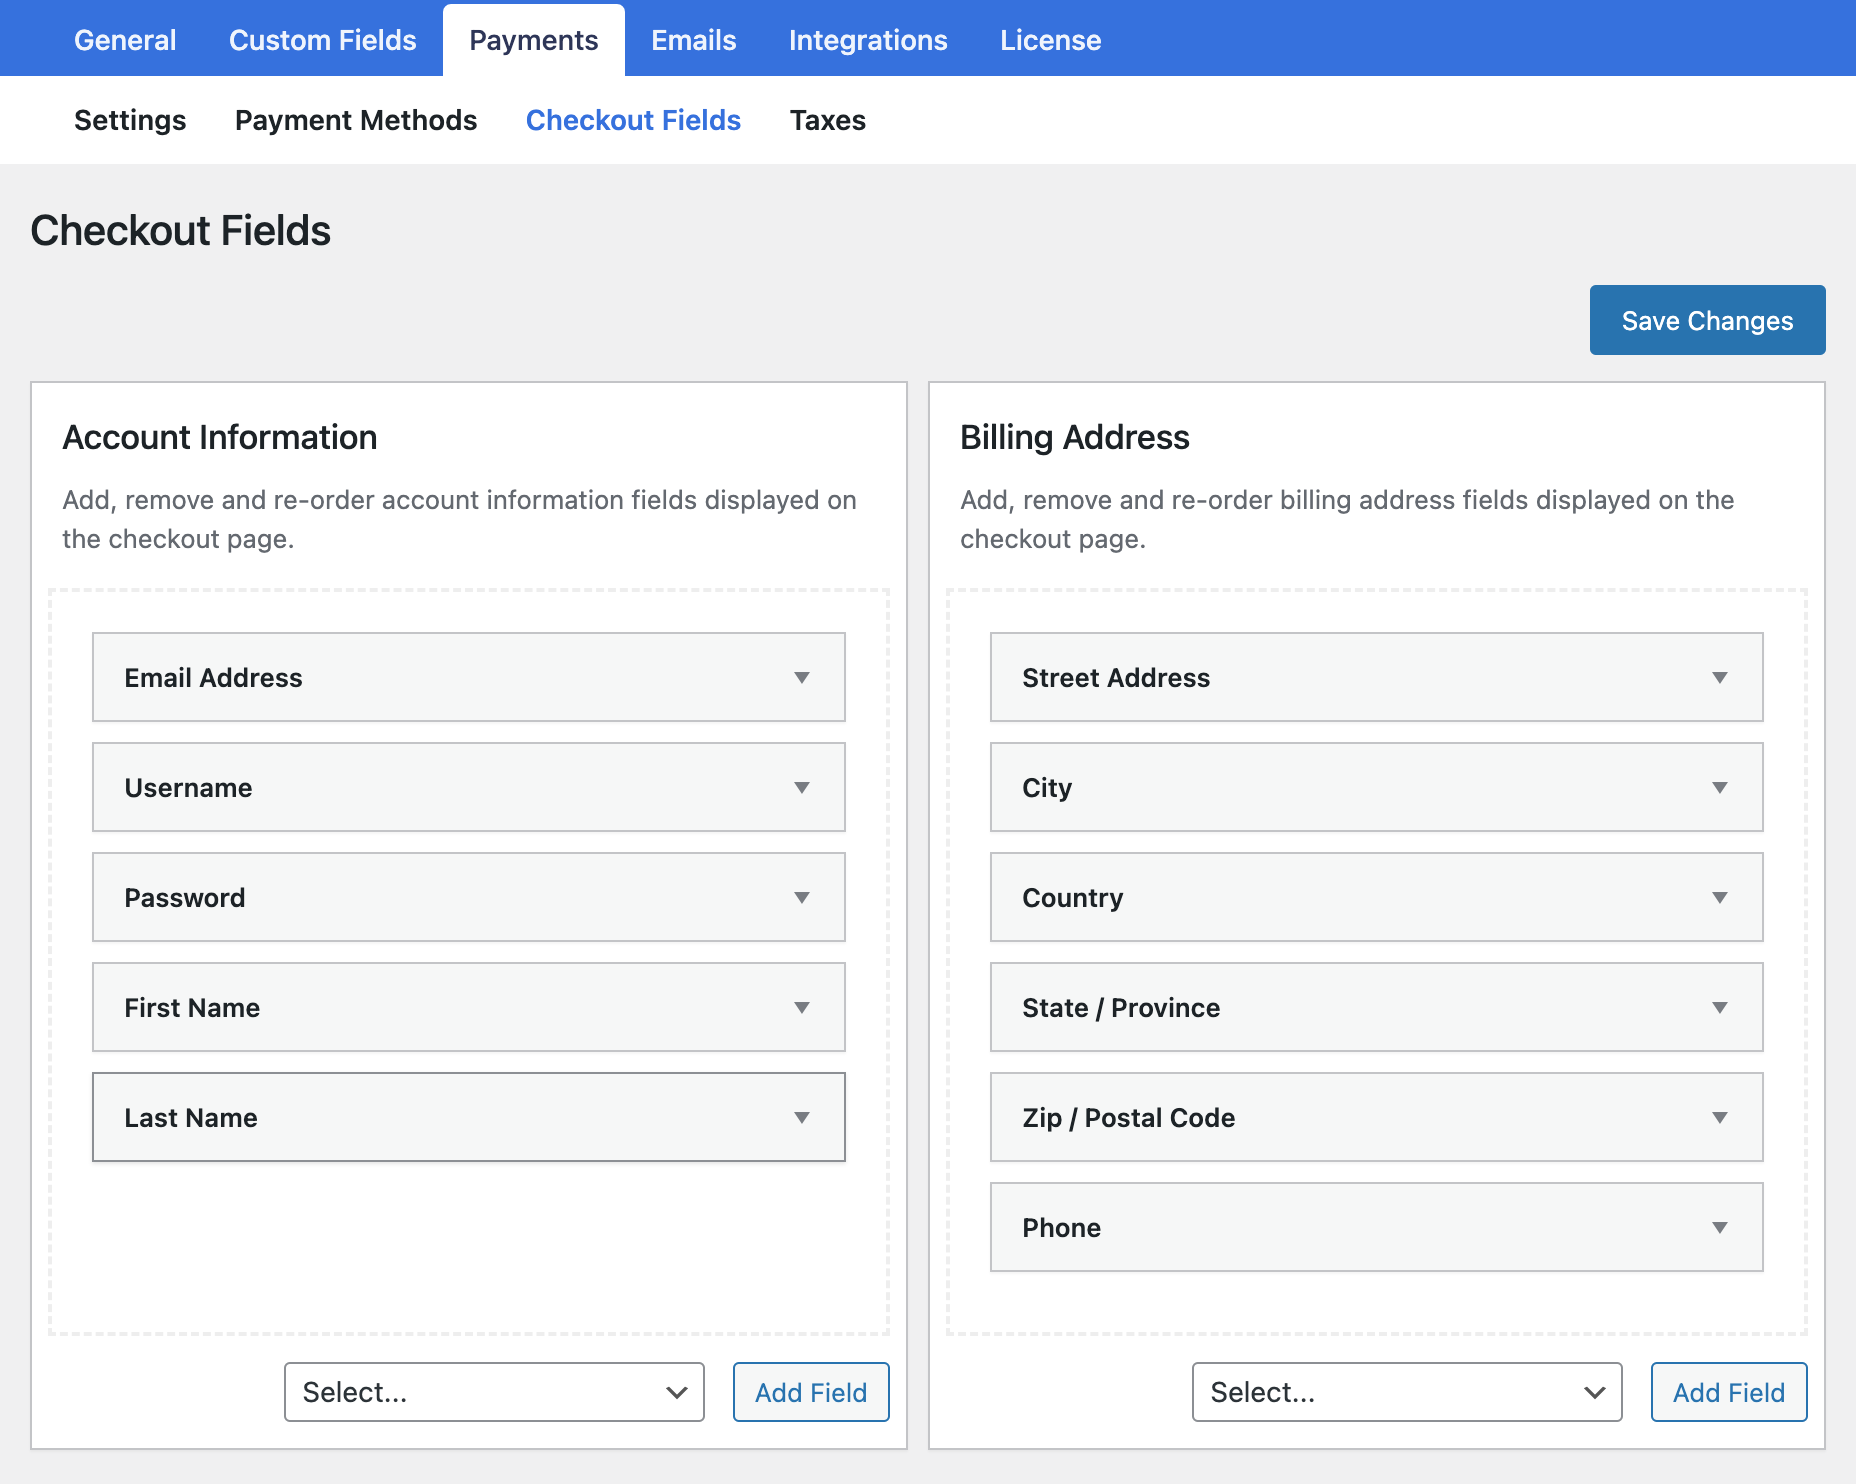
Here, you can arrange the fields on your checkout form and choose the information you want to collect from customers. ProfilePress also lets you add custom fields when you need extra details.
Once you’re happy with the checkout form, click Save Changes to apply your settings.
Step 6: Add the Digital Product to Your Site
Now that your digital product and checkout settings are ready, make them available to customers. Create a shop page where visitors can browse your offerings, whether you’re selling digital downloads, memberships, subscriptions, or online courses.
You can build the page using the WordPress block editor or use a page builder such as Elementor, Beaver Builder, WPBakery, or Visual Composer if you prefer a ready-made layout. For example, here’s a shop page we created using Elementor.
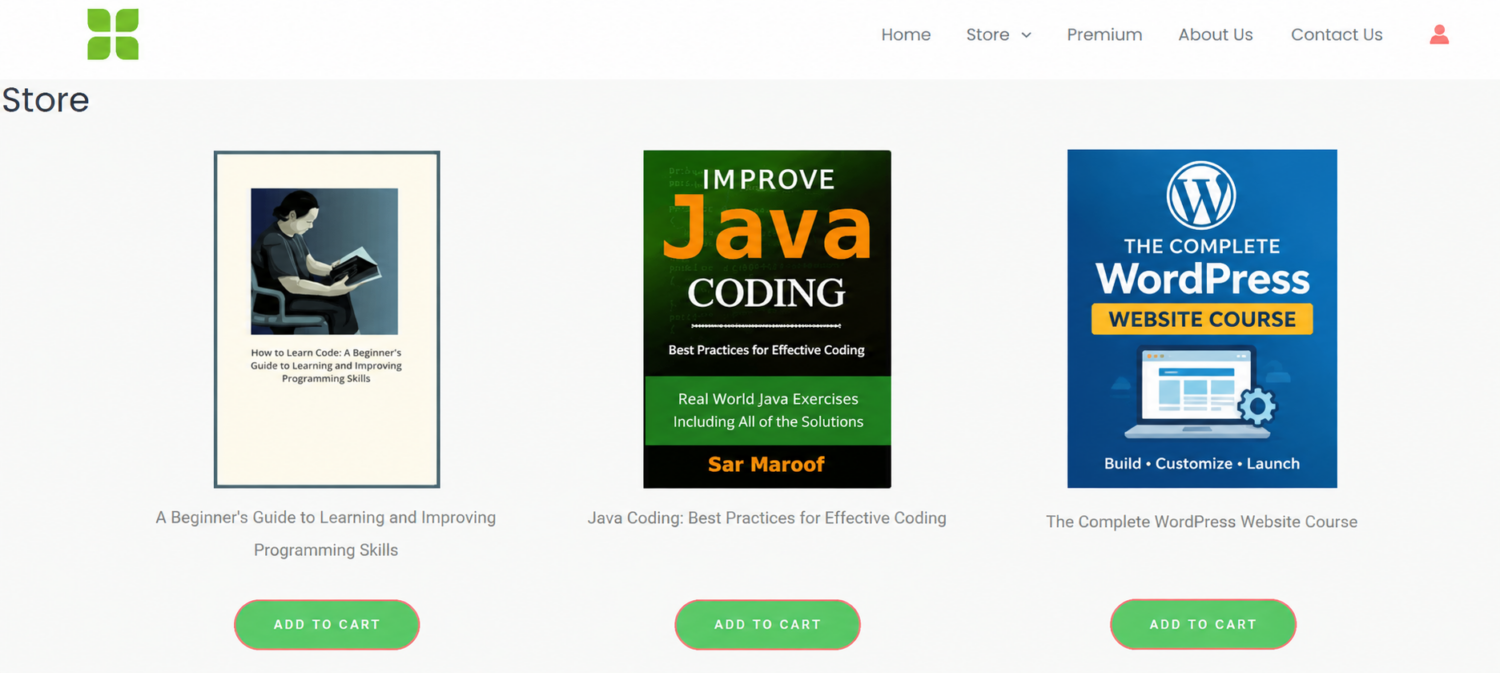
Once your shop page is ready, add an Add to Cart or Buy Now button for each product or membership plan. Link each button to the correct checkout page so customers can purchase the item they want.
To do this, go to ProfilePress > Membership Plans in your WordPress dashboard and locate the plan you created earlier.
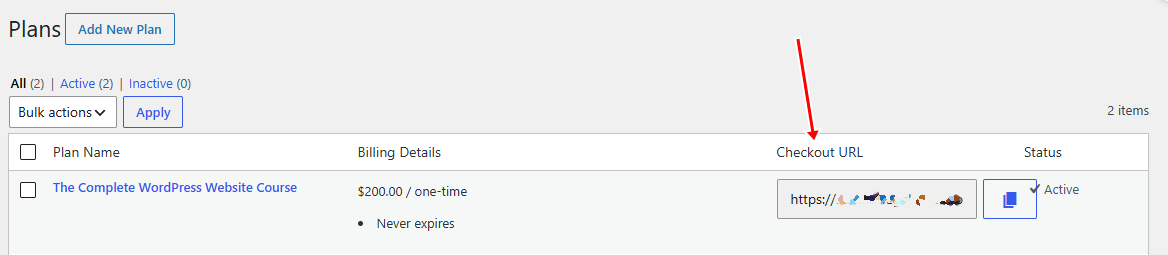
Copy its checkout link and paste it into the corresponding button on your shop page.
If you’d rather not build the shop page by hand, add the [profilepress-plans] shortcode to any page instead. It shows your plans as cards, each with a button to its checkout. See how to show membership plans on any page.
Now, when a customer clicks the button, they will be taken to the checkout page for that specific plan, where they can enter their details, input their desired amount, and complete their payment.
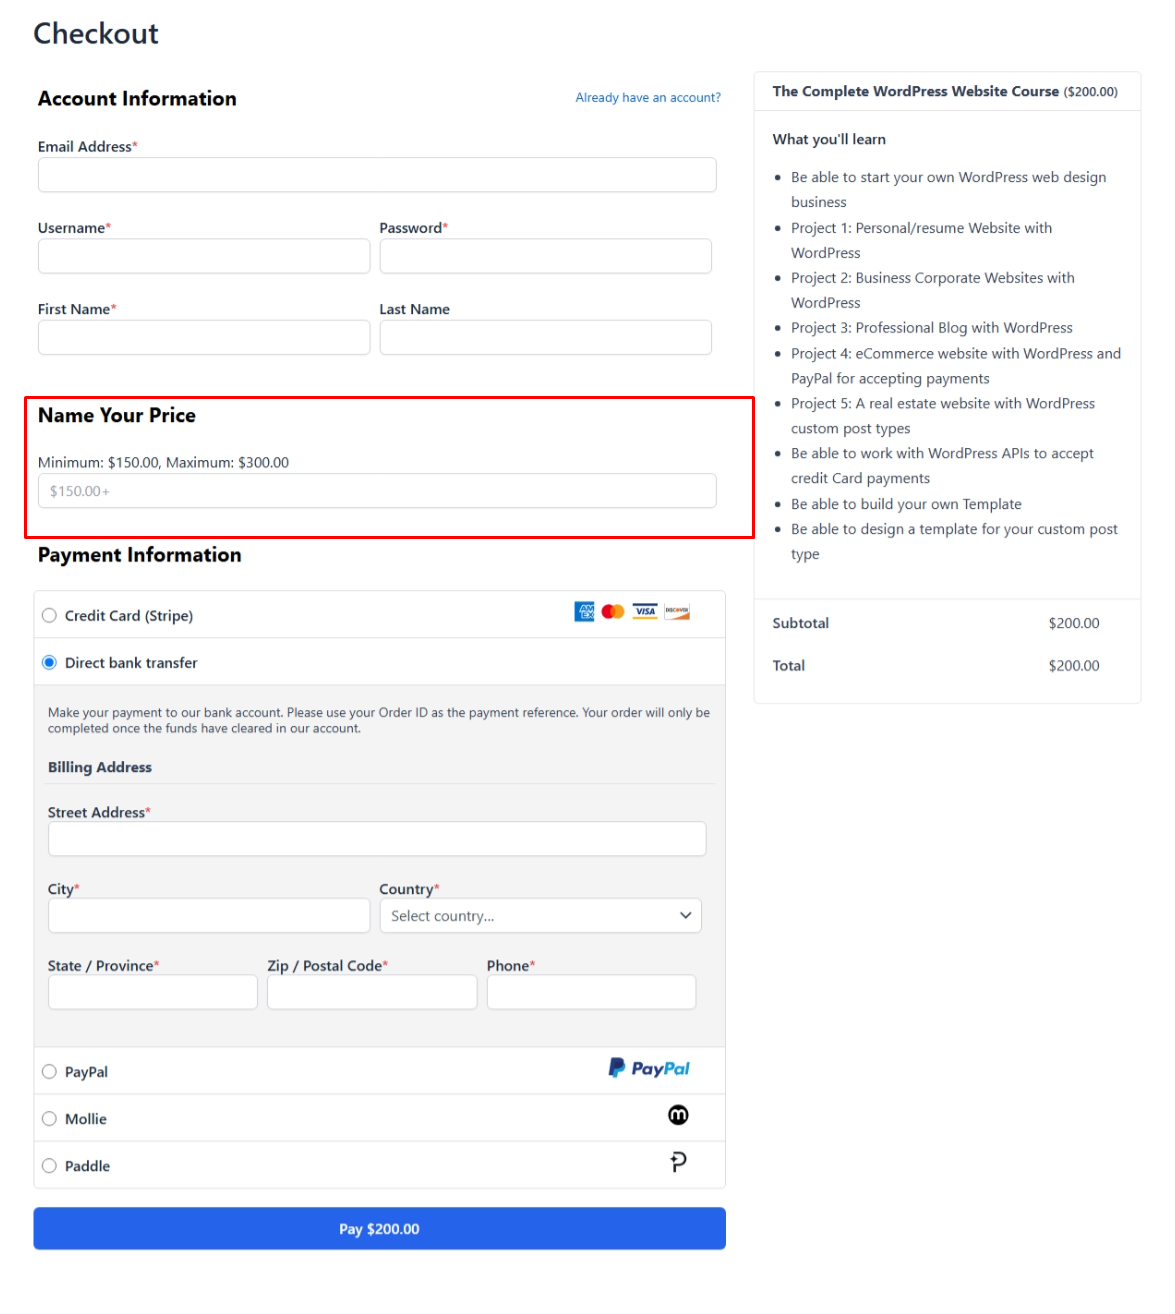
The checkout page shows a price field with the minimum and maximum amounts allowed. If a customer enters an amount outside that range, ProfilePress asks them to change it before they can pay.
Below is a screenshot of our checkout page.
And that is how to set up the ProfilePress Pay What You Want addon on your WordPress website!
Best Practices for Using Pay-What-You-Want Pricing
Now that you know how to let customers pay what they want in WooCommerce, let’s look at some best practices to help you use this pricing model effectively.
1. Set a Minimum Price: Although you want customers to choose their own prices, accepting any amount may not be good for your business. Setting a minimum price helps you cover production costs, payment processing fees, and other expenses.
2. Explain the Value of Your Product: Customers are more likely to pay a fair price when they understand what they will receive. Explain what your product offers, how it can help them, and why it is worth paying for.
If you sell an online course, describe what students will learn and what they can expect after completing it. Clear product details can help customers feel more confident about their purchase.
3. Keep the Checkout Short: Every extra required field is a place where a buyer can change their mind. Ask only what you actually need, and mark a field required only when the answer matters. For more ideas, see our list of the best WooCommerce checkout plugins.
4. Review Your Results Regularly: Pay attention to how much customers pay, how many people complete their purchases, and whether your revenue covers your expenses. If customers regularly pay below your costs, consider raising the minimum price or changing your suggested amount. Our guide on how to price a membership site can help you choose a starting point.
You should also check that the payment process works as expected on desktop and mobile devices. A clear checkout page helps customers enter their chosen amount and complete their purchases without confusion.
By following these practices, you can give customers more control over what they pay while keeping your business goals in mind.
Frequently Asked Questions About Pay-What-You-Want Pricing in WooCommerce
Q1. What Is Pay-What-You-Want Pricing in WooCommerce?
Pay-what-you-want pricing in WooCommerce is a pricing model that allows customers to decide how much they want to pay for a product instead of charging a fixed amount. Depending on the plugin you use, you can allow customers to enter their preferred price or choose from suggested amounts.
You can also set a minimum or maximum price to control how much customers can pay. This pricing model can work well for digital downloads, donations, creative products, and other eligible items.
Q2. Does WooCommerce Support Pay-What-You-Want Pricing by Default?
No. WooCommerce does not include a built-in feature that allows customers to choose their own product prices. However, you can add this feature by installing a compatible plugin, such as WPC Name Your Price for WooCommerce and Name Your Price for WooCommerce.
After installing and activating the plugin, you can configure the pricing settings and decide how customers choose their prices on your product pages.
Q3. Is Pay-What-You-Want Pricing Good for Digital Products?
Yes. Pay-what-you-want pricing can work well for digital products such as ebooks, templates, music, artwork, and downloadable guides. Since digital products do not always involve the same production costs as physical goods, you may have more room to test flexible prices.
Q4. Can I Use Pay-What-You-Want Pricing for Donations and Memberships?
Yes, provided your chosen plugin supports the type of payment you want to accept. Pay-what-you-want pricing can be useful for donation campaigns, paid memberships, and access to exclusive content.
For example, the ProfilePress Pay What You Want addon lets customers choose how much they pay for a membership plan, including plans that deliver digital downloads, within the minimum and maximum you set. You can also use it to accept donations, without setting up a WooCommerce store.
Q5. Does Pay-What-You-Want Pricing Increase Sales?
It can, but the results depend on your products, audience, and pricing setup. Giving customers control over the amount they pay may encourage some people to purchase who would otherwise avoid a fixed price.
However, other customers may pay less than your standard price, which can reduce your revenue. To find out whether this model works for your business, monitor your sales, average payment amount, conversion rate, and overall revenue.
You can also test different suggested prices and minimum amounts to see which settings produce the best results.
Conclusion
We hope this article helped you learn how to let customers pay what they want in WooCommerce. Giving customers the freedom to choose their prices can make your products more accessible and give people a reason to buy from your store.
You can get started with WPC Name Your Price, Name Your Price for WooCommerce, or ProfilePress, depending on what you sell and how your website works.
Choose the plugin that fits your needs, set your pricing limits, and test everything before making it available to customers. You can then track your sales to see whether this pricing model works for your business.
Get started today!