
How to Create a Donation Form in WordPress
Want to create a donation form for your WordPress website?
If you run a nonprofit organization, church, community project, or fundraising campaign, a donation form provides visitors an easy way to support your cause directly from your website.
Instead of asking people to contact you or follow a complicated payment process, you can give them a dedicated form where they can enter their details, choose how much they want to donate, and complete their payment.
The good news is you don’t need to be a developer to set one up. With the right WordPress donation plugin, you can create a professional-looking form, accept online payments, and add it to your website without building the payment system yourself.
In this guide, we will show you how to create a donation form in WordPress using ProfilePress and its Pay What You Want addon. You will learn how to create a donation plan, let donors choose how much they want to give, set minimum and maximum donation amounts, configure your payment gateway, and add the donation form to your website.
By the end of this guide, you will have a working WordPress donation form that gives visitors a convenient way to support your organization, project, or cause.
What Is a WordPress Donation Form?
A WordPress donation form is an online form that allows visitors to contribute money to your organization or fundraising campaign through your website.
A typical donation form may collect information such as:
- Donor name
- Email address
- Donation amount
- Billing information
- Payment details
- Optional message or donation purpose
The exact fields you need depend on how you plan to collect and manage donations and what donor data you want to capture.
Why Create a Donation Form in WordPress?
You might be wondering why you should build a donation form on your WordPress site instead of using a third-party fundraising platform like GoFundMe, JustGiving, or Facebook Fundraisers.
While those platforms have their place, hosting a donation form directly on your WordPress site comes with several important advantages.
1. You Keep Your Donors on Your Site: When you send supporters to an external platform, you lose control of the experience. They leave your website, land on a page filled with other causes, and may never come back. With a native WordPress donation form, donors stay on your site from start to finish, which means more engagement, more trust, and more repeat donations.
2. You Own Your Donor Data: Third-party platforms often keep donor information locked inside their system. You can see who donated, but you may not be able to export emails, track giving history, or build long-term relationships. A WordPress donation form puts that data in your hands. You can send follow-up emails, add donors to your newsletter, and nurture those relationships on your own terms.
3. You Save on Fees: Most third-party platforms charge a percentage of every donation plus a processing fee. Over time, those fees add up. With a WordPress donation form connected directly to a payment gateway like Stripe or PayPal, you typically pay only standard transaction fees.
4. You Have Full Design Control: Your donation form should match your brand, not look like a generic template. With WordPress, you can customize colors, fonts, button styles, and layout to create a seamless experience that feels like a natural part of your website. This builds trust and encourages more people to complete their donation.
5. You Can Accept Recurring Donations Easily: Recurring gifts are the lifeblood of sustainable fundraising. A WordPress donation form makes it easy to offer one-time or monthly giving options, so supporters can set up automatic contributions with minimal effort.
Why Use ProfilePress for a Donation Form?
Now that you understand what a donation form is and why it matters, the next question is: which plugin should you use to build it?
Plenty of WordPress donation plugins are out there, but ProfilePress is a great pick. It’s known as an ecommerce and paid membership plugin, but it works beautifully for accepting one-time and recurring donations too.
Below are the reasons why ProfilePress makes sense for your donation form.
1. Accept One-Time and Recurring Donations: ProfilePress supports both one-time and recurring payments. This lets you accept a single contribution or create a recurring donation plan for supporters who want to give regularly. For example, you could create a one-time donation plan for people who want to contribute once and a monthly donation plan for supporters who want to continue giving.
2. Let Donors Choose Their Own Amount: This is where the Pay What You Want addon becomes especially useful. Instead of creating fixed donation options such as $10, $25, $50, and $100, you can allow visitors to enter the amount they want to contribute. You can set a minimum and maximum amount.
3. Accept Payments Your Way: ProfilePress supports several payment processors, including Stripe, PayPal, Razorpay, Mollie, Paddle, Paystack, and Bank Transfer. You’re not locked into a single gateway. Pick the processor that fits your organization and your donors, whether that’s Stripe for US and European supporters, RazorPay for donors in India, Paystack for those in Africa, or Mollie for European organizations.
4. Keep the Donation Process on Your Website: With ProfilePress, you can create a donation payment plan and add its checkout to your WordPress website. This means visitors can learn about your cause and contribute without being sent to a separate fundraising website. You can create a dedicated donation page and link to it from your navigation menu, homepage, campaign pages, blog posts, or other parts of your website.
5. Track Payments and Transactions: ProfilePress includes ecommerce and membership reports that let you keep track of payments, earnings, refunds, sales, and other transaction information. For a donation campaign, having payment information in your WordPress dashboard makes it easier to track contributions and review transaction records.
7. Add More Features as Your Website Grows: A donation website may need more than a payment form over time. ProfilePress includes additional addons that can extend what you do with the plugin.
For example, you can use the PDF Receipt addon to allow customers to view, print, or download receipts or invoices for their donations. You can also use Google reCAPTCHA or Cloudflare Turnstile to help protect checkout and other forms from spam and bot activity.
Other addons provide features such as email confirmation, two-factor authentication, social login, and integrations with email marketing platforms.
You don’t need all these features to create a donation form, but having them available can help if your website eventually needs more functionality.
Steps to Create a Donation Form in WordPress
Now let’s go through the process, step by step on creating a WordPress donation form using ProfilePress.
Step 1: Install and Activate ProfilePress
Visit the pricing page and purchase the plugin. Once your purchase is complete, log in to your ProfilePress account and download the plugin ZIP file to your computer.
Next, log in to your WordPress dashboard and go to Plugins > Add New Plugin. Click Upload Plugin, then select the previously downloaded plugin ZIP file and click Install Now
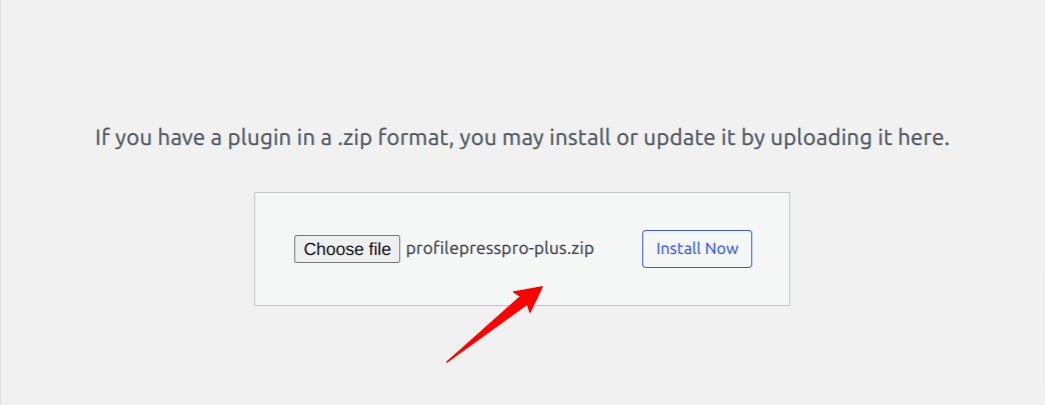
Once the installation is complete, click on Activate Plugin.
Step 2: Activate the Pay What You Want Addon
After installing ProfilePress, activate the Pay What You Want addon to accept donation on your WordPress website.
From your WordPress dashboard, go to ProfilePress > Addons. Find Pay What You Want and activate it.
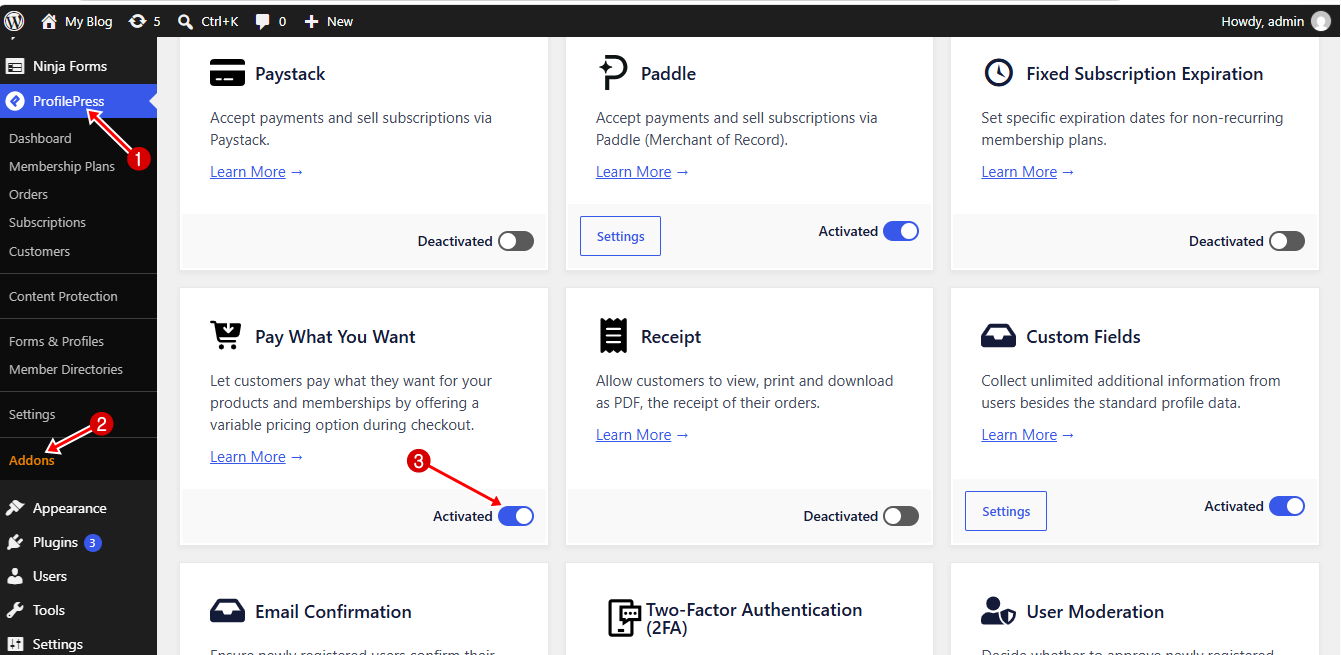
This addon lets visitors decide how much to pay on your donation website instead of using a fixed amount.
Step 3: Set Up Your Payment Gateway
Next, connect the payment gateway you want to donors to use to donate to your cause. ProfilePress works with several options, including Stripe, PayPal, Paystack, Mollie, and Razorpay.
For this tutorial, we’ll walk through setting up Stripe to accept donations through various payment methods including Visa, Mastercard, American Express, Discover, Diners Club, JCB, UnionPay, Cartes Bancaires, Apple Pay, Google Pay, PayPal, Cash App Pay, Link, Affirm, Klarna, Afterpay, Clearpay, ACH Direct Debit, ACH Credit Transfer, SEPA Direct Debit, SEPA Credit Transfer, BECS Direct Debit, BACS Direct Debit, Preauthorized Debits, Pix, PayNow, iDEAL, Bancontact, Giropay, Sofort, EPS, P24, BLIK, Swish, TWINT, Bancomat Pay, MobilePay, OXXO, Konbini, Boleto, FPX, GrabPay, Alipay, WeChat Pay, Kakao Pay, Toss Pay, Naver Pay, Zip, Alma
Go to ProfilePress > Settings > Payments > Payment Methods.
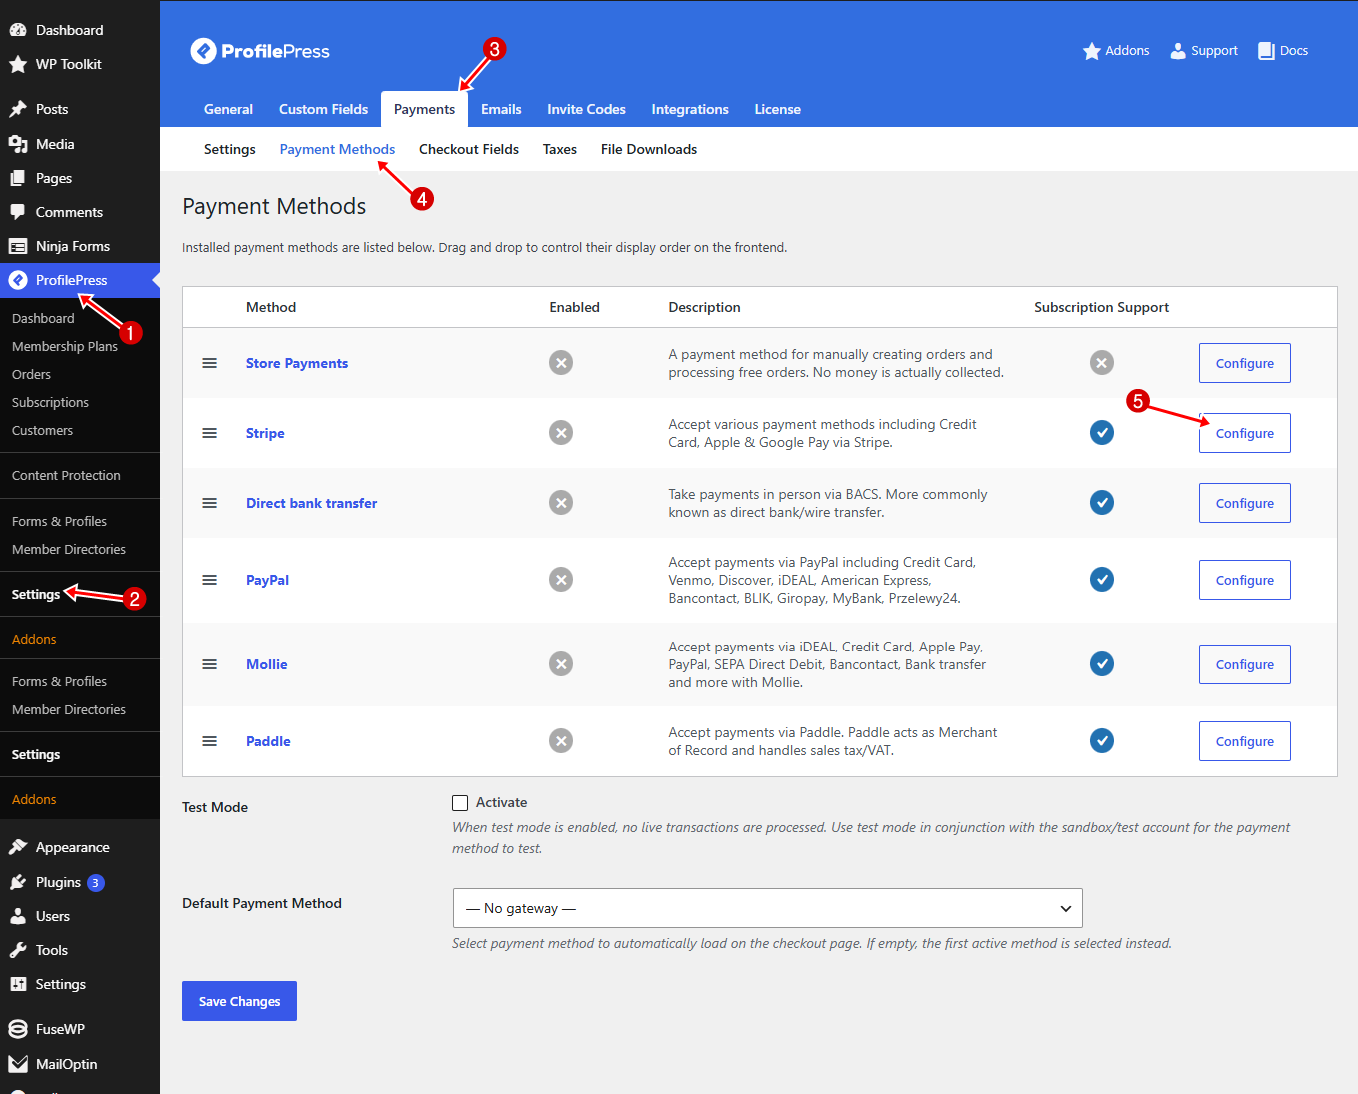
Find Stripe in the list and click the Configure button beside its name. A new page will open. Click Connect with Stripe.
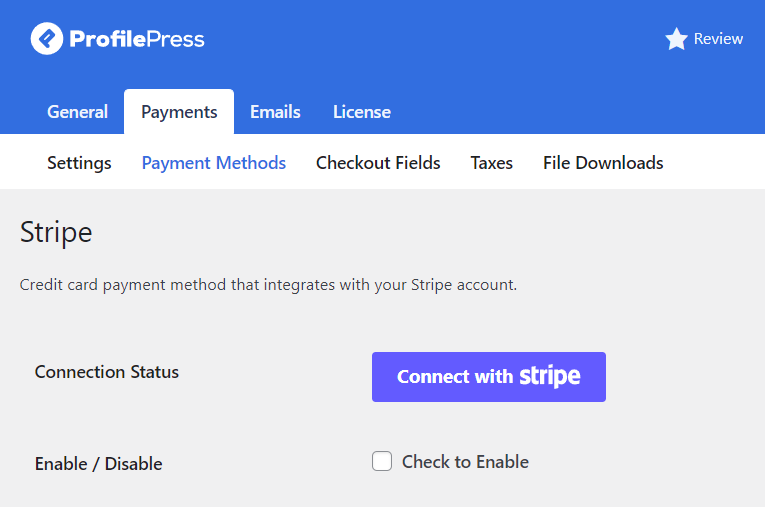
You’ll be redirected to Stripe’s website, where you can create a new account or log in to an existing one.
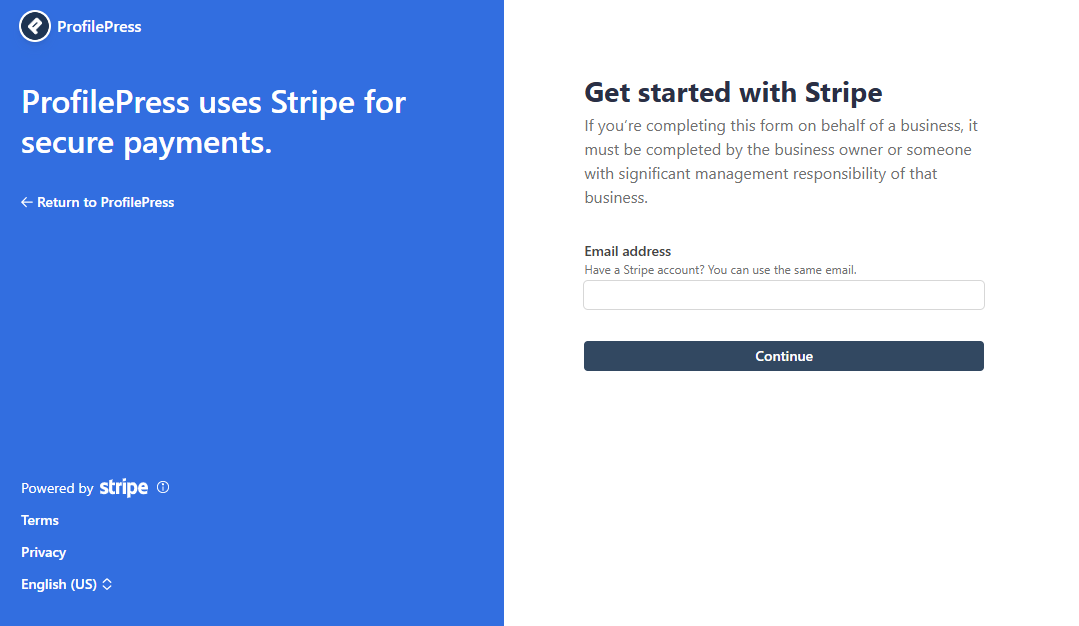
Once you’re done, Stripe sends you back to your site. Next, turn on the payment method using the Enable / Disable option. You can also edit the Title and Description that appear on your checkout page.
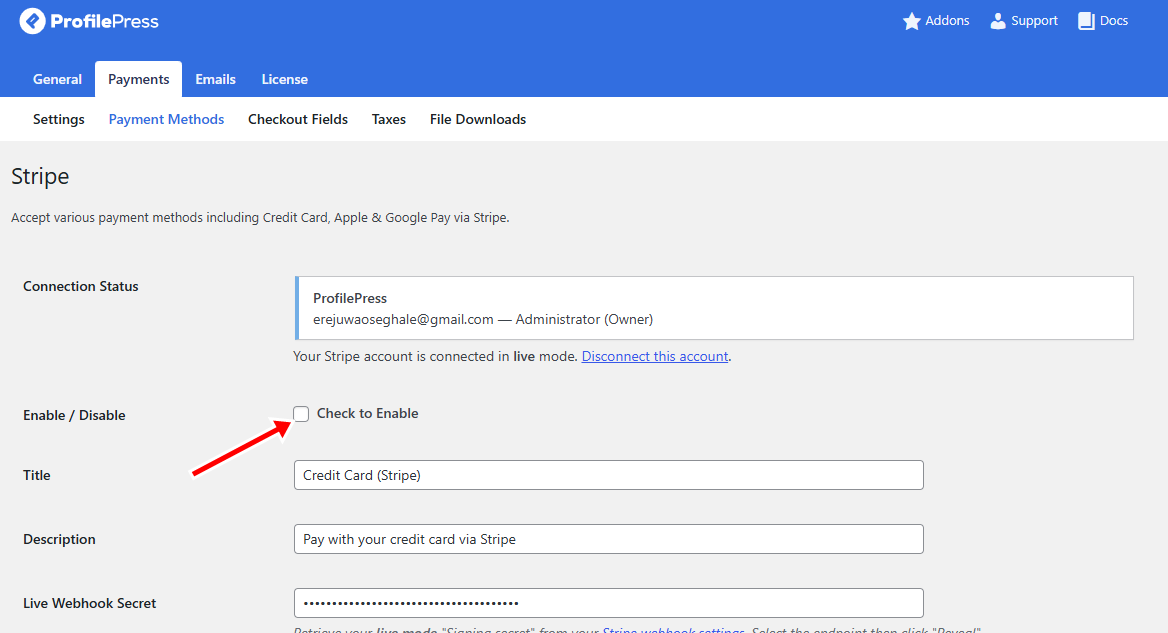
When done, click on Save Changes.
You have now successfully connected a payment method for accepting donations from your WordPress donation form.
Step 4: Create a Donation Membership Plan
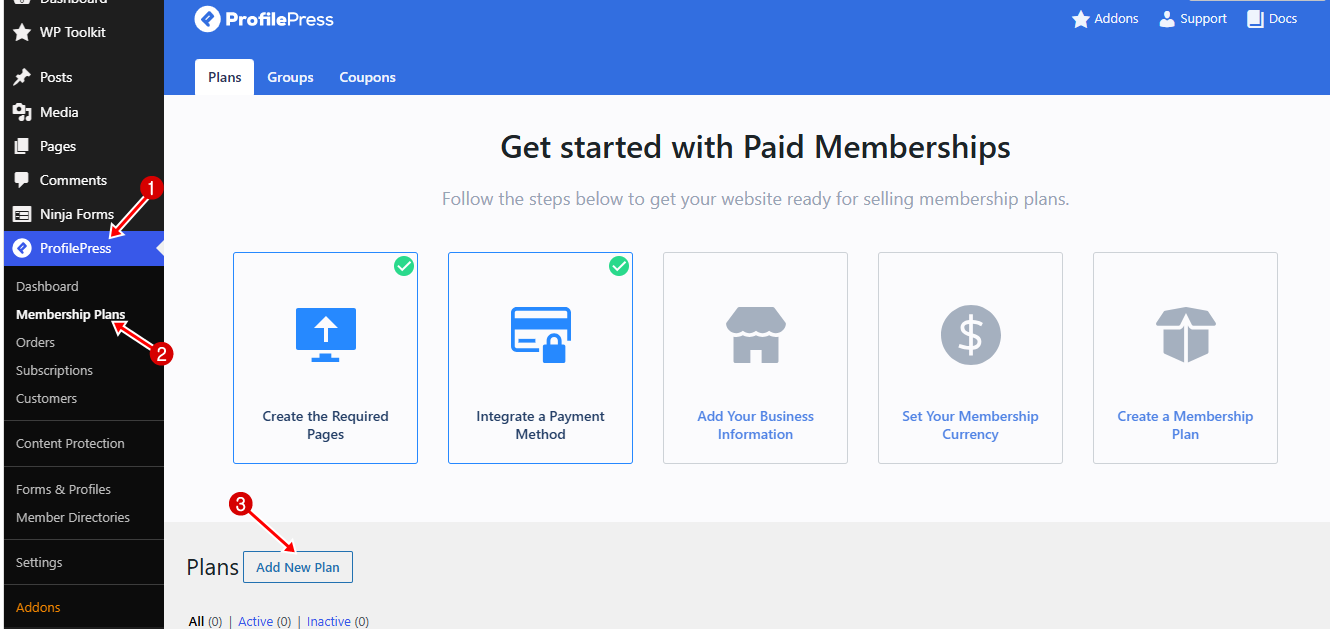
You need to create a membership plan in ProfilePress that donors will checkout through to make a donation. To do this, go to ProfilePress > Membership Plans > Add New Plan
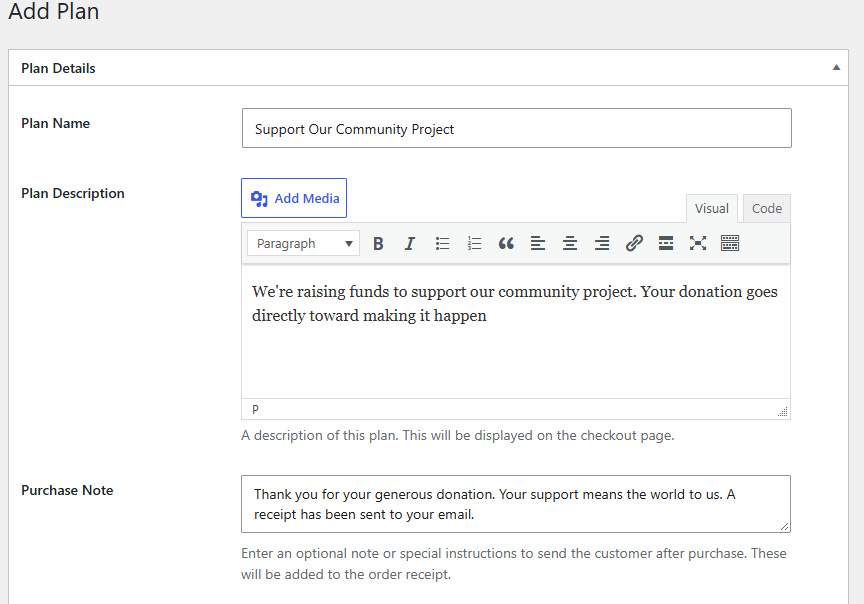
Give the plan a clear name that tells visitors what their donation will support. For example, you could use Support Our Community Project, Make a Donation, or Support Our Mission. Choose a name that matches the purpose of your fundraising campaign.
Next, add a short description explaining how the donations will be used. This gives visitors more context before they decide to contribute.
You can also use the Purchase Note field to add a thank-you message or any helpful instructions you want donors to see after completing their payment.
After you add the basic details, scroll down to the Pay What You Want option and enable it.
Then set the minimum and maximum prices donors can enter. If you do not want to limit the maximum donation amount, you can leave the maximum price field empty.
Next, configure the Subscription settings. Choose whether you want to accept a one-time donation or allow donors to make recurring contributions through the WordPress donation form.
For recurring donations, select the appropriate billing interval based on how often you want the payment to be collected.
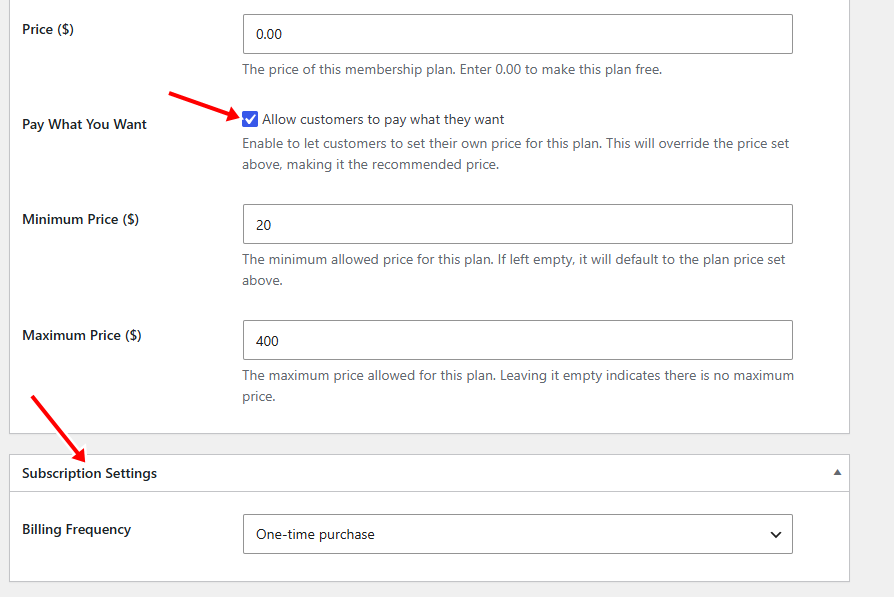
When done, click Save Plan to create the donation plan.
Step 5: Configure the Checkout Page
Once your donation plan is ready, configure the checkout page. This is where donors enter their details and complete payment, so keep the form clear and easy to complete.
To configure the checkout fields, go to ProfilePress > Settings > Payment > Checkout Fields from your WordPress dashboard.
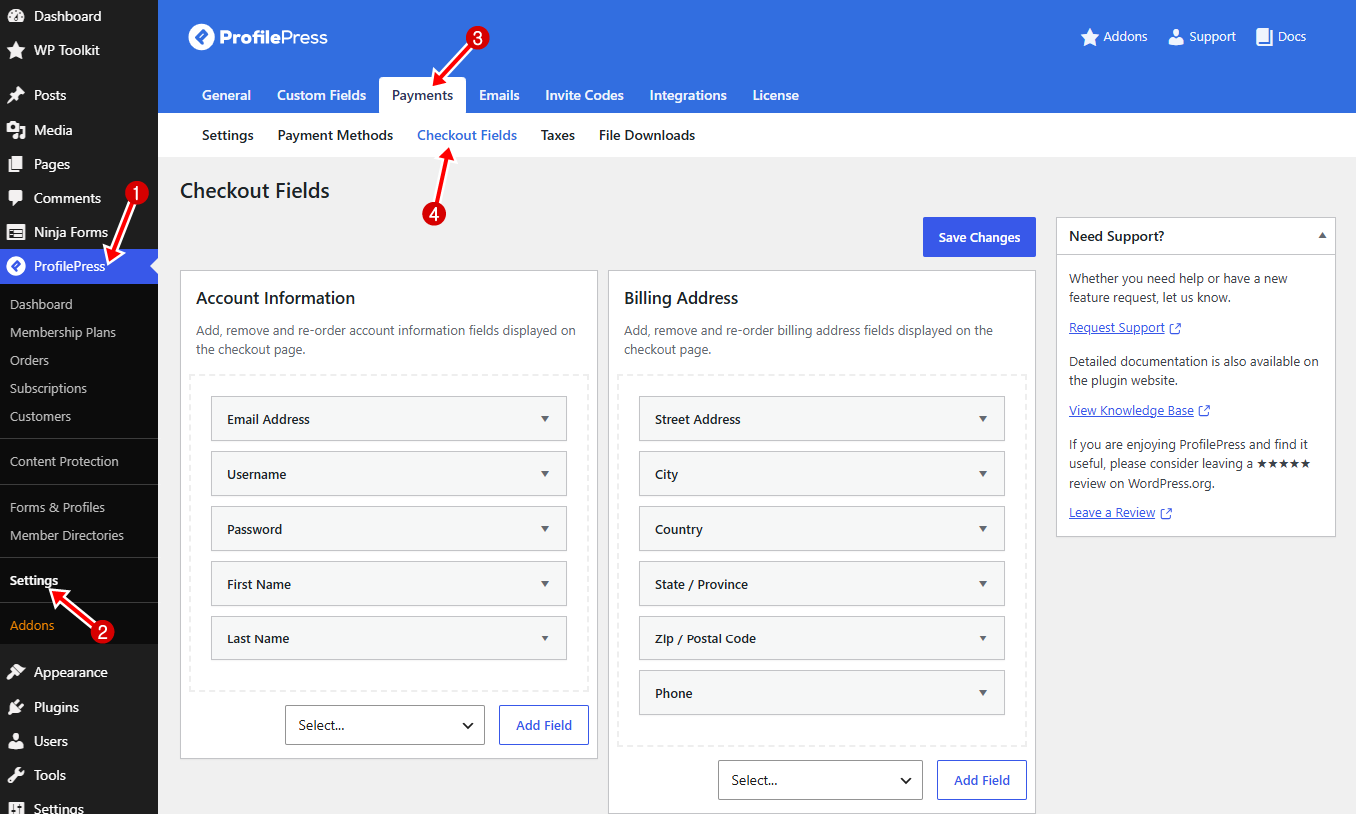
Here, you can arrange the fields that appear on the checkout form and decide what information you want to collect from donors.
ProfilePress also provides custom fields that allow you to collect additional information when needed. For example, you may want to ask donors for a phone number, organization name, or other information related to your fundraising campaign.
However, avoid adding unnecessary fields. A shorter checkout form gives donors fewer things to complete and can make the donation process easier and more convenient.
Once you have finished making your changes, click Save Changes to apply them.
Step 6: Add the Donation Form to Your WordPress Site
Now that our donation plan and checkout settings are ready, the next step is to make the WordPress donation form accessible to visitors on your website.
To do this, go to ProfilePress > Membership Plans from your WordPress dashboard. Find the donation plan you created earlier and copy its Checkout URL.
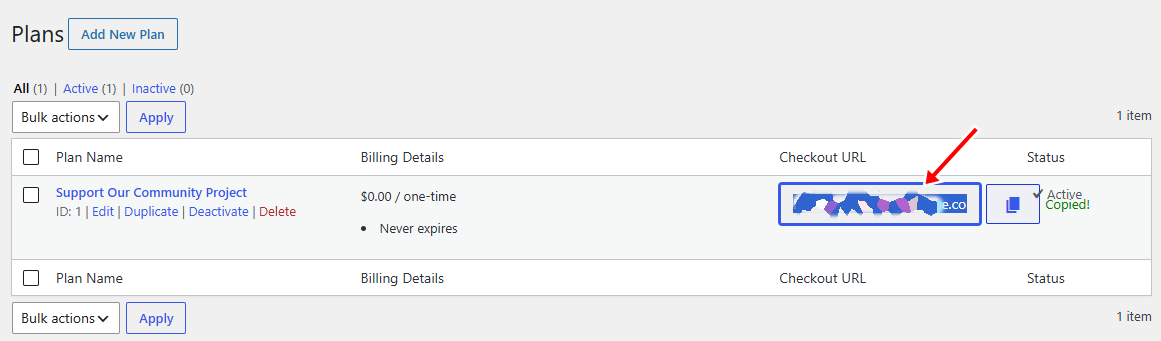
You can then add this URL to a dedicated donation page, navigation menu, text link, or call-to-action button on your website.
For example, you can create a Donate Now button on your homepage and link it to the ProfilePress checkout URL. When visitors click the button, they’ll go directly to the donation checkout page, where they can enter their preferred amount and complete their payment.
In the screenshot below, we added the Checkout URL to the Donate Now button on our website, making it easy for visitors to access the donation form.
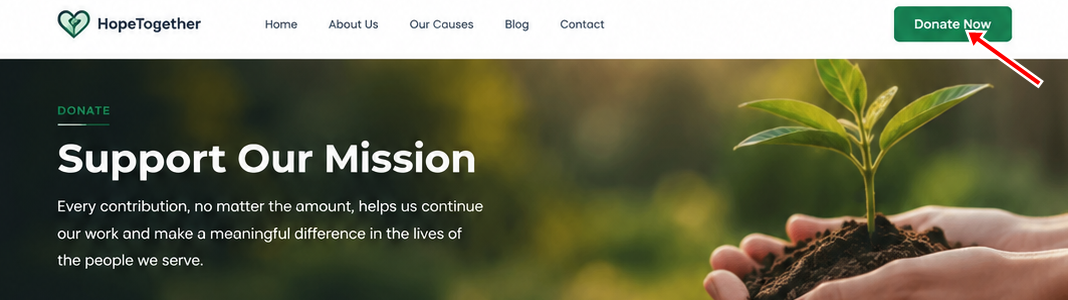
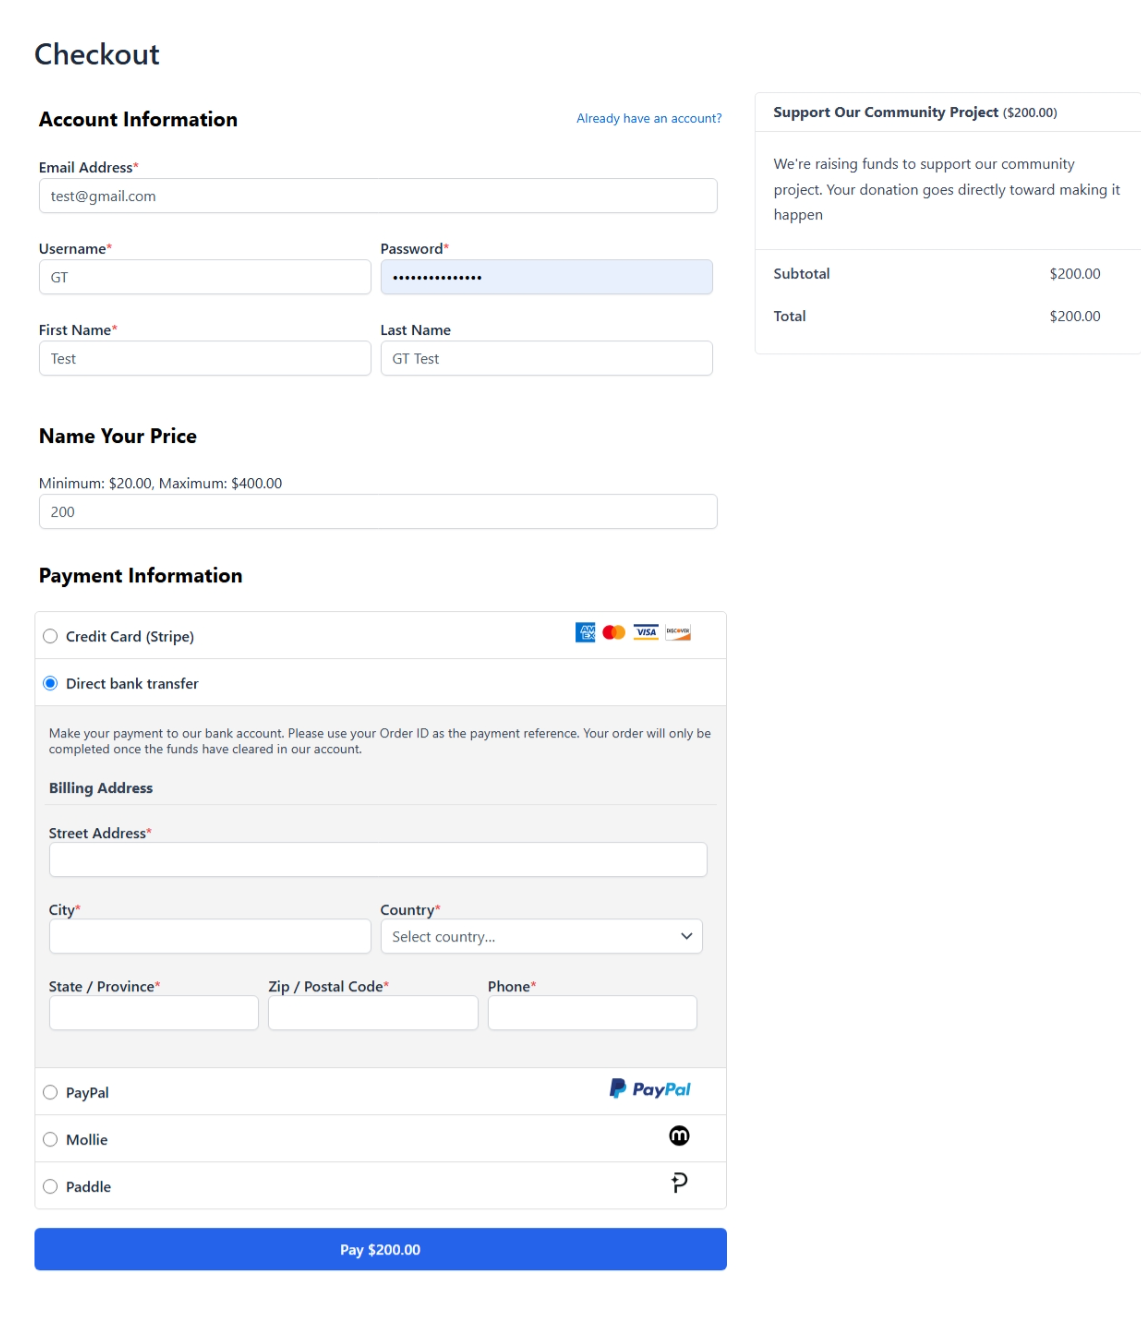
Once visitors click the Donate Now button, they will be redirected to the checkout page, where they can enter their donation amount, provide the required information, and complete their payment.
Below is a screenshot of our checkout page.
Step 7: Test Your Donation Form
Your donation form is live, but before you announce it to the world, take a few minutes to test it. This step is easy to skip, and it’s also the one that saves you the most embarrassment later.
Start by opening the page where your form lives. Click the Donate button and go through the checkout process as a donor. Use a real card if you can, or a test card if your payment gateway provides one. Stripe, for example, offers test card numbers you can use without moving real money.
As you go through the process, pay attention to a few things:
- Does the form load properly on desktop and mobile?
- Can you enter a custom amount without errors?
- Do the minimum and maximum limits work as expected?
- Does the payment go through without a hitch?
- Do you land on a confirmation page or see a thank-you message?
- Does the donor receive a receipt by email?
If something doesn’t work, fix it before you go live.
Once everything checks out, you can switch your payment gateway to live mode, share your form, and start collecting donations.
Best Practices for Creating a WordPress Donation Form
Building a donation form is one thing. Building one that people actually complete is another. These tips will help you get more gifts from the traffic you already have.
1. Keep the form short: Every field you add is another chance for someone to walk away. Ask for a name, email, and payment details. That’s usually enough. If you don’t need a phone number or mailing address, leave them out.
2. Make the donate button easy to spot: Use a color that stands out from the rest of the page and wording that’s clear. “Donate Now” works better than “Submit.”
3. Show the impact of a gift: Donors give because they want to help. A line like “Your $500 feeds a family for a week” does more than a blank amount field ever will.
4. Enable recurring donations: Monthly gifts add up fast and give you predictable income. Some donors prefer to give once, so keep both options available.
5. Send an immediate thank-you: A confirmation email or on-screen message reassures the donor that the gift went through. It also gives you a chance to say thanks and share what happens next.
FAQs About Creating a Donation Form in WordPress
Below are answers to common questions about building a donation form in WordPress.
Q1. Do I need coding skills to create a donation form in WordPress?
No. With a plugin like ProfilePress, you can build a donation form on your WordPress site. You arrange fields, set your amounts, and connect a payment gateway without writing any code.
Q2. Can I let donors choose their own amount?
Yes. The Pay What You Want addon lets donors enter any amount they want. You can set a minimum and maximum amount.
Q3. Can I accept recurring donations?
Yes. ProfilePress lets you offer both one-time and recurring gifts. Donors can give once or set up a monthly or annual contribution. You can also let them decide whether their donation auto-renews.
Q4. Can I use ProfilePress for more than donations?
Yes. ProfilePress is a full ecommerce and membership plugin. You can sell memberships, restrict content behind a paywall, build user profiles and member directories, and connect with tools like Mailchimp, LearnDash, and WooCommerce. Your donation form can grow into a larger fundraising setup over time.
Conclusion
So there you have it. You now know how to create a donation form in WordPress from start to finish.
Looking back, the process isn’t as complicated as it might have seemed at the beginning. Install ProfilePress, set up your plan, connect your payment gateway, and add the form to your site. That’s really it. No code, no developer, no waiting around for someone else to build it for you.
What matters most is what happens after your donation form goes live. Every donation you receive is someone choosing to support what you care about. That’s a big deal. So make it easy for them. Keep the form short. Say thank you. Show them where their money goes.
Thanks for reading, and good luck with your fundraising.