Best WooCommerce Subscriptions Alternative: ProfilePress
Are you looking to find the best WooCommerce Subscriptions alternative? Look no further than ProfilePress, a powerful and versatile solution for managing subscriptions and memberships on your WordPress site.
While the WooCommerce Subscriptions plugin has long been a popular choice for e-commerce sites, many users seek alternatives due to its complexity and cost. This is especially true for small businesses looking to create their first membership site using WordPress.
ProfilePress makes managing subscriptions effortless, allowing you to create and manage recurring payments with ease. You can set up flexible billing cycles, whether monthly, yearly, or customized to fit your needs. it enables you to offer both free and paid plans with various access levels, catering to different customer requirements.
ProfilePress seamlessly integrates with popular payment gateways such as Stripe, PayPal, Mollie, Razorpay, and Paystack. It offers a user-friendly account management interface that enhances the overall experience for your customers.
ProfilePress stands out as the top alternative for WooCommerce Subscription due to its all-in-one approach. It combines subscription management with front-end user registration and login pages, user profiles, and member directories. This integration simplifies the management of your WordPress site and enhances the overall user experience.
In this article, we’ll explore why ProfilePress is rapidly becoming the go-to alternative to WooCommerce Subscriptions and guide you through how to effectively use it to set up a successful subscription website with WordPress.
Why Use a WooCommerce Subscriptions Alternative?
The WooCommerce Subscriptions plugin is the official extension for WooCommerce that enables customers to subscribe to products with recurring payments. It allows you to manage subscription plans directly from the WordPress admin dashboard, offering features like manual plan upgrades and downgrades. Additionally, WooCommerce Subscriptions provides detailed reports and analytics to help you monitor the performance of your membership site.
While the plugin adds valuable subscription functionality to a WooCommerce site, it falls short in several important areas that lead many businesses to seek alternatives.
Complexity: WooCommerce Subscriptions can be difficult to use, particularly for those without technical expertise. Navigating the setup process can be challenging, requiring significant customization and technical knowledge. Even basic membership elements, such as the subscription registration page or member account login page, need to be manually created. This often involves using WordPress blocks or custom coding, which adds to the complexity, making it less accessible for beginners or small business owners with limited technical expertise.
Limited Content Restriction Options: For membership or subscription-based websites, content restriction is essential. However, WooCommerce Subscriptions offers limited options for controlling access to premium content. Users often need to depend on additional plugins or custom solutions to manage who can view this content. This can complicate the setup process and may require further investment in add-ons.
High Price Point: One of the biggest drawbacks of WooCommerce Subscriptions is its price. At $279 per year, it’s a high investment, especially for small businesses or startups with limited budgets. Given that other alternatives offer similar (if not better) features at a lower cost, many businesses find the price difficult to justify.
ProfilePress: The Best WooCommerce Subscriptions Alternative
ProfilePress is a powerful WordPress membership plugin designed to help you build paid membership sites, sell digital products, and control access to your content. Its excellent features make it the best WooCommerce Subscriptions alternative, offering more flexibility for managing memberships and subscriptions.
With the WooCommerce add-on, ProfilePress enables the creation of WooCommerce membership websites. You can easily manage WooCommerce shipping and billing fields, while also replacing the default WooCommerce login, registration, and checkout forms with customizable forms from ProfilePress.
Additionally, ProfilePress enables you to apply exclusive discounts to WooCommerce products automatically for users with active memberships, making it an excellent tool for creating a seamless and rewarding membership experience on your WooCommerce site.
Key Features of ProfilePress
- Restrict access to specific content such as pages, posts, categories, tags, custom post types, videos, and more.
- Accept one-time and recurring payments, as well as charge for subscription payments, using Stripe, PayPal, Razorpay, Paystack, Direct Bank Transfer, Mollie.
- A conversion-optimized checkout form designed to boost conversions.
- Easily set up discount codes and promotions to attract new members.
- Implement a metered paywall, allowing guests to view a limited number of free posts.
- Create member directories with advanced filtering options to help users discover other members.
- Build and sell online courses with seamless integration into LearnDash, Sensei LMS, LifterLMS, and Tutor LMS.
- Simplify registration and login process with social login integration.
- Enable passwordless login for convenient user access.
- Manually approve or reject new users before granting account access.
- Set up taxes and VAT automatically based on customers’ billing addresses.
- A reporting dashboard with visual charts to track your eCommerce performance.
- Professionally designed templates for front-end login, registration, password reset, and profile editing forms.
- Built-in custom fields to collect additional user information beyond the standard profile data.
- Advanced fraud protection and spam prevention for user registration, login, and checkout pages.
WooCommerce Subscriptions vs. ProfilePress
When comparing WooCommerce Subscriptions and ProfilePress, several factors come into play. Here’s a breakdown:
Scope: WooCommerce Subscriptions is primarily focused on managing product subscriptions, while ProfilePress offers a broader suite of tools for overall membership, subscriptions, and user management.
Pricing Comparison: WooCommerce Subscriptions come with a hefty price tag of $279 per year. ProfilePress, on the other hand, offers more affordable pricing tiers, making it a great alternative if you’re looking to cut costs.
User Management: ProfilePress excels in user profile management and membership features, which are more basic in WooCommerce Subscriptions.
Ease of Use: Generally, ProfilePress is considered more user-friendly, especially for those new to building WordPress membership websites that charges one-time and recurring payments.
Integration and Compatibility: WooCommerce Subscriptions is heavily focused on WooCommerce integration, whereas ProfilePress integrates with a broader range of tools, such as email marketing software and learning management systems (LMS).
Both solutions are powerful in their own right, but ProfilePress offers an excellent toolkit, making it the best alternative to WooCommerce Subscriptions.
Setting up a WooCommerce Subscription Site Using ProfilePress
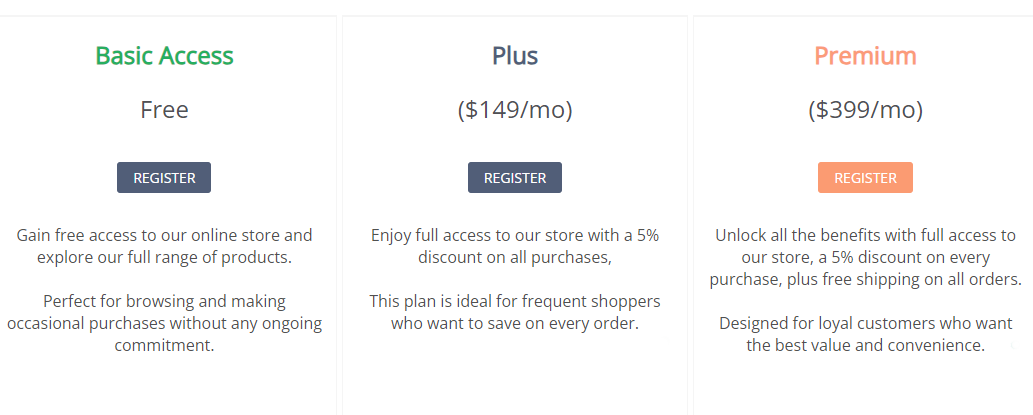
In this guide, we’ll show you how to set up a WooCommerce subscription site using ProfilePress. The site will require customers to register before making a purchase. We will offer three plans: Basic Access, Plus, and Premium.
First, ensure that WooCommerce is installed, activated, and running smoothly on your WordPress website. Next, you’ll need to disable guest checkout to ensure that all customers are required to register before making a purchase.
To do this, go to WooCommerce → Settings and select the Accounts & Privacy tab at the top.
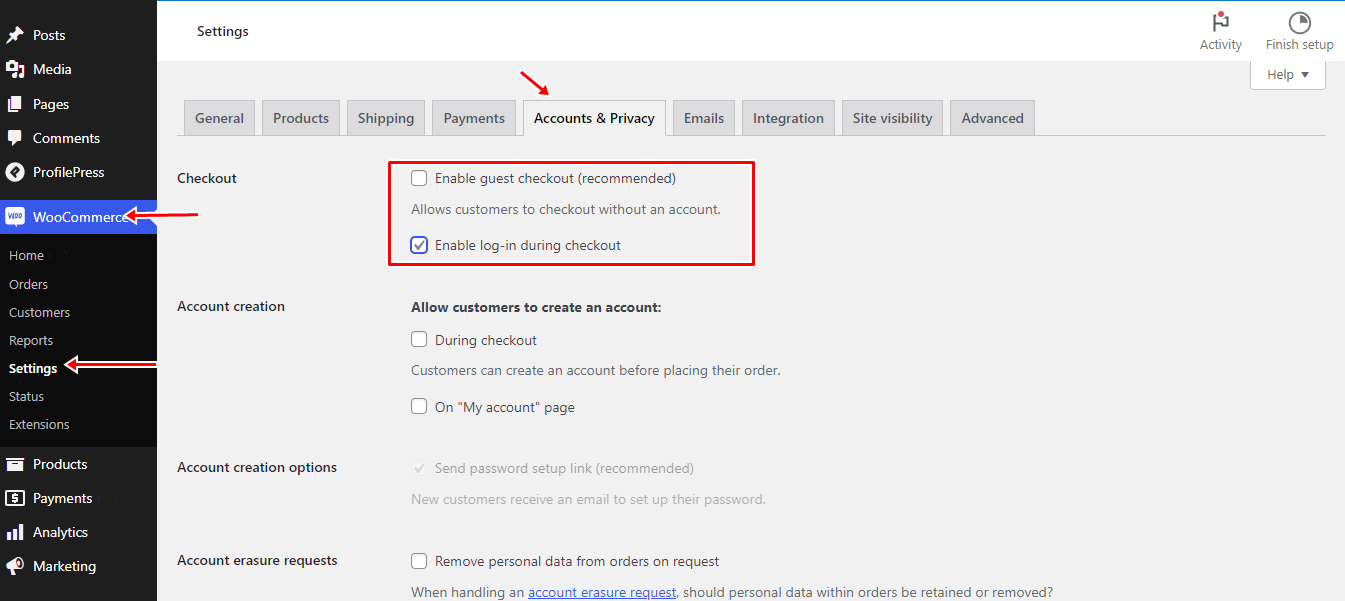
Disable the option that says ‘Enable guest checkout’ and enable the option that says ‘Allow customers to log in during checkout.’ Once done, click the ‘Save changes’ button to continue.
The next step is to install and activate the ProfilePress plugin.
Install and Activate ProfilePress
To do this, head to the ProfilePress website to purchase a plan that fits your requirements.
Log in to your WordPress dashboard and navigate to the Plugins section. Click on “Add New,” then select “Upload Plugin.” Choose the ZIP file you just downloaded and click on “Install Now.”
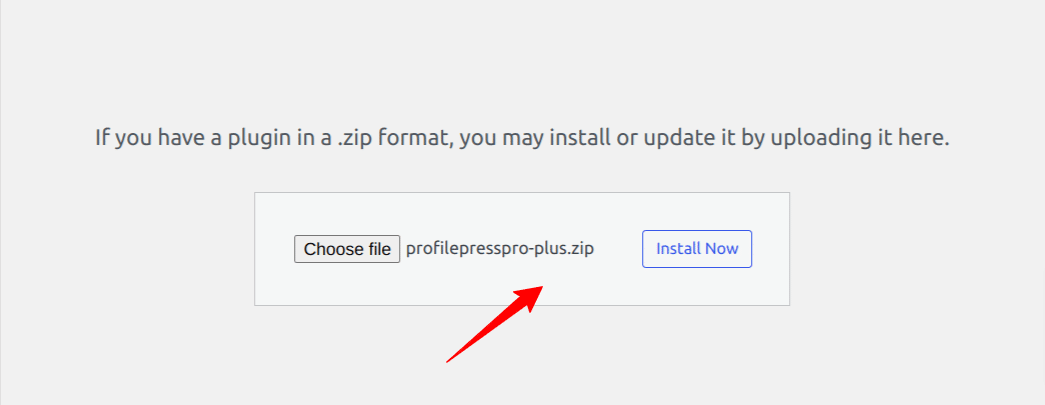
Wait a few seconds for the installation to finish. Once the plugin is installed, click Activate Plugin to enable it on your site.
The next step is to activate the WooCommerce addon. To do this, navigate to ProfilePress > Addons and toggle the switch to enable it.
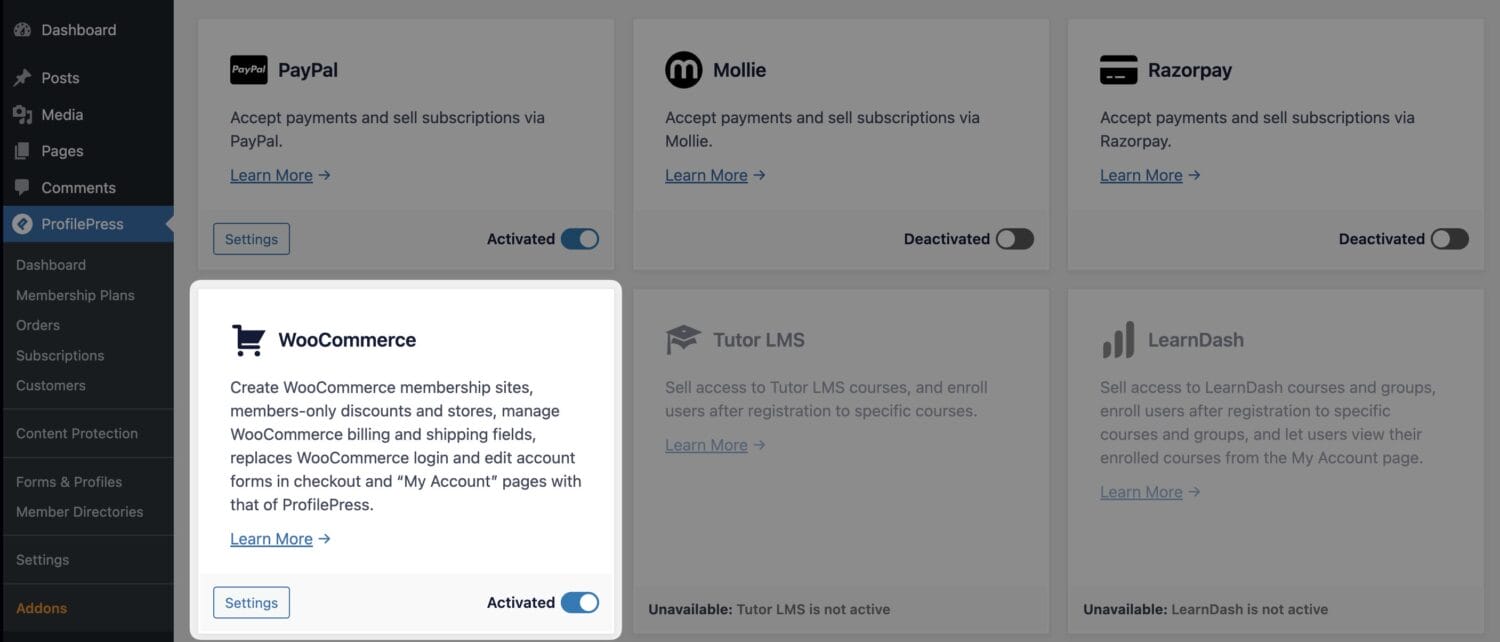
Before going into the configuration of subscription plans, there are a few preliminary steps to take, including integrating a payment method, adding your business information, and setting your currency.
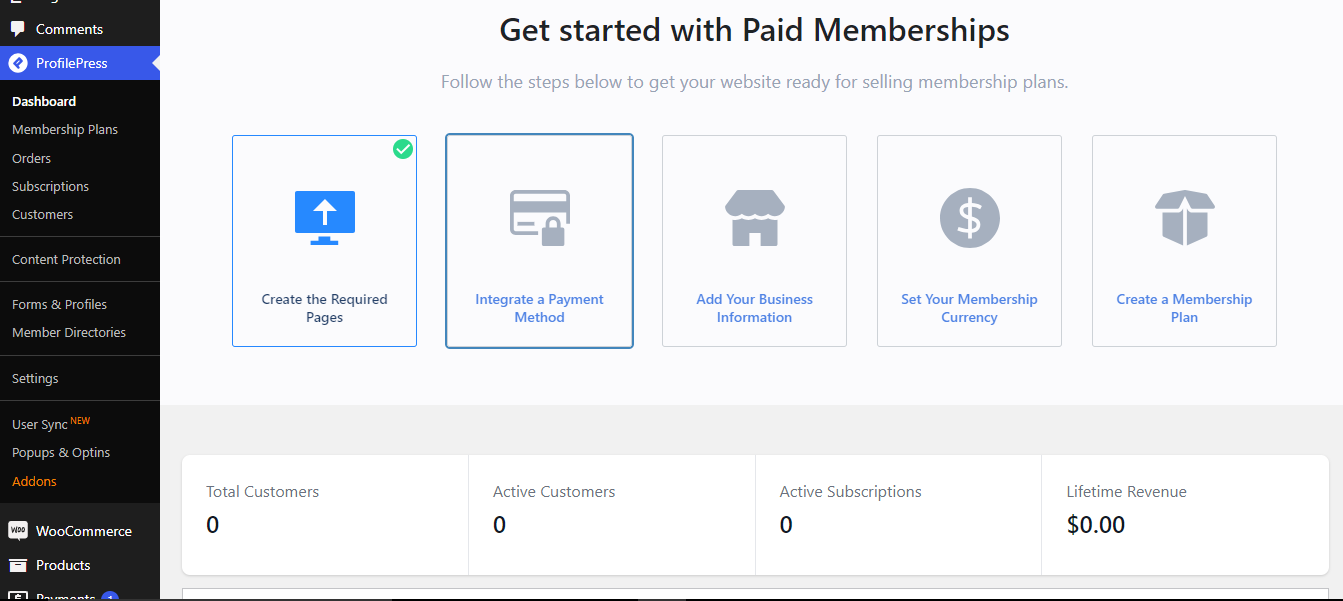
Integrate a Payment Method
ProfilePress supports a variety of payment gateways to charge for subscription payments such as Stripe, PayPal, Razorpay, Paystack, Direct Bank Transfer, Mollie.
To start collecting payments through these gateways, follow these steps: Navigate to ProfilePress > Settings > Payments > Payment Methods in your WordPress admin dashboard.
Then, choose the payment gateways you wish to use by enabling them. For each selected payment method, you’ll need to connect your account with ProfilePress. This usually involves entering API keys or authentication credentials provided by the payment gateway.
Once you’ve selected and configured your payment methods, save your settings to apply the changes.
Add Your Business Information
To add your business information, go to ProfilePress → Settings → General, then select the Business Info section.
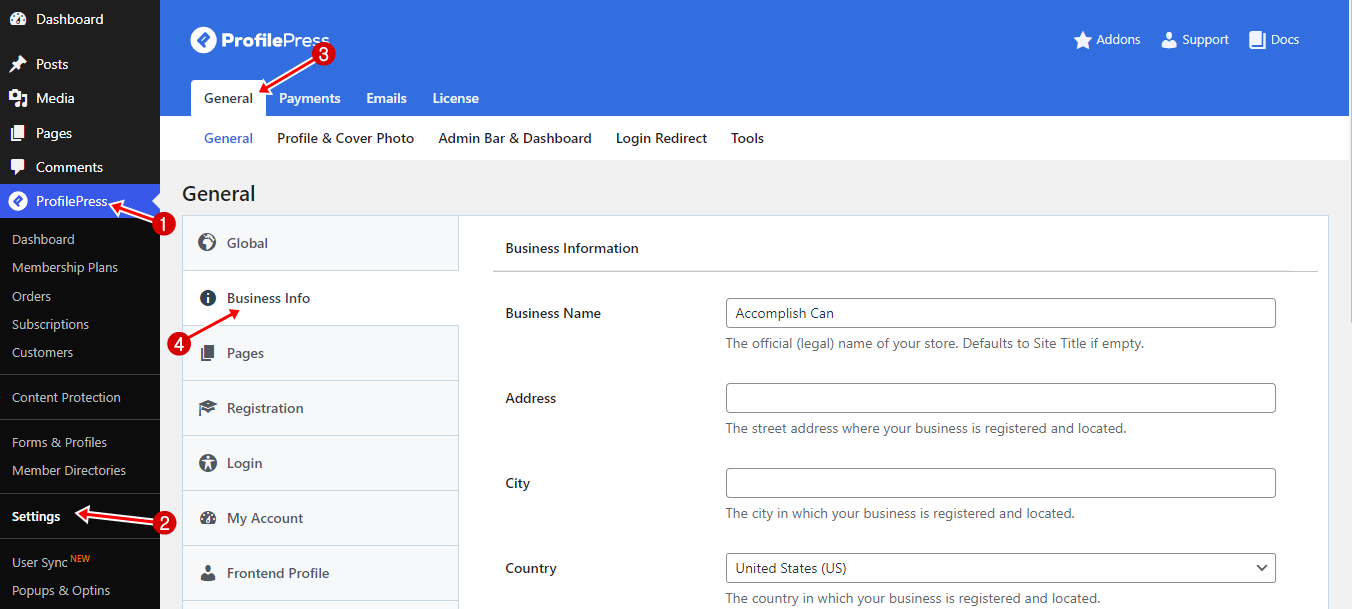
After entering your business details, click the Save Changes button to save your updates.
Setting Your Currency
ProfilePress gives you the flexibility to choose the currency in which you want to charge your customers. To configure this:
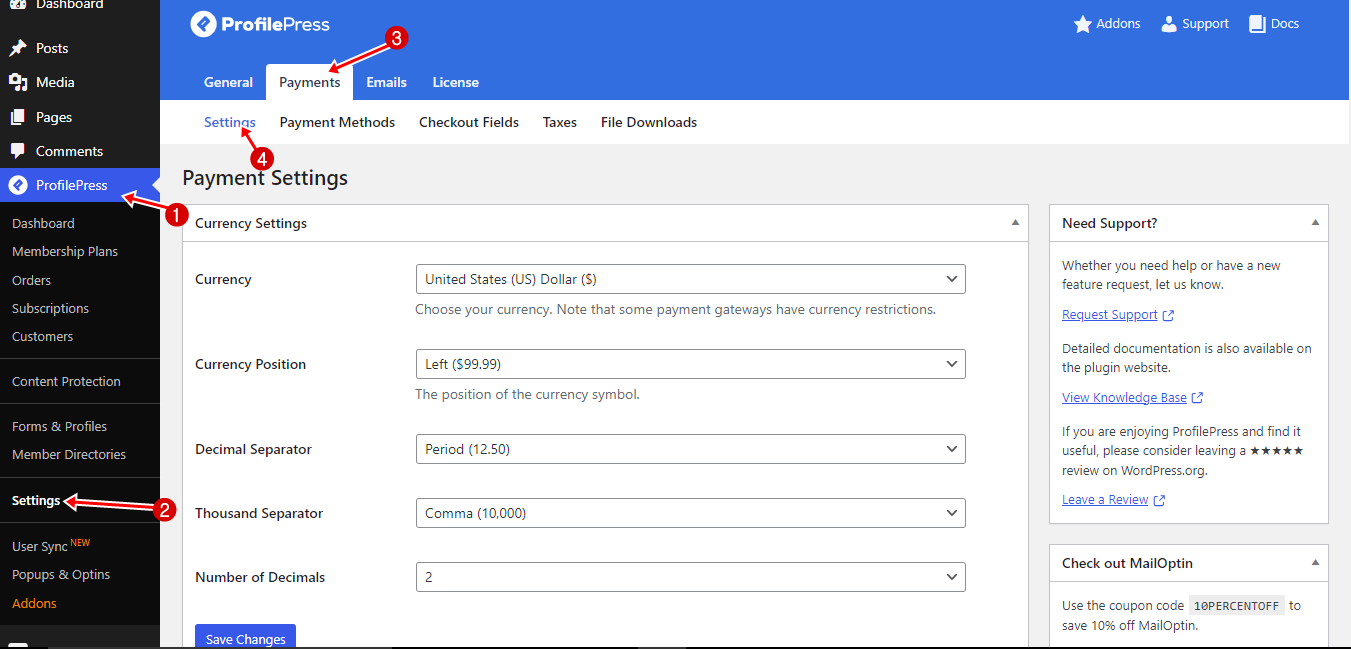
Navigate to ProfilePress → Settings → Payments, then select the Settings tab.
In the Currency Settings section, users can customize their financial display by selecting their preferred transaction currency, positioning the currency symbol, and choosing formatting options like decimal and thousand separators. They can also specify the number of decimal places for a clear and accurate presentation of financial information, enhancing the user experience.
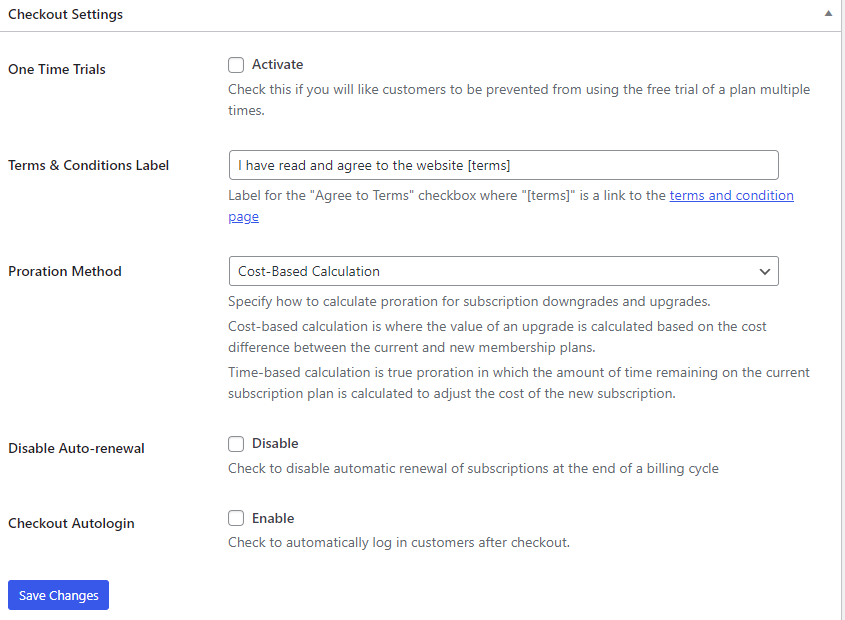
The Checkout Settings offer essential payment options to enhance user experience. You can activate one-time trials, set a label for the terms and conditions checkbox, and configure the proration method. For subscriptions, there’s the option to disable auto-renewal, providing customers with greater control. Lastly, enabling auto-login after checkout ensures a seamless transition post-purchase.
In the Receipt Settings section, you can personalize your customer experience by disabling receipts for free orders and adding a logo URL to customize the receipt. You can also include a thank-you note and customize the label for the receipt button to better reflect your brand.
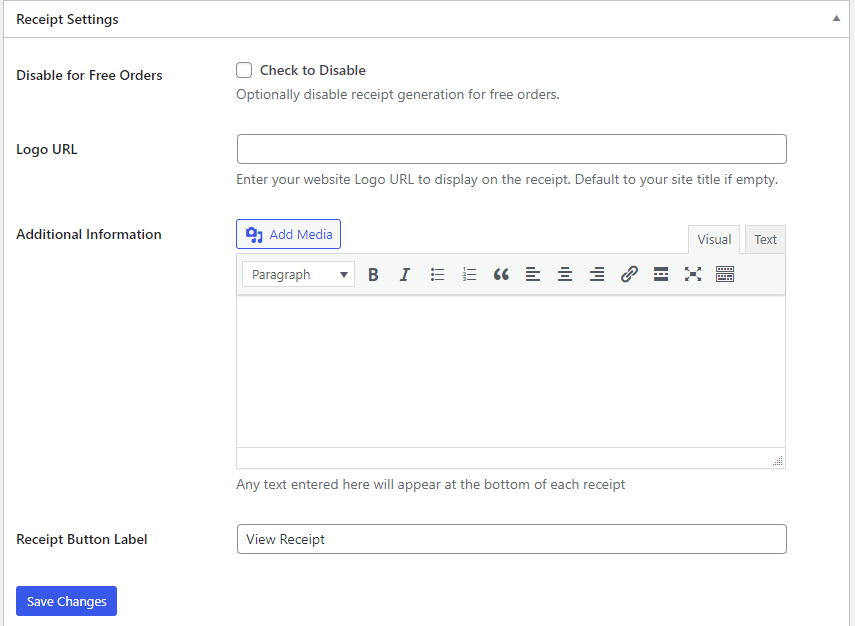
This setup allows you to customize the currency, checkout process, and customer receipt experience to suit your business needs.
Once finished, click the Save Changes button.
Setting Up the Subscription Plans
In this section, we will guide you through creating three subscription plans.
First, the Basic Access plan, which is free and grants customers access to the WooCommerce store.
Next, the Plus plan, priced at $149 per month, provides store access along with a 5% discount on all purchases.
Lastly, the Premium plan, priced at $399 per month, offers full store access, a 5% discount on all purchases, and free shipping.
Basic Access Plan
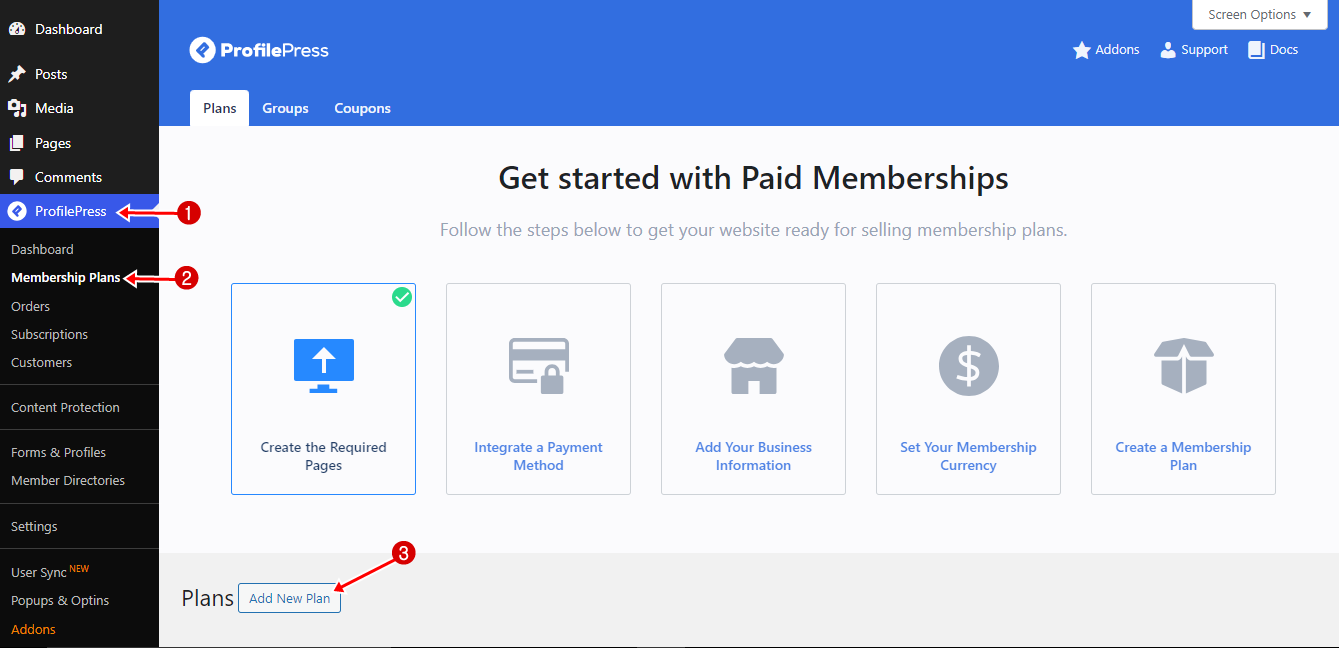
To do this, go to the ProfilePress option and select Membership Plans >> Add New Plan.
Give the plan a name; in this case, we’ll call it Basic Access. Since it’s a free plan, leave the price set to $0, and for billing frequency, choose One-time purchase.
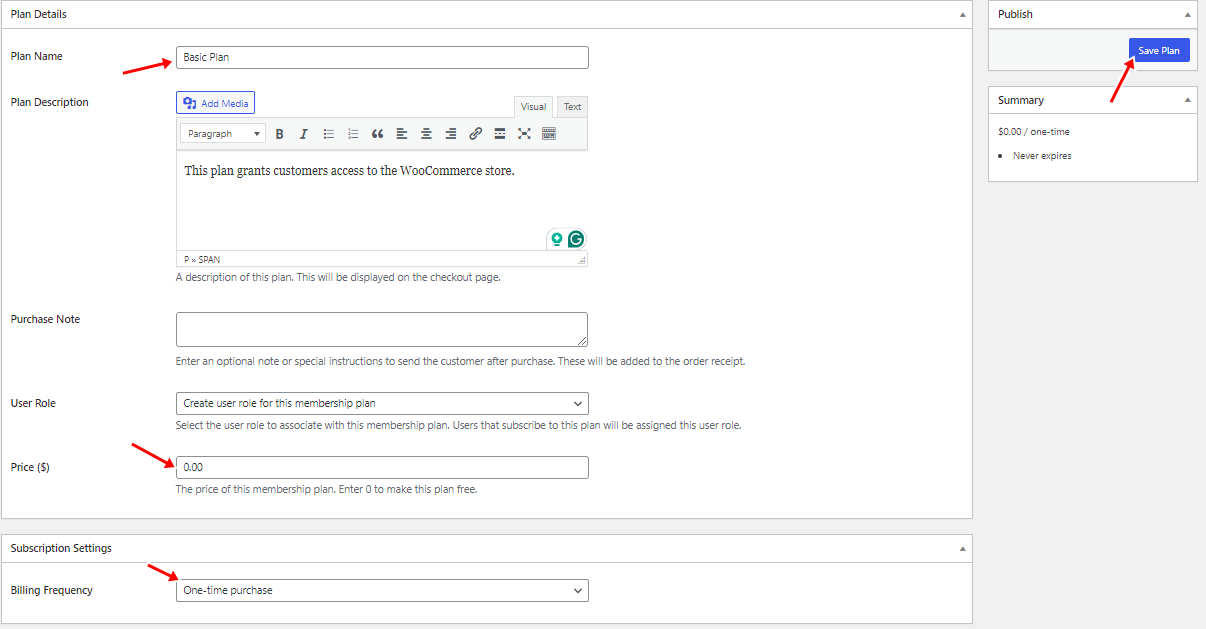
Once done, click the Save Plan button to finalize the setup.
Plus Plan
The Plus Plan offers a 5% discount to its subscribers. Before configuring the plan itself, you’ll first need to create the discount coupon that will be applied to all purchases for Plus Plan members.
To set up the discount, navigate to Marketing → Coupons. Click on the Add New button to create a new coupon.

In the coupon creation screen, customize the following: create a unique coupon code (e.g., “PLUSPLAN”), select Percentage discount as the discount type, and set the coupon amount to 5%.
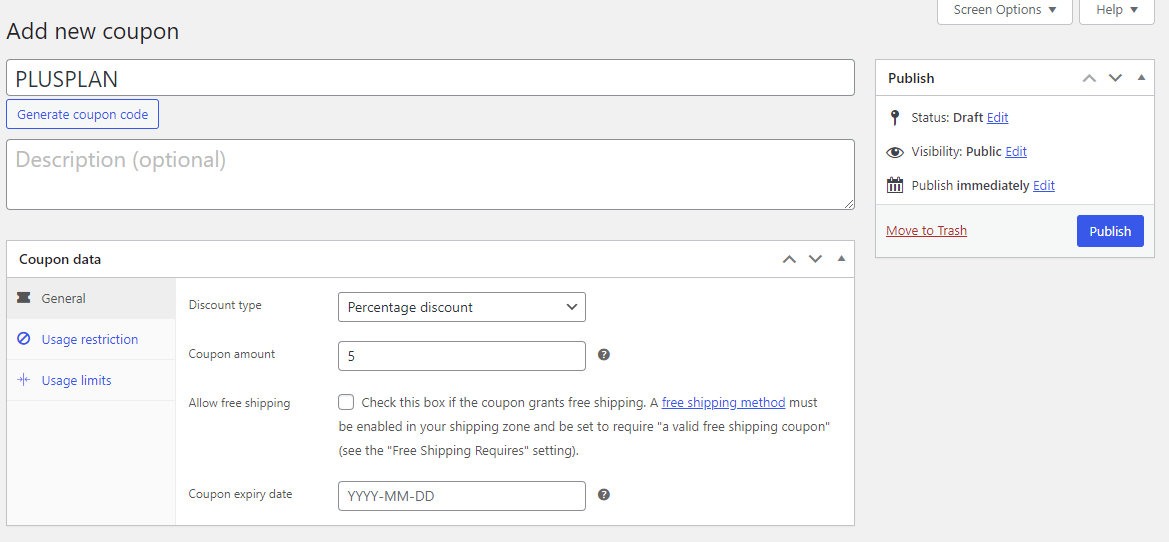
You can also configure the Usage Restrictions and Usage Limits if needed.
Once all the coupon settings are configured, click Publish to activate the coupon. With the discount now live, you can move on to setting up the Plus Plan.
To begin, navigate to ProfilePress → Membership Plans and click Add New Plan. Name the plan Plus, set the price to $149, and choose a monthly billing frequency. This will establish the plan’s recurring payment structure.
Next, scroll down to the Downloads & Integration section. Under the WooCommerce tab, select the coupon you created earlier. This ensures that subscribers to the Plus Plan will automatically receive a 5% discount on their purchases, with the discount applied automatically at checkout whenever they buy products from your store.
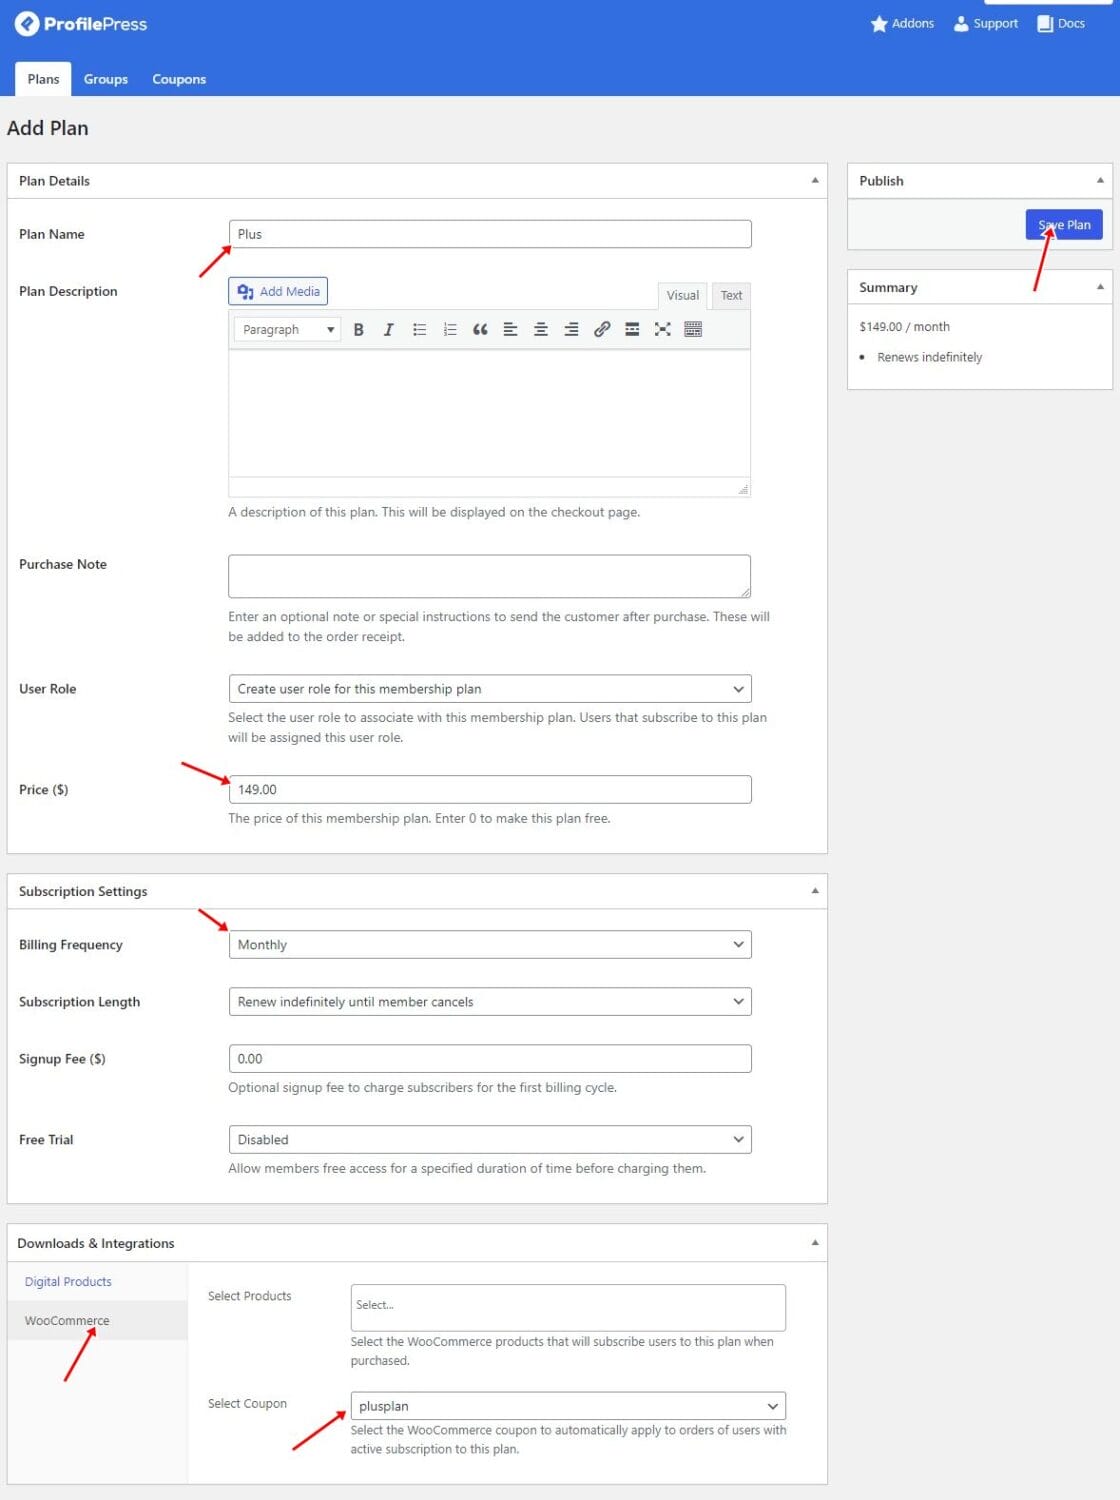
Click the Save Plan button to finalize the setup.
Premium Plan
The Premium Plan offers a 5% discount on all purchases and free shipping. Before configuring the plan itself, you’ll first need to set up the discount coupon and free shipping, similar to what we did for the Plus Plan.
To set up the discount and free shipping, navigate to Marketing → Coupons. Click the Add New button to create a new coupon.
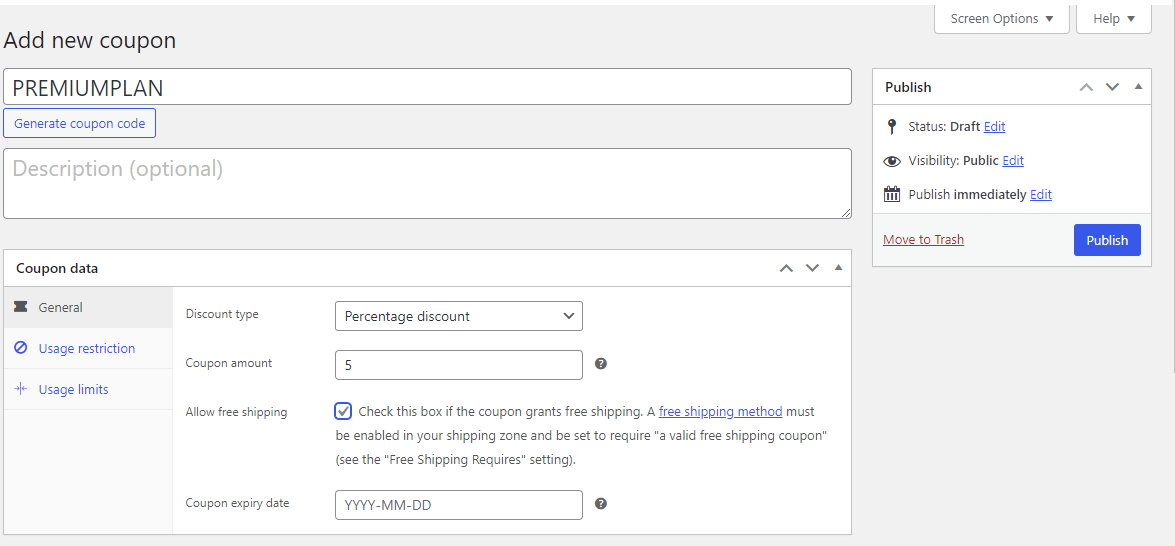
In the coupon creation screen, customize the following: create a unique coupon code (e.g., “PREMIUMPLAN”).
Select Percentage discount as the discount type, and set the coupon amount to 5%. Next, check the box to allow free shipping.
You can also configure the Usage Restrictions and Usage Limits if needed. Once you are done, click Publish to activate the coupon.
With the discount now live, you can move on to setting up the Premium Plan.
To do this, navigate to ProfilePress → Membership Plans and click Add New Plan.
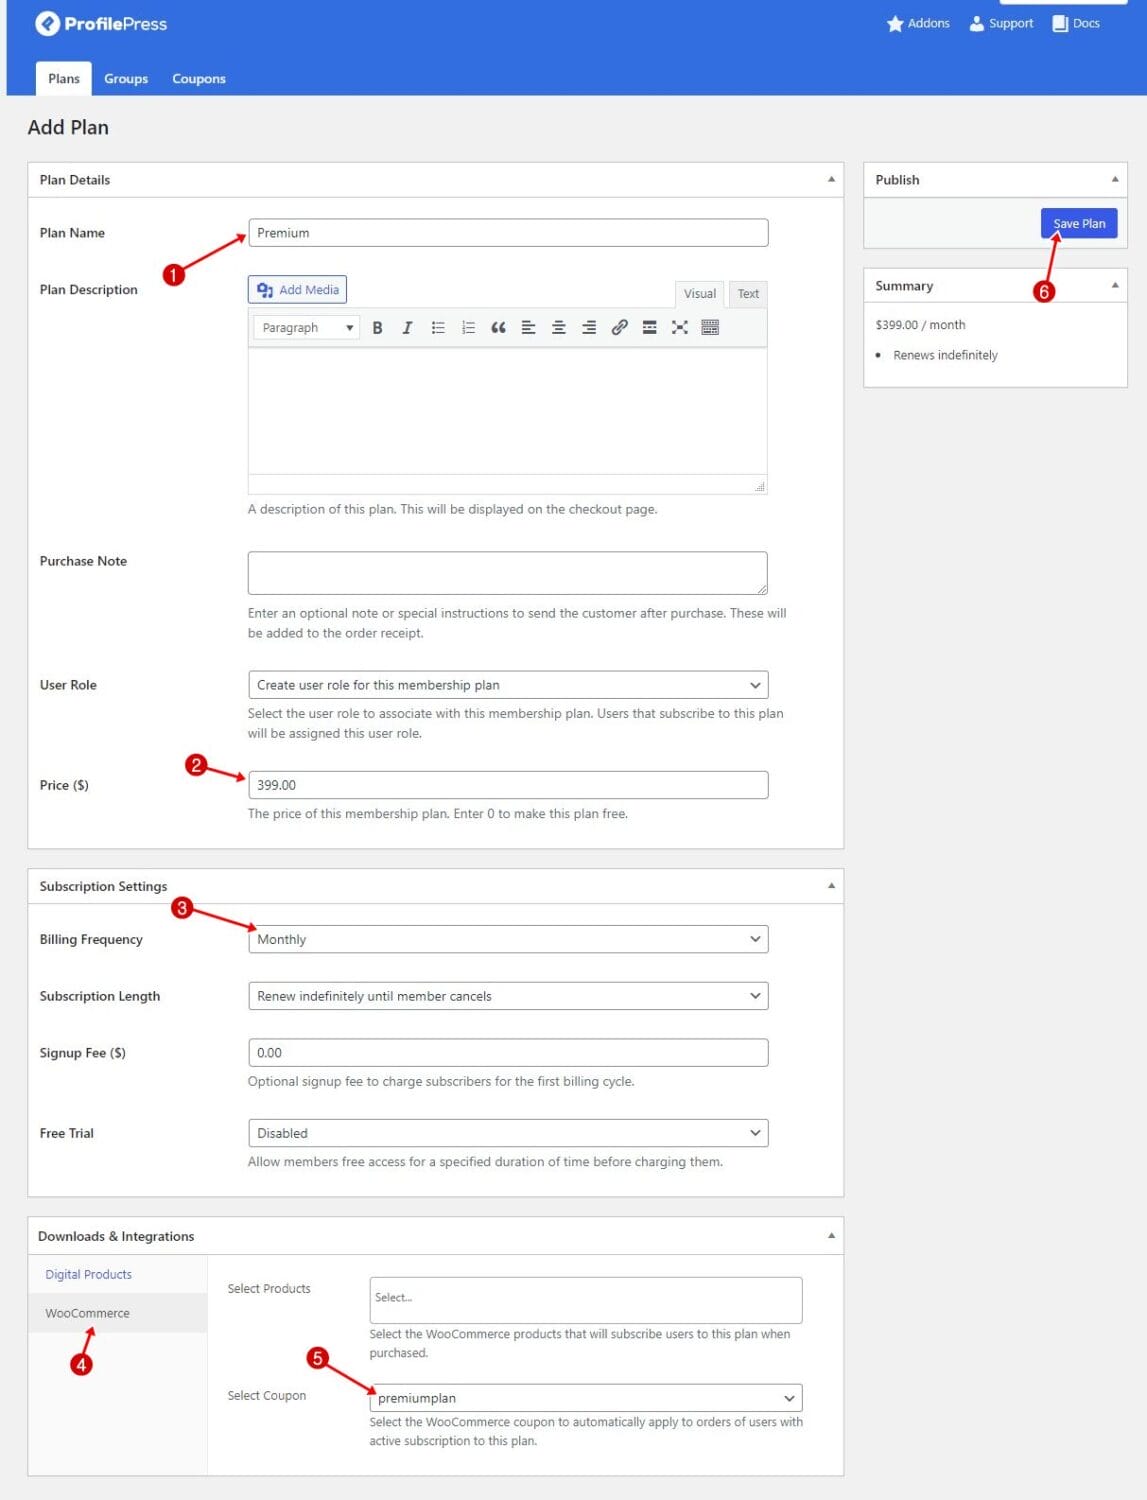
Name the plan Premium, set the price to $399, and choose monthly for the billing frequency.
Next, scroll down to the Downloads & Integration section. Under the WooCommerce tab, select the coupon you created earlier.
Finally, click the Save Plan button to finalize the setup.
Now we have the three plans active on our site.
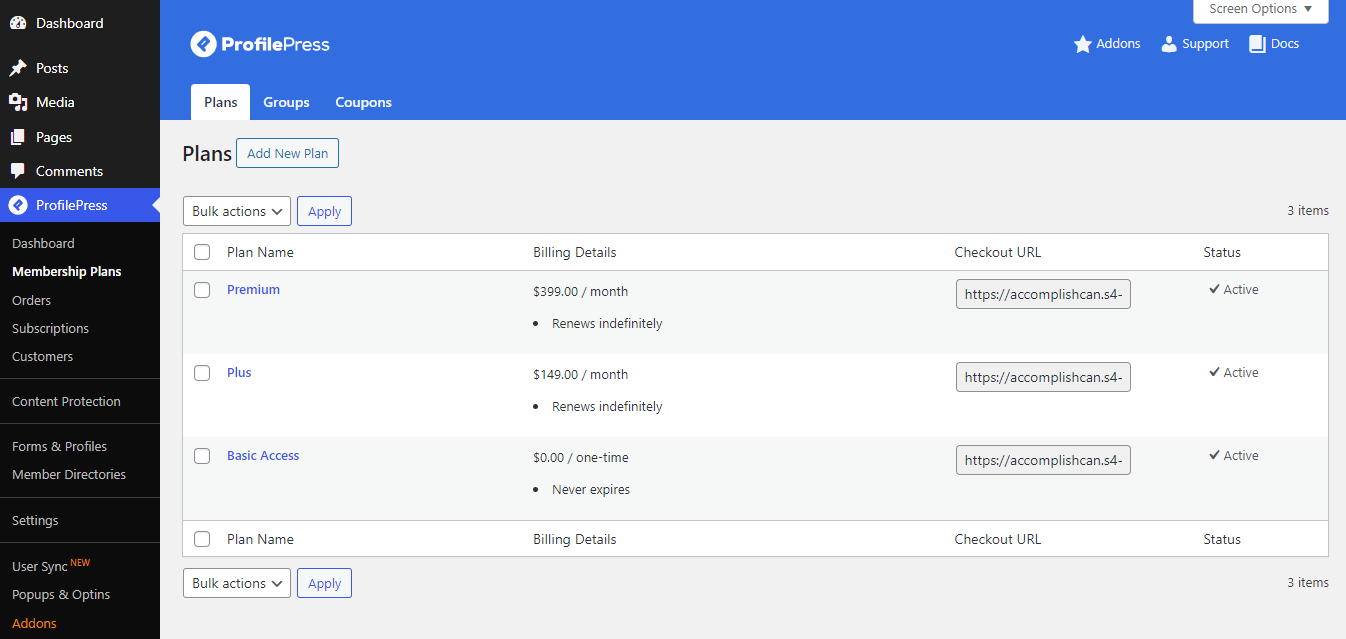
If you want to customize the checkout fields for selling WooCommerce subscriptions on your website, navigate to ProfilePress > Settings > Payments > Checkout Fields. Here, you can add or remove fields based on your requirements.
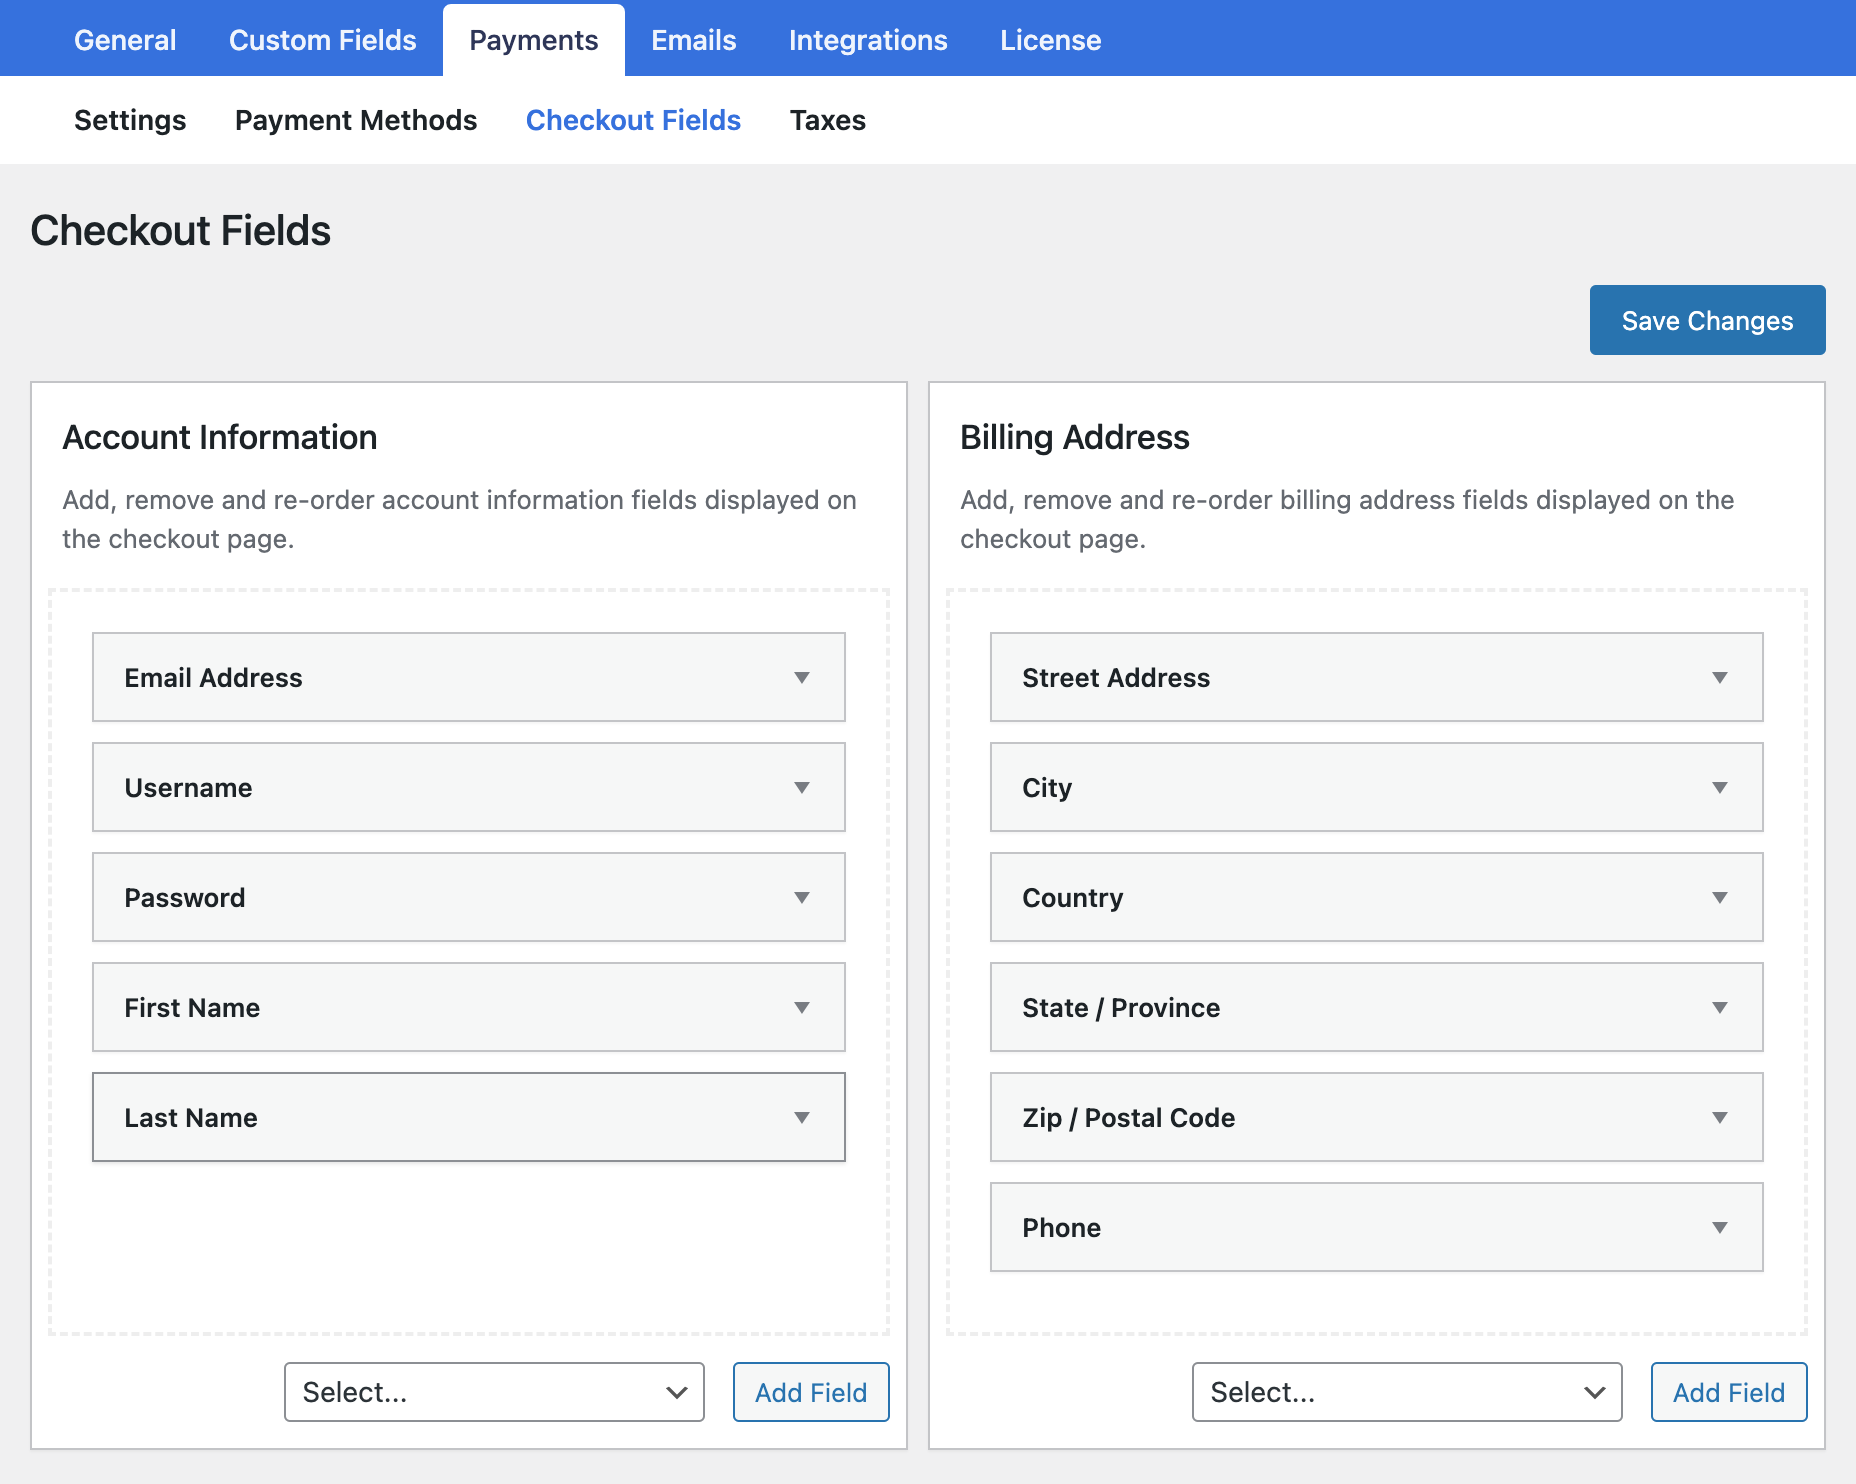
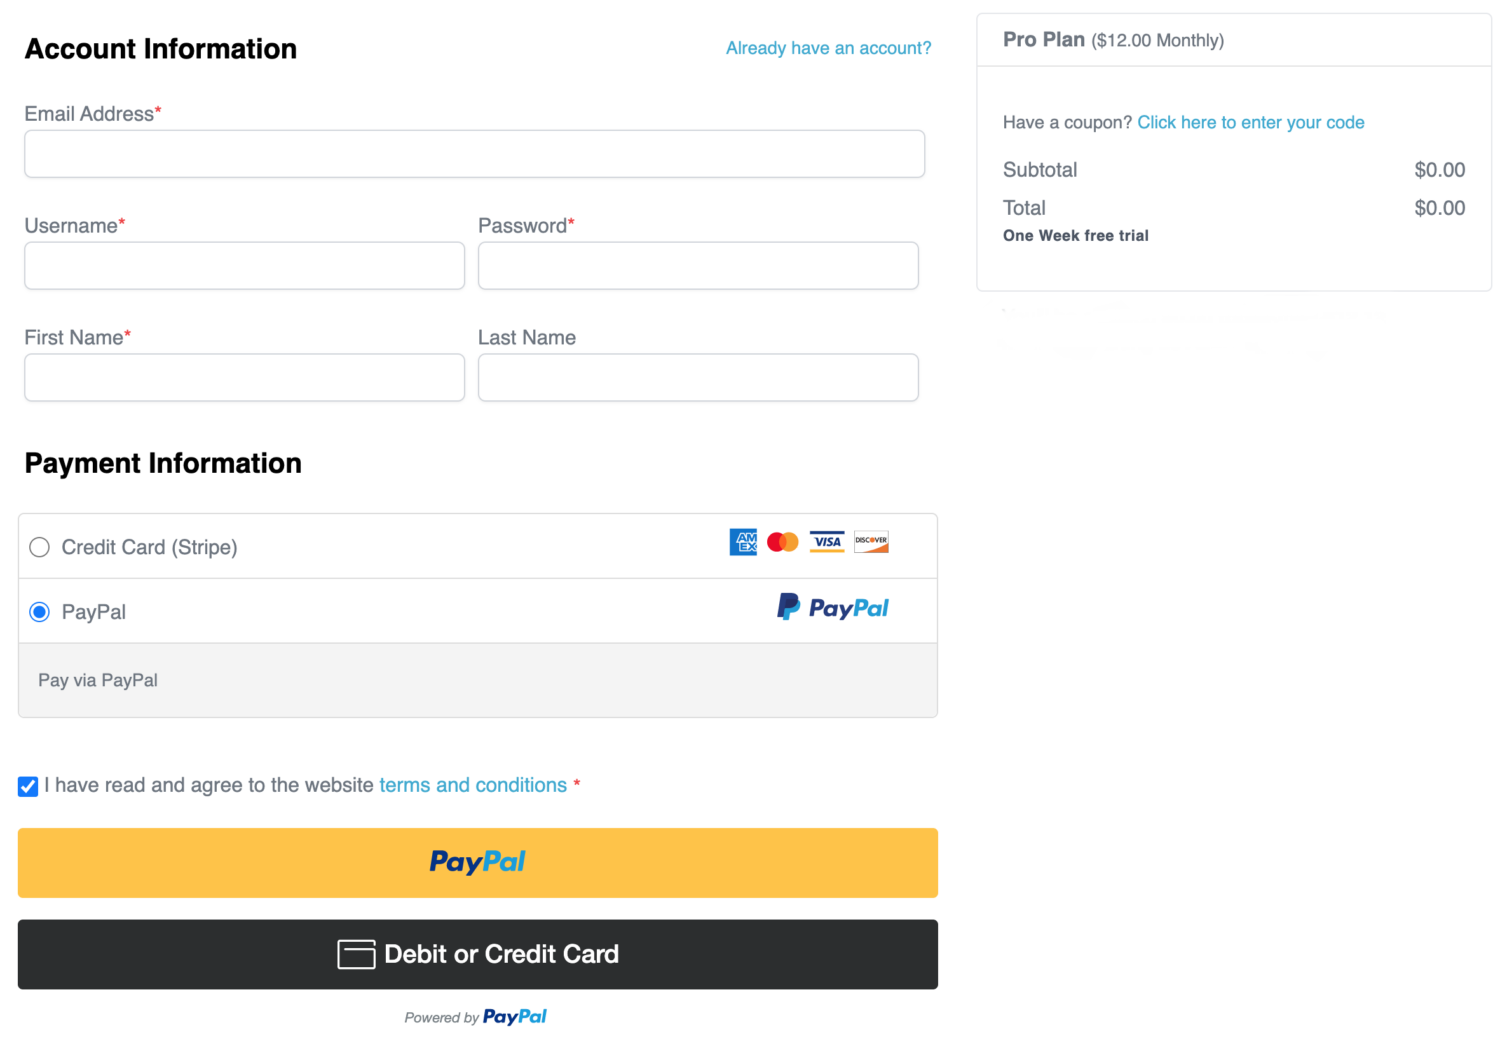
By setting up these pages correctly, you’ll offer your customers a smooth and professional checkout experience, enhancing their satisfaction and improving your subscription business’s overall effectiveness.
Create a Pricing Page & Add the Plans
With your subscription plans and checkout page set up, the next step is to create a dedicated pricing page and showcase your plans.
Start by designing a pricing page where potential customers can view and select from the available subscription options. If you need help, refer to this guide on how to create a pricing page.
Once your pricing page is complete, it’s time to integrate your subscription plans. Navigate to ProfilePress → Membership Plans in your WordPress dashboard.
Each plan has its checkout link. Copy the link.
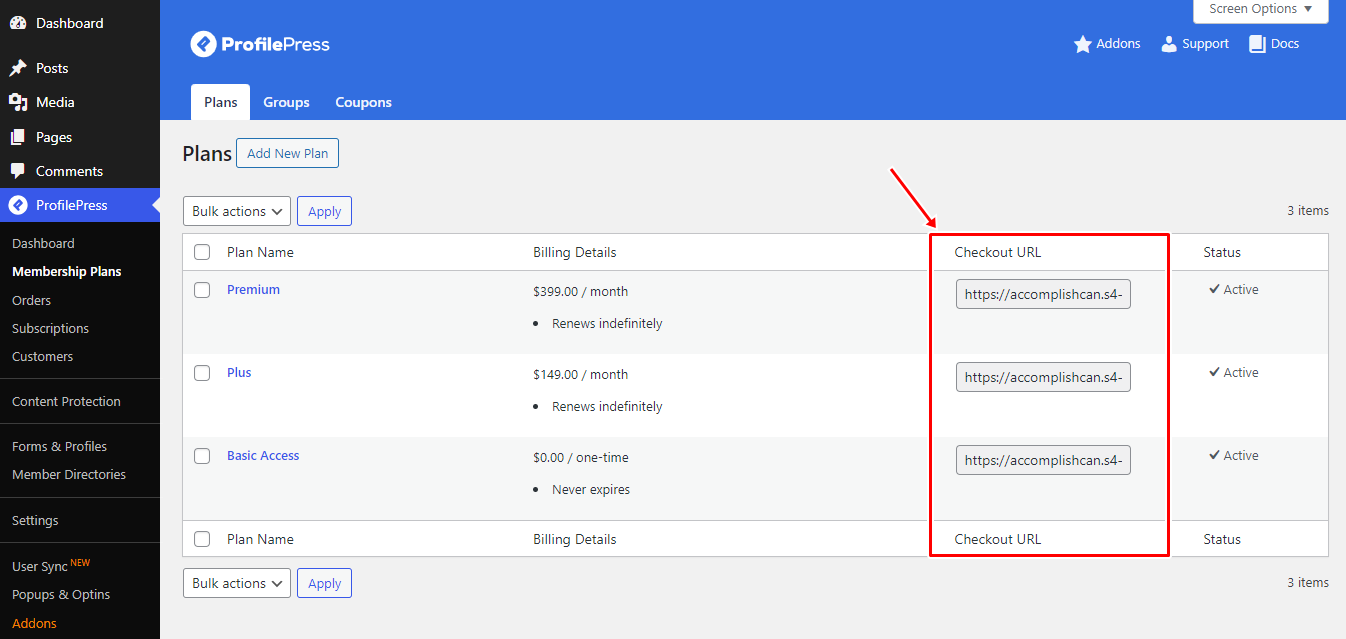
Paste the copied checkout link into the corresponding sections on your pricing page, ensuring that each plan directs customers to the appropriate checkout page.
Note: If you can’t find the checkout link on your membership plan page, go to ProfilePress > Settings > General > Pages and scroll down to the Payment Pages section. Make sure you have selected the Checkout page you just created under the Checkout Page option. Once this is set, return to your membership plans, and you should see the checkout link.
By completing these steps, potential customers who click on the link on your pricing page will be redirected to the checkout page for that specific plan.
Setting Up Member Area
An essential aspect of a membership system is account management, allowing subscribers to manage their accounts, orders, and subscription details.
ProfilePress offers an excellent Member Area (My Account) feature that enables your membership subscribers to update their profiles, change passwords, manage subscriptions, and more.
Since we are building a WooCommerce subscription website, it’s important that users can view their orders, memberships, and subscriptions on the My Account page.
To add WooCommerce tabs to the My Account page provided by ProfilePress, navigate to ProfilePress >> Settings >> WooCommerce >> My Account Tabs and select the desired tabs.
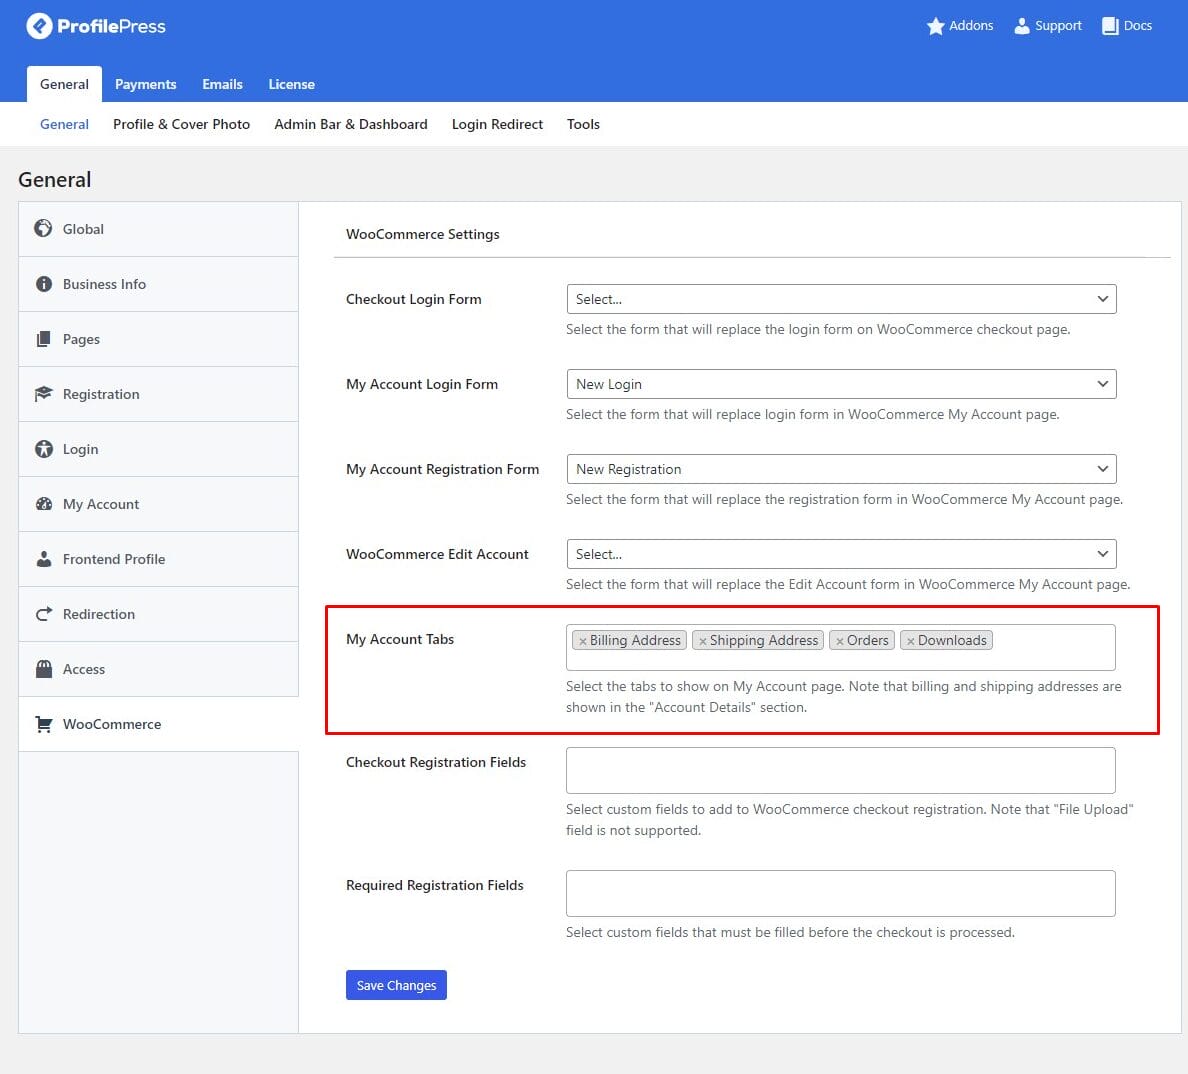
Click “Save Changes” to finalize the setup.
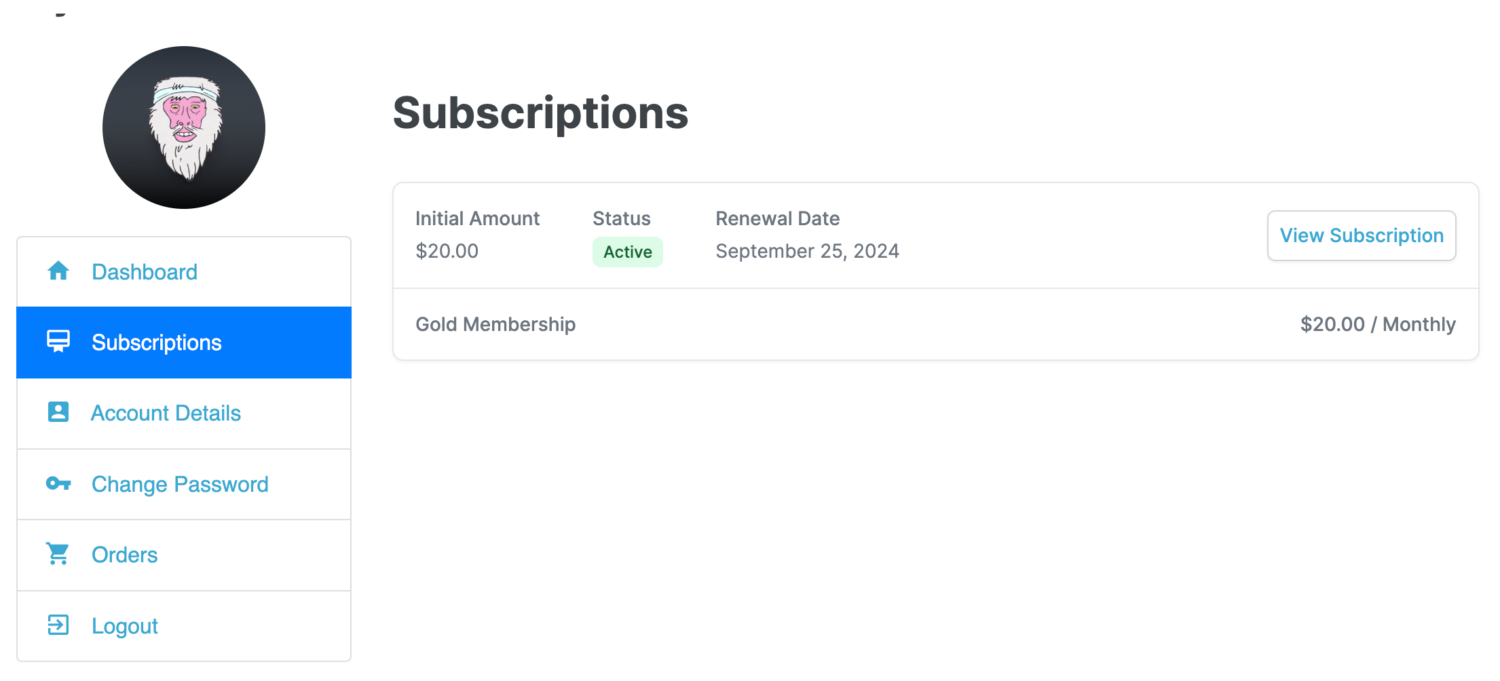
Once this is done, members visiting their My Account page will see a dashboard with menu tabs for viewing their plan subscriptions, WooCommerce orders, and more, as shown in the image below.
Get The Excellent WooCommerce Subscriptions Alternative Today
Throughout this article, we’ve highlighted how ProfilePress is an excellent alternative to WooCommerce Subscriptions. With its user-friendly interface, flexible subscription management, and seamless integration with WordPress, it caters to businesses of all sizes, providing an effective way to manage memberships and subscriptions.
While WooCommerce Subscriptions remains a popular option, ProfilePress is a worthy contender, especially for those seeking a more cost-effective, all-in-one solution.