Subscription Business Model: Meaning & Setup
Do you want to understand a subscription business model and how to set it up?
Many businesses are adopting subscription-based models to generate steady, recurring revenue streams. This business model has become a cornerstone for sustainable growth, whether for a SaaS product, membership site, or even a physical goods subscription box.
According to a report by Zuora, subscription-based businesses have grown nearly five times faster than companies in the S&P 500 over the last decade.
But what exactly is a subscription business model, and how can you set one up for your venture?
In this article, we’ll dive into the fundamentals of this model, explore its benefits, and provide a step-by-step guide to help you implement it effectively. Whether you’re selling digital content, offering ongoing services, or creating a membership platform, this article will give you the knowledge necessary to launch a subscription-based business successfully.
What is a Subscription Business Model?
A subscription business model is a revenue model where customers pay a recurring fee, usually monthly, quarterly, or annually, to continuously access a product or service. Instead of making a one-time purchase, customers subscribe to receive ongoing access to the offering. This model is commonly used by digital platforms, content providers, SaaS (Software as a Service) companies, and even physical goods providers like subscription boxes.
The advantage of this model is that it generates a predictable, recurring revenue stream for businesses. Companies offering subscriptions often focus on customer retention and providing continuous value, ensuring subscribers stay engaged and renew their subscriptions. Examples include services like Netflix, Spotify, Adobe Creative Cloud, and Amazon Prime.
Benefits of Subscription Models
The subscription business model offers a range of benefits for both businesses and customers, which include:
Predictable Revenue Stream: One of the most significant advantages of the subscription model is the steady, recurring revenue it generates. Unlike traditional sales models that rely on one-time purchases, subscription models provide businesses with a reliable income stream. This makes financial forecasting easier and helps ensure cash flow stability over time.
Higher Customer Retention: Subscription models are designed to encourage long-term customer relationships. When customers subscribe, they commit to ongoing payments in exchange for continuous access to a product or service. This structure fosters customer loyalty, as they’re more likely to stay with a service they use regularly.
Scalability: Once a subscription system is in place, scaling the business becomes easier. Whether you’re offering a SaaS product or a physical subscription box, the ability to manage large volumes of customers is often built into the infrastructure. This allows businesses to grow without significant increases in operational costs.
Increased Customer Lifetime Value (CLV): With subscriptions, customers stay engaged longer than when making one-time purchases. This extended relationship increases the Customer Lifetime Value (CLV), meaning you earn more revenue from each individual over time. The longer customers stay subscribed, the more valuable they become to your business.
Better Customer Insights: With a recurring revenue model, businesses can interact with their customers more. This enables companies to gather valuable data on customer preferences, behavior, and usage patterns. These insights can be used to improve products and services and offer personalized experiences, increasing customer satisfaction.
Customer Convenience: For customers, subscription models offer convenience and ease of use. They no longer need to make frequent purchases or worry about renewing access manually. Whether streaming content, software updates, or even receiving physical products, the recurring nature of subscriptions ensures hassle-free, ongoing service.
Opportunities for Upselling and Cross-Selling: Subscription models often provide natural opportunities to upsell or cross-sell related products or services. For example, a SaaS company might offer premium tiers with additional features, or a subscription box service might introduce add-ons to enhance the user experience. This not only increases revenue but also improves the value provided to customers.
Fosters Brand Loyalty: The continuous engagement between the customer and the business helps foster a deeper connection. Subscription-based businesses are often perceived as more reliable and customer-centric because they deliver consistent value. This relationship builds trust and strengthens brand loyalty.
Different Types of Subscription Models
There are several types of subscription models that businesses can adopt, depending on their products or services and the needs of their target audience. Here’s an overview of the most common subscription models:
Product Subscription Model: This is one of the most widely recognized subscription models, where customers receive physical goods regularly. Examples include subscription boxes like beauty products, meal kits, or fitness supplements. Companies using this model deliver curated or replenished products monthly or quarterly. Notable examples include Birchbox and HelloFresh.
Service Subscription Model: Customers subscribe to ongoing access to services rather than physical products in this model. This is common in industries like streaming (e.g., Netflix, Spotify) and online education platforms (e.g., Coursera). Customers pay a recurring fee to gain continuous access to their required services.
Membership Subscription Model: This creates a membership-based community where subscribers gain exclusive benefits, content, or services. Membership sites often cater to niche interests, offering valuable content, networking opportunities, or educational resources. Examples include Patreon (for creators) and LinkedIn Premium.
Access-Based Subscription Model: With access-based subscriptions, customers subscribe to gain limited or full access to a service or product library. For example:
- Cloud Storage Services: Users pay for a certain amount of storage, with examples like Dropbox and Google Drive.
- Gym Memberships: Customers pay monthly or yearly to access the facility and services.
Hybrid Subscription Model: A hybrid subscription model blends two or more types of subscriptions, often combining physical products and digital services. For instance, a fitness brand might offer a subscription box with workout gear and digital access to fitness classes. This model allows businesses to provide more value and cater to broader customer needs.
Freemium Subscription Model: This model provides basic access to a product or service for free, with the option to upgrade to premium features through a paid subscription. It is a popular strategy for SaaS companies and mobile apps. The free version attracts users, and the premium upgrade provides additional value. Examples include Dropbox and Spotify.
Tiered Subscription Model: In a tiered subscription model, businesses offer multiple subscription levels, each with benefits and pricing. Customers can choose the plan that best fits their needs. For example, a SaaS company might offer “Basic,” “Pro,” and “Enterprise” plans, with each tier offering more features than the previous one.
Usage-Based Subscription Model: Customers are charged based on how much they use a service or product, often called a “pay-as-you-go” system. Customers are billed according to their data consumption, storage, and other resources in industries like cloud computing (e.g., AWS) or telecommunications.
Each type of subscription model can be designed to meet specific business goals and customer needs, offering flexibility and scalability across various industries. Choosing the suitable model for your business depends on your product, service, and target audience preferences.
In the next section, we show you how to set up a subscription business on your WordPress website using ProfilePress, an excellent WordPress membership plugin that lets you build paid subscription sites, sell digital products, and control who can access your content.
Setting Up a Subscription Business Model on Your WordPress Site
To create a subscription-based business model, you will need to add subscription functionality to your WordPress site using a plugin like ProfilePress.
ProfilePress lets you sell digital products, create subscription-based sites, restrict access to your website content, and integrate with many payment gateways, including Stripe, Mollie, PayPal, Razorpay, and Paystack.
Let’s examine how you can use this excellent tool to create your subscription business model.
Step #1: Install and Activate Profilepress
First, you need to purchase a ProfilePress license. After purchasing, you will receive an email with the plugin’s download link and license key. Alternatively, you can download the plugin from your account page on the ProfilePress website.
Next, log in to your WordPress admin dashboard. Navigate to the Plugins page, click the “Add New” button, and then select “Upload Plugin”. Choose the plugin zip file you downloaded earlier and click “Install Now”.
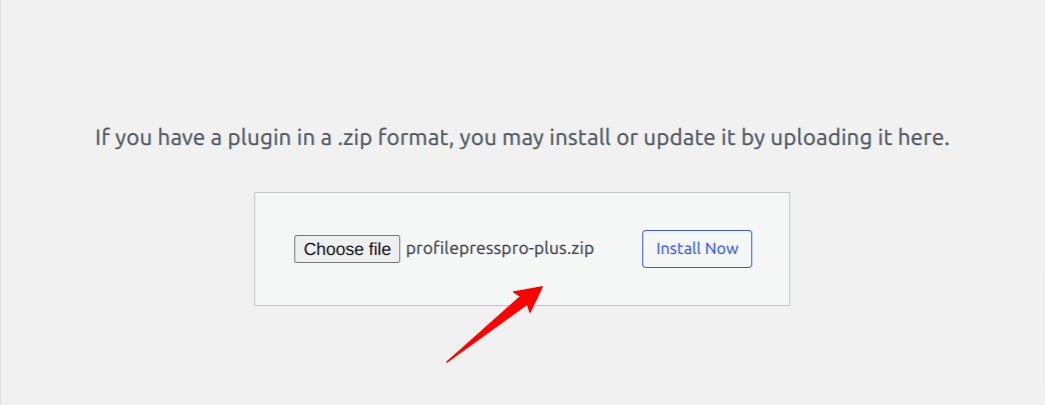
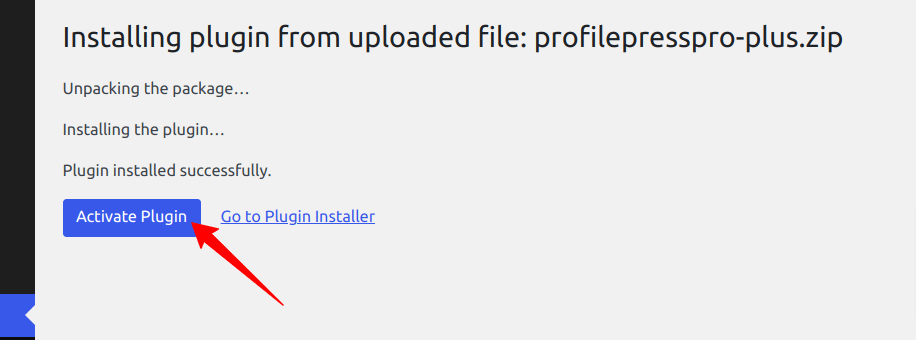
Wait a few seconds for the installation to be completed. Once the plugin is installed, click “Activate Plugin” to activate it on your site.
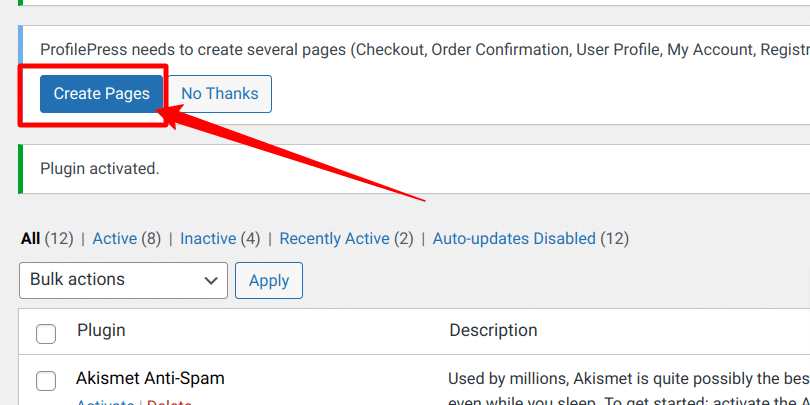
You’ll notice a notification at the top of the page stating, “ProfilePress needs to create several pages.” Click the “Create Pages” button to complete the plugin setup.
Step #2: Set up a Subscription Plan
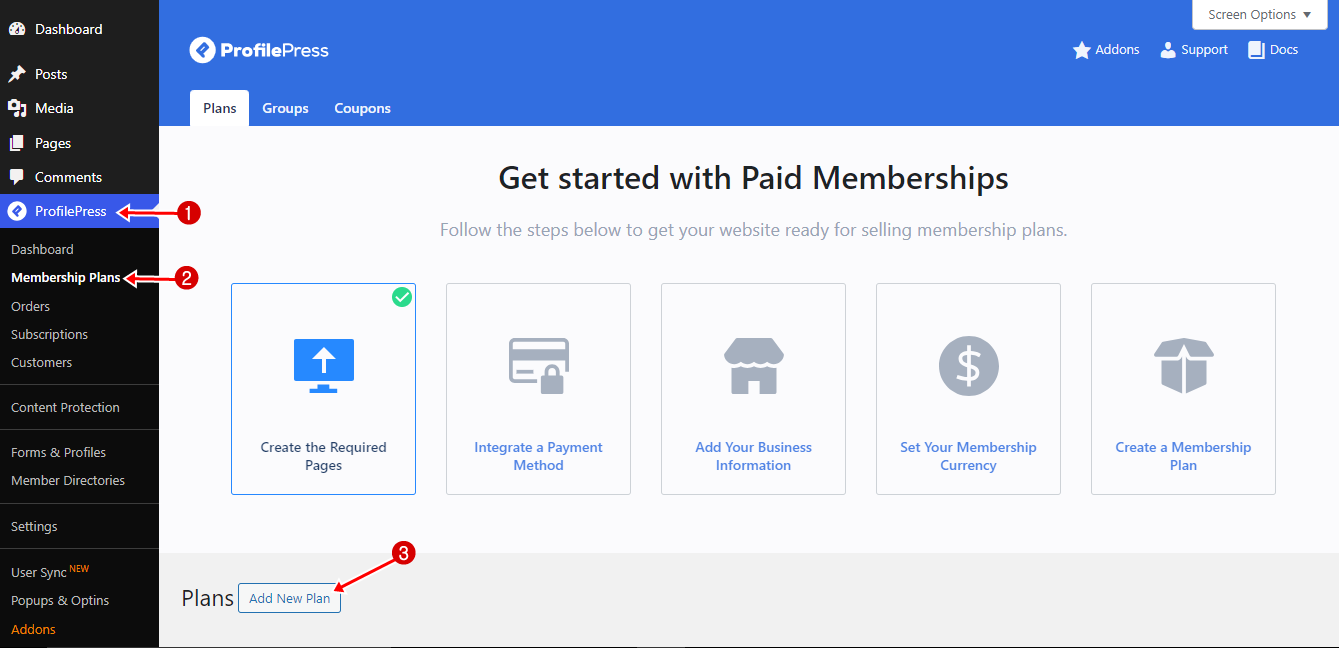
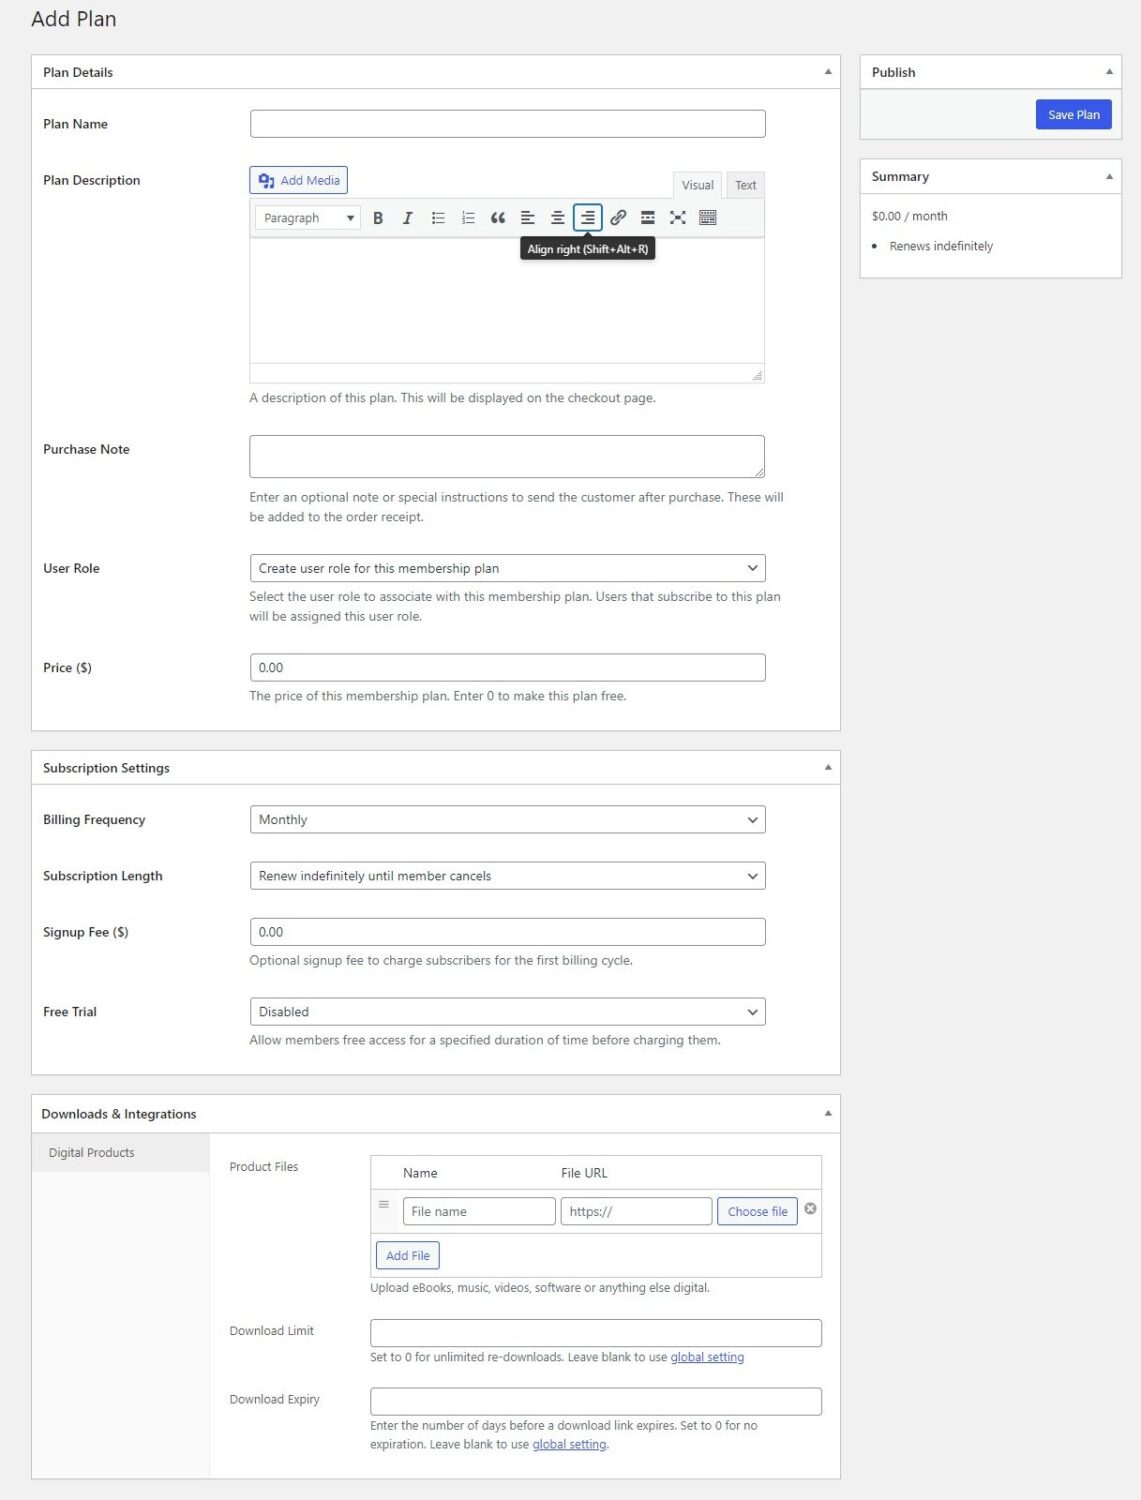
After installing and activating ProfilePress, the next step is to set up a subscription plan. To do this, go to the ProfilePress option and select Membership Plans >> Add New Plan.
The following page has three sections: Plan Details, Subscription Settings, and Downloads & Integration. These sections are crucial for setting up the specifics of your subscription plan.
Plan Details Section
In the Plan Details section, you’ll configure the essential information for your subscription plan. Here, you can set:
Plan Name: This is the title of your subscription plan, which will be visible to potential customers. It’s essential to choose a clear and enticing name that reflects the value of your offering.
Plan Description: The description field allows you to provide more detailed information about the plan. This is your opportunity to explain the benefits, features, and what subscribers can expect from the plan. Craft a compelling message that resonates with your target audience and convinces them to sign up. The description will be shown to potential customers on your subscription page, so it should be engaging and persuasive.
Purchase Note: This option allows you to input an optional note or special instructions to send the customer after purchase. These will be added to the order receipt.
User Role: This option allows you to choose the user role associated with the subscription plan. Selecting “create a user role for this membership plan” is recommended to create and assign a new role to members automatically. This new user role makes it easy to track new members who sign up for the membership plan”.
Price: Here, you will define how much you will charge for the subscription. You can choose a price that reflects the value of your product or service.
Subscription Settings Section
The Subscription Settings section will configure how your subscription plan operates regarding billing, payment cycles, and additional options like free trials or signup fees. These settings define the customer’s payment experience and ensure it aligns with your business model.
Let’s break down each key option available:
Billing Frequency: The billing frequency determines how often the customer will be charged for the subscription. You can choose between various billing frequency options such as monthly, weekly, daily, quarterly, every six months, yearly, or a one-time payment option.
Subscription Length: This option allows you to define the subscription’s length. You have two primary choices:
- Indefinite Renewal: Customers can continue their subscription indefinitely until they manually cancel it. This option is common for ongoing services, where customers are expected to remain subscribed if they find value in the offering.
- Fixed Number of Payments: You can limit how often a customer will be billed. For example, you might offer a 12-month program where customers are billed monthly, but the subscription ends automatically after 12 payments. This option is helpful for structured programs or courses with a defined duration.
Signup Fee: This option allows you to charge an upfront fee when a customer subscribes in addition to their regular subscription payments. A one-time signup fee can help cover initial onboarding or setup costs.
Free Trial: A free trial is a powerful way to attract potential customers. By allowing them to experience your product or service for a limited time at no cost, you reduce the barrier to entry and increase the chances of conversion once the trial period ends. In this section, you can set the length of the free trial (e.g., 7 days, 14 days, or 30 days).
The Downloads & Integration section should be used when selling digital products on your website. It allows you to upload the product file associated with the membership, set the download limit, and define the download expiration. For more details, check out our guide on how to sell digital products on your website.
Hit the Save Plan button after setting up the plan for your subscription business model website.
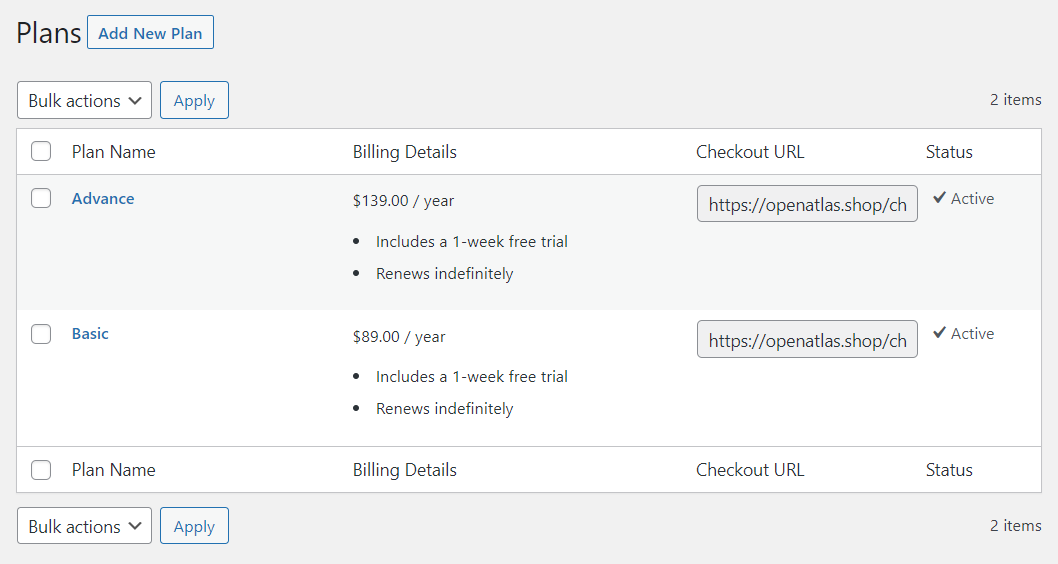
You can create more than one plan using the above steps.
Step #3: Create Checkout & Order Confirmation Pages
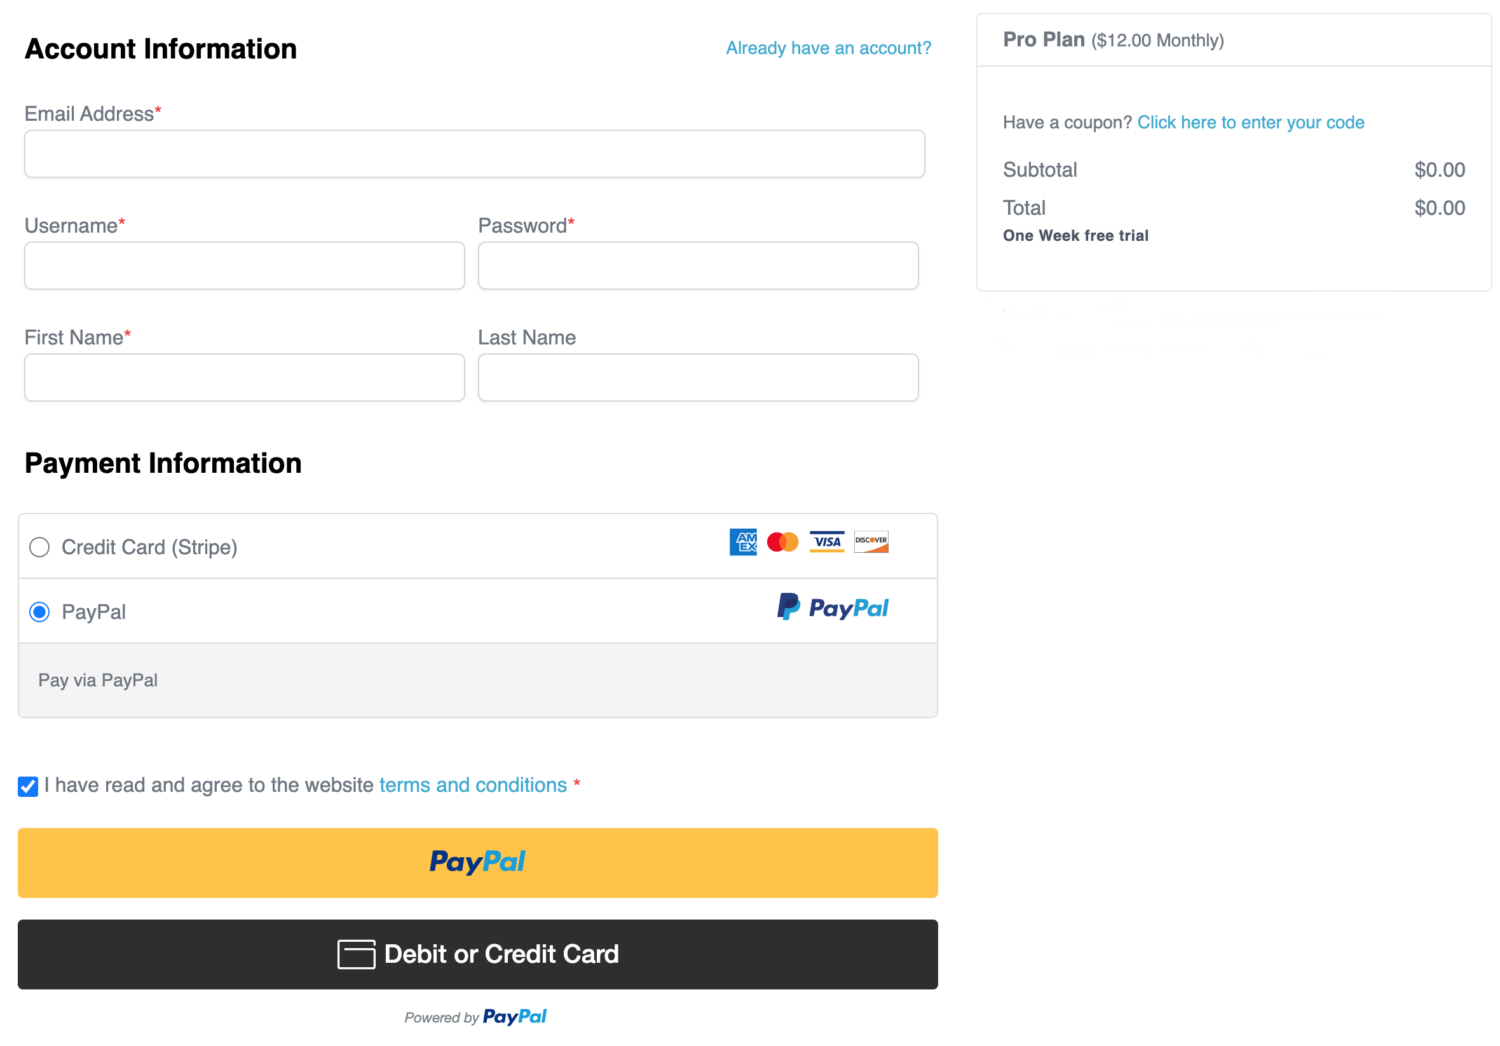
Creating dedicated Checkout and Order Confirmation pages is a crucial step in setting up your subscription business, as these pages facilitate the payment process and provide essential information to your customers.
Checkout Page: The Checkout page is where your customers will input their payment and billing information before finalizing their subscription or membership purchase. This page is vital for:
- Collecting Payment Information: Customers will enter credit card details or other payment methods supported by your payment gateway.
- Billing Details include capturing essential information such as the customer’s name, address, and contact information.
- Reviewing the Subscription Plan: Before purchasing, customers can review their selected plan, including the pricing and billing cycle.
Order Confirmation Page: The Order Confirmation page is displayed after a customer completes their purchase. This page serves several purposes:
- Order Summary: It provides a detailed summary of the order, including the subscription plan selected, the amount paid, and any applicable taxes or discounts.
- Thank You Message: A confirmation or thank you message reassures customers that their transaction was successful and their subscription is active.
Creating These Pages
By default, these pages are created during installation. If they are missing from your site, follow these steps:
Go to Pages > Add New. Name the page as Checkout and then add the checkout shortcode:
[profilepress-checkout]Also, create an “Order Success” page and add the shortcode:
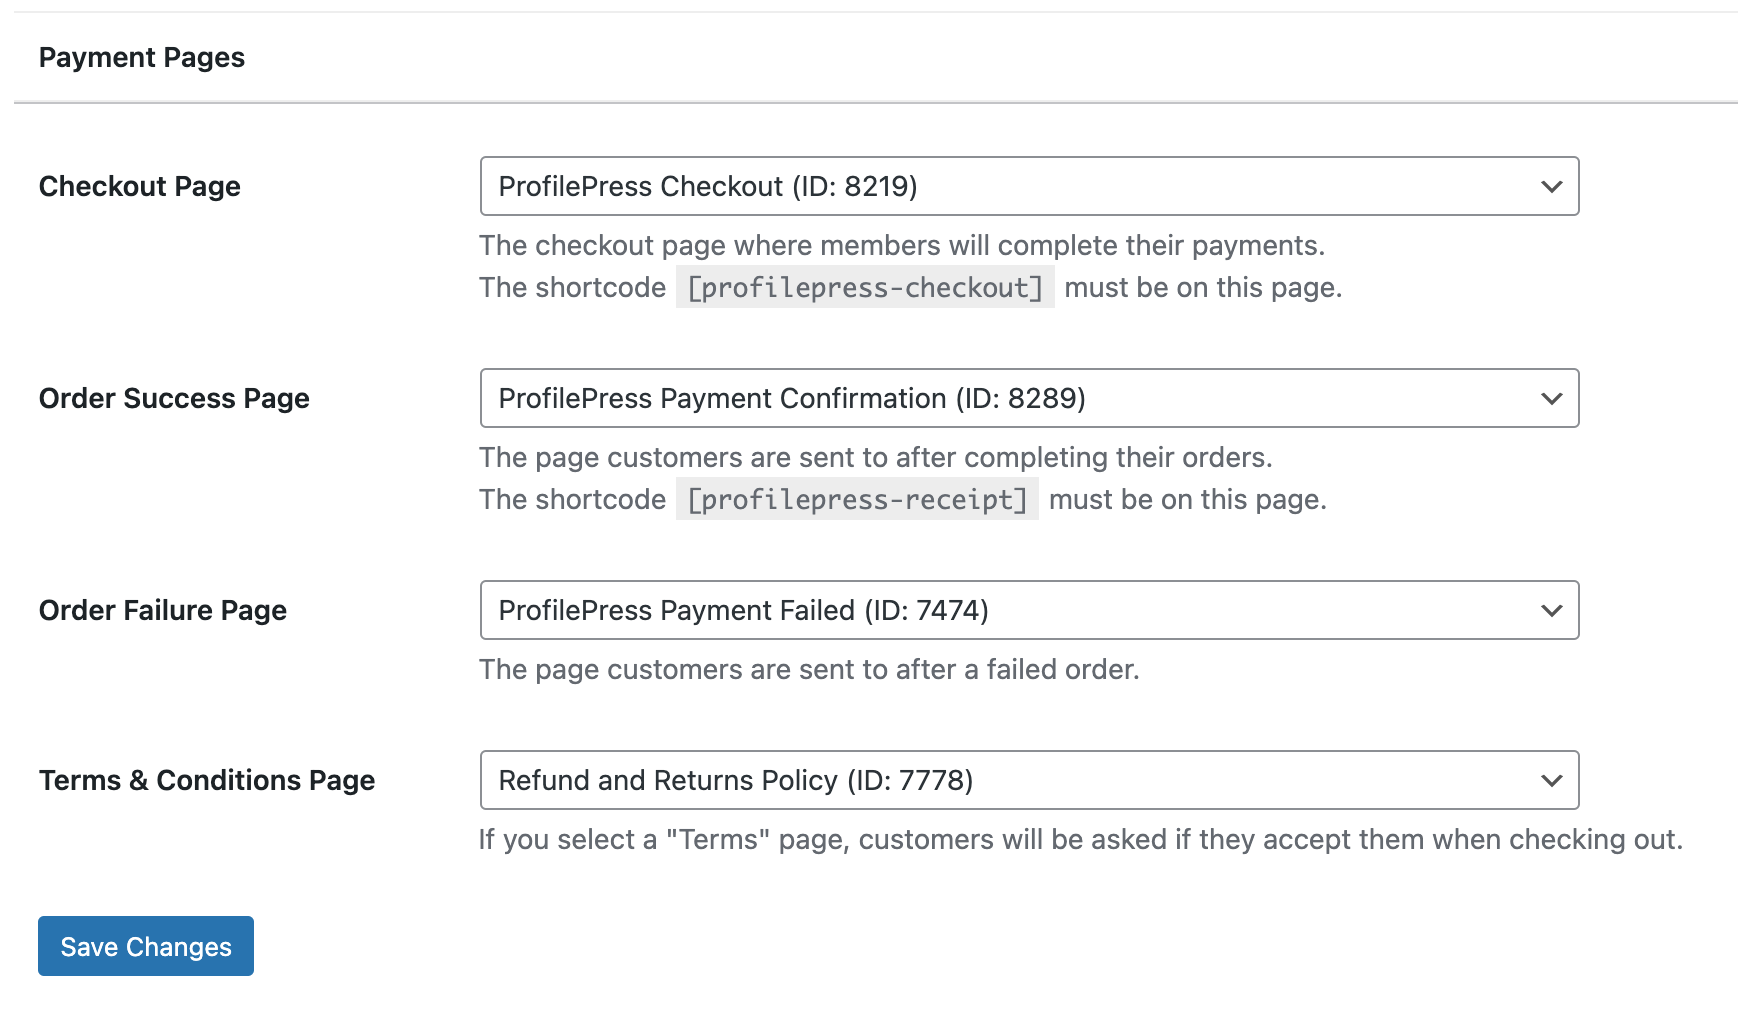
[profilepress-receipt]Finally, navigate to ProfilePress > Settings > Pages. Scroll to the Payment Pages section and select the Checkout and Order Success Page.
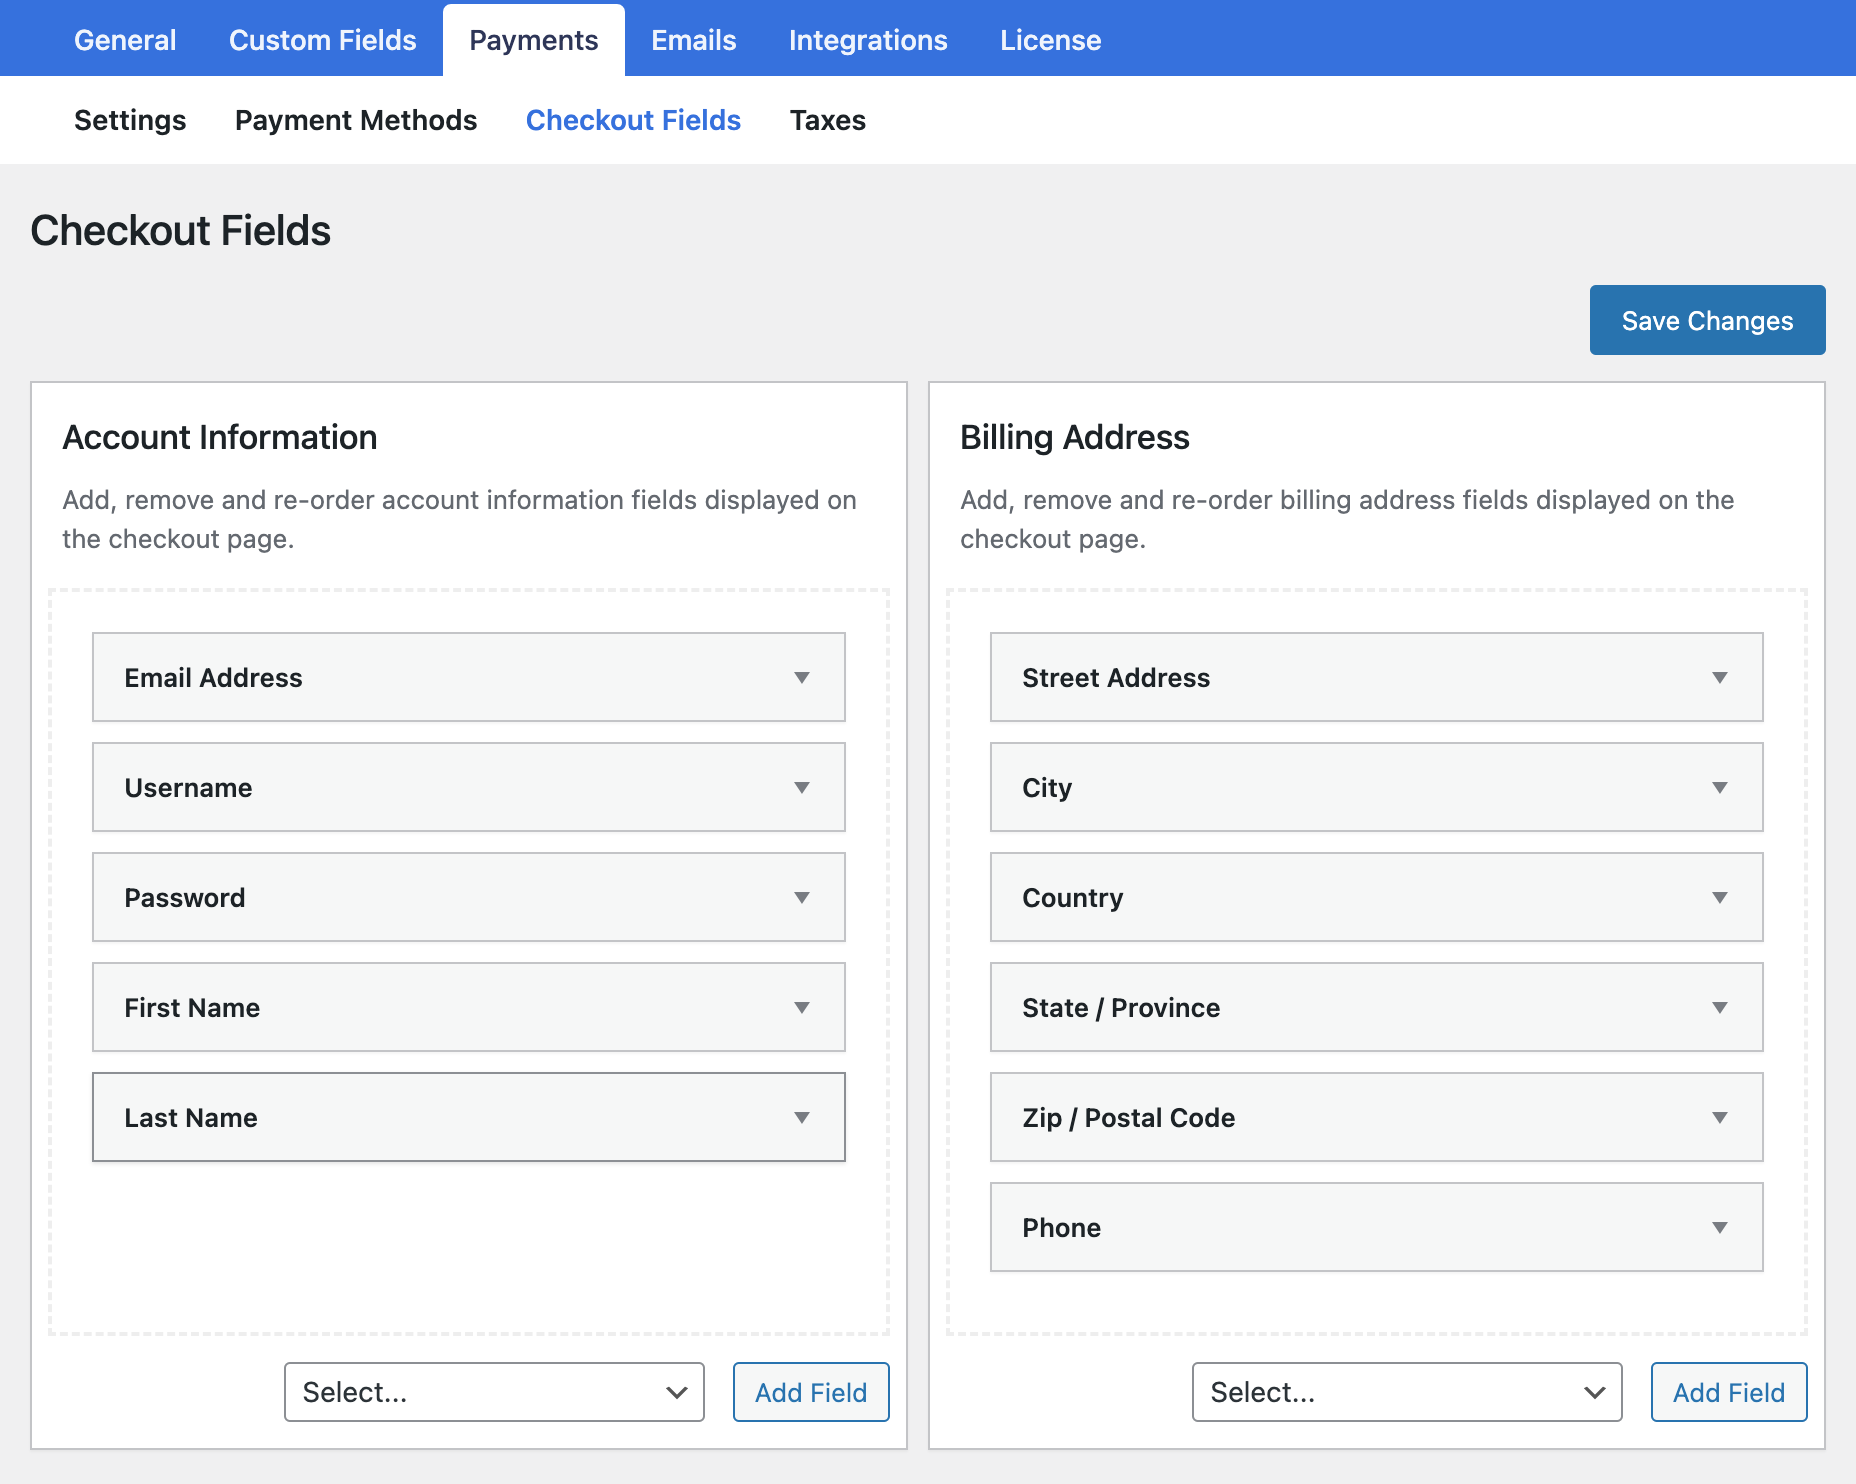
If you want to customize the checkout fields for selling subscriptions on your website, navigate to ProfilePress > Settings > Payments > Checkout Fields. Here, you can add or remove fields based on your requirements.
By setting up these pages correctly, you’ll offer your customers a smooth and professional checkout experience, enhancing their satisfaction and improving your subscription business’s overall effectiveness.
Step #4: Integrate Payments
ProfilePress supports a variety of payment gateways to facilitate transactions for your subscription services. These include:
Stripe: A popular payment processor known for its ease of integration and great features, including support for various credit cards, ACH transfers, and debit card payments.
PayPal: One of the most widely recognized payment gateways, PayPal provides a secure and straightforward way for customers to pay using their PayPal accounts or credit/debit cards. PayPal’s global reach makes it an excellent choice for businesses with an international customer base.
Razorpay: A versatile payment gateway catering primarily to businesses in India. Razorpay supports multiple payment methods, including credit/debit cards, net banking, and popular wallets. It’s known for its ease of use and suite of payment solutions.
Paystack: Popular in Africa, Paystack enables businesses to accept payments using various local and international payment methods. It provides features such as recurring billing and a smooth integration process, making it a strong choice for businesses in the African market.
Direct Bank Transfer: This method allows customers to make payments directly from their bank accounts to your business’s bank account. It’s a straightforward option but may require manual verification of payments.
Mollie: A payment service provider based in Europe, Mollie supports various payment methods, including credit cards, bank transfers, and local payment options. Mollie is known for its ease of setup and transparent pricing.
Enabling Payment Collection
To start collecting payments through these gateways on your website running the subscription business model, follow these steps:
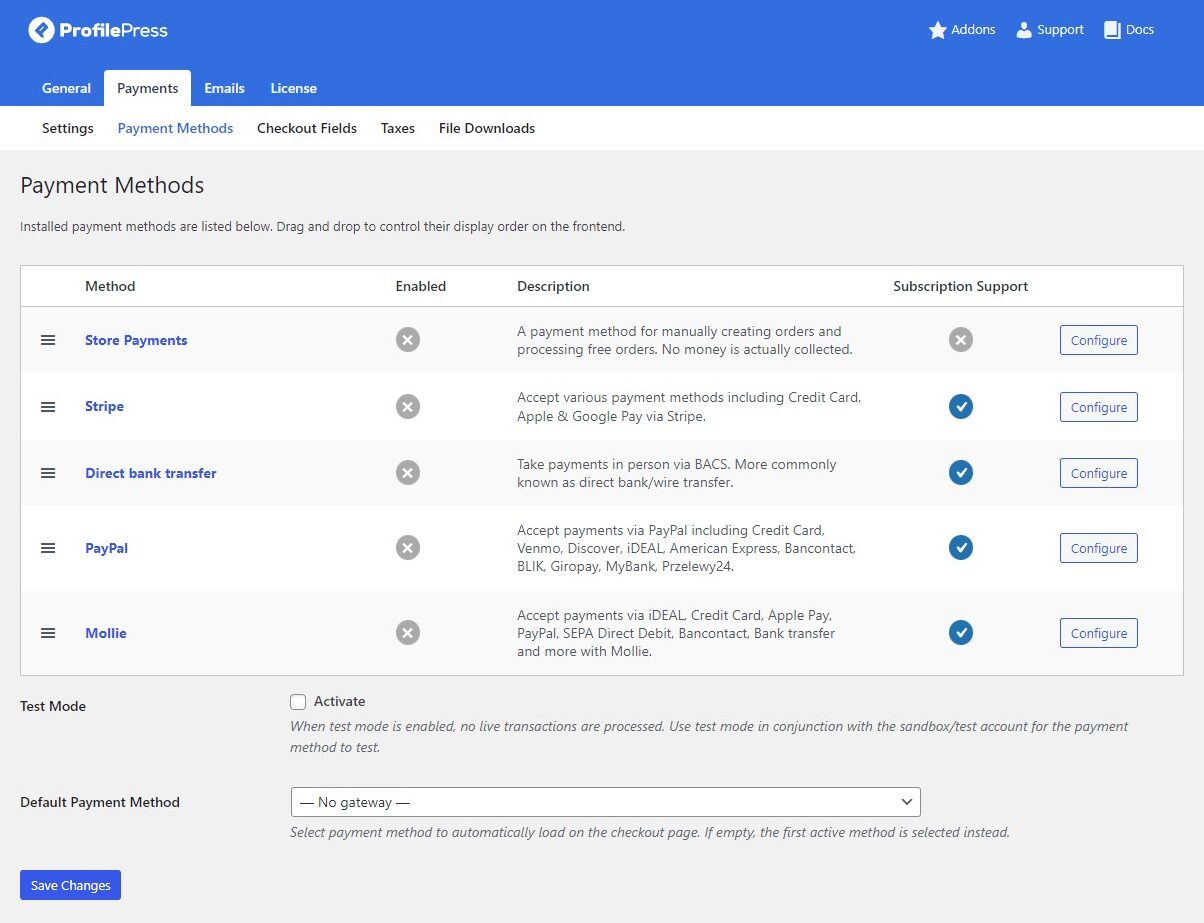
Navigate to Payment Settings: Go to ProfilePress > Settings > Payments > Payment Methods in your WordPress admin dashboard.
Then, choose the payment gateways you wish to use by enabling them. You’ll need to connect your account with ProfilePress to use each selected payment method. This usually involves entering API keys or authentication credentials provided by the payment gateway.
Once you’ve selected and configured your payment methods, save your settings to apply the changes.
Step #5: Create a Pricing Page & Add the Plans
With your subscription plans and checkout page set up, the next step is to create a dedicated pricing page and add your plans.
Begin by designing a pricing page where potential customers can view and choose from your subscription plans. If you need guidance, check out this page on how to create a pricing page.
Once your pricing page is ready, it’s time to integrate your plans. To do this, go to ProfilePress > Membership Plans in your WordPress dashboard and open the plans you set up in Step 2.
On the plans’ details page, look for the checkout link in the right-hand corner. Copy this link.
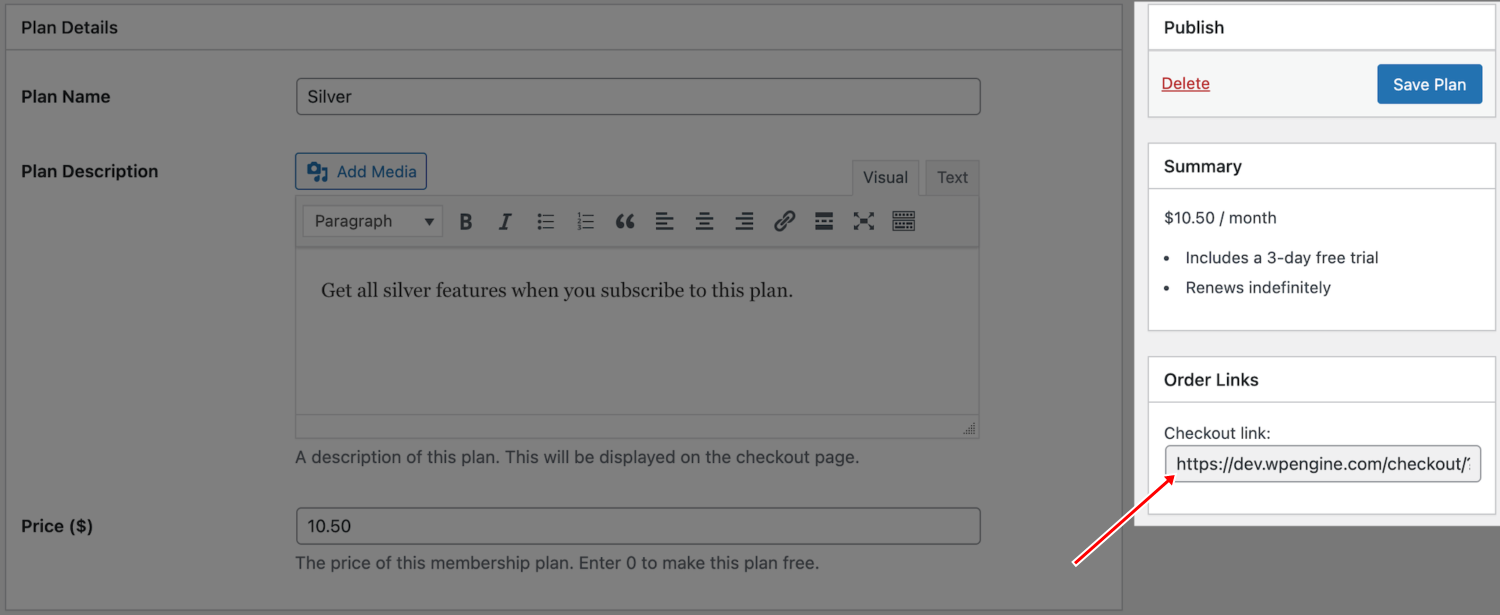
Paste the copied checkout link into the corresponding sections on your pricing page, ensuring that each plan directs customers to the appropriate checkout page.
Note: If you can’t find the checkout link on your membership plan page, go to ProfilePress > Settings > General > Pages and scroll down to the Payment Pages section. Ensure you have selected the Checkout page you created under the Checkout Page option. Once this is set, return to your membership plans, and you should see the checkout link.
By completing these steps, potential customers who click on the link on your pricing page will be redirected to the checkout page for that specific plan.
Step #6: Create Custom Registration and Login Forms
By default, ProfilePress generates highly customizable login and registration forms. To modify these forms, go to ProfilePress > Forms & Profiles, and under the Login tab, click the Edit button.
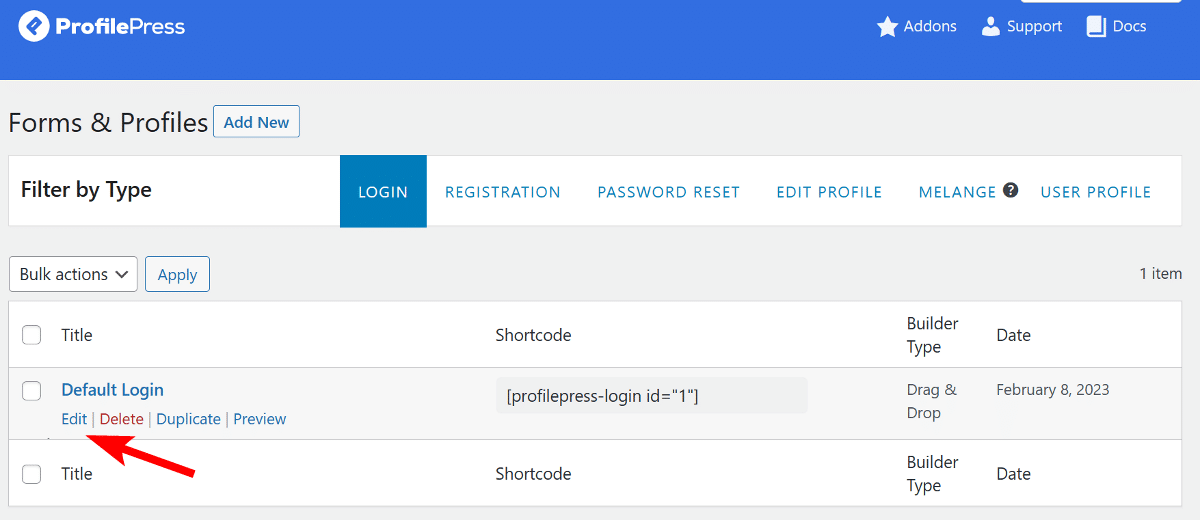
You can also create a new form and choose from the available premade form templates.
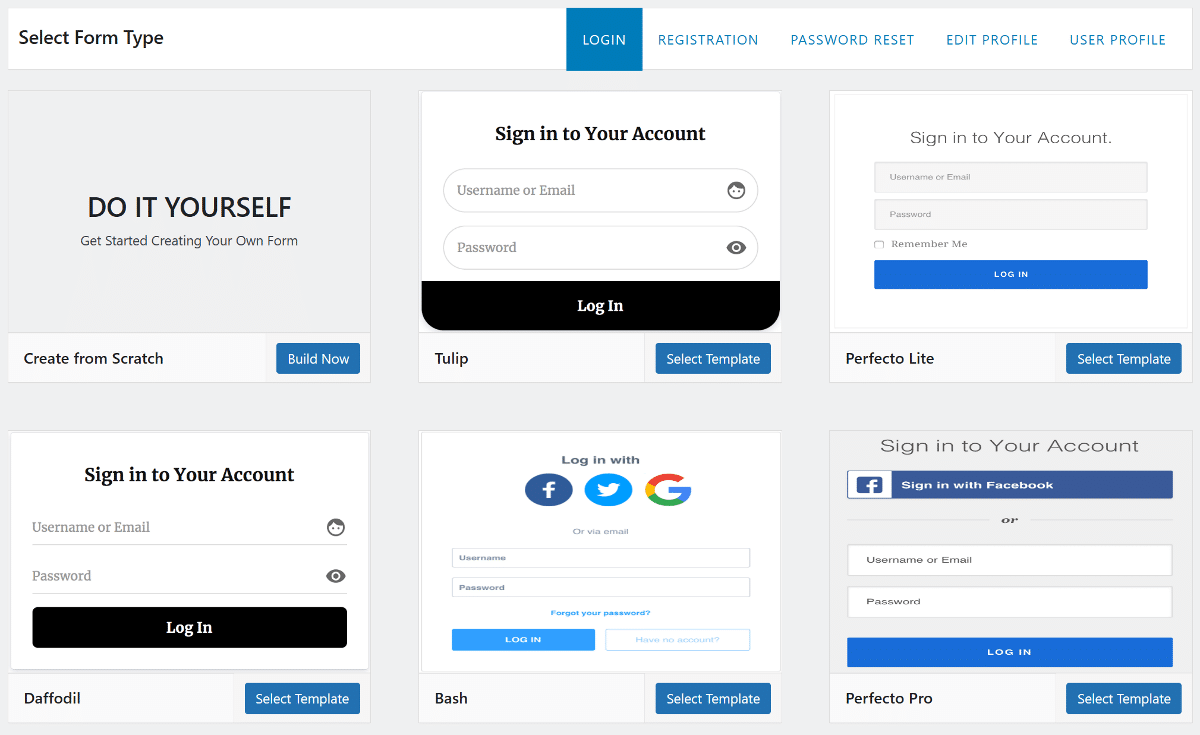
For this tutorial, we’ll customize the default forms.
Editing Login and Registration Forms
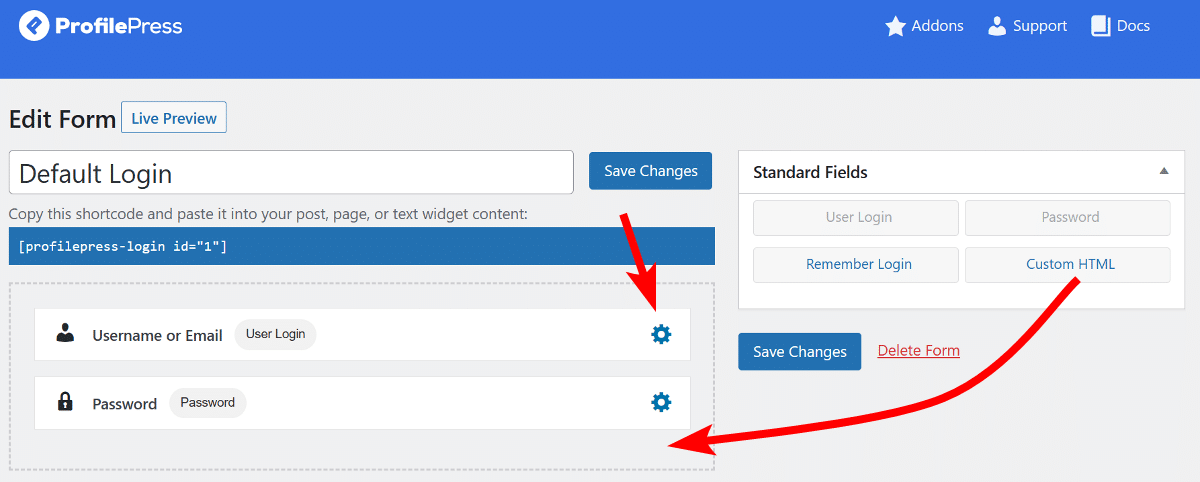
Clicking the ‘Edit’ link will open the drag-and-drop form builder, where you’ll find available form fields in the right sidebar. You can easily add or modify new fields by clicking the gear icon.
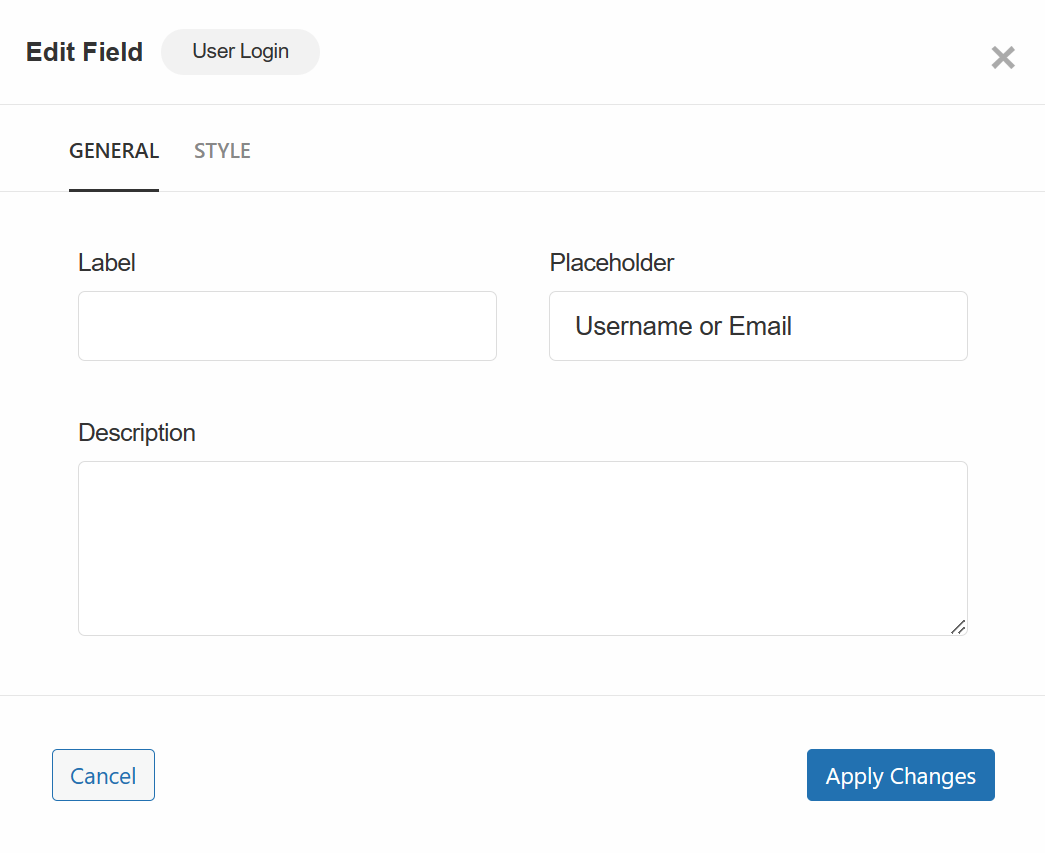
When editing form fields, you will have two tabs available for customization: General and Style. The General tab lets you add a label, placeholder, and brief field description.
Switching to the Style tab allows you to adjust the field’s width, add an icon, control the label position, and customize the description behavior. You can also apply CSS classes for more advanced styling. Once satisfied with your changes, click the Apply Changes button to save them.
Scrolling further down the page, you’ll find the Form Settings box, which provides additional styling options. Be sure to click Save Changes once you’ve finished making your adjustments.
You can follow a similar process to edit the registration form, which includes even more customizable fields.
Activate Registration and Add Login/Registration Links to the Header
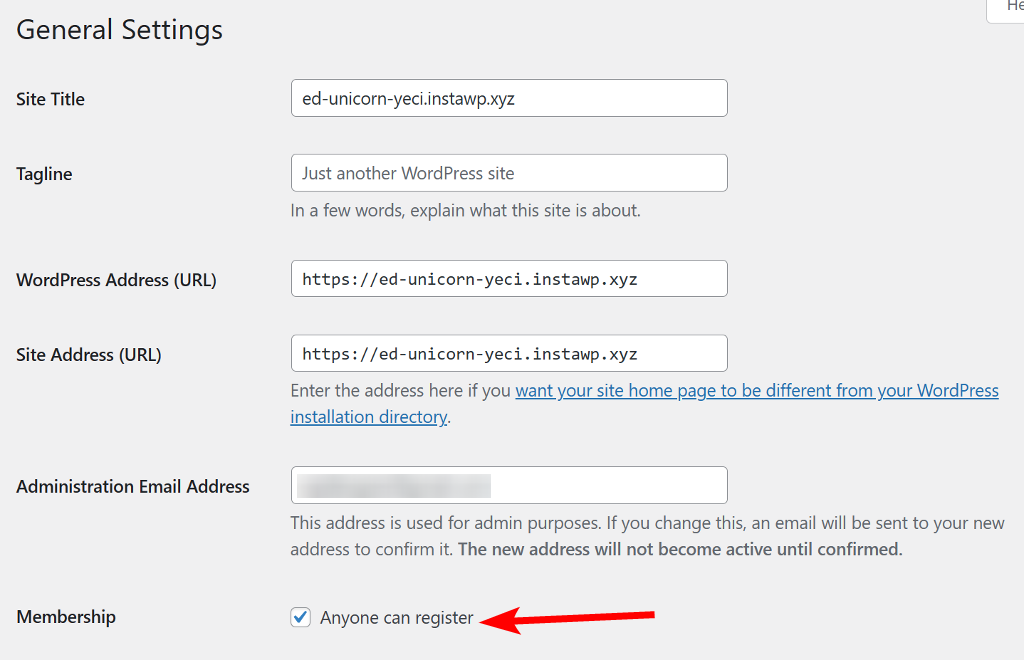
By default, WordPress user registration is turned off. To enable it, go to Settings > General and check the “Anyone can register” box in the Membership section.
Adding login and registration links to the website header is essential to make it convenient for users to access your website. You can do this by going to Appearance > Menus and creating a new menu. Next, expand the ProfilePress links section and add the Login and Sign Up links to the header menu.
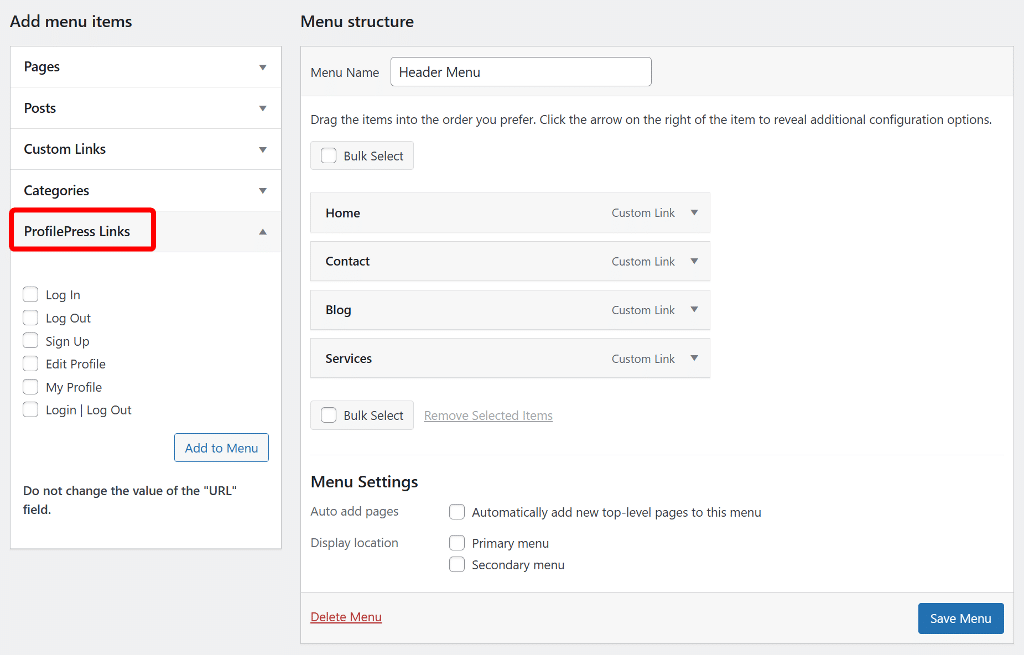
Then click on the Save Menu button to apply your changes.
Step #7: Management, Reports, and Tax Support
Once your subscription system is up and running, managing and overseeing the various aspects of your subscription business effectively is essential. ProfilePress offers excellent tools to help you monitor and manage your operations, generate reports, and handle tax-related matters.
Here’s how you can utilize these features:
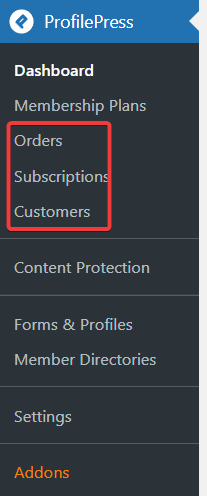
Orders Management: The Orders section provides a view of all transactions made on your website. This includes details such as order status, payment method, and date.
Subscriptions Management: The Subscriptions section allows you to track and manage active, pending, and canceled subscriptions. You can view subscription details, including renewal dates, initial order, and subscription status.
Customers Management: The Customers section provides insights into your user base, including information about active members, subscription plans, and account statuses.
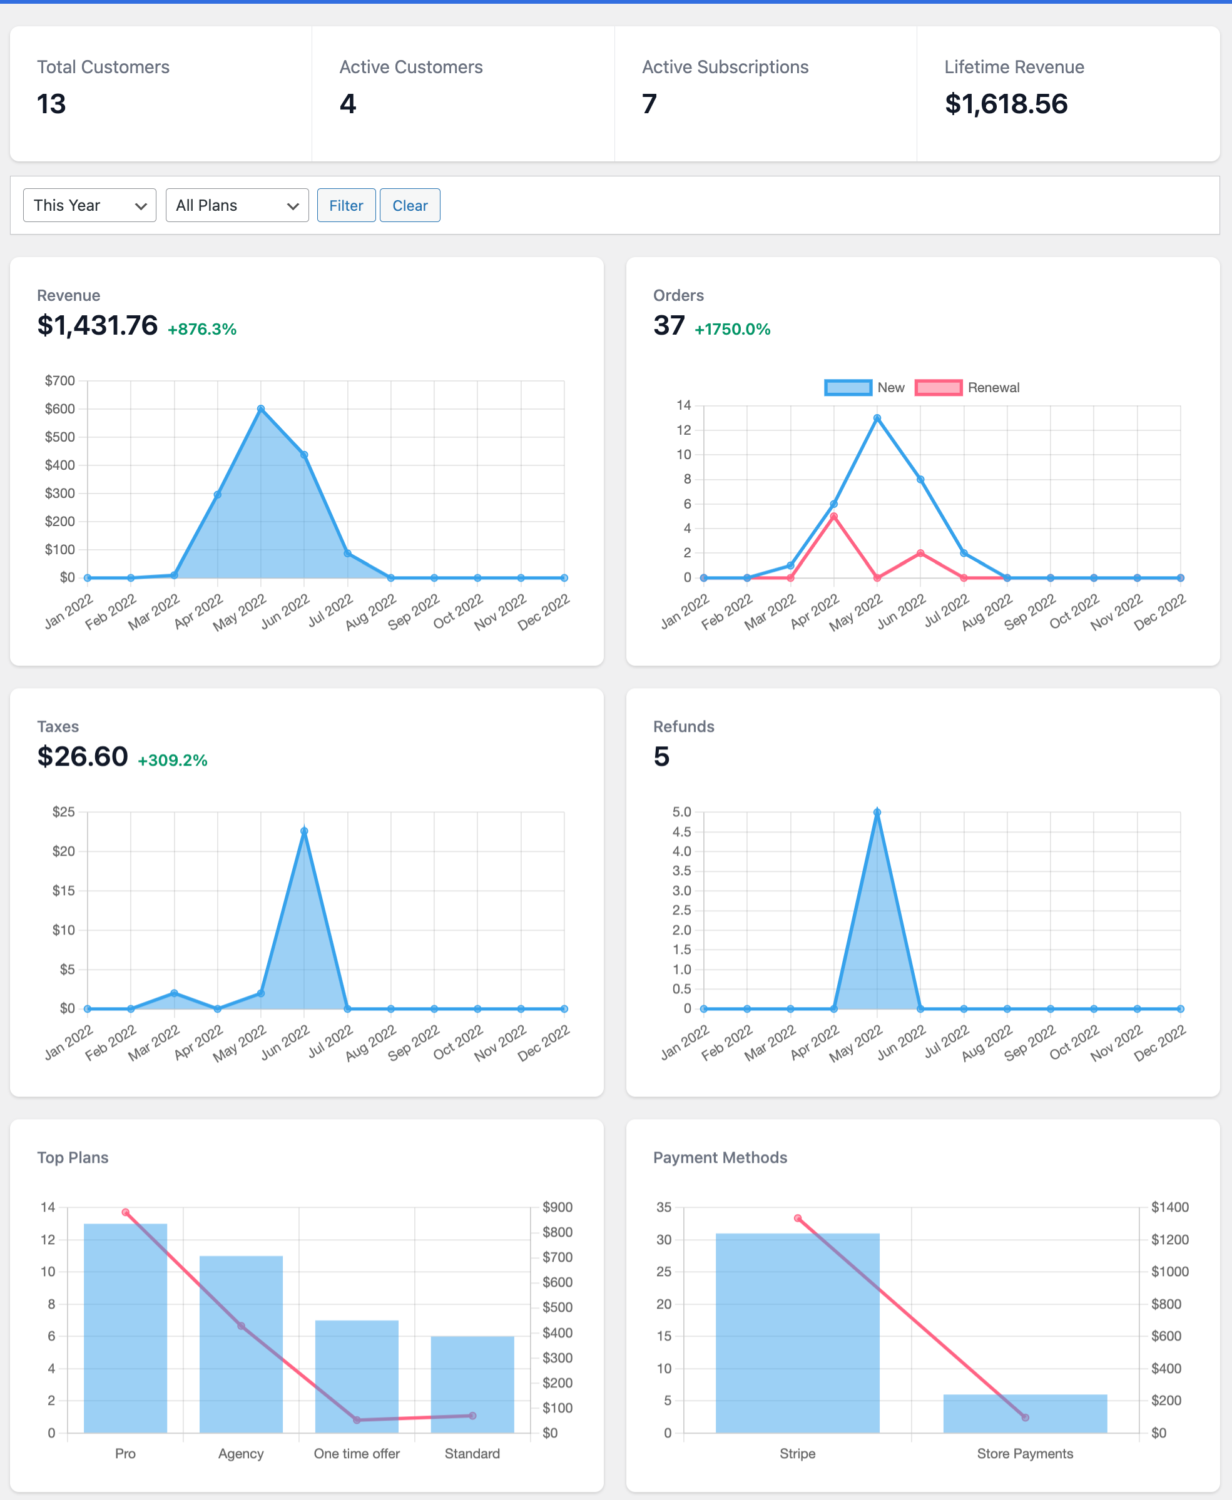
Reporting: ProfilePress provides reporting tools that offer insights into various aspects of your subscription business.
By navigating to ProfilePress > Dashboard, you can access detailed reports on your subscription plans’ performance, the number of orders placed, the revenue generated, and other key metrics.
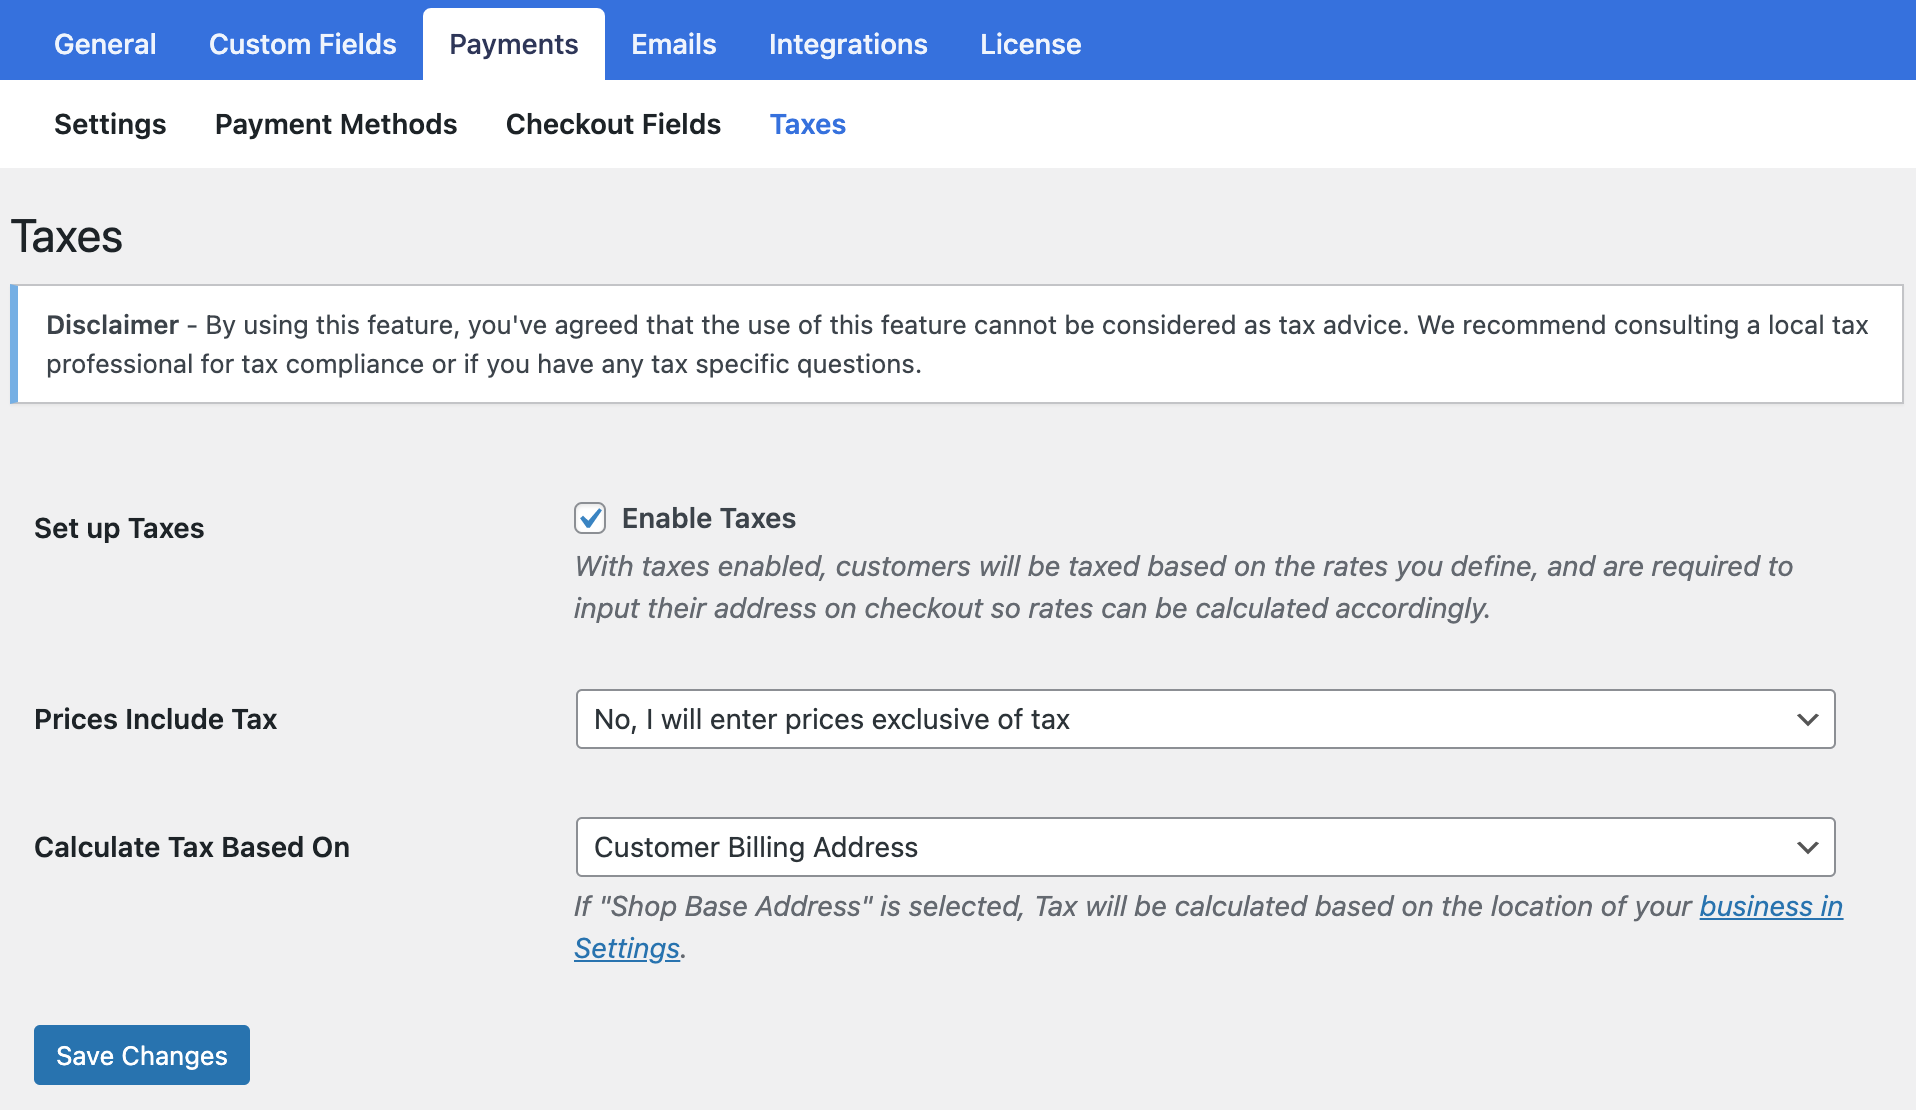
Tax Support: This option enables you to apply taxes or EU VAT if your business operates within the EU. However, it’s important to note that while the plugin allows you the ability to manage taxes, you have complete control over when and how much to charge.
By effectively using these management tools and features, you can maintain a well-organized subscription business, address customer needs efficiently, and ensure financial and tax regulations compliance.
Step #8: Create Members Directory
To encourage a sense of community among your subscribers, you can enable them to interact through community forums. However, a well-organized member directory is crucial to make connecting easy for users. This directory will show a list of all members, making it easy for them to find and communicate with each other.
Here’s how you can create a member directory:
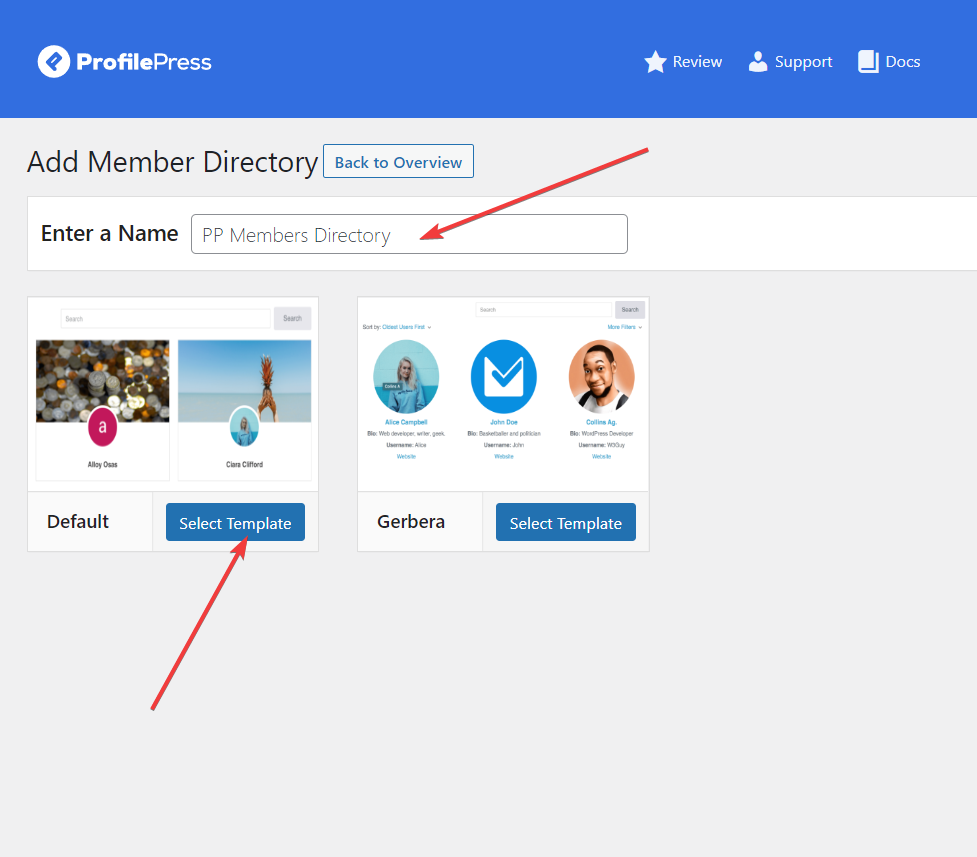
Navigate to ProfilePress > Members Directories and select the Add New button.
On the next page, you will need to enter a name for the member’s directory and select a template. It will determine how the user profiles will look on the member directory page.
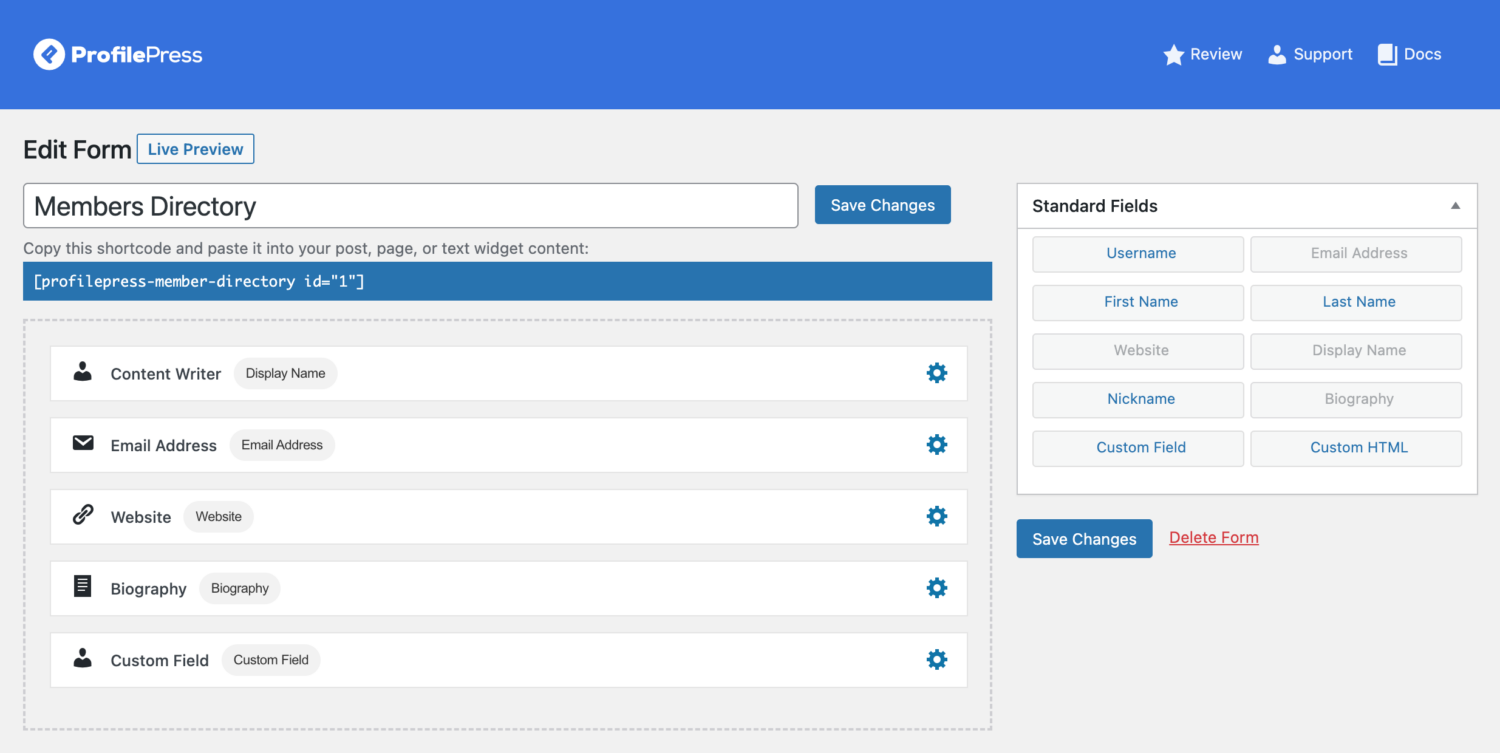
You’ll have access to a drag-and-drop builder to choose which fields will be displayed on the member directory page.
Here’s an example of how we designed the directory page on our demo site.
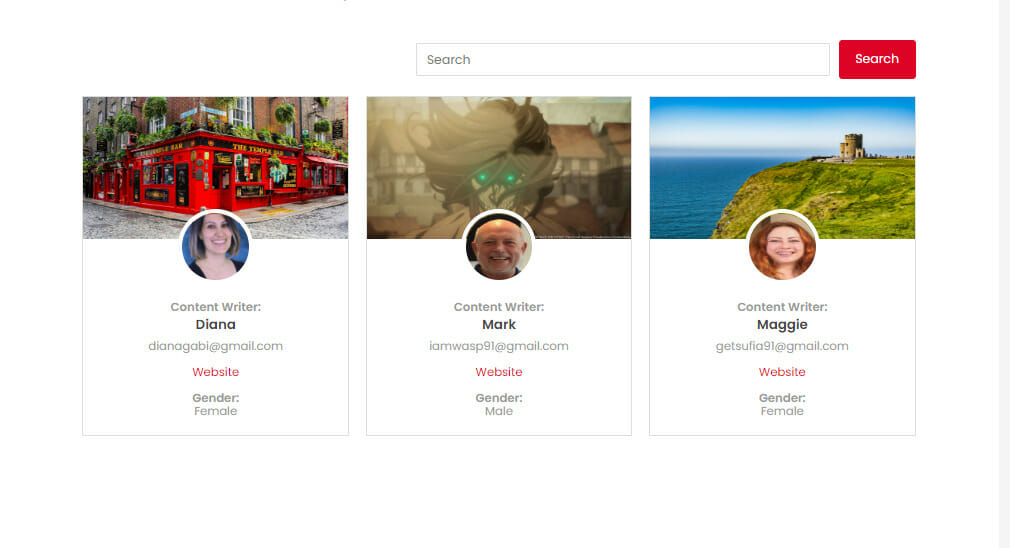
Here’s how the directory appears on the front end. As you can see, the fields we added in the editor are now visible on the live page.
By creating a member directory, you enhance the user experience on your site by promoting connection and engagement within your subscription community. We also recommend reading this guide on how to build a WordPress member directory page.
Implement Your Subscription Business Model Today!
In conclusion, the subscription business model offers numerous advantages for businesses and customers, including predictable revenue streams, increased customer retention, scalability, and opportunities for upselling and cross-selling.
By understanding the fundamentals of this model and implementing it effectively, businesses can create sustainable growth and foster long-term customer relationships.
Whether considering a SaaS product, membership site, or physical goods subscription box, embracing the subscription business model can lead to success in today’s dynamic marketplace.
So, take action today. Use ProfilePress to create a seamless subscription experience and start reaping the benefits of a well-structured, subscription-based business.