How to Build a Website With User Accounts & Profiles
Do you want to build a WordPress website with user accounts and profiles?
Building a website with user accounts and profiles has become an essential aspect of online presence, whether running a blog, an e-commerce store, or a community forum. Having a website where users have accounts fosters user engagement and lets you gather valuable data about your audience.
ProfilePress is an excellent WordPress membership plugin that lets you add user registration, login, and profile management functionalities to your website.
In this step-by-step guide, you’ll learn how to build a website with user accounts powered by WordPress and ProfilePress. You’ll be able to…
- Create custom registration forms for users to join your site. You can control the fields displayed and add custom fields.
- Build a frontend user profile page that displays users’ profile information.
- Create a frontend edit profile form and My Account page so users can easily manage their accounts.
- Display a front-end directory listing of some or all of your users.
- Restrict access to your content so only logged-in users or paid accounts can see it.
- Moderate user registration on your WordPress website
Why Use ProfilePress for WordPress User Management?
Building a website with user accounts and profiles can be challenging, especially if you require a powerful and easy-to-manage solution. ProfilePress excels in this area for these compelling reasons:
User-Friendly Interface: ProfilePress offers a user-friendly interface that makes creating and managing user accounts and profiles easy. The drag-and-drop form builder simplifies the creation of registration and login forms, allowing you to customize them to fit your needs without coding knowledge.
Customization Options: With ProfilePress, customization is at your fingertips. You can design registration forms, login forms, and user profiles to match your website’s design and functionality requirements. This includes customizing form fields, adding profile pictures, and integrating social login.
Security Features: Security is a critical concern when dealing with user data. ProfilePress includes built-in security features, such as reCAPTCHA and Cloudflare Turnstile, to prevent spam registrations, as well as two-factor authentication to add an extra layer of security. These features help protect your user data against unauthorized access and other security threats.
Membership and Subscription Management: ProfilePress allows you to set up membership tiers and subscription plans if your website offers premium content or services. This functionality is perfect for creating different access levels, charging for premium memberships, and managing recurring payments. It’s an all-in-one solution for monetizing your site’s content.
Seamless Integration: ProfilePress integrates seamlessly with popular WordPress plugins and services, such as WooCommerce, BuddyPress, Mailchimp, LearnDash, and others.
User Access Management: ProfilePress allows you to restrict access to WordPress content easily. You can restrict access to premium content or specific sections of your website. This feature is handy for sites that incentivize user registration.
Installing ProfilePress Plugin
To start building a WordPress website with user accounts and profiles, purchase a copy of the ProfilePress plugin. After purchase, you’ll get an email with a link to download the plugin.
Log in to your WordPress admin dashboard and navigate to the “Plugins” section on the left menu.
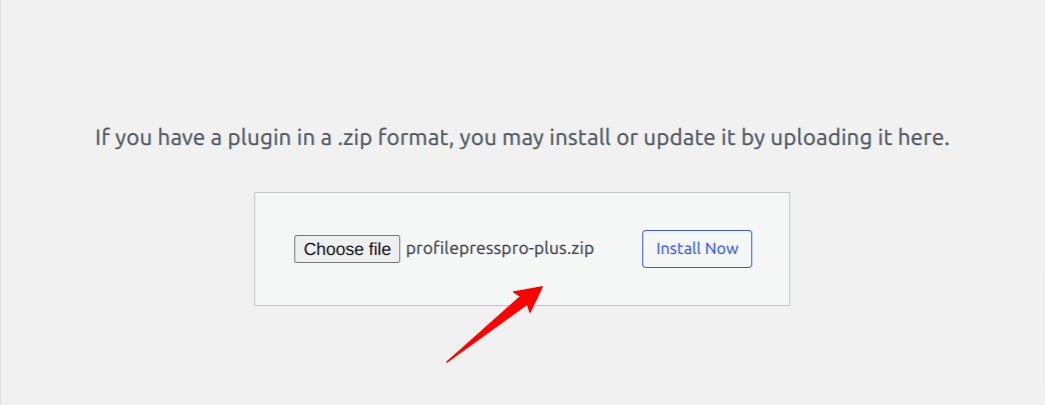
Next, click “Add New” at the top of the page. Choose the “Upload Plugin” option. Click “Choose file” and select the plugin you downloaded from your computer earlier.
Then, click “Install Now” to start the installation process.
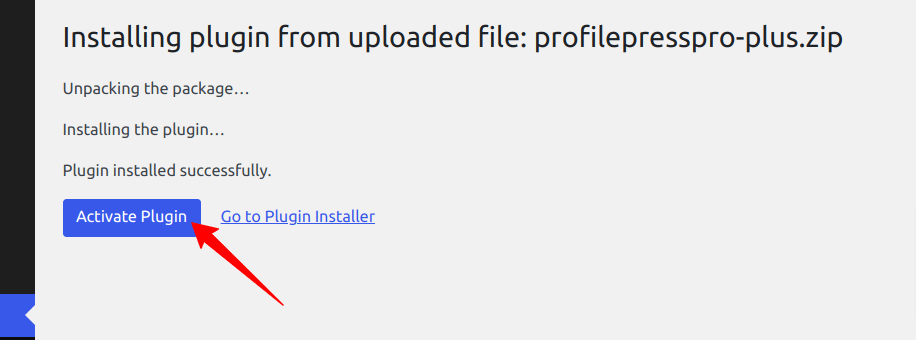
When the installation is done, click the ‘Activate Plugin’ button.
Building a WordPress Website with User Accounts Using ProfilePress
Let’s dive into how to build a website with user accounts using our powerful user management plugin for WordPress.
Setting Up a Custom Registration Page
To create a custom registration page, navigate to ProfilePress > Forms & Profiles, then click Add New.
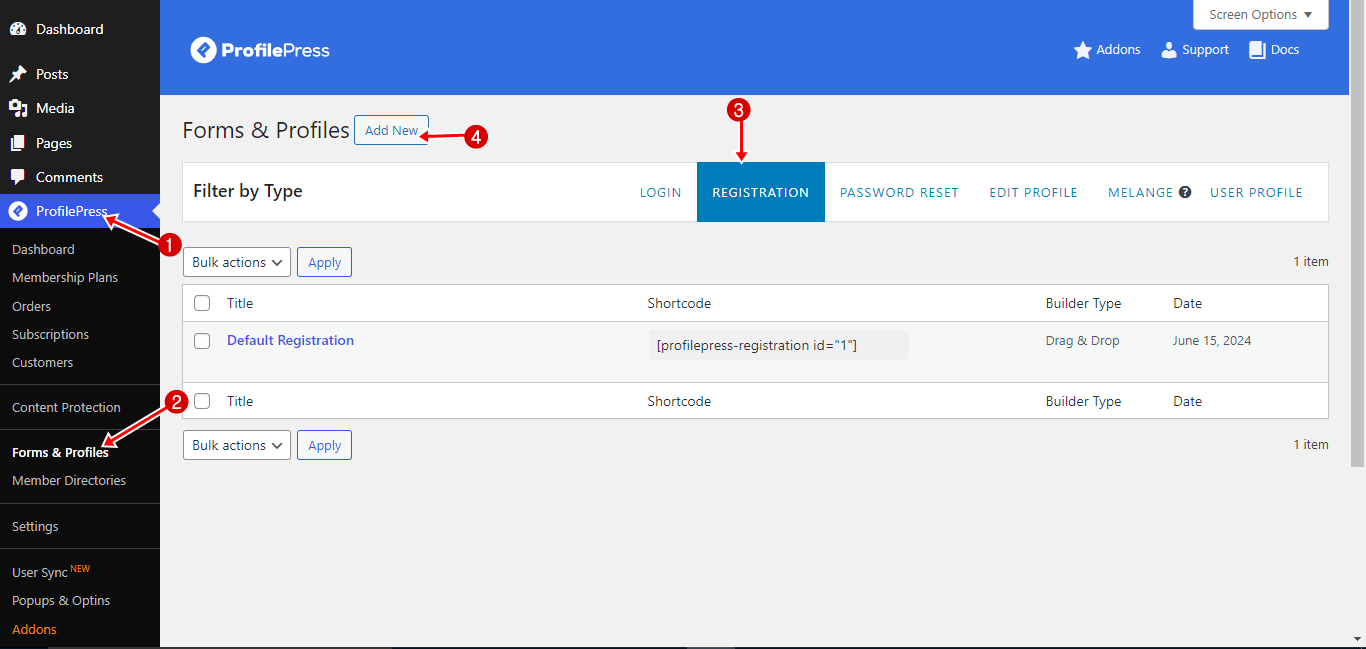
Next, you will need to select a builder type, and for this guide, we will go with the “Drag & Drop Builder “.
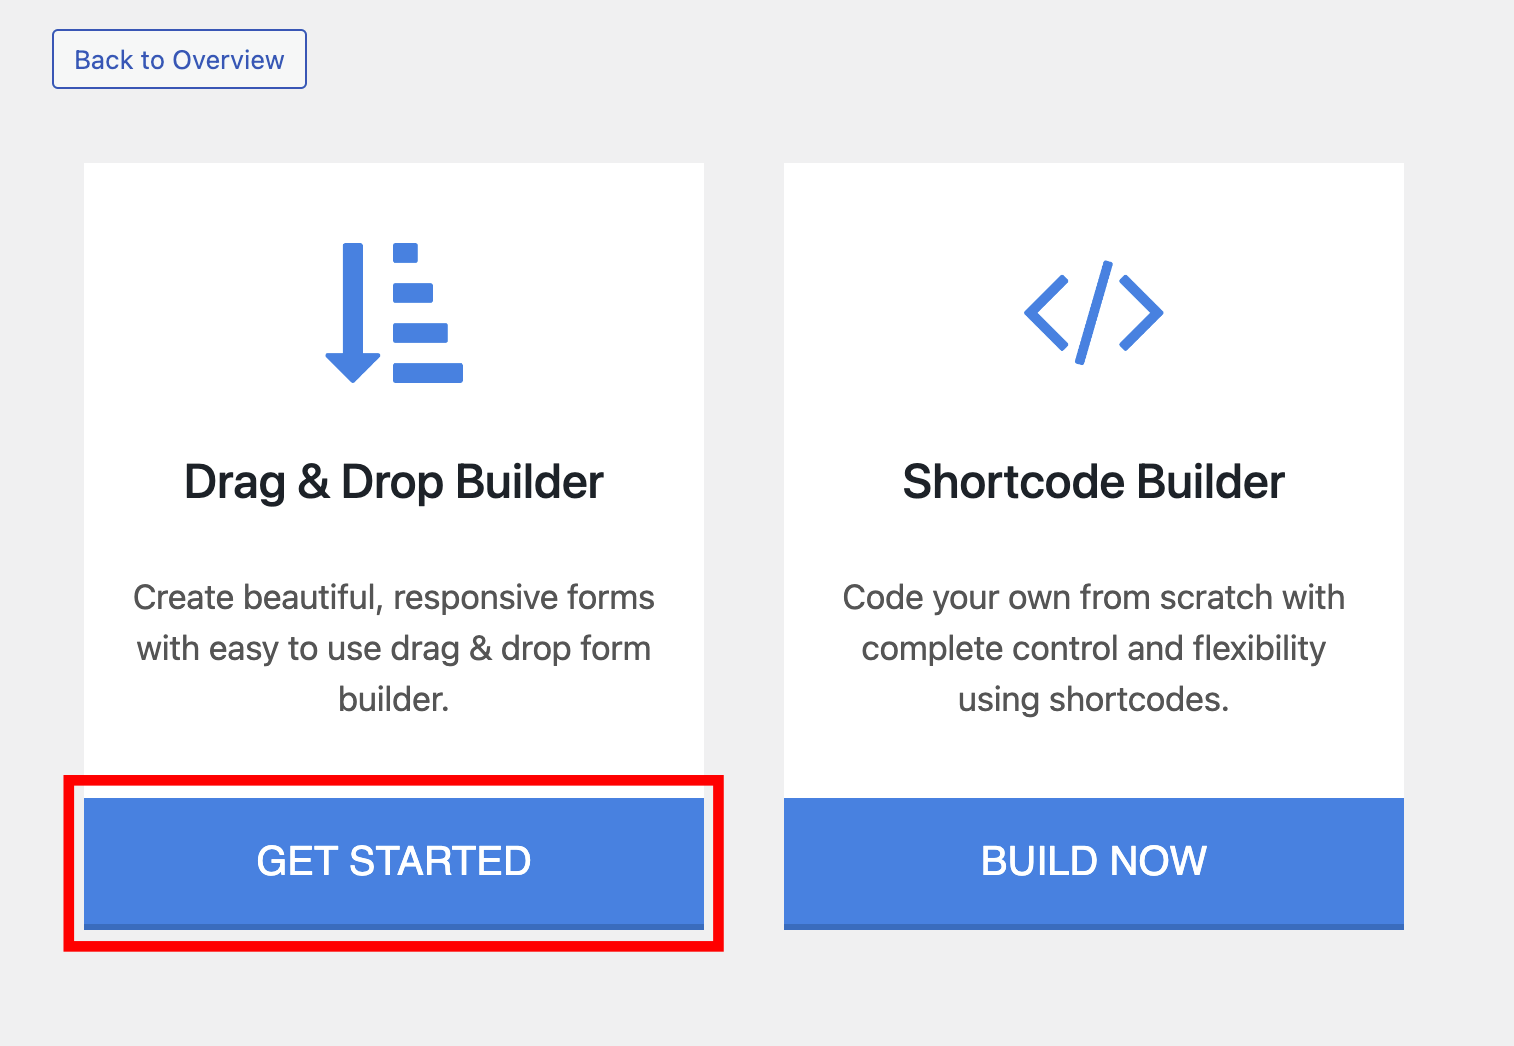
Click the “Get Started” button to use the Drag & Drop Builder to create the WordPress registration form. You’ll then be prompted to enter a name for your form. Feel free to name it something like “Registration Form” and switch the form type to Registration by selecting the Registration tab.
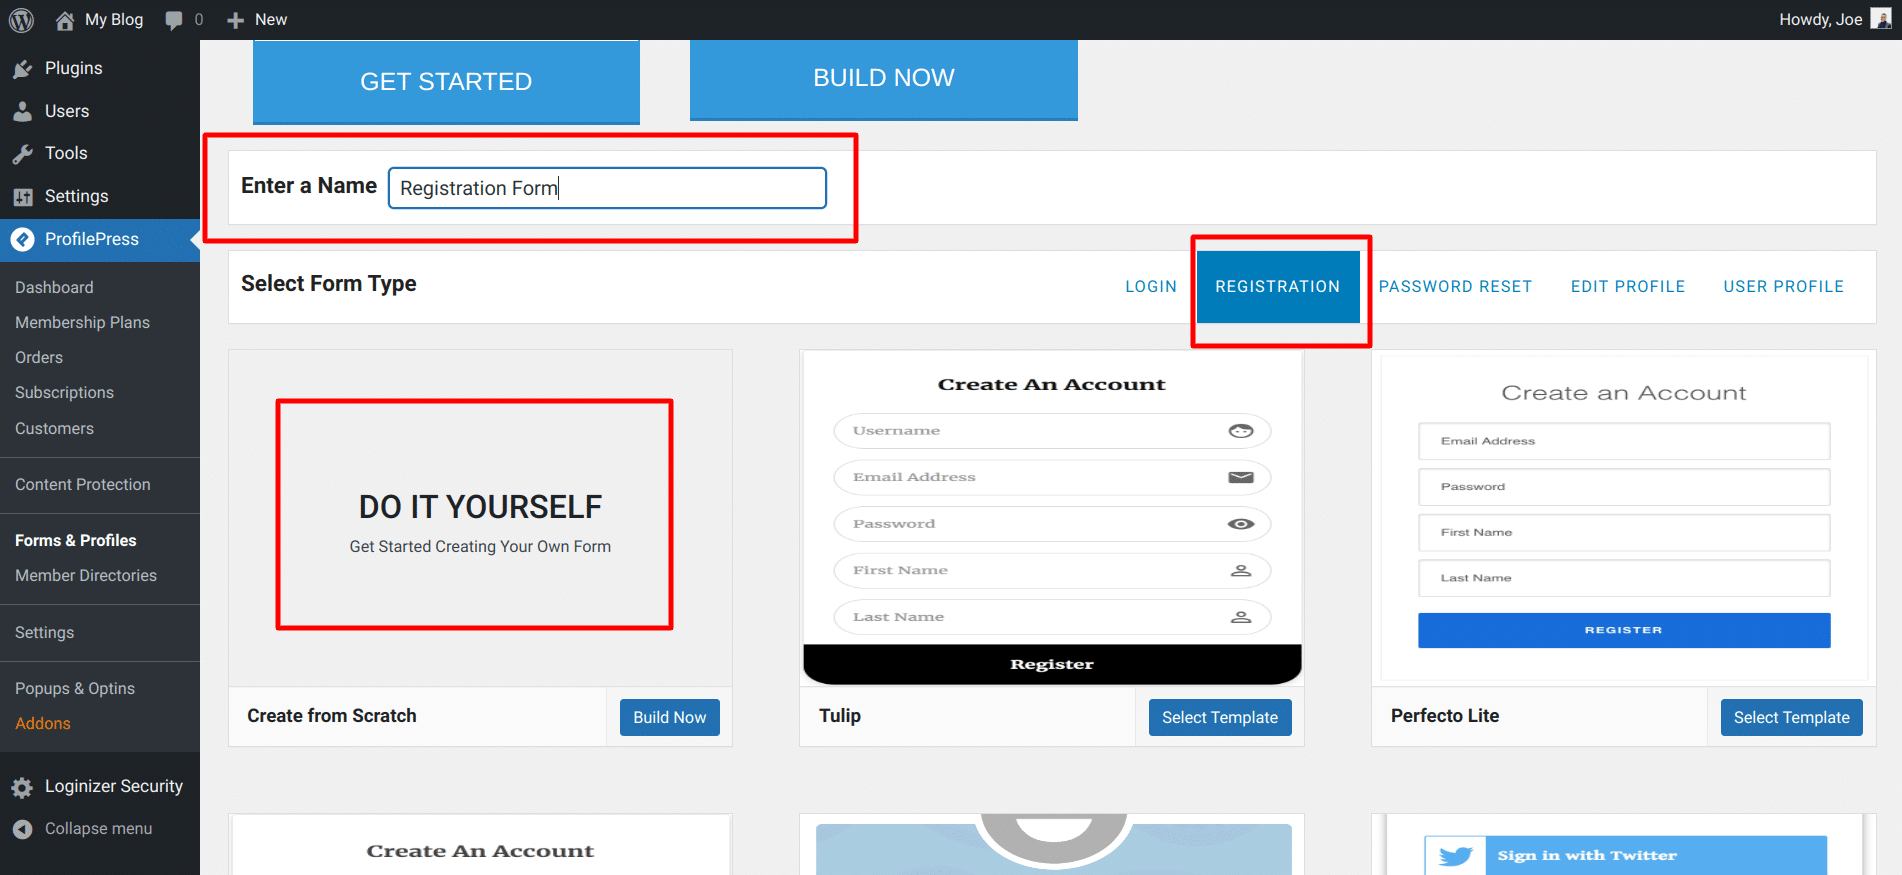
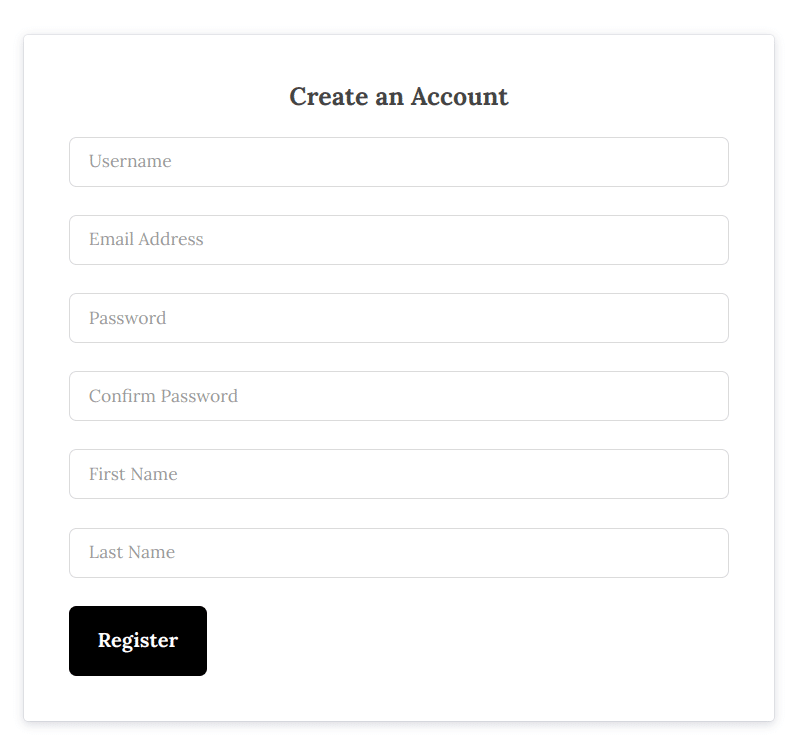
Next, you will see several pre-made registration form templates to choose from, as well as the “Do It Yourself” option. We will select the “Do It Yourself” option to build a registration form from scratch.
This will take you to the form builder page, where you can choose from various form fields to construct your form. At the top, you’ll find the form shortcode and a live preview button to view your form changes.
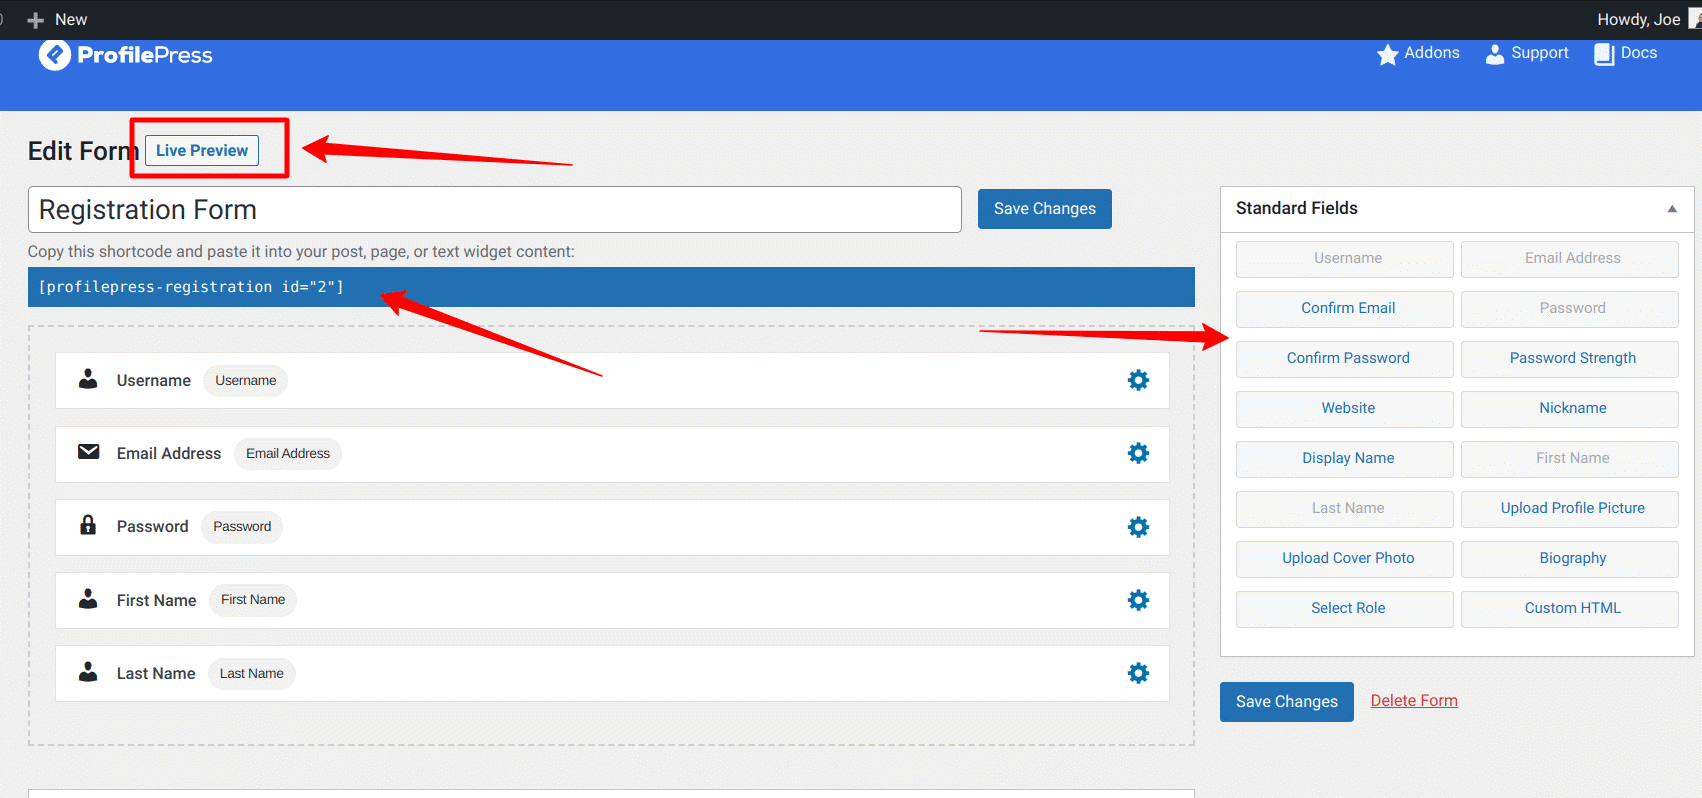
To customize the registration forms, we can easily drag and drop form fields from the Standard Fields section on the page’s right sidebar. If you need to remove any unwanted fields, hover your mouse over the field and click the Bin icon.
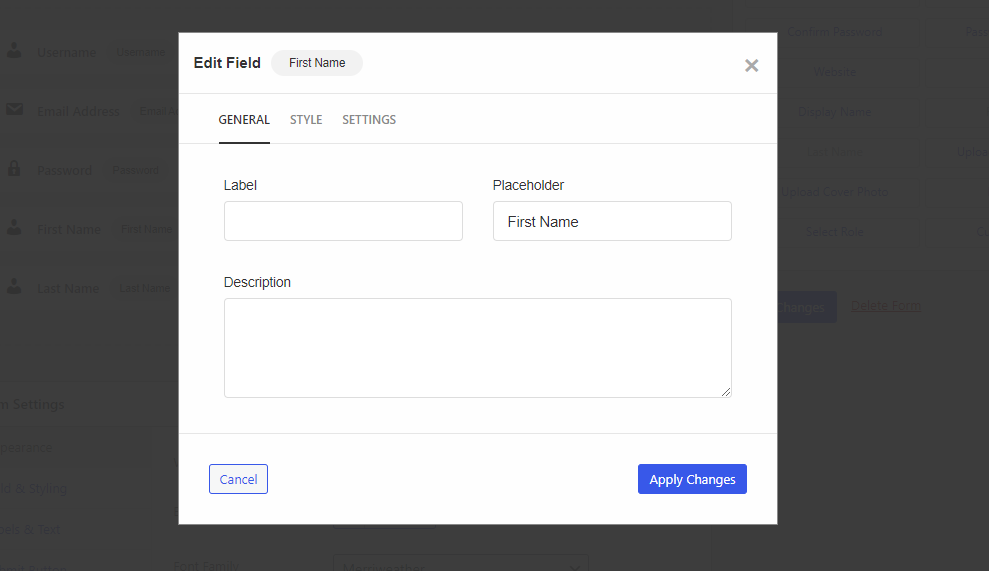
Click on the Gear icon to adjust the settings for any form field. A popup will appear with the available settings for that field. You can modify three sections for each form field: General, Style, and Settings. Each section contains various elements that influence the field’s display and behavior.
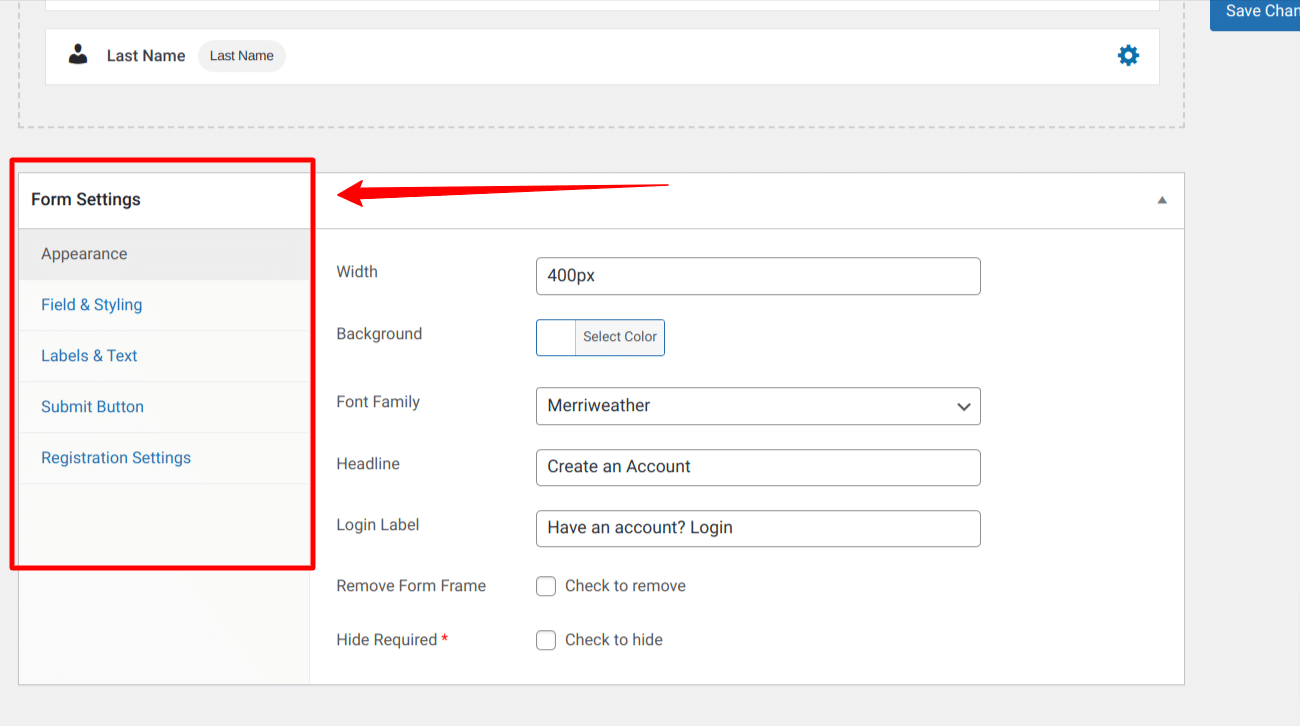
Scroll down to the Form Settings section. Here, we have different sections that provide us with the tools needed to customize our form design to our liking. These sections include Appearance, Field & Styling, Labels & Text, Submit Button, and Registration Settings.
Once you are satisfied with your registration form design, the next step is to create a registration page where users can fill out and submit the form.
To do this, copy the form shortcode displayed at the top of the form builder page.
Setting Up the WordPress Registration Page
To do this, go to Pages > Add New, and enter “Register” as the page title. If you are using the WordPress block editor, click on the plus icon, select the shortcode block, and paste the copied form shortcode into this block.
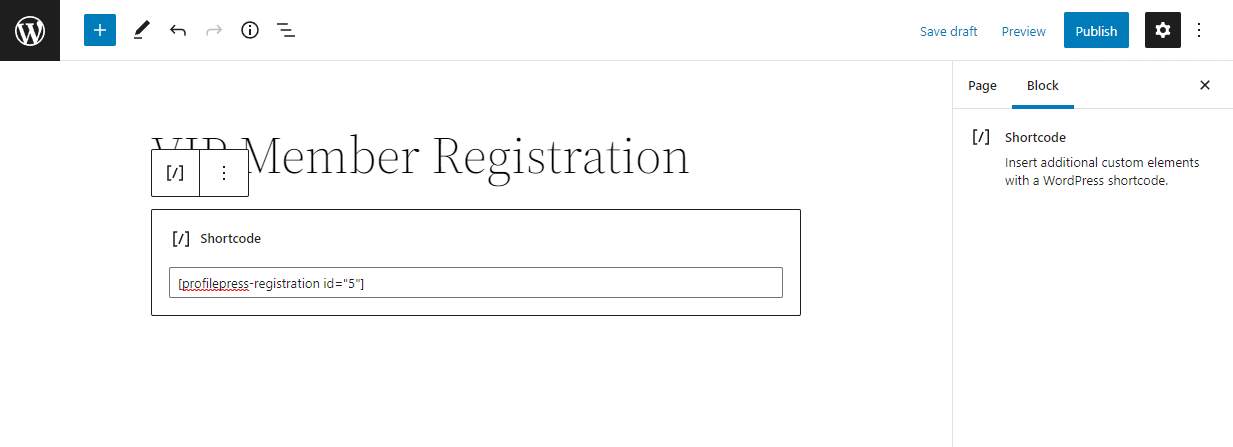
If you use the WordPress classic editor, paste the shortcode into the text editor. Next, click on Publish to publish your new WordPress user registration page.
Now, open the registration page in a new incognito window to ensure that you are logged out, and you should see your user registration form displayed.
Creating a Custom WordPress Login Form
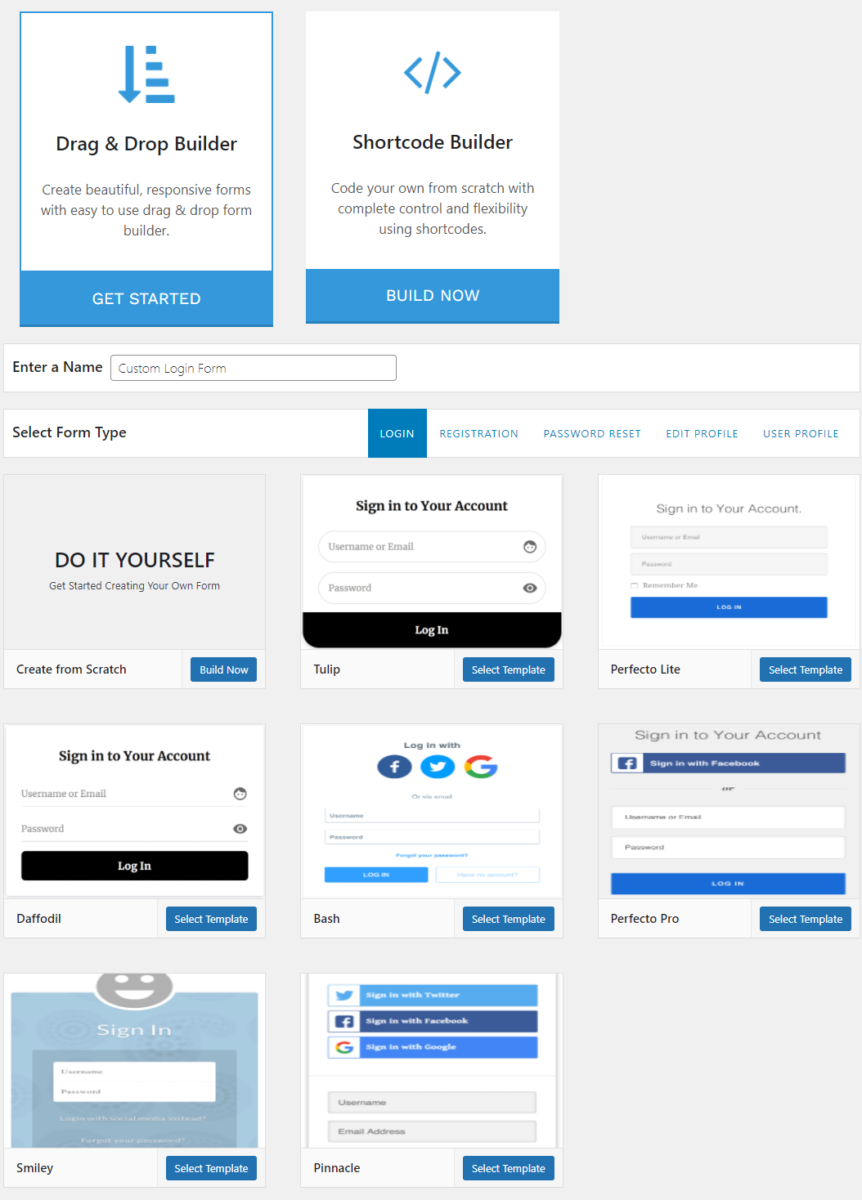
To create a custom WordPress login form, navigate to ProfilePress → Forms & Profiles from the WordPress admin panel and click the Login tab. Next, click on the Add New button and select the Drag & Drop Builder for this.
Enter a name and choose one of the pre-designed templates, or build one on your own. We will select the Perfecto Pro template to start with.
You can now customize the appearance of your WordPress login form, arrange the text fields by dragging and dropping them into your desired order, and add additional fields, such as the Custom HTML field, to enhance your login form.
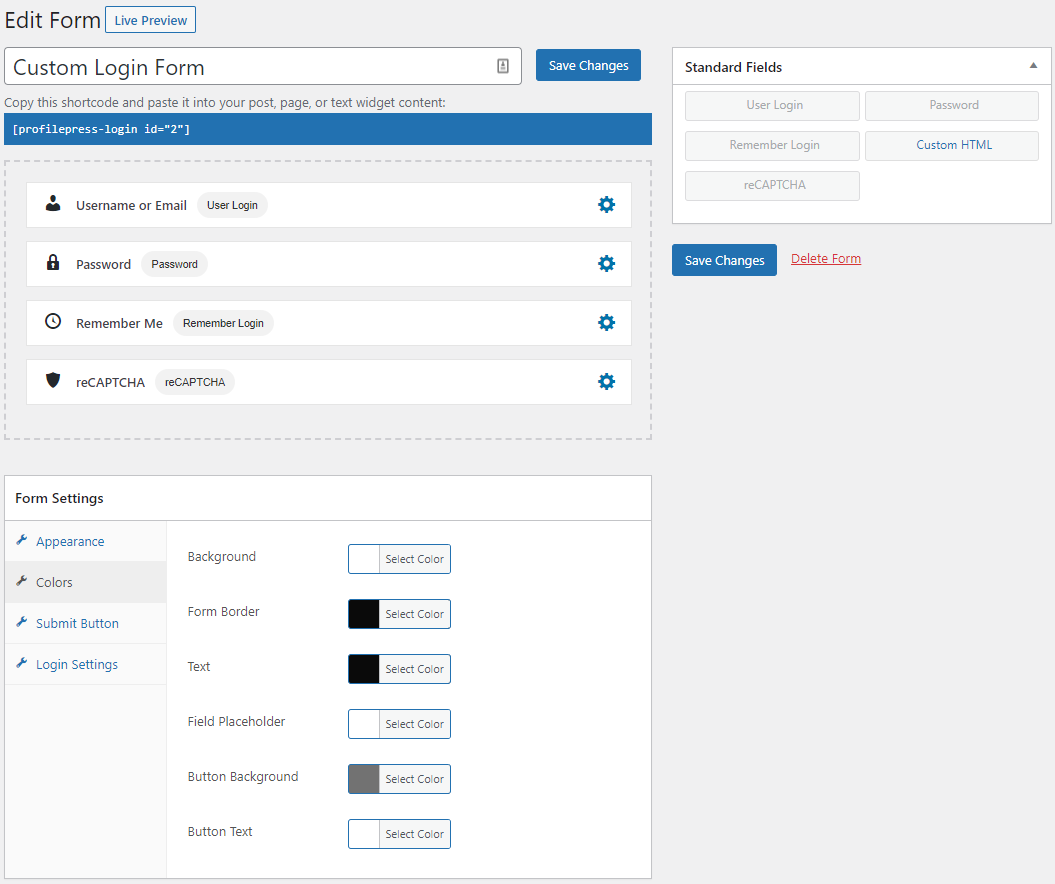
Using Form Settings, you can customize the appearance of your login form buttons and text and change the colors for your login form.
Once you’re done, the final step is to create a login page. Similar to setting up a registration page, create a new page in WordPress, add the login form shortcode to the page, and then publish.
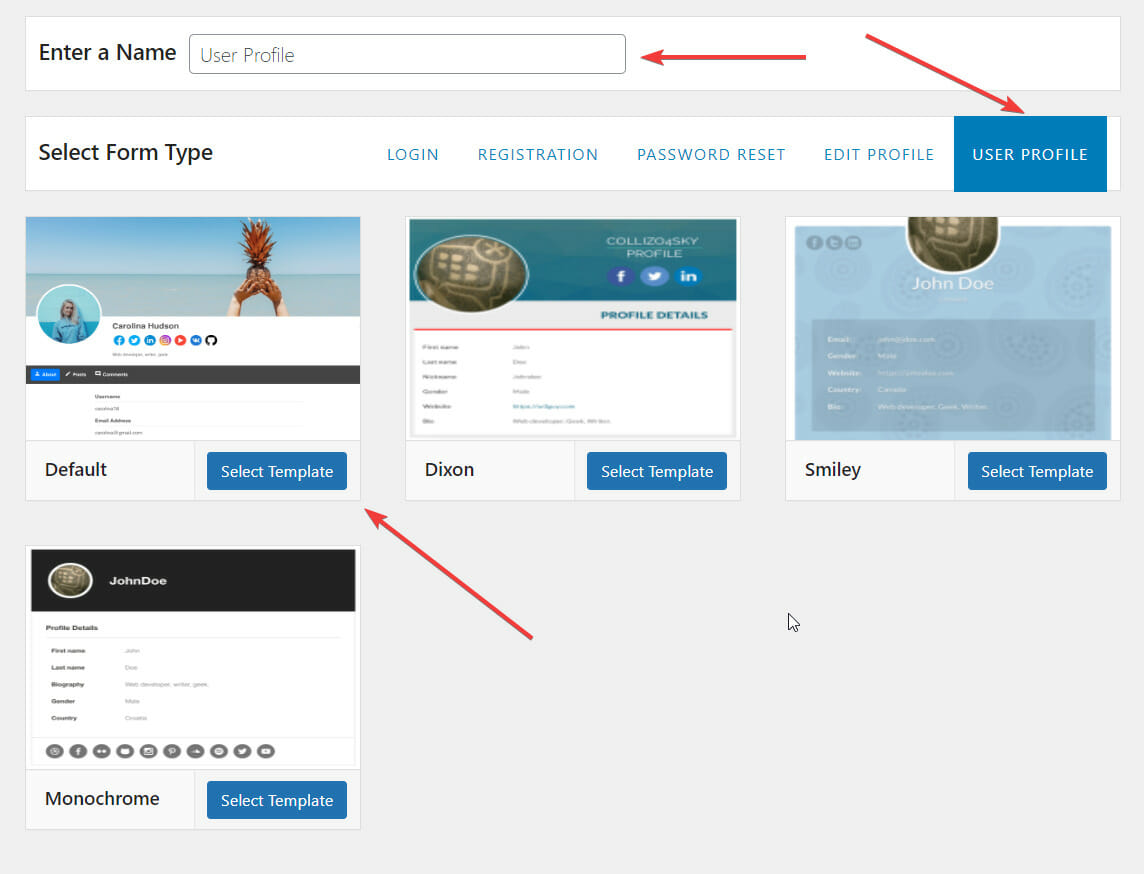
Creating a WordPress User Profile Page
To create a WordPress user profile page that allows users to view their profiles and that of others from the frontend of your website, go to ProfilePress > Forms & Profiles.
Click the Add New button. Select User Profile and the builder type. We will go with the “Drag & Drop Builder “.
Then, enter a title (such as “User Profiles”) and choose your preferred template.
You will be taken to a page called Edit Frontend Profile. On this page, you get to design the user profile page.
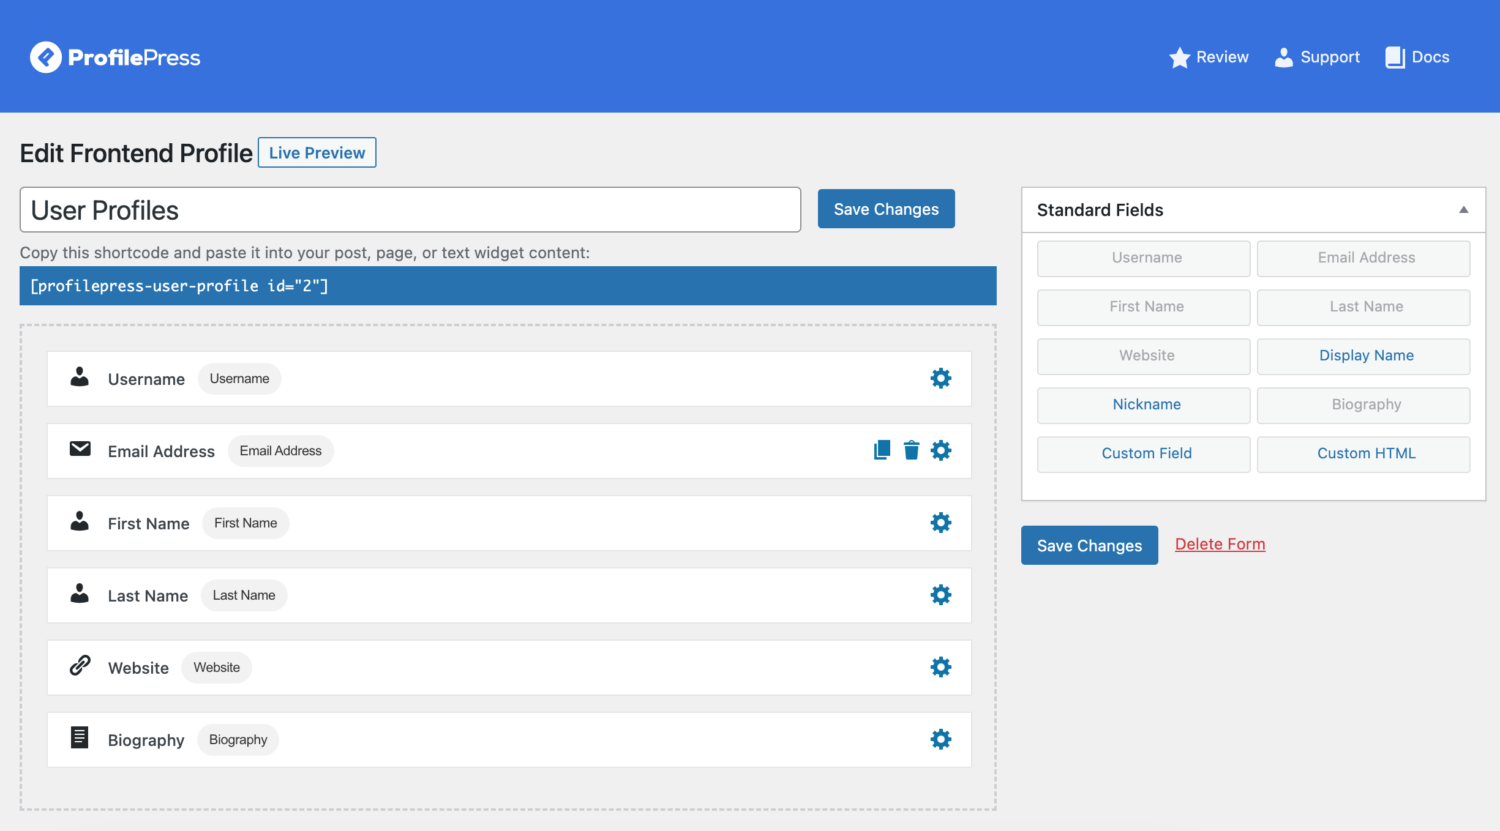
To customize your user profile form and add profile information to display, such as name, biography, custom field data, etc., drag and drop form fields from the Standard Fields section on the page’s right sidebar.
Remove any unwanted fields by hovering over them and clicking the Bin icon. Once you’ve finalized the design, save your changes.
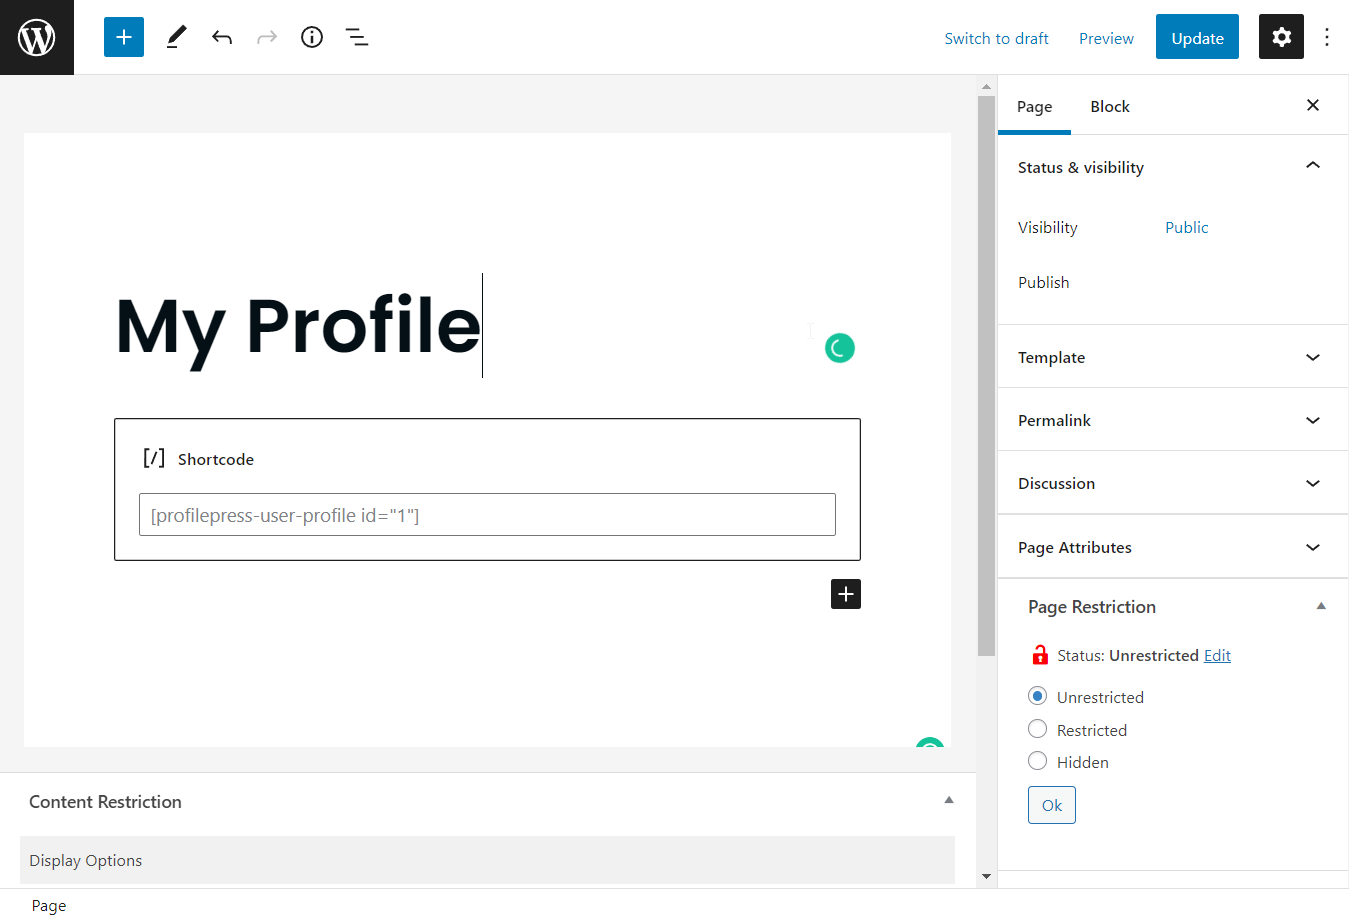
To display the user profile on your WordPress site, copy the shortcode of the Frontend Profile. Create a new page or edit an existing one where you want the profile to appear. Name the page accordingly, then paste the shortcode. Finally, click Publish to make your website’s custom user profile page live.
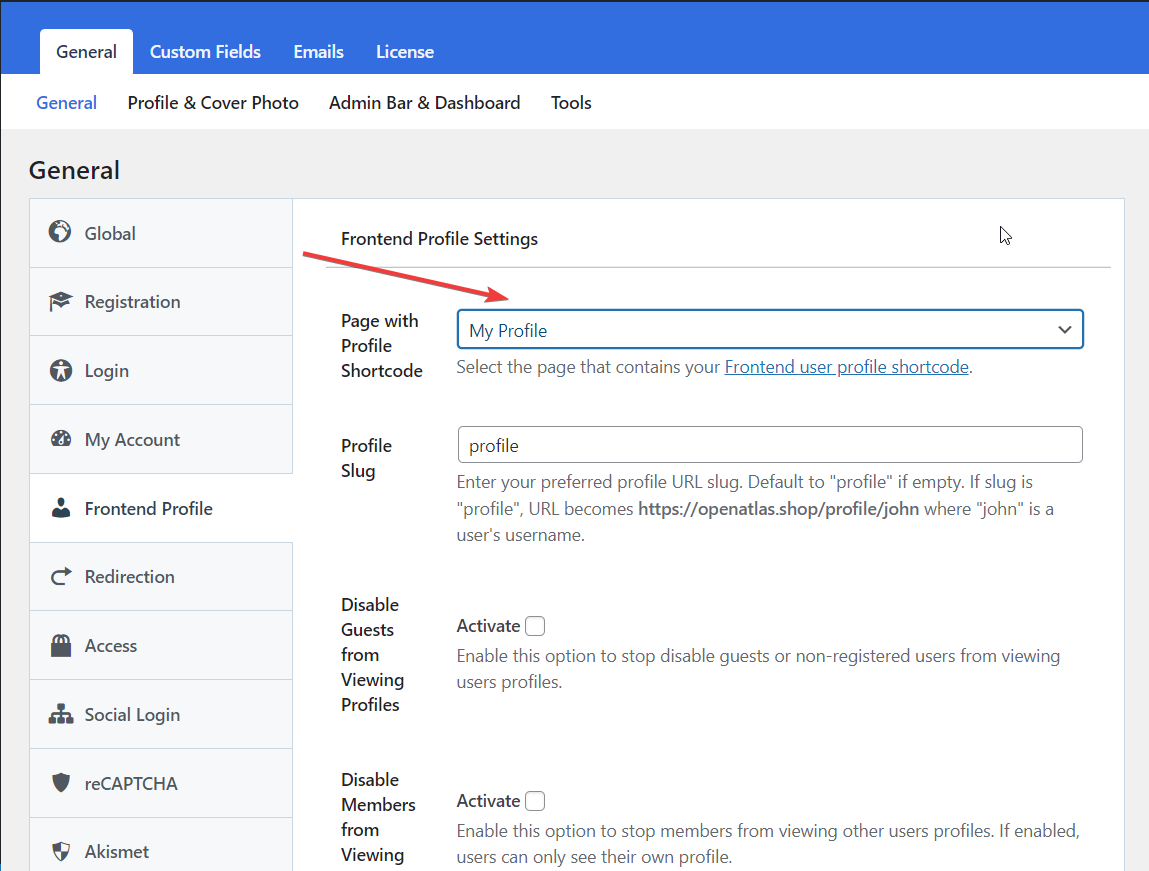
Now that the user profile is ready, you must set the new custom user profile page as the default profile page.
To do this, go to ProfilePress > Settings > Frontend Profile > Page with Profile Shortcode, then select the user profile page you just created. Save your changes.
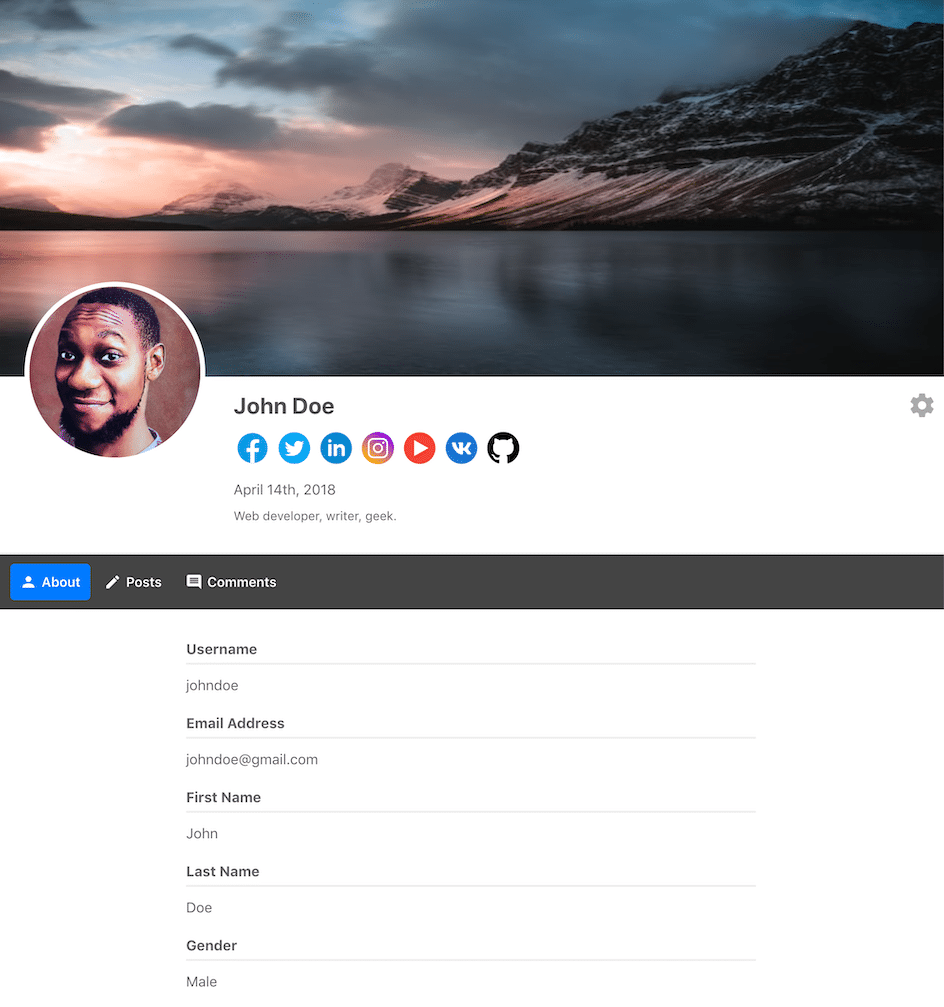
That’s it! You’ve successfully created a custom WordPress user profile page for all your users.
Here is an example of how the user profile appears on our demo site:
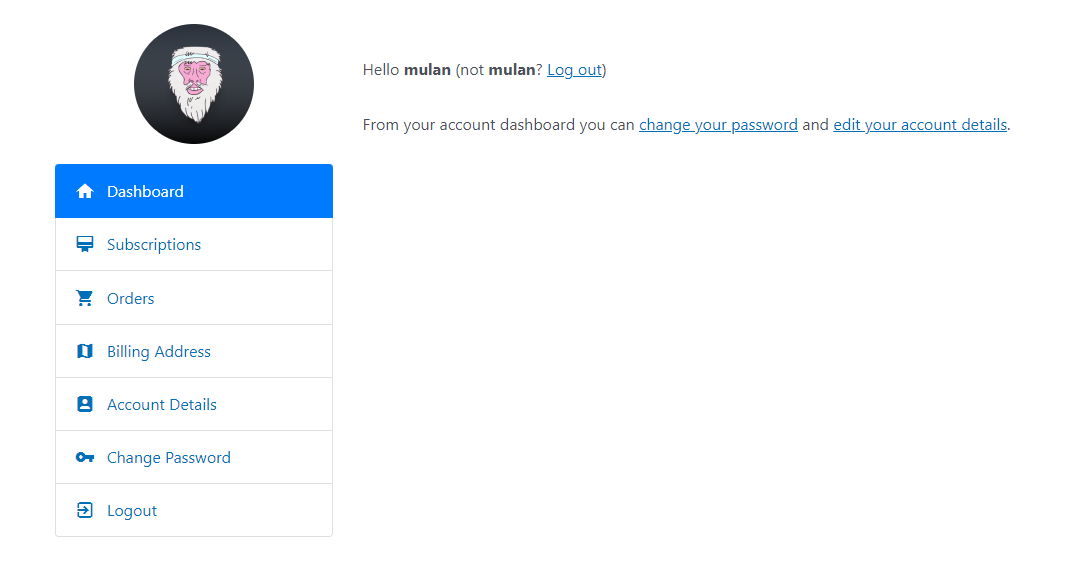
Creating My Account Page
The My Account page allows members or users of your website to conveniently update their profile information, manage their email list subscription, change their account settings and password, or even delete their account directly from the front end of your website.
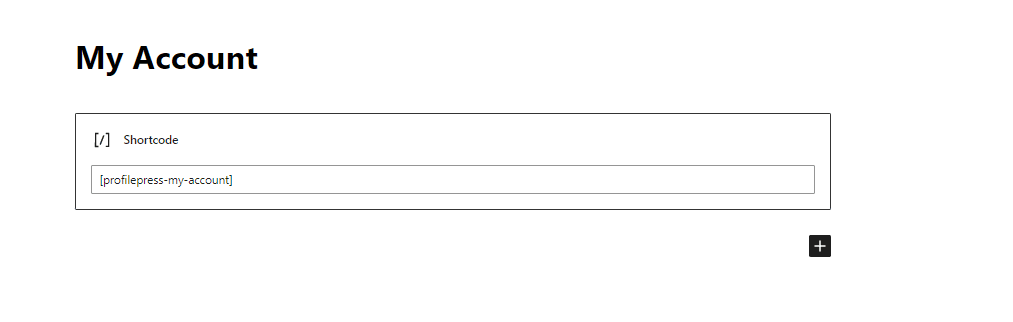
To add the My Account page to your site, create a new page or edit an existing one, insert the “profilepress-my-account” shortcode, and then save or publish the page.
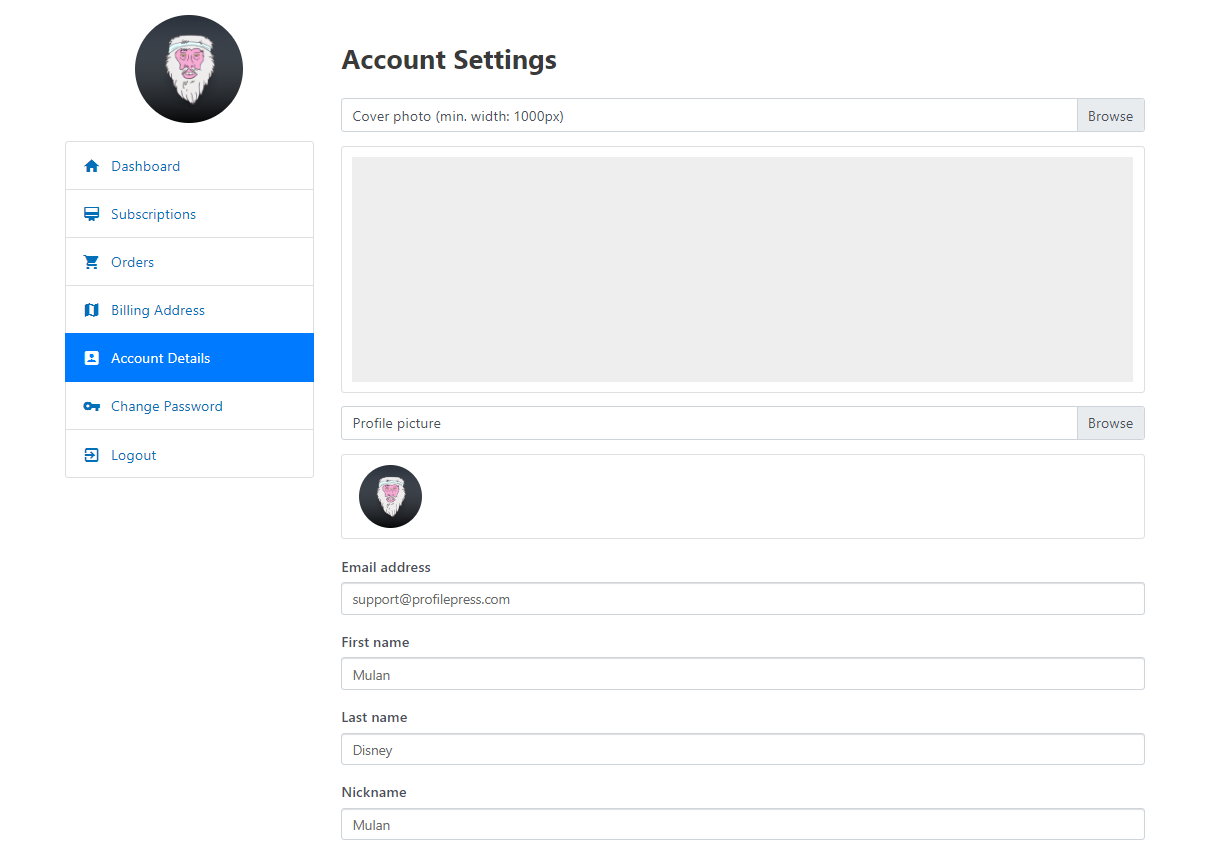
If you prefer a page with a simple form where users can update their profile information, ProfilePress lets you create a custom WordPress edit profile page.
Creating Member Directory
It’s important to have a member directory page that lists all registered users and their profile information. This makes it easy for people to find and contact each other.
If you want to create a directory of your users, ProfilePress enables you to create unlimited WordPress member directories for your website.
To do this, navigate to ProfilePress > Member Directories and click the Add New button.
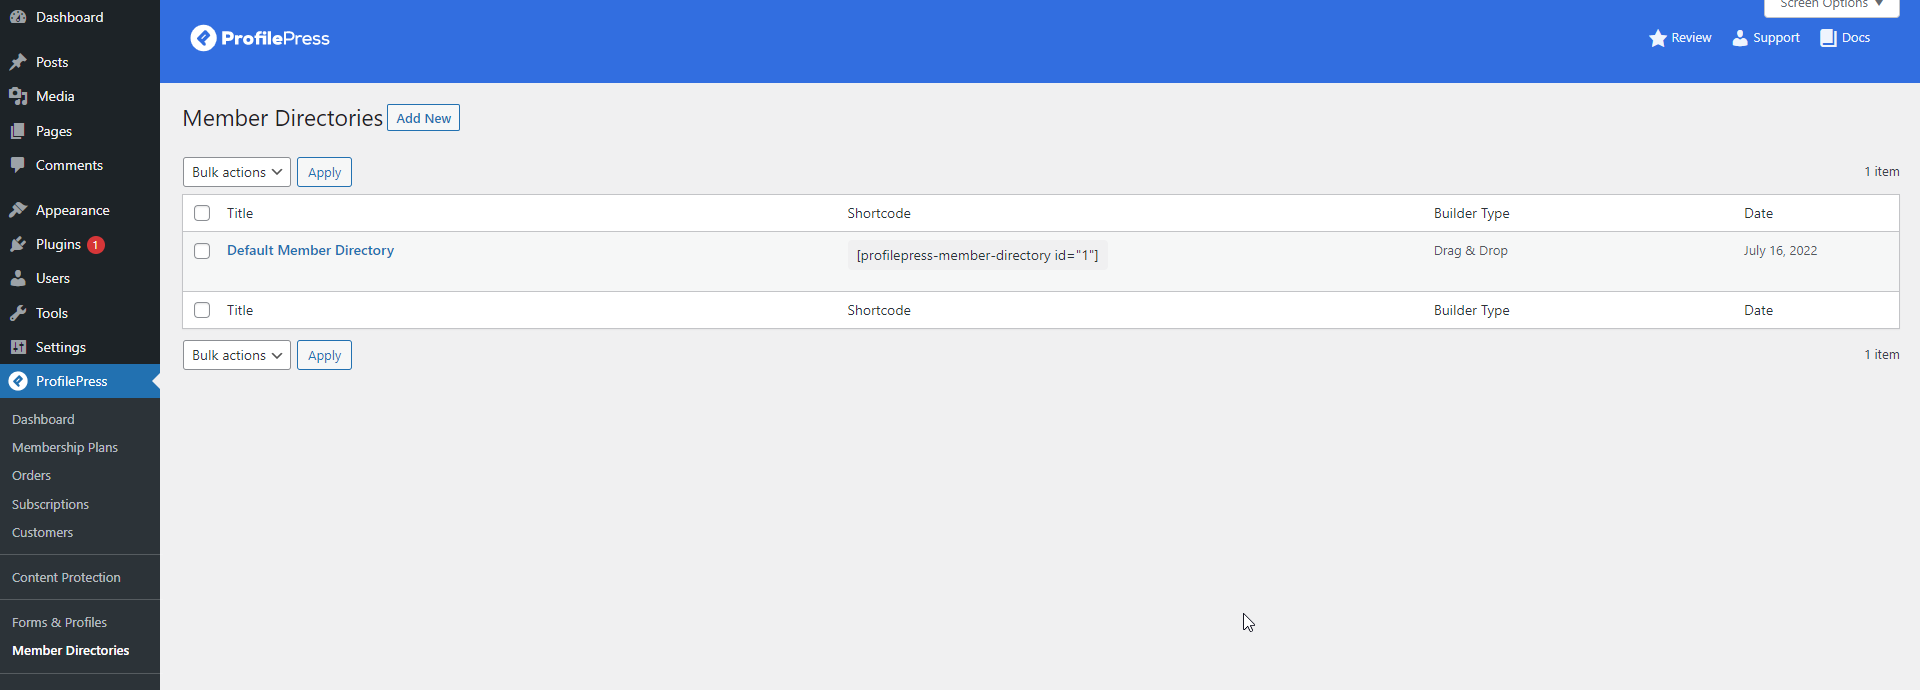
Enter a name for your new member directory and click the Select Template button to create the directory.
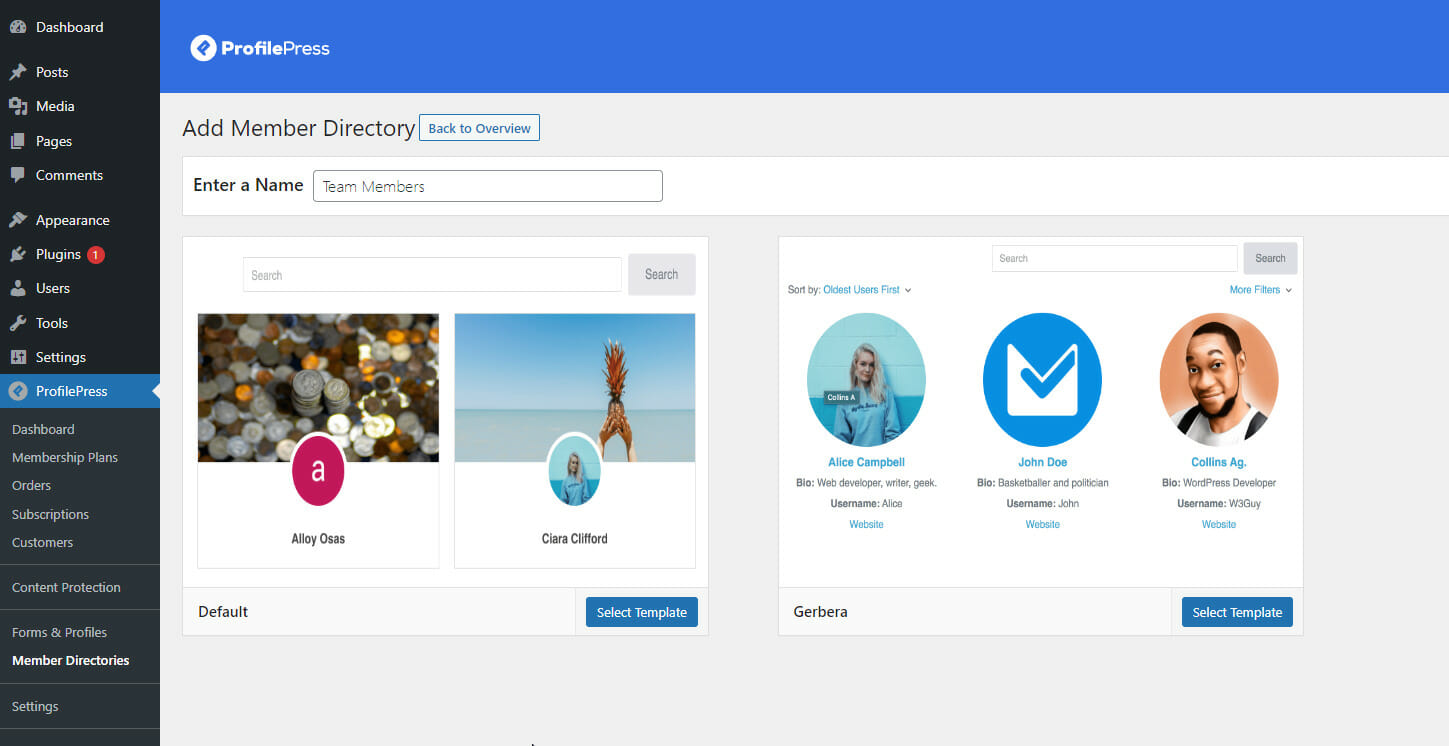
Next, you will be directed to your newly created member directory, where you can choose which fields to display and configure the directory settings.
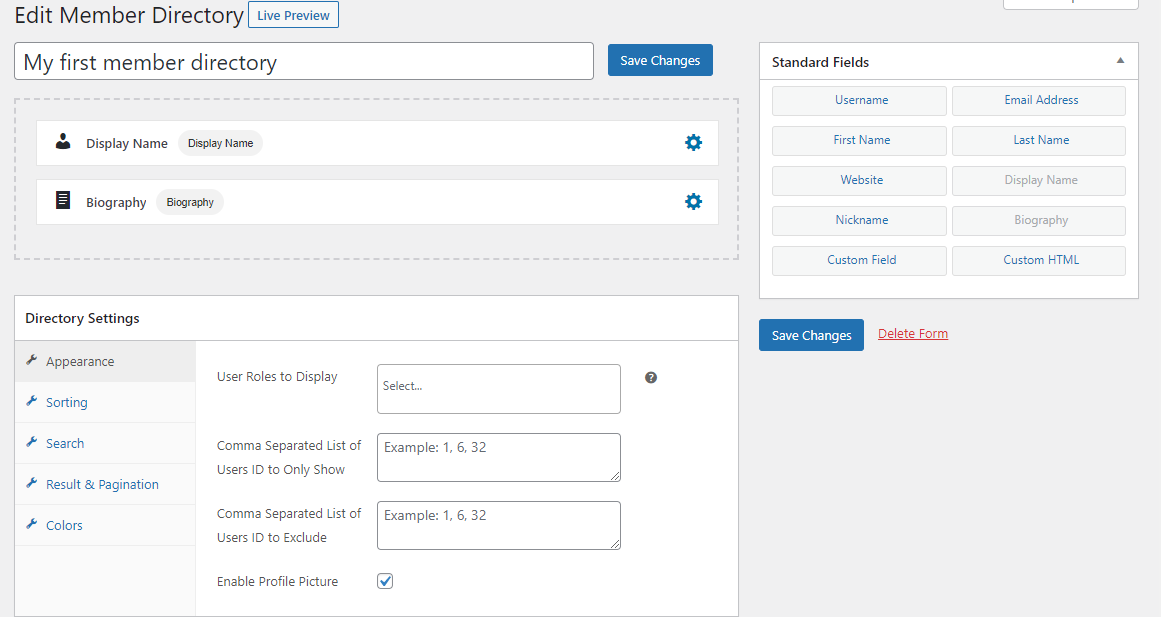
When you are done customizing the member directory, save your changes. Copy the generated shortcode to the clipboard.
Finally, create a new WordPress page, paste in the shortcode, publish the page, and voila! Your website member directory is now live.
Setting Up User Authentication and Security
Securing user authentication is vital. ProfilePress offers options to set up email confirmation, reCAPTCHA, and admin approval.
Setting up Email Confirmation
To begin, you need to activate the addon by navigating to ProfilePress>>Addons and toggling on the activation switch.
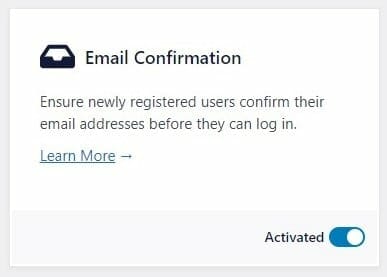
Next, go to `ProfilePress > Settings > Email Confirmation` and complete the necessary fields to configure the “email address verification” email sent to newly registered users in WordPress.
Note that the email confirmation URL or link expires after 30 minutes. If needed, you can adjust the expiration time in the Link Expiration settings field.
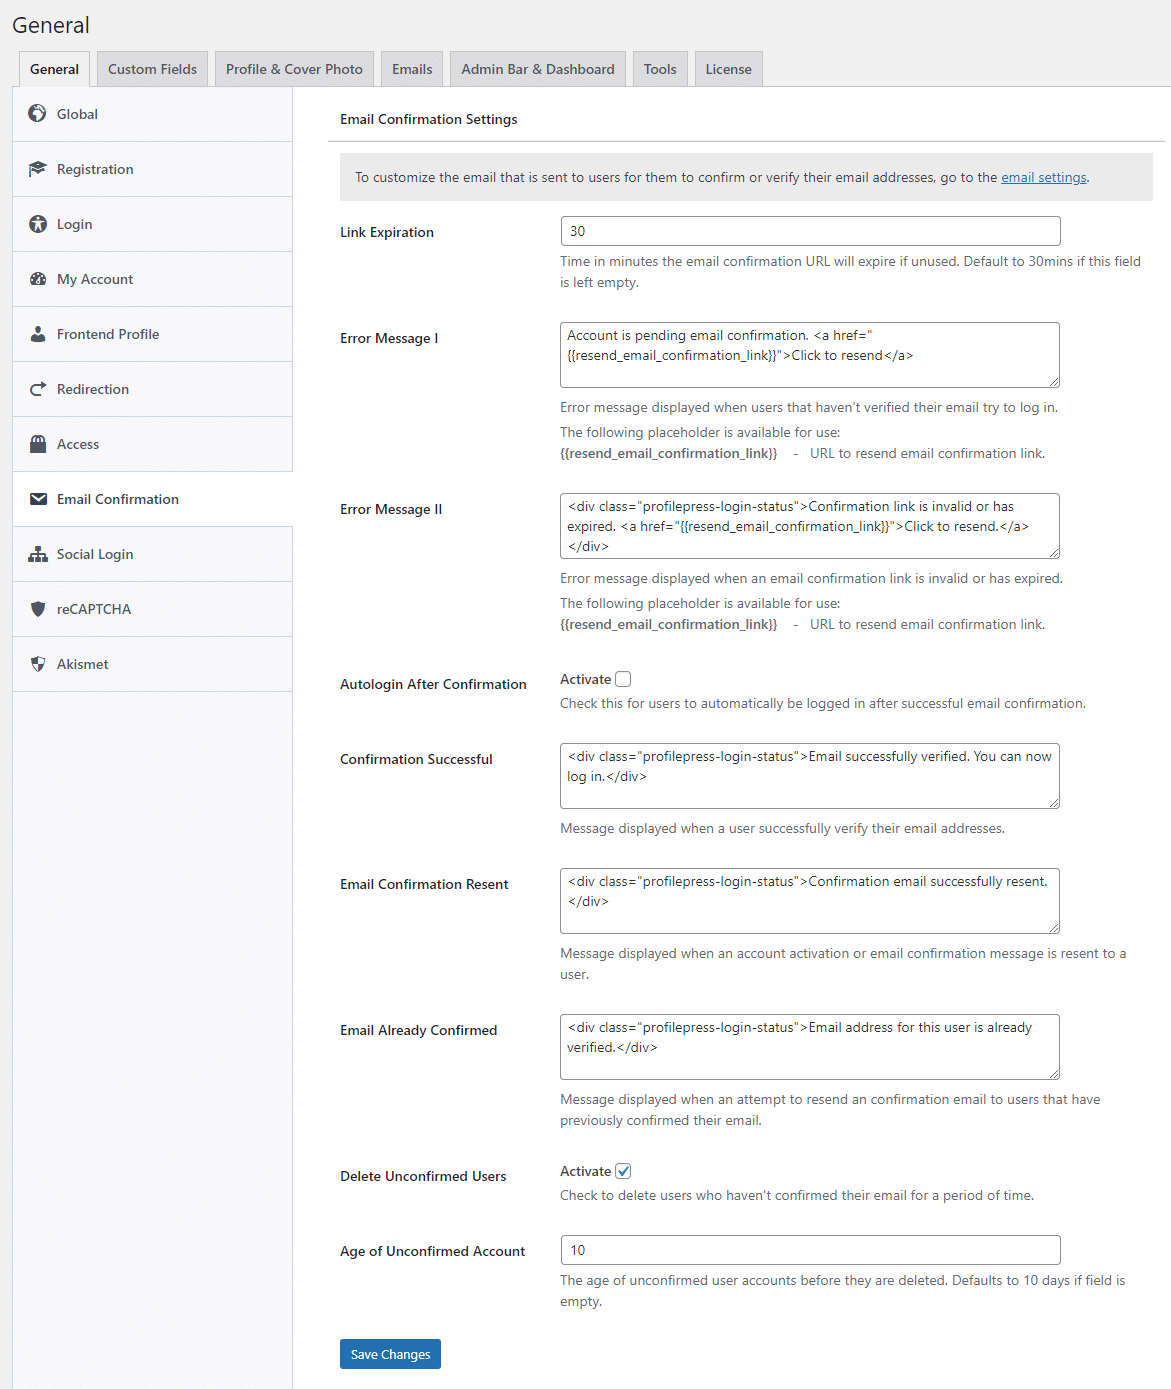
Click on Save Changes to apply your changes.
With the above setup done, when new users create an account on your website, they will receive a verification email with a link to confirm/verify their email address.
Setting up reCAPTCHA
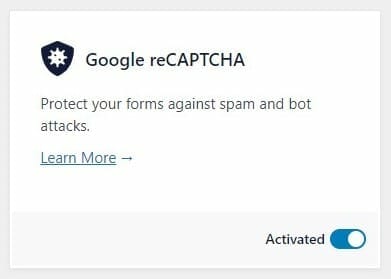
To activate the Google reCAPTCHA add-on, navigate to ProfilePress > Addons, scroll down to Google reCAPTCHA, and toggle it ON.
Next, it’s essential to configure Google reCAPTCHA. Obtain your reCAPTCHA site key and secret key specific to your website domain. You can acquire them through this link.
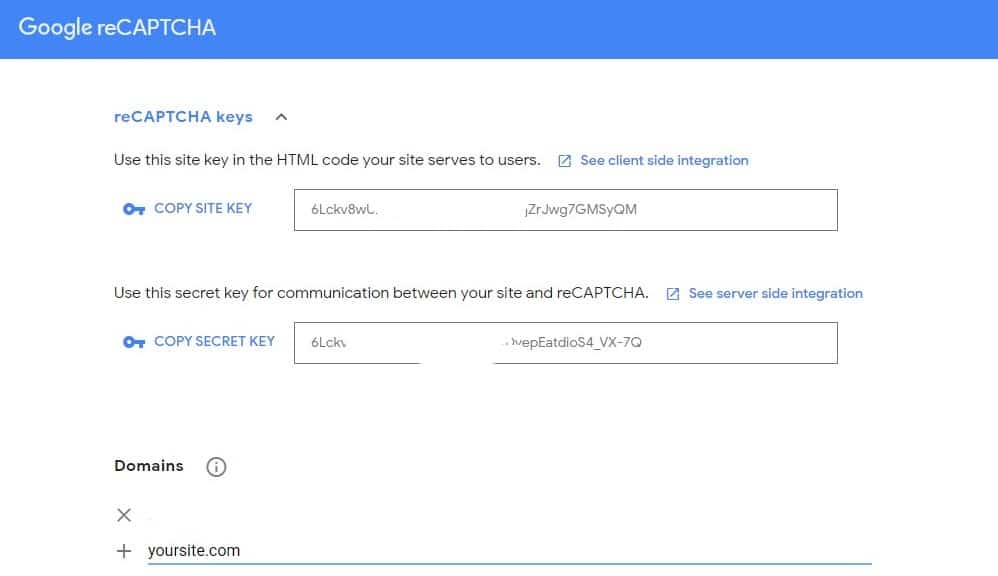
Note: Ensure you add your domain under the domains section.
Next, navigate to `ProfilePress > Settings > reCAPTCHA` and select the type of reCAPTCHA you want to use.
Paste your Site and Secret keys into the appropriate fields, then set the score threshold, which determines the score at which users will fail the reCAPTCHA v3 verification. Scores range from 0.0 (very likely a bot) to 1.0 (most likely a human), with the default set at 0.5.
Next, define the error message displayed when CAPTCHA is ignored or the challenge fails.
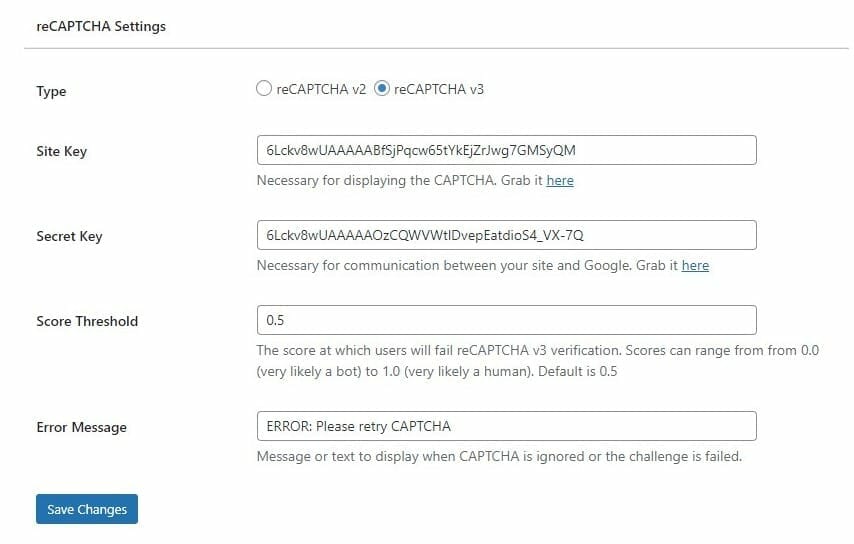
When done, click “Save Changes” to apply your settings.
For detailed instructions, check out our comprehensive guide on how to add reCAPTCHA to your login or checkout form.
Setting up Admin Approval
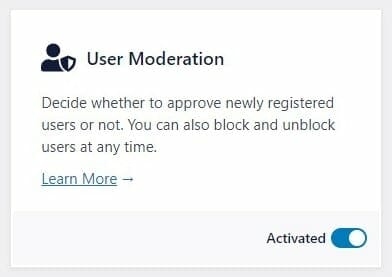
To set up admin approval, you must activate the User Moderation addon. To do this, navigate to ProfilePress>>Addons>> Scroll to User Moderation and switch it ON.
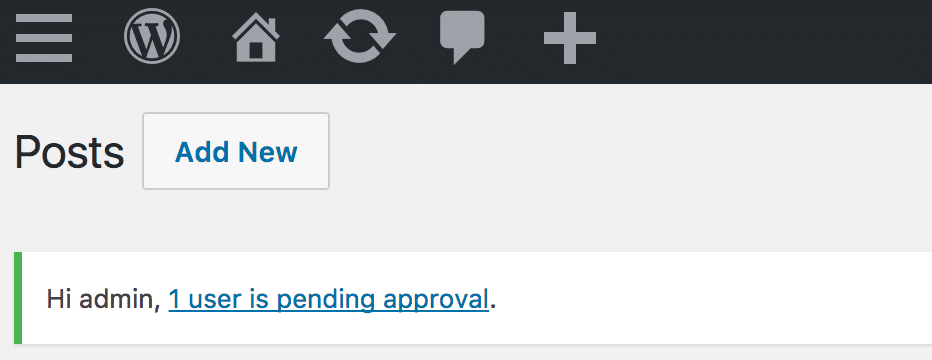
After activating the addon, you will receive a notification email for each user registration, allowing you to approve or reject the user. New user accounts will remain pending until you take action to approve or block them.
If users await approval, you will see an admin notice and a note in the “At a Glance” dashboard widget informing you of the pending approvals.
To approve new users or block/delete them, go to the Users → All Users. Find the pending users and approve them.
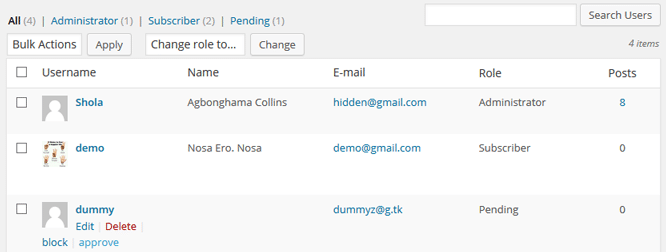
When a user is approved or rejected, they will receive an email notifying them of the decision. The exact process applies when a user is blocked or unblocked. To customize the email content, refer to our Email Settings article.
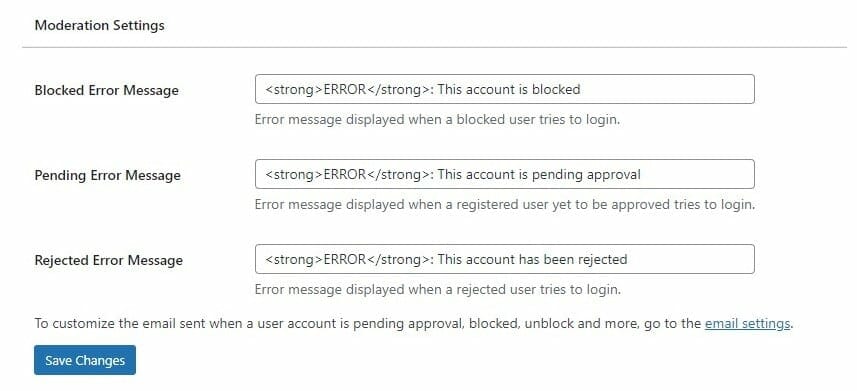
Once you have made the necessary changes, click “Save Changes.”
Restrict User Access to Content
You might also consider restricting user access to content when looking for ways to build a website with user accounts and profiles. The ProfilePress plugin allows you to restrict access to pages, child pages, posts, custom post types, categories, tags, and taxonomies on your WordPress website. For a detailed explanation, check out how to restrict content in WordPress.
Creating Paid Accounts
If you want to charge payment from some or all of your users for creating an account on your website, you can set this up by going to ProfilePress → Membership Plans and clicking the Add New button.
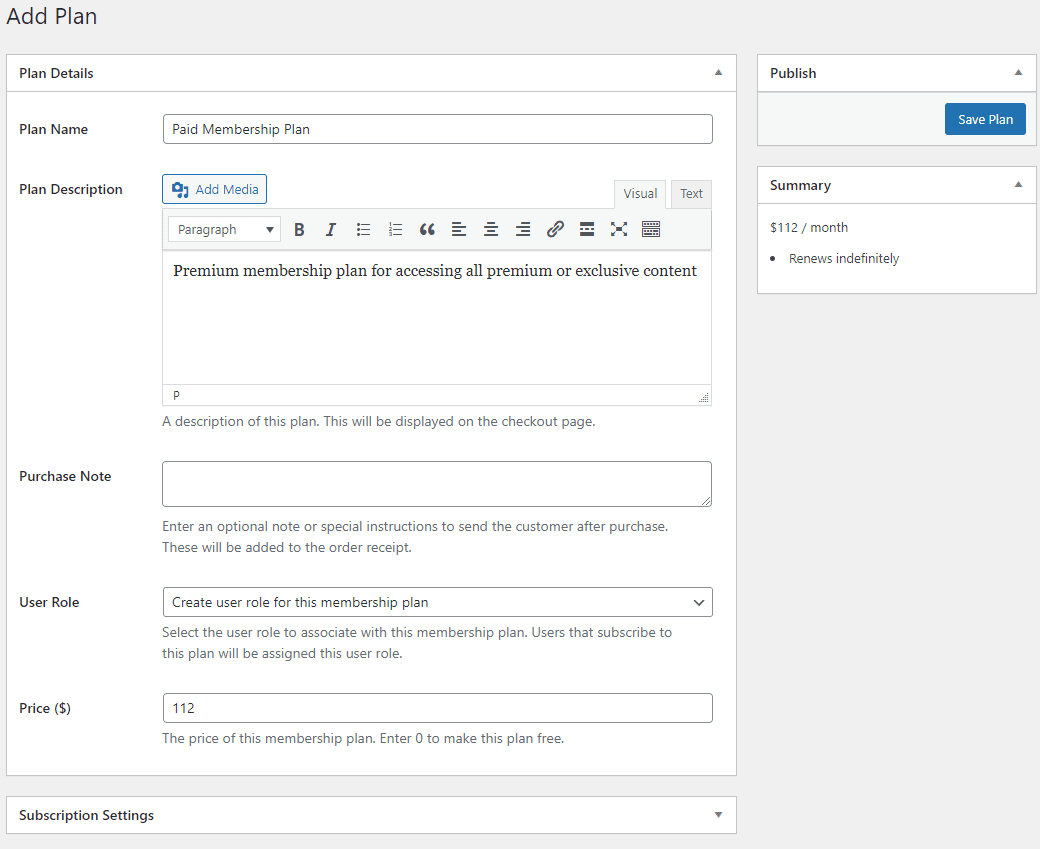
Give your paid membership plan a title and provide a description. You can also include a special message for subscribers using the Purchase Note text field. Lastly, specify the price of your paid membership plan in the Price ($) field.
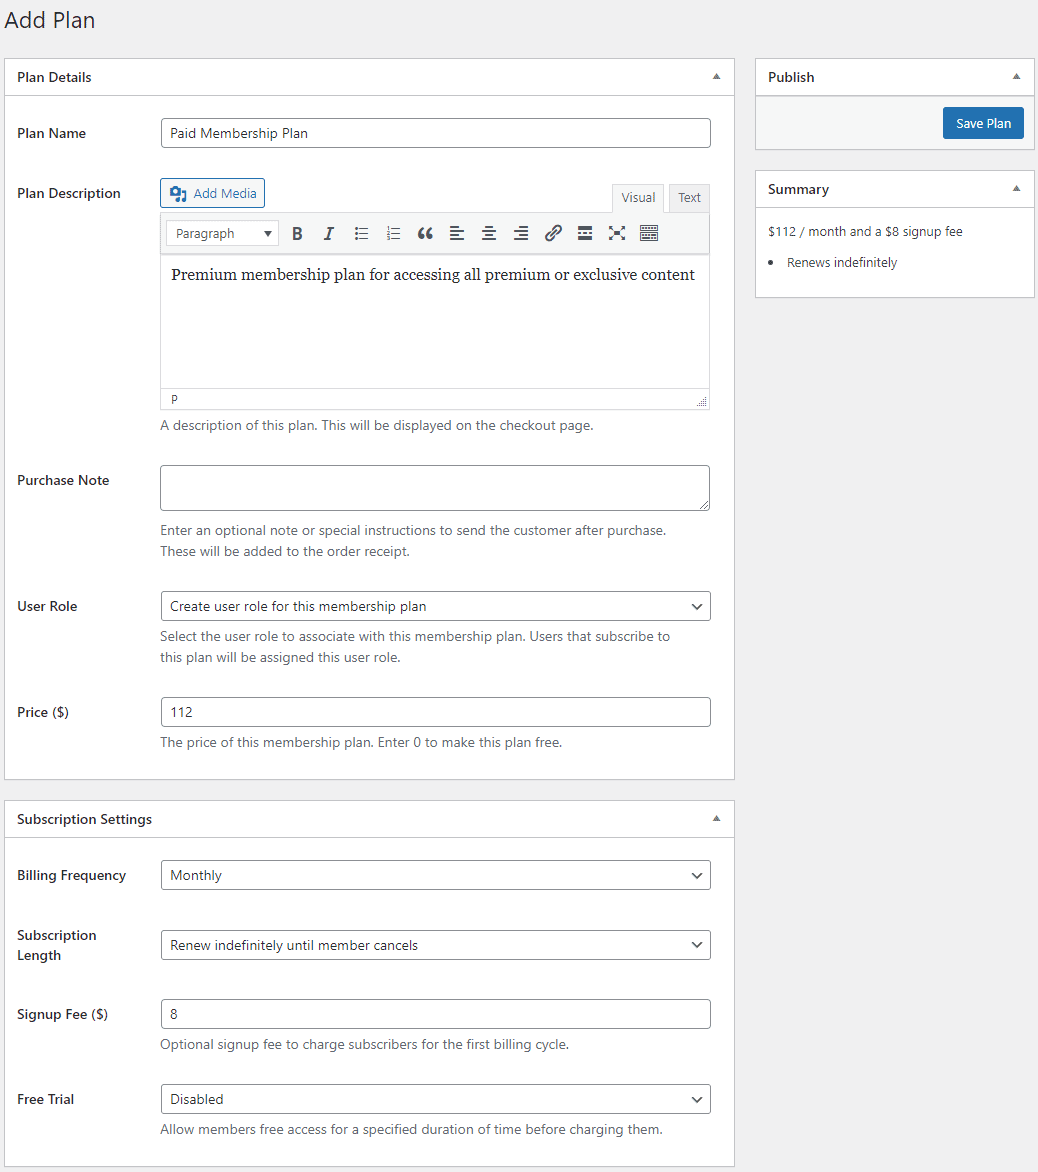
Using the Subscription Settings meta box, you can specify whether you want to create a paid membership plan that charges users weekly, monthly, or yearly. You can also set the Signup Fee ($) field to charge new registrants an extra fee.
Finally, click on the Save Plan button under the Publish meta box.
After saving, a checkout URL will be generated for you. You can create a pricing page on your website with the checkout link or add the link to your website’s navigation menu with a “Registration” or “Sign Up” label. This will allow users to register on your site through the link.
Check out how to create a membership site for more information, including how to integrate payment gateways.
Build a WordPress Website With User Accounts and Profiles Today
In conclusion, creating a WordPress website with user accounts and profiles is essential for enhancing user engagement and gathering valuable data about your audience.
Using ProfilePress for WordPress user management provides a user-friendly interface, powerful customization options, advanced security features, membership and subscription management, seamless integration with popular plugins, and efficient user access management.
Following the step-by-step guide and installing the ProfilePress plugin, you can confidently build a website with user accounts and encourage user registration.
Start using ProfilePress today!