How to Sell on WordPress Without WooCommerce
Do you want to learn how to sell on WordPress without WooCommerce?
While WooCommerce is a popular choice for online selling, I discovered that there are easier and more efficient ways to sell on WordPress, especially if your business focuses on digital products, subscriptions, memberships, or online courses.
One of the best WooCommerce alternatives is ProfilePress, a WordPress plugin that combines e-commerce and membership features. With it, you can sell digital downloads, manage recurring subscriptions, offer gated content, and run an online course site.
In this guide, I’ll show you step by step how to sell on WordPress without WooCommerce using ProfilePress. You’ll learn what types of products you can sell, how to install and configure ProfilePress, set up payment gateways, create plans, design your checkout page, build a shop page, and manage orders.
If you’re new to WooCommerce, you might want to check out this guide on how to set it up on WordPress to understand how it works. We have curated a list of some of the best WooCommerce Alternatives if ProfilePress isn’t for you.
What Can You Sell With ProfilePress?
ProfilePress isn’t limited to just one type of business model; it’s flexible enough to power a wide range of online ventures which makes it a pefect alternative to WooCommerce.
Whether you want to sell digital products, build a subscription-based business, or monetize exclusive content, ProfilePress gives you the features to make it happen.
Here’s a breakdown of what you can sell with ProfilePress:
Digital Products and Downloads: If your business focuses on selling digital files like eBooks, PDFs, templates, software, or music. ProfilePress makes the process straightforward. You can:
- Upload files directly to your WordPress site
- Protect them so that only paying customers can access downloads
- Set pricing options for one-time purchases or recurring access
- Set download limits and define expiration dates
This makes it perfect for creators, educators, designers, and anyone who wants to sell downloadable content without the need for complex setups.
Memberships: This is one of the most popular ways to generate recurring income. With ProfilePress, you can:
- Create membership tiers (free, basic, premium, etc.)
- Offer exclusive benefits such as gated content, community access, or special discounts.
- Automatically manage renewals, upgrades, and cancellations.
This model is well-suited for businesses seeking to cultivate a loyal community while generating predictable monthly or yearly revenue.
Subscriptions: If you offer services or content that people pay for regularly, such as coaching sessions, online lessons, or premium newsletters, ProfilePress has built-in subscription management capabilities. You can:
- Set up recurring billing (weekly, monthly, or annually)
- Offer trial periods or introductory pricing
- Handle automatic renewals and payment failures
This eliminates the headache of managing recurring payments and ensures you receive consistent payments.
Online Courses and Educational Content: If you’re running an online school or selling educational content, ProfilePress integrates seamlessly with popular WordPress LMS plugins such as LearnDash, LifterLMS, Sensei LMS, Tutor LMS, and Academy LMS, allowing you to sell courses, memberships, and training programs without WooCommerce.
Paywalled or Premium Content: Want to monetize your blog posts, podcasts, or videos? ProfilePress lets you set up a metered paywall or restrict specific content to paying subscribers. For example:
- Free users can read three articles per month, while paid subscribers get unlimited access
- Only members with a premium subscription can view certain videos or downloads
This is ideal for bloggers, publishers, and content creators who want to turn their expertise into a steady income stream.
Steps to Sell on WordPress Without WooCommerce
Now that you know what you can sell with ProfilePress, let’s walk through the process of setting it up for selling digital products, memberships, or subscriptions.
Step 1: Install and Activate ProfilePress
To do this, visit the ProfilePress website and purchase the plugin. After completing your purchase, download the ZIP file from your account.
Next, log in to your WordPress dashboard and go to Plugins > Add New, then click on Upload Plugin.
Now, either drag and drop the downloaded ZIP file into the upload area or click Choose File to select it from your computer.
Next, click Install Now.
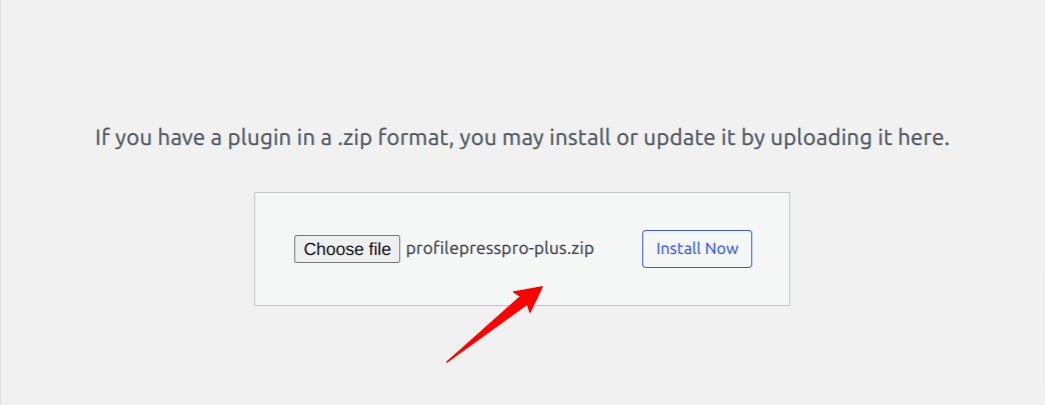
Once the installation is finished, click the Activate Plugin button.
Next, you’ll see a message at the top of your WordPress dashboard saying: “ProfilePress needs to create several pages to function correctly.” Click the Create Pages button.

Having accomplished this task, we successfully set up the ProfilePress plugin on our WordPress site.
Step 2: Configure Payment Gateways
Now that ProfilePress is installed and activated on your website, the next step is to configure your payment gateways. This ensures you can accept payments from customers when selling digital products, memberships, or subscriptions.
ProfilePress supports a variety of payment options, including Stripe, PayPal, Razorpay, Paystack, Direct Bank Transfer, Mollie. This flexibility enables you to offer multiple payment options for your customers.
In this section, we will guide you through setting up Stripe for seamless transactions.
Setting Up Stripe
On your WordPress dashboard, go to ProfilePress > Settings > Payments > Payment Methods.
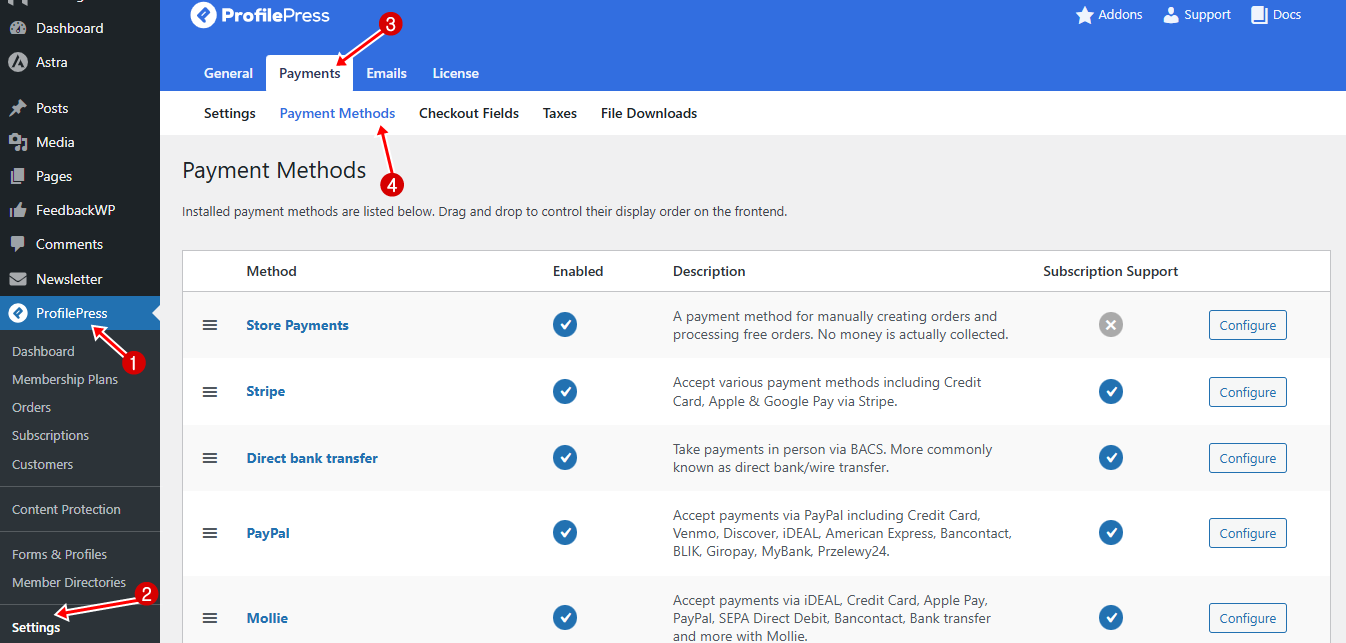
Next, click the Configure button next to Stripe.
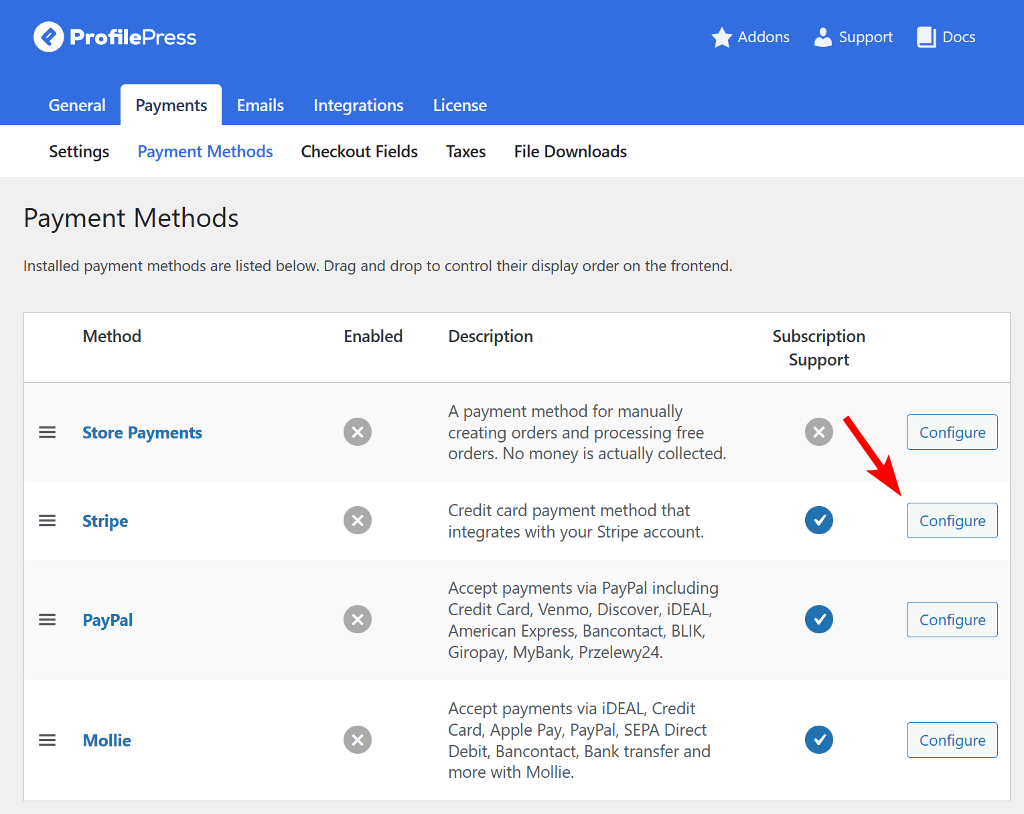
On the new page, click on Connect with Stripe to continue.
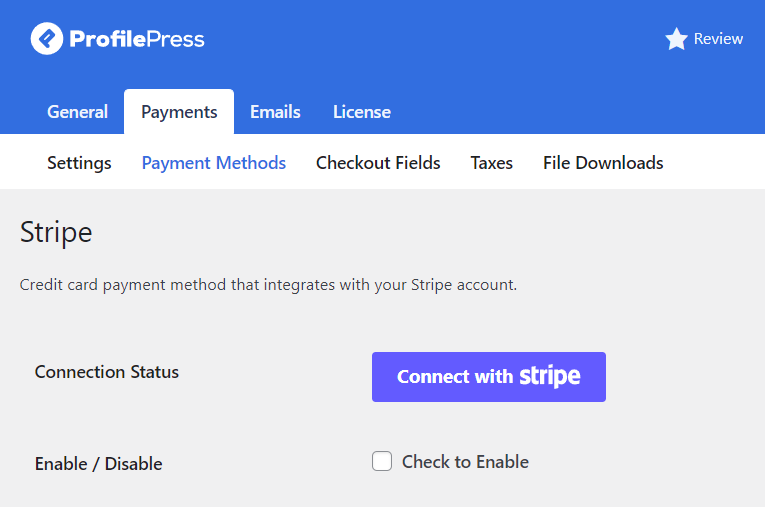
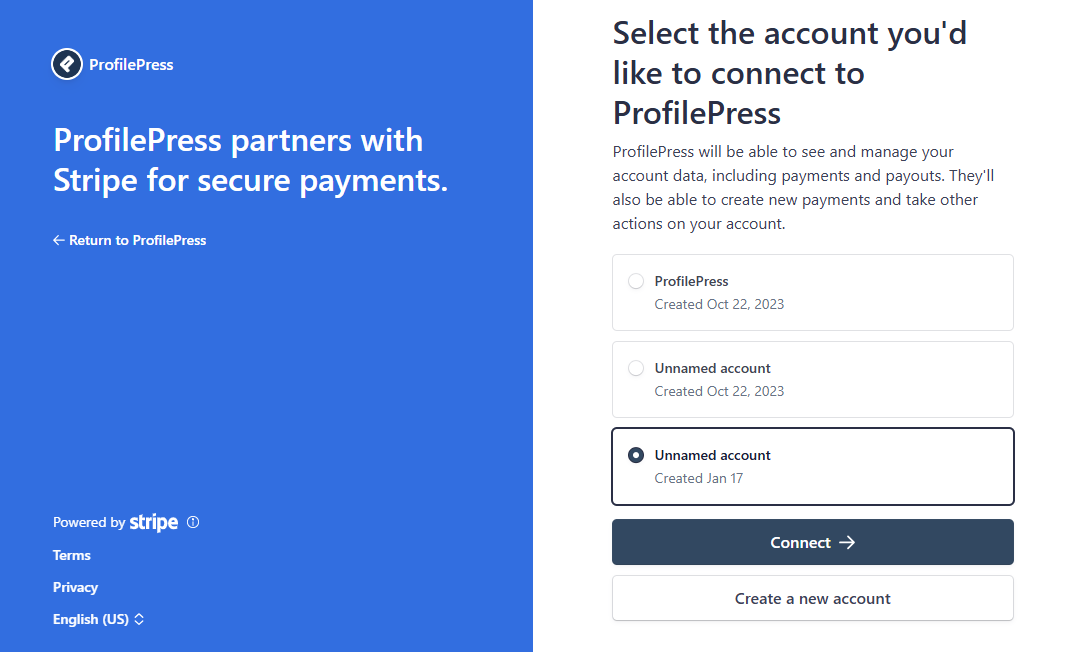
Next, you’ll be redirected to the Stripe website, where you can either set up a new account or sign in to an existing one. Once done, you’ll be automatically taken back to your website.
Next, enable the payment method by checking the box labeled “Check to Enable”. Be sure to add a title and description as well.
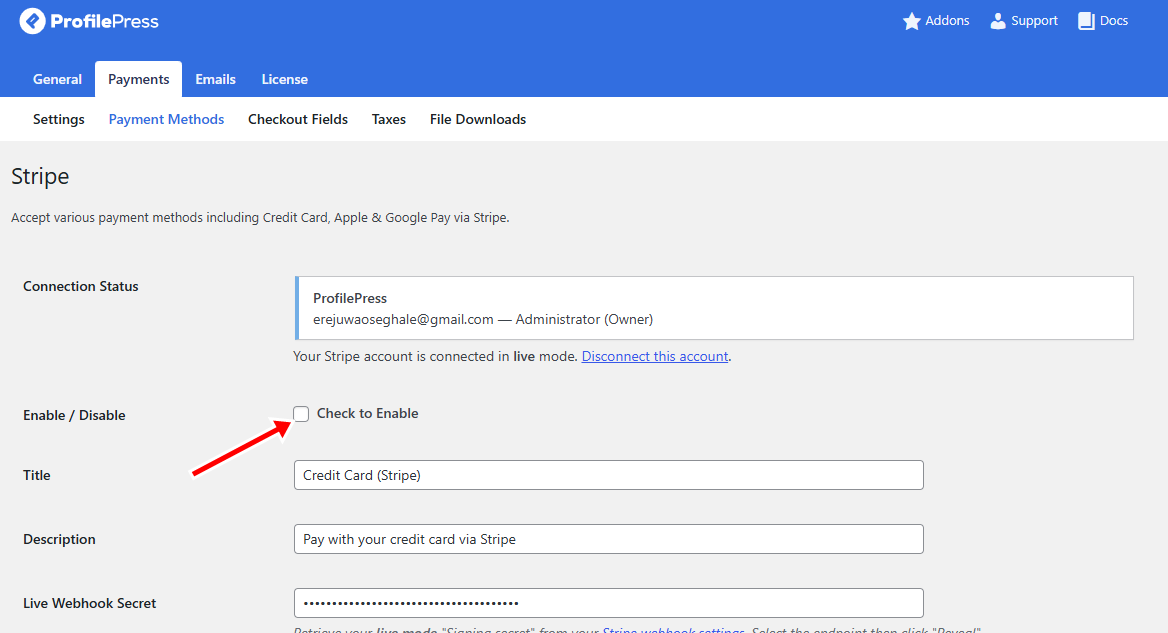
Once this is done, Stripe payments will be active on your WordPress website.
In the next section, we’ll guide you through creating a membership or subscription plan using ProfilePress, the perfect WooCommerce alternative plugin.
Step 3: Create a Membership Plan
Selling without WooCommerce in WordPress using ProfilePress is as easy as creating membership plans for selling digital products, memberships, or subscriptions.
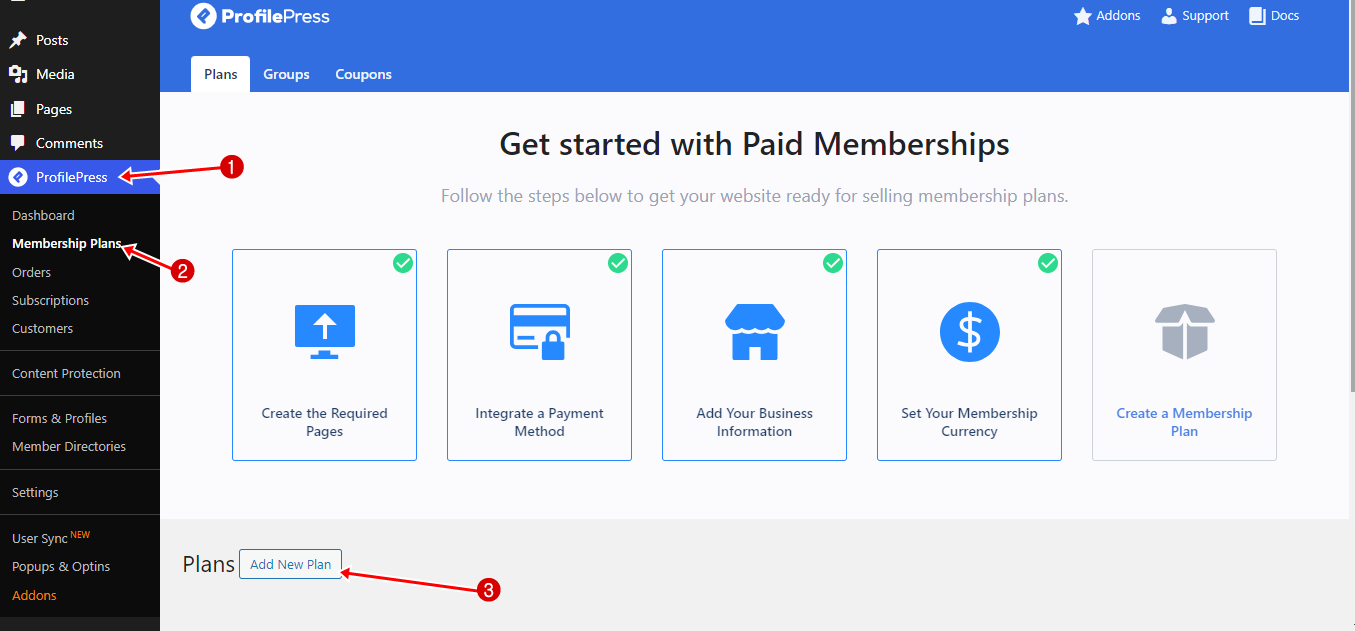
To set up a new plan, go to ProfilePress > Dashboard and click on the Create a Membership Plan button. Then, scroll down and select Add New Plan at the bottom of the page to begin.
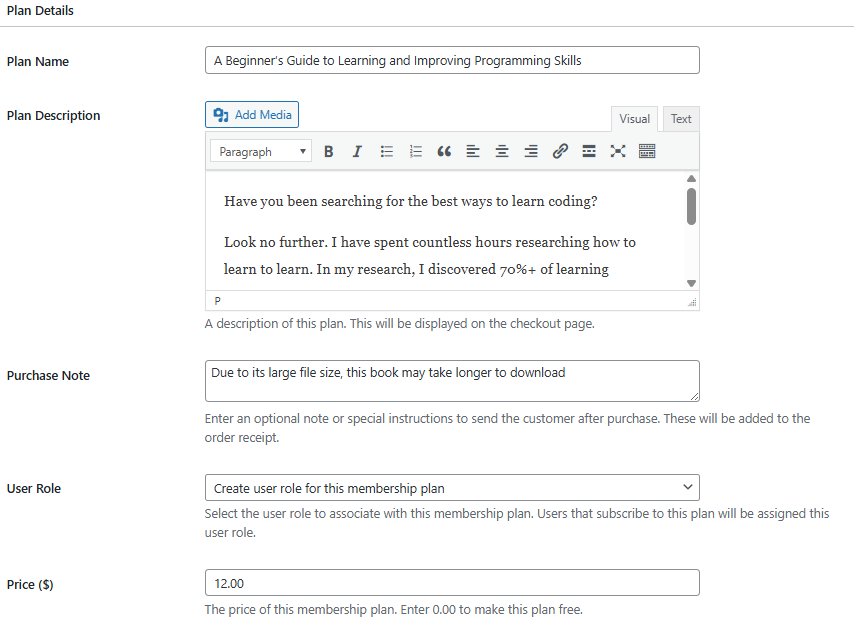
The next page is divided into three sections: Plan Details, Subscription Settings, and Downloads & Integration. Each section plays an important role in configuring your plan.
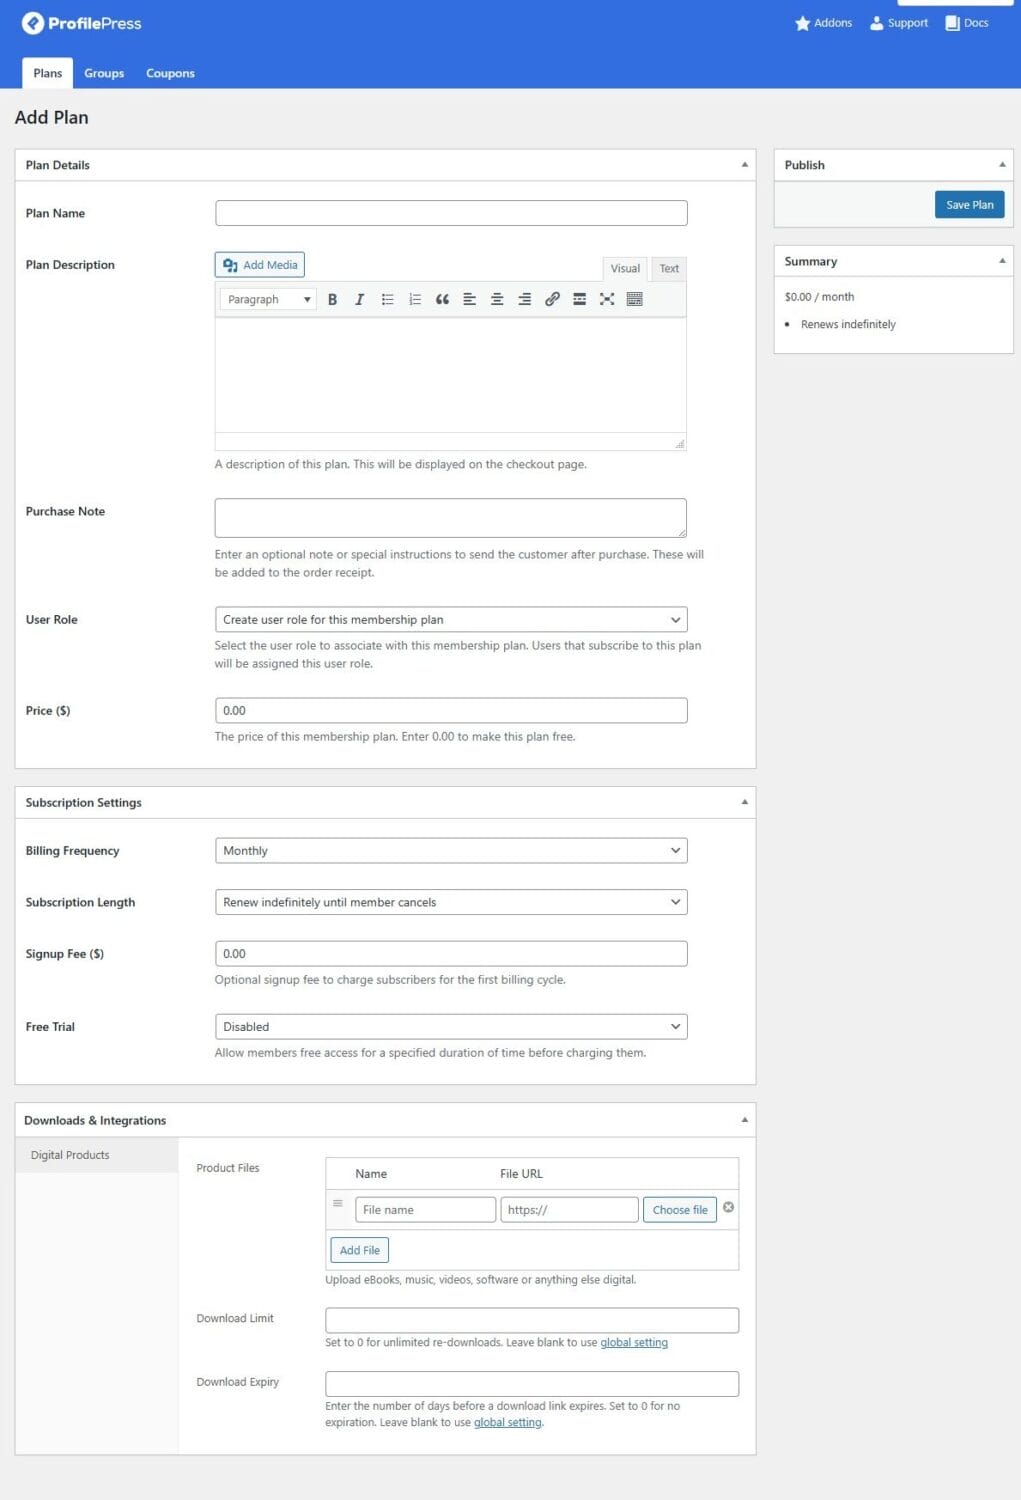
Let’s walk through them one by one.
Plan Details Section
In the Plan Details section, you’ll enter the core information for your plan. This is where you define how the plan will appear to your customers and how it will function on your site.
Here’s what you can configure:
Plan Name: In this field, input a clear, appealing name that reflects the value of what you’re offering, whether it’s a digital product, membership, or subscription.
Plan Description: Use this field to describe what the plan includes. Outline the benefits, features, and what members or buyers can expect to receive. For example, highlight if the plan grants access to exclusive content, a downloadable product, or ongoing subscription perks.
Purchase Note: This is an optional field that allows you to add custom instructions or a thank-you message. This note is included in the order receipt, providing space to upsell, share important information, or add a personal touch.
User Role: This option allows you to assign a role to members of this plan. The recommended option is to let ProfilePress ‘Create user role for this membership plan’. This makes it easy to manage, track, and organize members based on their purchases.
Price: Set the cost of your plan here.
Subscription Settings Section
The Subscription Settings section determines how your plan will operate, including billing cycles, payment frequency, signup fees, and free trial options.
Here’s a breakdown of the available settings:
Billing Frequency: In this field, you decide how often customers are billed. Options include daily, weekly, monthly, quarterly, semi-annually, yearly, or a one-time payment.
Example: If you’re selling a digital product, you could charge a one-time payment. For a membership plan, a monthly payment is most suitable for ongoing community access. If you’re offering a subscription service, you might choose a weekly or monthly billing cycle.
Subscription Length: This option enables you to specify the duration of the subscription. You can offer ongoing subscriptions that continue until the customer cancels. Alternatively, you can create fixed-term subscriptions with a set number of payments.
Signup Fee: With this option, you can add a one-time upfront cost when customers subscribe. This is useful for covering onboarding or setup expenses.
Free Trial: This option enables you to offer a trial period, allowing potential customers to explore your product or service before committing.
Downloads & Integration
The Downloads & Integration section is designed for situations where you want to sell digital products on your website. Here, you can upload the product file, set a download limit, and define the download expiration date.
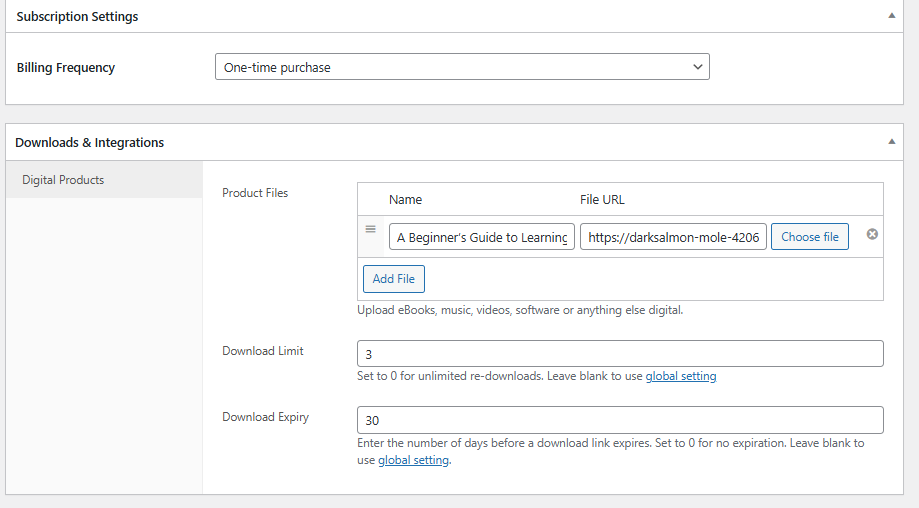
Once you’ve completed the setup, click the Save Plan button to publish your plan.
After publishing, a checkout link will be generated, which you can add anywhere on your website to start selling your digital products, subscriptions, or memberships.
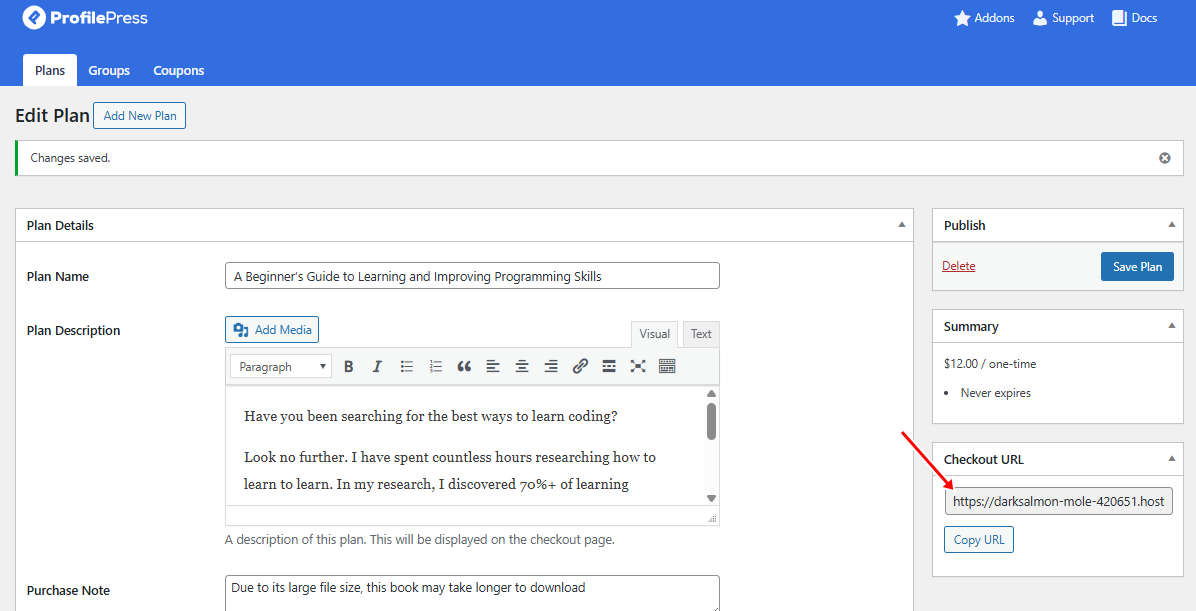
You can also create additional plans using the steps outlined above.
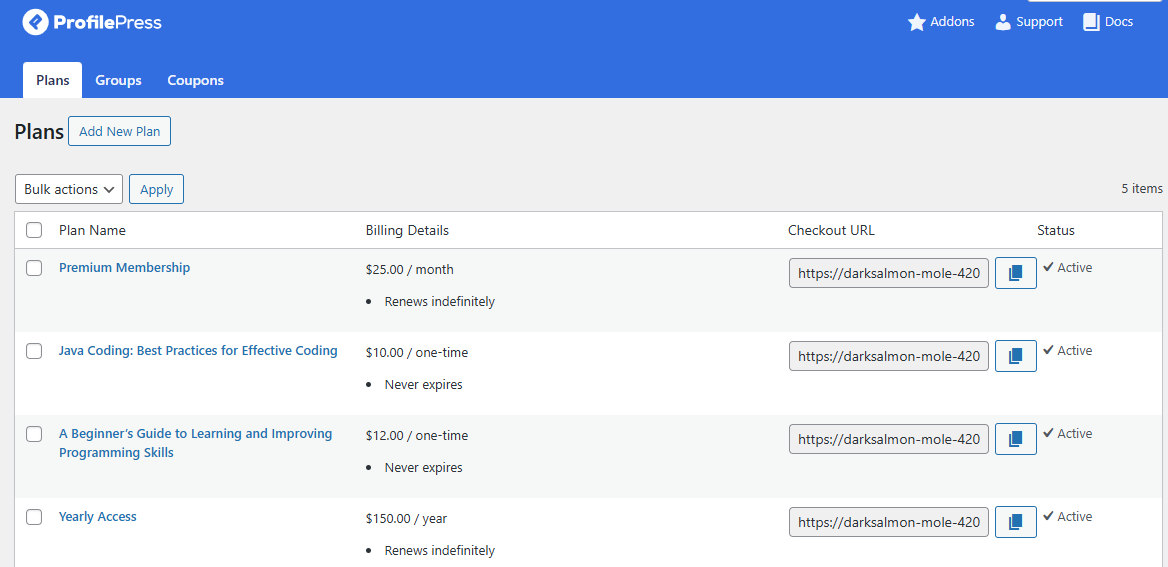
Now we have shown you how to set up a plan to sell your digital products, memberships, or subscriptions.
Next, we’ll show you how to design your checkout page.
Step 4: Setting Up Your Checkout Page
The checkout page is where customers complete their purchase by entering payment and billing details.
ProfilePress automatically creates this page for you, making it the perfect WooCommerce alternative plugin. However, if it’s missing, you can create it manually by going to Pages > Add New in your WordPress dashboard, naming the page Checkout, and then adding the shortcode [profilepress-checkout]
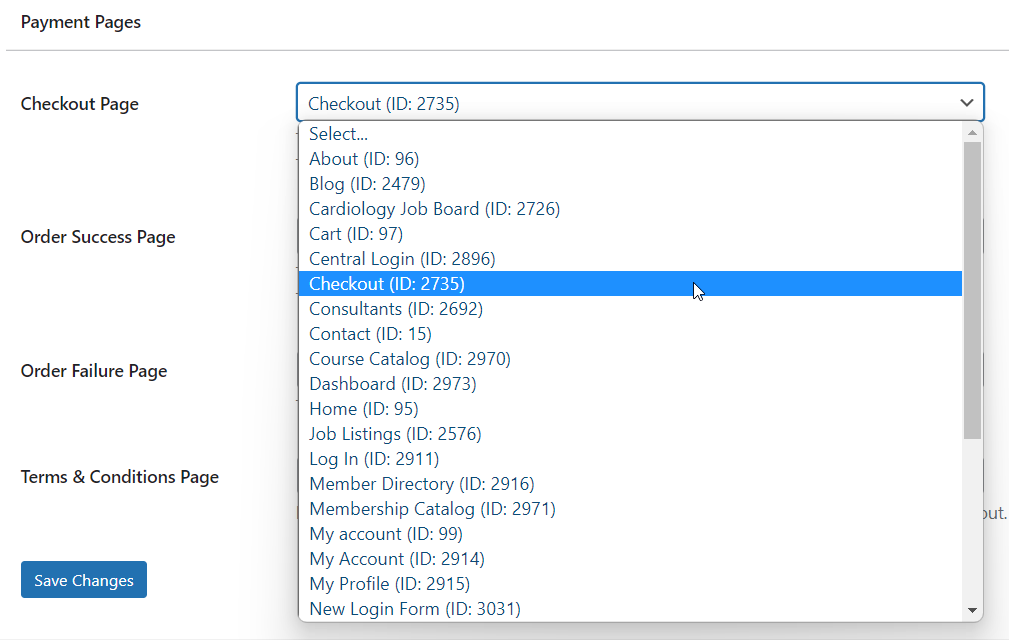
Next, go to ProfilePress > Settings > General > Pages in your dashboard. Scroll down to the Payment Pages section and select the checkout page you created in the Checkout Page option.
If you want to customize the checkout form, go to ProfilePress > Settings > Payments > Checkout Fields
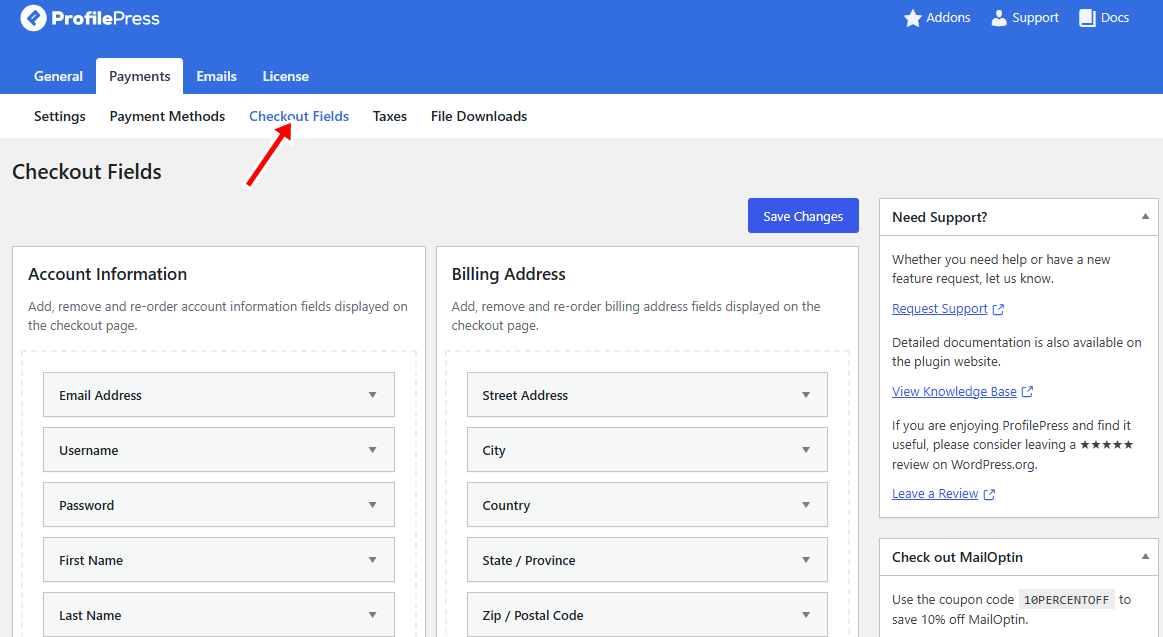
You can edit each field’s label, adjust its width, mark it as required, or even hide it from logged-in users.
To add a new field, select it from the dropdown menu and click Add Field. Once it’s added, you can rearrange the order of the fields by dragging and dropping them into the desired position.
After completing your setup, click Save Changes to apply the updates.
With your checkout page ready, proceed to the next step—creating a shop page and adding your plans.
Step 5: Creating a Shop Page and Adding Your Plans
In this step, you’ll create a shop page to showcase everything you want to sell on your WordPress site, whether it’s digital products, memberships, subscriptions, or online courses.
You can build the page with the Gutenberg editor, or, if you prefer not to start from scratch, use a ready-made shop template from page builders like Elementor, Beaver Builder, WPBakery, or Visual Composer.
Here’s a simple shop page we designed using Elementor:
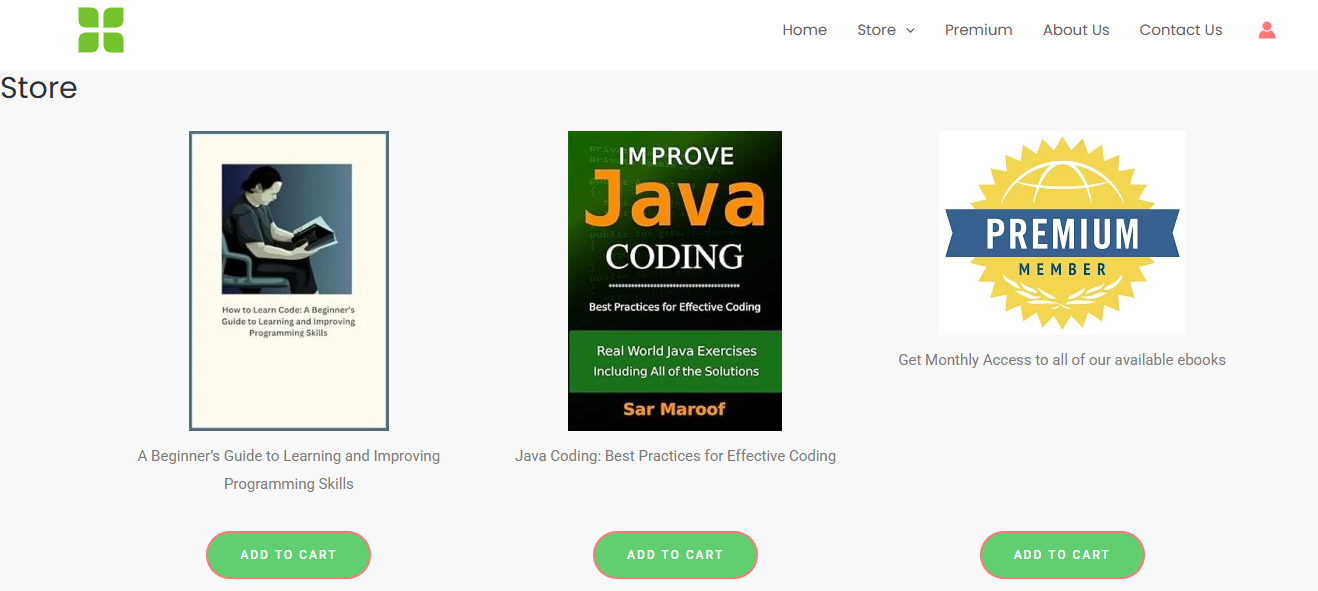
Once your shop page is set up, you’ll need to connect each product’s “Add to Cart” or “Buy Now” button to the correct plan.
To do this, navigate to ProfilePress > Membership Plans
Copy the link and paste it into the corresponding button on your shop page.
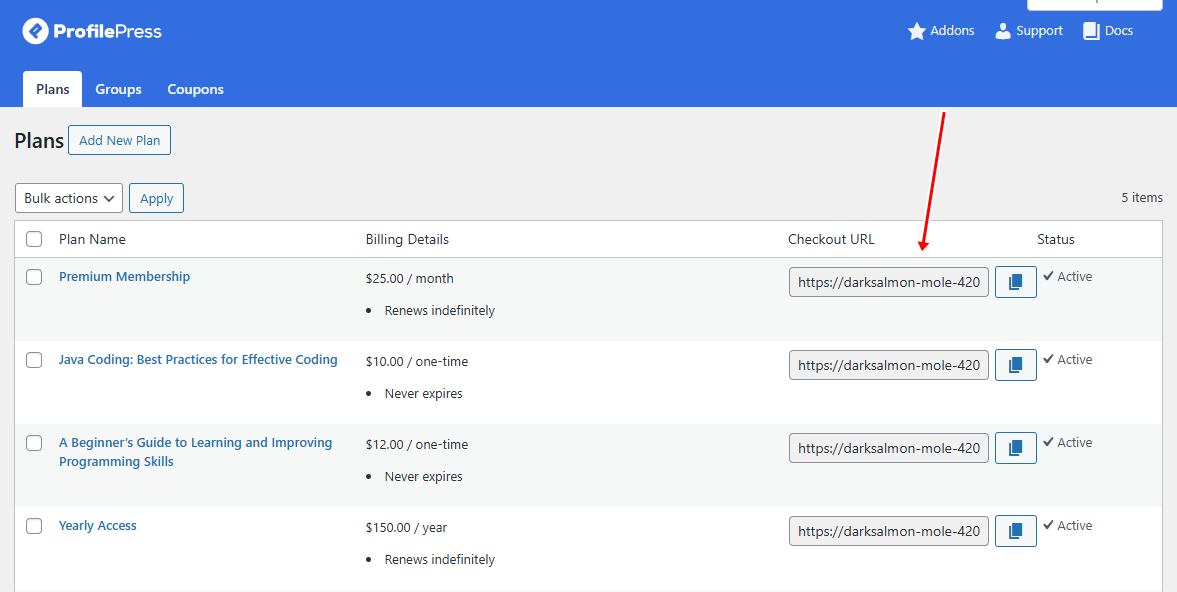
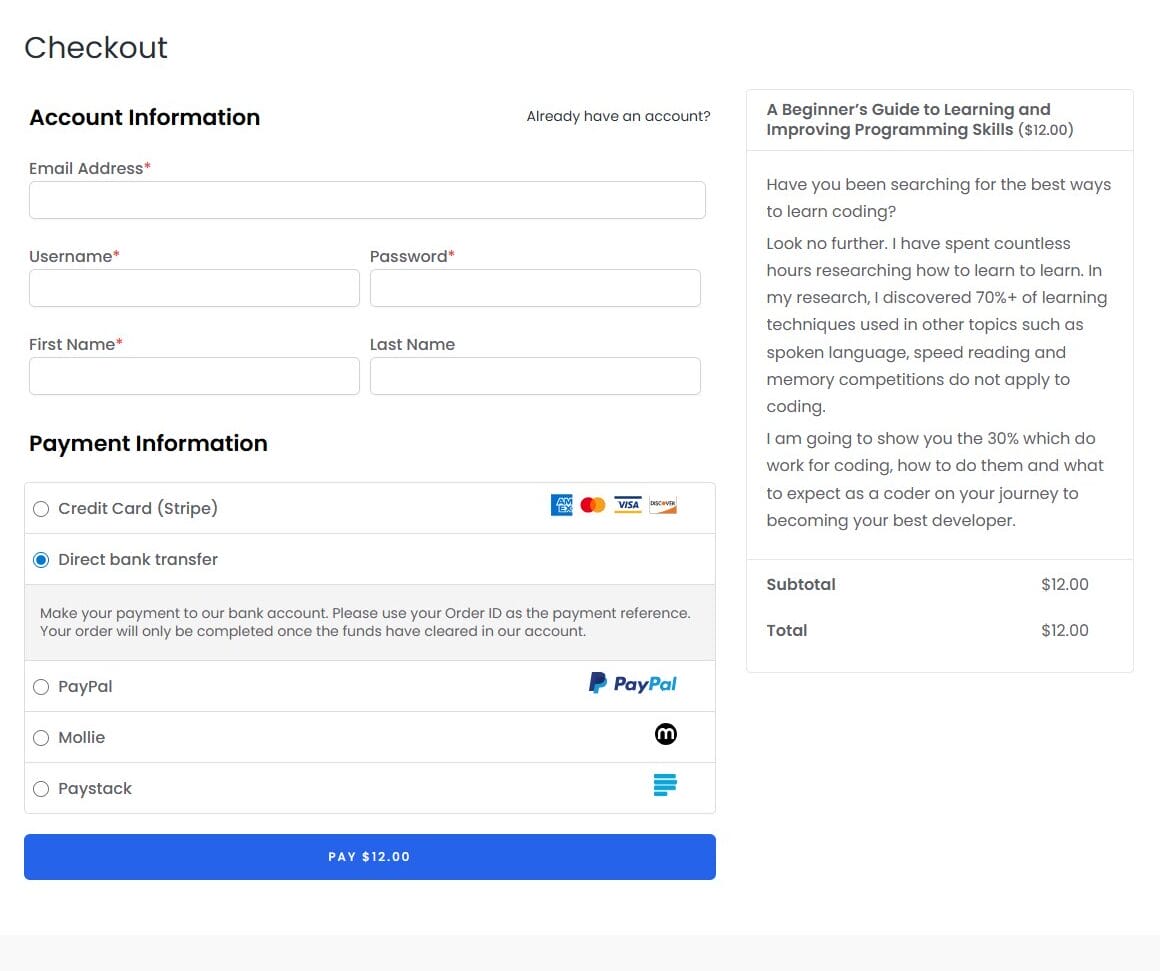
When a customer clicks the button, they’ll be redirected to the checkout page for that specific plan.
Step 6: Managing Orders
When you receive a new order for your digital products or services, ProfilePress will automatically send you an email notification. This ensures you’re always up to date whenever someone makes a purchase.
To view and manage all your current orders, go to ProfilePress > Orders in your WordPress dashboard.
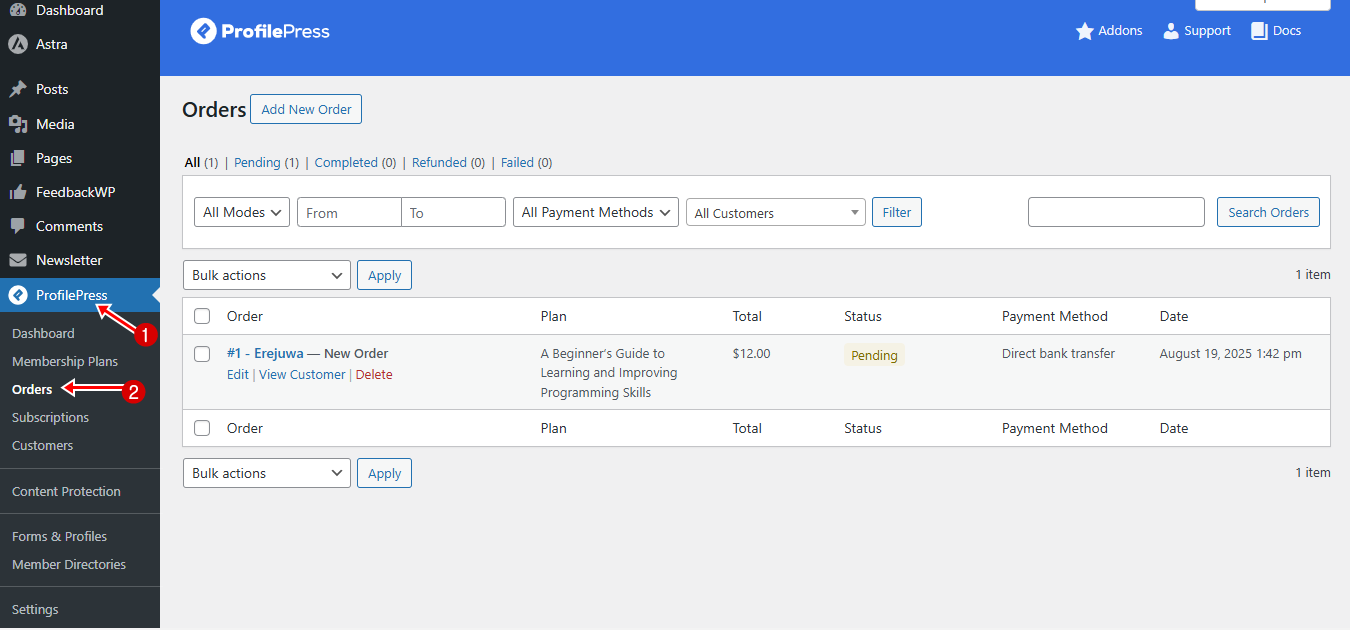
Here, you’ll find a list of every order placed, including details such as the customer’s name, plan purchased, total, payment status, payment method, and order date.
For a detailed view of any order, hover your mouse over it and click the Edit link. This will open the order details page, where you can review all information related to that transaction.
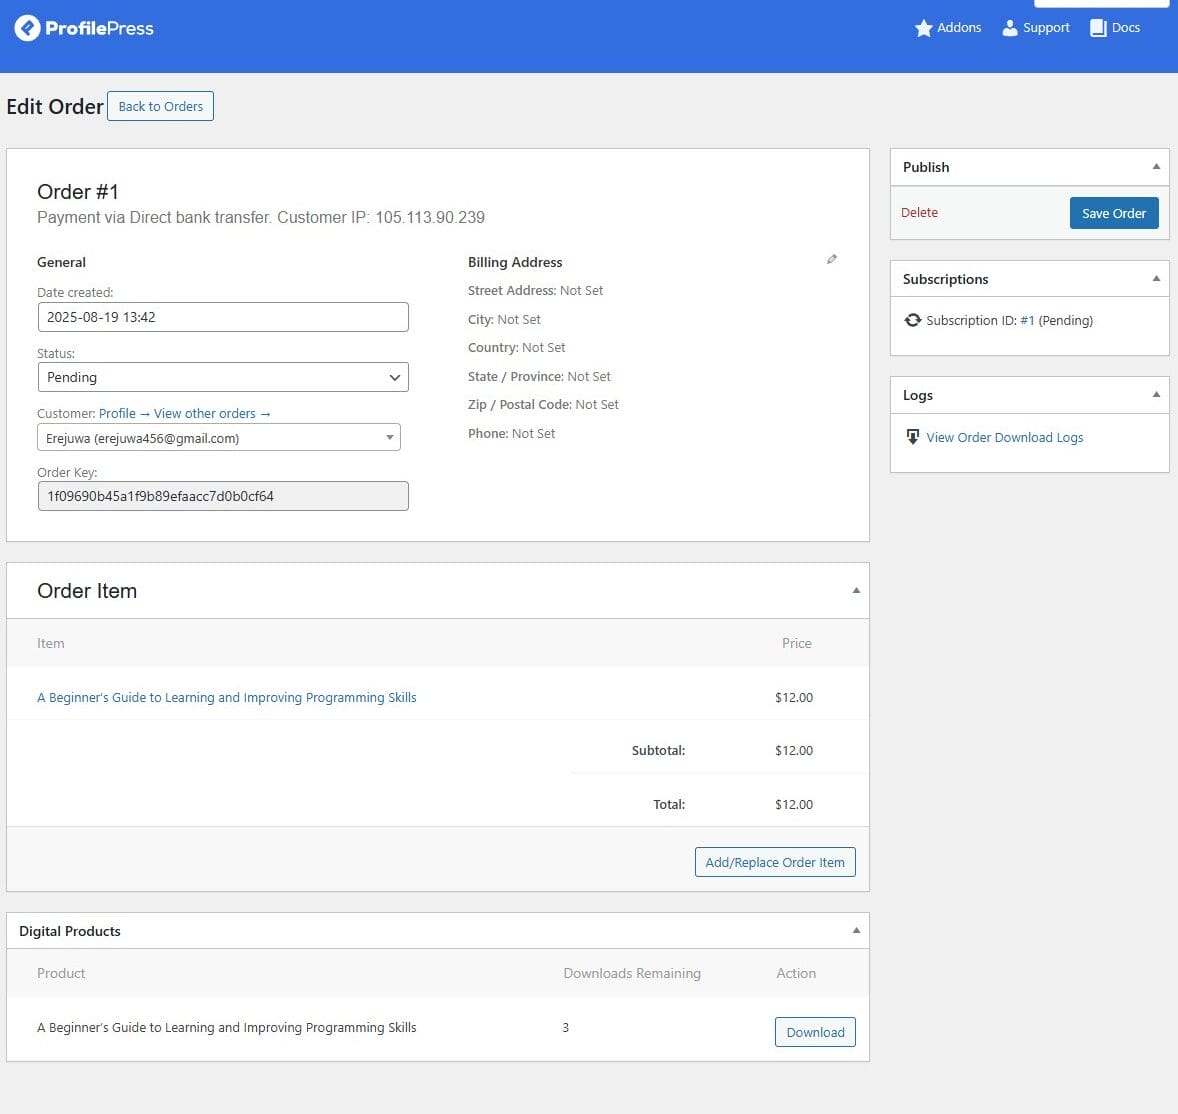
On this page, you’ll find all the order details, including the purchased products, customer address, order status, email, order key, and more. You can also manually update the order status.
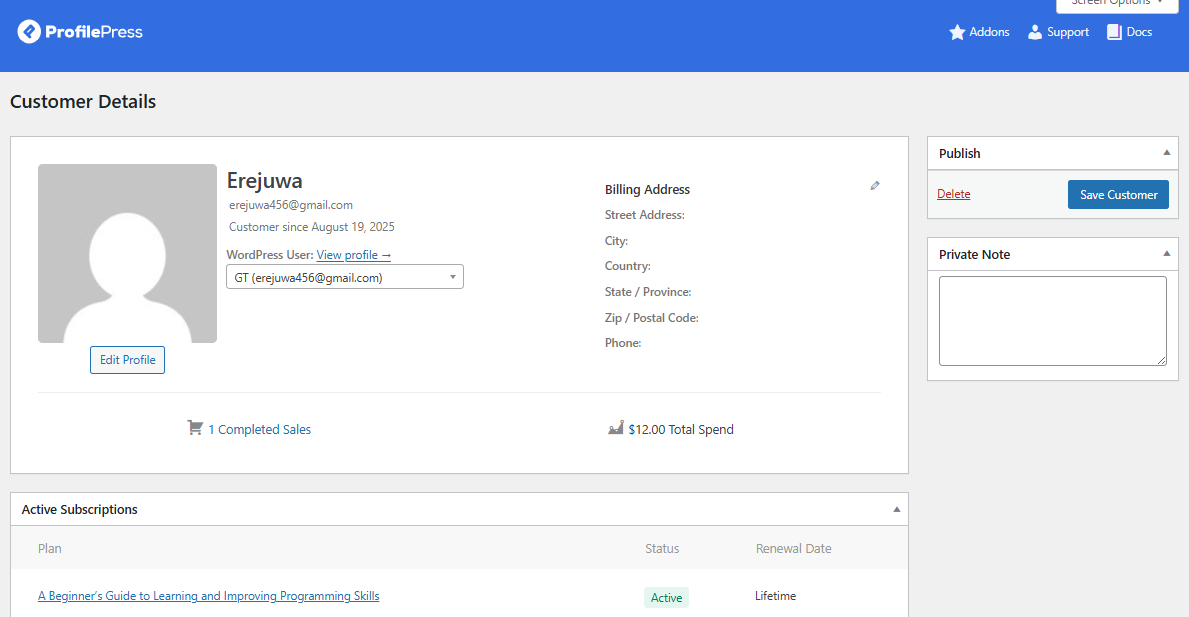
Additionally, you’ll notice a Customer Profile link on the Orders page. Clicking this will take you to the Customer Details page, where you can view and manage customer-specific information.
And there you have it! By following these steps, you can successfully sell on your website using our perfect alternative to the WooCommerce plugin.
ProfilePress: The Perfect WooCommerce Alternative
You now know how to sell on WordPress without WooCommerce using the ProfilePress plugin, which enables you to efficiently manage digital products, memberships, and subscriptions, providing a seamless experience for your customers.
This WooCommerce alternative plugin helps you to monetize your content effectively and build a loyal community around your brand. Use this opportunity to transform your WordPress site into a successful online business and watch your venture thrive!
ProfilePress lets you efficiently manage digital products, memberships, and subscriptions while providing a seamless customer experience. It will enable you to monetize your content effectively and build a loyal community around your brand.
We hope this article helped you learn how to sell on WordPress without WooCommerce. You may also want to check out our articles on how to sell memberships and subscriptions with WordPress and selling services online to discover more effective ways to monetize your site.