How to Create a Patreon Alternative on WordPress
Do you want to learn how to create a Patreon alternative on WordPress?
For many creators, Patreon is the go-to platform for monetizing exclusive content and building a loyal community. But here’s the truth: relying on Patreon comes at a cost: high fees, limited customization, and the constant risk of account restrictions.
That’s why more and more creators are turning to WordPress to build their own Patreon-style membership sites. With the right plugin, you can create a system that offers the same subscription tiers, exclusive content, and recurring payments, without the downsides.
In this guide, we’ll cover why you should build your own Patreon alternative on WordPress, why ProfilePress is the best WordPress ecommerce and membership plugin for the job, and provide a walkthrough to help you set it up.
By the end, you’ll have a membership site that’s not just a substitute for Patreon but a more powerful and profitable version that belongs entirely to you.
Why Build Your Own Patreon Alternative on WordPress?
Patreon gives creators an easy way to earn from their fans, but it comes with strings attached. You don’t fully own your platform, you pay high fees, and your creative freedom is limited by someone else’s rules.
By setting up your own Patreon-style membership site on WordPress, you get to run things your way.
Here’s why it’s a better option:
Full Ownership and Control: With Patreon, your content, your members, and even your income are tied to their platform. If they change their policies, suspend your account, or shut down your page, you lose everything. On WordPress, the opposite is true: you own your website, your email list, your members’ data, and all of your content.
Think of it like the difference between renting an apartment and owning a home. Renting means you follow the landlord’s rules. Owning means you decide what happens.
Keep More of Your Earnings: Patreon takes a percentage of your revenue (usually between 5% and 12%) plus payment processing fees. That may not sound like much at first, but as your community grows, those fees cut deep into your profits.
When you build your membership site with WordPress and ProfilePress, you don’t deal with such high commissions. You only pay for hosting, your domain, and the plugin license, meaning you keep more of the money your supporters give you.
Branding Without Restrictions: On Patreon, every creator’s page looks similar. The design, layout, and structure are controlled by Patreon itself, which limits your ability to differentiate yourself.
With WordPress, you have complete creative freedom. You can design your site exactly how you want it; custom colors, logos, layouts, and unique experiences for your members. Instead of promoting Patreon’s brand, you’re promoting your brand.
Freedom to Add Extra Features: Patreon focuses mainly on subscriptions and exclusive content, but with WordPress, you’re free to expand in countless ways. You can launch an online store, build online courses, or connect your site with email marketing platforms for automated campaigns.
Creating your own Patreon alternative on WordPress gives you ownership, freedom, and better profit margins. Instead of working under Patreon’s rules, you’ll be building a business that belongs entirely to you.
Now that you understand why building your own Patreon alternative on WordPress is a great choice, let’s move on to the plugin we’ll use to make it happen—ProfilePress.
Why Use ProfilePress to Create a Patreon Alternative on WordPress?
The question on your mind may be: why should I use ProfilePress to build my Patreon alternative on WordPress? And that’s a valid question.
In this section, we will explore the reasons why ProfilePress is the perfect plugin for creating your own Patreon-style membership site.
Here’s why ProfilePress is the best choice:
Complete Control Over Memberships and Subscriptions: With ProfilePress, you can set up one-time or recurring subscriptions, offer free or paid membership plans, and manage all members from a central dashboard. You also decide the pricing, billing cycle, and what content each membership tier can access.
Advanced Content Protection: ProfilePress allows you to decide what content to lock and who can see it. Whether you want to restrict blog posts, videos, courses, or downloadable files, ProfilePress lets you apply rules to specific pages, posts, or categories. This ensures your paying members always get the exclusive access they signed up for.
Multiple Payment Options and Revenue Control: ProfilePress integrates with popular payment gateways, including Stripe, PayPal, Razorpay, Paystack, Direct Bank Transfer, Mollie, enabling you to accept recurring payments directly on your website. Unlike Patreon, which takes high fees, ProfilePress ensures you keep more of what you earn.
Email Marketing and Automation: ProfilePress connects seamlessly with email marketing services like Mailchimp, Campaign Monitor, and MailerLite, allowing you to automatically add new members to your email list. This opens the door to onboarding sequences, newsletters, and promotional campaigns that strengthen relationships with your supporters.
Security and Fraud Protection: ProfilePress helps protect your site with built-in email verification, reCAPTCHA, Cloudflare Turnstile, and even two-factor authentication. You can also block registrations from banned email domains to prevent abuse.
Full Ownership and Branding: Unlike Patreon, which controls your page layout and design, ProfilePress gives you full ownership. Your membership site will reflect your brand identity, from the design to the user experience, making your platform look professional and uniquely yours.
Member Experience and Community Building: ProfilePress lets you create professional user profiles, member directories, and even communities. Members can manage their accounts through a dedicated dashboard, update their details, view purchase history, or reset passwords with ease. You can also add social login, allowing members to sign up quickly using Google, Facebook, or other platforms.
Expand With Extra Features: ProfilePress has other features that allow you to:
- Build custom registration and login forms that match your branding.
- Create a metered paywall, letting visitors view a limited number of free posts before requiring payment.
- Integrate with plugins like LearnDash, LifterLMS, Sensei LMS, Tutor LMS, and Academy LMS to offer online courses, or BuddyPress/BuddyBoss for community interaction.
- Sell digital products such as eBooks, courses, guides, or downloads directly from your site without needing another plugin.
- Offer coupons and discounts to attract and retain members.
- Launch an affiliate program by integrating with AffiliateWP or SliceWP.
With these reasons, it’s clear that ProfilePress gives you the power to build a Patreon alternative that reflects your brand, supports your business model, and grows with your audience.
Steps to Building a Patreon Alternative on WordPress
In this section, we will walk you through the steps to create a Patreon alternative on your WordPress site using the ProfilePress plugin.
Step 1: Set Up Your WordPress Website
Start by registering a domain name that represents your brand, niche, or creative work. For example, if you’re a podcaster, something like yournamepodcast.com would be a great fit. A clear and memorable domain name helps visitors recognize and return to your website.
Then, choose a reliable hosting provider. Services like Kinsta are great options because they offer WordPress-optimized hosting that ensures speed, security, and stability for your platform.
After that, install WordPress on your hosting account. Most providers make this very easy with a one-click installation feature. In just a few minutes, you’ll have a working WordPress site ready to customize.
Finally, install a WordPress theme. You can search Google for WordPress themes for fan sites, and you’ll find plenty of great options. Choose a clean, responsive design that looks good on all devices and works seamlessly with ProfilePress. For this guide, we’ll be using the Astra theme.
Once this is in place, you’re ready to install ProfilePress.
Step 2: Install and Activate ProfilePress
To do this, head over to the ProfilePress website and purchase the plugin. After completing your purchase, download the plugin’s ZIP file from your account area.
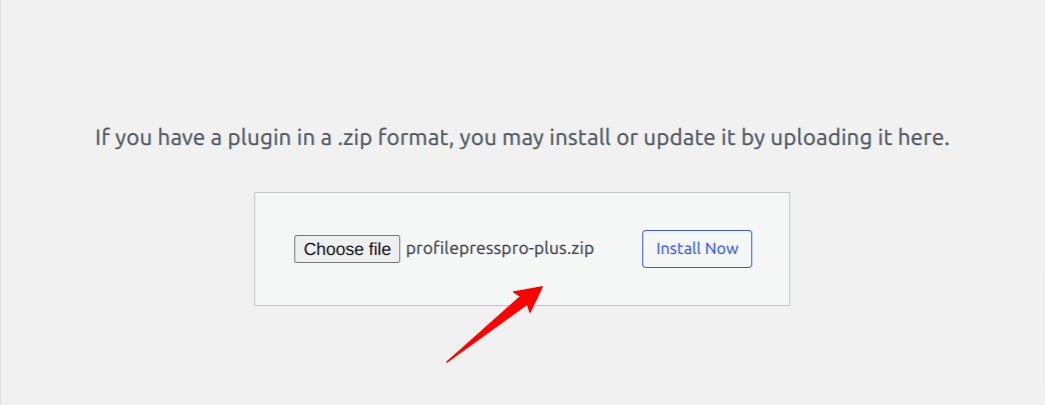
Next, log in to your WordPress dashboard and go to Plugins > Add New and select Upload Plugin.
Upload the ZIP file by dragging it into the upload box or by clicking Choose File to locate it on your computer.
Then, click Install Now and wait for a few minutes, then click on Activate to enable ProfilePress on your site.
After the activation of the ProfilePress plugin, a notification will appear at the top of your WordPress dashboard stating, “ProfilePress needs to create several pages to function properly”. Click on the Create Pages button.
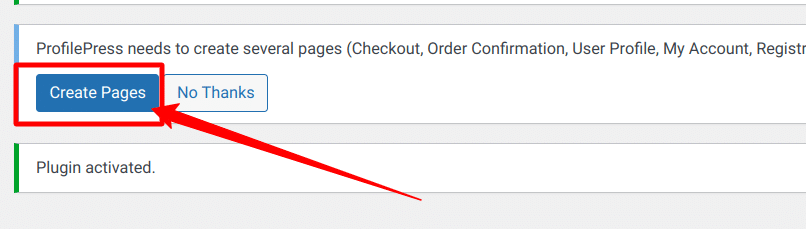
With that done, ProfilePress is now active on your WordPress site.
Step 3: Set Up Payment Gateways
To start collecting payments from your supporters, you’ll need to connect a payment gateway.
ProfilePress integrates with several payment methods, including Stripe, PayPal, RazorPay, Paystack, Mollie, and Bank Transfer. This gives you the flexibility to provide multiple payment methods for your audience.
To begin accepting payments, navigate to your WordPress dashboard and go to ProfilePress > Settings > Payments > Payment Methods.
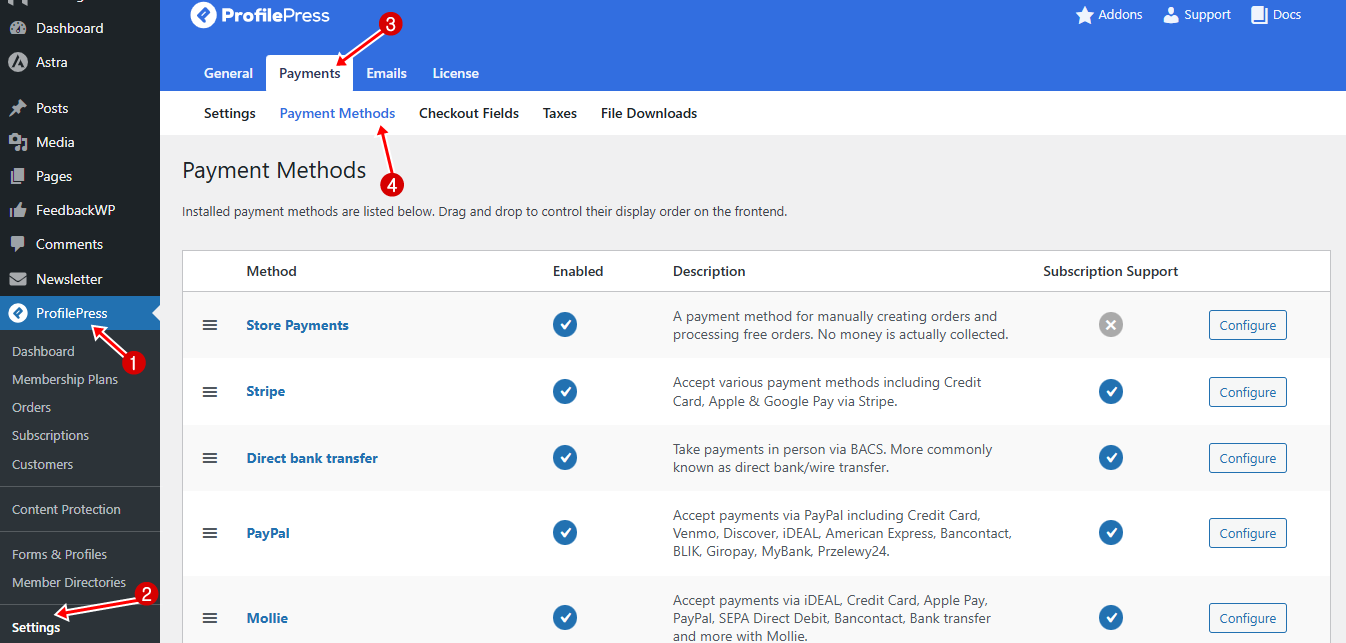
From there, enable your preferred payment gateways and connect your accounts by entering the required API keys or login credentials provided by each service.
Once your payment methods are configured, click Save to apply the changes and start receiving payments.
Below, we’ll walk you through how to set up Stripe.
Setting Up Stripe
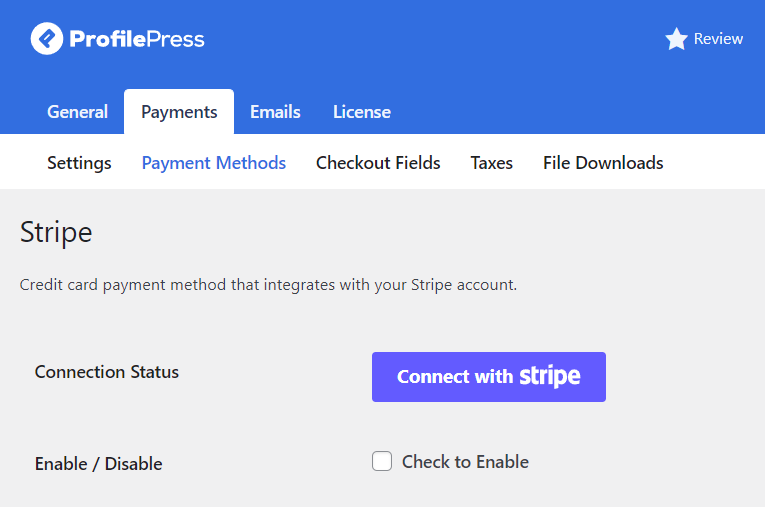
To set up Stripe for our Patreon-like website in WordPress, click on the Configure button next to Stripe.
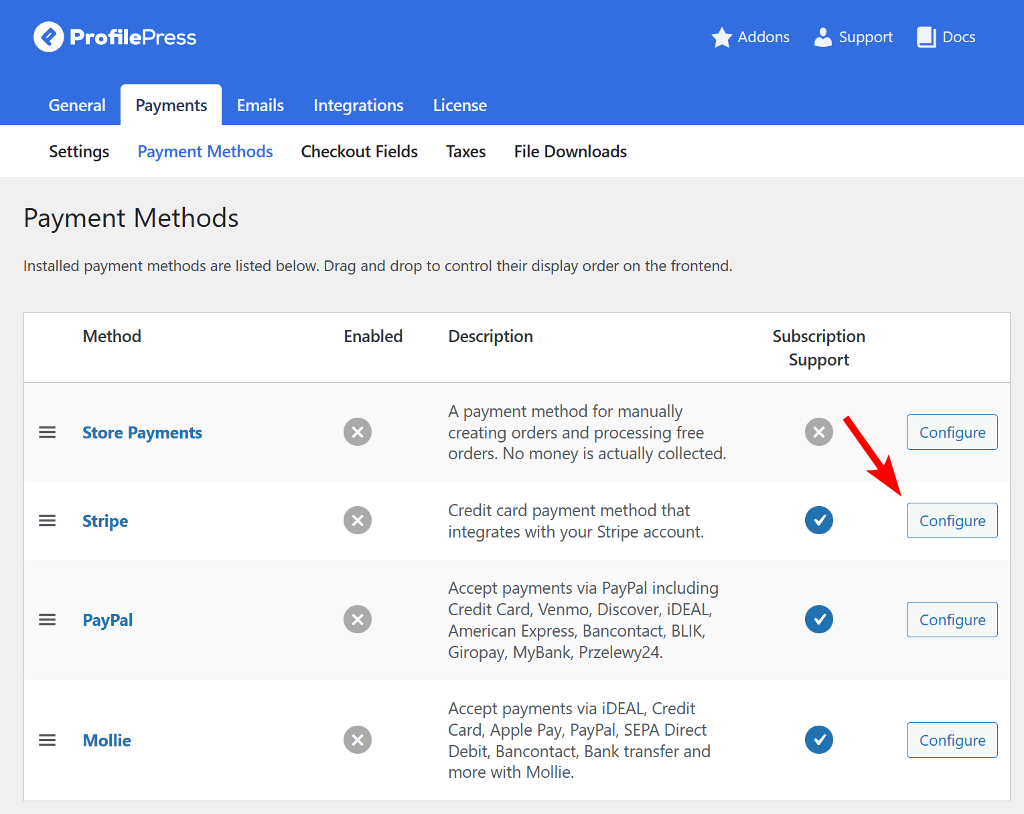
On the new page, click on Connect with Stripe to continue.
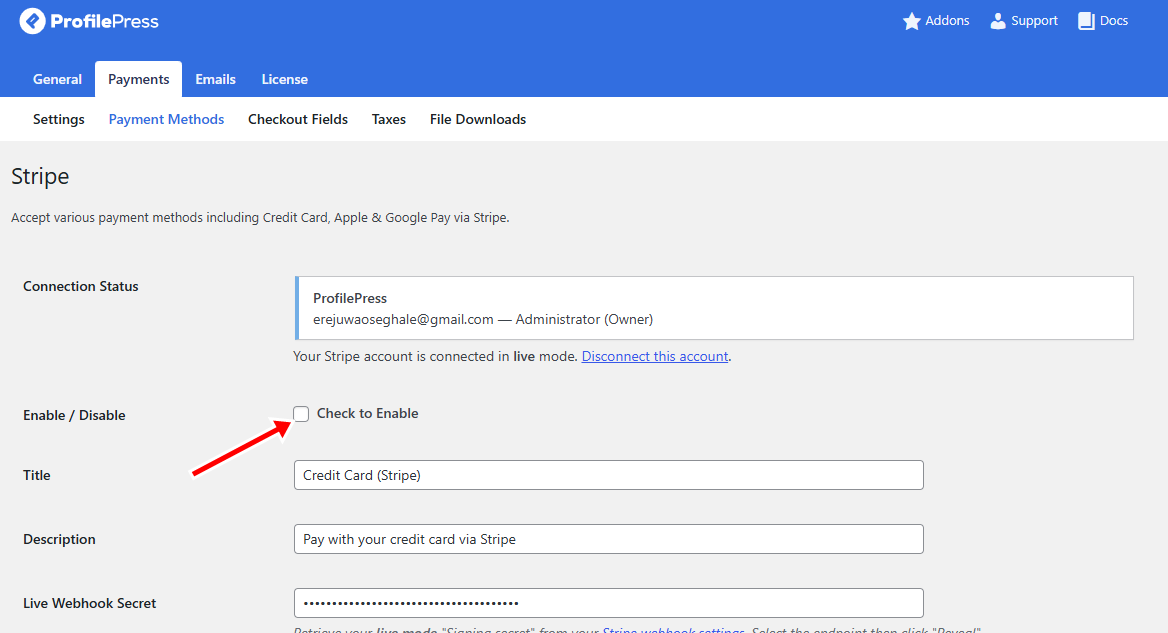
Next, you’ll be redirected to the Stripe website, where you can either set up a new account or sign in to an existing one.

Once you have signed in to your Stripe account, select the account you would like to connect to ProfilePress, then click Connect. After that, you’ll be redirected back to your website automatically.
Next, enable the payment method by checking the box labeled “Check to Enable”. Be sure to add a title and description as well.
Click Save Changes to finalize the setup.
Step 4: Add Your Business Information
After connecting your payment gateway, the next step is to provide your business details.
To do this, go to ProfilePress > Dashboard and click the Add Your Business Information button. Fill in your business name, full address, and tax identification number in the fields provided.
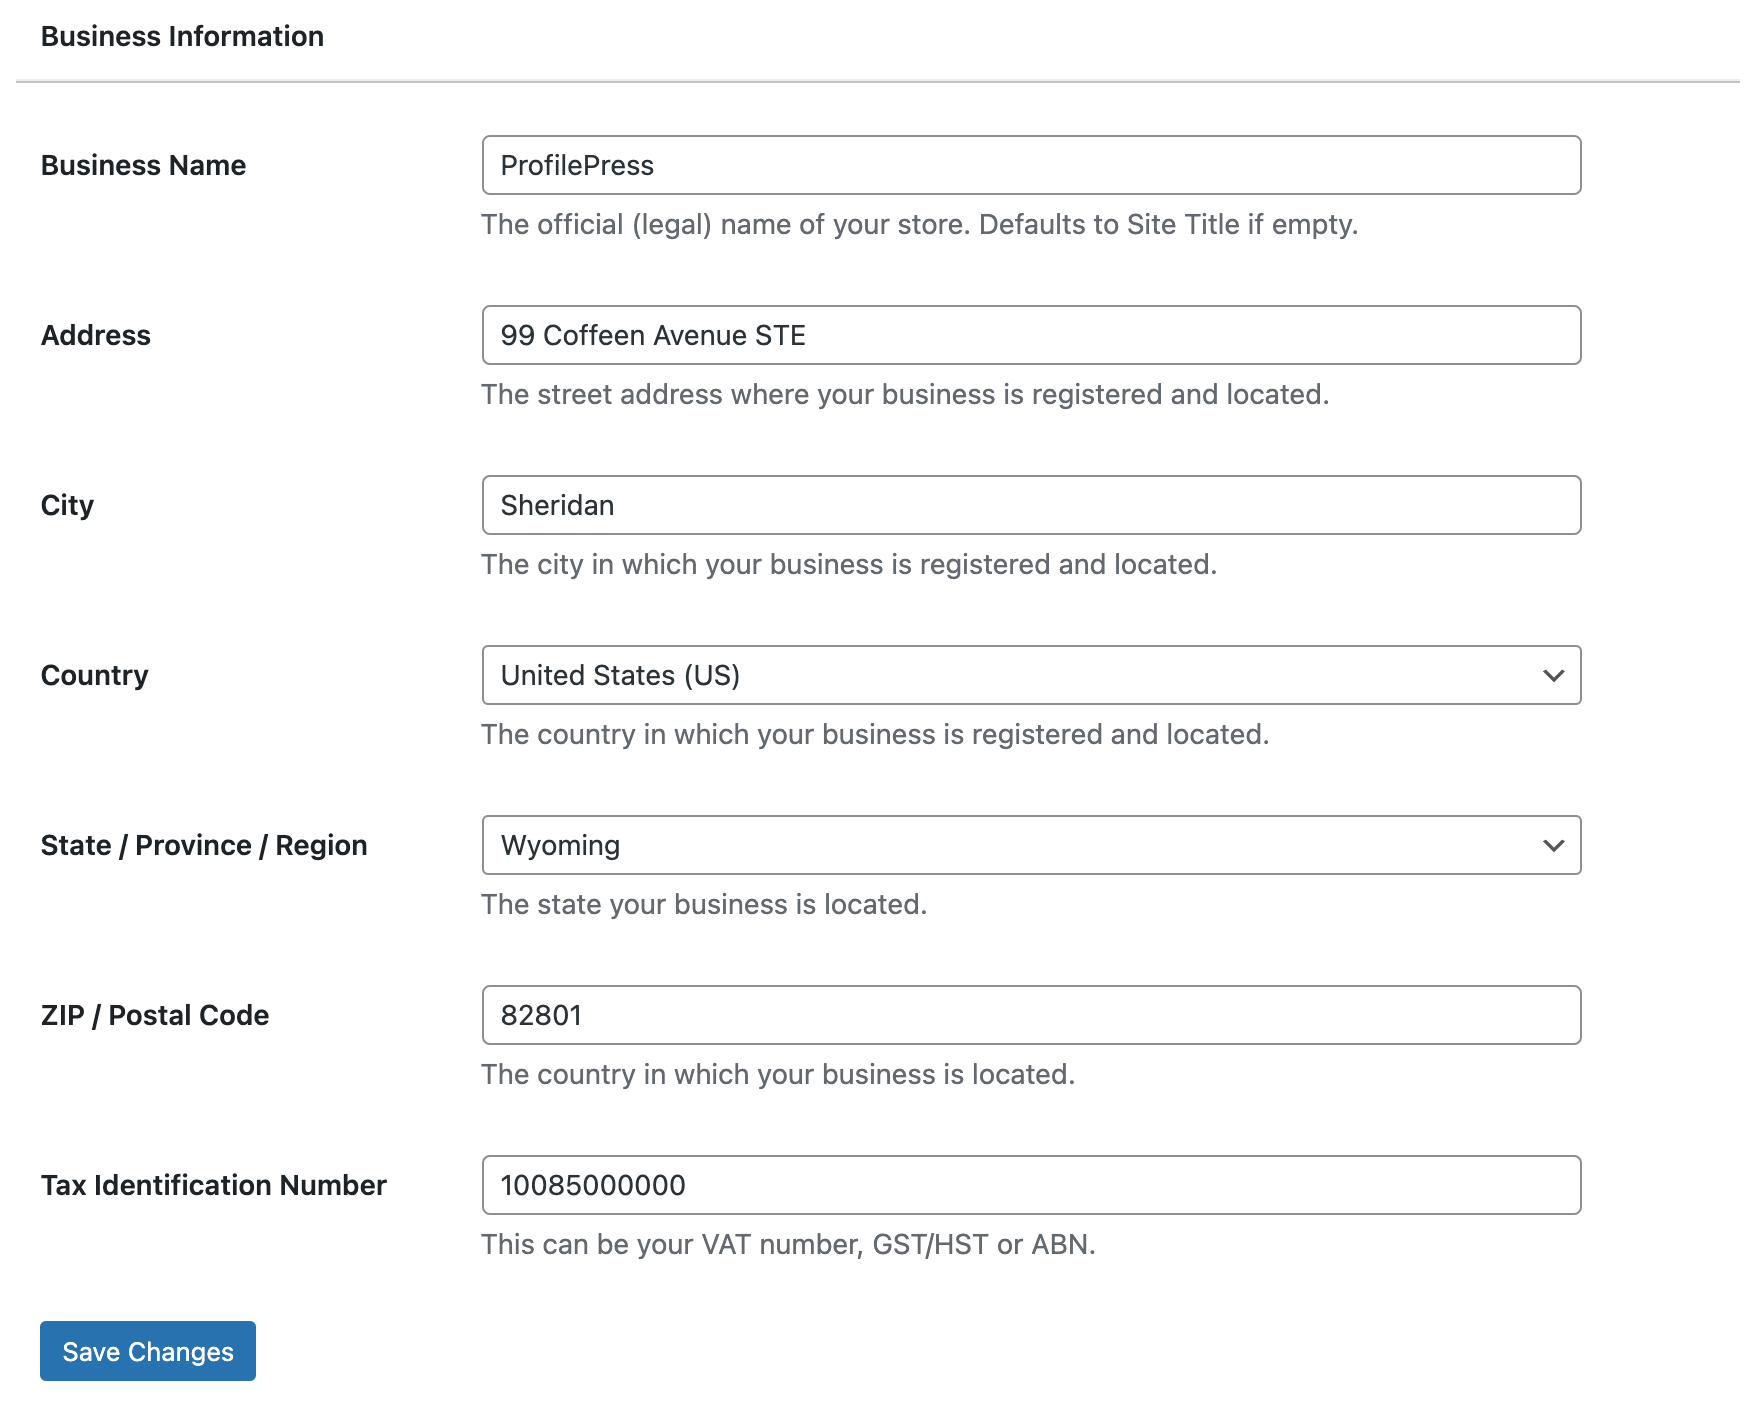
Once everything is entered, click Save Changes to update your settings.
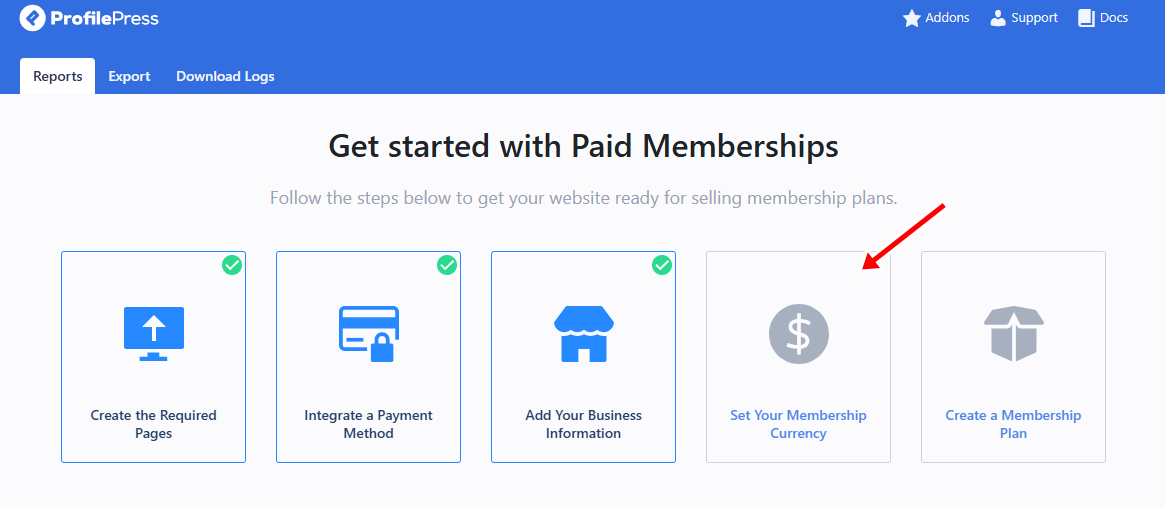
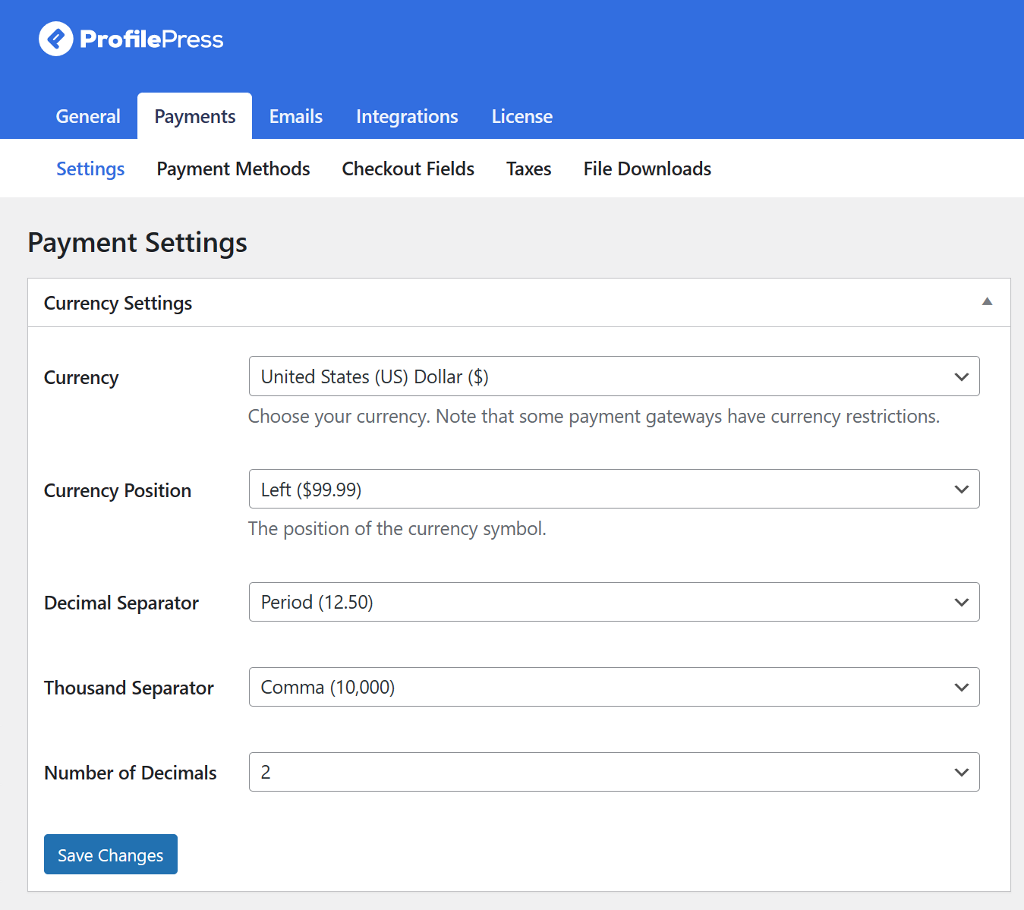
Step 5: Setting Your Membership Currency
With your business information in place, the next step is to choose the currency for your membership site. This is important because it determines how your supporters will be billed and ensures consistency across all your subscription plans—similar to how Patreon sets a default billing currency for creators.
To set this up, go to ProfilePress > Dashboard and click the Set Your Membership Currency button.
In the Currency Settings section, you’ll be able to select your preferred currency, set the position of the currency symbol, and customize formatting options such as decimal and thousand separators.
Additionally, you can specify the number of decimal places to ensure your pricing is displayed clearly and accurately, enhancing the customer experience.
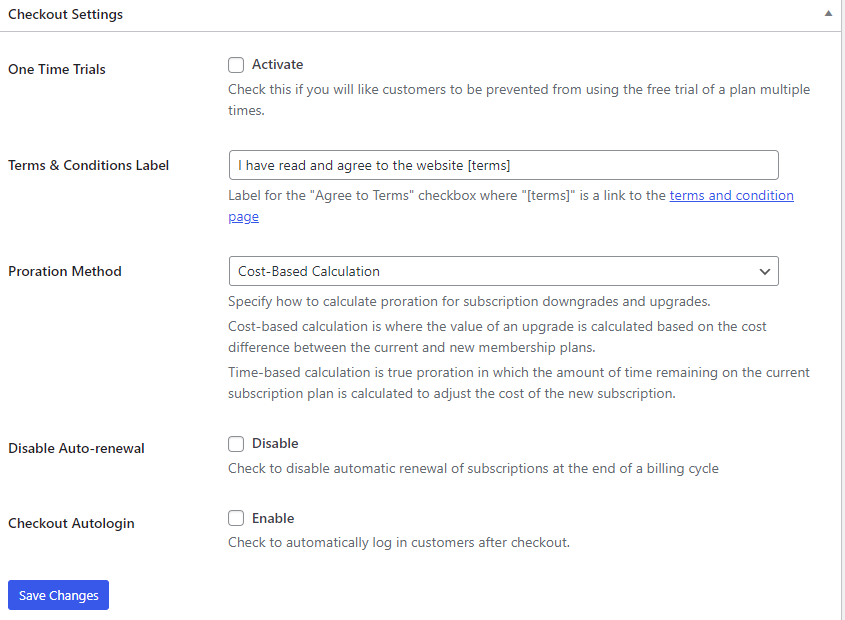
Next, scroll down to the Checkout Settings section, where you can customize payment options.
These include activating one-time trials, setting a label for the terms and conditions checkbox, configuring the proration method, disabling auto-renewal for subscriptions, and enabling auto-login after checkout.
Next, scroll down to the Receipt Settings section.
Here, you can choose whether to disable receipts for free orders, add a logo to your receipts by entering its URL, and include extra details like a thank-you note.
You can also customize the label of the receipt button to match your brand better.
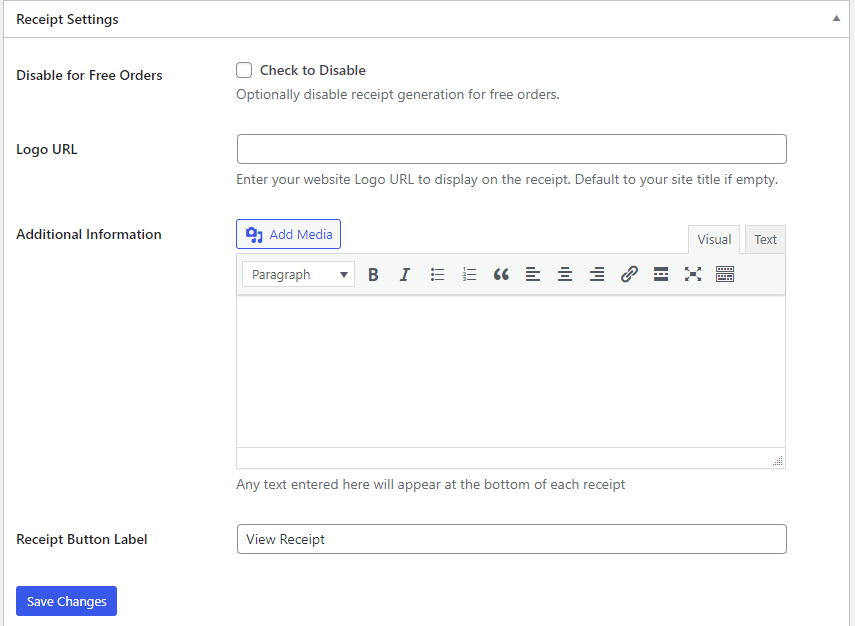
Once you’ve finished making your adjustments, click Save Changes to apply them.
After that, head over to the Checkout Fields tab, where you can choose and customize the fields you want to display on your checkout page.
Configuring Your Checkout Fields
The checkout process is one of the most important parts of building a Patreon-style membership site. A straightforward checkout can make the difference between someone completing their subscription or abandoning it.
With ProfilePress, you have full control over your checkout fields so you can collect exactly the information you need without overwhelming new members.
To set it up, click on Checkout Fields in ProfilePress >> Settings >> Payments.
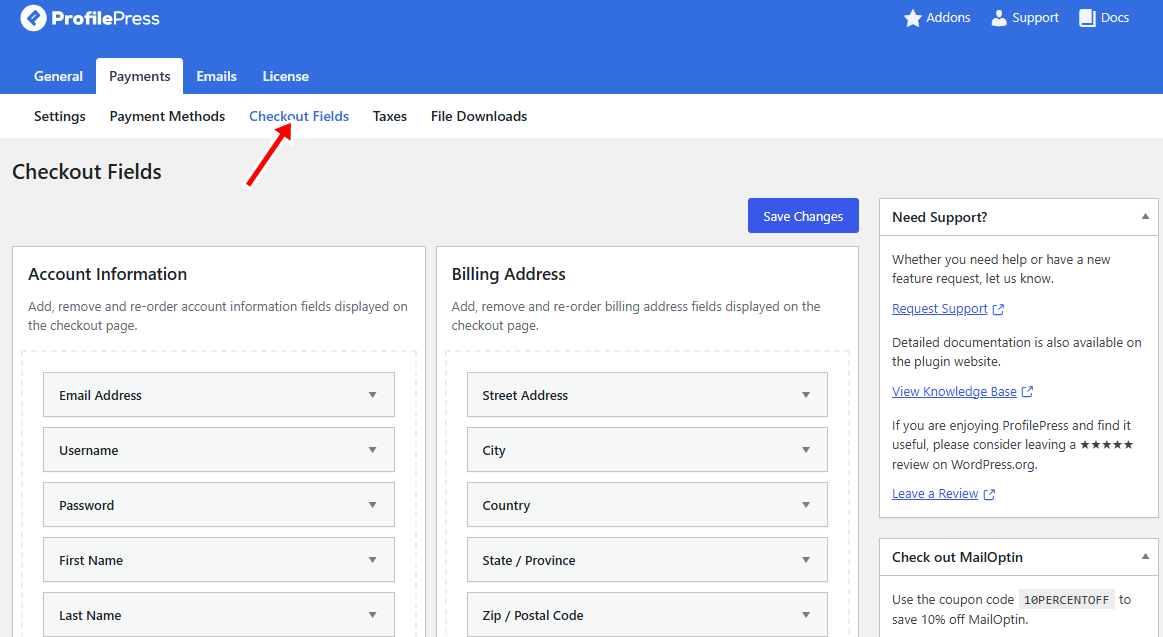
You can change each field’s label, adjust its width, set it as required, or hide it for logged-in users.
To add a new field, select it from the dropdown and click Add Field. Rearrange fields by dragging and dropping them on the checkout page. Once you’ve finished, click Save Changes.
With your optimized checkout form ready, you can now proceed to create your membership plans.
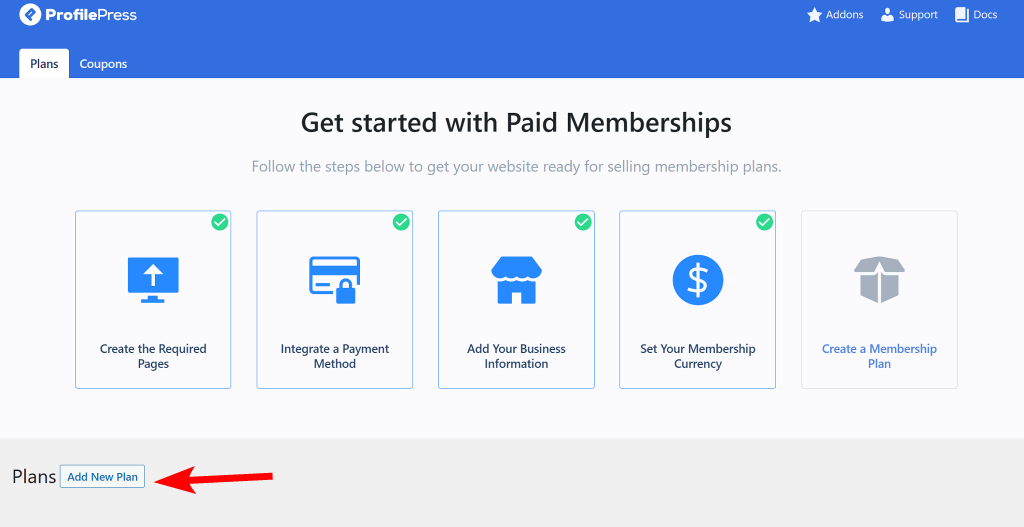
Step 6: Creating Membership Plans
To charge one-time or recurring payments from your users, you need to create a membership plan.
Navigate to ProfilePress > Membership Plans and click on the Add New Plan button.
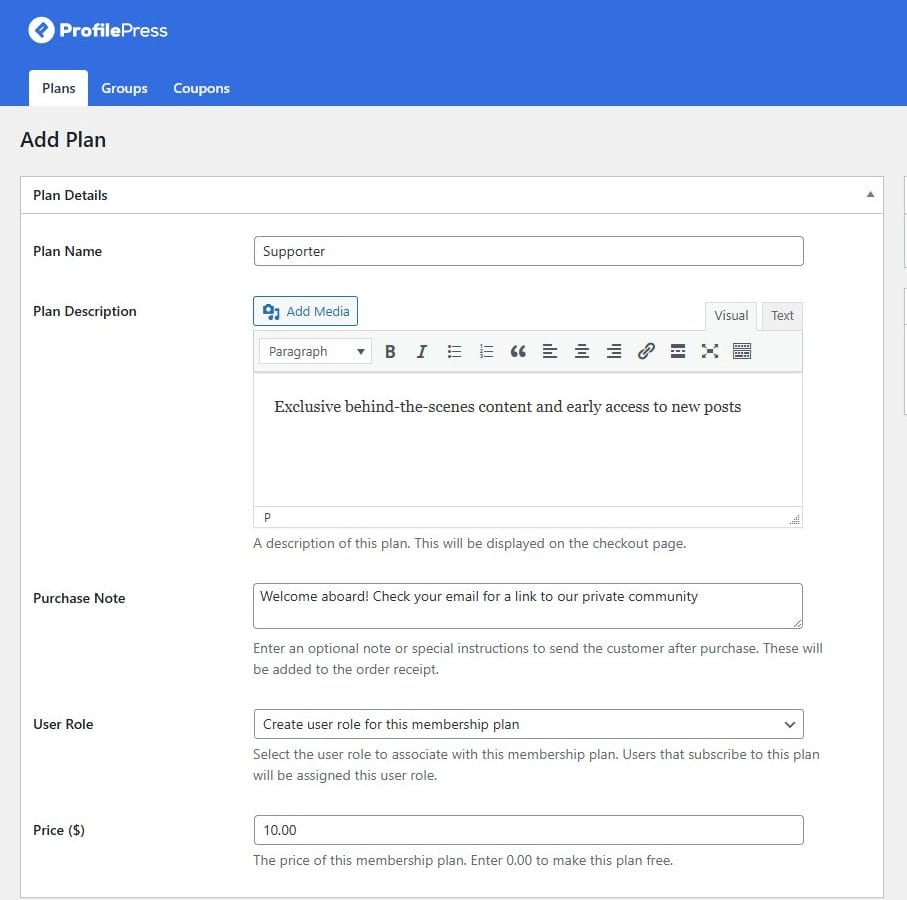
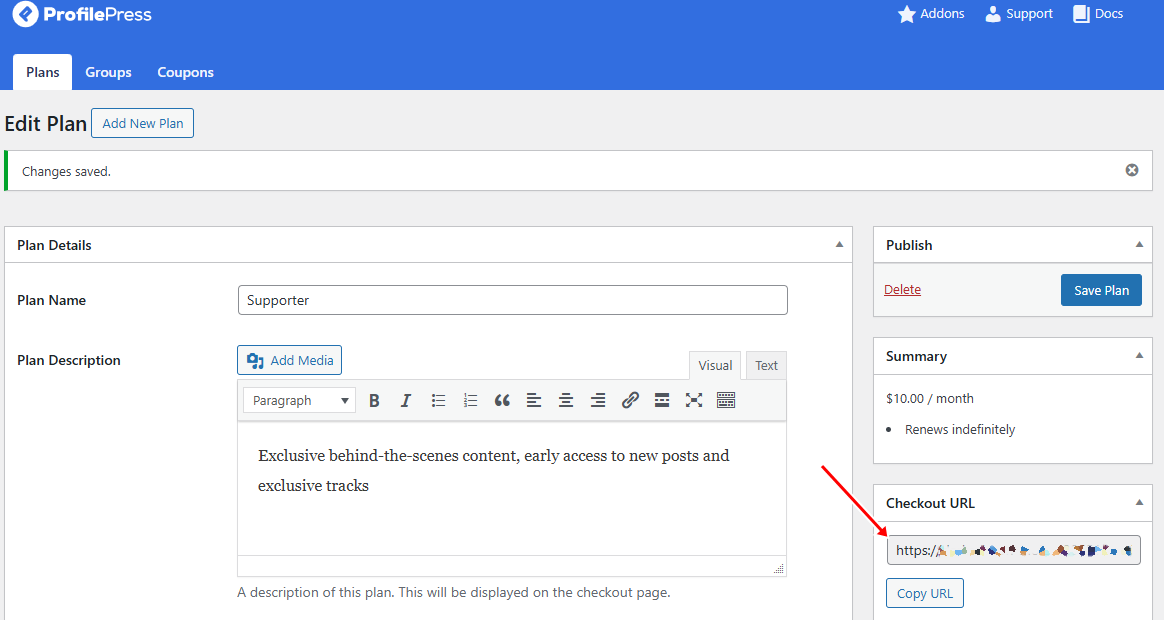
Enter a name and description for the plan, and set up the price to charge.
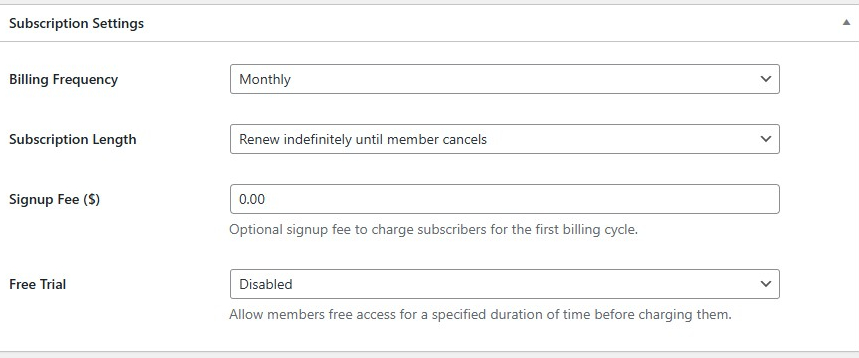
The Subscription Settings section is where you can manage your billing preferences, including billing cycles, payment frequency, free trials, and signup fees. It serves as a way to establish the rules governing how your supporters pay for and access your content, similar to how it works on Patreon.
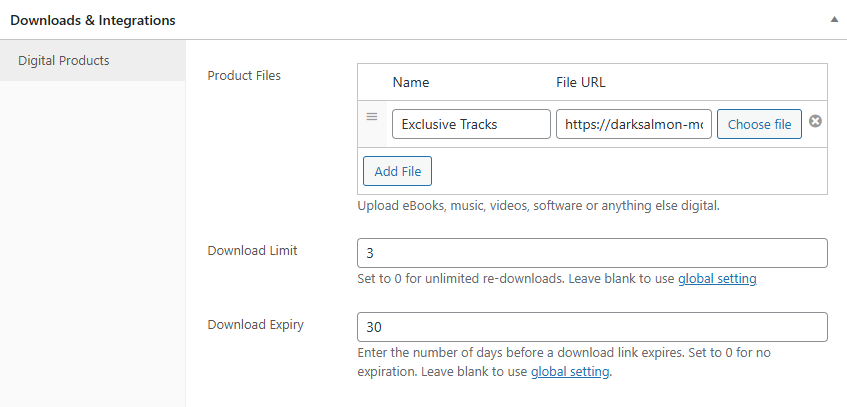
Downloads & Integration Section
The Downloads & Integration section is especially useful for adding digital products to your membership plans, a feature that goes beyond what Patreon offers.
With this feature, you can attach exclusive files or resources to a plan so that members automatically gain access after subscribing. You can upload digital files for members to download upon joining a plan, such as eBooks or exclusive templates. Additionally, you can set limits on the number of downloads and establish an expiration period for access to those files.
This feature is ideal for creators who want to reward members with digital perks, such as a fitness coach offering workout plans, a designer sharing premium templates, or a musician providing exclusive tracks.
Once your plan is fully set up, click Save Plan to publish it.
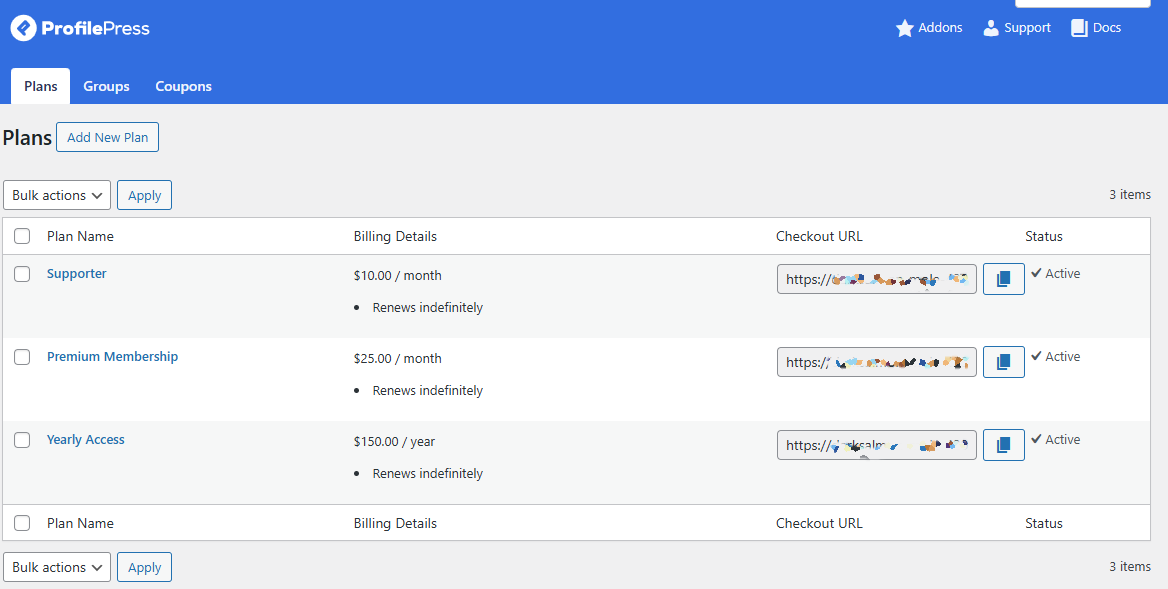
After publishing, ProfilePress generates a unique checkout link that you can share with your audience, similar to how Patreon creators share their tier links.
You can place this link anywhere on your WordPress site, such as a pricing page, or share it on your social media, newsletters, and even within your YouTube video descriptions to drive signups.
This link is how your supporters will subscribe to your membership tiers, giving you full control over your community and earnings without relying on Patreon.
If you’d like to offer more than one tier, you can repeat the same steps to create additional membership plans.
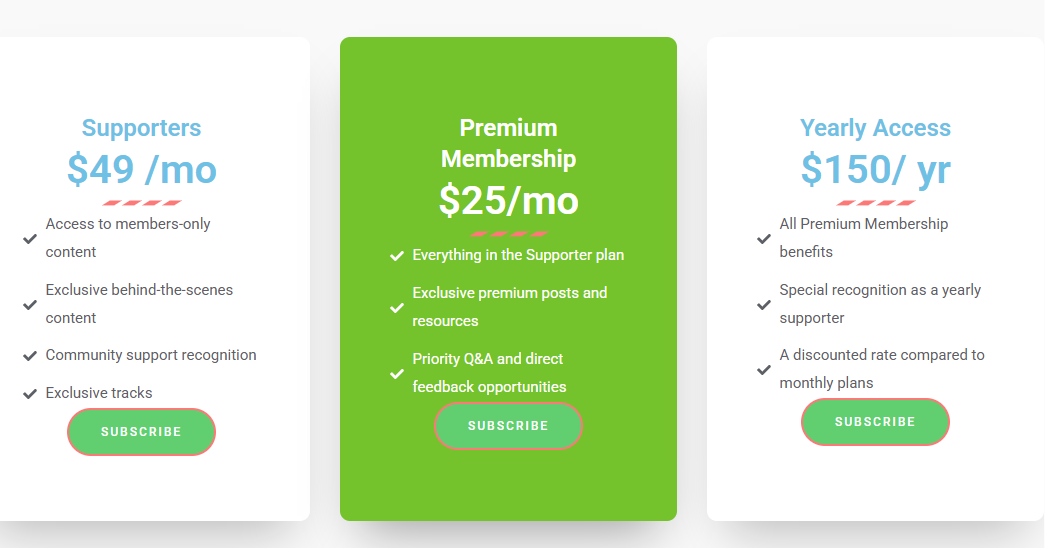
Step 7: Create a Pricing Page & Add Your Membership Plans
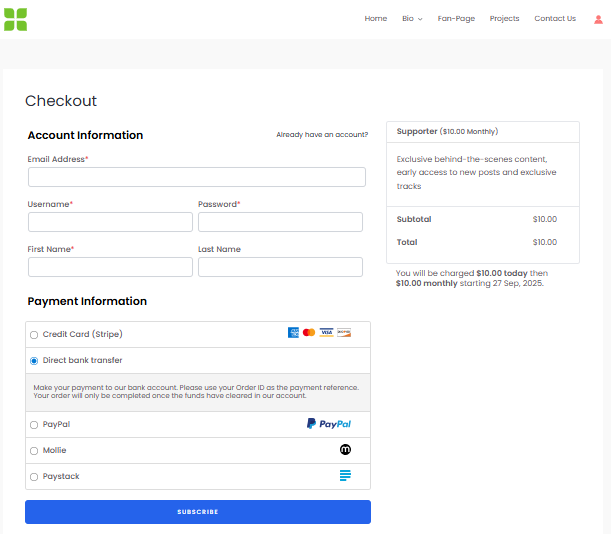
Once your membership plans are set up, the next step is to create a pricing page where visitors can easily compare your options and choose the one that fits them best. This page acts just like Patreon’s tier system, giving supporters a clear view of what they’ll get at each level.
You can design the page using the default Gutenberg editor, or, if you want a faster start, use prebuilt templates from page builders like Elementor, Beaver Builder, WPBakery, or Visual Composer.
Below is a WordPress pricing page we created using Elementor page builder.
After designing your page, you’ll need to connect each plan’s Subscribe button to the right membership.
To do this, go to ProfilePress > Membership Plan in your WordPress dashboard, copy the subscription link for each plan, and paste it into the corresponding button on your pricing page.
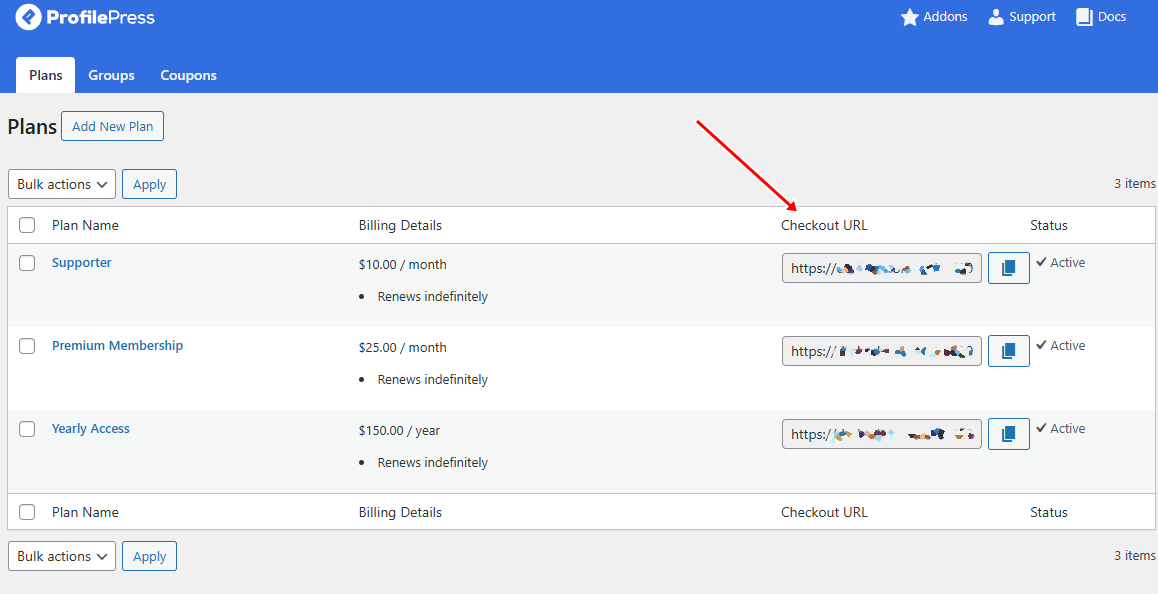
Now, whenever someone clicks a button, they’ll be redirected straight to the checkout page for that specific plan.
With your pricing page live and connected, you’ve built the main gateway for supporters to join your community.
Next, let’s decide what exclusive content your members will get access to.
Step 8: Configuring Content Access and Metered Paywall
ProfilePress offers two powerful ways to manage content access on your website: full content restriction or a metered paywall.
Full Restriction limits access to selected members only, while a metered paywall lets visitors view content for a limited time before requiring a subscription.
Setting Up a Content Protection Rule
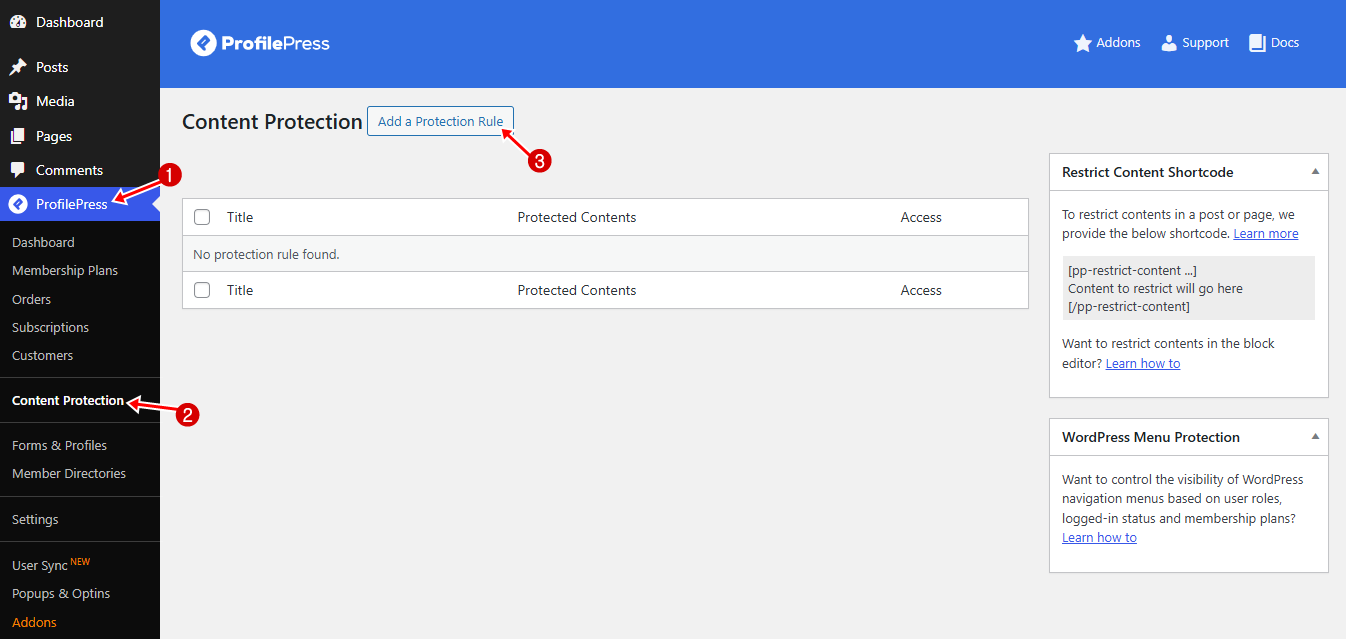
To enable restriction of content in WordPress, go to ProfilePress > Content Protection and click the Add Protection Rule button at the top of the page.
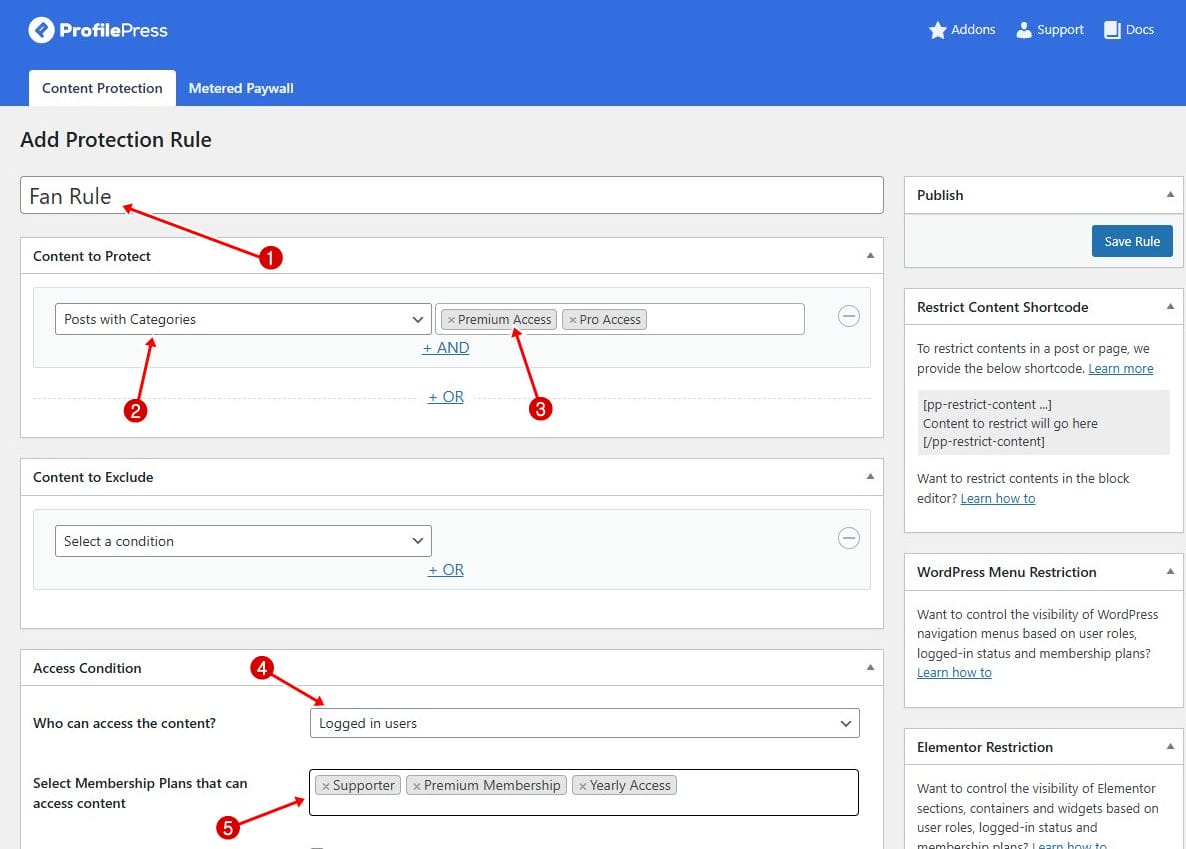
Give your protection rule a clear, descriptive name and choose which content you want to protect. You can target posts or pages by category, tag, archive, format, or even combine multiple conditions for precise control.
Depending on your selection, additional settings will appear. You can connect the protection rule to a specific membership plan, assign it to a user role, or manually grant access to selected usernames.
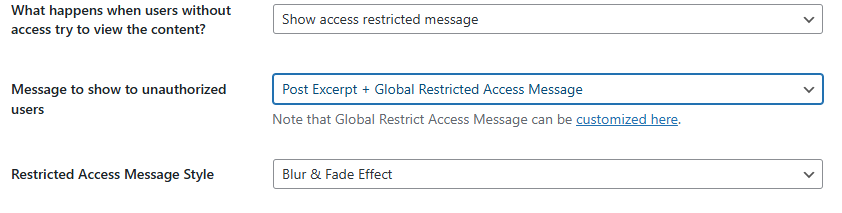
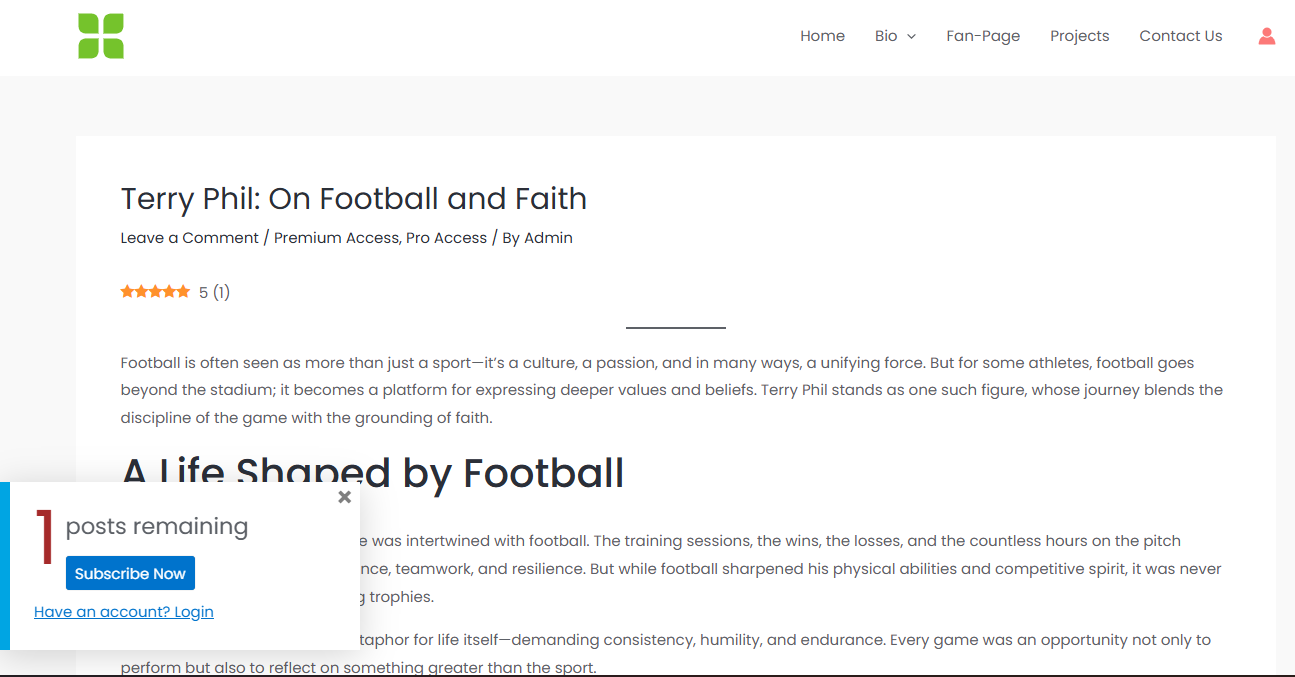
For example, in the image below, we’ve named our protection rule “Fan Rule” and set it to protect posts under the “Premium Access” and “Pro Access” categories.
For access conditions, we’re allowing only logged-in users with an active subscription to our previously created membership plans to access posts categorized as “Premium Access” and “Pro Access” in WordPress.
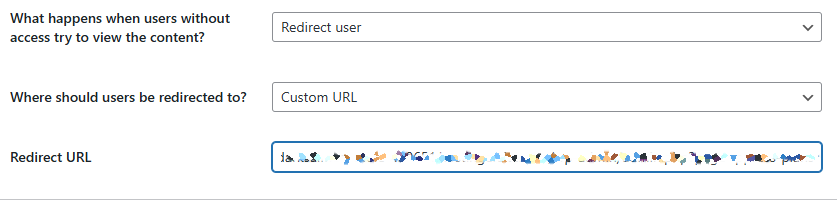
For visitors without access, you can either redirect them to another page or display an access-restricted message directly on the content.
For example, you might redirect them to your pricing page, encouraging them to subscribe so they can unlock your premium stories.
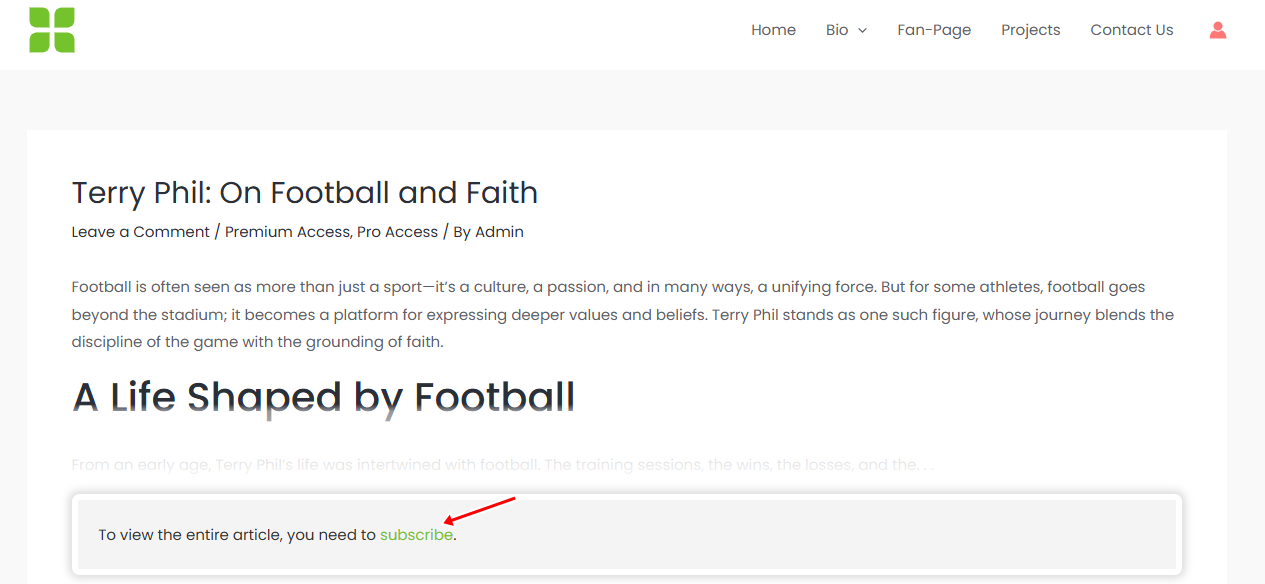
You could also display a short excerpt from the article, followed by a note explaining that the full content is available only to members and providing instructions on how to sign up.
Both methods are effective, so the choice depends on your strategy: redirect if you want a clear conversion path, or tease the content on the page if you prefer a softer nudge toward membership.
Once you’ve configured your chosen option, click Save Rule in the right sidebar to apply the changes.
From then on, any post within the restricted category will follow the rule you’ve set, either showing a teaser or sending visitors straight to your pricing page.
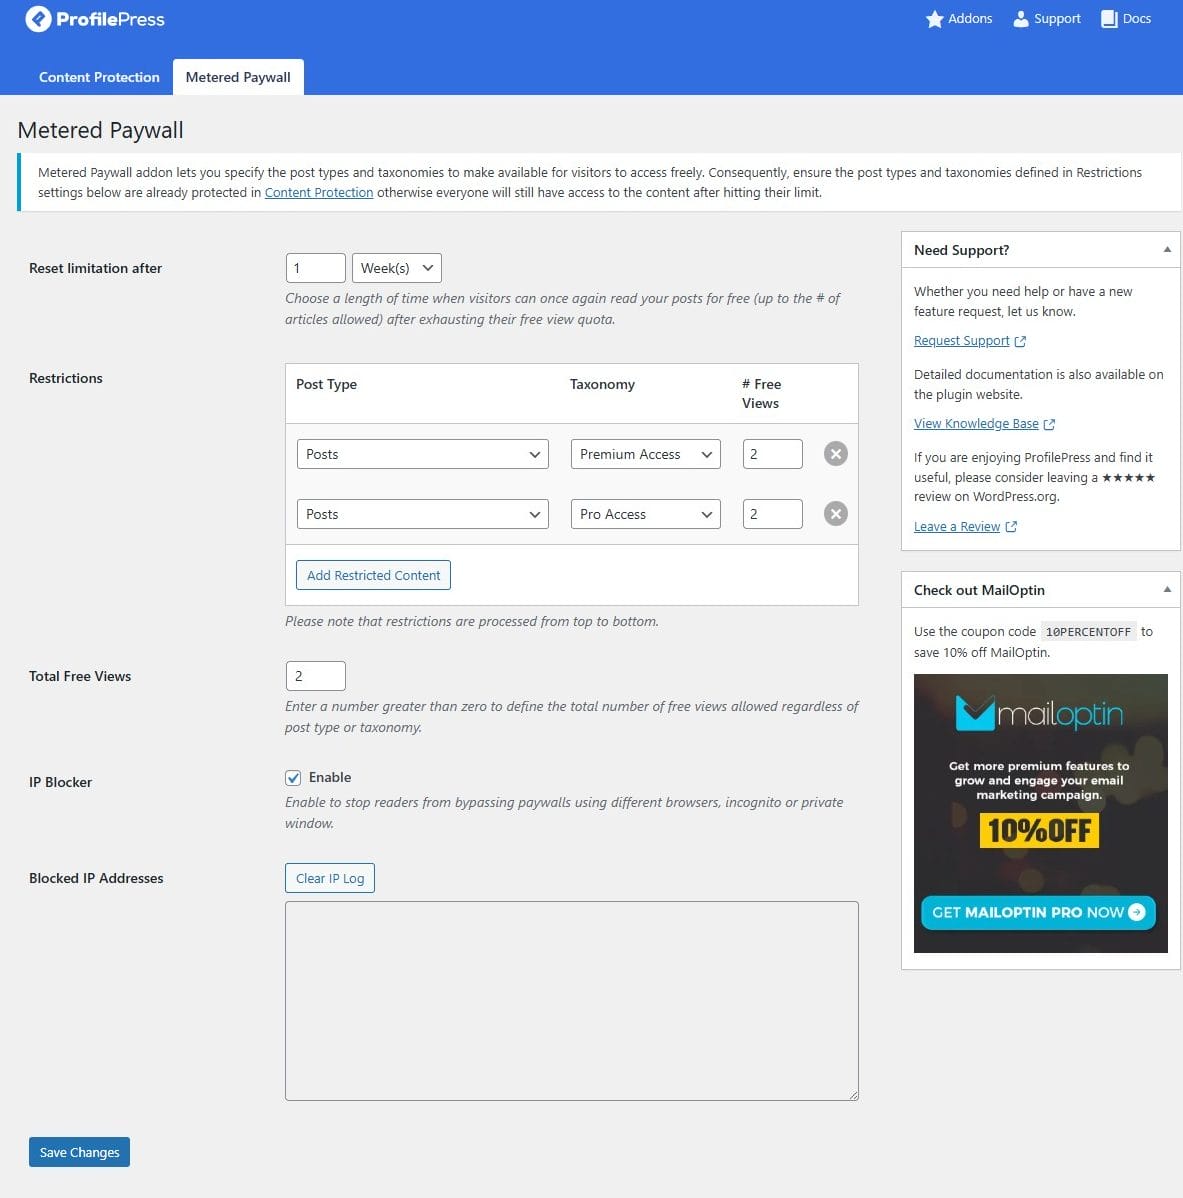
Setting Up a Metered Paywall
With ProfilePress’s Metered Paywall, you can give visitors limited access to your premium content before requiring them to subscribe to a membership plan. Rather than blocking posts right away, this option lets visitors enjoy a set number of posts for free.
To enable it, go to ProfilePress > Addons. Locate the Metered Paywall addon and switch it on.

Next, click Settings to open the configuration page. You can also get there by navigating to ProfilePress > Content Protection in your WordPress dashboard and selecting the Metered Paywall tab.
Note that before setting up your metered paywall, ensure that the post types and taxonomies you want to meter are already restricted in your Content Protection rules. Otherwise, visitors will still be able to access them freely, even after their allotted views are used up.

Once that’s in place, you can begin configuring the metered paywall.
The first option, Reset limitation after, determines how long a user must wait before their free access refreshes after reaching the limit. You can set this period to any duration, ranging from hours to years.
Next, under Restriction, choose which post types and taxonomies are available for free viewing and decide how many views each visitor receives. You can also set a Total Free Views limit across all content.
For extra protection, enable the IP Blocker to stop users from getting around restrictions by using private or incognito browsers.
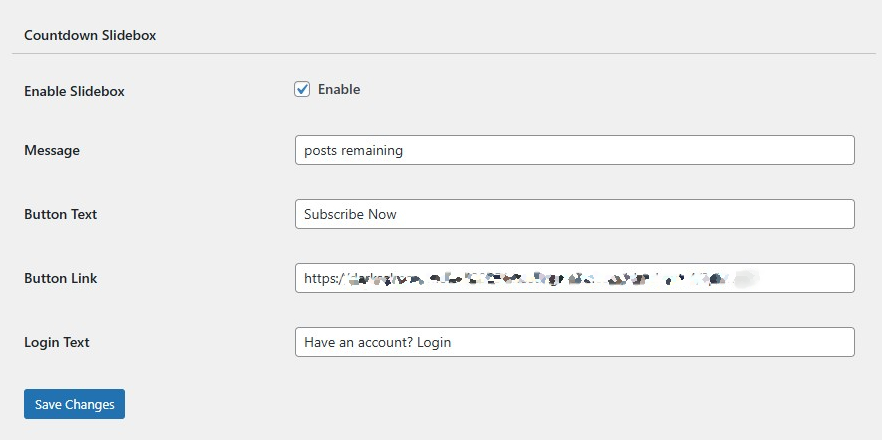
To make your paywall more engaging, you can enable the Countdown Slide feature. This displays a small pop-up that shows visitors how many free articles they have left, along with a button that links directly to your pricing page.
You can customize both the message and button text to encourage sign-ups.
Once you’re done with the settings, click Save Changes to activate the paywall.
From then on, readers will see a clear notice showing their remaining free views and a prompt to either subscribe or log in.
In the example below, the Notification Box informs the reader that they have one free post left and includes a button for readers to subscribe to your paid offerings.
And that’s it! By following these steps, you’ve successfully created a WordPress-powered alternative to Patreon.
Next, let’s look at how you can promote your fansite.
Step 9: Promote Your Fansite
Now that your fansite is live, the next step is getting the word out.
Here are a few practical ways to promote your site and grow your community:
Share on Social Media: Leverage platforms like Instagram, TikTok, Twitter (X), Facebook, and even LinkedIn, depending on your niche. Post teasers of your premium content, behind-the-scenes updates, or clips that give followers a reason to click through to your fansite.
Build an Email List: Email remains one of the most powerful marketing channels. With plugins like MailOptin, you can collect emails from visitors and send them newsletters, updates, or sneak peeks of upcoming content.
Collaborate with Other Creators: Cross-promotion is a great way to reach new audiences. Partner with other creators in your niche for shoutouts, guest posts, or joint livestreams. This not only introduces your work to fresh eyes but also adds credibility to your fansite.
Optimize for Search Engines (SEO): Search engines can drive consistent traffic to your site over time. Use the CrawlWP SEO plugin to improve and monitor your WordPress site’s visibility on search engines.
Offer Limited-Time Promotions: Creating a sense of urgency encourages customers to take action. You can offer discounts, free trial periods, or exclusive perks for early subscribers.
By combining these strategies, you’ll not only draw traffic to your fansite but also create a loyal community willing to support your work.
That’s how to create a Patreon alternative on WordPress!
Building your own Patreon alternative on WordPress puts you in full control of your income, your community, and your creative brand.
With ProfilePress, setting up subscription tiers, offering exclusive content, managing members, and collecting recurring payments becomes seamless. Plus, you gain access to extra features like email verification, content protection, social login, and powerful integrations that take your platform beyond what Patreon offers.
Now, the choice is yours. You can continue relying on third-party platforms, or you can build your own sustainable membership business on WordPress, where you own everything.
Get started with ProfilePress today, and build a Patreon-style site that’s profitable, flexible, and completely yours.